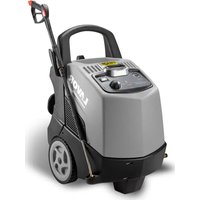
USER MANUAL Rio 1108 Lavor
1 Burner switch
2 ON/OFF Electropump switch
3 Detergent tank
4 Water outlet
5 High pressure hose
6 Gun
7 Lance
8 Diesel tank
9 Electric cable
10 Water inlet + filter
11 Handle
FR
$$
Z \max = 0, 2 5 6 O h m
$$
- Questa macchina è soggetta ad allacciamento sotto condizione: Zmax EN The appliance shall be connected to the electrical network providing that the impedance zmax FR. Cette machine est soumise a un raccordement electrique sous condition du respect de l'impédence zmax DE. Nach Berechnung ist die maximal zulässige Netzipedanz Zmax am Versorgungs-Anschlusspunkt des Kunden. Españaquina esta sujeta a conexión bajo condición: Zmax Deze toestel is onderworp aan een electrische verbinding op basis van een respekt van het impedantie zmax. Españaquina é sujeita à ligaçao sob condición: Zmax elento stroj podléhá priipojeni za následujici podminky: Zmax Elforsyningen, som maskinen tilsluttes, skal opfylde folgende krav: Zmax E. H ouokéun πoopiζεται για ouvδεοη Εδίκτuo με: Zmax F. Sahkövirran, johon laite kytketään, on tāytettäva seuraavat ehdot: Zmax Pri prikljuciti aparata na omrežje je potrebno zagotoviti naslednji pogoj: Zmax SV Denna maskin sca anslutas enligt foljande villkor: Zmax Elektricno napajanie na koje je uredjai prikljucen mora zadovoljavati sljedeci uvjet: Zmax TR Bu makinin in baglandigi elektrik beslemesi sistemi, asagidaki sarta uygun olmaldir: Zmax
IT
EN Translation of the original instructions
| INDEX | pag. |
| General information | 12 |
| Symbols | 12 |
| Safety precautions | 12 |
| Usage | 14 |
| Care and maintenance | 16 |
| Warranty conditions | 16 |
| Disposal | 16 |
| Troubleshooting | 17 |
| Pictures | 84-85 |
>INTENDEDUSE
- The appliance can be used for washing surfaces outdoors, whenever pressurised water is required to remove dirt.
- With special optional accessories, it can be used for foaming and sandingblasting, and for washing with a rotary brush for application to the gun.
This appliance's performance and userfriendliness make it suitable for NON PROFESSIONAL use.
> THECNICAL DATA
(see thecnical data plate)
SYMBOLS

CAUTION! It is important to be careful of the following items.

IMPORTANT

LOCKED

OPEN

IF PRESENT

Double insulated (IF PRESENT): supplementary insulation is applied to the basic insulation to protect against electric shock in the event of failure of the basic insulation.
warning do not touch
warning symbol : do not inhale
SAFETY PRECAUTIONS
>WARNINGS
01WARNING: This appliance is for outdoor use only.
02WARNING: Always disconnect the electricity and water supplies on completion of every job.
03WARNING: Do not use the machine if a supply cord or important parts of the machine are damaged, e.g. safety devices, high pressure hoses, trigger gun.
04WARNING: This appliance has been designed for use with the detergent provided or the detergent specified by the manufacturer, such as a neutral shampoo based on biodegradable anionic surface active detergents. The use of other detergents or chemicals may put the appliance's safety at risk.
05WARNING: o not use the machine within range of persons unless they wear protective clothing.
06WARNING: Do not direct the nozzle toward mechanical parts containing lubricant grease, as the grease will dissolve and spread over the surrounding ground. Vehicle tyres/tyre valves may only be cleaned from a minimum distance of 30~cm otherwise the vehicle tyre/tyre valve could be damaged by the high-pressure jet. The first indication of this is a discoloration of the tyre. Damaged vehicle tyres/tyre valves can be deadly dangerous.
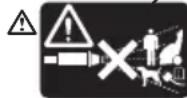
07WARNING: High pressure jets can be dangerous if subject to misuse. The jet must not be persons, animal, live electrical or the machine itself.
08WARNING: High pressure hoses, fittings and couplings are important for the safety of the machine. Use only hoses, fittings and couplings recommended by the manufacturer. (it is extremely important to protect these components against damage by avoiding their improper use and protecting them against bending, knocks and scratches).
09WARNING: Appliances not equipped with A.S.S. - Automatic Stop System: must not be left in operation for more than 2 minutes with the gun released. The recycled water
heats up considerably, seriously damaging the pump.
A.S.S. AUTOMATIC 10 WARNING: STOP SYSTEM Appliances equipped
with A.S.S - Automatic Stop System: these appliances should not be left in standby for more than 5 minutes.
11WARNING: Switch the appliance off completely (master switch on (0)OFF) whenever it is left unattended.
12WARNING: Every machine is tested in its operating conditions, so it is normal for a few drops of water to be left inside it.
13WARNING: Take care not damage the electric cable. If the supply cord is damaged, it must be replaced by the manufacturer, its service agent or similarly qualified persons in order to avoid a hazard
14WARNING: Appliance with fluid under pressure. Keep a firm hold on the gun and be prepared to take the kickback pressure. Only use the high pressure nozzle provided with the appliance.
16 WARNING: This appliance is not intended for use by persons (including children) with reduced physical, sensory or mental capabilities, or lack of experience and knowledge, unless they have been given supervision or instruction concerning use of the appliance by a person responsible for their safety.
17WARNING:Children should be supervised to ensure that they do not play with the appliance.
18WARNING: Never start the high-pressure cleaner without first completely unwinding the high-pressure hose.
19WARNING: When winding and unwinding the pipe take care not to cause the high-pressure cleaner to overturn.
20WARNING: Before unwinding or winding the hose, switch the machine off and release the pressure in the hose itself (switching off).
21WARNING: Risk of explosion — Do not spray flammable liquids.
22WARNING: To ensure machine safety, use only original spare parts from the manufacturer or approved by the manufacturer.
23WARNING: Do not direct the jet against yourself or others in order to clean clothes or foot-wear.
24WARNING: High pressure cleaners
shall not be used by children or untrained personnel.
WARNING: Water that has flown through backflow preventers is considered to be non-potable.
XXWARNING: the machine shall be disconnected from its power source, by removing the plug from the socket-outlet, during cleaning or maintenance and when replacing spare parts
XJWARNING: If an extension cord is used, the plug and socket must be of watertight construction.
XYWARNING: Inadequate extension cords can be dangerous.
WARNING: When the unit is working do not use it in a closed place where ventilation may be insufficient and never cover the unit.
WARNING: By no means use the machine during thunderstorms or when it is raining.
WARNING: Do not use the unit on inflammables surfaces.
WARNING:
- NEVER EVER TOUCH THE MACHINE WITH WET HANDS OR BARE FEET.
- NEVER PULL THE POWER SUPPLY CABLE OR MACHINE IN ORDER TO DISCONNECT THE PLUG FROM THE SOCKET.
- IF DURING FUNCTIONING THE POWER SUPPLY RUNS OUT, FOR SAFETY REASONS, TURN THE MACHINE OFF.
> SAFETY_DEVICE
WARNING: the gun is fitted with a safety catch. Whenever use of the machine is interrupted it is important to operate the safety catch to prevent accidental activation of the jet.
- Safety features: gun equipped with safety locking device, appliance equipped with (Class I) overload cutout, pump equipped with by-pass valve or shutdown device.
- The safety button on the gun is not there to lock the lever during operation, but to prevent its accidental operation.
WARNING: The appliance is equipped with a motor protection device: in case of device intervention, wait some minutes or, in alternative, disconnect and re-connect the product to the electric system. In case this problem repeats again or if the product does not start again, take the product to the nearest After Sales Service Point
EN
STABILITY
WARNING: The machine must be always kept on horizontal bases, in a safe and stable way.
USAGE
DESCRIPTION OF THE MACHINE
See pag.3-4-5.
ASSEMBLY INSTRUCTIONS
See pag.2.
PUT INTO SERVICE
See fig. A
Check that the master switch is turned to "OFF" and that the water filter is fitted into the pump's inlet pipe.
Screw the snap connection into place by hand, without the aid of tools.
Connect the water supply hose to the snap connection. The hose must have an inside diameter of at least 13 mm( 1/2^ ) .
Connect the high pressure hose to the pump's outlet pipe. Press the high pressure hose coupling fully down and then screw into place by hand without the aid of tools.
Connect the high pressure hose to the gun.
Turn the water tap fully on. The water temperature absolutely must be below 40^ C .
IMPORTANT: The washer machine has to operate with clean water in order to avoid any damages to the washer machine itself.
Release the gun safety catch and keep the trigger pressed, allowing the water to flow until all the air has been expelled.
Fit the lance into the gun.
Connect the plug to the power socket.
To start the machine, press the gun trigger and at the same time turn the master switch to "ON".
FILLING UP
Fill up the tank with the fuel indicated on the technical data plate.
Avoid that the tank is empty when the machine is running in order not to damage the fuel pump.
WARNING: Incorrect fuel shall not used as they as provide hazard.
Fill up the detergent tank with the suggested products, suitable for the kind of washing to be carried out.
WARNING: make use only of liquid detergent, do not absolutely use acid or too much alkaline products.
We suggest you to make use of our products, which have been studied for the use with washer machines.
> STARTING UP
See fig. B
Start the machine:
turn the switch pos. 2 (I) ON 心
To wash with hot water:
turn the switch pos. 1 (I) ON
The burner operates when the machine is in pression.
HIGH PRESSURE LANCE
See fig. H
DETERGENT SUCTION
See fig. E
HIGH PRESSURE HOSE
See fig.1
WATER SUPPLY
Water supply collection
Water supply from the water main

- Connect a supply hose (not included) to the water inlet of the unit and to the water supply.
- Open the water supply.
WARNING: (symbol) machine not suitable for connection to the potable water mains.
The cleaner can only be connected to the water mains if the water mains is separated by a backflow preventer. Make sure that the hose is at least 0.13mm - 1 / 2 inch and that it is reinforced.
WARNING: Water that has flown through backflow preventers is considered to be nonpatable.
IMPORTANT: Only clean or filtered water should be used for intake. The delivery of the water intake tap should be equal to the double of the maximum pump range.
-
Minimum delivery rate: 15 l/min.
Maximum intake water temperature: 40^
Max inlet water pressure: 1Mpa
Place the cleaner as close to the water supply system as possible.
Water supply from an open container
-
Unscrew the coupling part for the water inlet.
- Screw the suction hose with filter (not included) onto the water connection of the unit.
- Hang the filter in the container.
- Vent the unit before operation.
- Unscrew the high-pressure line at the high-pressure outlet of the unit.
- Switch on the unit and let it run until water free of bubbles emerges at the high-pressure outlet.
- Switch off the unit and screw on the high-pressure hose again.
Failure to comply with the above conditions causes serious mechanical damage to the pump and the loss of warranty cover.
> ELECTRICITY SUPPLY
- The appliance's electrical connection must comply with the IEC 60364-1 standard.
IMPORTANT: Before connecting the appliance, make sure that the nameplate data are the same as those of the electrical mains and that the socket is protected by a differential security breaker with tripping sensitivity below 0.03 A - 30 ms.
- If the appliance's plug is not compatible with the socket, have the socket replaced with another of suitable type by professionally qualified staff.
- Never use the appliance in ambient temperatures below 0^ if it is equipped with a PVC (H VV-F) cable.
XYWARNING: Inadequate extension cords can be dangerous.
XJ WARNING: If an extension cord is used, the plug and socket must be of watertight construction.
Information for supply may also be obtained from the plug manufacturer.
| <16 A | <25 A |
| <20 m | Ø 1,5 mm²
14 AWG | Ø 2,5 mm²
12 AWG |
| 20 m - 50 m | Ø 2,5 mm²
12 AWG | Ø 4,0 mm²
10 AWG |
> PLUG
HOW TO CONNECT THE CORD TO A U.K. PLUG:
IMPORTANT The wires in the mains lead are coloured in accordance with the following code:
Blue
Neutral
Brown
Live
Yellow/Green
Earth
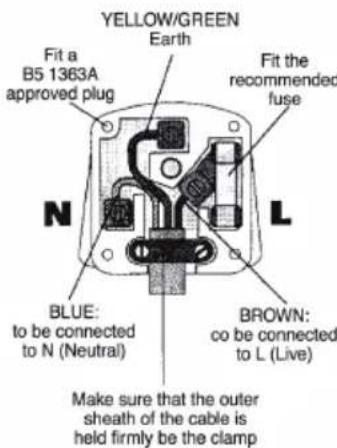
Please read the instructions given below before connecting the cord to a plug. If in doubt please consult a qualified electrician. As the colours of the wires in the mains lead of this appliance may not correspond with the coloured markings identifying the
terminals in your plug, proceed as follows: The wires that is coloured Brown must be connected to the terminal which is marked with the letter L or coloured Red. The wire that is coloured Blue must be connected to the terminal wich is marked with the letter N or coloured Black. Safety points for rewireable or moulded plug: The mains lead of this appliance may be already fitted with a BS1363 13A plug.
If your socket outlet is not suitable for the plug, then the plug must be removed (cut off if it is a moulded on plug), the flexible cord insulation should be stripped back as appropriate and a suitable 3 pin plug fitted.
WARNING: Dispose of a plug that has been cut from the power supply cord, as such a plug is hazardous if inserted in a live 13A socket outlet elsewhere in the house. - Should the fuse need to be replaced an ASTA marked fuse, approved to BS1362, of the same rating must be used. - Always replace the fuse cover after fitting a fuse. The plug must NOT be used if the cover is omitted or lost until a replacement is obtained. - Make certain that only the correct fuse cover is used and fitted. - For plugs with detachable fuse cover the replacement must be the same as the colour insert in the base of the plug, or as directed by the embossed wording on the base of the plug. - If the detachable fuse cover is lost a replacement may be purchased from a Service Centre.
A.S.S. (if fitted)
NOTE: ASS. (Automatic Stop System), which stops the machine during the bypass phase. To start the water cleaner, it is therefore necessary to set the switch on position (I) "ON"; after that press the pistol trigger: the Automatic Stop System will start the machine and will stop it automatically when the trigger is released. It is advisable to 15
EN
put on the safety of the pistol trigger whenever the machine is stopped, in order to avoid unintentional starting.
- Any automatic start of the machine without pressing the gun trigger is attributable to air bubbles in the water or other similar phenomena which do not imply the existence of any defects in the machine.
- Do not leave the appliance unattended during the standby for more than 5 minutes. Contrarily, for the safety of the appliance it is necessary to re-turn the switch into the (0) OFF position.
- Please check that the coupling of the high pressure hose with the appliance and the gun supplied as standard equipments made correctly, that is to say without any water leak.
> SWITCHING OFF
See fig. C
turn the switch pos. 2 (0) OFF position and wait that the water get completely cold.
In this way you avoid any calcareous deposit and overheatings of the coil and the boiler, which are always dangerous.
IMPORTANT: When the machine is switched off, always discharge the pressure hose, opening the gun.
CARE AND MAINTENANCE
See fi
XXWARNING: the machine shall be disconnected from its power source, by removing the plug from the socketoutlet, during cleaning or maintenance
WARNING: Do not spray the appliance with water and do not use detergents or aggressive solvents. Machine could be damaged.
- Clean the exterior part of the machine with a dry cloth.
- Always keep the machine clean so that the cooling air can pass through the slits without obstructions..
- Cleaning the water filter: To ensure the pump gives good service it is extremely important to check and clean the water filter frequently. Use pliers to extract it from the pump and rinse it carefully in running water.
- Cleaning the nozzle: A blockage in the nozzle may prevent the machine from operating correctly, so it must be kept clean. Switch off the machine and
remove the lance. Clean the nozzle with the pin provided. Rinse the lance in running water.
- When topping up the oil in the pump, use a SAE 20W40 mineral oil. Quantity supplied: 70 gr.
- The replacement of the fuel metal pipe is requested after disassembling to avoid fuel leakages.
>STORAGE
See fig. D
- Move the machine only by grasping the carrying handle
- Store the appliance and the accessories in a frost-safe room.
WARRANTY CONDITIONS
All our machines are subjected to strict tests and are covered against manufacturing defects in accordance with applicable regulations. The warranty is effective from the date of purchase. The following are not included in the warranty: - Parts subject to normal wear.
- Rubber parts, charcoal, filters and the accessories and optional accessories. - Accidental damage, caused by transport, neglect or inadequate treatment, incorrect or improper use and installation failing - The warranty shall not cover any cleaning operations to which the operative components may be subjected, such as clogged nozzles and filter blocked due to limestones. This pressure cleaner is intended to be used for domestic and hobby work: the warranty does not cover any other different kind of use.

DISPOSAL (WEEE)
As the owner of electrical or electronic equipment, the law (in accordance with the EU Directive 2002/96/EC of 27 January 2003) prohibits you from disposing of this product or its electrical / electronic accessories as municipal solid waste and obliges you to make use of the appropriate waste collection facilities.
The product can be disposed of by returning it to the distributor when a new product is purchased. The new product must be equivalent to that being disposed of.
TROUBLESHOOTING
| FAULT PROBABLE CAUSE | REPAIR | |
| 1. The pump does not start when the switch is pressed. | 1. The plug is not properly connected to the socket.
2. The electrical socket is not working.
3. The mains voltage is insufficient.
4. The gauge of the electrical power lead is too small.
5. The pump has cut out. | 1. Connect the plug to the power socket correctly.
2. Have the electrical socket checked.
3. Check that the system is suitable.
4. Refer to the section detailing the electrical connection.
5. Turn the switch to ON while keeping the gun lever pressed; if the problem persists contact an authorised service centre. |
| 2. The machine starts, but no water comes out. | 6. Pump, hoses or accessories frozen.
7. No water supply.
8. Water filter fouled.
9. Nozzle fouled. | 6. Allow the pump and hoses to thaw.
7. Connect the machine to the water supply system and turn on the tap.
8. Remove and clean the filter (see "MAINTENANCE" section).
9. Remove the lance from the gun and clean the nozzle with the pin provided. |
| 3. The pump runs but pressurisation does not take place. | 10. Insufficient water.
11. Suction filter fouled.
12. Pressure regulator valve (if fitted) on minimum pressure setting.
13. Lance nozzle worn.
14. Suction or delivery valves fouled or worn. | 10. Check that the delivery rate is at least 12 l/min.
11. Remove and clean the filter (see "MAINTENANCE" section).
12. Increase the pressure by turning the handgrip.
13. Replace the lance.
14. Contact an authorised service centre. |
| 4. Uneven working pressure. | 15. Lance nozzle fouled or dirty.
16. Air in intake water.
17. Suction filter fouled.
18. Suction or delivery valves fouled or worn.
19. Gaskets worn.
20. Pressure regulator valve gaskets worn. | 15. Remove the lance from the gun and clean the nozzle with the pin provided.
16. Supply the machine with water correctly.
17. Remove and clean the filter (see "MAINTENANCE" section).
18. Contact an authorised service centre.
19. Contact an authorised service centre.
20. Contact an authorised service centre. |
| 5. The motor stops suddenly. | 21. Machine's safety overload cutout has been tripped.
22. The gauge of the electrical power lead is too small. | 21. Allow the motor to cool for a few minutes. If the problem persists contact an authorised service centre.
22. Refer to the section detailing the electrical connection. |
| 6. Water leaks from the machine. | 23. Leaks from hose reel (if used).
24. Leaks from intake coupling.
25. Leaks from pump. | 23. Tighten the couplings; if the problem persists contact an authorised service centre.
24. Make sure that the coupling has been fitted correctly (See illustrations in the "INSTALLATION" section).
25. Contact an authorised service centre. |
| 7. Abnormal noise. 26. Suc | ion filter fouled.
27. Intake water temperature too high.
28. Suction or delivery valves fouled or worn.
29. Bearings worn. | 26. Remove and clean the filter (see "MAINTENANCE" section).
27. Reduce the temperature below 40°C.
28. Contact an authorised service centre.
29. Contact an authorised service centre. |
| 8. Water in the oil. 30. O-rin | q seals worn. 30. Contact an authorised service centre. | |
| 9. The machine restarts with the gun released (versions with A.S.S.). | 31.Water leak from hose - gun connection (except models with hose and gun supplied readyconnected).
32. Air in intake water.
33.Water leak from the gun.
34.Water leak from the pump. | 31. Tighten the connection with 2 spanners.
32. Supply the machine with water correctly.
33. Contact an authorised service centre.
34. Contact an authorised service centre. |
| 10.The machine does not suck in detergent. | 35. Tank empty.
36. Lance handgrip on high pressure setting (if present).
37. Transparent suction pipe damaged or disconnected. | 35. Fill the tank.
36. Move it to the low pressure setting by pulling the lever towards the nozzle.
37. Reconnect the pipe. If the problem persists contact an authorised service centre. |
| 11.Turning on the burner switch the boiler doesn't start. | 38.No fuel
39.Fuel filter is clogged
40.Fuel pump is either blocked or burnt out
41.Damaged thermostat
42.Ignition spark insufficient or totally lacking
43.The space among the electrodes is not correct | 38. Check the level in the tank and check whether the rigid suction pipe is clean
39.Replace the line filter
40.Replace it.
41.Replace it.
42.Contact an authorised service centre.
43.Contact an authorised service centre. |
CONDITIONS DE GARANTIE
via J.F.Kennedy, 12-46020 Pegognaga (MN) - Italy
Dichiara除去la propria responsabilita che la macchina:
EN Declares under its responsibility that the machine:
FR Ateste sous sa responsabilité que la machine:
OE Erklär unt der eigenen Verantwortung dass die Maschine:
Declaraba bajo su propia responsabilidad que laquina
NL Verklaart geheel onder eigenverantwoordelijkheid dat de machine:
Declarasobpropriaresponsabildadequeamaquina:
Vakuuttaa omalla vastuillaan etta kone:
Na vlastní zodpovednost prohlasuje,Že přístroi:
DA Erklaerer, under eget ansvar, at maskinen:
Lzjavlja pod lastno odgovornostjo, da je naprava
SV Forskarar nedan sitt ansvar for att maskinen:
HR Izjavljupe pod vlastitom odgovornošću da stroj:
Kendi sorumluluğu altinda aşagidaki makinenin:
PRODOTTO: IDROPULITRICE AD ALTA PRESSIONE A CALDO
EN PRODUCT: HOT HIGH-PRESSURE WASHER MACHINE
PRODUIT: NETTOYEUR HAUTE PRESSION A CHAUD
DE PRODUKT: HEIBWASSER-HOCHDRUCKREINIGER
PRODUCTO: HIDROLIPIADORA DE ALTA PRESION EN CALIENTE
NL PRODUCT: HEET WATER HOGEDRUCK REINIGER
PRODUTO: HIDROLIMPADORA DE ALTA PRESSAO A QUENTE
TUOTE: HYDRAULINEN KORKEAPAINEPESURI
VYROBEK: VYSOKOTLAKY VODNI CISTIC PRO CISTENI ZA TEPLA
DA PRODUKT: VARMTVANDS HJTRYKSRENSER
PROIZVOD: VISOKOTLACNI VODNI CISTILEC NA VROCO VODO
PRODUKT: VATTENKURANSTALT RENGÖRA HÖG - TRYCK PÄ VÄRMA
PROIZVOD: TOPLI VODENI PERAC VISOKOG PRITISKA
TR URUN: YUKSEK BASINCLI SICAK SULU YIKAMA MAKINESI
MODELLO-TIPO:
MODEL-TYPE:
MODELE-TYPE:
MODELL-TYP:
MODELO - TIPO:
MODEL - TYPE:
MODELO - TIPO:
MALLI-TYYPPI:
MODELO-TIPO
MODEL-TYPE
MODEL-VRSTE:
MODELL-TYP:
MODEL-TIP:
MODEL-TiPI:
FKX, Kappa,
XTR, Fuego,
RIO, Kappa A
P80.0229
é conforme alle direttive CE e loro successive modificazioni, ed alle norme EN:
EN complies with directives EC, and subsequent modifications, and the standards EN:
FR est conforme aux directives CE et aux modifications successives ainsi qu'aux normes EN:
DE den Richtlinien EG,den nachfolgenden Änderungen sowie den Normen EN:
esté en conformidad con las directivas CE y sus sucesivas modificaciones y también con la norma EN:
in overeenstemming is met de Richtlijnen EG en latere wijzigingen waarop en de normen EN:
Pé está em conformidade com as direcrizes EC e bem como com as normas EN e as suas successivas modificações.
Malli vastaa direktiivejEA ja myohempia muutoksia sek standardeja, ja myohempia muutoksia:
G Je v souladu se smernicemi jejich naslednymi novelizacemi a normami, a jejich naslednymi novelizacemi.
DAStemmer overens med direktiverne og deres afterfolgende eandringer, og med standarderne, og Deres afterfolgende eandringer.
V skladu z direktivami in njunimi kasnejsimi spreemembami ter s standardi, in z njihovimi kasnejsimi spreemembami.
Overensstammer med direktiven och dess foljande modifieringar och standarderna och dess foljande modifieringar.
He je u skladu sa direktivama, te njihovim naknadnim modifikacijama te standardima, njihovim naknadnim modifikacijama.
Direktiflerine ve sonraki guncellemeleri ile standartlarina ve sonraki guncellemelerine uygun oldugunu banyan eder.
2006/42/EC.
2006/95/EC,
2004/108/EC,
2000/14/EC,
97/23/CEE
EN 60335-1,
EN 60335-2-79
EN 62233:2008
EN 55014-1:2006
EN 55014-2:1997 + A1:2001,
EN 61000-3-2:2006.
EN 61000-3-3:1995 + A1:2001 + A2:2005,
EN 61000-3-11, EN ISO 12100-1, EN ISO 12100-2,
ENISO14121-1,ENISO14121-2
EN 303-2
| LpA 69,5dB(A) | LwA 89dB(A) | LwA 92dB(A) | FKX, Kappa, RIO, Kappa A |
| K(uncertainty) 3 dB (A) |
| LpA 88dB(A) | LwA 95,43dB(A) | LwA 96dB(A) | XTR, Fuego, |
| K(uncertainty) ±1 dB (A) |
| Livello pressione acustica | Livello di potenza sonora misurato | Livello di potenza sonora garantito | |
| Acoustic pressure | Acoustic power measured | Acoustic power granted | |
| Niveau de pression acoustique | Niveau du puissance sonore mesuré | Niveau du puissance sonore garantı | |
| Schalldruckpegel | Abgemestes Schalleistungs niveau | De Garantietes Schalleistungs niveau | |
| Nivel de ruido | Nivel de potenza acustica mesurado | Nivel de potenza acustica garantido | |
| Geluidsdrukniveau | Geluidsdrukniveau LwA gemeten | GL Geluidsdrukniveau LwA gegarandeerd | |
| Nivel da pressão acustica | Nivel de potenza acustica mensurada | Nivel de potenza acustica garantida | |
| Hladina akustického tlaku | CS Naměřena hladina akustického vykonu | CS Zarucěna hladina akustického vykonu | |
| Akustisk trykkniva | DA Mälty dyffektniveau | DA Garanteret lydeffektniveau | |
| Äänen paineen taso | MI Attatu äinitehotaso | FI Taattu äinitehotaso | |
| Stopnjá zvočnega hrupa | SL Izmerjen nivo zvočne moci | SL Zagotovljen nivo zvočne moci | |
| Akustisk tryckniva | SV Uppmättl ljudeffektniva | SV Garanterad ljudeffektniva | |
| Razina akusticnog pritiska | HR Izmjerena razina zvočne snage | HR Zajamcena razina zvočne snage | |
| Ses basić seviyesi | TR Ölçulen akustik guć seviyesi | TR Garanti edilen akustik guć seviyesi | |