USER MANUAL MV 5 Premium Kärcher
| 14
15 | 16 | 17 18 | 19 20 21 | 22 | | | |
| WD 5 | ● | ● | ● | ● | ● | ● | ○ | ○ |
| WD 5 P | ● | ● | ● | ● | ● | ● | ● | ○ |
| WD 5 Premium | ● | ● | ● | ● | ● | ● | ○ | ○ |
| WD 5 P Premium | ● | ● | ● | ● | ● | ● | ● | ○ |
| WD 6 P Premium | ● | ● | ● | ● | ● | ● | ● | ● |

Inhaltsverzeichnis
Description of the Appliance EN 7
Operation EN 8
Care and maintenance EN 9
Troubleshooting EN 9
Technical specifications EN 10
Dear Customer,
Please read and comply with these original instructions prior to the initial operation of your appliance and store them for
later use or subsequent owners.
Proper use
In accordance with the descriptions and the safety information in these operating instructions the appliance is intended for use as a multi-purpose vacuum cleaner.
This appliance has been designed for use in private households and is not intended for commercial use.
Use the multi-purpose vacuum cleaner only with:
The manufacturer is not responsible for any damages that may occur on account of improper use or wrong operations.
Environmental protection
The packaging material can be recycled. Please do not place the packaging into the ordinary refuse for disposal, but arrange for the proper recycling.
Old appliances contain valuable materials that can be recycled. Please arrange for the proper recycling of old appliances. Please dispose your old appliances using appropriate collection systems.
Disposing the filters and filter bags
Filters and filter bags are made from environment-friendly materials.
They can therefore be disposed off through the normal household garbage provided you have not sucked in substances that are not permitted to be thrown into household garbage.
Notes about the ingredients (REACH)
You will find current information about the ingredients at:
www.kaercher.com/REACH
Warranty
The terms of the guarantee applicable in each country have been published by our respective national distributors. We will repair possible faults on your unit free of charge within the warranty period, insofar as the faults are caused by material defects or defective workmanship. Guarantee claims should be addressed to your dealer or the nearest authorized customer service centre, and supported by documentary evidence of purchase.
Customer Service
Our KARCHER branch will be pleased to help you further in the case of questions or faults.
Ordering spare parts and special attachments
At the end of the operating instructions you will find a selected list of spare parts that are often required.
You can procure the spare parts and the attachments from your dealer or your KÄRCHER branch office.
△DANGER
-
The appliance may only be connected to alternating current. The voltage must correspond with the type plate on the appliance.
-
Never touch the mains plug and the socket with wet hands.
-
Do not pull the plug from the socket by pulling on the connecting cable.
-
Check the power cord with mains plug for damage before every use. To avoid risks, arrange immediately the exchange by an authorized customer service or a skilled electrician, if the power cord is damaged.
-
To avoid accidents due to electrical faults we recommend the use of sockets with a line-side current-limiting circuit breaker (max. 30 mA nominal tripping current).
-
Turn off the appliance and remove the mains plug prior to any care and maintenance work.
-
Repair works may only be performed by the authorised customer service.
WARNING
Certain materials may produce explosive vapours or mixtures when agitated by the suction air! Never vacuum up the following materials:
- Explosive or combustible gases, liquids and dust particles (reactive dust particles)
- Reactive metal dust particles (such as aluminium, magnesium, zinc) in combination with highly alkaline or acidic detergents
- Undiluted, strong acids and alkalies
- Organic solvents (such as petrol, paint thinners, acetone, heating oil).
In addition, these substances may cause the appliance materials to corrode.
Hazard levels
△DANGER
Pointer to immediate danger, which leads to severe injuries or death.
WARNING
Pointer to a possibly dangerous situation, which can lead to severe injuries or death.
CAUTION
Pointer to a possibly dangerous situation, which can lead to minor injuries.
ATTENTION
Pointer to a possibly dangerous situation, which can lead to property damage.
Description of the Appliance
Illustrations on fold-out pages!
These operating instructions describe the multi-purpose vacuum cleaners listed on the front cover.
The illustrations show the maximum equipment; depending on the model, there are differences in equipment and supplied accessories.
When unpacking the product, make sure that no accessories are missing and that none of the package contents have been damaged. If you detect any transport damages please contact your dealer.
included in the scope of delivery
possible accessories
Suction hose connection
Illustration B1
To connect the suction hose during vacuuming.
ON/OFF switch for appliance (without built-in socket)
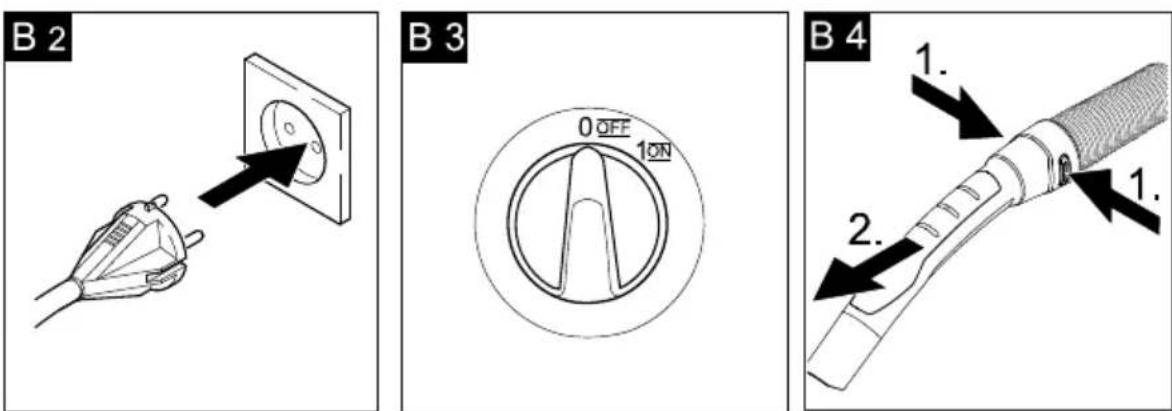
Illustration B3
Position I: Suction or blowing Position 0: Appliance is switched off
ON/OFF switch for appliance (with built-in socket)
Illustration B3
Position MAX:Vacuuming or blowing.
Position MAX:Vacuuming with connected electric tool
Performance regulation: Reduce the suction if necessary during vacuuming, blowing or when working with an electric tool.
Position 0: The appliance is switched off. Electric tool is supplied with voltage.
3 Machine socket
Note: Observe the maximum connected load (see Chapter "Technical data").
Illustration C2
To connect an electric tool.
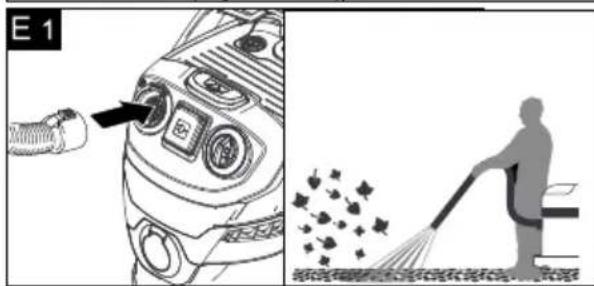
4 Blowing connection
Illustration E1
Connect the suction hose to the blower connection, this will activate the blower function.
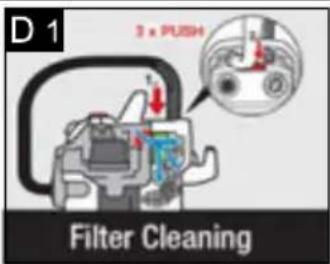
Illustration D1
For cleaning the flat pleated filter fitted.
Note: Do not operate the button when the flat pleated filter is wet.
6 Recessed grip
After unlocking it, grab the appliance head by the handle recess and remove it.
7 Carry handle
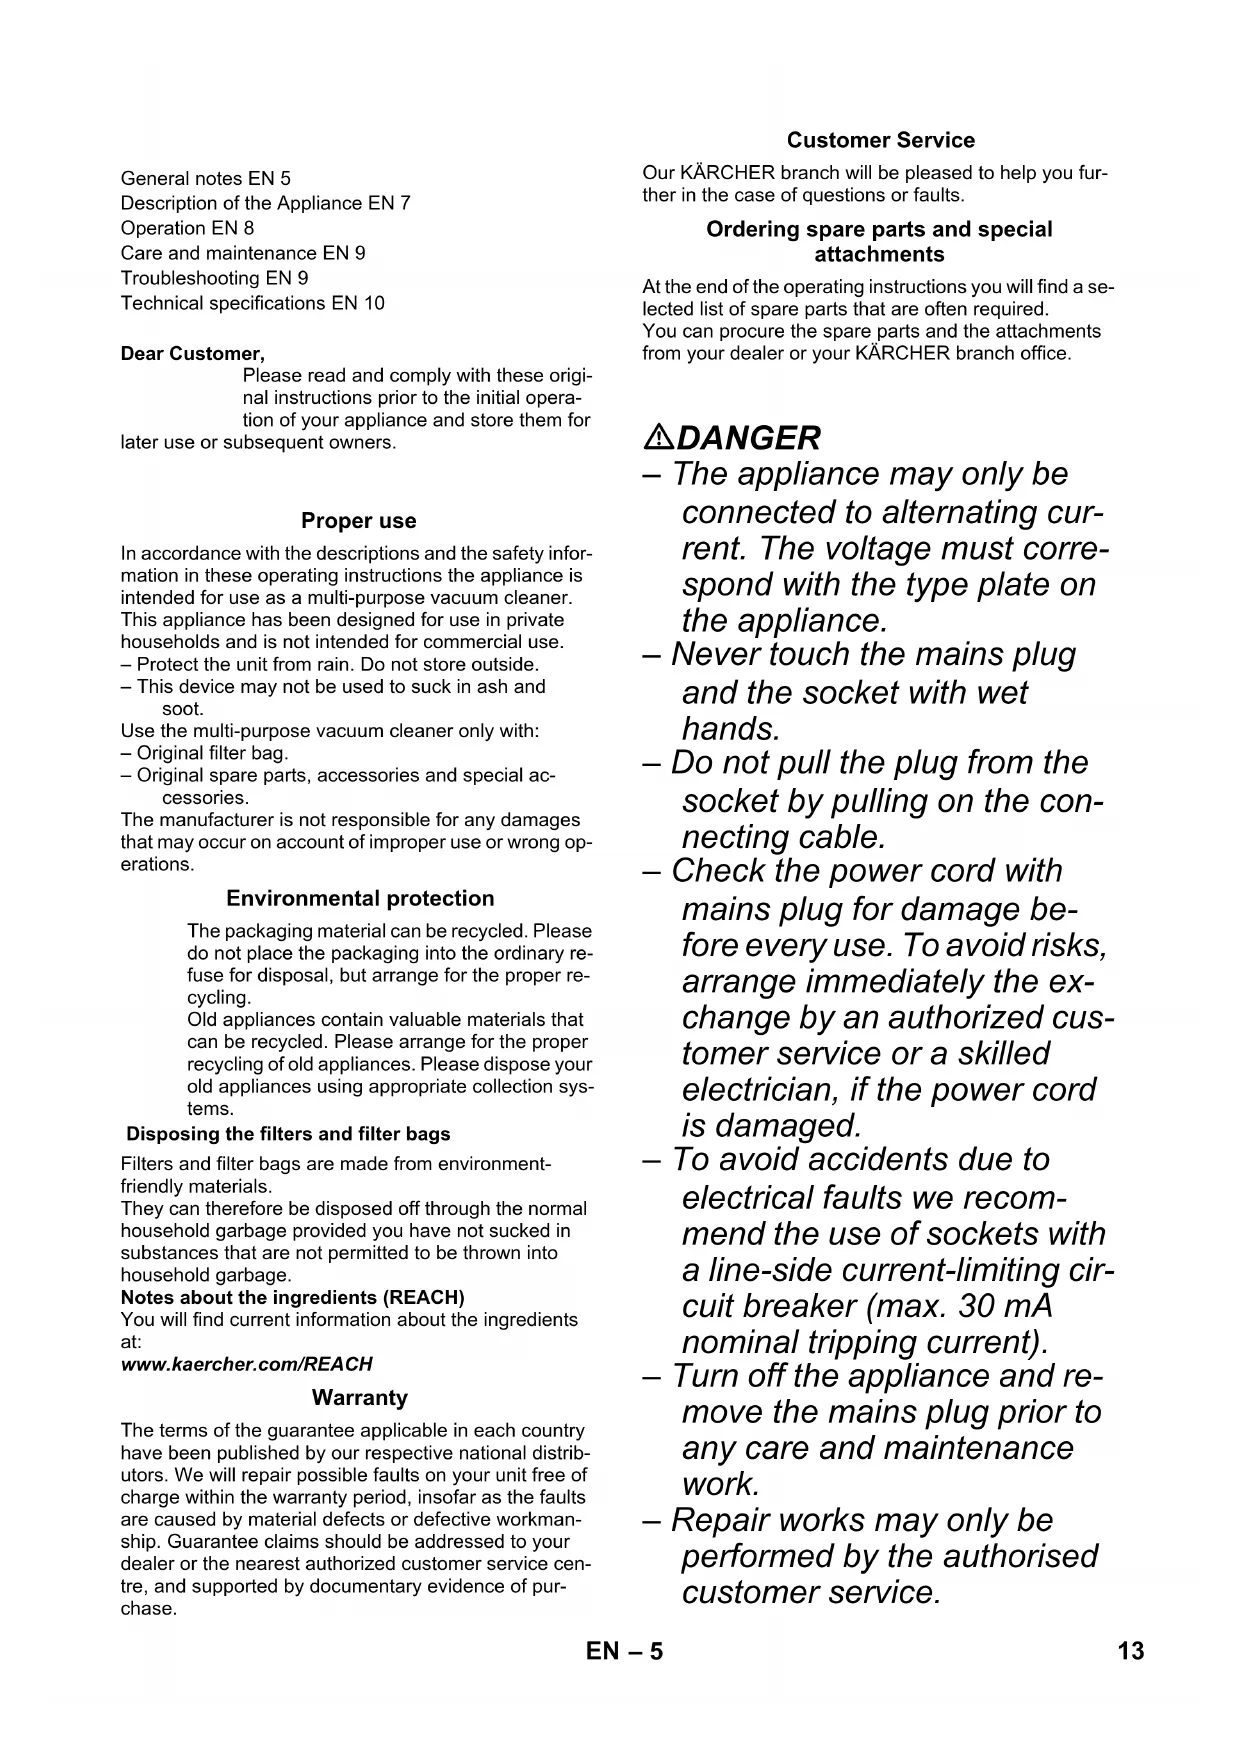
Illustration A1
The carrying handle is also used to lock the appliance head and the container. To unlock, push the bow all the way forward until you clear the lock.
Grab the appliance head by the handle recess and remove it.
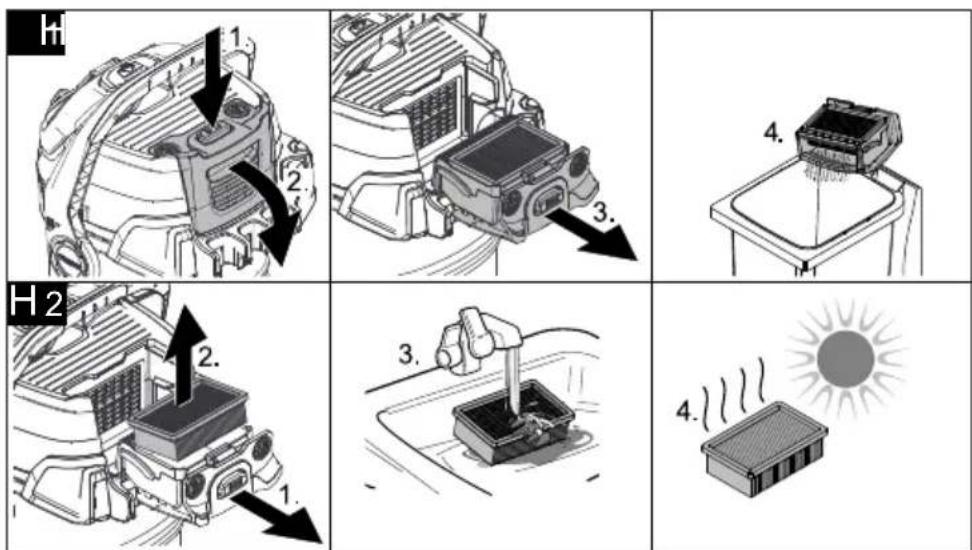
8 Filter box and release key
Illustration H1
Illustration H2
In order to clean the filter, press the release key, fold out and remove the filter box.
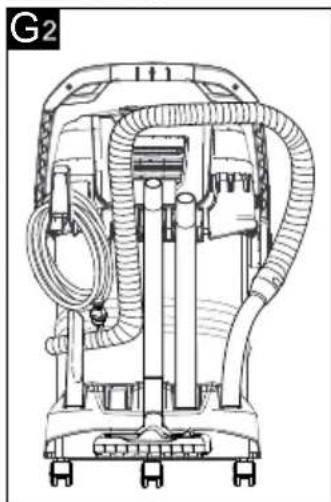
9 Accessory mount
Illustration G2
The accessories compartment allows the storage of suction pipes and suction nozzles on the appliance.
10 Cable hook
Illustration G2
To store the mains cable.
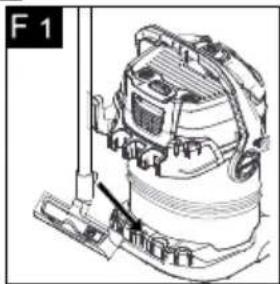
1 Parking position
Illustration F1
To rest the floor nozzle during work interruptions.
12 Steering roller
Illustration A1
Turn the container, press in the steering roller in the openings at the base of the container till the end-point.
13 Drain screw
Illustration G1
The drain screw is used to quickly and comfortably empty wastewater in the container. Tilt the container forward for easier emptying.
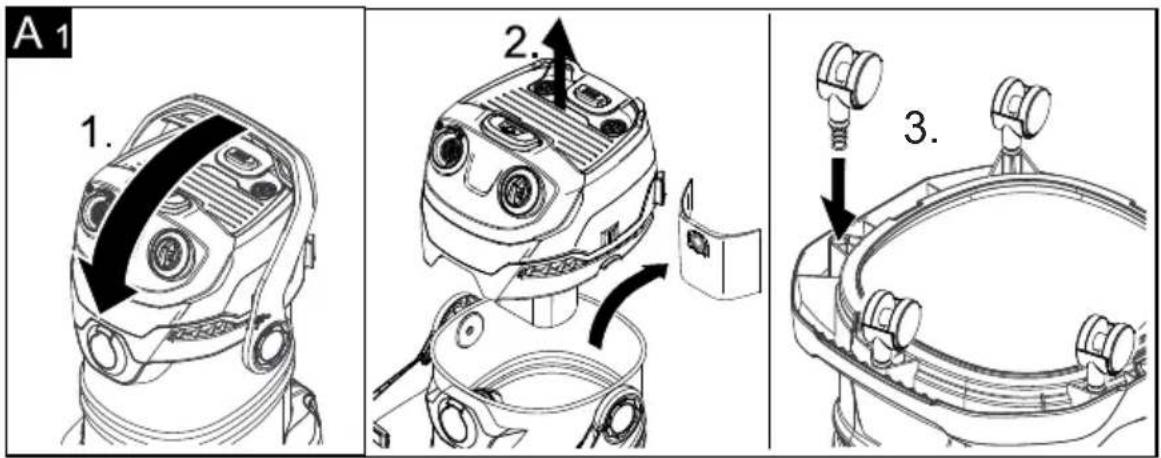
14 Filter bag
Illustration A2
Note: Do not use a filter bag for wet vacuuming!
Flat fold filter
(already installed in the appliance)
ATTENTION
Always work with an inserted flat fold filter - during wet as well as dry vacuum cleaning!
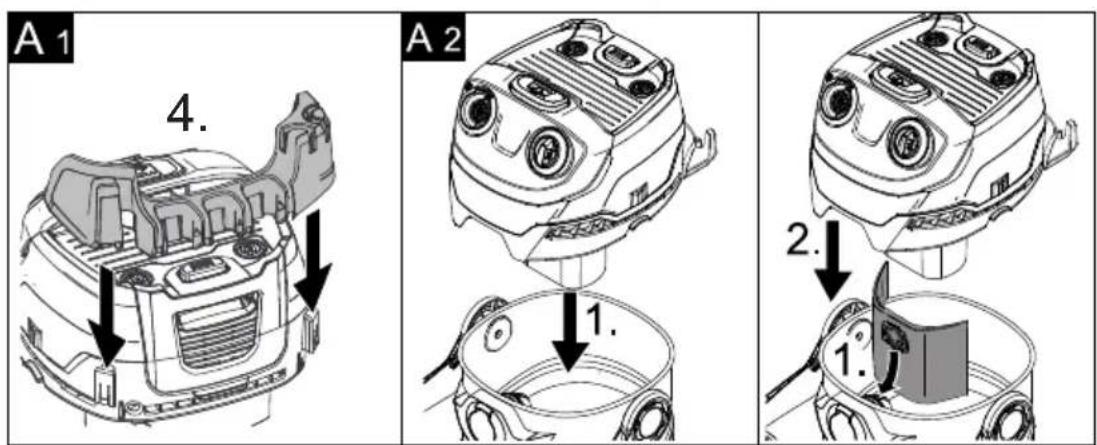
16 Suction hose with connecting piece
Illustration B1
Push the suction hose into the connection on the appliance, it snaps in place.
In order to disconnect it, push down with your thumb and pull the suction hose out.
Note: Accessories, such as suction brushes (optional) can be directly attached to the connecting piece and thus connected to the suction hose.
For convenient working even in tight spaces.
The removable handle can be attached between the accessories and the suction hose if necessary.
See position 17.
Recommendation: In order to vacuum the floor, attach the handle to the suction hose.
17 Removable handle
Illustration B1
Connect the handle with the suction hose until it snaps in place.
Illustration B4
To remove the handle from the suction hose, press the notch using your thumb and pull off the handle.
Note: Due to removing the handle, accessories can be directly attached to the suction hose.
Recommendation: In order to vacuum the floor, attach the handle to the suction hose.
18 Suction tubes 2 × 0.5 ~m
Illustration B1
Put both suction tubes together and connect them with the handle.
Floor nozzle (with switching lever)
Illustration B1
For convenient switching between dry and wet dirt:
For vacuuming dry dirt off the floor, use position with extended brush strips.
For vacuuming water off the floor, use position with extended rubber lips.
20 Crevice nozzle
For edges, joints, heaters and hard to reach locations.
21 Adapter
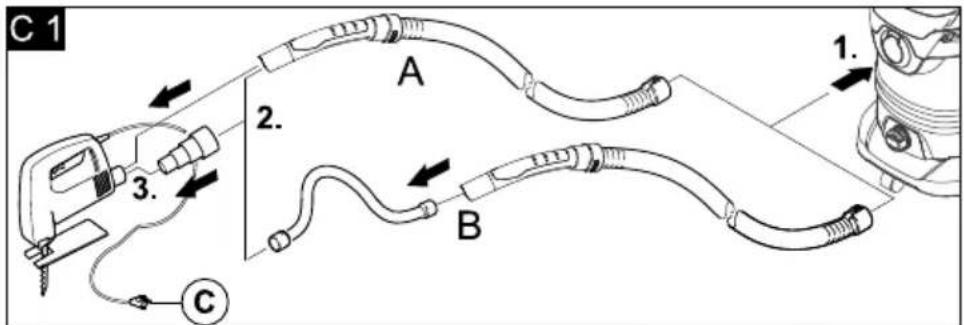
Illustration C1
To connect the suction hose with an electric tool
Adapt the adapter to the connection diameter of the electric tool using a knife if necessary.
22 Flexible tool hose
Illustration C1
For more flexibility when working with electric tools.
Note: Can also be used with an adapter.
Operation
ATTENTION
Always work with an inserted flat fold filter - during wet as well as dry vacuum cleaning!
Before Startup
Illustration A1
Remove the appliance head and take the contents out of the container.
Turn the container, press in the steering roller in the openings at the base of the container till the end-point.
Insert and lock the appliance head.
Clip the holder for the accessory compartment onto the rear side of the appliance.
Start up
Illustration B1
Connect accessories.
Illustration B2
Plug in the mains plug.
Illustration B3
Turn on the machine.
Dry vacuum cleaning
ATTENTION
Work with a dry flat fold filter only.
Check the filter for damage prior to installation and replace as necessary.
Illustration A2
For vacuuming dry dirt an additional filter bag can be inserted if necessary.
ATTENTION
Only operate the filter cleaning without a filter bag inserted, otherwise the filter bag can get damaged.
- The filling level of the filter bag depends on the dirt that is sucked in.
- The filter bag needs to be replaced more frequently while sucking in fine dust, sand, etc.
- Clogged filter bags can burst - therefore make sure to replace the filter bag in a timely manner!
ATTENTION
Vacuum cold ashes only when using a pre-filter.
Order no. basic design: 2.863-139.0, premium design: 2.863-161.0.
Wet vacuum cleaning
ATTENTION
Do not use a filter bag!
Note: If the container is full, a float closes the suction opening, and the appliance works at a higher speed. Switch off the appliance immediately, and empty the container.
For vacuuming up moisture or wetness pay attention to the correct floor nozzle setting and connect the corresponding accessories.
Adapt the adapter to the connection diameter of the electric tool using a knife if necessary.
Illustration C1
or
A) Plug the enclosed adapter onto the handle of the suction hose and connect the electric tool with the connection.
B) Use the flexible tool hose to gain more flexibility in your work. Connect this hose to the suction hose and to the adapter and then to the connection of the electric tool.
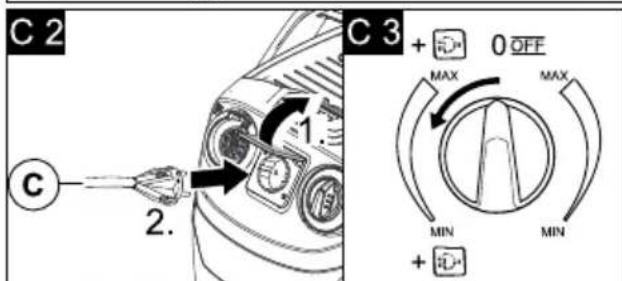
Illustration C2
For appliances with built-in socket: Connect the mains plug of the electric power tool to the vacuum cleaner.
Illustration C3
- Switch the appliance on (move the rotary switch to the left to position MAX) and start working.
Note: As soon as the electric tool is switched on, the suction turbine starts with a 0.5 second delay. If the electric tool is switched off, the suction turbine continues to run for approx. 5 seconds in order to vacuum up the remaining dirt in the suction hose.
Integrated filter cleaning system
The filter cleaning system is intended for vacuuming up large volumes of fine dust without an inserted filter bag.
Note: Thanks to the filter cleaning system the soiled flat pleated filter can be cleaned at the push of the button and the suction performance can be increased again.
Illustration D1
Place the handle of the suction hose in the accessory compartment on the appliance head. Push the filter cleaning button 3× while the appliance is switched on, wait 4 seconds between the individual operations.
Note: After operating the filter cleaning button several times, check the container for its filling volume. Otherwise, the dirt might escape when the container is opened.
Blowing function
Cleaning hard to reach locations or, where vacuuming is not possible, like leaves from a gravel bed.
Illustration E1
Connect the suction hose to the blower connection, this will activate the blower function.
Interrupting operation
Illustration B3
Turn off the appliance.
Illustration F1
Hook the floor nozzle into the parking position.
Finish operation
Turn off the appliance and disconnect the mains plug.
Empty the container
Illustration G1
Remove the appliance head and empty the reservoir filled with wet or dry dirt.
For appliances with drain screw: Empty the dry dirt over the container. Use the drain screw to empty liquids.
Storing the appliance
Illustration G2
Stow away the mains cable and accessory at the machine. Store the appliance in a dry room.
Care and maintenance
Clean the appliance and accessory parts made of plastic with a commercial plastic cleaner.
If required, rinse the container and accessories with water properly and dry them before reuse.
Clean flat fold filter
Recommendation: Clean the filter box after every use.
Illustration H1
Unlock, fold out and remove the filter cartridge, empty dirt from the filter cartridge over a waste bin.
In order to clean the inserted flat fold filter, knock the filter box against the edge of the waste bin. It is not necessary to remove the flat fold filter from the filter box.
If necessary, clean the flat fold filter separately.
Illustration H1
Unlock, fold out and remove the filter cartridge.
Illustration H2
Remove the flat fold filter from the filter box and tab it out.
When necessary, clean under running water only, do not wipe or brush down.
Allow to dry completely prior to use.
Finally, reinstall the dry flat fold filter into the appliance. Insert the filter cartridge into the appliance.
Troubleshooting
Decreasing cleaning power
If the suction power becomes less, check the following points:
Accessories, suction hose or suction pipes are clogged, please remove the obstruction using a stick.
Illustration A2
Filter bag is full: Insert new filter bag.
Illustration H2
Flat fold filter contaminated: Remove the filter box and clean filter (see Chapter "Cleaning the flat fold filter").
Replace damaged flat fold filter.
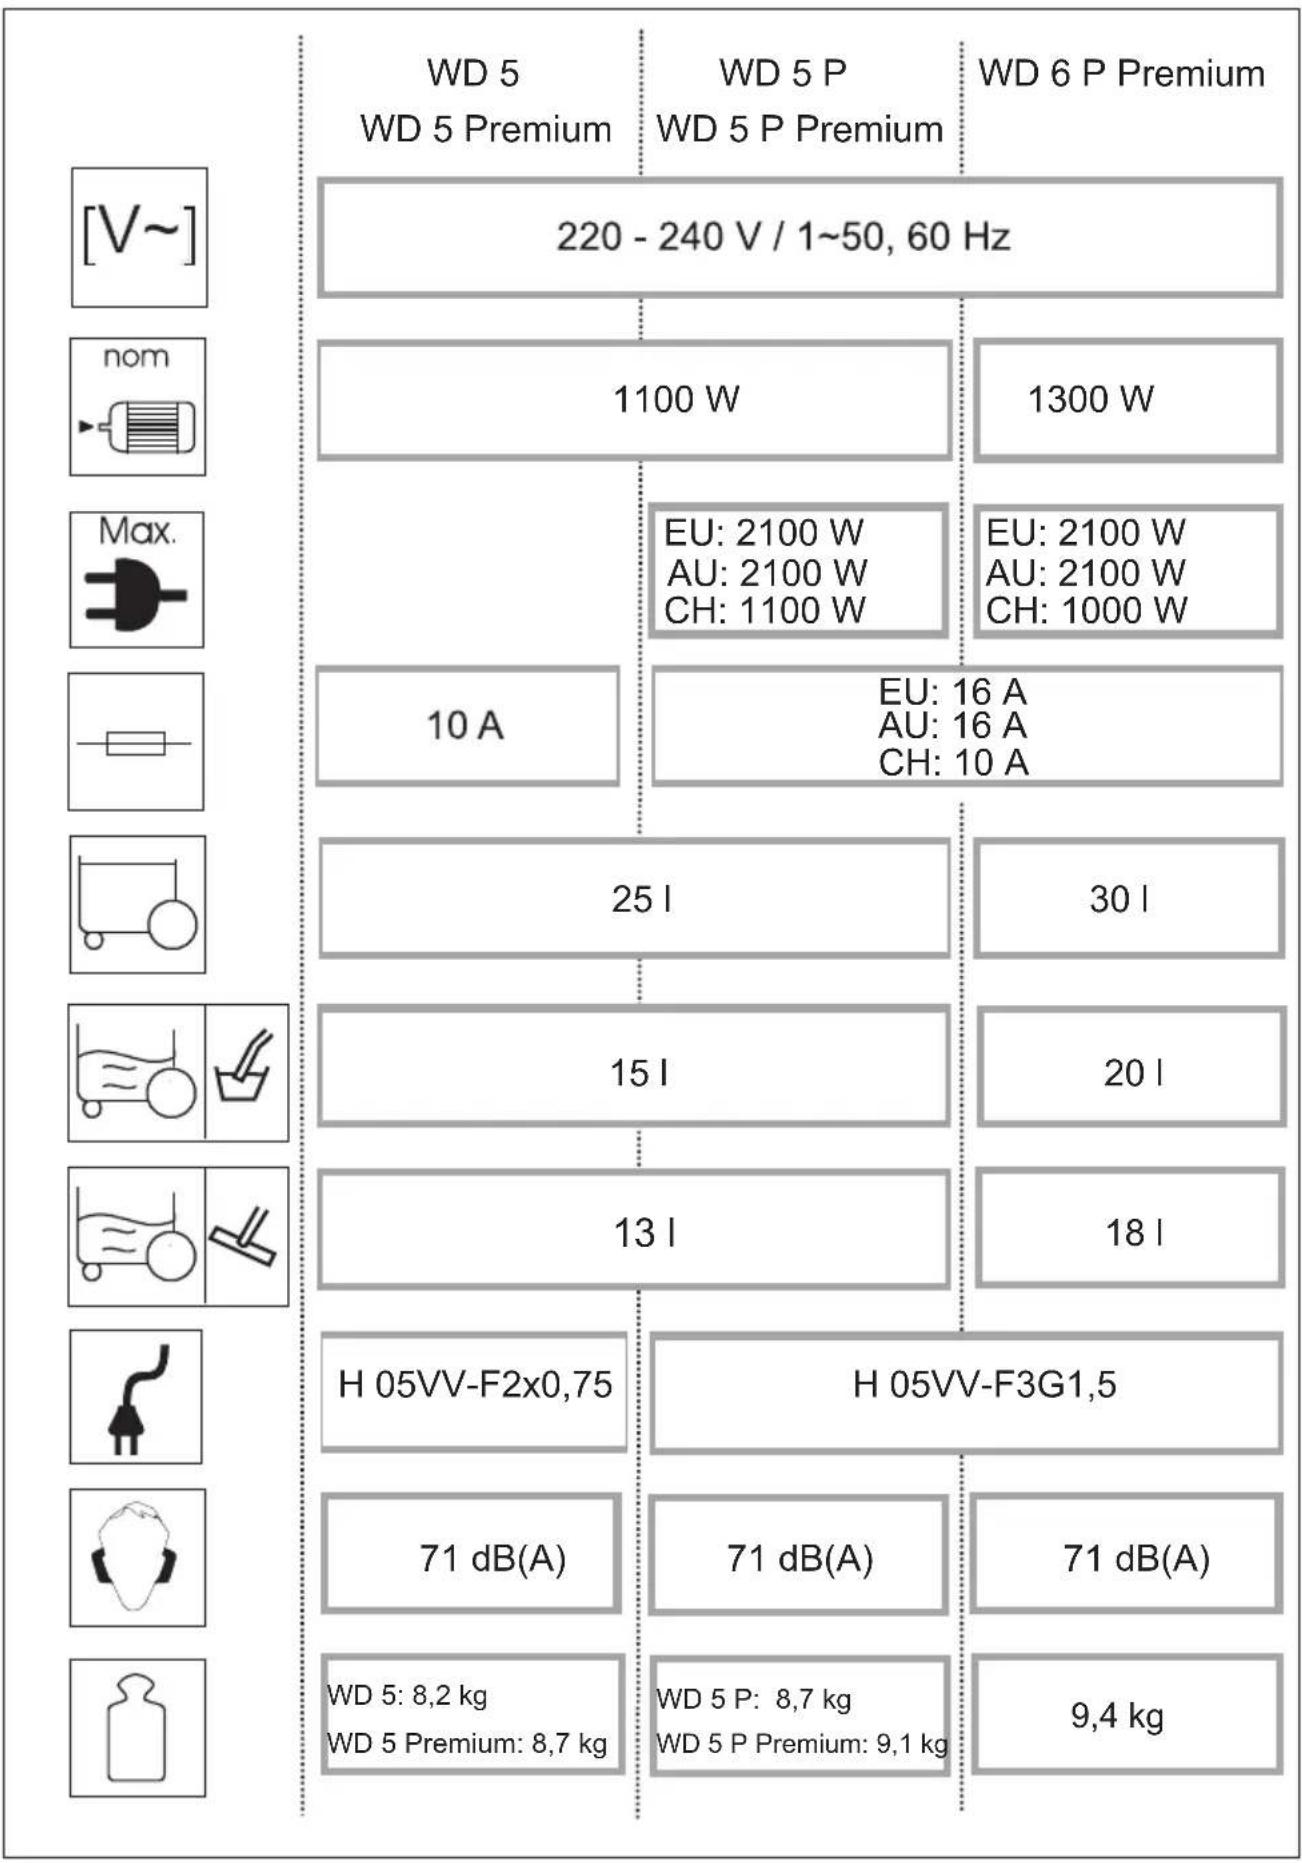
Technical specifications
The specifications are listed on the flaps. In the following, you will find the explanation of the symbols used.

Voltage

Output P_nom

Max. connection output of appliance socket

Mains fuse (slow-blow)

Container capacity
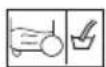
Water intake with handle
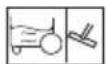
Water intake with floor nozzle

Power cord

Sound pressure level (EN 60704-2-1)

Weight (without accessories)
Subject to technical modifications!
Table des matieres
Consignes generales FR 5
www.kaercher.com/REACH
Garantie
www.kaercher.com/REACH
Garanzia
www.kaercher.com/REACH
Garantía
10 Gancho porta cables
Imagen G2
www.kaercher.com/REACH
Garantia
www.kaercher.com/REACH
Garanti
M Parkeringsposition
Figur F1
www.kaercher.com/REACH
Garanti
2 Hovedbryter (AV/PA)
2 Hovedbryter (AV/PA)
www.kaercher.com/REACH
Garanti
www.kaercher.com/REACH
Eyyuon
www.kaercher.com/REACH
Garanti
Calismayi yarida kesme
Sekil B3
Cihazi kapatin.
Sekil F1
Hnctpykunno npnmeHeHIO KOMNOHEHTOB (REACH)
AkyaIbHbIe CBeHnO KOMNoHEtax npBedeHbI Ha Be6-y3ne no CNeDyUoEmy aDpecy:
www.kaercher.com/REACH
TapaHTnA
B kaxdoi ctpahe DeicbYIO T COOTBeTCTBeHHO rapaHTnHbIe ycNOBnA, n3daHbIe ynoNHOmOeHHo OprAHn3aueHe C6bITA HaWe npOdyKuNN B daHHo CTpaHe. Bo3MOxHbIe HeNCpabHocTn np6opA B TeeyHe rapaHTnHorO cpoKaMbI yCtpaHReM 6ecnNaTHo, ecnn npunHa 3akNoyaeTcB N depeKtAX MaTePnaJIOB nn Own6kax npn N3rOToBJeHN. B Cnyae BO3NKHObeHn npTeH3n B TeeyHne rapaHTnHorO cpoKa npoc6Ba o6paataBcra, Imer npn Ce6e Yek O nOKynke, B ToproByIO opraHn3aUH, npOdaBswyo Bam np6Op INN B 6nJXaWsyO ynoNHOmOeHHyO cnjx6y cepBnCHoro 06cnyKBaHn.
Data BbInycka OTo6paXaETCa Ha 3aBOcko Ta6nueke B 3aKOpOBaHHOM BnDE.
Pn 3TOM OTdEINbHbI UnpbIMeIO TcneDyUoue 3HaueHHe::
Приимер: 30190
3 roB BbInycka
0 CTOnTeBbInycka
1 DecaTnIeTne BbInycka
9 BTOPA CnOpa MeCraa BBInycka
0 nepBaIuPpa MeCya BbInycka
TakIM o6pa3OM, B daHHOM npHMepe KoD 30190
O3Haayet DaTy BbInycka 09/(2)013.
RapaHTn
B kajdoi ctpaHe DeiCTByIOT COOTBeTCTBeHHo rapaHTHbIe ycIOBnA, n3daHHbIe yNOJHMOUeHHo oprAHn3aue He 6bIta HaWe npOdyKcnn B daHHo CTpaHe. Bo3MoXhBiE HeNCpabHOCTn npIBopaB a TeueHne raPapHTHoro CPOKa Mbl YcTpaHREM beCnPaTHo, ecnnpuHa 3akNIOyaeTcB depeKtax MaTepuAIOB nnOn6kax npn N3rOToBJeHN. B cnyae Bo3NKHOBEHn npTeHsBn B TeueHne rapaHTHoro CPOKa npoc6Ba 06paatbcra, Imer npn ce6e Yek O NOKynke, B ToproByo oprAHn3aunO, npodawyBO Bam npio6op INB 6nJxayuO yNoHMOUeHHyO cnjx6y cepBnCHOrO 6cnJxBAHn.
CepBnchna cnyx6a
B cnyuae BO3HKnHOBeHn BOpocOB nnn nonomok HaW
fuiua f npmbi KARCHER nomoxet Bam pa3peunTb
nx.
3aka3 3anaChbix YacTei n CneuaJIbHbIX npHaadJeXHoCTeI
Bb6op Han6oJee qacto Heo6xOaMbIX 3anacte Bbl HauTe B KOHcE INCTpyKcNIO 3KcNpyaTcN. 3aNaChbIe qactn I npHaJdJeXHOCTNu Bbl MoXe TNOy. Yntb y BaWero dInepa nnB fOpnae fnpMbI KARCHER.
Yka3aHnno TeXHnKe 6e3oNaChOCTn
ONACHOCTb
- Ppu6op cneodyem eknouamb mOJIbKO 6 cEmb nepemeHNO-20 moka. HApJxKeHue doJXHo coOmBeemcMBoaMb yKa3aHnMa 63aBODCKoU ma-6IuYke npubopa.
He npukacmbcK cemebou 6uIke u po3emKe MOKpbIMu pyKaMu.
He bimackuambcemeyUo umencelbHyU BuIky nymem noomraueaHua 3a cemebou uHyp.
- Ipeod nauaIom paobmblc npubopom npoepbmt cemebou u uwmencelhnyo buky Ha nopejdeHnra. NopejdeHHbU cemeBOu uHyp doJxhen 6bimb He3amadlmeNbHO 3aMeHen ynoHMOueHHou cnykbou cepBuuchO2O o6cnykuhaHua/cneuaIucmOM-3neKmpukom.
-Bo u36eKaHue HecyaacmHbIX cnyuae8, C8a3aHHbIX C 3JeKmpuueCmBOM, Mbl peKoMeHdyem UcnoJb30BaHue pO3eMOK C npedkIIOUeHHbIM ycmpoUcMbOM 3auumbl om moka nopejdeHnra (MaKC. HOMuHaJIbHa r cuna moka cpaabmbaHua: 30 mA).
- Ppu npoe deenu IIObix pa-bom no yxody u mexHuyeckoMy o6cnykuBaHuo annapam cne dyem bIKIouumb, a ce
me80u uHyp - 6bIHymb u3 po-3emku.
- PemohmHbIe pa6omblu pa6omblc 3JIeKmpuueckmu y3JaMu Mo2ym npou3BODumbCra mOJbKO yNOJHOMOeHHoU cJy60u cepBuuchOzo o6cJy-JxuaHua.
△PENEYINPEKDEHNE
-Данhoe ycmpoicmbo He npedha3naeHOn dIy uCnOJIb- 30BaHua JIOdbMu C O2paHu- ueHHbIMU qu3UueCKUMU, ceHCOPHBIMU Unu YMcmbeh-HbIMU 603MOxHOCmMy, a makke luuc omcymcBueem onbima U/uIu omcymcBue em Heo6xOdBmBX 3HaHu, 3a uCKNIOyeHuem clyuaeB, KO2da OHu HaxOjamc nod Ha3Opom om6emcMbeHHO2O 3a 6e3Opanachocmb luua Unu noIpyaHOM om Hezo yka3aHua IIO npumHeHuO ycmpoicm8a, a maKxe Oco3HaHom bImeKaIoue omCioDa puCKu.
-Донусяся пums HeHue ycmpoUcmea dembmu, do-cmu2wumu 8-JemHezo 603-pacma u HaxodAumucn pod npusmompMnua, omeem-cmbeHNOZO 3a ux 6e30na-CHOCMb, unu noIyUeWUMu UHcmpykuu O npums HeHu uycmpoUcmea om maKo2o lu-ua, a makxe ocO3Haouzumu 6bimekaIoue omCJDA puCKU.
- He pa3pewaume demyM u2pambc ycmpoucmeBOM.
- Cπeðumb 3a mēm, ymoδbɪ deμu He uερaŋu c ycmpoʊ-cmeōm.
- He pa3pewaume demam npo8ooumb ouucmky u o6cnyxuehue ycmpoucma 6e3 npucmompa.
- YnakoBouHyIO pIeHky depJxume nOdaJIbwe om demeu, cyuuecmByem onaChocmb ydyuueHu!
- Ppu6op cneoyem omKIO-yamb nocne kaJdo2o npumeHHeu u nepeo peDeHuemOucMcku/mexHuuecko2o obCnyxUbaHua.
- Onachocmb noxapa. He donyckamb b cacbibaHua 2opyaux unu mneioux npedme-moB.
- Θκπλγamaцу npubopa bo 63рьбоопасны IX 30HaX 3a-npeuaemca.
- Ppu o6pa3o8aHuu neHbI uUu 6bimeKaHuu KudKocMu npu-bOp HadJexum He3aMeDulmeNbHO 6bIKnOuymb uUu omcoedunmb om 3neKmpocemu!
He uclnoIb30aMb yucmuaux nacm, moouux cpeocme dJa cmeKna u yHuBepcalbHbIX MOouux cpeocme! 3aPeeuzaemcra no-ayxambl prubop e body. HekomopbIe veueecmba puc MeueHuU CO BCacbIaEMbIM 6o3dyXOM Mo2ym o6pa306blAamb 83pbIeOONaChbIe napbl Ulu cmecu!
Huko2da He bcacbiamb cneyouue eeuecmba:
- B3pbIbYamblie uJU zoPIOuue 2a3bl, KuOkoMu u nbInb (peakmuBHa nblb)
- Peakmuehaj MemaJIuyeCKaIbIb (HaNPumep, aHOMuHu, Ma2Hu, uHK) bcoeDuHeHUcCunbHbIMU uEJIOyHbIMU U KUCNJOMHbIMU MOHOzUMuCpeOcmbaMu
- Hepa36a6neHHbIe cUJIbHbIe KUCJOMblu u UeJIoU
- OpaHueckue pacm8opu meIu (HaIpuMeP, 6eH3Un, pacm8opumelb, aUcEmoH, Ma3ym).
Kpome mo2o 3mu eeueecmea Mozym pa3beamb uCnoB30- 8aHHbIe e npubope mamepuaJIbl.
CTepeHb onaCHOCTn
ONACHOCTb
Yka3aHue omHocumelbHo He- nocpeDcmbeHNO 2po3aueu onacHocmu, Komopar npuO- dum K mjaKeIbIM yBeybM uU K cmepmu.
△PENyIPEKDEHNE
Yka3aHue omHocumelbHo 603-MOxHOUI nOmeHuaJIbHO ONa-CHOU cumyaauu, Komopar MoKem npubecmu K mJxJIbIM yBeybAm UUN K CMEpmu.
OCTOPOXHO
Yka3aHue Ha nomeHuzaJIbHo OnachyUcmyauu, Komopar MoJem npueecMu KNoIyuHuO Je2Kux mpaM.
BHUMAHNE
Yka3aHue omHocumelbHo 603- MoXHOI NOMeHuaJIbHO ONaCHOU cumyaauu, Komopar MoXem IOBHey MamepuaIbHbIy uep6.
Oncanhe np6opa
№6paXeHnCm. Ha pa3BopOtax!
B daHHo IHCTpyKuIN NO 3KcNpyatauIN npNBedeHO ONICAHne yHnBepcaIbHoro nbIeCoCA, npedctabHeHHoro Ha o6Noke.
Ha nIIOCTpaunx N3O6paXeHa MaKcImaJIbHae OCHACTka yCTpoiCTBa. OChauene H KOJIueCTBO DOIOJIHHTeJIbHbIX INpuHaJNeXHOCTe, BXOJaUNX B 06bem NOCTaBKn, 3aBNCNT OT MOnEny yCTpoiCTBa.
Pn pacnakokBke npnbopa npoBepbTe erO kOMnIeKTHOCTb, a TAKKe erO cENOCTHOCTb. Pn o6hApyKeHnIOBpeXdHn, NOJUyeHHbIX BO BpEmr TpaHCnOpTnpOBKn, CJIeDyET yBeDMNTb TOPROByO opraH3aCnIO, IpOdaBsyIO np6Op.
COepeKHTcBOBbEmnoCTaBKn
O BO3MOXHoe DOONIHHTeNbHOe 6OpyIOBaHne
1 3IeMeHT NOdKJIIOUeHnBcAcbBaHOuCero UHaHa
PcYHOK B1
→ДЯpoDcoEduHHeNBAcBbAIOUeROuHaHraBO Bpempa6oTbI.
2 BbIKHouaTeIb npu6opa (BKn./BbIKn.), (6e3 BCtPoEHHOI po3ETKn)
PcYHOK B3
P03nIa: BcabsBaHne nHaHrHeTaHne Bo3dyxa. P03nIa 0: YcTpoiCTBO BBIKHOeHO.
2 BbIKHouaTeIb npu6opa (BKn./BbIKn.), (co BCtpoeHHo p03eTKoI)
PNCVHOK B3
PtoJoxeHne MAX: BcacbBaHne nnBbIyB.
→ NoloxeHne + MAX: BcacbIbAHne c noKIO-ueHHbIM 3JIeKTpOHnHCTpyMeHTOM
→ PeryIaTOp MoUHocTn: Ipn Heo6xOUMOCtN, npn BCacbIBaHnn nI npn pa6Ote C 3JKeTpnueckmN INHCTpyMeHTAMn CH3NTb MOUHOCTb BCacbIBaHn.
Nolokheno:YcTpoNCTBO BKNIOUeHO.Ha 3JIeK- TPOINHCTpymENT NOdaeTCn HAnpJKeHne.
3 Po3eTka annapapa
Yka3aHHe: YuHTbIBaTb MaKcImaJIbHyIO O6UyIO NOTpe6Iaemyo MOUHOCTb (CM. rnaBy, "TexHnueckne daHNhble").
PncyHOK C2
→ДЯ NOДКЛIOUeHЯ 3JIeKTPoINHCTpyMeHTOB.
4 BbIXoD nIy noIaun Bo3dyxa
PncyHOK E1
→ PnpocoeHNHTB BcabibaOuI IuaHr K NOkNooe HnIO DnI Noaun Bo3dyxa. Tem cambim aKTNBpy- etcra yHKnna npoDyKn.
5 Khonka ounctkn qnlbtpa
PmcyHOK D1
→ ΠЯ OYnCTKN BCTPPOeHHORO NnOcKOrO cKnJaUaTOrO ΦnJIbTpα.
Yka3aHHe He HaxImaTb KONky npn BnaXHom CKNaD- yaTOM qInbTppe.
6 3axBaThbI na3
→ CHaTb roJIOBky yCTpOInCTBa nocIe pa36JNOKIpOBKn B 3axBAthOM n3y.
7 Pyka
PNCVHOK A1
→PyuKa OJHOBpeMeHNO CnyKNT IJIpa36JIOKIpOBKn roJIOBKN yCTpoNCTBa n pe3epByapa. JIpa36JIO-KINPOBKN IONHOCTbO OTKHyTb pyKy Bnepei.
B3aTbC3a roIOBky yCTpoIcTBa n BbITaHyTb ee n3 3axBaTHoro na3a.
8 ΦиьТрОВаьнэяКAcceTaиKHonka pa36no-KnрOBKN
PncyHok H1
PncyHOK H2
→ 4To6blOuHCTnTbΦnIbTp, CneIyET HaKaTb KHONKy pa36NoKIpOBKn, OTKnHyTbΦnIbTpPoBaJbHyIO Kaccety n I3BNeYb ee.
9 MecTo XpaHeHnI npHaNdNexKHOcTei
PmcyHOK G2
MecToIyXpaHEnI npHaJnEJxHocTeI npeHa3-HaYeHO IyXpaHEnI BcAcBIAuOux Tpy6ok N BCacBIAUoix HacaDOK Ha yCTpOInCTBe.
10 KpOuKn dJa Ka6eJr
Pmcvhok G2
→ ΠЯханенcaTeBOrO shHypa.
11 NapkoBoUHoe noLoXeHne
PNCYHOK F1
→ДЯ BBIKIQUeHn HacaKn IЯ NOJa BO BpeM nepepbBa B pa6Ote.
12 HanpaBnaIooi npnK
PNCVHOK A1
NObepHyTb pe3epByap, BCTaBnTb Do ynpa ynpabIyIouIe poNkB OTBepCTna Ha OCHOBAHn pe-3epByapa.
13 CnBna npo6ka
PUCYHOK
G1
BINTCNIBHOROOTBEPCTNCSJyKNTIJIb6bICTpOroUydoBHoroONOPOKHeHnrgra3HOBbI3EMKOCTN.IJNAUYWeroONOPOKHeHnHaKNOHTbEMKOCTB Bnepei.
14 ΦильТpoBaNBbI MeWOK
PmcyHok A2
Yka3aHHe:ДЯчNTKBOBlaXHompeXmHe cneDy-et npImeHrTb MeWOk dIra c6opa nbIN!
15 NnockncknaaTaBtbnHbTp (yxe yctahOBJen B yctpoNCTBO)
BHIMAHHE
Pabomamb 8ce2a moIbKO c ycmaHOeNEHbIM nOckum cknaadyambIM fUbmpOM, KaK npu eIaxHo, maK u npu cyxou y6Opke!
16 BcacbIbAIOUHm IuaHr c coeHNHTeBHBIM 3JIeMeHTOM
PncyHOK B1
BCTaBtB BCAbIBaIOUmI UJHaH B yCTPOIcTBO DO 1KCaUN.
→ДЯи3BleueHnIshnaHra cIeDyET HaaTb naJIb-zaMnHa CTOpOp N BbITaUHTb BCacbIBaOuIshJNaHr.
Yka3aHHe: TaKHe npHaJNeJXHOCTn, KaK, HApIMep, BCacbIBaOuIe NcETKn (OnUra), MOxHO HaDeBaTb HenoCpeDCTBeHHo HA CoEINHHTeBHyBn 3JEMeHT n TaKM O6pa3OM CoEINHHTb CO BCacbIBaOuIM WJaHROM.
Дя KMФбгн pa60ы джсь B ycnoBnx OрраHHeHHOrO npoctpaHCTBa.
Pn Heo6xOIMOCtN CbemHyO pyKy MoXHO pa3Me-aaTb MeKdy npHaIeXHocTMy N BCaCbIBaIOUM WJahrom.
Cm. noJoxKeHne 17.
PekomeHau: Pn y6opKe nona cIeNyET BCTaBntb pyky BO BCacblBaIOuNl IHaHR.
17 Cbemna pyka
PmcyHok B1
CoeHHTb pyKc co BCacbBaIOuM UJnAHROM Do 1Kcaun.
Pmcyhok B4
Yto6bI CHrTb pykCy co BCacbIBaHOe rO JnHaHra CneJyEe T HaxKaTb Ha qNKCaTOP 6oJIbWiIM NaJIbCeM IN NOTAHyTb 3a pykY.
Yka3aHHe: IocJe ChrTn pyuKn pInHaJnxHoCTn TaKxe MoXHO BCTaBJIaTb HeNOCpeIcTBeHHO BO BCaCbIbaHou nI WnaHr.
PekomeHdaun: Pn y6opKe nona cIeNyET BCTaBntb pyky BO BCacblBaIOuNIM IHaHr.
18 BcacbBaiouue Tpy6kn 2x0,5M
PucyHok B1
CoeHnHTb o6e BCacbIbAIOuNe Tpy6Kn n noCoeDHHHTb IN K pyUKe.
19 Hacaikda nona
(cpbyaromnepeknyouHna)
PNCYHOK B1
Iydo6Horo nepeKnueHn c y60pKn cyxOrO Mycopa Ha y60pky BnaKHO rpa3n:
→Дяуборкипonaсухиммycopomнспь3уетсяпоJOKeHHeC BbIDBnHyTbIMN UeTOUHbIMN ПанKa-MN.
→ ⅡIЯ BCaCbBaHnB BoDbl c nona nCnoJb3yETcR no- JIOXKeHHe C BbIDBNHyTbIMn pe3NHOBBIMn KpOMKaMn.
20ΦOpCyHkaДЯЧNTKN WBOBи CTbIKOB
→ IyRIOB,CTbIKOB,paIaNtopoB OToJIeHnI TpydHOIOCTyHbIX NOBepxHOCTeI.
21AanTep
PncyHOK C1
→ Ππa coεπHην BcαbBaIOUeI OιNaHra C 3neK-tpoobopyoDBaHnEM
→ Pπn Heo6xOДIMOCtI npKpeNtB k 3JIeKtpoo60pyDObAHNo aadTep c HOXOM, COOTBeTCTByIOUm DnAmETpy NOkJIHOHeHn.
22 Tn6knn wlnaHr nHcTpymeHaTa
PncyHOK C1
→Дябоьшeweигбкoctn npn pa6oTe c 3JIeKtpOnH-CTpyMeHTOM.
Yka3aHHe: TaKKe MoXHo IcNoIb3OBaTb c aJaantPePOM.
YnpabJIeHne
BHIMAHNE
Pabomambbceeda monbko c ycmaHOeNEHbIM nnockum cknaadyambIM duBmpOM, kaK npu enaXHo, maK u npu cyxou y6opke!
IpeaHaanpa6oTbI
PncyHOK A1
→ ChTb KpbIuKy ycTpoiCTBa, BbIHyTb npHaJNeK-HocTn n3 pe3epByapa.
NObepHyTb pe3epByap, BCTaBnTb do ynpa ynpaBnIyUOuNe poNkN B OTBepCTnHa OCHOBaHn pe-3epByapa.
HaTeB u 3aФнкupOBaTB roJIOBky np6opa.
YcTaHOBnTBdePkaTeNbKpeNneHnIg npHaI- neXHoCTeN C3aDHeCtOPOhB BepxHeYacTn yCTpOncBa.
BbOdB3KcnnyatauHIO
PncyHok B1
→ PtnpocoeHNHTb npnHaNexKHOCTN
PmcyHOK B2
BCTaBbTe WTeNcBHyU BnIky B 3JneKtpop03eKy.
PncyHOK B3
BbIKJIouHTe npu6op.
Cyxayuuctka
BHIMAHNE
Pabomammbonbko c cyxum nlockum cknaqambim pfunbmpom.
Ipepe npumehenuem cneyuem npoeepumb pfunbmp Ha Hanuue noepekdehu u, npu Heobxodumocmu, 3aMeHumb.
PncyHok A2
→ДЯ BCacbBaHnCyXoIpy3n Ipn Heo6xOIMOCrMOKeT DOONJHITeJIbHO IpIMeHrTbcФЛb-TOBaJIbHbMI MeJOK.
BHIMAHHE
Ouucmky fumbmpa kJIOyamb moIbKO npu cHramOM fumbmpoBaBHom Mewke, uHaue OH MOXem 6bIMb noepexkden.
Yka3aHnO THOCTeNbHO pNbTpPoBaJbHoro Meuka
-CTeHb 3aNoJIHeHnI NbIeC6OpHOro MeuKa 3aBnCHT OT BCacbIbAeMoR rpy3N.
- Pn MeIkoN nbIIN, nceKe NTd. nbIne6bOpHbI MeWOK Heo6xOJNO MeHrTb Yaue.
- YcTaHOBJIeHHbI MeWOk IJRA C6Opa NblIM MOKeT JIOHHTb, NO3ToMy erO CNeDyET CBOEBpeMeHHo 3a-MeHNr!
BHIMAHHE
BcacbbaHue xonodhozo neHna ocuyecmernb monbko npumehuem npedapumelbhozo omcekamena. Homep nla 3aka3a, 6a0BOe nCnONHeHne: 2.863-139.0, npemym-nCnONHeHne: 2.863-161.0.
UcTka BO BJaXHOM pexnme
BHIMAHHE
He ucnolb3o8amb Hukakozo nbinec6ophoz0 Meuka!
Yka3aHHe: npn noJIHOM pe3epByape BCacbIbAHOUe eOTBepCTne 3aKpbIbAEtCnONJIaBkOM, a yCTPONCTBO HauHHaET pa6oTaTb C NOBbIeHHbIM YNCmO6OpOTOB.
YcTpoIcTBO CneIyET He3aMeIITeIbHO BblKnHouHTb N OOnOpOXHnTb pe3epByap.
→ Pn BCacbBaHn Bnarn Co6nIpaTb npaBnHoe nOIOKeHne HacaIKn DnI pNlA nPnCOeINHrTb COOTBeTCTByUOuNe PnHaDJIeXHOCTn.
Pa6oTa c 3JekTpnuecknMn nHCTpyMeHTaMn
→ Ππν Heo6xOДIMOCSTn npKpeNtB K 3JIeKtpo060pyDObAHIO aAnTep C HoxOM, COOTBeTCTByIoumДиamEtpy NOkIIuOHeHЯ.
PucyHOK C1
A)HaTeb Ha pyuKy BCacbIbAIOUeTo ⅢaHra HaxoDЯшИСВ KOMПЛeKTe aDAITep N COeINHTb C MeCTOM NOdKJIIOUeHnE 3JIeKTPoINHCTpyMeHTa.
6)Дябьшeигбкoctn nppa60te nCnoJb3oBabTb wnaHnHCTpymEnTa. CoeDHHt b erO co BcaCbBaIOUIM WnaHrom n, npH Heo6xOuMOCtN, c aanTePOM, a 3aTeM NOkHouHTb 3JIeKtpOHCTpyMeHT.
PncyHOK C2
→ДЯустpoиCTB CO BCTpoEHHNo po3eTKoN:
BctaBntb ceTeByIO BUNIky 3JIeKtpnueckoro INHCTpyMeHTA B NblNEcOC.
PncyHOK C3
-BKIOHHTb np6Op (NOBOPOTbI BbIKIOUaTeJIb BNeBO B noIOKeHne +MAKC.) nHaATb pa6Ory.
Yka3aHHe: Iocne BKnIOUeHn 3JIeKTPoINHCTpyMeHTa BCacbIBaIOUaT py6bHa 3anyCKaETc C0,5-CEkyHNHO 3aIepKKo. Pn BbIKIOUeHn 3JIeKTPoINHCTpyMeHTa BCacbIBaIOUaT py6bHa npOdoJXaET pa60TaTb NO INHePcUN eue npIMepHo 5 ckyHd, YTO6bI BCocatb OCTaTK MyCopa n3 shnaHra.
BcTpoHHa cHCTema ouHCTKn 1JIbTpA
CnCTema Ounctkn fNJIbTpna npeDycmOTpeHa dIa NcNoIb3OBAHn yCTpoINCTBa B yCNOBnX, KOrDa BCacbIBaEeTcra 6oNbJIOe KOINueCTBO MeNKODnCnepCHOI bIIn 6e3 fNJIbTpOBaHnHO MeuKa.
Yka3aHHe: C NOMOuBcNCTeMbI OUNCTKn QnNbTp aMOKHO HaxKaTneM KHONK OUNCNTb 3aRpa3HeHHbI QnNbTp n BOCCTaHOBntb MOUHOCTb BCacBHaHna.
PncyHOK D1
BCTaBnTb pyKy BCacbIbAIOJero ⅢJHaRa B KpEnJIeHHe IJr npHaADNeKHOCTeB B BepXHe YAcTn yCTpoiCTBa.HaxaTb 3 pa3a KONky OCHCTKnΦnblTp a npn BKNIOeHHOM yCTpoiCTBe C INHTepBaJOM B 4 ceKyHDbI.
Yka3aHne: PocJIe MHOROKpAthoro npIMHeHnKHOJKN OuNCTKn QIJIbTpca CneDyET npOBeprTb yPOBHeh 3aONHeHn pe3epByapa dna Mycopa. IHaue pIn oTKpbITn pe3epByapa MOKeT npOn3oHTN BbITEKaHne rpa3n.
Функциюдун Bo3dyxa
OuNTKa TpydHODOctyHBIX MeCT NIN MeCT, rDe BCacblBaHne He BO3MOKHO, HApnMpE, ydaJIeHHe JNCTbeB n3 rpaBna.
PcCyHOK E1
→ PnpncoeHNHTb BCacbibaOuHn WJHaH K NOdKnOueHnIO DnI Noaun Bo3dyxa. Tem cambl aKtNBpy-etcra yHKnna npoDyBkn.
IpepepbB B pa6oTe
PmcyHOK B3
BbIKJIouHTe npu6op.
PncyHOK F1
YCTaHOBbTb HacaKy dIy IOna B NapKOBOUHoe NOJIOXKeHne.
OkoHuaHne pa6oTbI
BbIKIIOHTb np6Op IN BbITaUNTb cTeByHO BNKy.
OnopoxHntb pe3epByap
PncyHOK G1
→ CHaTb roJIOBky yCTpoNCTBa, onOpOxHnTb pe3epByap C BnaXHo nIu cyXoI rpa3bIo.
B yctpoicTBax c npo6ko CJnBHorO OTBepCTna: YdaIHTb cyxuI rpa3b n3 pe3epByapa.ДЯуdaneHnJxNkOCTe NcNoJIb3OBaTb npo6ky CnIB-Horo OTBepCTna.
XpaHHeHne yctpoNCTBa
PNCVHOK G2
→ CLOXKntb Ka6eNb NITaHnO rT 3JIeKTPoCeTN n npuHaIeXHOCTN Ha yCTpoiCTBe. XpaHtB yCTpOoiCTBO B cyxnx NOMeueHnX.
Yxod n TeXnueckoe 06cnyxmbaHne
www.kaercher.com/REACH
Garancia
www.kaercher.com/REACH
Záruka
www.kaercher.com/REACH
Garancija
www.kaercher.com/REACH
Gwarancja
Mult stimate client,

www.kaercher.com/REACH
Conditi de garantie
Pokyny k zlozeniu (REACH)
Aktualse informáce o zloženi najdete na:
www.kaercher.com/REACH
Záruka
www.kaercher.com/REACH
Jamstvo
www.kaercher.com/REACH
Garancija
U svakoj zemlji vaze uslovi garancije koje je objavila naša prodajna sluzba. U garantnom roku besplatno otklanjamo sve smetnje na uredaju ako se radi o gresci materijala ili proizvodnim manama. U slučaju ostvarivanja garantnih prava obratite se svom prodavcu ili ovlascenoj servisnoj sluzbi; prilozite pribor i originalni račun.
Servisna sluzba
www.kaercher.com/REACH
TapaHcIa
BbB BcKa cTpaHa ca BaIuIiHn I3JaDeHIne YcIIOBn 3a rapaHcN aO CTpaHa Ha Haue OToPi3NuPAHO dpyKeCTBO 3a pa3npoctpaHenHe Ha npoDyKTnTe H. EBeHTyaIIH NOBpeDN bypeDa B pAMKte Ha cPoka Ha rapaHcNraTa ce oTcpanBaT 6e3JIaTHO, aKO npuHnHa 3a TEx e B MaTePnAna nPi npuPOn3BOcTBOTo. B cTyuaH Ha n3- NOJ3BaHe Ha npabOTO Ha rapaHcNca Ce o6pbUaAte, MoJr, KbM BaWnra TBpRoBeu nn Hau-N6nn3Knry OTOpN3nP an cepBn3, KaTo npedctabnte 60pydBaHeto n DokyMeHTa 3a NOKynka.
Cnyk6a 3a pa6ota c KnneHTN
PnBbnpocn n nobpei Baunr dnctpuytop Ha KARCHER ue Bn nomorhe c ydoBOJCTBne.
IopbUka Ha pe3epBHN uactn i cneuaJIHn npHaJNeXHOCTN
CnncbKaHa Haa Hae CheTo Heo6xOuMnte pe3epBn qactn 1ue Hamepnte B Kpa Ha ynbTbaHTo 3a EKcnIooataun. Pe3epBn qactn n npnaadJeXHOCTn ce noJyUte OT Baunr TbproBeu nn BBb fnnnaJaHa KARCHER.
Yka3aHnna 3a6e30nacHoCT
ONACHOCT
- Cépb3baûme ypeda camo KbM npomehnue mok. Happe-JeHuemo mpr6ea da cbom-Beemcmea Ha umupaHomo Ebypx ma6ekama Ha ypeda HappeKeHue.
- Hukozha He dookocbaume KOHmakma u uencela c enaXnUpbue.
- Ucenlume da He ce u3aX-k-dam nocpeodcmbom u3obpnaHe Ha npucbeduhumeJIHHua Ka6eI om KOHmakma.
-
Празу всяко сбьрзване на кабела с конмама на лесимрозхсановемо, празераяше кабела за празrodu. He3abahno праздаме праз dedehume сбьрз-baшикама за празллллллллллллллллллллллллллллллллллллллллллллллллллллллллллллллллллллллллллллллллллл.
-празу всяко сбьрзване на
-празу всяко сбьрзване на
-празу всяко сбьрзванe
-празу всяко сбьрзванe
-празу всяко сбьрзванe
-празу всяко сбьрзванe
-празу всяко сбьрзванe
-празу всяко сбьрзванe
-празу всяко сбьрзventa
-празу всяко сбьрзventa
-празу всяко сбьрзventa
-празу всяко сбьрзventa
-празу всяко сбьрзventa
-празу всяко сбьрзventa
-празу всяко сбьрзventa
-празу в限度
-празу в限度
-празу в限度
-празу в限度
-празу в限度
-празу в限度
-празу в限度
-празу в限度
-празу в限度
-празу в限度
-празу в限度
-празу в限度
-празу в限度
-празу в限度
-празу в限度
-
-празу в限度
-празу в限度
-празу в限度
-празу в限度
-празу в限度
-празу в限度
-празу в限度
-празу в限度
-празу в限度
-празу в限度
-празу в限度
-празу в限度
-празу в限度
-празу в限度
-нфыгчы
-нфыгчы
-нфыгчы
-нфыгчы
-нфыгчы
-нфыгчы
-нфыгчы
-нфыгчы
-нфыгчы
-нфыгчы
-нфыгчы
-нфыгчы
-нфыгчы
-н发改委
-н发改委
-н发改委
-н发改委
-н发改委
-н发改委
-н发改委
-н发改委
-н发改委
-н发改委
-н发改委
-н发改委
-н发改委
-н发改委
-н发改委
-н发改委
-н发改委
-н发改委
-н发改委
-н发改委
-н发改委
-н发改委
-н发改委
-н发改委
-н发改委
-н改革委
-н改革委
-н改革委
-н改革委
-н改革委
-н改革委
-н改革委
-н改革委
-н改革委
-н改革委
-н改革委
-н改革委
-н改革委
-н改革委
-н改革委
-н改革委
-н改革委
-н改革委
-н改革委
-н改革委
-н改革委
-н改革委
-н改革委
-н改革委
-н改革委
-н发改委
-н发改委
-н发改委
-н发改委
-н发改委
-н发改委
-н发改委
-н发改委
-н发改委
-н发改委
-н发改委
-н发改委
-н发改委
-н发改委
-н发改委
-н发改委
-н发改委
-н发改委
-н发改委
-н发改委
-н发改委
-н发改委
-н发改委
-н发改委
-н国资委
-
-
-
-
-
-
-
-
-
-
-
-
-
-
-
-
-
-
-
-
-
-
-
-
-
-
-
-
-
-
-
-
-
-
-
-
-
-
-
-
-
-
-
-
-
-
-
-
-
-
-
-
-
-
-
-
-
-
-
-
-
-
-
-
-
-
-
-
-
-
-
-
-
-
-
-
-
-
-
-
-
-
-
-
-
-
-
-
-
-
-
-
-
.
.
.
.
.
.
.
.
.
.
.
.
.
.
.
.
.
.
.
.
.
.
.
.
.
.
.
.
.
.
.
.
.
.
.
.
.
.
.
.
.
.
.
.
.
.
.
.
.
.
.
.
.
.
.
.
.
.
.
.
.
.
.
.
.
.
.
.
.
.
.
.
.
.
.
.
.
.
.
?
;
/
+
;
+
;
?
?
;
?
;
?
;
?
;
?
;
?
;
?
;
?
;
?
;
?
;
?
;
?
;
?
;
?
;
?
;
?
;
?
;
?
;
?
;
?
;
?
;
?
;
?
;
?
;
?
;
?
;
?
;
?
;
?
;
?
;
?
;
?
;
?
;
?
;
?
;
?
;
?
;
?
;
;
;
;
;
;
;
;
;
;
;
;
;
;
;
;
;
;
;
;
;
;
;
;
;
;
.
;
.
;
.
;
.
;
.
;
.
;
.
;
.
;
.
;
.
;
.
;
.
{
...
}
;
.
=
...
=
...
=
...
=
...
=
...
=
...
=
...
=
...
=
...
=
...
= ...
= ...
= ...
= ...
= ...
= ...
= ...
= ...
= ...
= ...
= ...
= ...
= ...
= ...
= ...
= ...
= ...
= ...
= ...
= ...
= ...
= ...
= ...
= ...
= ...
= ...
= ...
= ...
= ...
= ...
= ...
= ...
= ...
= ...
= ...
= ...
= ...
= ...
= ...
= ...
= ...
= ...
= ...
= ...
= ...
= ...
= ...
= ...
= ...
= ...
= ... = ... = ... = ... = ... = ... = ... = ... = ... = ... = ... = ... = ... = ... = ... = ... = ... = ... = ... = ... = ... = ... = ... = ... = ... = ... = ... = ... = ... = ... = ... = ... = ... = ... = ... = ... = ... = ... = ... = ... = ... = ... = ... = ... = ... = ... = ... = ... = ... = ... = ...
= ...
= ...
= ...
= ...
= ...
= ...
= ...
= ...
= ...
= ...
= ...
= ...
= ...
= ...
= ...
= ...
= ...
= ...
= ...
= ...
= ...
= ...
= ...
= ...
= ...
= ...
= ...
= ...
= ...
= ...
= ...
= ...
= ...
= ...
= ...
= ...
= ...
= ...
= ...
= ...
= ...
=
=
=
=
=
=
=
=
=
=
=
=
=
=
=
=
=
=
=
=
=
=
=
=
=
=
=
=
=
=
=
=
=
=
=
=
=
=
=
=
=
=
=
=
=
=
=
=
=
=
=
=
=
=
=
=
=
=
=
=
=
=
=
=
=
=
=
=
=
=
=
=
=
=
=
=
=
=
=
=
=
=
=
=
=
=
=
=
=
=
=
=
=
=
=
=
=
=
=
=
=
=
=
=
=
=
=
=
=
=
=
=
=
=
=
=
=
=
=
=
=
=
=
=
=
=
=
=
=
=
=
=
=
=
> 0 0 0 0 0 0 0 0 0 0 0 0 0 0 0 0 0 0 0 0 0 0 0 0 0 0 0 0 0 0 0 0 0 0 0 0 0 0 0 0 0 0 0 0 0 0 0 0 0 0 1 1 1 1 1 1 1 1 1 1 1 1 1 1 1 1 1 1 1 1 1 1 1 1 1 1 1 1 1 1 1 1 1 1 1 1 1 1 1 1 1 1 1 1 1 1 1 1 1 1 256789678967896789678967896789678967896789678967896789678967896789678967896789678967896789678967896789678
-
3a da u36e2heme a8apuu c moka, Bu npenopbyeame da u3no138ame KOHmaKmu, npedu koumo e MOhmupan npedna3umei (MaKcumalho 30 mA homunaHa cuna Ha moka 3a 3adeucmbaHe).
- Ppedu 6craKaeu pa6omu no n0o0dpbXkama ypeobm da ce u3KnIOU8a u uenCeIb m da ce u3BaJda om KOHmaKma.
- Pemohmhu pa6omu u pa6omu no eJekmpuueckume eJemeHmu Mo2am da ce u3-8bpu8am camo om omopu3upaH cep6u3.
△PPEyIPEKDEHNE
To3u ypeD He e npedHa3Ha-uen 3a moBa, da 6bde u3-no13BaH om luua c o2paHu-yeHu qu3uuecku, ceH3OpHu uyMcmBeHu cnocobocmu u lunca Ha onum u/uIu Lunca Ha no3HaHua, ocEen aKO me ca nod had3opa Ha om2oBa-paio 3a maxhama be3oNa-c-Hocm luue uLU ca noIyuUu om He2o UHcmpkyuu, ka Ka u3no136am ypeDa.
-Позболно e deua da u3-ползбam урета,camo akocа hab8 zoduushu u akocanod hab3opa ha luue,koemo ce ьраху 3a mIxHama 6e3oNaC-Hocm unu ca noIyUu om He2O uHcmpykuuu 3a u3noJ3-6aHemo Ha ypeDa u noIyuaBauzume ce onacHocmu u ca 2u pa36paJU.
- Deuama He bua da upaam cypea.
- Deuama mpa6ba da 6bda m noa ha3op, 3a da ce 2apaHmupa, ye Hma da upaam c ypeda.
-Поусмьанemo u noodopbЖ-kama om cmpaHa Ha nompe-6umela He 6uBa da ce u3-6bpwam om deua 6e3 NaD-30p.
-Дрьжme onakobvHomoФoJluo daJeue om deua,cb-UeemByBa onacHocm om 3a-dywaabaHe!
- Ypeobm da ce u3KnIOU8a cneo 0craKO u3noJ3BaHe uu npedu 0craKO noUcmeaHe/ noOdpbXka.
- Onachocm om noxap. He 3acmykaume oopu unu mnee u npedmemu.
- 3a6paHa e pa6omama b6e3pu80OnacHu nOmeueHua.
-Ako ce obpa3yba nHa uIu u3muya meyHocm, u3KJIIOye me ypeda bEdha2a uIu u3Ba- deme uenceeta!
He u3noJ3BaUme abpa3ueHu cpeOcM6a, npenapamu 3a noUcM6aHe Ha cMbKnlo uIu yHueepCanHu noUcM6auu npenapamu! Hukoza He no-maPnIme ypeDa bBbOda. Ppu 3aBuxpHe C b3dyxa 3a 6CMyKbaHe onpeDeIeHu beUe-cm6a Mozam da o6pa3yBam ekCnNo3u8Hu napu unu cmecu! Hukoza He u3cMyKbaUme cneD-Hume beUeecMa:
-
Ekncno3u6Hu uUu 2Opumu 2a308e, meuHocmu u npaxoBe (peakmu6Hu npaxoBe)
-
Peakmuhme Memannu npaxo8u (Ha np. anmuH u, Ma2He3u, uHK) bB ePb3ka Cbc cUH0 aKmu8Hu u Kucenu noucmeau npenapamu
- Hepa3peDeHu cuHnHu KucenHu u OCHO6u
- op2aHuHu pa3mboOpumeLu (Ha np. 6eH3uH, pa3peDumeLu 3a 6ou, auemoH, Hafma). OceH moBa me3u veuecmeMaOzam da noBpeJam MamepuAunme, u3noJ3BaHn npu u3paBomkama Ha ypeDa.
CTepeHn Ha onaCHOCT
ONACHOCT
Yka3aHue 3a HenocpeDcmeHo 2po3ra oNaChocm, Koamo 6odu do mekku melechu HapaHraHua uIu do cMbpm.
△PENEYNPEXKDEHNE
Yka3aHue 3a 6b3MOxHa onaHa cumyaun, KoMo MoKe da do-oeDe do mexku meJeCHu HapaHraHua Upu Do Cmbpm.
△ПЕДПАЗЛМBOCT
Yka3aHue 3a 6b3MoXHa ONaCHa cumyaucu, KoJmo MoKe da doBeede do Jeku HapaHraHua. BHIMAHNE
Yka3aHue 3a 6b3MoJHa onacHa cumyaucu, kOmo MoKe da doBeDe do MamepuanHu uemu.
OnncaHne Ha ypeDa
BuxTe cxemnte Ha cTpaHnte Ha otBaprHe!
ToBa yntbAhe 3a pa6oTa onncBa NocOeHnte Ha npEHaTAto 6JIOKka MHOrOcYHKUHOHaHN npaxOCMyKaKn.
■ФигурптЕ nOKa3BaT MaKcIMaHTo O obOpyДbaHe, cNopeД moDEna Ima pa3IINK B obOpyДbaHTo NdoCTaBeHHTe npHaDnEKNHOCTn.
Pn pa3oNaKOBaHe npOBepTe daN B onaKOBkata nnncBAT npHaJnxKHOCTOn OT OKOMNKeKTOBkTa nIIMa NOBpeHEn eJeMeHTn. Pn NOBpeN npu TpaHCnopTa yBeDoMeTe TbproBeua,OT KORTo Cte 3aKynnnypeDa.
BKNHueh BOeMa Ha DOCTaBA
Bb3MOKHa pINHaIeXHOCT
Bpb3ka 3a BcMykaTeHnmaKky
B1
3a Cbbp3BaHe Ha Mapkyu 3a 3acMyKBaHe npn n3-CMyKBaHe.
KlouHa ypea(BkIIOUbaHe/Im3KIOUbaHe) (6e3 Brpaedn KOHTAKT)
ФИтура B3
NoloxeHne I: IV3cMyKbaHe nnnn 3dYxBaHe. NoloxeHne O: YpeBt e n3KnIoueH.
KlouHa ypea(BkIIOUbaHe/M3KIOUbaHe) (cBrtpaedn KOHTAKT)
ФИТРа B3
Пложжени MAX:Изсмуквае Илии Издунхвае.
→ NoloxeHne + MAX: IV3cMyKBaHe C BKNIOueH eJIeKTPnueCKN INHCTpyMeHT
PeryInpaHe Ha MoUHocTtA: HamaTe npn Huykda MOUHOCCTTa npn 13CMyKBaHe, n3dyXbaHe nnn npn pa6Ota c eJeKtpuueckn IHcTpymeHT.
NoloxeHne 0: YpeIbTe e n3KnIoueH. EneKtpuCeCKnT INHCTpyMeHT e 3axpaHeH c HappeKeHne.
3 KoHTaKT Ha ypeDa
Yka3aHHe: CnAsBaIte MaKcImaJIHaTa npCbeHNHTeJIHa MoUHOCT (BIX rnaBa ,TexHueeCKn daHHN"
Фигура C2
3a Cbbp3BaHe Ha eIeKtpnueckn HhCtpyMeHT.
4 Bpb3ka 3a n3dYBaHe
Фигра E1
NocTaBeTe CMyKaTeHnH MaPkyu B OTBopa 3a n3-DyXBaHe, Taka yHKunra Ta Ha n3DyXbaHe e aKTNbPaHa.
5 ByToH 3a NOuHcTbAHe Ha fHNTbpa
Фигура D1
3a nouchBaHe Ha BrpaedHn pntb.
Yka3aHHe:He 3aJeIcTBaIe 6yToHa npM MOKbp IIO CbKΦNITbP.
6
Ydbnbocyehne3aXbuahe
→ Cπeπde6nokupahe xbaheTe rnaBaTa Ha ypeDa 3a ydb6ooyehneTo 3a Xbaaane HЯ cBaane.
7Дрьхka
Фигура A1
Dpbkkata cnkyn eHNOBpeMeHHo 3a 6IOKupaHe Ha rnaBaTa Ha ypeHa n Ha pe3epBoapa. 3a ne6IOKupaHe Ha dpbkkata ra KaHIOHete HAnbHHO Hanpei, DOkato ce ocBO6OOn 6IOKupaHTo.
XbaHETeIaBaTaHa ypeDa 3a yDbIbOChHeTo 3a XBaUaHe I a CbaTe.
8 Φиntpupa kaceTa n De6nokpauch 6yToH
H1
H2
3a nouCTBaHe Ha qnntbpa HATNCHE Te de6IOKnpaun 6yToH, HAKIOHETe qnntpnpaunaTa Kacetau nraCbaTe.
9 MraTo 3a cBxpaHHeHcBp3BaHe Ha npHaJnEeXHOCTHTe OT OKOMJIeKTOBKata
Фигура G2
MrcTOTO 3a cbxpaHeHne Ha npHaJnEeKHOCTNe IO3BOJRA CbXpaHeHneTO Ha BCMyKaTeJHHTe Tpb-6n n CmyKaTeJHHTe DIO3n Ha camn ypeI.
10 Kyka ha ka6ena
Φnypa G2
3a cbxpaHeHnHaMpexkoBn3axpaHbaKabEJ.
103nua 3a npKaPaHe
F1
3a cBaIaHHe Ha noObTa IIO3a npn npeKbcBaHe Ha pa6ota.
12 Bodeua poIka
Фигра A1
3aBbTepe3epBoapa,BoeIuTeKoIena npTtChHe TBOpHTHaNoJaHa pe3epBoapa Do ynop.
13 N3nyckaTeHa npo6ka
Фигура G1
I3nyckateHnata np6ka cnkyk 3a 6bp3o u ydo6- Ho n3npa3BaHe Ha Mpbchata Boda B pe3epBoapa. 3a no-do6po n3npa3BaHe o6bphete pe3epBoapa Hanpei.
14 ΦИNTbРHa TOp6nUka
Фигура A2
Yka3aHHe: 3a MOKpo N3cMyKBaHe He 6nBa da ce nocTaBraΦnTbPHa Top6uKa!
BHIMAHHE
→ PtntncHeTe BCMyKaTeJIHnMa MapKyu B n3BOda Haypeda,ToI ce qnknpa.
3a cbaJnHe HATUCHe Te KcTOpa C naleu N 3-TeJIeTe BCMyKaTeHnMa MapKyu.
15
Pnocbk qntbtp
(Beue e nocTaBeHa B ypeHa)
Pabomeme buha zu c nocehenu nnocbk fumtb, KaKmo npu mokpo, maKa u npu cyxo u3cMykeahe!
16
BcmykaTeIeH Mapky cbc cBbp3BaueJeMeHT
B1
Yka3aHHe: PnHaJNeXHoCTNte, KaTo Happ. BcMyKaTeJIHN YETKN (OIIUN) MORAT Da 6bDat NocTaBeHN DInpeKTHo Ha CBbp3BaUIN eIeMeHT IN CBbp3AHN NO TO3N NaHn C BcMyKaTeJIHHa Mapkyu.
3a ydo6ha pa6oTa n B TeCHn NOMeueHna.
Pn Heo6xOIMOCCT CbAJIaUaTa Ce dpBxKka MoKe Da 6bJe NoCTaBeHa MeJy PnHaIeXHocHTne N BCMyKaTeJIHnMaPky.
BnKTe nO3nna 17.
Ppenopka:3a n3cmykbaHe Ha noJa nocTaBeTe npbkkata Ha BCMykATEHnMa Mapky.
17 Cbannaa ce npbxxka
B1
→ CbpxkTe dpBxKata C BCMyKaTeJHnA Mapky,do-KaTO ce qnkupa.
ФиграВ4
3a cBaJIaHe Ha npbXkKaTa OT BCMyKaTeJIHnA MapKyu HATNCHE Te pIKCaTopa C naneu nN3TeTne DpBXkKaTa.
Yka3aHHe: IocpeIcTBOM CBAJIaHE Ha npbXkKaTa npn-HaJIeXHOCTnte MoRaT Da 6bDaT NoCTaBeHn N DInpeKTHO HA BCMyKATEJHmR MapKyU.
Ppenopka:3a n3cmykbaHe Ha noDa nocTaBeTe Dpbkkata Ha BCMykATEHnMa Mapky.
18 BcmykaTeHn Tp6n 2x0,5M
B1
NocTaBeTe DBeTe BCMyKaTeHn TpB6n eHa B Dpyra n CbBpKteC dpbKkata.
19 NpOoBaI03a
(cIIOCT3a npEeBknHouBaHe)
B1
3a yno6n npebknHouBaHe MeKny cyxa n MOKpa 3auuTa:
3a n3cmykbaHe Ha noJa ot cyxa Mpbcotn, n3- nON3BaIte NONOKeHne C n3HeceHN HBNC CYeTKN.
3a n3cMykBaHe Ha noJa OT BOba, n3nO3BaIe no- loKeHHe C n3HeceHN rMeHN paackn.
20 103a 3a NOOHTBaHe Ha yu
3a pb6oBe, fyu, paiaTOpu n Tpydno IOcTbHn MeCTa.
21Aaantrep
Φnrgpa C1
3a Cbbp3BaHe Ha Mapkyu 3a 3acMyKBaHe c eJeK-tpnueckn HhctpyMeHT.
→ Ptn Huyka npurodeTe aanTopa c HOK KbM dnaMeTbpa Ha Cbbp3BaHe Ha eJeKTpuyeckn INHCTpy-MEHT.
22 TbBkab Mapky 3a HNCTpyMeHTn
Φnrgypa C1
3a noBueye TBbKaBOcT npu pa6Ota c eNeKtpnueckn HhCTpyMeHTN.
Yka3aHHe: MoKe Da ce n3noJ3Ba u c aJaTOp.
06cnyXbaHe
BHIMAHHE
Pa6omeme buhau c noceHua nnocbK pfunmbp, KaKmo npu MOKpo, maka u npu cyxo u3cMyKaHaHe!
Ipei nyckahe B ekcnloaTaun
ФИгура A1
→ Cbaine rnaBata Ha ypea, n3BaTe cblbpka-HneTo OT pe3epBoapa.
3abptete pe3epboapa, BOeunite KOJena npTnCHte B OTBOpnte Ha noa Ha pe3epboapa do ynop.
IocTaBete n 6nokpaIte rnaBaTHa ypeDa.
3akonuayte Hocaya 3a MxctOTo 3a cbxpaHHe Ha 3aHaTa CtpaHa Ha rnaBata Ha ypeda.
Pa6omeme cmo cbc cyx nocbK qunmbp.
Ipedu u3noJ3eAne npoepeme fummbpa 3a yepk-danu u npu Heobxodumocm 20 cmeHeme.
ФИтура A2
3a n3cMykBaHe Ha cyxa Mpbcotn npn Hxka doTbJIHHTeJIHO MOKe Da ce NoCTaBn FmTTbpHa TOp6uKa.
BHIMAHNE
3adeumbeume noucmeaHemo Ha fummbpa cmo 6e3 nocmaeeha fummbpHa mop6uka, mbu kamo e npomuehen cnuyau fummbpHama mop6uka moke da 6bde nopeedeHa.
Yka3aHnHnΦnITbPHaTOp6nUka
- CteneHTa Ha nblHeHa hIITbphata Top6nUka e 3aBcIMMa OT MpbCOTnTa, KOrTO Ce N3CMyKBa.
- PnH npax, nCbK nT.H. ... nIITbphata Top-6uKa Tp8Ba Da ce CMeHr no-yecTo.
IocTaBeHInTe DoNbJInHeJIHO fNITbPnTOp6uKmMoraT Da Ce cnyKaT, nopadu TOBa CMeHnTe CBoeBpeMeHHo fNITbPnHaT Top6uKa!
BHIMAHHE
3acmykeaHe Ha cmydeHa nenel camo c qunmbp 3a apy6o npeuucmahe.
Homep 3a nopbyk n3nblHeHne Basic: 2.863-139.0, n3nblHeHne Premium: 2.863-161.0.
Mokpo n3cmykBaHe
BHIMAHHE
He u3noJ3aUme fummbpu mOp6uKu!
Yka3aHHe: Ako pe3epBoapbTe nIbJeH, nonJaBbK 3aTbApB BCMyKaTeJIHHo OTBOp uypeDbT pa6Ot n c NobuWeHn o6OpOTn. BeHara n3KnUoyete ypeDa n3npa3-hePe3epBoapa.
3a n3cMykBaHe Ha Bnara HnN TeuHocTn BHIMaBaI-Te 3a npabnHaTa HAcToPka Ha NoOBoN IIO3n N CBbp3BaIe CbOTBeTHnte PnHaJNeXHOCTn.
Pa6oTa c eJeKtpnueckn HnCtpyMeHTn
→ Πρι Ḥύχιδα πρινόθετe ἀλαπΤΟρa C HΟχ KβΜ ἀνα-MeΤbpa Ha CBbρ3BaHé Ha eJIeKTpηUeCKN I NHTpy-MEHT.
C1
A) NocTaBeTe BkHoueHnB OKOMnJIeKToBkata aDaantep KbM pkoXBaTKaTHa BCMyKaTeJHnMapkyu nCBpXeTe eNektpueeckn HnCTpyMeHT.
B) 3a noBee rBkAocT npn pa6oTa n3noJ3BaIte rBKBaNIA Mapkyu 3a IHCTpyMeHTn. CbpxTe ro Cbc CMyKaTeHnna Mapkyu n eBEHT. c aJaTep n KbM n3BOda Ha eNEKtpueckn HcTpyMeHT.
Φnγpaa C2
→ Pn ypeu c Brpaen KOntaKT: Uencena Ha eJIeKTPnueckn INcTpymeHT da ce PbXHe B npaxo-CMyKaUkata.
Φnypa C3
-BkIIOUeTe ypeDa (BbPTrIaIIT npeKbCBAu HAIJBO Ha noIOKeHne + MAX) 3aONHeTe pa6Ota.
Yka3aHHe:UOMceBKnIOuN eJeKtpnuecknT INHCTpyMeHT,CMyKaTeHNHaTa Typ6NuHa NoTeRnC0,5 cKeynHn3aKbCSHeHne. UOM ce N3KnIOuN eJeKtpnuecknT INCTpyMeHT,CMyKaTeJHaTa Typ6NuHa pa6Otn OSe np6J. 5 CekyHn,3a Da ce 3acMye OCTaTb4HnA t MpbCoTnB CMyKaTeJIHHa MapKy.
NHTerpupaHa cnCTema 3a nouHCTBaHe Ha cnTbpa
CnCTemata 3a NOUcTBaHe Ha fNITbpa e npEDbUeHa 3a 3acMyKBaHe Ha rOleM NOKIueCTBa fH IN npax 6e3 nocTabeHa fNITbphA TOp6uKa.
Yka3aHHe: C nOmoTHa Ha cNCTeMaTa 3a NoUcTbaHe Ha qnIbTa 3aMbpcEHrT pNoCbK qnIITbp MoKe Da 6bDe noOuInTeH C hATnCKaHe Ha KOnyTeO mOuHocTTa HA BCMyKBaHe MoKe Da 6bDe NOBnUeHa OTHOB.
Фигра D1
→ NocTabete npbkkata Ha BcMykateHnmaPkyB MRCTO3a cbxpaHeHne Ha npHaadNekHOtNo rnaBata Ha ypeJa. Hatnche 3 x 6yToHa 3a no- uHCTBaHe Ha qntbpa, npu TOBa n3aKaaiTe 4 ckyHm Mexdy OTdeHNHTe 3aDeiCTbaHn.
Yka3aHHe: CJIeM MHOrOKpaTHO 3aDeiCTBaHe Ha 6yToHa 3a NOuICTBaHe Ha cInIbpa npOBepTe Oue BeHNbX 06ema Ha 3aIbIbAHe Ha pe3epBoap. B IpOTnBEN cIy- yai pni OTbapRHe Ha pe3epBoap MoKe Da n3Je3e MpbcOTnJ.
Pa60Ta KaTo DyxaJIka
NoCTBaHe Ha TpydH OocTbNn MeCt a TAm, KbDeTo He e Bb3MOxHO N3CMyKBaHe, HAnp. Wyma OT aneTa C 6anactpa.
ΦuRypa E1
NocTaBeTe CmyKaTeHnHm MapKyuB O TBopa 3a n3-DyXBaHe, Taka yHKUraTHa n3DyXBaHe e aKTUBpaHa.
IpeKbcBaHe Ha pa6oTa
Φuypa B3
→ 3KJIIOUeTe ypeda.
F1
3aKaueTe IIO3aTa 3a noD B No3nIyra 3a npKnpaHe.
Kpaɪ ha pa6oTaT
→ N3KJIHoyeTe ypeJa nN3TeTneTe UeNCeJa OT KOHTa-KTa.
N3npa3BaHe Ha pe3epBoapa
Φnrgpa G1
→ CbaIe TnaBata Ha ypeDa, n3npa3HeTe HnblHeHnra C MOKpa nn Cyxa MpbcOTna pe3epBoap.
Pn ypeu n3nyckaTeHa npo6ka: N3npa3He-Te cyxata MpbcoTna ppe3 pe3epBoapa. 3a n3npa3BaHe Ha TeyHocTN n3No13BaIte N3nyckaTeHaTa npo6ka.
CbxpaheneHa ypeda
Φnypa G2
→ Pπi6epeTe MpeKOBn3axpaHbau Ka6eI n npi-HaJIeXHoCTnTe B ypeJa. CbXpaHraBaIte ypeDa B cyxN NOMeUeHnJ.
PnJn noDpBjKka
POnDbpkaaTe ypea n npHaJnEeXHocTne My OT pIactMacacObuaHInTe,HAMnpaunCeBTbproBCKaTaMpexa npenapatn 3a nouCTBaHe Ha IpaCTMaca.
pe3epBoapo n npHnAdneKHoCTnTe npn Heo6x. da ce n3nnakHaT C BOa n da ce noDcyuWt npeDi da ce ynoTpe6rOTHOBO.
NouctBaHe Ha nlocknq hnTbp
Ipenopbka:CJed BCaKO u3noJI3BaHe NOuHCTBaHTe fNITpnpaaata Kaceta.
H1
De6nokpaIteΦnITpnpaUaTaKaceTaIЯCBAJeTe,H3npa3HeTeMpbcOTnraT0fΦnITpnpaUaTaKaceteHaN KoΦa 3a 6oKnYk.
3a nouCTBaHe Ha nocTaBeHHn nnocbK fHntBp H3TyNaIte fHnTtnPnPauata Kaceta Ha pb6a Ha Ko- pata 3a 60knyk. 3a ueIta nlocknT fHnTbp He Tpr6Ba Da ce BAnOT fHnTtnPnPauata Kaceta.
Pn Heo6xOUMoCT noHcTe nNoCKnA pntbpoTdeHNO.
H1
De6loKnpaIte ΦnItpnpaIaTa KaceTa, HAKIOHeTeЯ nraIeTe.
H2
→ ⅢBaTe Te nIOcknA φnITbP oT φnITpnpaTaKa-cetα n rO n3TynaIte.
→ Pn Heo6xOUMOCT NOUcTe TE cMo nOu Teuaa BOda, He rTO TbpKaIte uNn YeTKaIte. Ppei ynoTpe6a ro octabeTe da n3cbxHe HAnbJIHO.
→ Hakpa oTHOBo MOHTnpaTe cyxna pncbK qnTbp Bypeda. NocTabete qnItpupaata kaceta Bypeda.
HOMOu npn HEn3npaBHOCTN
HeocTaTbueH eΦeKT OT H3cMyKBaHeTo
Ako MoUHOCTTa Ha BCMyKBaHe Ha ypea ce noHnKn, MOJI npOBepeTcNeHNHTe TOuKn:
→Пинадлесховтое OT OKOMпгКТВКаТа,СмУкATEннRT Маркун BCMyKaTeHNTe Tpb6n ca 3a-nyшен, MONM,OTCTpaHETe C npbUka TOBa,KoETO n 3anyuBA.
Фигура A2
ΦπΠbρHaTAtop6nkaeπbJHa:PiocTabeteHOBaΦπΠbρHaTop6nka.
H2
Плоскийтфиntьрезambpeсн:ИЗвадеуфипгирацаразкетаи поочпесуфиNTьра(BИКтгаба "ПочисванохяфиNTьp").
→ PioDmeHete noBpeDeHnIIOcbK pIITbP.
TexHnueckn daHHN
TexHnuecknTe daHHn ce HAMnpaT Ha OTbaprauNTe Ce cTpaHnCi. CneBa oBacHeHne Ha n3noJ3BaHnTe TaM CnMBoNt.

HanpexeHe

Molnoct P HOM.

MaKc. npncbei. MoUHOCT Ha KOHTaKTa Ha ypeda

IpeNa3nTe (HepTeH)

OsemHape3epBoapa
IoeMaHe Ha BOna C pBkoXBaTkata
IpoemaHa B0da C IIOOBaTa IIO3a

3axpaHbau Ka6eI

DonyctmHO HbO Ha Wym (EN 60704-2-1)

Tero (6e3 npHaJneKnoctn)
3ana3ame cu npaebomo ha mexHuuecku U3MeHeHua!
Sisukord
Uldmarkusi ET 5
Seadme osad ET 7
Kasitseine ET 8
www.kaercher.com/REACH
Garantii
www.kaercher.com/REACH
Garantija
www.kaercher.com/REACH
Garantija
www.kaercher.com/REACH
TapaHTiA
Y KOKHI KpaIIH DIIOb yMOBn rapaHTI, BUnaH I HaUNM KOMneTeHTHMn TOBapNCTBAMN 3i 36yTu. HenonJaKn B pO6oti npCTPOu MN ycBaEMo 6e3nnatHO npOTrOM TepmiHy II rapaHTI, RaUO BOHN BUKNIKAHI 6paKOM MaTepiany N NOMIKAMN BINOTOBJeHHa. Y rapaHTiHOMy BnAky 3BepTaIteCb, 6yNb NaCKa, 3 O6NaHaHHaT Ta DOKymENTAMN, 10 NiITBePdXyIOb NOKyKNpICPTPOU, Do BaWoRo ToproBOro areHtA a6o Do npNBedeHnx HNK-ye NyKtIB rapaHTIHorO 06cnyROByBaHHa KJIeHTIB.
Cnyk6a nIDtpmKn KOpncTyBauiB
3 pi3Hnx nItAhb Ta b pa3i nonomok Bam donomokyTb hawi npedctabHnKu pfiany KARCHER.
3amOBJIeHHa3nachnx YacTH Ta CneuaJIbHorO 06naHaHHN
AcoptmEHT 3anachnX qactnH, 0o yacto Heo6xidhi, MoKHa 3aHnT B KInu iHCTpykui no EKCnnyataui. 3anachi qactnHu Ta CneuaIbHe oBnaDHaHHn Bu 3mo XeTe OTPMaTu y BaWero dIInepa a6o y finiani fipM KARCHER.
ПразвILA 6e3nekn
HEBE3NEKA
- Ppucmpiu cniD emukamu nuwe do 3miHnoo cmpymy. Hanpy2a noBuHa biNoBia-mu eKa3aHm Ha φipmoBiu ma6nuyi npucmpoTo daHm uodo Happyu.
- Hikoku He mopkaumecb MepejHo2o umekepy ma po3emku BOJIO2UMu pyKaMu.
- Hemoxha bumayamu MepexHu u mekep i3 po3emku 3a MepexHu uHyp.
-
Ipebeipamu nioKluoyenn npunaody do mepexi Ha nped-Mem nowkojxeHna nepoKoJHM buKOpucmaHHaM. 3amihb depekmHu npoBid uepe3 aBmopuzoBaHy cepicHy cnx6by/eKeKmpuKa.
-
Uo6 yHukhymu Heuachux 8unaekie nioac bukopucmaHHeIekmponpuiaide, Mu peKomeHdyEmo bukopucmoByaamu po3emku 3 nopeHbO yimKHeHM aomamom 3axucmy biD moky 8umoky (mAc. 30 mA cunu mOKy HOMHaJIbHOi di).
-Пid уac npoBeDeHЯ 6yObkux po6im 3do2ny ma mexnH02O obcIy2OByaH-HЯ anapam cniod bumKhymu, a MepeKeBu wHyp -BumZmu 3po3emku.
- Pemohmhi pobomu ma poobomu 3 eJekmpuHmu 6y3naMu moKe buKohyeamu minb-KU ynoBHOaKeHa cnyk6a cepbcHO2O obcIy2OByaHNr.
△NONEPEDJXEHH
Liu npucmpiu He npu3naeHuou 6ukopcmaHnnaOdbmu 3 obmxeHmu oI3uHmu, ceHcOpHmu a6o p03ymoBuMu moKlueocmmu a6o 3 biDcymHicmIO docbiOdy u/a6o biDcymHicmIO bIDnoBihux 3HaHb, 3a BuHramKom Bunaik, KOlu BOHU 3haoOdaMbcra NiO hauJdOM bIDnoBidaNbHOi 3a 6e3neky oc6u a6o ompumyomb bi Hei Bka3i8ku IIO 3acmocybaHHIO npucmpoU, a maKoX ycBi- domnloomb MoKluepu3uku.
-Доусkaembся 3acmocybaHnЯ npucmpoio dimbmu, kki doceau 8-piHno2o bky, 3HaXODaMbscnD ha2Jydom oco6u, biDnoBidaNbHOi 3a ix 6e3-
neky, a6o yki ompumalu iHcmpykuii i3 3acmocybaHHn npucmpoio biD mako'i ocobu, a maKoJ yceiOmoMb MOxIuBi pu3uku.
- He do360jme dima 2pa-mu 3 npucmpoem.
- Cmexumu 3a mum, uo6 dimu He epaun i3 npucmpoem.
He do3e0jme dimm npo- bodiumu ouuueHnma o6cny2o8ybaHH npucmpoio 6e3 Ha2j4y.
- Πакуьыну піьку мрumsу me nodani biD dimeu, icHye He6e3neka 3aodyweHnry!
- Ppucmpiu cnid bioknouamu nicna koxno bukopcmaHn i neped npoedeHnM oyuueHHa/mexhichno 6-cny20ybaHHa.
- Hebe3neka nokeki. He donyckamu BCMOkmyBaHnnaIauOuyx abo mIIouux npedMemis.
- PoobomayubuxoHe6e3neuHuxymo8ax He 0380JembCra.
- Ppu ymbopeni niu a6o bumikaHpiu npucmpiu cnid Heaunho buknioyu mu abo biochyamu bi ekempomepexi.
- He bukopucmoeyama 3acobu dny uueeHHa dna cknaafo yHiepcalbHi 3acobu dny uueeHHa! 3abopoHembcra3ahypuoamu npucmpiu y 8o-y.
IeEHi peoBuHu MOxymb cm80pOaMu ubeyXone6e3neuHi 2a3u a6o cymiwi, 3Miuyouucb 3i EcmokmyaHUM nobimprm. Hikolu He EcmokmyaMu nuococom HacmynHi peoBuHu:
- Bu6yxoHe6e3neHi a6o 20pOci 2a3u, pIDUnHu a6o nun (peakmuBuHn)
- PeakmueHu MemaneBu u nui (HaPukna, aHOMiHiu, Ma2Hiu, uHK) y cNoIyci 3 CunbHOJyXHUMu ma KUCnOMHUMu 3acO6aMu dJa YuUeHN Hra
- Hepo3e dehi cunbHi Kucno-mu ma nyu
- Op2aHicHi po3uHHuku (Ha-npuKnaad, 6eH3uH, po3piDxyBau φap6u, auemoH, ma-3ym).
Io mozo J, upeoBuHu Mo- kymb nowoduMu MamepiAnu, uO buKOpucMoByIombcy npUcmpoi.
Pibehb He6e3nekn
HEBE3NEKA
Bka3iBa 0oDo He6e3neku, Ka 6e3nocepedHbO 3a2poKyE ma npu38oDumb do mJxKuxmpaM Yu cmepmi.
△NONEPEDJKEHH
Bka3iBa uo do nomenuHOMoxnboi He6e3neuHOcumya-u, uo moKe npu3ecmu do mJkuxmpaM Yu cmepmi.
△OBEPEXHO
Bka3iBa zoOo nomeHciUHO He- 6e3neuHoi cumyaui, rka MoKe cnpuUhumu ompumHaHHaJe2kuxmpaM.
yBAGA
Bka3iBa uo do moxnueoi noMeHciuHo He6e3neuHi cmya-u, uo MoKe cnpuHuMu maMepiaIbHi 36umku.
Onnc npnctpoko
3o6paXeHHaNb. Ha po3Bopotax!
UycbomyKepiBnTbi3ekcnIyaTauii HabeJeHO ONUC yHibepCaIbHOro NINOcOca, kNIm306paxeHo Ha 0knaDnHi.
Ha iHIOCTpauiX HAMaIbObaHO MaKcMamJIbHe OCHAUeHHN IpiCTpOIO.OCHAUeHHN TAI KINbKiCtB DOaTKOBOrO pInJaD, IO BXoJITb B 06cgr NoCTaAHHRAJENKHTB BiID MoJeI IpNCrTOIO.
Pn po3nkyBaHHi nepeBipTe Bmict ynakOBKn Ha HnBnHicTb DoaTkoBOrO O6naHaHHN Y N0uKOJKeHb. Y BNanKy N0uKoJKeHb npn TpaHCnOpTyBaHHi NOiDomTe npo ce CBOeMny npoDaBIO.
BxOaTb Do KOMJIeKTy NOCTaHaHHA
MOKJIbE 06nHaHHr
1 Micce nid'εdHaHHaHry
ManHOHOK B1
→ДяпдкюechнвсмokуbaьHoroшlaHry niJyac po6otn.
2 Bumkaay
(6e3B6yDObaHoi p03eTKn)
ManHOK B3
N03nizI:BCMOKtyBaHHa6oHarHitaHHa NO-BITpR. NIOJoxeHHa 0:PiucTpiBumKHeHH.
2 Bumkaay
(3i B6yDIOBaHO pO3eTKOHO)
ManHOHOK B3
→ Noloxen MAX: BcMOKTyBaHHa 6o BuNyBaH-H.
→ Nolokhenra MAX: BcMOKtyBaHHa 3 niD'εHaHn m eNEkTpoHCTpyMeHTOM
PerynTop noTyXHocTi: 3a Heo6xidHocTi, npn BCMOKTyBaHHi a60 npn po60ti 3 eNeKtpuHmN iHCTpyMeHTAMN 3HN3NTn noTyXHicTb yCMOKTyBaHHJ.
NonoXeHHa 0: Pnucpii BBIMKHeHn. Ha eJeK-tpoIHcTpymeHT nodaetbca Hanpyra.
3 3TencelbHa po3eTkapnctpo
Bka3iBaKa:BpaxoByBaTn MaKcImaIbHy 3aIaIbHy CnoKmbaHy notyKHiCtB (DVB. po3dIn «TexhiHi daHi).
ManHOK C2
→Для NiiknIOUeHRe eNEKtpoiHCTpyMeHTy.
4 Micce niД'εДнHaHЯ ДЯ po3dBy
ManhoHok E1
→ PnEHaTn BCMOKTyBaIbHn IJNaHr Do nIKNIOeHHra INoaqui NobiTp. Tm Camm aKTnByetbcra FyHKia npOdyBaHHa.
Khonka ouuueHHa pInbtpa
ManIOHOK D1
→ έуншеньуdoBaHOro nNoCKoro cKnJaAca-CTORO φinbTpa.
Bka3iBa: He HataNcKaTu KhoNky, KOJI N cKnaJauctn fiNbTp BOnOrn.
6 3arnn6nennn nn pyouk
3HrTn roJIOBky npucToPO nICy po36NOKyBaHHBA 3aRNI6NeHHI dny pyuK.
7 Puyka
ManHOHOK A1
→PyuKa OAnOuaChO CnyKnTb Dnra po36IOKyBaHHr rONOBKn npncTpoIO pe3epByapa. Dnra po36IOKyBAHHr NOBHCtBO BIDKNHyTN pykU Bnepei.
B3aTnca 3a roIOBky npncptpoio i BntraHytn II 3a- rnn6neHH.
19 HacaKaIy nIaNorn (3BaXeJIempeEmnKAK
ManIOHOK B1
IpyHOro nepemkaHHa 3 cyxoro npuapnHa BONORE:
→ IINBAOMOKTyBaHHcyxOo6pydy BnKOpNCOTobyETBCrIIOXKeHH3BnCyHyTmN UITKOBUM NlaHkAMN.
→ ⅡЯ BCMOKTYBaHHBAONU BUKOPNCTOBYeTbCЯ NOJIOXHEH3 BUCYHYTUMI rMBOUMn KpaKaMaN.
20
Conno 3aOBHeHH
→ДякгИВ,CTNKIB,padiatopib onaneHHra Ta Baxko-DOCTyHnx NOBepxOHb.
21
Aanrep
ManHOHOK
C1
→ДЯ3'eHHaHHB CMOKtyBaIbHOro IHaHra 3 eJekTpoIHCTpyMeHTOM
→ Ptn Heo6xidnocti npkpiinTu do eNeKtpoiHcTpymeHTy aanTep 3 HOXEM, uO BiNobiae diaMeTpynikJIOUohen
22
Ihyckn IshaHr IHcTpymenta
ManHOHOK
C1
→Дябьwoi rhykocti npn po6oti 3 eJektpoiHCTPYMEHTOM.
PnmuTka: TaKoK MoXHa BnKOpNCTOByBaTu 3 aanTePOM.
Ekcnnyatauaia
YBAGA
Ppauoeamu 3aekdu nuue 3i ecmahoeeneum cknadacmum fInbmpom, k npu eoosomy, ma i npu cyxomy npubupaHHi.
IpeB BBeDeHnM BeknnyataciIO
ManpoHok A1
3HATN KPNKU npnCTPO TO Ta BnDaJIHTN BMICT 3 pe-3epByapy.
NObepHytn pe3epByap, BCTaBHTn Do ynopy nobopotHi KOniuaTb BOTBOpHa niDctabi pe3epByapa.
BctaHObit Ta 3afoikcyte roinky npunady.
YctahOBHT TpIMauch KpinHEnHa nI npnlaHa 3aHbomy6oCiBepXhBoi qactHHnpncTpoIO.
BBeHnB EKcnIyataciio
ManHOHOK B1
Pi'd'edHaTu aKcecyapu.
ManIOHOK B2
BCTaBTe 1TEnCeIbHy BUNKy.
ManHOHOK B3
BknHcyTb npucTpni.
Pnlooc dIy cyxoOuNCTK
YBAGA
Ppauoeamu minbku 3 cyxum nnockum cknaadacmum fInbmpom.
Ipeed 3acmocyehnHcnd nepeepumu fInbmp Ha Harehicmb NowkOKeHb i, 3a nompebu, 3amihu.
ManHOK A2
→ДЯ BCMOKryBaHHa cyxoro 6pydy 3a noTpe6n MOKe BnKOpNCOByBaTnC4 φiNbTpYBaJIbHn Mi- WOK.
YBATA
Функцю ouuueHЯ φinbmpa bukopucmoyeamu 3aexdu 6e3 φinbmpyeanbHOZo Miuka, iHaKwe ue moKe npuzeecmu do uo2o nowkodxehn.
Bka3iBkn 0do o foIbtpyBaIbHoro Mioka
CtyinHb 3anOBHeHHaIbTpByaBbHOro MiKky 3aJekntb BiBCMOKtByaHoRo 3a6pydHeHHa.
- Pn BCMOKTyBaHHi nny, nicky Ta iH. cnid qactiwe 3miHOBATn pIbTpByaBbHm Miok.
BcTaHOBJIeHmIiOKdIa36OpyNnMyMOKeIOnHyTN, TOMy Ioro CnID CBOEcAchO 3amHITb.
YBARA
BcMOKmyeAHnXoNoHO2 nonEny 3diuchHobamu minbku i3 3acmocyBaHHn nonepehbozo biOcika. Homep nla 3amOBnEHn, 6a0Be BnKoHaHH: 2.863-139.0, npemiym-BnKoHaHH: 2.863-161.0.
Bolore npn6panna
YBACA
He eukopucmoeyume fInbmpybaHnMiwoK!
Bka3iBa:KuO pe3epByap nobHn, nonnaBok 3akpNaBae OTbip dNBA BCMOKTyBaHH i npncTpi npaue 3 6IbUIM uCNOM o6epTi. HeraHNO BmKHytn npncTpi Ta BnnpoXHTn pe3epByap.
→ IJIyBCMOKTyBaHHBOJONI DOTpIMyBaTnCnIpaBUNbHOro NIOXKeHH HaCaKn IJa NiIOnr Ta npueDHyBaTn BiIDNoBIDHe npuNaDn.
BukopncTaHH eJektpoiHcTpymeHTIB
→ Pπn Heo6xioHocti npKpinnT do eJeKtpoiHcTpymeHTy aanTep 3 HOXEM, 0o BiNobiae diaMeTpyπdkIOUoyehn
ManHOHOK C1
A) OДЯнун aадантep, lo Ддэбсьс, Ha BCMOKtyIOUчишпг Ta 3'6dHaTn NOrO 3 eNekTpoiHCTpy-MEHTOM. a6o
B)ДябиоI rHyKocTi BnKOpNCToByBaTn rHyKn WnAHr DЯ eJekTPOiHCTpymeHTy. 3'EdHaTn Ioro 3 ycmokTyBaJIbHM WnAHRom i, 3a Heo6xIDHOcTi, 3 aanTePOM, a Notim NiDKNIOHTu eJekTPOIHCTpymeHT.
ManHOHOK C2
→Дпя npinctpoiB 3 B6ydoBaHOIO po3etkoH: BctaBHTN wTeNCeJI beneKTPOIHCTpymEnTy B nINOCoc.
ManHOK C3
-ByimKHyTN npnnaD (noBopOTnBumKaay BnIOB nnoJoxeHHaMAKC.) i noatnpo6oty.
Bka3iBa: Iicn yBIMKHeHH eJektpoiHcTpymeHTy BCMOKTyBaIbHa Typ6iHa 3aNyckaetbcra 30,5-ceyn- dHOIO 3aTpIMKOIO. Iicn BIMKHeHH eJektpoiHcTpymeHTy BCMOKTyBaIbHa Typ6iHa ue npauoe 6in 5 ceYHd nra TORO, uoBCMOKTaTH 3aIIuWN CmTTy BCMOKTyBaIbHOMy UlaHry.
B6ydoBaHa cnCTema ouuueHHa pibtpa
CnCTema OunuHHe HnBbTp a BnKOpNCToByeTbcR, KOINBCMOKTyEcBcA BeNkka KInbKicTb Dpi6HoDnCnepChoroNNJy 63 nIbtpyBaBbHorO Mioka.
Bka3iBa: 3a donomoroCnCTemOn OuyeHHH fIbtpa MoXHa HATNCKAHMM KONKN OUYyBatn 3a6pydHeHm fIbTp i BiHOBNIHOBAtn NOTyKHiCTb BCMOKTyBaHH.
ManHOHOK D1
BCTaBnTu pyKy BCMOKTyBaIbHOrO uHaHra B KpInneHnI npuaIa. HATncHyTn 3 pa3n KOnKy OuNueHHa fJIbTpTa 3a BBIMKHeHOro npcTpo0 3 iHTepBaIOM y 4 cekyHdN.
Bka3ibKa:nicra 6araTopa3oBO RbKOpnCTaHH KHOKN OunuHHeHH qinbTpca cnid nepebiprtu pBeHb 3anOBHeHH pe3epByapa. IHaKUe niD yac BiUnHeHH pe3epByapa MoKe BnteKtn 6pyd.
Po3aYB
OuHHeHH BaxKoOCTyHnX Micb a6o Micb, De BCMOKTyBaHH He MoKnBHe, HanpuklaD, BuJaNeHH JnCTra 3 rpaBIO.
ManIOHOK E1
→ PnEHaTn BCMOKTyBaJIbHn IJNaHr Do nIqKnIOeHHra IaI NOaHi NobITpr. Tm camM aKTbYeTb-Cs cyHKi npOyBaHH.
IpeepnbHnpo6To
MaHIOHOK B3
BuknIOuITb npucTpii.
ManHOHOK F1
BctaHOBNi HacaKy dny niDnOrn B napKyBaIbHe nOIOKeHH.
3aikHueHH po6OTn
BumkhHytn npucTpi Ta BnTuHryTu uTeKepe.
CnopoXHnTpe3epByap
ManIOHOK G1
3HnroJIOBky npncIpo, cnopoxHnTn pe3epByap 3 BOJorIM a6o cyxIm 6pydOM. Y npncIpoaX i3 np6koio 3JIbAalbHorO OTbOpy: BuaNTn cyxN 6pyd 3pe3epByapy. Jra BuaJIeHHra piINHn BkOpNCTOBvBaTN np6Ky 3JIbAblb HorO OTbOpY.
36epiraHn npnctpo
ManIOHOK G2
→ CknaCTn Ka6eB JKBneHH BID eJekTpOmepeKi Ta npHaJeXHoCTi Ha npucTpoi. 36epiraTu npucTpiB cyuxx npumiuEHHx.
Dorna TaTexHue o6cnyroByBaHHa
OuynyBaTn npicpti Ta akcecyapn 3 nlaactMacn 3a donomoroCTaHdaptTHnx 3aco6ib dnyuueHHBupo6ib 3 nlaactMacn.
Bak Ta npilaA B pa3i Heo6xHocTi npomTu BOIO To Ta npocuHTn NpeEd HAcTyHNM BUKOpuctaHbM.
PpOuNCTnTn nlockn cknaDuaCTn fIbTp
PekomeHauia: FinbtpyBaIbHy kaceTy ouHuaTn nicna Koxhoro 3actocyBaHHa.
ManHOK H1
BikHyntiNbtpyBaHbHy KaceTy BnTgTTi, BnTpycuTn 6pyd i3 fiNbtpyBaHbHO' KaceTu y BiDpo DnAcmTT.
→Дя ouHnB BCTaBHeHO nIOCKOrO cKnadA CTOIbTp aCnI NOctyKATn IbtpyBaIbHO KacetoNo KpaIO BiPa dNcMTT. NocKn CKnAdactn IbTp He notpi6Ho BNTaRyBatn 3 IbtpyBaIbHOi Kacetn.
3a noTpe6n nIockni cKnaDuctn fiJIbTp cIid OunuataN Okpemo.
ManHOHOK H1
Po36JIOKOByBaTN pInbTppyBaIbHy KaceTy, BiDKNHyTn ii Ta BITrTn.
ManHOHOK H2
→ BntTn nlockn cknaqactn fiIbTp i3 fiIbtpyBaIbHOi Kacetn N BnTpycuTn 3 HbOro 3a6pydHeHHa.
Y pa3i nOtpe6n npoBOuNTn OOnuEHHra NiD cTpyMeHem BOIN. He BnTnpaTu N He uNCTuN i3 3aCTOCyBAHHrM uITKn.
Ipea3actocyBaHHnM NOBHiCTo BnCyuHTn.
Ha 3aBepWeHH 3HOBy BcTaHOBuTN BnCyWeHH nIocKn cKaJauactn fIpNbTp y npucTpii. BcTaBuTu fipnbTyBaJIbHy Kacety B npucTpii.
Donomora y BnnaKy HenoJaok
3HnXeHHcNINBCMOKTyBaHH
Y BUNaIky 3HIXeHHc CINN BCMOKTyBaHHn nepeBipTe HAcTynHe:
Ⅲnahr BCMOKTyBaHHa6o Tpy6ka BCMOKTyBaHHa3a6nncra. BuaIb 3a6pydHeHHa 3a donomoroo CTePKH.
ManIOHOK A2
ΦiNbtpyBaIbHmMiOk3aIOBHeHn:BcTaHOBNTn HOBnΦiNbTpYBaIbHmMiOK.
ManHOHOK H2
PInockn cKnaduactn fIbTp 3a6pydHeHn: BnHrtn fIbtpyBaJIbHy kaceTy nOChTu n fIbTp (INB. po3diN «OunueHHra nnocKOrO cKnadactoro fIbTpTa)).
→ 3amHHTn noWKoJxehN CKJaUdAcTn φInbTp.
TexHiChi xapaKTepeNCTNKI
TexhiHi xapaKtepncTnBk3aHi Ha cToPiHKax, 10 po3kpNbaHtbc. DaJI npOnHyEtbcra po3'rcHeHH BnKopnCTAHx CmBONiB.

Hanpyra

NotyXHCTb P HOMIHANbHa

MaKcImaJIbHa Hanpyra B po3eTu npNCTpoIO

3ano6iKHK (inepuHn)

Mictkictb pe3epByapy
BxntOK BOIN pyKoTkoI
Bxntok BOIN HacaKOIO JI niJIOI

MepexeBn ka6eb

Pibeh 3BykoBoro Tncky (EN 60704-2-1)

Bara (6e3 0bnaHaHHa)
Moxjuei 3miu y KOhcmpykuii npucmpoio!
Ma3MyHbI
KannbHcyckaynap KK5
Kayinci3ik typanbHyckaynap KK 6
Bmybim CnataTamacbl KK8
KoIaHy KK9
Kytmy MeH TexHnKaIbIK Tekcepy
KyMbICTapbl KK 10
Kepeprinep 6oIraHaKa KEmek any KK 11
TexHnKaIbIK MaJyMaTTap KK 11
Kypmetti Tytbihyubi,

ByibMbbl anfawkbk kondaHy aIdbihanaaHaHy HcKaybH MyKnT OKbIN bIfbHb3, HyckaynapDbOpbHdAn,
KeHHri naDanaHy yHIN Hemece ocbl annapaTbI KeHH NaDanaHaTBiH TynFaJap yHIN CaKTan KObIHb3.
Xannbl HycKaynap
BmybIMdbMaKcaTbHa cainkec kondaHy
OcbI KOJaHy TypaJIb HyckayIbIka 6epiJreH cnataTamaIap MeH Kayinc3ik HycKayIapbHa caikec, 6yblm a6e6an copfbiW peIHde KOJaHbIyra apHaIraH.
BykpyblfjXeKe KOJdaHbIcKa apHaJIFaH XaHe eHdpictik MaKcattapMeH KOJdaHbIyFa apHaJImaFaH.
BynbIMdbjKaH6bipdah caKtaHb3.JaIaDa aWbik acnah actbIHda caKtayfRa 6oJMaIdbI.
Kyn MeH KypbIMdbI OcbI 6yNbIM apKblbI copyra 60nmaJdbI.
Om6e6an copfbltBeK TeMeHderinepeMeH naDanahyfa 6oIaIbI:
KanTay MaTePnaIaIapbI ekHsi eHdeyre
Japamdbi. KanTamaHbI yu KOKbcibaHa
JaKbIpMaBbHb3DbIcypaMb3,OnapdbEkiHui
eHney yuin 6eNEK KOybHb3.

O3 Mep3imH aKtaFAN KpaJnapda 6aFanbl, ekHI eHeyre kapaMdbMaTepnannap 6ap
CoHdbikTaH KOnJaHaBInFaH XeHe ecki
6yibIMapdbI apHaibipikTeN xHay Kyeinepi
apKbIbI KaIbIKTapra Tancbipybi3 Ja3bIM.
Cy3rihi xhe cy3iw kantbI tacay
Cy3ri MeH cy3iW KAN 3KoJIOrnaJIbIK Ta3a MaTePnAnDapDaH XacalFaH.
ErepynKaIdbikTapbl ywiH pyKcat etinmereh 3aTap KOK60nca, KaIbINTbl yN KaIdbikTapbImeH 6ipre Tactayfa 60nabbl.
KypaMbIHdafl 3aTTap TypaIbI aHbIKTaMaIap (REACH)
BmybIMbH KypambIHdaftb3aTat typanb COHfMaFmattapdbactbda Kepcetiren HHTepHet6eTTepim3e OKn anacb3:
www.kaercher.com/REACH
Keninme
BiybIMapbIM3 ywIH ap ene jxayantbI eTIM cepiKTeCepim3 TapanbIHAN WbIFapbINaTH KENiNDeme wapTTapb KyUte 6oNaIbE. Erep MaepnAndapdbH akyIbFbHEmece daBHday 6apbcihdaftb KaTeJIkTeP Ta6bInca, 6i3 bIKtMAN aKayblKTapdbI KeniMep3imi iwiHne akbcIs3 XeHNeMi3. KeniMep3mi iuiHHe Hapa3blbIKTapbIHb3 6oNca, acnantbI caTKAH cayda MEkemecHe Hemece XaKbIHDAfbE kKinetTI cepBNCtIK KbImET KepeTy opHbHa catbIn any YerIH Kepcetin, xa6apnaCbHbI3.
OHHdpinreH KyHi KepceTinreH Typ KecTeciHde
Keke caHapdbH MaBHaCb KeNeciJeB oNaIbI:
Mbizanbl:30190
3 ΘHДiPIJREнЖыЛы
0 电HdpinreH racbipbl
1 EHdpinreH OHKbINdbIK
9 EhdpinreH aibHbH ekihu caHbI
0 ΘHdpipinreHaibHbH 6ipHwCaHbI
COhblMeH 6yI Mbicanda 30190 KoDbI
09/(2)013 enhdipinre H KyHIN 6iDipeDi.
Aybip japaKaMaHa rHa He
eImze anapbIn cofambIH
mikeNeu mype myce aIambIH
moyekelze Hycay.
△ECKEPTY
Aybip kapaKaMaHa rHe eJIMze anapbIn cofambIH bIKmumanKayinmi KaFdaunapra Hycay.
△ABAHJIAHbI3
KeHin JapaKammaHyra anapbIn cofambih bIKmumai Kayinmi KaFdaufa Hycay.
HA3AP AYДAPbIHbI3
Mamepuanobik 3uHra anapbincorambih bikmuman kayinmikaFDAufa Hycay.
Biyibm cHnataMaacbI
Cypertepdi 6yKTeMeJI 6eTepdH KapaHbI3!
Ocb kondaHy Typanbl Hcaybfb andbihfb 6etteri 0M6e6an copfbltB cunnattaBl.
CypeTepTeToIbIK KOMnneKtauNKePcTeiInreH, ap MoenIbe 6aHaNbICTbI KOMnneKtauJaXHe 6epinetIH KepeK-kaPaKTapDa e3reWeiikTep 6oanaBbl.
6yibim KopanwacbH awkaHa Kopanwa iwiHderi 6yibim MeH 6eJWekTepiH TObnk XHe 6y3bImaraH Typde 6onFaHdbfBn H TeKcepin anbHbI. TacbImaNay hEtNXeciHc 6ynihre H Kepi 6oNca, 6yibmbl caTkah cayda meKemecie xa6apnaHbI.
KHnHaKaTa KaMTbJlFaH
MymkiH Kepek-KapaKTap
Copy wnaHrici
Cypet B1
Ta3anay Ke3iHDe copfbyuHaHricin Kocy uih.
2 BybIM Kockbiwbl (Kocy/Theta) (kipictipinreH 3neKtpnik po3eTkacbi3)
Cypet B3
→ Iky: Copy Hemece ypney. 0 kyn: Bynbim eupipinreH.
2 Bynbim Kockbiwbl (Kocy/Theta) (kipictipinreH 3neKtpnik po3eTkameH)
Cypet B3
MAXkyi: Copy Hemece ypney.
→ Kyn + MAX: Xanfahrah 3neKtp KypaJIbIMeH copy
KyaattbipetTey:Kymbic6apbcihdaKaXeT6oJfAH XaFdaIa copy,ypneY Hemece 3neKtp KypalbImeH copy KyuH a3aity.
→ 0 Knyi: KypbInfbl eWippyni. 3neKtp KypaBbHbH KepHeyi 6ap.
3 ByyibMHbIH əneKtpnik po3eTkacbl
HcyKay: MakcmaIbI TyTbIHbIaTbIH KyaTTbI caKaTahB13 ("TexHkaJIbIK depeKTeP"6eImiH kapaHbI3).
Cypet C2
→ 3neKtpnik Kypanapdapdbkocy yuH.
4 Ypney aanterepi
Cypet E1
CopbyIty wJnahrici ypney aanTepihe enHriinreH, ypney cyHKunraCb6enCeHdi.
5 Cy3rhi Ta3anay Tymecici
Cypet D1
OpHaTbIINFaH XaIINaK KaTnApJIb Cy3rHi Ta3aJnayFa apHaNfA H.
Hyckay:KannakKatnapbCy3ri bInfaiNb6oJca, Tyme Kymbic icTeMeNi.
6 Tyrka
KypbIbHbIH 6acBH 6ocatap Ke3ne, TytKaHaH yCTan, anblHbI3.
7 Can
Cypet A1
Can KpybInfbl 6acbl MeH KOHTeHep apacbln 6ekitin typaBbl. Bocaty ywiH cantbl 6apbHwa anfa kapa, TOnbIK aBlfHaWJXblNkblTbHb3.
KypbIbIbI 6acbiHdafbI TyTKaHbI yCTan, aIbHbI3.
8 C
3rii 3nemENT Xe He axbipaty Tymecic
Cypet H1
Cypert H2
→ Cy3rinepi Ta3anay ywiH axbipaty Tymecin 6acbHb3, cy3riu 3JemeHTti wifapbHb3 XHe aBnTACTaHb3.
9 By
YbIM Kepek-KapaKaTapBn CaKdTay Xepi
Cypet G2
Kepek-kaapakapdbicaKaTay Xepi copfbu TytikTepiH XHe copfbu CnJIKOHbI 6yibIMda caKlaya MymkiHdk 6epei.
10 Ka6eInreri
Cypet G2
KyaT cbIMbIH caKdTay ywiH.
11 Typak kyi
Cypet F1
Y3iNic ke3iHne copy yIymerin eIiypy yIuH.
12 SaftbTTaftbIw pONIK
Cypet A1
CaybTTb aHaHaNbIbPbHb3, 6aftTtaBtW poNkTePi caybTTbH Ty6iHderi caHbJaaynapFa tipenreHwe 6acbHb3.
3 KybIaTbIH caHbIaydbIH 6ypaHaJIbI TblfblHbl
Cypet G1
KyibnabHcHbIaydbH6paHaIaIbTbIfhBkoHTeHepnerI nac cybI Te3,api bHaIbI 6ocatyuH Kaxet. BocatydbH eH OHaJ KOJIb - KOHTeHepdi Jxofapbl Kapa Tery.
14 Cy3riw kan
Cypet A2
Hycay:blfandta3anay ywiH cy3riu KanTbicaJMaHbI
15 Teric 6yrinmeni cy3ri
(6yibimrfaaJndekaaHOpHaTbIraH)
HA3AP AYdAPbIHbI3
blrandahe KypraKa ma3anay Ke3iHde, apkauaH kipicmpinaeH meic 6yainmeni cy3zimEn Kymbic icmehi3!
16 BaJIaHbIcTbIprfbiW 6eKneH copfby wJahrici
Cyper B1
CopfbyuHaHriciH6yBIMdaFbI KOHTaKtire eHriHj3, on 6ekitilei.
Aynin Tactay yuhi onbiKtbci CaycaKeH 6acbHb3 XHe copbyity wnaHrici WbifrapbHb3.
Hyckay: Copfbll Kbllwaft (KocbIMwa) cnaKtbi KepekXapakTap 6aunahbictbipfli 6eIweke TikeenJkaIhaHybl MyMKH XeHe OcbIaNwla copfblTy IwnahricimEn 6aunahbictbipblMyMKIH. WekTeInre h aImakTa bIHraNbI XyMbIC icTeyre apHaJIraH.
AInbH6anbl TyTKaHb KaKeTIHwe KepeK-JapaKaTap MeH copbyIy IJIaHriciH apacbHa opHAtyra 6ona.17-KyndI KapaHbI3.
Kehe: EeHHen copy yuiH tyTKaHbI copbyu naHricHe xanFaHb3.
17 AnbH6aNbI TyTka
Cypet B1
TytKaHbI copByuJnahricHe 6ekitJmereHue opHaTbIH3.
Cyper B4
TytKaHbI copfby wlaHriciHeH anbIn Tactay ywiH OblkTBcaycaKneH 6acbHb3 XeHe TyTKaHbI WblfapbIHb3.
Hcykay: TyTkaHbI anbIn Tactay Ke3iHne KepeKkapaKap CopfbyuHaRicHe TikeNe JxAnFaHyblMymkiH.
Kehe: EeHHen copy yuiH TTKaHb copby uahricHe xanfaHb3.
18 CopbIw TyTiri, 2 x 0,5 M
Cyper B1
→ Copfblu tyTikTepiH ekeyi n de 6ipre kajraHb3 XaHe TyTkAmen 6aNaHaBcTBpBlb3.
19 EdeHHen copy wymeri (aybicy TeTirimEn 6ipre)
Cyper B1
Kpyraek neh bllrana kokbc apacbHda bHraaaybicy:
→ Kyprak KOKbIcTb copraH Ke3de, WbIFbIHKbI TypaTbH bICbIuTbI naJaHaHbIHbI3.
→ CynbI KObICTbI copy Ke3iHDe, UbIFbIKbI TypaTbIH pe3eHKei epHeyDi naJaHaNbHbIb3.
20 Xancapnap ywiH wymek
→Бурьштар,хancapnap,батaperanap men kon Jxetki3y KnbH Xepnepre apHaJraH.
21AanTep
Cyper C1
Copbyity wJahricin 3neKtpnik KypanfKa Kocyfa apHaJFaH.
Kaxet 6oIfAHa aadantepdi 3eKtpnik Kypanap KOHTAKTinepiH dAmameTpIe 6eiimdeyre 6oIaIb.
22 Nkemdi wnaHr
Cypet C1
3NeKtp KypaIbIMeH KyMbIc icTeReH Ke3De 6apbIHwa bIHraNbl KOJaHaBbIcKa apHaNraH. HycKay: AanTepMeH biPre KOJaHaYf a6oJaBl.
KoIdaHy
HA3AP AYdAPbIHbI3
blranda He kprak mazanay ke3ihe, epkaaH KipicmpipinaeH meic 6yainmeni cy3aimeH ymbic icmehi3!
Icke KocyaIbIHda
Cypet A1
→ Byibm XaikbIbH aIbIn TactaHbI3 Da, caylttah iuiHdericih aIbIHbI3.
CaybTTb aHaHaNDbipbHb3, 6aftTtaBliW pONKTePdi caybTTbIH Ty6iHderi caHbIaynapFa tipenreHwe 6acbHb3.
→ Byibim XankbihOpHaTbHb3 xHe 6eKtiHj3.
Kepek-kaapakka aphannipeyiwi Kypan 6acbHbApTkb KaftbHa iinj3.
BmybIMdbickeKocy
Cypet B1
Kepek-kaapakapdbkaJFaHb3.
Cypet B2
Xeni awacbH ehr3iH3.
Cypet B3
→ BybIMdbI KOcbHb3.
KypraKa Ta3aay
HA3AP AYdAPbIHbI3
Tek KypraK meic 6yainmei cy3imeH kymbic icmehi! Cy3aiHi kondaH6ac 6pybH 3aKbIMdapdbH 6ap-KOFBH mekepiH3 kHe KaXem 6oNca, aybcmbpbHbI3.
Cypet A2
KypraK KObictb copy Ke3iHne, KaXeT 6oIraH XaJaAaCy3ri KaNTacbIH KocBIMua opHaTyfa 6oJaBl.
HA3AP AYdAPbIHbI3
Cy32iHmazanay Ke3iHcye3z KanmacbH anbin macmaHb13, eumnece Kanma 3aKbIMDaHybI MymkiH.
Cy3riw Kan BoynbHwa HycKay
Cy3riKanTbHToJyDeHrei copBlnraH Kipre 6aunhaBCTbl.
Kyka WaaH, Kym XaHe T.6. ywiH cyarH KanTbI Kni aybICTbIPbIHb3.
KaTbI ToJFaH cy3riW kan JapblNybl MymKih, COHbIKaH cy3riW KANTbI yaKbITbIHda aybICTbIPbIH3!
HA3AP AYdAPbIHbI3
Cybk kyni mek andbn ana 6enaiuneh copbHb3.
Tancbipbc N. Heri3ri Hcyckacbl: 2.863-139.0, Premium Hcyckacbl: 2.863-161.0.
blnfandbTa3aay
HA3AP AYdAPbIHb3
Cy3aiw Kanmbi KjdaH6aHb3!
Hycay: Erep CaybIT tonfAH 6oJcA, KaNTkbI Kipic caHbIaydbj KaybIN, 6yBIM XOFapbl XblnDaMlbIKneH kYMbIC icTeiDi. BybIMDbI depey eWipipi3 xHe caybITbI 6OcaTbIHbI3.
Mbicanbl,binfaIbI copy yuHnTnici copy wymeriHIn eHdpMeci aHbIKtaIbn, KaKeTTi KepekXapakTap KocblnyTaTnic.
3JIeKTpIik KypaIapMeH KymbIc icTey
Kaxet 6oIraHa aIaIantepi3neKtpnik Kypanap KOHTaKTinePiH dnaMeTpine 6eimdeyre 6oIaIbI.
Cypet C1
A) TyTkblTafbl copy wnaHricimeh 6ipre 6epinre H aanTepdi Kocbin,3neKtp KpaBbHbH KaIramacbImeH baNaHbICTbipyKaXeT. HeMece
B) KymbctbH eHimdiinirH apTbipy wih, kEmdi Wnahrihi naDaaHbHb3. Copy uHaRici MeH aanTep (Ke6ip kaFdaJa) 6aJnAhaCada, coaH COH 3NeKTP KpbJIbICbIHbIH KaIfAmacbHa KOcbJaDbI.
Cypet C2
→ Po3eTka opHaTbIraH KypbIrfBlnap: 3neKtp KypaIbIHbIH po3ETkacbIH copfblWka Kocy KepeK.
Cypet C3
-KypblfblHb eWipy (aHaMa axbpaTkblTb con
kakTaBkyre anapy) MAX) XMeictbl
6actay.
Hcyay:3neKtpnik Kypan KocbInrFaHa, copfbIu Typ6nHa 0,5cekyHd iwiHde 6aay XyMbic icTeenDi. 3neKtpnik Kypan eWipinreHde, copfbIu Typ6nHa copfby uHaHrciHderi KanraH kipdi copy yuH Inwamameh 5 ckyHd iwiHde xMybic icTeen TypaBbl.
Bipikkeh cy3ri Ta3aJay KyeNCi
Cy3ri Ta3anay Kyeipecy3ri KaTacbH opHaTnai-Ak, WaH-To3aHHbH Ken 6eJirih CopbIn Tactayra apHaIraH.
HcKay: Cy3ri Ta3anay Kyneci NaCTaHFaH KaINaK KaTnpbl cy3riHi TyMeHi bacy apkbl Ta3anaNbI, coDaH coH copy Kywi KaTa KeTepeIneI.
Cypet D1
Copy luNaHriciHderi TyTkaHbI Kypblfbl 6acblHbIH KepeK-kaPakapbHa Kocy KaKeT. Kypblfbl KocblbIn TpyFaH Ke3de Cy3rHi Ta3aJAY TyIMecIH 3 pet 6acblHbI3, KeBip epeketep Ko3raJIbICKa TycKeHwe 4 cek. KyTIH3.
Hyckay: Cy3rihi Ta3anay TyMecin 6ipHewe pet 6ackaH coH, KOHTeHepDIn TOntbIpBIM KeNemIH TeKcepH3. Θntnece, KOHTeHepDi awy 6apbcihda waH-To3aH cbiptKa yWby MyMKiH.
YpneyyHKnIacbl
KoJKeTki3y KInBHeMeCe copy MymKiH eMeC kepIepi Ta3aJIay, MbICaJIb, KInbIPuBk Tac Topbl.
Cypet E1
Copfby ty lnaHrici ypney aanTepine eHriinreH, ypney cyHKnrcb6enceHdi.
BmybIMHbIH KymbIC icTeyiH yaKbitwa TOKTaTy
Cypet B3
→ ByuBIMdbI icTeH uBIFapbIHb3.
Cypet F1
Edeh copy wymerih typaK KyiHe opHaTbHb3.
XymbictbIaTay
→ ByibIMdb eipin, awaHb TOKtaH Wbifapbin aIbIHb3.
Caybittb6ocaty
Cypet G1
Kypblfjxankblih anbIn tactaHb3, caybitbblfaJIbI He Kypfak KipdeH 6ocatbHb3. KybnalntbH cahblaydbH 6ypahdaNbTbIFbHb6ap Kypblfj: KOtheHep yctIHderi Kypfak KOkictbAnbIn TactaHb3. Byn MaKcattacybnlkbKyblnAeH CaHbIaydbH 6ypahdaNbTbIfbHbH KOJaHaHbI3.
ByHbIMdbI caTay
Cyper G2
KyaT cbIMbI MeH KepeK-KapaKaTapDbI 6yBIMda caKaTaHbI3. BybIMdbI Kypfak WapTTapDa caKaTaHbI3.
Kytmy MeH TexHnKaJIbIK TeKcepy XyMbIcTapbl
6yibIM MeH nIaCTNKTeH XacanFaH KepeKXapakTapdbI pNactNK 6yibIMapbHa apHaIFaHCTaHdapTTbI Ta3aJafbiU 3aTTapMeH Ta3aayKepeK.
Kaxet 6oIraHda, caybIT neH Kepek-KapaKaTapDbI cyMeH 7aBbHb3 KHe KaT a KOJaHa6ac 6ypbH KyprA TbHbI3.
Teric 6yirinmei cy3riHtataJay
Kehec: pKoIaHydAn KeiH cy3riw 3neMeHTTI
Ta3aHaHbI3. Cyper H1
→ Cy3riu 3JIeMeHTTI KJyIbINTaH 6OcaTbIHbI3 da, WbIFapBIn TactaHbI3, cy3riu 3JIeMeHTTEH KIPdi KOKbc ce6eTIHe 6OcaTbIHbI3.
Kipictipinren teric 6yrinmeni cy3rinepepi ta3anay ywiH cy3riu anemehTti ce6eTTi wetHe KaBn TactaHbI3. Teric 6yirmeni cy3ri cy3riu 3nemehTten Wbifapblmaybi Kepek.
Kaxer 6oJca, teric 6yirnmei cy3riHi 6eNk Ta3aJaHbI3.
Cypet H1
→ Cy3riu 3nemehTt KynbIntan H 6ocatblb13 da, WbIfapbln TactaHb13.
Cypet H2
Teric 6yrinmeni cy3riHi cy3riu 3nemeHTteh kafbin WbifapbIHbI3.
Kaxet 6oIraHda, TeK aIbIHbI cy actbIHda Ta3anaHbI3, CypTneHi3 He KblIwakneH Ta3apTnaHbI3. KonDaHy anDbIHda TOJIbIFbIMeH KypFaTbIHb
CoHbIHda Kpyrak Teric 6yriJMIeni cy3riHi 6ynbIM iWHe KaTadaH opHaTbHb3. Cy3riu 3JeMeHTTI 6yibIM iWHe caBn KOBIHb3.
Keedeprinep 6oIFaHnda KEmek any
TemeH copy kbldAmdbifbl
BiybIMbIH copy KbldAmdbIfbI TeMeHdece, KeJIecInepDi TekcepHj3:
Kepek-kapaakTap, copfbuW luHaHri Hemece copfbuW tyiri 6itEni KaIdbI, 6itEnydi TaKaNneh KetipiH3.
Cypet A2
→ Cy3riu Kan tonfah: KaHa cy3riu KantbI opHaTbIHbI3.
Cypet H2
Teric 6yirinmeni cy3ri kipneHre: Cy3riu 3JemeHTTI wbfapbni anbiHb3 xhe cy3rihi ta3aiahbi3 ("Teric 6yirinmeni cy3rihi Ta3anay" 6enimn KapaHb3).
3aKbIMdAnfah Teric 6yriJmeni cy3riHi ayblCTbIPbIHbI3.
TexHnKaIbIK MaFJyMaTTap
TexHnKanbIK DepeKTePdi VI 6eTTe H kapaHbI3. TeMeHne naDanaHbINFaH 6enrineepiH aHbIKTaMaCbl KeTIPinReH.

Kephey

HomHaJIbIK KyaTbIbIbIbP

BiybIMHbIH 3neKtpnIK po3eTKacbIHbIH MaKC. TyTbIHbIaTbIH KyaTbI

Texhukaike3epicme npda6onbin kanybi MYMKiH!
#
gag aJl aal all aai ll gj 1aasuaall jgoj
4
ayyj
J 1
aJgll aissll aegai (ssll gogll aasrrjll
Jaa
aallolal
a@gaiolalw a
L
gall bao ginao (EN 60704-2-1)
gall jali a5j a9 aill
sj 0j j1j1 j1j1 j1j1 j1j1 j1j1 j1j1
Jueol
aJxall Johai all a
jull aolll bannl 039 Jau pa y .aull laln no cnn 251g
oogolgglgsbgslalldallcsy 1sawil alljup08gmo laow
M
s> jS sJ:Jaa jall s
H0
gll Jgogll gll sLal l baa Jia.1g baiu ll y ll slaI 4aJn aall alalglg
10
aill alog 10aull pgo Jssai aadbg kui jaoi
Jdall
0
1
aolgsolplaswJohd
jai g a>la i 1000
中
5gall aannll gall lalll 1s1 (1) alog, alogu p9 gnail ggbj
Jaagajgall yjall ( ) g. all oal pgs pssi
sag kaill gbsy alogsi
aill aogll alogsi a .g jall
中
:sallalb 1
n
jgljglal jgljlaa, p 2JHg gogll JcJlall o b; JaJI Lg (
aai 101111111111111111111111111111111111111
#
gao jil8 gao pao y jdl l jol 1000
A0gplaswI,ss,agllgwlbnw .aall
yS all> yJall 100 y Jalll sKJg
1gall jall aJ 4j3 Jai j
a 10000000000000000000000000000000000000000000000000
aai jai baa jai jai aai
jaiIg a>dls iie 1
yao plssui aie gll oalog
aill 1bHglo
0
- how do you look at this book?
B
m
all gall jali all jali all 15 b jll 10 all y
a 1592u jgluljuiyll
Tab 1
M
aaii gll Jalal assu
Jag. jallg jgal Jgl
Ialipal aay Jalalld
0jpi j
Jaaall jgal wJn mayyL
aalg
8
H0
H2
Jie biaiala jilaiu Jj 1 aaii jilal elae g jinll
jlyjgljy jzgjgall
Jail
Lpaui pui jll uixai jbi aao
aaiia
1
alasplall sic baiill gdo Josj
上
(1)
(uSuaaog)
10
aai jiaai:1gai
JaaJIe aagio jIaJI: hao
()
(uS,u)
m
gaiI:
aui:
aloo ailus
laull oj19 Jai:ojall lao
plusuJazglgailglbaullx
y1y b) uug aul 01
jia jia jia jia jia jia jia jia jia jia jia
yJg.oguWg.ugNJag
()
gall 0iD sui / Sua u/1 aaiy
gio aaxinnolbll
1421
#

gssall a5wog oawllolbllol
gai 4a> C|w| jSj
.08gll

g jblal 10
gai aaiu> uol
.

gJgJaaal allagallol
ab Aol Bol

2g 1g jaoaall aagai all oaiy
1
ggl gao xuogppl aas y
jgl jai li jglaxn jl jalil
jgl jali jalblj
jgl jali jalblj
jgl jali jali jali jali jali jali jali jali jali jali jali jali jali jali jali jali jali jali jali jali jali jali jali jali jali jali jali jali jali jali jali jali jali jali jali jali jali jali jali jali jali jali jali jali jali jali jali jali jali jali jalljali jalljali jalljali jalljali jalljali jalljali jalljali jalljali jalljali jalljali jalljali jalljali jalljali jalljali jalljali jalljali jalljali jalljali jalljali jalljali jalljali jalljali jalljali jalljali jalljalli jalljalli jalljalli jalljalli jalljalli jalljalli jalljalli jalljalli jalljalli jalljalli jalljalli jalljalli jalljalli
aL

Jg jagj g jog j 10
Jg Jg jg jg jg jg jg jg jg jg jg jg jg jg jg jg jg jg jg jg jg jg jg jg jg jg jg jg jg jg jg jg jg jg jg jg jg jg jg jg jg jg jg jg jg jg jg jg jg jg jg jg
aagdo aaydall ojgaiy
jlg paxwylg ydlolc y al
alil y. l.lqo aanwll
abi go ggluyaaydall ojgaiy
aaill gau
71364 Winnenden (Germany)
Tel.: +49 7195 14-0
Fax: +49 7195 14-2212