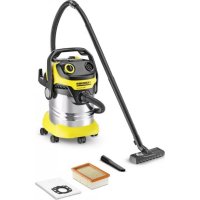
USER MANUAL MV 5 Premium Kärcher
| 14
15 | 16 | 17 18 | 19 20 21 | 22 | | | |
| WD 5 | ● | ● | ● | ● | ● | ● | ○ | ○ |
| WD 5 P | ● | ● | ● | ● | ● | ● | ● | ○ |
| WD 5 Premium | ● | ● | ● | ● | ● | ● | ○ | ○ |
| WD 5 P Premium | ● | ● | ● | ● | ● | ● | ● | ○ |
| WD 6 P Premium | ● | ● | ● | ● | ● | ● | ● | ● |
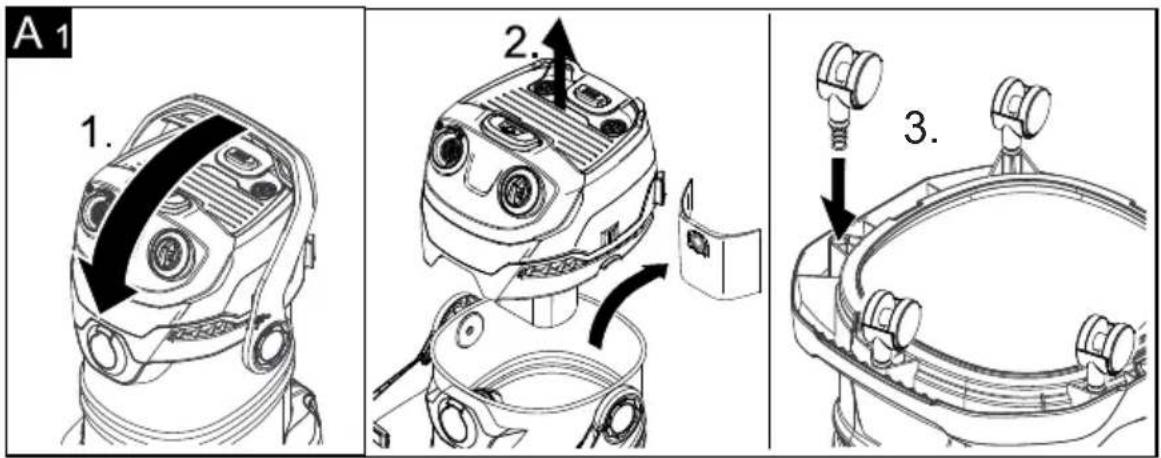
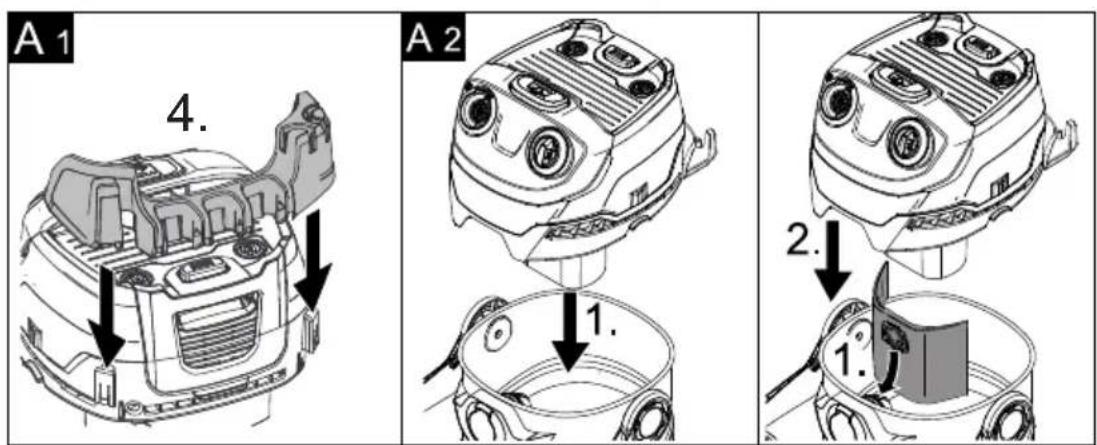
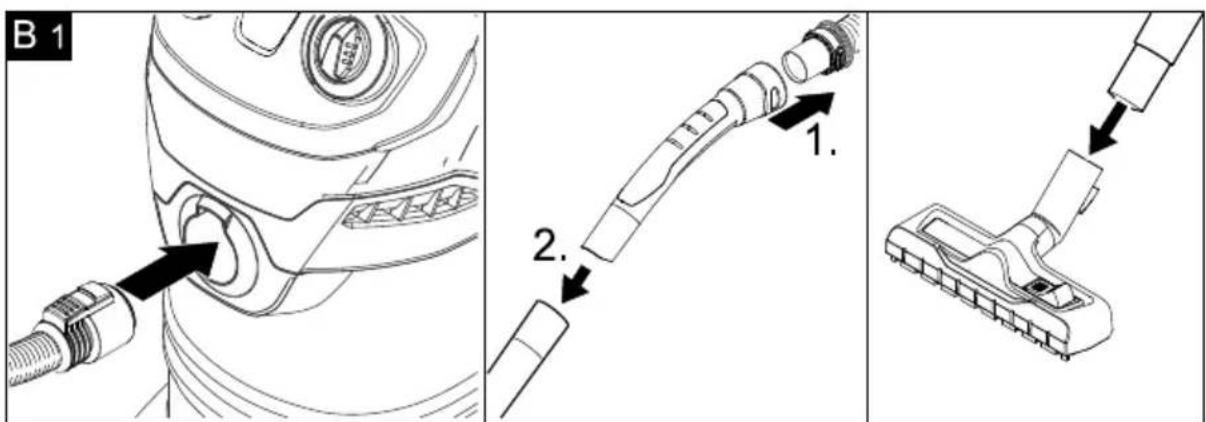
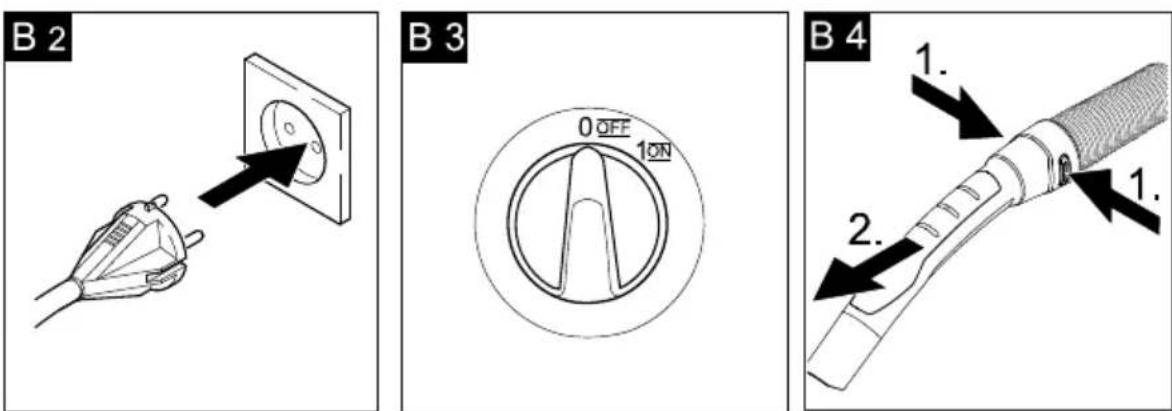
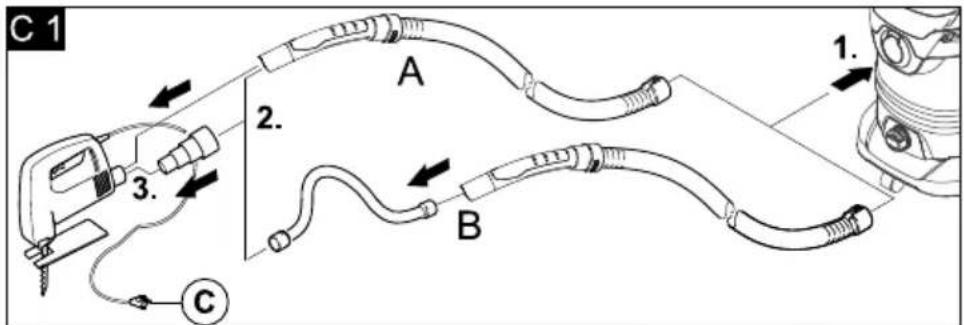
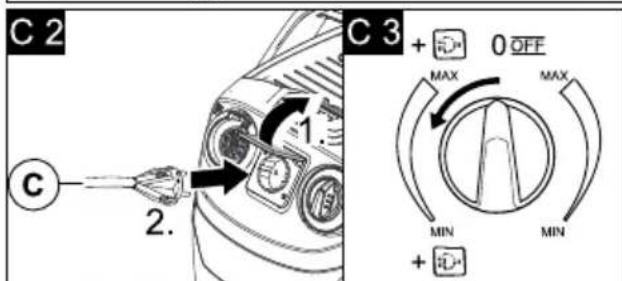
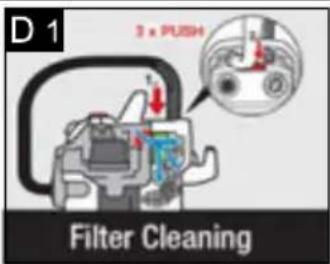
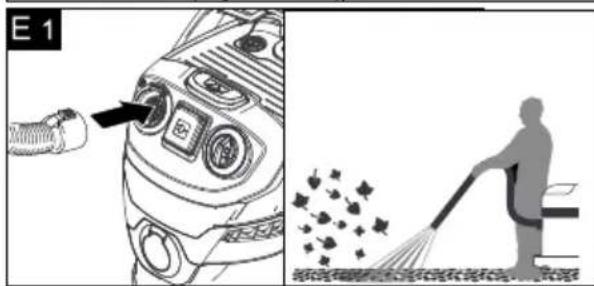
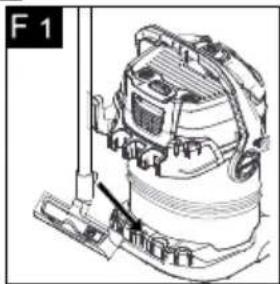
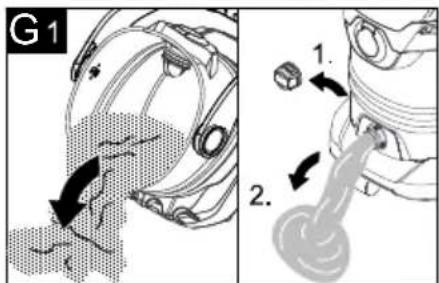
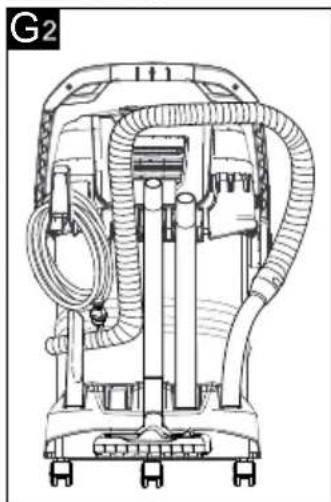
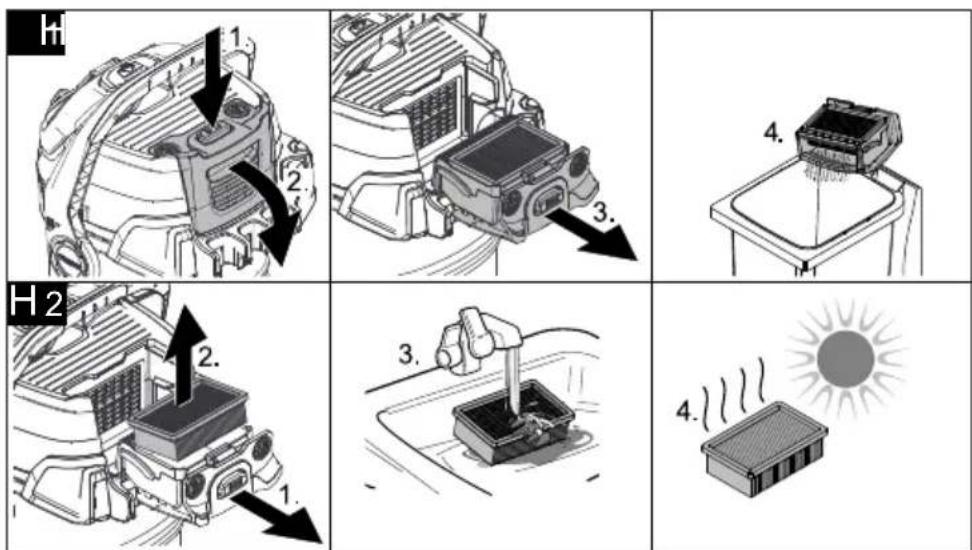
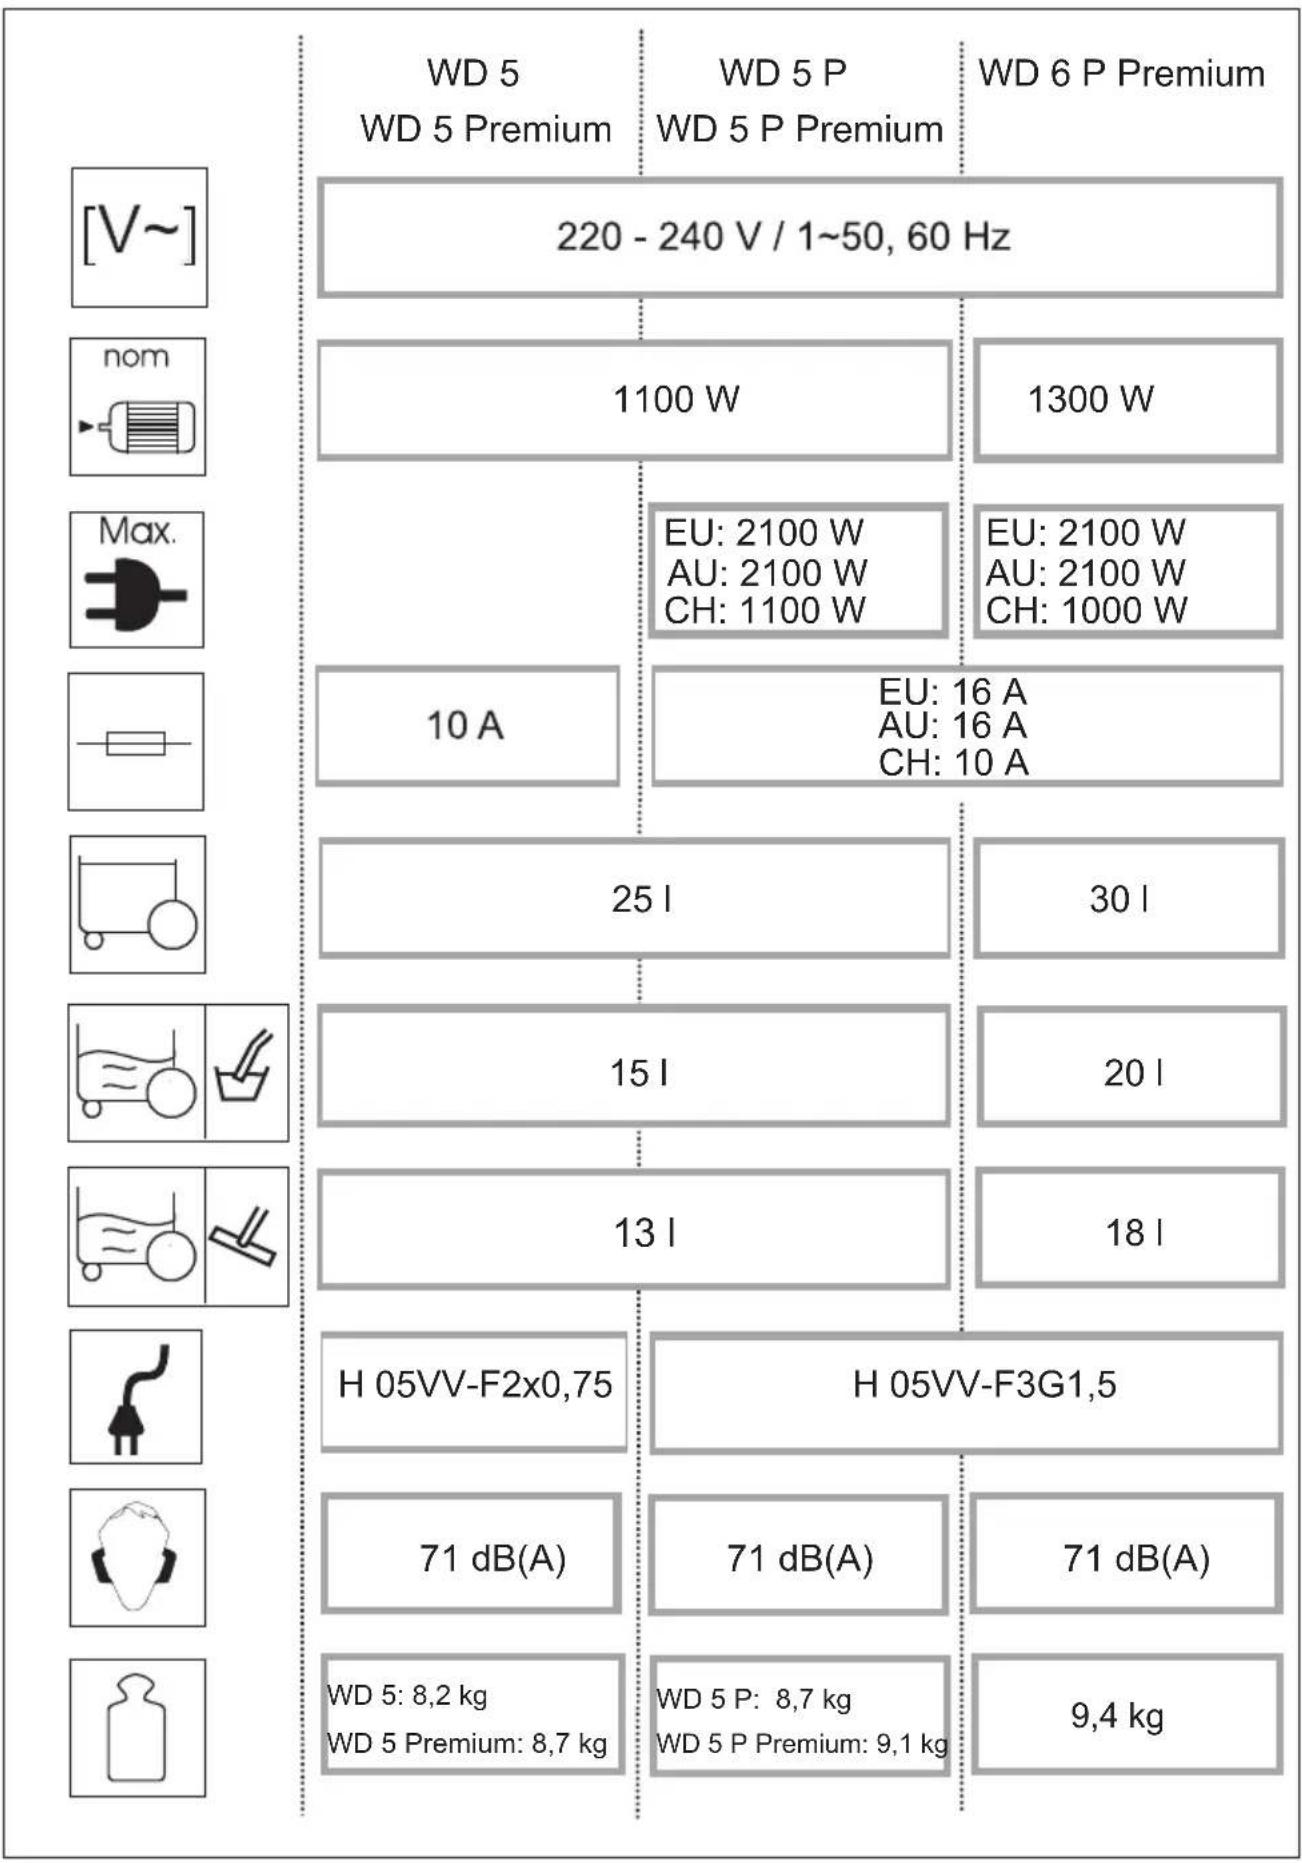
Table of Contents
Description of the Appliance EN 7
Operation EN 8
Care and maintenance EN 9
Troubleshooting EN 9
Technical specifications EN 10
Dear Customer,
Please read and comply with these original instructions prior to the initial operation of your appliance and store them for
later use or subsequent owners.
Proper use
In accordance with the descriptions and the safety information in these operating instructions the appliance is intended for use as a multi-purpose vacuum cleaner.
This appliance has been designed for use in private households and is not intended for commercial use.
- Protect the unit from rain. Do not store outside.
- This device may not be used to suck in ash and soot.
Use the multi-purpose vacuum cleaner only with:
- Original filter bag.
- Original spare parts, accessories and special accessories.
The manufacturer is not responsible for any damages that may occur on account of improper use or wrong operations.
Environmental protection
The packaging material can be recycled. Please do not place the packaging into the ordinary refuse for disposal, but arrange for the proper recycling.
Old appliances contain valuable materials that can be recycled. Please arrange for the proper recycling of old appliances. Please dispose your old appliances using appropriate collection systems.
Disposing the filters and filter bags
Filters and filter bags are made from environment-friendly materials.
They can therefore be disposed off through the normal household garbage provided you have not sucked in substances that are not permitted to be thrown into household garbage.
Notes about the ingredients (REACH)
You will find current information about the ingredients at:
www.kaercher.com/REACH
Warranty
The terms of the guarantee applicable in each country have been published by our respective national distributors. We will repair possible faults on your unit free of charge within the warranty period, insofar as the faults are caused by material defects or defective workmanship. Guarantee claims should be addressed to your dealer or the nearest authorized customer service centre, and supported by documentary evidence of purchase.
Customer Service
Our KARCHER branch will be pleased to help you further in the case of questions or faults.
Ordering spare parts and special attachments
At the end of the operating instructions you will find a selected list of spare parts that are often required.
You can procure the spare parts and the attachments from your dealer or your KÄRCHER branch office.
△DANGER
- The appliance may only be connected to alternating current. The voltage must correspond with the type plate on the appliance.
- Never touch the mains plug and the socket with wet hands.
- Do not pull the plug from the socket by pulling on the connecting cable.
- Check the power cord with mains plug for damage before every use. To avoid risks, arrange immediately the exchange by an authorized customer service or a skilled electrician, if the power cord is damaged.
- To avoid accidents due to electrical faults we recommend the use of sockets with a line-side current-limiting circuit breaker (max. 30 mA nominal tripping current).
- Turn off the appliance and remove the mains plug prior to any care and maintenance work.
- Repair works may only be performed by the authorised customer service.
WARNING
- This appliance is not intended for use by persons with limited physical, sensory or mental capacities or lacking experience and/or skills, unless such persons are accompanied and supervised by a person in charge of their safety or they have received precise instructions on the use of this appliance and have understood the resulting risks.
- Children may only use this appliance if they are over the age of 8 and supervised by a person in charge of their safety, or if they have received instructions on the use of this appliance and have understood the resulting risks.
- Children must not play with this appliance. Supervise children to prevent them from playing with the appliance.
- Cleaning and user maintenance must not be performed by children without supervision.
- Keep packaging film away from children - risk of suffocation!
- Switch the appliance off after every use and prior to every cleaning/maintenance procedure.
- Risk of fire. Do not vacuum up any burning or glowing objects.
- The appliance may not be used in areas where a risk of explosion is present.
- Immediately switch the appliance off or pull the power plug if foam forms or liquids escape!
- Do not use abrasives, glass or universal cleaners! Never immerse the appliance in water.
Certain materials may produce explosive vapours or mixtures when agitated by the suction air! Never vacuum up the following materials:
- Explosive or combustible gases, liquids and dust particles (reactive dust particles)
- Reactive metal dust particles (such as aluminium, magnesium, zinc) in combination with highly alkaline or acidic detergents
- Undiluted, strong acids and alkalies
- Organic solvents (such as petrol, paint thinners, acetone, heating oil).
In addition, these substances may cause the appliance materials to corrode.
Hazard levels
△DANGER
Pointer to immediate danger, which leads to severe injuries or death.
WARNING
Pointer to a possibly dangerous situation, which can lead to severe injuries or death.
CAUTION
Pointer to a possibly dangerous situation, which can lead to minor injuries.
ATTENTION
Pointer to a possibly dangerous situation, which can lead to property damage.
Description of the Appliance
Illustrations on fold-out pages!
These operating instructions describe the multi-purpose vacuum cleaners listed on the front cover.
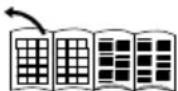
The illustrations show the maximum equipment; depending on the model, there are differences in equipment and supplied accessories.
When unpacking the product, make sure that no accessories are missing and that none of the package contents have been damaged. If you detect any transport damages please contact your dealer.
included in the scope of delivery possible accessories
Suction hose connection
Illustration B1
To connect the suction hose during vacuuming.
ON/OFF switch for appliance (without built-in socket)
Illustration B3
Position I: Suction or blowing. Position 0: Appliance is switched off.
ON/OFF switch for appliance (with built-in socket)
Illustration B3
Position MAX: Vacuuming or blowing. Position MAX: Vacuuming with connected electric tool. Performance regulation: Reduce the suction if necessary during vacuuming, blowing, or when working with an electric tool. Position 0: The appliance is switched off. Electric tool is supplied with voltage.
3 Machine socket
Note: Observe the maximum connected load (see Chapter "Technical data").
Illustration C2
To connect an electric tool.
4 Blowing connection
Illustration E1
Connect the suction hose to the blower connection; this will activate the blower function.
Illustration D1
For cleaning the flat pleated filter fitted.
Note: Do not operate the button when the flat pleated filter is wet.
6 Recessed grip
After unlocking it, grab the appliance head by the handle recess and remove it.
7 Carry handle
Illustration A1
The carrying handle is also used to lock the appliance head and the container. To unlock, push the bow all the way forward until you clear the lock. Then grab the appliance head by the handle recess and remove it.
8 Filter box and release key
Illustration H1
Illustration H2
In order to clean the filter, press the release key, fold out and remove the filter box.
9 Accessory mount
Illustration G2
The accessories compartment allows the storage of suction pipes and suction nozzles on the appliance.
10 Cable hook
Illustration G2
To store the mains cable.
1 Parking position
Illustration F1
To rest the floor nozzle during work interruptions.
12 Steering roller
Illustration A1
Turn the container, press in the steering roller in the openings at the base of the container till the end-point.
13 Drain screw
Illustration G1
The drain screw is used to quickly and comfortably empty wastewater in the container. Tilt the container forward for easier emptying.
14 Filter bag
Illustration A2
Note: Do not use a filter bag for wet vacuuming!
Flat fold filter
(already installed in the appliance)
ATTENTION
Always work with an inserted flat fold filter - during wet as well as dry vacuum cleaning!
16 Suction hose with connecting piece
Illustration B1
Push the suction hose into the connection on the appliance, it snaps in place. In order to disconnect it, push down with your thumb and pull the suction hose out.
Note: Accessories, such as suction brushes (optional) can be directly attached to the connecting piece and thus connected to the suction hose.
For convenient working even in tight spaces.
The removable handle can be attached between the accessories and the suction hose if necessary.
See position 17.
Recommendation: In order to vacuum the floor, attach the handle to the suction hose.
17 Removable handle
Illustration B1
Connect the handle with the suction hose until it snaps in place.
Illustration B4
To remove the handle from the suction hose, press the notch using your thumb and pull off the handle.
Note: Due to removing the handle, accessories can be directly attached to the suction hose.
Recommendation: In order to vacuum the floor, attach the handle to the suction hose.
18 Suction tubes 2 × 0.5 m
Illustration B1
Put both suction tubes together and connect them with the handle.
Floor nozzle (with switching lever)
Illustration B1
For convenient switching between dry and wet dirt:
For vacuuming dry dirt off the floor, use position with extended brush strips. For vacuuming water off the floor, use position with extended rubber lips. 20 Crevice nozzle For edges, joints, heaters and hard to reach locations. 21 Adapter
Illustration C1
To connect the suction hose with an electric tool → Adapt the adapter to the connection diameter of the electric tool using a knife if necessary.
22 Flexible tool hose Illustration C1 For more flexibility when working with electric tools.
Note: Can also be used with an adapter.
Operation
ATTENTION
Always work with an inserted flat fold filter - during wet as well as dry vacuum cleaning!
Before Startup
Illustration A1
Remove the appliance head and take the contents out of the container. Turn the container, press in the steering roller in the openings at the base of the container till the end-point. Insert and lock the appliance head. Clip the holder for the accessory compartment onto the rear side of the appliance.
Start up
Illustration B1 Connect accessories.
Illustration B2 Plug in the mains plug.
Illustration B3 Turn on the machine.
Dry vacuum cleaning
ATTENTION
Work with a dry flat fold filter only.
Check the filter for damage prior to installation and replace as necessary.
Illustration A2
For vacuuming dry dirt an additional filter bag can be inserted if necessary.
ATTENTION
Only operate the filter cleaning without a filter bag inserted, otherwise the filter bag can get damaged.
- The filling level of the filter bag depends on the dirt that is sucked in.
- The filter bag needs to be replaced more frequently while sucking in fine dust, sand, etc.
- Clogged filter bags can burst - therefore make sure to replace the filter bag in a timely manner!
ATTENTION
Vacuum cold ashes only when using a pre-filter.
Order no. basic design: 2.863-139.0, premium design: 2.863-161.0.
Wet vacuum cleaning
ATTENTION
Do not use a filter bag!
Note: If the container is full, a float closes the suction opening, and the appliance works at a higher speed. Switch off the appliance immediately, and empty the container.
For vacuuming up moisture or wetness pay attention to the correct floor nozzle setting and connect the corresponding accessories.
Adapt the adapter to the connection diameter of the electric tool using a knife if necessary.
Illustration C1
or
A) Plug the enclosed adapter onto the handle of the suction hose and connect the electric tool with the connection. B) Use the flexible tool hose to gain more flexibility in your work. Connect this hose to the suction hose and to the adapter and then to the connection of the electric tool.
Illustration C2
For appliances with built-in socket: Connect the mains plug of the electric power tool to the vacuum cleaner.
Illustration C3
- Switch the appliance on (move the rotary switch to the left to position MAX) and start working.
Note: As soon as the electric tool is switched on, the suction turbine starts with a 0.5 second delay. If the electric tool is switched off, the suction turbine continues to run for approx. 5 seconds in order to vacuum up the remaining dirt in the suction hose.
Integrated filter cleaning system
The filter cleaning system is intended for vacuuming up large volumes of fine dust without an inserted filter bag.
Note: Thanks to the filter cleaning system the soiled flat pleated filter can be cleaned at the push of the button and the suction performance can be increased again.
Illustration D1
Place the handle of the suction hose in the accessory compartment on the appliance head. Push the filter cleaning button 3 times while the appliance is switched on, wait 4 seconds between the individual operations.
Note: After operating the filter cleaning button several times, check the container for its filling volume. Otherwise, the dirt might escape when the container is opened.
Blowing function
Cleaning hard to reach locations or, where vacuuming is not possible, like leaves from a gravel bed.
Illustration E1
Connect the suction hose to the blower connection, this will activate the blower function.
Interrupting operation
Illustration B3
Turn off the appliance.
Illustration F1
Hook the floor nozzle into the parking position.
Finish operation
Turn off the appliance and disconnect the mains plug.
Empty the container
Illustration G1
Remove the appliance head and empty the reservoir filled with wet or dry dirt.
For appliances with drain screw: Empty the dry dirt over the container. Use the drain screw to empty liquids.
Storing the appliance
Illustration G2
Stow away the mains cable and accessory at the machine. Store the appliance in a dry room.
Care and maintenance
Clean the appliance and accessory parts made of plastic with a commercial plastic cleaner. If required, rinse the container and accessories with water properly and dry them before reuse.
Clean flat fold filter
Recommendation: Clean the filter box after every use.
Illustration H1
Unlock, fold out and remove the filter cartridge, empty dirt from the filter cartridge over a waste bin. In order to clean the inserted flat fold filter, knock the filter box against the edge of the waste bin. It is not necessary to remove the flat fold filter from the filter box.
If necessary, clean the flat fold filter separately.
Illustration H1
Unlock, fold out and remove the filter cartridge.
Illustration H2
Remove the flat fold filter from the filter box and tab it out. When necessary, clean under running water only, do not wipe or brush down.
Allow to dry completely prior to use.
Finally, reinstall the dry flat fold filter into the appliance. Insert the filter cartridge into the appliance.
Troubleshooting
Decreasing cleaning power
If the suction power becomes less, check the following points: Accessories, suction hose or suction pipes are clogged, please remove the obstruction using a stick.
Illustration A2
Filter bag is full: Insert new filter bag.
Illustration H2
Flat fold filter contaminated: Remove the filter box and clean filter (see Chapter "Cleaning the flat fold filter"). Replace damaged flat fold filter.
Technical specifications
The specifications are listed on the flaps. In the following, you will find the explanation of the symbols used.

Voltage

Output P_nom

Max. connection output of appliance socket

Mains fuse (slow-blow)

Container capacity
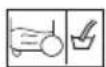
Water intake with handle
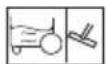
Water intake with floor nozzle

Power cord

Sound pressure level (EN 60704-2-1)

Weight (without accessories)
Subject to technical modifications!
Table of contents
General instructions FR 5
www.kaercher.com/REACH
Warranty
www.kaercher.com/REACH
Warranty
www.kaercher.com/REACH
Warranty
10 Cable hook
Imagen G2
www.kaercher.com/REACH
Warranty
www.kaercher.com/REACH
Warranty
M Parking position
Figure F1
www.kaercher.com/REACH
Warranty
2 Main switch (ON/OFF)
2 Main switch (ON/OFF)
www.kaercher.com/REACH
Warranty
www.kaercher.com/REACH
www.kaercher.com/REACH
Warranty
Interrupting work
Figure B3
Switch off the device.
Figure F1
Information on the ingredients (REACH)
Current information on the ingredients can be found at the following web address:
www.kaercher.com/REACH
Warranty
In each country, the warranty conditions published by our authorized distributor apply. Possible malfunctions of the device during the warranty period are repaired free of charge if they are due to material defects or manufacturing errors. In the event of a claim during the warranty period, please contact, with your proof of purchase, the dealer who sold you the device or the nearest authorized customer service.
The date of manufacture is shown on the factory plate in encoded form.
The individual digits have the following meaning:
Example: 30190
3 year of manufacture 0 decade of manufacture 1 month of manufacture 9 second digit of month of manufacture 0 first digit of month of manufacture
Thus, in this example, code 30190 indicates the date of manufacture 09/(2)013.
Warranty
In each country, the respective warranty conditions issued by our authorized distributor apply. If our product is defective in this country, we will repair any malfunctions free of charge within the warranty period, provided that the defect is due to material or manufacturing faults. In case of complaints during the warranty period, please contact, with the purchase receipt, the trade organization that sold you the device or the nearest authorized customer service.
Customer service
If you have any questions or malfunctions, our KARCHER branch will be happy to help you resolve them.
Ordering spare parts and special accessories
You will find the most frequently needed spare parts at the end of the operating instructions. You can order spare parts and accessories from your dealer or directly from KARCHER.
Safety instructions
DANGER
- The device should only be connected to alternating current. The voltage must correspond to the specifications on the type plate of the device. Do not touch the mains plug and socket with wet hands. Do not pull the mains plug out of the socket by pulling on the mains cable.
- Before starting work with the device, check the mains cable and the mains plug for damage. A damaged mains cable must be replaced immediately by an authorized customer service/electrical specialist. -To avoid accidents related to electricity, we recommend using sockets with a residual current device (max. rated residual current: 30 mA).
- Before performing any work on care and maintenance, the device must be switched off and the
mains plug must be pulled out of the socket.
- Repair work and work on electrical components may only be carried out by the authorized customer service.
This device is not intended for use by persons with reduced physical, sensory or mental capabilities, or lack of experience and/or lack of necessary knowledge, unless they are under the supervision of a person responsible for their safety or have received instructions on the use of the device from such a person, and also understand the risks involved. - Children may use the device only if they have reached the age of 8 and are under the supervision of a person responsible for their safety, or have received instructions on the use of the device from such a person, and also understand the risks involved. - Do not allow children to play with the device.
- Make sure that children do not play with the device.
- Do not allow children to clean or maintain the device without supervision.
- Keep the packaging film away from children, there is a risk of suffocation!
- The device should be unplugged after each use and before cleaning/maintenance.
- Fire hazard. Do not allow hot or glowing objects to come into contact with the device.
- Operation of the device in potentially explosive areas is prohibited.
- If smoke or liquid leaks from the device, it must be switched off or disconnected from the power supply immediately! Do not use abrasive cleaners, glass cleaners, or all-purpose cleaners! Never immerse the device in water. Some substances mixed with the air drawn in can form explosive vapors or mixtures!
Never vacuum the following substances:
- Explosive or flammable gases, liquids, and dust (reactive dust)
- Reactive metal dust (e.g., aluminum, magnesium, zinc) in combination with strong alkalis and acids
- Undiluted strong acids and alkalis
- Organic solvents (e.g., benzene, thinner, acetone, fuel oil).
In addition, these substances can damage the materials used in the device.
Degree of danger
DANGER
Indicates an imminent hazardous situation which, if not avoided, will result in death or serious injury.
WARNING
Indicates a potentially hazardous situation which, if not avoided, could result in death or serious injury.
CAUTION
Indicates a potentially hazardous situation which, if not avoided, may result in minor or moderate injury.
NOTICE
Indicates information considered important, but not hazard-related.
Device description
Illustrations are on the fold-out pages!
This operating manual provides a description of the universal vacuum cleaner shown on the cover. The illustrations show the maximum equipment of the device. The equipment and number of additional accessories included in the delivery scope depend on the device model.
When unpacking the device, check that it is complete and undamaged. If damage incurred during transport is detected, notify the trade organization selling the device.
Contents of delivery and possible additional equipment
1 Connection element for the suction hose
Figure B1
→ For vacuuming work. 2 Appliance switch (on/off), (without built-in socket)
Figure B3
→ Position: Suction/blowing air. Position 0: Appliance switched off. 2 Appliance switch (on/off), (with built-in socket)
Figure B3
→ Position MAX: Suction of dust. → Position + MAX: Suction with connected power tool → Power regulator: If necessary, when vacuuming or when working with power tools, reduce the suction power. → Position: Appliance switched on. Voltage is supplied to the power tool.
3 Socket on the appliance
Note: Observe the maximum total connected load (see chapter "Technical data").
Figure C2
→ For connecting power tools.
4 Air outlet
Figure E1
→ Connect the suction hose to the air outlet. This activates the blowing function.
5 Filter cleaning button
Figure D1
→ For cleaning the built-in flat pleated filter.
Do not press the button when the device is wet.
6 Gripping groove
→ Remove the device head after unlocking it from the gripping groove.
7 Handle
Figure A1
→The handle also serves to unlock the device head and the reservoir. To unlock, fully push the handle forward. Grasp the device head and pull it out of the gripping groove.
8 Filter cassette and unlocking button
Figure H1
Figure H2
→ To clean the filter, press the unlocking button, tilt the filter cassette back, and remove it.
9 Storage compartment for accessories
Figure G2
The storage compartment for accessories is intended for storing the suction tubes and suction nozzles on the device.
10 Cable clips
Figure G2
→ Turn the switch.
11 Parking position
FIGURE F1
→ To switch off the nozzle, turn it to the off position during a break in work.
12 Guide pin
FIGURE A1
→ Turn the reservoir, insert the guide pin into the hole on the base of the reservoir.
13 Drain plug
FIGURE
G1
The drain plug serves for quick and convenient emptying of the tank. For emptying, tilt the tank forward.
14 Filter bag
FIGURE A2
Note: For cleaning the filter, it is necessary to use the bag for collecting dust!
15 Flat gasket (already installed in the device)
The vacuum cleaner can be used with the installed dust bag filter, both for dry and wet cleaning!
16 Suction hose with connecting element
Figure B1
Insert the suction hose into the device until it clicks. To remove the hose, press the release button on the side and pull out the suction hose.
Note: Accessories such as, for example, suction nozzles (optional) can be attached directly to the connecting element and thus connected to the suction hose.
For comfortable work even in confined spaces.
If necessary, the handle can be placed between the accessory and the suction hose.
See position 17.
Recommendation: When cleaning the floor, insert the handle into the suction hose.
17 Handle
Figure B1
Connect the handle to the suction hose until it clicks.
Figure B4
To remove the handle from the suction hose, press the release button with your thumb and pull the handle.
Note: After turning off the vacuum cleaner, you can also insert the hose directly into the suction hose.
Recommendation: When cleaning the floor, insert the hose into the suction hose.
18 Suction hoses 2x0.5 m
Figure B1
Connect both suction hoses and connect them to the hose.
19 Floor nozzle
(with brush switch)
Figure B1
For convenient switching from dry dirt pickup to wet dirt pickup:
→ For dry dirt pickup from the floor, use the position with the brush strips extended. → For wet pickup from the floor, use the position with the rubber strips extended.
20 Nozzle for cleaning joints and seams
→ For joints, seams, radiators, and hard-to-reach surfaces.
21 Adapter
Figure C1
→ To connect the suction hose to the electrical appliance → If necessary, attach the adapter with a diameter matching the appliance connection to the electrical appliance.
22 Tn6knn wlnaHr nHcTpymeHaTa
Figure C1
→ Increasing safety when working with power tools.
Note: Can also be used with an adapter.
Control
WARNING
Always work only with the flat folding filter installed, both for wet and dry vacuuming!
Preparation for work
Figure A1
→ Remove the device cover, take out the accessories from the reservoir. → Turn the reservoir, insert the control rollers into the openings on the base of the reservoir. Press and lock the device head. → Install the accessory holder on the rear side of the upper part of the device.
Commissioning
Figure B1
→ Connect the accessories
Figure B2
Insert the mains plug into the socket.
Figure B3
Turn off the device.
Dry filter
WARNING
Only work with a dry, folded filter.
Before use, check the filter for damage and replace if necessary.
Figure A2
For dry vacuuming, a paper filter bag can be used additionally if necessary.
WARNING
Clean the filter only with the filter in place, otherwise it may be damaged.
Specified degree of filter bag filling
- The degree of filling of the dust bag depends on the material being vacuumed. - When vacuuming fine dust, the dust bag must be changed more often. - The installed bag for collecting dust may tear, so it should be replaced in a timely manner!
WARNING
Vacuuming cold ash is only possible using a pre-separator. Order number, basic version: 2.863-139.0, premium version: 2.863-161.0.
Cleaning in wet mode
Do not use any pneumatic tools!
Note: when the tank is completely full, the suction opening is closed by a float, and the device starts operating at increased speed.
The device should be switched off immediately and the tank emptied.
When suctioning liquids, keep the nozzle in the correct position to connect the appropriate accessories.
Working with electric tools
If necessary, attach an adapter with a nozzle to the electrical equipment, matching the diameter of the connection.
Figure C1
a) Put the adapter on the suction hose handle and connect it to the electrical tool connection point. b) For better work comfort, use the tool handle. Connect it to the suction hose and, if necessary, to the adapter, then switch on the electric tool.
Figure C2
For devices with a built-in socket:
Insert the power plug of the electric tool into the vacuum cleaner.
Figure C3
Switch on the device (turn the switch to the left to the +MAX position) and start working.
Note: After switching on the electric tool, the suction hose starts with a 0.5-second delay. When switching off the electric tool, the suction hose continues to operate by inertia for about 5 seconds to suck up the remaining debris from the hose.
External filter cleaning system
The filter cleaning system is provided for using the device in conditions where a large amount of fine dust is sucked in without filtering the bag.
Note: Using the filter cleaning system, you can press the cleaning button to clean the dirty filter and restore suction power.
Figure D1
Insert the suction hose handle into the holder of accessories at the top of the device. Press the filter cleaning button 3 times while the device is switched on, with an interval of 4 seconds.
Note: After repeatedly pressing the filter cleaning button, check the fill level of the dirt reservoir. Otherwise, when opening the reservoir, dirt may leak out.
Blower function
Cleaning hard-to-reach places or places where suction is not possible, e.g., removing leaves from the lawn.
Figure E1
→ Connect the suction hose to the air outlet connection. This activates the blowing function.
Break in work
Figure B3
Switch off the device.
Figure F1
→ Place the floor nozzle in the parking position.
Work description
Switch off the device and pull out the mains plug.
Empty the reservoir
Figure G1
→ Remove the device head, empty the reservoir with wet or dry dirt.
On devices with a drain plug: Remove dry dirt from the reservoir. For liquids, use the drain plug.
Storing the device
Figure G2
→ Wind up the mains cable and accessories on the device. Store the device in dry rooms.
Care and maintenance
www.kaercher.com/REACH
Warranty
www.kaercher.com/REACH
Guarantee
www.kaercher.com/REACH
Warranty
www.kaercher.com/REACH
Warranty
Dear Customer,

www.kaercher.com/REACH
Warranty conditions
Instructions on ingredients (REACH)
Current information on ingredients can be found at:
www.kaercher.com/REACH
Warranty
www.kaercher.com/REACH
Warranty
www.kaercher.com/REACH
Warranty
In every country, the warranty conditions published by our sales company apply. During the warranty period, we will rectify any faults on the device free of charge if they are due to material or manufacturing defects. In the event of a warranty claim, please contact your dealer or an authorized service center; enclose the accessories and the original receipt.
Service department
www.kaercher.com/REACH
Warranty
In each country, the warranty conditions published by our authorized distributor apply. Possible damage within the warranty period is repaired free of charge if the cause is material or manufacturing defects. In the event of exercising the warranty right, please contact your dealer or the nearest authorized service center, presenting the equipment and proof of purchase.
Customer service
If you have questions or problems, your KARCHER distributor will be happy to help you.
Spare parts and special accessories
The list of necessary spare parts can be found at the end of the operating instructions. Spare parts and accessories are available from your dealer or from the authorized KARCHER branch.
Safety instructions
DANGER
- Only connect the device to alternating current. The voltage indicated on the type plate of the device must match the supply voltage.
- Never touch the mains plug and socket with wet hands.
- Ensure that the connection cable is not damaged by pulling it out of the socket.
- To avoid electric shock, we recommend using contacts with a built-in fuse (maximum 30 mA rated current for activation).
- Before any maintenance work, the device must be disconnected from the mains and removed from the contacts.
- Repair work and work on electrical components may only be carried out by authorized service personnel.
WARNING
This device is not intended for use by persons with reduced physical, sensory or mental capabilities, or lack of experience and/or knowledge, unless they are under the supervision of a person responsible for their safety or have received from that person instructions on how to use the device. - Children are allowed to use the device only if they are over 8 years old and are under the supervision of a person responsible for their safety or have received instructions on how to use the device and understand the dangers involved. - Children must not play with the device.
- The device must be kept out of reach of children to ensure safety. -The use and maintenance by the consumer must not be carried out by children without supervision. -Keep the packaging film away from children, there is a risk of suffocation!
- The device must be disconnected after use or before cleaning/maintenance.
- Fire hazard. Do not cover the openings or the device with objects.
- It is forbidden to work without safety precautions. -If malfunctions or leaks occur, disconnect the device immediately or remove the battery! Do not use abrasive agents, cleaning agents for glass or universal cleaning agents! Never immerse the device in water. When vacuuming with the air for cleaning certain materials, explosive gases or mixtures may form! Never vacuum the following materials:
- Explosive or flammable gases, liquids and dusts (reactive dusts)
- Reactive metal dusts (e.g. aluminum, magnesium, zinc) in combination with highly active and acidic cleaning agents
- Undiluted strong acids and bases
- Organic solvents (e.g. benzene, paint thinners, acetone, naphtha). In addition, these substances may damage the materials used in the manufacture of the device.
DANGER LEVELS
DANGER
Indicates an imminent danger that will lead to serious injury or death.
WARNING
Indicates a potentially dangerous situation that may lead to serious injury or death.
Warning about a possible dangerous situation that could lead to personal injury. ATTENTION
Warning about a possible dangerous situation that could lead to material damage.
Description of the device
See the diagrams on the pages of the device!
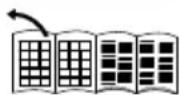
This instruction for use describes the operation of the delivered multi-function vacuum cleaner unit. The figures show the maximum equipment, depending on the model there may be differences in the equipment and the supplied accessories.
When unpacking, check that the accessories listed in the packaging are present and that no elements are damaged. If damage is found during transport, notify the dealer from whom you purchased the device.
Switching on the device is possible only when it is fully assembled.
Connection for the suction hose
B1
For connecting the suction hoses when suctioning.
Device switch (On/Off) (without locking contact)
Figure B3
Position I: Suction or blowing. Position 0: Device is switched off.
Device switch (On/Off) (with locking contact)
Filter B3
Position MAX: Suction or blowing. → Position MAX: Suction with electric tool connected. Power regulation: Press when suction, blowing, or working with an electric tool is needed. → Position 0: The device is switched off. The electric tool is locked with voltage.
3 Socket for the tool
Note: Observe the maximum permissible power (see chapter "Technical Data")
Figure C2
For connecting an electric tool.
4 Blowing connection
Figure E1
→ Insert the suction hose into the blowing opening so that the blowing function is activated.
5 Filter cleaning button
Figure D1
For cleaning the main filter.
Note: Do not press the button when the filter is wet.
6
Accessories
→ The release lever locks the head of the device for vacuuming and cleaning. 7Dust container
Figure A1
→ The lever simultaneously locks the head of the device and the reservoir. To unlock the lever, press it down until the lock releases. The device head for vacuuming and cleaning is locked.
8 Filter cassette and locking buttons H1 and H2 for filter replacement. To replace the filter, press the locking buttons and remove the filter cassette. 9 Storage compartment for accessories Figure G2. The storage compartment allows storing the crevice nozzle and the upholstery nozzle on the device itself. 10 Cable hook Figure G2 for storing the cable. 11 Parking position F1 for parking the nozzle during work interruptions. 12 Water tank lever Figure A1 for the reservoir. The lever presses the reservoir down to the stop. 13 Drain plug Figure G1 → The drain plug allows quick and easy draining of dirty water from the reservoir. For better draining, tilt the reservoir forward. 14 Filter sponge Figure A2. Note: For wet vacuuming, do not use the filter sponge!
WARNING
→ Press the suction hose locking marks into the device outlet until it clicks. To release, press the release button with your finger and pull out the suction hose locking marks.
15 Flat filter (already installed in the device) Working with a flat filter is possible both for wet and dry vacuuming! 16 Suction hose with connection element B1. Note: Accessories, e.g., suction nozzles (optional), can be attached directly to the connection element or connected via the suction hose. For convenient work in tight spaces. If necessary, the connection piece can be placed between the accessories and the suction hose. See position 17. Recommendation: For vacuuming floors, attach the nozzle to the suction hose. 17 Connection piece B1 → Attach the connection piece to the suction hose until it clicks. Figure B4. To detach the connection piece from the suction hose, press the release button with your finger and pull out the connection piece. Note: By means of the connection piece, accessories can also be attached directly to the suction hose. Recommendation: For vacuuming floors, attach the nozzle to the suction hose. 18 Suction hose 2x0.5 m B1 → Insert the two suction hoses one into the other and attach the connection piece. 19 Air regulator (for power adjustment) B1 For convenient adjustment between dry and wet cleaning: For vacuuming dry dirt, use the position with the raised bristles. For vacuuming wet dirt, use the position with the raised rubber lip. 20 Nozzle for cleaning upholstery, for furniture, radiators, and hard-to-reach places.
21Adapter
Figure C1
For connecting the vacuuming hose to an electrical tool. → When using the adapter, insert the adapter with the nozzle end into the connection of the electrical tool.
22 Hose for tools
Figure C1
Safety when working with electric tools.
Note: Can also be used with an adapter.
Maintenance
WARNING
Working with a dry filter is recommended, both in wet and dry vacuuming!
Before starting operation
Figure A1
Remove the head from the container, take out the filter bag from the reservoir. Close the reservoir, insert the knees into the openings on the floor of the reservoir until they stop. Then place and lock the head on the container. Secure the hose for the storage space on the side of the head.
Work only with a dry filter.
Before use, check the filter for damage and replace if necessary.
Figure A2
For dry vacuuming with low suction power, a filter bag can be placed.
WARNING
Always operate the device without a filter bag, as if the filter bag is damaged, it may be sucked in.
Filter bag
- The filter cartridge must be replaced depending on the height at which it is used.
- In case of dirt, sand, etc., the filter cartridge must be replaced more often. The additional filter cartridges must be used, so replace the filter cartridge in a timely manner!
ATTENTION
Use of the device is only permitted with a coarse dirt filter.
Order number for replacement Basic: 2.863-139.0, replacement Premium: 2.863-161.0.
Wet vacuuming
ATTENTION
Do not use filter cartridges!
Note: If the reservoir is full, the float closes the suction opening and the device works at increased speed. Switch off the device immediately and empty the reservoir.
For vacuuming moisture or liquids, pay attention to the correct setting of the floor nozzle and connect the appropriate accessories.
Working with electrical tools
→ Before any work, remove the plug from the socket before connecting or disconnecting the electrical tool.
C1
A) Insert the supplied adapter into the tool holder and turn the electrical tool. B) For better handling during work, use the supplied tool holder. Connect it with the suction hose and the adapter to the electrical tool.
Figure C2
→ Before using the electric tool, it must be kept in the dust-suction unit.
Figure C3
-Turn on the device (turn the switch to the + MAX position) and start working.
Note: When the electric tool is switched on, the suction turbine takes about 0.5 seconds to start. When the electric tool is switched off, the suction turbine continues to run for about 5 seconds to suck up the remaining dust in the suction hose.
Integrated filter cleaning system
The filter cleaning system is designed to suck large amounts of dust without installing a filter bag.
Note: With the filter cleaning system, the filter can be cleaned by pressing the button. The suction power can be increased again.
Figure D1
→ Place the suction hose attachment in the storage compartment on the top of the device. Press the filter cleaning button 3 times, waiting 4 seconds between each activation.
Note: After pressing the filter cleaning button multiple times, check the fill level of the reservoir. Otherwise, dust may escape from the reservoir.
Working as a blower
Cleaning hard-to-reach places where suction is not possible, e.g., dust from a balcony.
Figure E1
→ Place the suction hose in the blowing opening, so that the blowing function is activated.
Switching off the device
Figure B3
→ Disconnect the device.
F1
Order spare parts in the service for repairs.
End of work
→ Disconnect the device and remove the plug from the socket.
Cleaning the reservoir
Figure G1
→ With the device head removed, clean the interior with a damp or dry cloth from the reservoir.
If the device has a drain plug: clean the dry cloth through the reservoir. For cleaning, use the drain plug.
Storing the device
Figure G2
→ Remove the power cord and accessories from the device. Store the device in a dry room.
Maintenance
→ Maintain the device and its accessories from dust. Use the brush attachment for cleaning. The reservoir and accessories should be washed with water and dried before reuse.
Cleaning: After each use, clean the filter cassette.
H1
→ Remove the filter cassette, pull out the filter cassette from the housing. To clean the supplied filter, remove the filter cassette from the housing. For a clean filter, the filter cassette should not be inserted.
If necessary, clean the filter with water.
H1
→ Remove the filter cassette, tilt it and empty it.
H2
→ Take the filter out of the filter cassette and pull it out. If necessary, clean it under running water, do not rub or brush it. After use, leave it to dry completely. → Then mount the dry filter back into the housing. Insert the filter cassette into the housing.
Troubleshooting
Insufficient suction effect
If the suction power of the device decreases, check the following points:
→ The accessories from the kit, the suction hose and the suction tubes must be unblocked. If they are blocked, remove the blockage with a stick.
Figure A2
→ The filter is clogged: Insert a new filter.
H2
Flat filter: replace the filter and clean the filter (see "Cleaning the filter"). → Follow the instructions for cleaning the filter.
Technical data
The technical data can be found on the rating plate. On the left is an explanation of the symbols used there.

Voltage

Power P W.

Max. connected load at the contact of the device

Fuse (slow)

Volume of the water reservoir
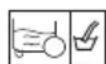
Water inlet with quick coupling
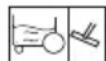
Water inlet with screw connection

Mains cable

Permissible noise level (EN 60704-2-1)

Weight (without accessories)
We reserve the right to make technical changes!
Table of contents
General notes ET 5
Parts of the device ET 7
Operation ET 8
www.kaercher.com/REACH
Warranty
www.kaercher.com/REACH
Warranty
www.kaercher.com/REACH
Warranty
www.kaercher.com/REACH
Warranty
In every country, the warranty conditions are set by our authorized distributor. We will repair any malfunctions of the device free of charge during the warranty period, provided that they are caused by material or manufacturing defects. In the event of a warranty claim, please contact your dealer or the nearest authorized customer service center with the purchase receipt and the device.
Customer service
For any questions or in case of malfunctions, our KARCHER branch representatives will be happy to assist you.
Spare parts and special accessories
The range of spare parts, which are often necessary, can be found in the operating instructions. Spare parts and special accessories can be obtained from your dealer or from the KARCHER branch.
Safety instructions
DANGER
- Devices with plugs are only to be connected to alternating current. The voltage must correspond to the type plate of the device.
- Never touch the mains plug and socket with wet hands.
- Do not pull the plug out of the socket by the cable.
- Check the device and the power cord for possible damage before each use. Have damaged cables replaced by an authorized customer service/electrician.
- To avoid accidents from electrical devices, we recommend using sockets with a residual current circuit breaker (max. 30 mA nominal current). - During cleaning and maintenance work, the device must be switched off and the plug removed from the socket.
- Repair work and work on electrical components may only be carried out by authorized customer service.
CAUTION
This device is not intended for use by persons with reduced physical, sensory or mental capabilities or lack of experience and/or lack of knowledge, unless they are supervised by a person responsible for their safety or have received instructions on how to use the device, as well as all possible risks. - The device may be used by children aged 8 and above if they are supervised by a person responsible for their safety or have received instructions on how to use the device, as well as all possible risks. - Do not allow children to play with the device. - Supervise children to ensure they do not play with the device. Do not allow children to clean or maintain the device without supervision. - Keep packaging film away from children, there is a risk of suffocation! - The device must be switched off after each use and before cleaning/maintenance. - Risk of injury. Do not allow any liquids or objects to enter. - Do not operate in explosive atmospheres. - When switching the device on or off, unplug it or disconnect it from the power supply. - Do not use cleaning agents for the device. Use universal cleaning agents! It is forbidden to immerse the device in water.
neky, a6o yki ompumalu iHcmpykuii i3 3acmocybaHHn npucmpoio biD mako'i ocobu, a maKoJ yceiOmoMb MOxIuBi pu3uku. - He do360jme dima 2pa-mu 3 npucmpoem. - Cmexumu 3a mum, uo6 dimu He epaun i3 npucmpoem. He do3e0jme dimm npo- bodiumu ouuueHnma o6cny2o8ybaHH npucmpoio 6e3 Ha2j4y. - Πакуьыну піьку мрumsу me nodani biD dimeu, icHye He6e3neka 3aodyweHnry! - Ppucmpiu cnid bioknouamu nicna koxno bukopcmaHn i neped npoedeHnM oyuueHHa/mexhichno 6-cny20ybaHHa. - Hebe3neka nokeki. He donyckamu BCMOkmyBaHnnaIauOuyx abo mIIouux npedMemis. - PoobomayubuxoHe6e3neuHuxymo8ax He 0380JembCra. - Ppu ymbopeni niu a6o bumikaHpiu npucmpiu cnid Heaunho buknioyu mu abo biochyamu bi ekempomepexi. - He bukopucmoeyama 3acobu dny uueeHHa dna cknaafo yHiepcalbHi 3acobu dny uueeHHa! 3abopoHembcra3ahypuoamu npucmpiu y 8o-y.
These substances may form explosive gases or vapors when mixed with other substances. Never use the following substances:
- Explosive or flammable gases, liquids or dusts (reactive substances)
- Reactive metals and dusts (e.g., aluminum, magnesium, zinc) in combination with strong alkalis and acids for cleaning purposes
- Undiluted strong acids and lyes
- Organic solvents (e.g., benzene, paint thinner, acetone, toluene).
Before use, check whether the materials used are compatible with the device.
Safety level
DANGER
Indicates a danger that directly threatens and leads to serious injury or death.
WARNING
Indicates a potentially dangerous situation that may lead to serious injury or death.
CAUTION
Indicates a potentially dangerous situation that may cause minor injury.
NOTICE
Indicates a potentially dangerous situation that may cause material damage.
The instruction manual for the universal device is shown on the cover.
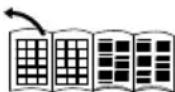
The illustrations show the maximum equipment of the device. The equipment and quantity of the delivery set included in the scope of delivery may differ depending on the device model.
When unpacking, check the contents of the packaging for completeness of the delivery set as specified. If the packaging is damaged during transportation, please contact your seller.
The delivery set includes the following equipment:
1 Device
Handle B1
For manual operation during work.
2 Power cord
(without plug)
Handle B3
For use with a power outlet. Position: for connection.
2 Power cord
(with plug)
ManHOK B3
→ Noloxen MAX: BcMOKTyBaHHa 6o BuNyBaH-H. → Nolokhenra MAX: BcMOKtyBaHHa 3 niD'εHaHn m eNEkTpoHCTpyMeHTOM PerynTop noTyXHocTi: 3a Heo6xidHocTi, npn BCMOKTyBaHHi a60 npn po60ti 3 eNeKtpuHmN iHCTpyMeHTAMN 3HN3NTn noTyXHicTb yCMOKTyBaHHJ. → NonoXeHHa 0: Pnucpii BBIMKHeHn. Ha eJeK-tpoIHcTpymeHT nodaetbca Hanpyra.
3 3TencelbHa po3eTkapnctpo
Bka3iBaKa:BpaxoByBaTn MaKcImaIbHy 3aIaIbHy CnoKmbaHy notyKHiCtB (DVB. po3dIn «TexhiHi daHi).
ManHOK C2
→Для NiiknIOUeHRe eNEKtpoiHCTpyMeHTy.
4 Micce niД'εДнHaHЯ ДЯ po3dBy
ManhoHok E1
→ PnEHaTn BCMOKTyBaIbHn IJNaHr Do nIKNIOeHHra INoaqui NobiTp. Tm Camm aKTnByetbcra FyHKia npOdyBaHHa.
Khonka ouuueHHa pInbtpa
ManIOHOK D1
→ έуншеньуdoBAHoro nNoCKoro cKnJaAca-CTORO φinbTpa.
Bka3iBa: He HataNcKaTu KhoNky, KOJI N cKnaJauctn fiNbTp BOnOrn.
6 3arnn6nennn nn pyouk
3HrTn roJIOBky npucToPO nICy po36NOKyBaHHBA 3aRNI6NeHHI dny pyuK.
7 Puyka
ManHOHOK A1
→PyuKa OAnOuaChO CnyKnTb Dnra po36IOKyBaHHr rONOBKn npncTpoIO pe3epByapa. Dnra po36IOKyBAHHr NOBHCtBO BIDKNHyTN pykU Bnepei. B3aTnca 3a roIOBky npncptpoio i BntraHytn II 3a- rnn6neHH.
19 HacaKaIy nIaNorn (3BaXeJIempeEmnKAK
ManHOHOK B1
IpyHOro nepemkaHHa 3 cyxoro npuapnHa BONORE:
→ IINBAOMOKTyBaHHcyxOo6pydy BnKOpNCOTobyETBCrIIOXKeHH3BnCyHyTmN UITKOBUM NlaHkAMN. → ⅡЯ BCMOKTYBaHHBAONU BUKOPNCTOVYeTbCЯ NOJIOXHEH3 BUCYHYTUMI rMBOUMn KpaKaMaN.
20
Conno 3aOBHeHH
→ДякгИВ,CTNKIB,padiatopib onaneHHra Ta Baxko-DOCTyHnx NOBepxOHb.
21
Aanrep
ManHOHOK
C1
→ДЯ3'eHHaHHB CMOKtyBaIbHOro IHaHra 3 eJekTpoIHCTpyMeHTOM
→ Before using the power tool with a blade, check that the blade diameter matches the tool.
22
Starting the tool
ManHOHOK
C1
→ For smooth operation when working with the power tool.
Note: It can also be used with a blade.
Operation
WARNING
Always work with the tool only when it is properly assembled with the blade, both when wet and dry cutting.
Before putting into operation
ManHOHOK A1
Remove the locking screw and empty the contents from the reservoir. → Turn the reservoir, insert the pivot pin into the opening of the reservoir base. Install and lock the tool head. Set the cutting depth according to the upper part of the tool.
Putting into operation
ManHOHOK B1
Pi'd'edHaTu aKcecyapu.
ManIOHOK B2
BCTaBTe 1TEnCeIbHy BUNKy.
ManHOHOK B3
BknHcyTb npucTpni.
Pnlooc dIy cyxoOuNCTK
YBAGA
Ppauoeamu minbku 3 cyxum nnockum cknaadacmum fInbmpom.
Ipeed 3acmocyehnHcnd nepeepumu fInbmp Ha Harehicmb NowKOKeHb i, 3a nompebu, 3amihu.
ManHOK A2
→ДЯ BCMOKryBaHHa cyxoro 6pydy 3a noTpe6n MOKe BnKOpNCOByBaTnC4 φiNbTpYBaJIbHn Mi- WOK.
YBATA
Функцю ouuueHЯ φinbmpa bukopucmoyeamu 3aexdu 6e3 φinbmpyeanbHOZo Miuka, iHaKwe ue moKe npuzeecmu do uo2o nowkodxehn.
Bka3iBkn 0do o foIbtpyBaIbHoro Mioka
CtyinHb 3anOBHeHHaIbTpByaBbHOro MiKky 3aJekntb BiBCMOKtByaHoRo 3a6pydHeHHa. - Pn BCMOKTyBaHHi nny, nicky Ta iH. cnid qactiwe 3miHOBATn pIbTpByaBbHm Miok. BcTaHOBJIeHmIiOKdIa36OpyNnMyMOKeIOnHyTN, TOMy Ioro CnID CBOEcAchO 3amHITb.
BcMOKmyeAHnXoNoHO2 nonEny 3diuchHobamu minbku i3 3acmocyBaHHn nonepehbozo biOcika. Homep nla 3amOBnEHn, 6a0Be BnKoHaHH: 2.863-139.0, npemiym-BnKoHaHH: 2.863-161.0.
Bolore npn6panna
YBACA
He eukopucmoeynte fInbmpybaHnMiwoK!
Bka3iBa:KuO pe3epByap nobHn, nonnaBok 3akpNaBae OTbip dNBA BCMOKTyBaHH i npncTpi npaue 3 6IbUIM uCNOM o6epTi. HeraHNO BmKHytn npncTpi Ta BnnpoXHTn pe3epByap.
→ IJIyBCMOKTyBaHHBOJONI DOTpIMyBaTnCnIpaBUNbHoFO NIOXKeHH HaCaKn IJa NiIOnr Ta npueDHyBaTn BiIDNoBIDHe npuNaDn.
BukopncTaHH eJektpoiHcTpymeHTIB
→ Pπn Heo6xioHocti npKpinnT do eJeKtpoiHcTpymeHTy aanTep 3 HOXEM, 0o BiNobiae diaMeTpyπdkIOUoyehn
ManHOHOK C1
A) OДЯнун aадантep, lo Ддэбсьс, Ha BCMOKtyIOUчишпг Ta 3'6dHaTn NOrO 3 eNekTpoiHCTpy-MEHTOM. a6o B)ДябиоI rHyKocTi BnKOpNCToByBaTn rHyKn WnAHr DЯ eJekTPOiHCTpymeHTy. 3'EdHaTn Ioro 3 ycmokTyBaJIbHM WnAHRom i, 3a Heo6xIDHOcTi, 3 aanTePOM, a Notim NiDKNIOHTu eJekTPOIHCTpymeHT.
ManHOHOK C2
→Дпя npinctpoiB 3 B6ydoBaHOIO po3etkoH: BctaBHTN wTeNCeJI beneKTPOIHCTpymEnTy B nINOCoc.
ManHOK C3
-ByimKHyTN npnnaD (noBopOTnBumKaay BnIOB nnoJoxeHHaMAKC.) i noatnpo6oty.
Note: After switching on the electric tool, the auxiliary turbine starts with a 30.5-second delay. After switching on the electric tool, the auxiliary turbine does not run for 5 seconds because the auxiliary start protects the auxiliary stage.
Built-in filter cleaning system
The filter cleaning system is used when a large amount of fine dust is generated without a dust bag.
Note: With the help of the filter cleaning system, you can clean the clogged filter by pressing the button and restore the suction power.
Figure D1
Insert the auxiliary handle into the bracket of the device. Press the filter cleaning button 3 times with the device switched off at intervals of 4 seconds.
Note: After using the filter cleaning button several times, check the fill level of the reservoir. Otherwise, during the cleaning of the reservoir, dust may escape.
Emptying
Cleaning of difficult-to-reach places or places where vacuuming is not possible, for example, removing leaves from the gutter.
Figure E1
→ Insert the auxiliary hose into the connection for the vacuum hose. This activates the suction function.
Pre-filter
Figure B3
Switch off the device.
Figure F1
BctaHOBNi HacaKy dny niDnOrn B napKyBaIbHe nOIOKeHH.
Завершение работы
Выключить прибор и вытянуть штекер.
Опорожнить резервуар
Рисунок G1
Снять насадку, опорожнить резервуар от воды или сухим брудом. В приборах с пробкой сливного отверстия: вынуть сухой бруд из резервуара. Для удаления грязи использовать пробку сливного отверстия.
Хранение прибора
Рисунок G2
→ Сложить кабель питания и принадлежности на прибор. Хранить прибор в сухом помещении.
Уход и техническое обслуживание
Очищать прибор и аксессуары из пластмассы с помощью стандартных средств для чистки изделий из пластмассы. В случае необходимости протереть влажной тканью и просушить перед следующим использованием.
Очистка складного фильтра
Рекомендация: фильтровальную кассету очищать после каждого использования.
Рисунок H1
Вынуть фильтровальную кассету, вытрусить бруд из фильтровальной кассеты в ведро для мусора. →Для очистки вставленного плоского складного фильтра постучать фильтровальной кассетой по краю ведра. После складывания фильтр не нужно вытаскивать из фильтровальной кассеты.
If necessary, clean the flat filter element separately.
Figure H1
Disassemble the filter cassette, press it out and pull it out.
Figure H2
→ Remove the flat filter element from the filter cassette and shake out any dirt from it. If necessary, clean it under running water. Do not wipe or clean with a brush.
Allow to dry completely before reuse.
Finally, reinsert the dried flat filter element into the device. Insert the filter cassette into the device.
Troubleshooting
Reduced suction power
In case of reduced suction power, check the following:
→ The suction hose or suction tube is clogged. Remove the blockage with a rod.
Figure A2
→ The filter bag is full: Insert a new filter bag.
Figure H2
→ The flat filter element is dirty: Remove the filter cassette and clean the filter (see section "Cleaning the flat filter element"). → Replace the flat filter element.
Technical characteristics
Technical characteristics are given on pages, 10 are disclosed. The symbols used are explained below.

Voltage

Power P nominal

Maximum voltage in the device socket

Protection (IP)

Reservoir capacity
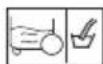
Water inlet with handle
Water inlet with pump or hose

Mains cable

Sound pressure level (EN 60704-2-1)

Weight (without packaging)
Possible changes in the device construction!
Dimensions
KannbHcyckaynap KK5
Instructions for use KK 6
Introduction to the device KK 8
Operation KK 9
Maintenance and technical inspection
Troubleshooting KK 10
Help for the user KK 11
Technical data KK 11
Dear user,

Please read these instructions carefully before using the device. Keep them for future reference.
For further use or for other users of this device, keep them safe.
General instructions
Intended use
This device is intended for use in accordance with the instructions and safety instructions given in this manual, and for the purpose for which it was designed.
It is intended for household use and is not intended for commercial use.
Keep the device away from moisture. Do not store it in damp places.
The following table shows the changes:
Input materials in dry form
are required. The input must be
protected from moisture, and the
output for measurement must be dry.

For the above-mentioned cases, dry materials are
used and old
parts are replaced with new ones
by means of the supplied tools.
Water and water filter cleaning
The water and water filter are made of environmentally friendly materials.
If the filter is not approved for use, it can be cleaned together with the filter.
Information on substances in the mixture (REACH)
You can read the information on substances in the mixture on our website, as indicated in the instructions.
www.kaercher.com/REACH
Spare parts
The warranty terms for our company are published by the respective sales company. If you have any questions about the warranty, please contact your dealer or the nearest authorized customer service center.
On the day of purchase
The following information is required:
Model: 30190
3 x date of purchase 1 x date of purchase 9 x date of purchase 0 x date of purchase
With this, the model 30190 is meant.
09/(2)013 date of purchase
Do not dispose of the device in household waste.
WARNING
Do not dispose of the device in household waste.
CAUTION
Do not dispose of the device in household waste.
ATTENTION
The device is intended for use in medical institutions.
Instructions for use
Sterile packaging is damaged!
If the packaging is damaged, do not use the product and contact the supplier. The product is supplied sterile, and in case of damage to the packaging, the sterility cannot be guaranteed.
The instructions for use contain important information about the product and its use. Read them carefully before use. If you have any questions, contact the manufacturer or supplier.
Intended use
Figure 1
Figure B1
During use, follow the instructions.
2 Product accessories (scissors/forceps) (without electrical outlet)
Figure B3
→ Use: For cutting or trimming. 0 Use: For holding.
2 Product accessories (scissors/forceps) (with electrical outlet)
Figure B3
Use: For cutting or trimming.
→ Kyn + MAX: Xanfahrah 3neKtp KypaJIbIMeH copy
KyaattbipetTey:Kymbic6apbcihdaKaXeT6oJfAH XaFdaIa copy,ypneY Hemece 3neKtp KypalbImeH copy KyuH a3aity.
→ 0 Knyi: KypbInfbl eWippyni. 3neKtp KypaBbHbH KepHeyi 6ap.
3 ByyibMHbIH əneKtpnik po3eTkacbl
HcyKay: MakcmaIbI TyTbIHbIaTbIH KyaTTbI caKaTahB13 ("TexHkaJIbIK depeKTeP"6eImiH kapaHbI3).
Cypet C2
→ 3neKtpnik Kypanapdapdbkocy yuH.
4 Ypney aanterepi
Cypet E1
CopbyIty wJnahrici ypney aanTepihe enHriinreH, ypney cyHKunraCb6enCeHdi.
5 Cy3rhi Ta3anay Tymecici
Cypet D1
OpHaTbIINFaH XaIINaK KaTnApJIb Cy3rHi Ta3aJnayFa apHaNfA H.
Hyckay:KannakKatnapbCy3ri bInfaiNb6oJca, Tyme Kymbic icTeMeNi.
6 Tyrka
The pressure switch is installed, the valve is closed.
7 Can
Figure A1
Check the pressure switch and container for leaks. Before installation, check the pressure switch and container for leaks. The valve on the pressure switch is closed.
8 C
This element is not replaceable
Figure H1
Figure H2
→ To replace the filter, press the filter element and remove it.
9 By
Required maintenance location
Figure G2
The required maintenance location can be checked by the filter and filter indicator.
10 Cable
Figure G2
Keep the device clean.
11 Type of key
Figure F1
Use the key to turn the device on.
12 Pressure regulator
Figure A1
The pressure regulator is designed to adjust the pressure in the system.
3 Device operation
Figure G1
The device is equipped with a pressure regulator that automatically maintains the required pressure. The regulator is located on the top of the container.
14 Water supply
Figure A2
For water supply, use the water supply hose.
15 Water drainage
(Drainage hose not included)
Before starting the device, make sure that the device is properly installed and the power is turned off!
16. Device for adjusting the tension of the belt
Figure B1
Press the contact on the tension adjustment device, it will release. To remove the belt, press the lever and pull out the adjustment device.
Note: The tension adjustment device (bracket) can be moved to the required position on the belt and the tension adjustment device can be moved. The device is intended for adjusting the tension of the belt.
The distance between the belt pulley and the tension adjustment device should be 17. See paragraph 17.
Tip: To adjust the belt, use the tension adjustment device.
17. Belt pulley
Figure B1
Place the belt pulley in the position indicated by the tension adjustment device.
Figure B4
To remove the belt pulley, press the lever and pull out the belt pulley.
Note: When removing the belt pulley, the tension adjustment device may move to the required position.
Tip: To adjust the belt, use the tension adjustment device.
18 CopbIw TyTiri, 2 x 0,5 M
Cyper B1
→ Copfblu tyTikTepiH ekeyi n de 6ipre kajraHb3 XaHe TyTkAmen 6aNaHaBcTBpBlb3.
19 EdeHHen copy wymeri (aybicy TeTirimEn 6ipre)
Cyper B1
Kpyraek neh bllrana kokbc apacbHda bHraaaybicy:
→ Kyprak KOKbIcTb copraH Ke3de, WbIFbIHKbI TypaTbH bICbIuTbI naJaHaHbIHbI3. → CynbI KObICTbI copy Ke3iHDe, UbIFbIKbI TypaTbIH pe3eHKei epHeyDi naJaHaNbHbIb3.
20 Xancapnap ywiH wymek
→Бурьштар,хancapnap,батaperanap men kon Jxetki3y KnbH Xepnepre apHaJraH.
21AanTep
Cyper C1
→ Copbyity wJahricin 3neKtpnik KypanfKa Kocyfa apHaJFaH. Kaxet 6oIfAHa aadantepdi 3eKtpnik Kypanap KOHTAKTinepiH dAmameTpIe 6eiimdeyre 6oIaIb.
22 Nkemdi wnaHr
Cypet C1
3NeKtp KypaIbIMeH KyMbIc icTeReH Ke3De 6apbIHwa bIHraNbl KOJaHaBbIcKa apHaNraH. HycKay: AanTepMeH biPre KOJaHaYf a6oJaBl.
Do not use this product without first reading the instructions carefully.
Before use
Figure A1
→ Remove the protective cap and keep it for later use. → Check the nozzle for blockages and clean if necessary. → Keep the product upright and protected. Do not press the trigger until ready to use.
Figure B1
Remove the protective cap.
Figure B2
Do not squeeze the trigger.
Figure B3
→ Do not use the product.
Cleaning the nozzle
Do not use the device if it is damaged or has visible defects! If the power cord or plug is damaged, contact your dealer.
Figure A2
When using the device, place the power cord so that it does not get in the way.
ATTENTION
Do not pull the cord to disconnect the plug, as this may damage the plug.
Using the device for the first time
Before using the device, read the instructions carefully. For washing, drying, etc., use the device only as intended. The device may be used for other purposes, but in such cases, use it at your own risk!
ATTENTION
Do not use the device near water.
Order number: Basic model: 2.863-139.0, Premium model: 2.863-161.0.
Troubleshooting
ATTENTION
Do not use the device without water!
Instructions: If the device is not working, check the power supply and contact the service center. Do not attempt to repair the device yourself.
-> For example, to determine the water hardness, use the test strip included in the package.
Electric kettles are intended for household use.
It is necessary to check the electrical connections before use.
Figure C1
A) Connect the plug to the socket and turn on the kettle by pressing the switch. Or B) To adjust the water temperature, press the button. If the plug and socket (depending on model) do not match, contact the service center.
Figure C2
→ From the socket: unplug the kettle from the power outlet.
Figure C3
- To turn on the kettle (after filling with water), press the switch.
Note: When the kettle is plugged in, the turbine starts spinning within 0.5 seconds. When the kettle is turned on, the turbine spins for about 5 seconds after the water boils.
Descaling function
The descaling function is designed to remove limescale from the kettle's interior.
Note: When the descaling function is activated, the kettle heats the water to a high temperature and then automatically turns off.
Figure D1
→ Press the button on the kettle handle to open the lid. When the kettle is turned on, the descaling function starts automatically after 3 seconds, and the heating element turns off after 4 seconds.
Note: After the descaling function has been activated once, the container must be rinsed thoroughly. Otherwise, the container may be damaged when opening the lid.
Remove the protective film from the adhesive surface, then press firmly.
Figure E1
→ Align the protective film with the adhesive surface and press it on.
Press the adhesive surface firmly to ensure proper adhesion.
Figure B3
→ Press the adhesive surface firmly.
Figure F1
Remove the protective film from the adhesive surface before installation.
Adhesion
→ Press the adhesive surface firmly, then allow it to set.
Removal
Figure G1
To remove the adhesive, pull it slowly and evenly, avoiding sudden jerks. If the adhesive leaves residue, use a suitable solvent to clean it. This will help maintain the surface's integrity.
Adhesive application
Cyper G2
KyaT cbIMbI MeH KepeK-KapaKaTapDbI 6yBIMda caKaTaHbI3. BybIMdbI Kypfak WapTTapDa caKaTaHbI3.
Kytmy MeH TexHnKaJIbIK TeKcepy XyMbIcTapbl
→ 6yibIM MeH nIaCTNKTeH XacanFaH KepeKXapakTapdbI pNactNK 6yibIMapbHa apHaIFaHCTaHdapTTbI Ta3aJafbiU 3aTTapMeH Ta3aayKepeK. Kaxet 6oIraHda, caybIT neH Kepek-KapaKaTapDbI cyMeH 7aBbHb3 KHe KaT a KOJaHa6ac 6ypbH KyprA TbHbI3.
Teric 6yirinmei cy3riHtataJay
Kehec: pKoIaHydAn KeiH cy3riw 3neMeHTTI
Ta3aHaHbI3. Cyper H1
→ Cy3riu 3JIeMeHTTI KJyIbINTaH 6OcaTbIHbI3 da, WbIFapBIn TactaHbI3, cy3riu 3JIeMeHTTEH KIPdi KOKbc ce6eTIHe 6OcaTbIHbI3. Kipictipinren teric 6yrinmeni cy3rinepepi ta3anay ywiH cy3riu anemehTti ce6eTTi wetHe KaBn TactaHbI3. Teric 6yirmeni cy3ri cy3riu 3nemehTten Wbifapblmaybi Kepek.
Kaxer 6oJca, teric 6yirnmei cy3riHi 6eNk Ta3aJaHbI3.
Cypet H1
→ Cy3riu 3nemehTt KynbIntan H 6ocatblb13 da, WbIfapbln TactaHb13.
Cypet H2
→ Teric 6yrinmeni cy3riHi cy3riu 3nemeHTteh kafbin WbifapbIHbI3. Kaxet 6oIraHda, TeK aIbIHbI cy actbIHda Ta3anaHbI3, CypTneHi3 He KblIwakneH Ta3apTnaHbI3. KonDaHy anDbIHda TOJIbIFbIMeH KypFaTbIHb CoHbIHda Kpyrak Teric 6yriJMIeni cy3riHi 6ynbIM iWHe KaTadaH opHaTbHb3. Cy3riu 3JeMeHTTI 6yibIM iWHe caBn KOBIHb3.
Keedeprinep 6oIFaHnda KEmek any
TemeH copy kbldAmdbifbl
By removing the copy, the following text is obtained: character-by-character, the original text and the original type of each letter, and the letter is brought to the end.
Figure A2
→ Connect the water supply: Connect the water supply hose correctly.
Figure H2
→ To disconnect the water supply hose: Remove the water supply hose elements and clean the hose (see "Cleaning the water supply hose"). Reconnect the disconnected water supply hose.
Technical specifications
See the technical data on page VI. The description of the symbols used is provided.

Operation

Nominal power

Max. power of the electrical outlet

Possible malfunctions during operation!
#
4
J 1
aJgll aissll aegai (ssll gogll aasrrjll
Jaa
aallolal
a@gaiolalw a
L
gall bao ginao (EN 60704-2-1)
gall jali a5j a9 aill
sj 0j j1j1 j1j1 j1j1 j1j1 j1j1 j1j1
Jueol
aJxall Johai all a
jull aolll bannl 039 Jau pa y .aull laln no cnn 251g
oogolgglgsbgslalldallcsy 1sawil alljup08gmo laow
M
s> jS sJ:Jaa jall s
- How do you look at this book?
m
Tab 1
M
8
H0
H2
Jail
1
(1)
(uSuaaog)
10
aai jiaai:1gai
JaaJIe aagio jIaJI: hao
()
(uS,u)
m
gaiI:
aui:
aloo ailus
laull oj19 Jai:ojall lao
plusuJazglgailglbaullx


Therefore, ab sin angle Aol angle Bol

2g 1g jaoaall aagai all oaiy
1
ggl gao xuogppl aas y jgl jai li jglaxn jl jalil jgl jali jalblj jgl jali jalblj jgl jali jali jali jali jali jali jali jali jali jali jali jali jali jali jali jali jali jali jali jali jali jali jali jali jali jali jali jali jali jali jali jali jali jali jali jali jali jali jali jali jali jali jali jali jali jali jali jali jali jali jalljali jalljali jalljali jalljali jalljali jalljali jalljali jalljali jalljali jalljali jalljali jalljali jalljali jalljali jalljali jalljali jalljali jalljali jalljali jalljali jalljali jalljali jalljali jalljali jalljalli jalljalli jalljalli jalljalli jalljalli jalljalli jalljalli jalljalli jalljalli jalljalli jalljalli jalljalli jalljalli
aL

Jg jagj g jog j 10 Jg Jg jg jg jg jg jg jg jg jg jg jg jg jg jg jg jg jg jg jg jg jg jg jg jg jg jg jg jg jg jg jg jg jg jg jg jg jg jg jg jg jg jg jg jg jg jg jg jg jg jg jg
aagdo aaydall ojgaiy jlg paxwylg ydlolc y al alil y. l.lqo aanwll abi go ggluyaaydall ojgaiy aaill gau
71364 Winnenden (Germany)
Tel.: +49 7195 14-0
Fax: +49 7195 14-2212