
5885 MA - Scie SKIL - Free user manual and instructions
Find the device manual for free 5885 MA SKIL in PDF.
Download the instructions for your Scie in PDF format for free! Find your manual 5885 MA - SKIL and take your electronic device back in hand. On this page are published all the documents necessary for the use of your device. 5885 MA by SKIL.
USER MANUAL 5885 MA SKIL
M A D E H P M A D E H K NOT STANDARD INCLUDED
• This tool is intended for lengthways and crossways
cutting of wood with straight cuts as well as angle cuts up
to 45°; with the appropriate saw blades also non-ferrous
metals, light building materials and plastics can be cut
• Read and save this instruction manual 2
TECHNICALSPECIFICATIONS1
SAFETY GENERALSAFETYINSTRUCTIONS WARNING!Readallsafetywarningsandall
instructions. Failure to follow the warnings and instructions
may result in electric shock, fire and/or serious injury. Saveall
warningsandinstructionsforfuturereference. The term
“power tool” in the warnings refers to your mains-operated
(corded) power tool or battery-operated (cordless) power tool.
a) Keepworkareacleanandwelllit. Cluttered or dark
areas invite accidents.
b) Donotoperatepowertoolsinexplosive
atmospheres,suchasinthepresenceofflammable
liquids,gasesordust. Power tools create sparks which
may ignite the dust or fumes.
c) Keepchildrenandbystandersawaywhileoperating
apowertool. Distractions can cause you to lose control.
and matching outlets will reduce risk of electric shock.
b) Avoidbodycontactwithearthedorgrounded
surfacessuchaspipes,radiators,rangesand
refrigerators.There is an increased risk of electric
shock if your body is earthed or grounded.
c) Donotexposepowertoolstorainorwetconditions.
Water entering a power tool will increase the risk of
d) Donotabusethecord.Neverusethecordforcarrying,
pullingorunpluggingthepowertool.Keepcordaway
fromheat,oil,sharpedgesormovingparts. Damaged
or entangled cords increase the risk of electric shock.
e) Whenoperatingapowertooloutdoors,usean
extensioncordsuitableforoutdooruse. Use of a cord
suitable for outdoor use reduces the risk of electric shock.
f) Ifoperatingapowertoolinadamplocationis
unavoidable,useanearthleakagecircuitbreaker.
Use of an earth leakage circuit breaker reduces the risk
operating power tools may result in serious personal injury.
b) Usepersonalprotectiveequipment.Alwaysweareye
protection. Protective equipment such as dust mask,
non-skid safety shoes, hard hat, or hearing protection used
for appropriate conditions will reduce personal injuries.
c) Preventunintentionalstarting.Ensuretheswitchisin
theoff-positionbeforeconnectingtopowersourceand/
orbatterypack,pickinguporcarryingthetool. Carrying
power tools with your nger on the switch or energising power
tools that have the switch on invites accidents.
d) Removeanyadjustingkeyorwrenchbeforeturning
thepowertoolon. A wrench or a key left attached to a
rotating part of the power tool may result in personal injury.
e) Donotoverreach.Keepproperfootingandbalance
atalltimes. This enables better control of the power tool
in unexpected situations.
f) Dressproperly.Donotwearlooseclothingor
jewellery.Keepyourhair,clothingandglovesaway
frommovingparts. Loose clothes, jewellery or long hair
can be caught in moving parts.
g) Ifdevicesareprovidedfortheconnectionofdust
extractionandcollectionfacilities,ensuretheseare
connectedandproperlyused. Use of dust collection
can reduce dust-related hazards.
a) Donotforcethepowertool.Usethecorrectpower
the job better and safer at the rate for which it was designed.
b) Donotusethepowertooliftheswitchdoesnotturn
itonandoff. Any power tool that cannot be controlled
with the switch is dangerous and must be repaired.
c) Disconnecttheplugfromthepowersourceand/or
thebatterypackfromthepowertoolbeforemaking
anyadjustments,changingaccessories,orstoring
powertools. Such preventive safety measures reduce
the risk of starting the power tool accidentally.
d) Storeidlepowertoolsoutofthereachofchildrenand
donotallowpersonsunfamiliarwiththepowertoolor
tools are dangerous in the hands of untrained users.
accidents are caused by poorly maintained power tools.
f) Keepcuttingtoolssharpandclean. Properly
maintained cutting tools with sharp cutting edges are less
likely to bind and are easier to control.
g) Usethepowertool,accessoriesandtoolbitsetc.,in
accordancewiththeseinstructions,takinginto
accounttheworkingconditionsandtheworktobe
performed. Use of the power tool for operations dierent
from those intended could result in a hazardous situation.
a) Haveyourpowertoolservicedbyaqualifiedrepair
will ensure that the safety of the power tool is maintained.8
SAFETYINSTRUCTIONSFORCIRCULARSAWS DANGER
Keephandsawayfromcuttingareaandtheblade;
keepyoursecondhandonfronthandle(if both hands
are holding the saw, they can not be cut by the blade)
• Donotreachunderneaththeworkpiece (the guard
cannot protect you from the blade below the workpiece)
• Adjustthecuttingdepthtothethicknessofthe
workpiece(less than a full tooth of the blade teeth
should be visible below the workpiece)
• Neverholdpiecebeingcutinyourhandsoracross
yourleg(it is important to support the work properly to
contacthiddenwiringoritsowncord(contact with a
“live” wire will also make exposed metal parts of the tool
“live” and shock the operator)
• Whenrippingalwaysusearipfenceorstraight
edgeguide(this improves the accuracy of cut and
reduces the chance for blade binding)
• Alwaysusebladeswithcorrectsizeandshapeof
arborholes(diamondorround)(blades that do not
match the mounting hardware of the saw will run
eccentrically, causing loss of control)
• Neverusedamagedorincorrectbladewashersorbolt
(the blade washers and bolt were specially designed for
your saw, for optimum performance and safety of operation)
• Kickback is a sudden reaction to a pinched, bound or
misaligned saw blade, causing an uncontrolled saw to lift
up and out of the workpiece toward the operator
• When the blade is pinched or bound tightly by the kerf
closing down, the blade stalls and the motor reaction
drives the unit rapidly back toward the operator
• If the blade becomes twisted or misaligned in the cut, the
teeth at the back edge of the blade can dig into the top
surface of the wood causing the blade to climb out of the
kerf and jump back towards operator
KICKBACK-OPERATORPREVENTION Kickback is the result of tool misuse and/or incorrect
operating procedures or conditions and can be avoided
by taking proper precautions as given below
• Maintainafirmgripwithbothhandsonthesawand
positionyourarmstoresistkickbackforces;position
yourbodytoeithersideoftheblade,butnotinline
withtheblade(kickback could cause the saw to jump
backwards, but kickback forces can be controlled by the
operator, if proper precautions are taken)
• Whenbladeisbinding,orwheninterruptingacut
foranyreason,releasethetriggerandholdthesaw
and take corrective actions to eliminate the cause of
• Whenrestartingasawintheworkpiece,centrethesaw
bladeinthekerfandcheckthatsawteetharenot
engagedintothematerial(if saw blade is binding, it may
walk up or kickback from the workpiece as the saw is restarted)
• Supportlargepanelstominimisetheriskofblade
pinchingandkickback(large panels tend to sag under
their own weight; supports must be placed under the
panel on both sides, near the line of cut and near the
• Donotuseadullordamagedblade(unsharpened or
excessive friction, blade binding and kickback)
• Bladedepthandbeveladjustinglockingleversmustbe
tightandsecurebeforemakingcut(if blade adjustment
shifts while cutting, it may cause binding and kickback)
• Useextracautionwhenmakingaplungecutinto
existingwallsorotherblindareas(the protruding
blade may cut objects that can cause kickback)
• Checklowerguardforproperclosingbeforeeachuse
movefreelyandcloseinstantly
• Neverclamportiethelowerguardintothe
• If saw is accidentally dropped, lower guard may be bent;
disconnect the plug, raise the lower guard with the
retracting handle and make sure it moves freely and does
not touch the blade or any other part, in all angles and
• Checktheoperationofthelowerguardspring;ifthe
guardandthespringarenotoperatingproperly,
theymustbeservicedbeforeuse(lower guard may
operate sluggishly due to damaged parts, gummy
deposits, or a build-up of debris)
• Lowerguardshouldberetractedmanuallyonlyfor
soonasbladeentersthematerial,thelowerguard
mustbereleased(for all other sawing, the lower guard
should operate automatically)
• Alwaysobservethatthelowerguardiscoveringthe
bladebeforeplacingsawdownonbenchorfloor
(an unprotected, coasting blade will cause the saw to
walk backwards, cutting whatever is in its path; be aware
of the time it takes for the blade to stop after switch
• This tool should not be used by people under the age of
• This tool is not suitable for wet cutting
• Alwaysdisconnectplugfrompowersourcebefore
makinganyadjustmentorchanginganyaccessory
• Never use the tool when cord is damaged; have it
replaced by a qualied person
• Donotworkmaterialscontainingasbestos
(asbestos is considered carcinogenic)
• Dust from material such as paint containing lead, some
wood species, minerals and metal may be harmful
(contact with or inhalation of the dust may cause allergic
reactions and/or respiratory diseases to the operator or
bystanders); wearadustmaskandworkwithadust
extractiondevicewhenconnectable
• Certain kinds of dust are classied as carcinogenic (such
as oak and beech dust) especially in conjunction with
additives for wood conditioning; wearadustmaskand
workwithadustextractiondevicewhenconnectable9
• Follow the dust-related national requirements for the
materials you want to work with
• Only use a saw table provided with a switch that prevents
restarting of the motor after interruption of voltage
• Only use a saw table provided with a kerf guide
• SKIL can assure awless functioning of the tool only
when the correct accessories are used which can be
obtained from your SKIL dealer
• Use only accessories with an allowable speed matching
at least the highest no-load speed of the tool
• Never use saw blades made of high speed steel (HSS)
• Never use grinding/cutting discs with this tool
• Always check that the supply voltage is the same as the
voltage indicated on the nameplate of the tool (tools with
a rating of 230V or 240V can also be connected to a
• Avoid damage that can be caused by screws, nails and
other elements in your workpiece; remove them before
• Remove all obstacles on top of as well as underneath the
cutting path before you start cutting
• Securetheworkpiece (a workpiece clamped with clamping
devices or in a vice is held more securely than by hand)
• Usesuitabledetectorstofindhiddenutilitylinesorcall
thelocalutilitycompanyforassistance (contact with
electric lines can lead to re or electrical shock; damaging a
gas line can result in an explosion; penetrating a water pipe
will cause property damage or an electrical shock)
• Use completely unrolled and safe extension cords with a
capacity of 16 Amps (U.K. 13 Amps)
• The noise level when working can exceed 85 dB(A); wear
• Never use the tool without the original protection
• Do not attempt to cut extremely small workpieces
• Do not work overhead with the tool
• In case of jamming or electrical or mechanical malfunction,
immediately switch o the tool and disconnect the plug
• If the cord is damaged or cut through while working, do
not touch the cord, but immediately disconnect the plug
• When you put away the tool, switch o the motor and ensure
that all moving parts have come to a complete standstill
• After switching o your circular saw, never stop the rotation
of the saw blade by a lateral force applied against it
WHEN CONNECTING NEW 3-PIN PLUG (U.K. ONLY):
• Do not connect the blue (= neutral) or brown (= live) wire
in the cord of this tool to the earth terminal of the plug
• If for any reason the old plug is cut o the cord of this tool,
it must be disposed of safely and not left unattended
• Mounting saw blade 3
! disconnecttheplug
- take hex key A from storage B
- push spindle-lock button C and hold it while you
remove blade bolt D with hex key
! pushspindle-lockbuttonConlywhentoolisata
- release spindle-lock button C
- open lower guard F with lever G and hold it while you
mount saw blade with saw teeth and arrow printed on
saw blade pointing in same direction as arrow on
- release lower guard F
! makesurethatclampingsurfacesHofflanges
areperfectlycleanandfacetheblade
- push spindle-lock button C and hold it while you
tighten blade bolt with hex key 1/8 turn past nger tight
(ensures slippage of saw blade when it encounters
excessive resistance thus reducing motor overload
- release spindle-lock button C
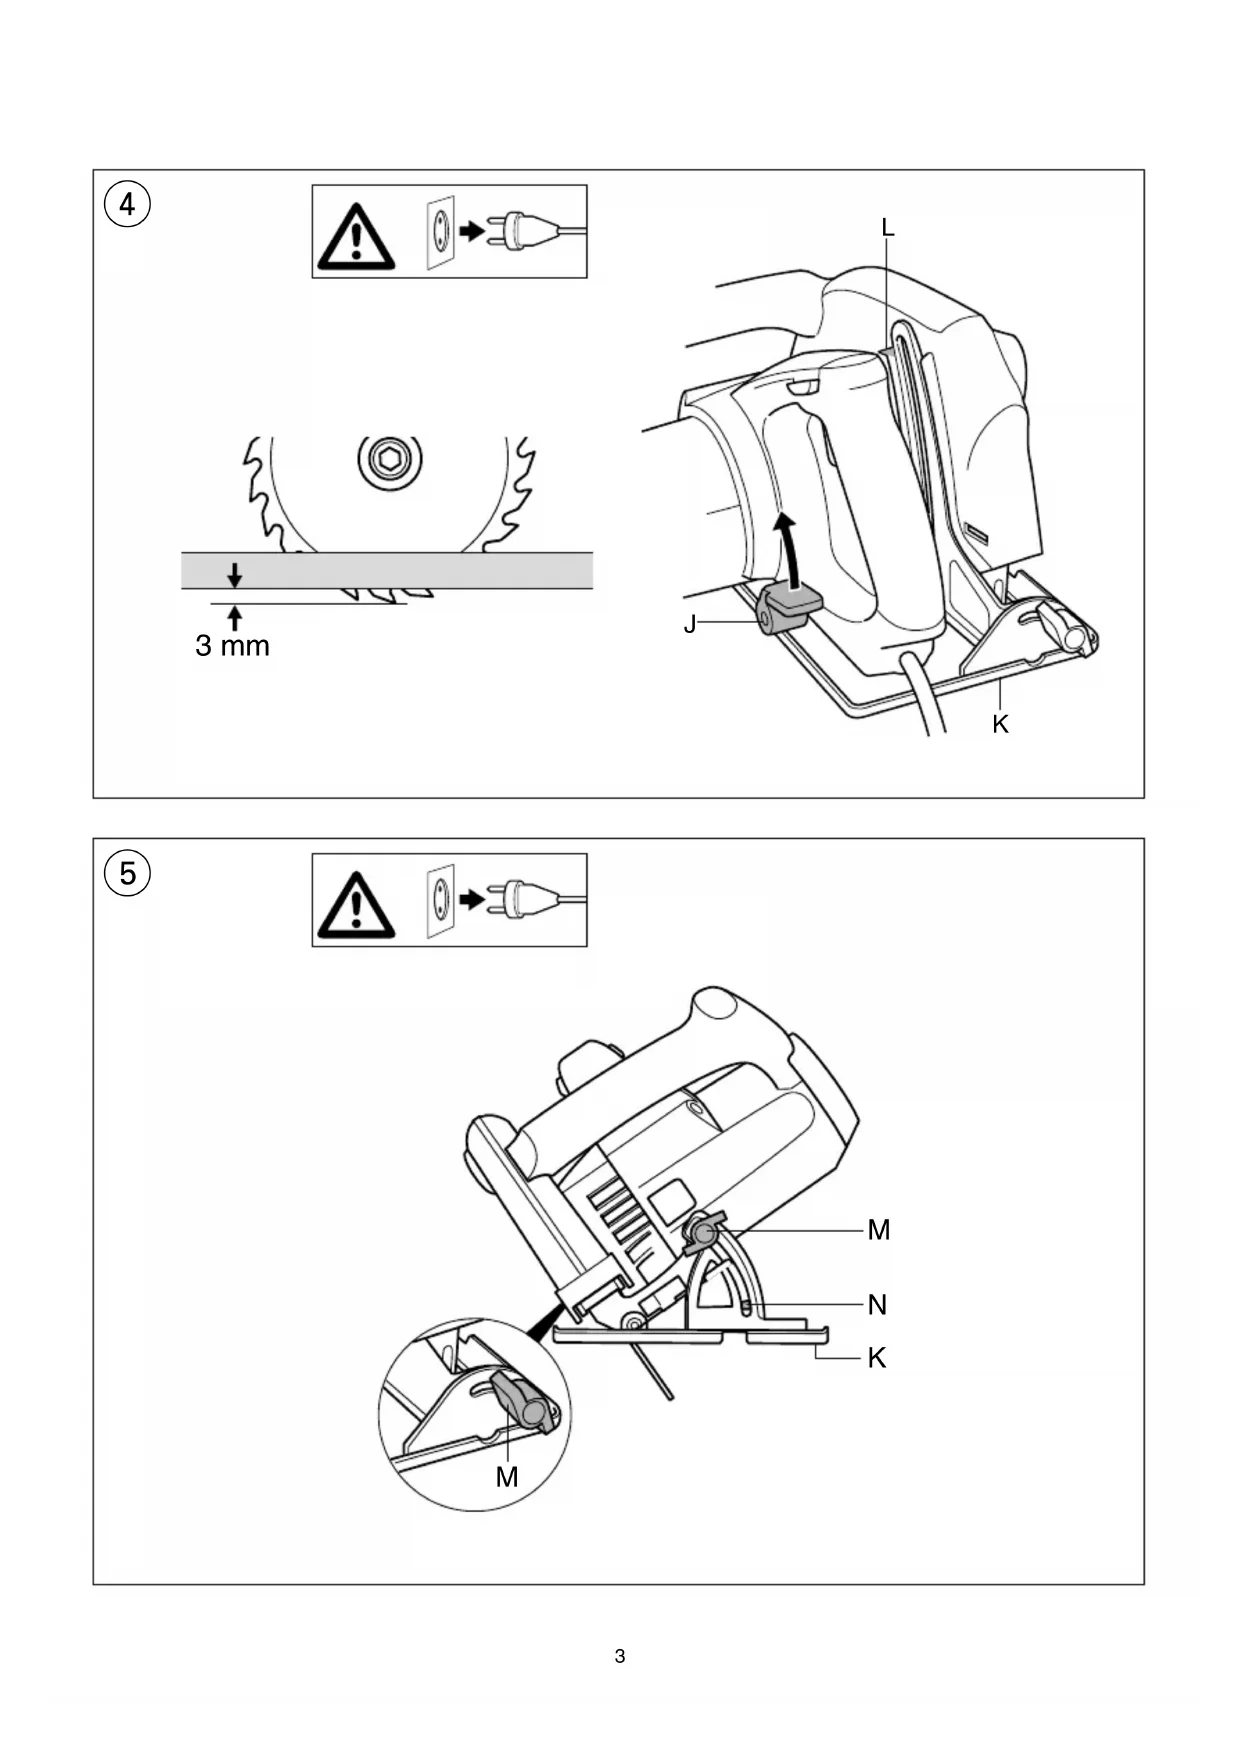
• Adjusting cutting depth (0-85 mm) 4
- for an optimal quality cut the saw blade should not
extend more than 3 mm below the workpiece
- raise/lower foot K until desired cutting depth is set on
- tilt tool until desired cutting angle is set on scale using
• 90° Cutting angle check 5
- adjust and tighten foot K to maximum cutting depth 4
- adjust and tighten cutting angle to 0°
- check for a 90° angle between the blade and bottom of
- if adjustment is needed, loosen 2 knobs M and use
adjustment screw P as illustrated
• Line-of-cut indicator Q 7
- for guiding tool along desired line of cut marked on
- for a straight 0° cut or a 45° bevel cut use the indicator
- allows you to choose whether waste material is on
inner or outer side of blade
! thewidepartofthefootshouldrestonthe
supportedpartoftheworkpiece
• Electronic soft-start 8
Ensures reaching the maximum speed smoothly without
a sudden impact when tool is switched on
- connect vacuum cleaner to extension R 9
! neverletthevacuumcleanerhoseinterferewith
thelowerguardorthecuttingoperation
- one may also use a dust bag (SKIL
• Operating the tool 9
- connect plug to power source
- always hold handle S rmly with one hand and handle
T rmly with the other hand
- place tool with front end of foot at on workpiece
! ensurethatthesawteetharenotengagedinto
- switch on tool by rst pressing knob U (= safety switch
which cannot be locked) and then pulling trigger V
! thetoolshouldrunatfullspeedbeforetheblade
entersintotheworkpiece
- lower guard F opens automatically when saw blade
enters the workpiece (open lower guard manually by
using lever G only for special cuts such as plunge cuts)
- do not force the tool; apply light and
! whileworking,alwaysholdthetoolatthe
grey-colouredgriparea(s)
- after completing the cut switch o tool by releasing
! ensurethatthebladehascometoacomplete
• Always face the good side of the workpiece down to
ensure minimum splintering
• When using guide-rail (accessory 2610Z00217), the depth
of cut will be reduced with 9 mm for 90° as well as 45° cuts
• Only use sharp saw blades of the correct type 0
- quality of cut improves by the number of teeth
- carbide tipped blades stay sharp up to 30 times longer
than ordinary blades
- for making exact cuts along a workpiece edge
- can be inserted in either side of foot
- adjust to desired cutting width by using rip fence scale
(use line-of-cut indicator Q as 0-reference)
- set desired cutting depth
- tilt tool forward with line-of-cut indicator Q lined up with
desired line of cut marked on the workpiece
- open lower guard F with lever G
- just before blade enters workpiece, switch on tool and
gradually lower back end of tool using front end of foot
- gradually move tool downward as well as forward
- as soon as blade enters the material, release lever G
! thetoolshouldrunatfullspeedbeforetheblade
entersintotheworkpiece
! neverpulltoolbackwards
• Cutting large panels #
- support panel close to the cut either on oor, table
! setcuttingdepthsothatyoucutthroughpanel
andnotthroughsupport
- in case rip fence does not allow desired width of cut,
clamp or nail straight piece of wood to workpiece as a
guide, and use the right side of the foot against this guide
MAINTENANCE/SERVICE
• Always keep tool and cord clean (especially the
! disconnecttheplugbeforecleaning
• Clean saw blade immediately after use (especially from
• If the tool should fail despite the care taken in
manufacturing and testing procedures, repair should be
carried out by an after-sales service centre for SKIL
- send the tool undismantled together with proof of
purchase to your dealer or the nearest SKIL service
station (addresses as well as the service diagram of
the tool are listed on www.skilmasters.com)
• Donotdisposeofelectrictools,accessoriesand
packagingtogetherwithhouseholdwastematerial
(only for EU countries)
- in observance of European Directive 2002/96/EC on
waste of electric and electronic equipment and its
implementation in accordance with national law,
electric tools that have reached the end of their life
must be collected separately and returned to an
environmentally compatible recycling facility
- symbol $ will remind you of this when the need for
DECLARATIONOFCONFORMITY
• We declare under our sole responsibility that this product
is in conformity with the following standards or
standardized documents: EN 60745, EN 61000,
EN 55014, in accordance with the provisions of the
directives 2006/95/EC, 2004/108/EC, 2006/42/EC
• Technicalfileat: SKIL Europe BV (PT-SEU/PJE),
• Measured in accordance with EN 60745 the sound
pressure level of this tool is 94 dB(A) and the sound
power level 105 dB(A) (standard deviation: 3 dB), and the
vibration 2.9 m/s² (hand-arm method; uncertainty
• The vibration emission level has been measured in
accordance with a standardised test given in EN 60745; it
may be used to compare one tool with another and as a
preliminary assessment of exposure to vibration when
using the tool for the applications mentioned
- using the tool for dierent applications, or with dierent
or poorly maintainted accessories, may signicantly
increase the exposure level11
- the times when the tool is switched o or when it is
running but not actually doing the job, may signicantly
reduce the exposure level
! protectyourselfagainsttheeffectsofvibration
2004/108/CE, 2006/42/CE
2004/108/EF, 2006/42/EF34
2006/95/CE, 2004/108/CE, 2006/42/CE
2006/95/CE, 2004/108/CE, 2006/42/CE
EN 55014, a 2006/95/EK, 2004/108/EK, 2006/42/EK
navodil 2006/95/ES, 2004/108/ES, 2006/42/ES121
M ADE H P M ADE H K NOT STANDARD INCLUDED 6
M ADE H P M ADE H K NOT STANDARD INCLUDED 6