
TS12150 - Iron SIEMENS - Free user manual and instructions
Find the device manual for free TS12150 SIEMENS in PDF.
| Product type | Iron (compact steam station) |
| Brand | Siemens |
| Model | TS12150 |
| Dimensions (L x W x H) | Approximately 31 x 15 x 20 cm |
| Weight | Approximately 1.5 kg |
| Power supply | 230 V ~ 50 Hz |
| Power | Approximately 2400 W |
| Water tank capacity | Approximately 300 ml |
| Soleplate | Stainless steel (standard model) |
| Main functions | Continuous steam, steam burst, spray, vertical ironing, sensorSteam (auto-off), activeControl Plus, anti-drip |
| Steam settings | Eco, Max, Off |
| Anti-calc system | Multiple: self-clean, anti-calc, calc'n clean (manual descaling or with descaler liquid) |
| Textile protection soleplate | Optional (depending on model) for delicate fabrics |
| Care and cleaning | Clean soleplate with damp cloth; regular descaling with calc'n clean function |
| Safety | Automatic shut-off via sensorSteam, anti-drip system, overheat protection |
| Spare parts available | Anti-calc filter (ref. 311144), textile protection soleplate (TZ11001) |
| Repairability | Repair by authorized center; power cord replaceable by qualified personnel |
| General information | Household use only; tap water recommended; warranty void if non-Siemens additives |
Frequently Asked Questions - TS12150 SIEMENS
User questions about TS12150 SIEMENS
0 question about this device. Answer the ones you know or ask your own.
Ask a new question about this device
Download the instructions for your Iron in PDF format for free! Find your manual TS12150 - SIEMENS and take your electronic device back in hand. On this page are published all the documents necessary for the use of your device. TS12150 by SIEMENS.
USER MANUAL TS12150 SIEMENS
Operating instructions
Thank you for buying the TS12 steam iron from Siemens.
This iron is a compact steam generator. The water is pumped into the steam chamber with pressure by a special pump. The steam amount when ironing is higher than in conventional irons. The steaming performance is therefore far more effective. In general it is advised to use the iron with the "eco" setting.
This appliance has been designed exclusively for domestic use and must not be used for industrial purposes.
Carefully read through the operating instructions for the appliance and safeguard them for future reference.
General safety warnings
Danger of electric shocks or fire!
- This appliance is to be connected and used in accordance with the information stated on its characteristics plate.
- This appliance must be connected to an earthed socket. If it is absolutely necessary to use an extension cable, make sure that it is suitable for 16A and has a socket with an earth connection.
- The iron should not be used if it has been dropped, if there are visible signs of damage or if it is leaking water. It must be checked by an authorized Technical Service Centre before it can be used again.
- If the safety fuse fitted in the appliance blows, the appliance will be rendered inoperative. To restore normal operation the appliance will have to be taken to an authorised Technical Service Centre.
- In order to avoid that, under unfavourable mains conditions, phenomena like transient voltage drops or lighting fluctuations can happen, it is recommended that the iron is connected to a power supply system with a maximum impedance of 0.27 . If necessary, the user can ask the public power supply company for the system impedance at the interface point.
- This appliance is not intended to be used by persons (including children) with reduced physical, sensory or mental capacities, or lack of experience and knowledge, unless they have been given supervision or instruction concerning the use of the appliance by a person responsible for their safety.
Children should be supervised to ensure that they do not play with the appliance. - Remove the plug from the socket before filling the appliance with water or before pouring out the remaining water after use.
- The appliance must never be placed directly under the tap to fill the water tank.
-
The appliance must be used and placed on a stable surface.
-
When placed on its stand, make sure that the surface on which the stand is placed is stable.
- The iron must not be left unattended while it is connected to the supply mains.
- Unplug the appliance from the mains supply after each use, or if a fault is suspected.
- The electrical plug must not be removed from the socket by pulling the cable.
- Do not allow the power cord to come into contact with the soleplate when it is hot.
- Never immerse the iron in water or any other fluid.
- Do not leave the appliance exposed to weather conditions (rain, sun, frost, etc.).
- With the aim of avoiding dangerous situations, any work or repair that the appliance may need, e.g. replacing a faulty mains cable, must only be carried out by qualified personnel from an Authorised Technical Service Centre.
Description
- Handle with contact sensor.
- Steam activation button.
- activeControl Plus indicator lamp. (clear light)
- Steam setting selection button.
- Steam setting indicator lamps. green = eco red = max
- Shot of steam button.
- Spray button.
- Water inlet.
- Filling opening lid.
- Spray nozzle.
- Water tank.
- Level mark for maximum filling.
- Soleplate.
- Temperature index.
- Temperature control.
- Power cable.
- Descaling fluid*.
-
Fabric-protection soleplate cover*.
-
Model dependent.
Before using the iron for the first time
i Remove any labels or protective covering from the soleplate (13).
For further details on the following actions, please refer to the related chapters in this user manual.
- With the iron unplugged, fill the tank (11) of the iron with tap water and set the temperature control (15) to "max".
- Plug in the appliance to the mains.
- When the iron has reached the desired temperature, the green light (5) stops flashing and the clear light (3) starts flashing. Grip the handle (1) and set the steam control to the maximum position "max".
- Hold the iron horizontally and repeatedly press the shot of steam button (6). Any residue may come out of the soleplate (13).
- If necessary, carefully clean the soleplate (13) down with a dry, folded cotton cloth.
- When using the steam function for the first time, do not use it on your laundry, as there may still be dirt in the steam dispenser.
- When turned on for the first time, your new iron may smell and emit a little smoke and a few particles; this will stop after a few minutes.
Filling the water tank (1)
Unplug the iron from the mains!
- Open the filling opening lid (9).
- Never fill beyond the level mark for maximum filling (12).
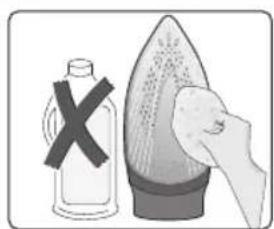
- Use only clean water from the tap without mixing anything with it. The addition of other liquids, (unless recommended by Siemens) such as perfume, will damage the appliance.
Any damage caused by the use of the aforementioned products will make the guarantee void.
- Do not use condensation water from tumble dryers, air conditioning systems or similar. This appliance has been designed to use normal tap water.
- To prolong the optimum steam function, mix tap water with distilled water 1:1. If the tap water in your district is very hard, mix tap water with distilled water 1:2.
You can inquire about the water hardness with your local water supplier.
Setting the temperature (2)
The temperature control (15) adjusts the temperature of the soleplate (13).
- Check the temperature instructions shown on the care label of the garment you are ironing.
- Set the temperature control (15) to the corresponding position by lining it up with the temperature index (14) on the iron:
| ·Synthetics |
| ·Silk-Wool |
| ·Cotton·Linen |
- Sort your garments based on their care labels, always starting with clothes that have to be ironed at the lowest temperature.
- If you are unsure what type of material the garment is made from, start ironing on the lowest temperature setting and increase accordingly. If the garment is made from mixed fabrics, set the temperature for the most delicate material.
- For silk, woollen or synthetic materials iron the reverse side of the fabric to prevent shiny patches. Avoid using the spray function to prevent stains.
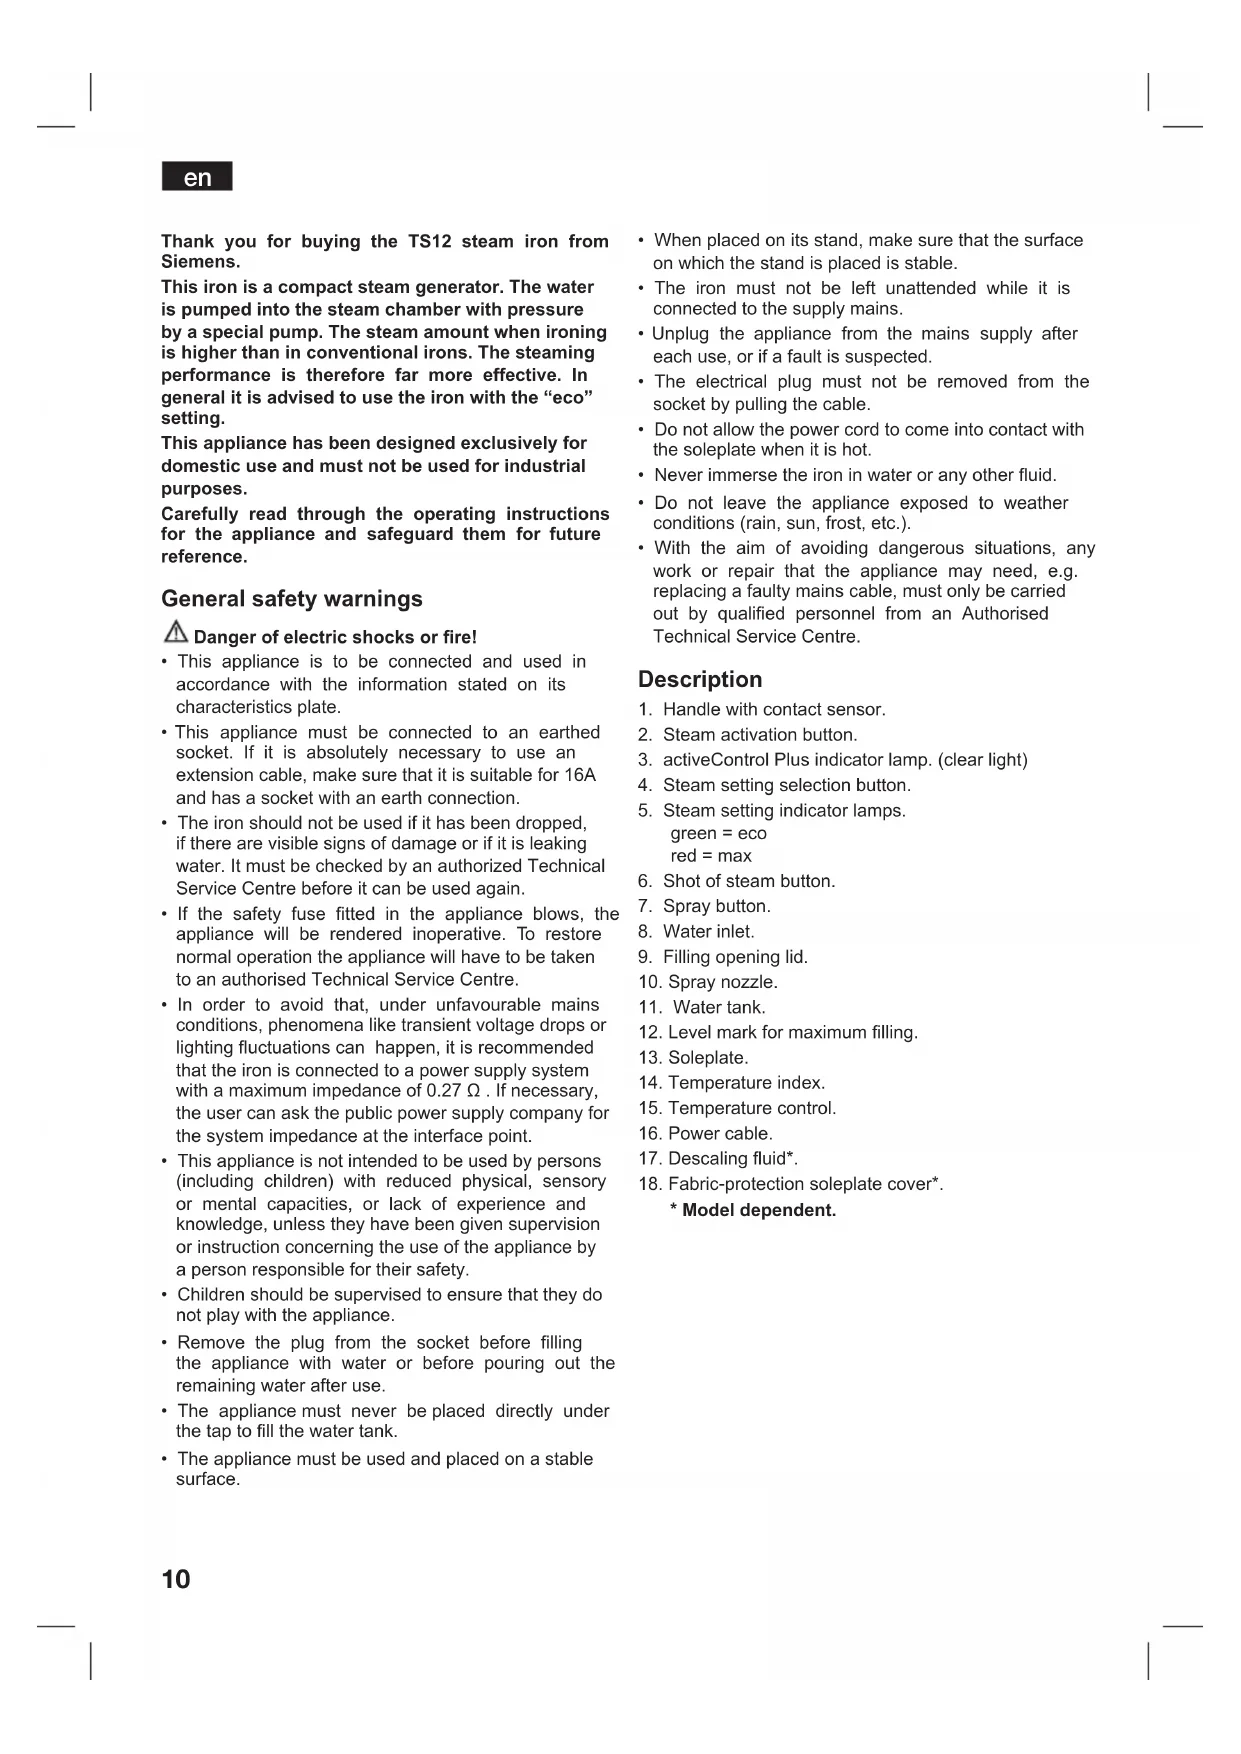
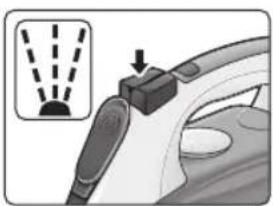
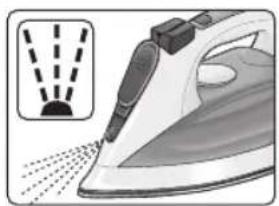
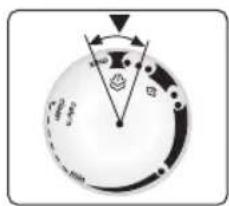
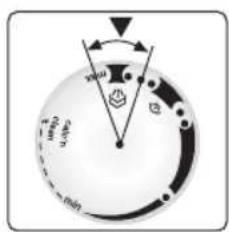
Setting the steam amount (3)
Your iron is equipped with a steam setting selection button (4) and with indicator lamps (5) showing the steam setting, according to the table below:
| Steam setting | eco | max | steam off |
| Indicator lamps | SET Green | SET Red | SET Off |
Steam can be generated by gripping the handle (1), or by pressing the steam activation button (2).
If the "eco" steam mode is selected, the energy consumption of the appliance will be reduced by means of reduction of electricity and water consumption. A good ironing result can be obtained on this setting for most garments.
The steam setting can be changed by pressing the steam setting selection button (4). The iron runs through the following cycle:
sensorSteam
The "sensorSteam" function automatically switches off the iron when the handle is no longer gripped, thus increasing safety and energy saving.
When plugging the iron in, during the first minute:
- The soleplate (13) heats up to the temperature corresponding to the selected setting.
The steam generation is blocked.
The green lamp (5) flashes.
en
After the initial 1 minute period:
- "eco" setting is automatically selected.
The green lamp (5) stops flashing. - The "activeControl Plus" indicator lamp (3) (clear light) goes on and starts flashing.
From this moment on, when the handle (1) of the iron is gripped or if the steam activation button (2) is pressed at steam setting:
- The "activeControl Plus" indicator lamp (3) stops flashing.
- The pump starts working and steam is generated automatically.
If the handle (1) is released:
- Steam generation will stop.
The "activeControl Plus" indicator lamp (3) will flash - The iron shuts off automatically. If the handle is gripped again, the iron turns on.
If the iron remains plugged in and is not used for several minutes:
After the handle (1) is touched or the steam activation button (2) is pushed again, the green light starts flashing.
- Steam generation will not be possible for several seconds, until the appropriate working temperature has been reached.
Ironing with steam (4)
The steam control is used to adjust the amount of steam produced when ironing (see "setting the steam amount" section).
Steam can be generated in two ways :
1. Continuous steam generation :
- Set the steam control to "eco" or "max" position.
- Grip the handle (1).
2. Steam on demand :
- Set the steam control to the "position, to cancel continuous steam generation while gripping the handle (1). On this setting, steam can only be produced when manually pressing the steam activation button (2) under the handle.
- Press the steam activation button (2).
Important :
- Steam is only available if the temperature control (15) is set at the steam symbols between “ ” and “ ”.
- Adjust the temperature setting and then set the steam control according to the table below. Steam will automatically be produced:
| Temperature control (15) setting | Steam setting |
| .. | eco |
| ... to “max” max |
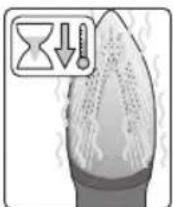
Note: Once a steam ironing setting has been chosen using the temperature control (15), steam generation may be delayed for several seconds until the appropriate working temperature has been reached.
Ironing without steam (5)
This enables the iron to be used for dry ironing.
- Grip the handle (1) and set the steam control to the setting.
- The temperature control (15) adjusts the temperature of the soleplate (13). Set it to the corresponding position by lining it up with the temperature index (14) on the iron.
Select an appropriate temperature for the type of material being ironed (see "setting the temperature" section).
- While ironing, do not press the steam activation button (2).
Spray (6)
This can be used to remove stubborn wrinkles.
- Do not use the spray function with silk as staining may occur.
- When ironing, press the spray button (7) and water will spray out of the spray nozzle (10) onto the garment.
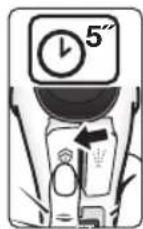
Shot of steam (7)
This can be used to remove stubborn wrinkles or to press in a sharp crease or pleat. It cannot be used on a synthetic setting for delicate items.
- Set the temperature control (15) to the “…” or “max” position.
- Set the steam control to the "max" position.
- Press the shot of steam button (6) on the handle repeatedly at intervals of 5 seconds.
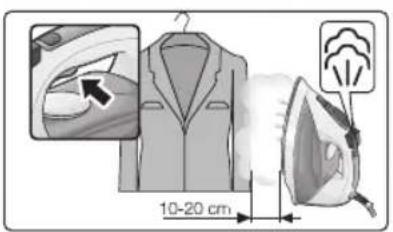
Vertical steaming (8)
This can be used to remove creases from hanging clothes, curtains etc.
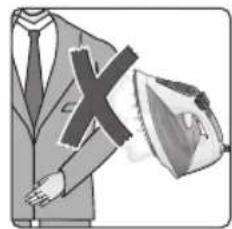
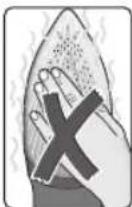
Warning!
Do not iron clothing while it is being worn!
Never spray or aim the steam at persons or animals!
- Set the temperature control (15) to the “...” or “max” position and the steam control to the position.
- Hold the iron in an upright position about 15cm away from the garment being steamed.
- Press the steam activation button (2). The shot of steam button (6) on the handle may be additionally pressed at intervals of 5 seconds. However, after 4 shots of steam, wait for 10 seconds to allow for continued steam production.
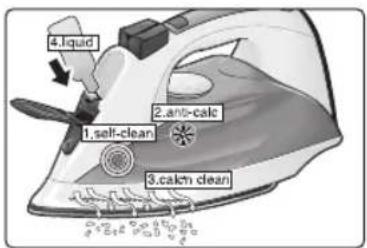
Multiple descending system (9)
Depending on the model, this range of irons is equipped with the following de-scaling features "AntiCalc".
1.self-clean
The self-clean filter between the water tank and the pump prevents scale impairing the steam generation system and ensures the optimum production of steam.
2. anti-calc
The "anti-calc" cartridge has been designed to reduce the build-up of scale produced during steam ironing, helping to extend the useful life of your iron. Nevertheless the "anti-calc" cartridge cannot prevent all of the scale that is produced naturally over time.
3. calc'n clean
The "calc'n clean" function helps to remove scale particles out of the steam chamber. Use this function approximately every 2 weeks, if the water in your area is very hard.
Follow the procedure described below:
a) Remove the plug from the socket, ensure that the iron has cooled down and that the water tank (11) is empty.
b) Set the temperature control (15) to the "calc'n clean" setting.
c) Fill the water tank (11) to the maximum level with clean tap water.
d) Plug in the iron and select the maximum steam setting "max" by pressing the steam selection button (4).
e) Hold the iron over a sink or a container to collect the water.
f) Grip the handle (1) until the water tank (11) is empty. This could take several minutes.
g) Repeat the procedure until particles no longer come out of the soleplate (13) of the iron.
h) Turn the temperature control (15) to the maximum setting. The iron will begin to emit steam. Wait until the water inside the iron has evaporated.
i) Clean the soleplate (13) of the iron.
4. calc'n clean with descending fluid
(model dependent)
For deep descending, use the descending fluid (17) supplied.
This should be carried out every 3 months
The descending fluid (17) can be obtained from our After-sales service or from our website..
| Accessory code (After-sales) | Name of accessory (Online shop) |
| 311144 TZ11001 |
Follow the procedure described below:
a) Remove the plug from the socket, ensure that the iron has cooled down and that the water tank (11) is empty.
b) Set the temperature control (15) to the "calc'n clean" setting.
c) Fill the water tank (11) with tap water mixed with a measure (25ml) of the descaling fluid (17).
d) Plug in the iron and select the maximum steam setting "max" by pressing the steam selection button (4).
e) Hold the iron over a sink or a container to collect the water.
f) Grip the handle (1) until the water tank (11) is empty. This could take several minutes.
g) Then follow the procedure described above in section "3. calc'n clean" until particles no longer come out of the soleplate (13) of the iron.
Anti-drip system
If the temperature control (15) is set too low (below "..."), the steam is automatically switched off to prevent water from dripping out of the soleplate (13).
The "activeControl Plus" indicator lamp (3) on the handle flashes and the pump will not work.
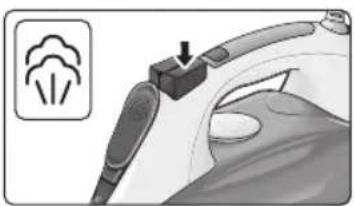
Fabric-protection soleplate cover (10)
(model dependent)
The fabric-protection is used for steam-ironing delicate garments at maximum temperature without damaging them.
Use of the protector also does away with the need for a cloth to prevent shine on dark materials.
It is advisable to first iron a small section on the inside of the garment to see if it is suitable.
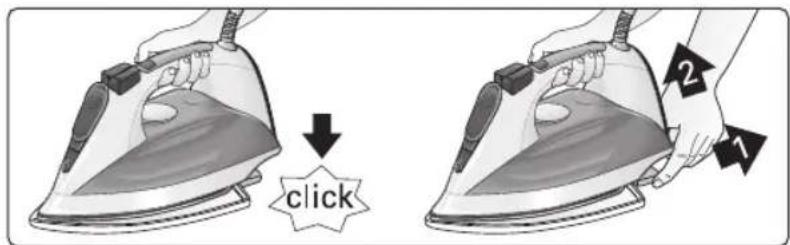
To attach the fabric protector to the iron, place the tip of the iron into the end of the fabric protector and press the rear of the protector upward until you hear a click.
To release the fabric protector, pull down on the clip at the rear and remove the iron.
en
Cleaning (11)
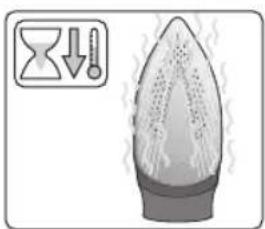
Attention! Risk of burns!
Always unplug the appliance from the mains supply before carrying out any cleaning or maintenance operation on it.
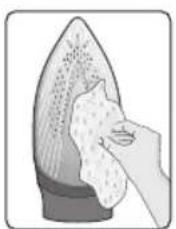
- If the iron is only slightly soiled, pull out the plug and allow the soleplate (13) to cool down. Wipe the housing and the soleplate with a damp cotton cloth only.
- If the cloth is synthetic, it may melt due to the high temperature on the soleplate (13), switch off the steam and rub off any residue immediately with a thickly folded, dry cotton cloth.
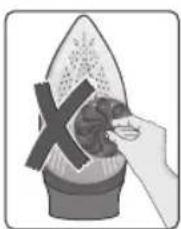
- To keep the soleplate (13) smooth, you should avoid hard contact with metal objects. Never use a scouring pad, or chemicals to clean the soleplate.
- Never decalcify the tank (11) or treat it with detergents or solvents, otherwise the iron will drip water whilst steaming.
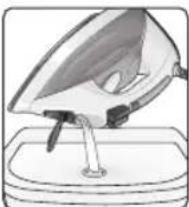
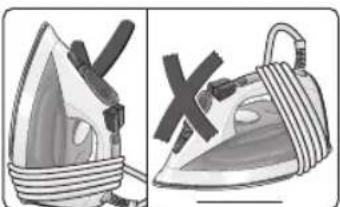
Storing (12)
- Open the filling opening lid (9).
- Hold the iron with the front facing down and shake it gently until the water tank (11) is empty.
- Set the iron aside in a vertical position to cool down.
- Coil the power cable (16) loosely around the heel of the iron, before storing.
- Store the iron in an upright position.
Tips to help saving energy and water
Steam production consumes the most energy. To help minimise the energy used, follow the advice below:
- Start by ironing the fabrics that require the lowest ironing temperature. Check the recommended ironing temperature in the label on the garment.
Regulate the steam according to the selected ironing temperature, following the instructions in this manual. Iron at "eco" steam setting (see "setting the steam level" section). - Try to iron the fabrics while they are still damp and reduce the steam setting. Steam will be generated from the fabrics rather than the iron. If you tumble dry your fabrics before ironing them, set the tumble drier on the 'iron dry' programme.
If the fabrics are damp enough, set the steam to the position (see "ironing without steam" section).
Advice on disposal
Our goods come in optimised packaging. This basically consists in using non-contaminating materials which should be handed over to the local waste disposal service as secondary raw materials. Your local town council can give you information about how to dispose of obsolete appliances.
This appliance is labelled in accordance with European Directive 2002/96/EG concerning used electrical and electronic appliances (waste electrical and electronic equipment -WEEE).
The guideline determines the framework
for the return and recycling of used appliances as applicable throughout the EU.
Trouble shooting guide for minor issues
| Problem Probable cause Solution | ||
| The iron does not heat up. 1. | Temperature control (15) set to minimum.2. No mains supply.3. The "sensorSteam" system has been activated. The iron is set to stand-by. | 1. Turn to a higher position.2. Check with another appliance or plug the iron into a different socket.3. Grip the handle (1) of the iron to re-start it. |
| "activeControl Plus"indicator lamp (3) flashes. | The "sensorSteam" system has been activated. The iron is set to stand-by. | Grip the handle (1) of the iron to re-start it. |
| Iron difficult to slide on the clothing. | Clothing is too wet. Reduce the steam amount by selecting "eco" or "settings. | |
| The clothes tend to stick. The temperature is too high. Turn the temperature control (15) down and wait until the iron has cooled down. | ||
| Water drips out of the soleplate together with steam. | 1. Temperature control (15) setting is too low.2. Steam control is set too high in conjunction with a low temperature.3. You have pressed the shot of steam button (6) repeatedly without waiting for 5 seconds between each press.4. Pure distilled water has been used (see "Filling the water tank" section) or other products such as fragrant water have been added to the tank. | 1. Turn the temperature control (15) to a higher setting (between "••" and "max") and wait until the green steam setting indicator lamp stops flashing.2. Set the steam control to a lower setting.3. Wait 5 seconds between each press of the jet of steam button.4. Mix distilled water with tap water as directed in the "Filling the water tank" section and never add any other products to the water tank (unless recommended by Siemens). |
| Steam does not come out. | 1. Steam control is set to "position.2. No water in the tank (11).3. The temperature is too low. Anti-drip system is activated. | 1. Set the steam control to "eco" or "max" position.2. Fill the tank (11).3. Set to a higher temperature if compatible with the fabric. |
| Spray does not work. 1. No water in the tank (11).2. Obstructed mechanism. | 1. Fill the water tank (11).2. Contact the Technical Service. | |
| Smoke comes out when connecting the iron for the first time. | This may be caused by the lubrication of some of the internal parts. | This is normal and will stop after a few minutes. |
| Deposits come out through the holes in the soleplate | Traces of lime scale are coming out of the steam chamber. | Carry out a cleaning cycle (see "calc'n clean" section). |
If none of the above solves the problem, get in touch with an authorised technical service.
You can download this manual from the local homepages of Siemens.
fr
Indstilling at temperatures (2)
Temperaturvaelgeren (15) indstiller bundpladens temperatur (13).
2. Damp after behov:
Stalla in temperature (2)
Temperaturkontrollen (15) justerar strykplattans temperatur (13).
Ipeed nepnIM BnKOpncTaHHaM npackN
3HIMITb 3 NiIOoBn (13) Bci eTNKeTKn Ta 3axnCHy ynaKOBky.
IpyoTpmaHHdoaTKOoi IHopmaui OIOBnKOHHH HxHHeabeDeHN DiN B. BiNobiHn po3in iiei Hctpyku 3 ekcnnyataui.
He niklouaoh npacky do ekeTpomepeki, HanoBHtB pe3epByap (11) BOHO 3 KpaHa Ta BCTaHOBITb peryIaTOp TemnepaTyPi (15) Ha no3HaKy max.
-Пдклочьпстрийdo eJeKtpomepeksi.
- Koln npacka HarpieTbc Do Heo6xHoi TemnepaTpy, 6nmuHH 3eJeHO rHdkatopy (5) npnnHHTcbr i noHe 6nmatn 6eKOBopOBu nHdkatop (3).
Bi3bmitbcra 3a pyky (1) Ta BCTaHObitb peryIITop npn Ha MaKcImaJIbHy No3HaCy max.
TpmaOu npacky B ropn3oHTaIbHomy noIoxeHHi, KInbKa pa3IB HaTncHtB Ha KHONky napOBoro ydApY (6). 3 niOouBn (13) MaE BnITn BeCb 6pyd.
- Y paazi Heo6xidHocTi o6epeXHo npotpiB niOuBy (13) cyxoio 6aobOBraHOIO TKAHHOIO, CKJaedeHOIO deKiIbKa paazIB.
-ПдчаспороВИКОРиСТАннЯфункii noDAч napHe cnpmaOByTe napу Ha 6iJIN3Hy, TOMU loB CnCTeMI nODAч napu moKe 3aJIuWATnC8 6pyd.
- Iicna nepworo yBIMKHeHHa Baa HoBa npacka MoKe BnDInrTn CneuHn 3anax i HeBeNk Ky KInbKiCTb DmMy. Lc npinnHtbcraepe3 DeKibKa XBNH.
HanoBHeHHpe3epByapa Ia BOn (1)
Bicnne npackn BiEeKtpomepexi!
BiiKpnTe KpnKy 3aJIbHOrO O'TbOpy (9).
-Пдчac HANOBHeHHH HIKON He nepeBnUyTe BiDMITK MAKCmMaJIbHOro pIBHr HANOBHeHHH (12).
Bukopntobyte TINbKn NcTByOdy 3KpaHa 6e3 6yIbKaNX DomiwoK. IOnaBaHn HwNpiHN (KpIM Tnx,popekomeHdoBahi Komnaiieo Siemens), HanpNKnad apomatn3aTopiB, MoKe noWkoDHT npCtpi.
NoukoJKeHHBhAcNiIDOK BnKOpNCaHHBnueBkA3aHx DOMiWOk PpN3BODNTb Do anHyIIOBaHHrapaHTt.
He BnKOpNCToBnyTe BOdAHN KOHDeHCat i3 cyuINbHOro 6apabHa, CnCTeM KOHdUcIOBaHHa NOBITpy ToTO. PnpCTpi Po3paxOBAHN Ha BnKOpNCtAHHr 3BnuAuaHOi BOuN 3 KpaHa.
- 3a6e3neHTn TpBaIe Ta ONTMaJIbHe BIKOpNCtAHH NfHKUII NOaHi NapH, DoaIte DO BOIu 3 KpaHa INCTUNBOAHy BOy y CnIBBIDHOweHHI 1:1. YKIO y BAOWMy perioHi BOA 3 KpaHa DyKe JOKcTKa, 3MIwYNe BOy 3 KpaHa 3 INCTUNBOAHO BOHO y CnIBBIDHOweHHI 1:2.
Ipo pibEnb JoxpctKocTi BOuM MoXHa i3HaTnCra y MICeBi BODONOCaJaBHi KOMNaHII.
PerylIOBaHH TeMnepeatypn (2)
Temnepatypa nioobu (13) perynoctbcra 3a donomoro opeyraTopa temnepatypu (15).
O3haHOMTeec 3peKoMeHdaLizmIuOTo TemnepaTpy npacyBaHHHa eTuKetU OJry, kN Bu npacyeTe.
- YctaHOBiTb peryIyIop TemnepaTyprn (15) Ha BiIDNoBIDHy no3HaCy nokaxKuKa TemnepaTyprn (14) Ha npacui:
| · | Си ntete nka |
| ... | Шов — Вова |
| ... | Бавова — Лвон |
- P036epiB 6iinn3Hy 3aJIeJxHO BiD CmBOJIIB Ha etIKeTKax Ta 3aBXdN NOHnHaIte npacyBaHHra 3 peeu, IIO NOTpe6yIb HnHnKQoi Tempeatypn npacyBaHHr.
- RaKIO Bn He MoKTe Bn3HaHTn, 3 RaKO MaTePiaJy BnroTOBHeH N OJaR, NOuHaIe TnpacyBaTn 3 peKIMy HauHKnQoi TemNepaTpyn 36iNbSyOuN II 3a Heo6XiDHOCTi. RaKIO OJaR BnROToBHeH N 3 pi3Hnx TnINB TKAHNH, BCTaHObitb TemNepaTppy, IIO NiIXoAnTB DnI npacyBaHHa 6JIbU DeJIkaTHoro MaTePiaJy.
- Peyi 3 wOBy, BOBn a6o CInHTeTNUHoi TKAHNH Heo6xIDHO npacyBaTN 3i 3BOpOTHO 60ky, 106 3ano6irtn noRBI 6nCKyUx PnM. He BnKOpNCTOBuYTe cyHKIIO pO3nnIOBAHHaBOIN, 106 3ano6irtn noRBI nIIM.
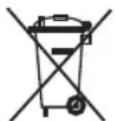
PeryuBoHHn noaui napn (3)
Baawa npacka MaekhONky Bn6opy pexmmy noaqui napu (4) Ta iHukatopn (5), 0o Bka3yOHTb Ha o6paHni pekmnpoanaipapn BiINOBiHO do ciie ta6nui.
| Рек imm побачи пари | eco | max | 6e3 пари |
| Индikatopи | SET Зелени | SET Чер boны | SET Нe сВiTЯтбя |
Iapa BnDInrEbCn iN cac TpUmHaHn pyuKn (1) a6o HATnCKaHH KHOKN noaui napn (2).
JaKuo BN o6pann peXnM ECO, eHeprocnoXBHaHH npncTpo 6yde 3nHexeHO 3aB4KN 3MeHweHHO cNoXnBaHH eJekTpoEhePrr Ta BOi. Y bomypeXnMI MOnHa OtpMaTH Do6pi pe3yNbTaTH npacyBaHH dJI 6IbWoCTI TnIB TKAHN.
Pekmnoaipn moKHa 3miHHT,HaNTCHyBUN Ha KhoNky Bn6opy peKmmy noaipn (4). NpeemkaHHM iK pekmamn Bi6yBaetc B taki nocniIOBHOCTi:
sensorSteam
Функця sensorSteam BIMMkae npacky,Якsoи He Trpmaete 3a pyky. Lze 36ilbwye 6e3neky ekcnnyataui npack Ta Do3BOJAE 3aouaJxByBaTN eNeKtpoehepiio.
Ppotarom nepwoi XBUNHH nicnBKNUoyehn npackn do eJekTpomepeki:
-Пиошва(13)HarpiBaetbca Do TempepaTpyn,io Biinobiidae obpaHOMy pexmMy.
- THeHepyBaHHnI npn 3a6JIOKOBaHe.
- 3eNeHn iHndkaTop (5) 6nMaac.
uk
Iicna 3akHcHnepioy BkHoueHHa TpBbnicHO B ONDHYXBNNHy:
- ABTomatnuHO BMnkaetbcrapeKmEco.
- 3eHeHm iHdNkATop (5) npnnnne 6nMaHHa.
3acbiyeTbcn nouHaec 6nMaTu iHdkaTop activeControl Plus (3).
NoHHaOHn 3 bOro MOMeHTy, kUIO B3rTncra 3a pyKy (1) npackn a6o HaTNCHyTu HA KHONky nOaNi napn (2), konu BNbpaHO peXHM nOaHi nap
- IIndkaTop activeControl Plus (3) npunnne 6nmaHH.
-Поуннапрацовати nomna,i aBTOMaTHO reHepyETbcnnapa.
Kuo BiDnyctn pyky (1):
- THepepyBaHHnnapn npnnHnEeTbcra.
- IIndkaTop activeControl Plus (3) nouHae 6JnMaTn.
- Ppacka aBtOMaTHUHO BmNkaETbcr. RaIIO B3rTnC3a pyuKy, npacka 3HOBy BMNkaETbcr.
Kuo npacka 3annaaetbcer niknueho do Mepeke XNBHeHH He BnKOpncTOBycBcnnpotrom KInbKOx XBnnH:
- 阿卡多3HOBYTOPKHyTncsryKn(1)aboHaTnCHyTu KaHONky noaqi napi (2),nouHae 6IImatn 3eJeHn iHdkaTOp.
- TenepyBaHHn napn cTaHe MoKJIbBm TiNbKn Yepe3 KInbKa cekyHd, nicna DoCraRHeHHa BiNIOBIdHOi po6oHi tempeatypn.
PpacyBaHHa 3 npoO (4)
PerynTop napn BnKOpNCTOByEcTbcA nperynoBaHH KInbKocti napu, 0reHepyctbcn iic npacyBaHH (INB. po3diN «PerynoBaHH noaichi napu').
Iapa moke rehepeybaTcNDBOMa cnooc6amn:
1. NocTiHre reHepyBaHHn napu
- YctaHOBiTb peryIaTOp napn Ha no3HaUky eco a6o max.
- Bi3bmiTbca 3a pyky (1).
2. Napa 3a Bmoroio
- Uctahobitb perytnatop napn ha no3haKyy, 06B BMKNHyTn NoCTiHe reHepyBaHHa napn niD yacytprmyBaHHa pyuKn (1). Y cybOMy pexkmi nparahepeHepyETbcra TlIbKn NiD qac HATNCKAHHa KHONKn NOdau npn (2), po3Miuehoi niD pyuKIO.
- HataChiItb Ha KhoIky noaqui napi (2).
Baxnbo:
- Napa 6ynde BuxoDHTN, TijbKn JaKIO peryJrTOp TEMnepaTyPn (15) BCTaHOBNeHO MIX CmMBOJaMn napu - , MIX No3HaQKaMn . Ta max.
- O6epitb TemnepatypnH peKIM,notim yctahOBiB peryIaTOp npn BiIDNoBIDHO do HIXKHeHaBeDeHoI Ta6JIuCi. Iapa 6ynde reHepyBaTncsA BtOMaTHUHO.
Cey peKHM DO3BOJNE BKNOPNCTOByBaTN npacky dny cyXOrnpacyBaHH.
- Bi3bMItbC8a pyky (1) i BcTaHOBiTb peryIaTOp npnHa no3HaCy
-Дяperynobahnempepatyn niOuBn (13) BNKOpNCOBYeTbCerpyrnapoTepnepatyn (15). YctaHOBITyoro HAnpoTN BiINOBiHOI NO3HauKIn NOKaXnKa tempepatyn (14)Ha npacui.
TemnepaTpHn peKm Mae BiINObIaTn Tnny TkaHHn, kY Bu 6ynde npacyBaTu (DnB. po3diN «PeryIOBaHHra TemnpaTpN»).
-Пдчаспacyванн HeHaTnCKaITeHaKhONKy nOdaqi napi (2).
Po3nIIOBaHHB ODN 6
DanaФункIMOKe BnKOpNCToByBaTnCnДnA yCyHeHHCTiIKx3MOpWOK.
He BnKOpNCToBvIe yHKciIO po3nnIOBaHHra BOHnPiJ uac npacyBaHHra WOBky, iHaKUe Ha HbOMy MoKyTb 3aNNHTNcRA JPMN.
-Пд уac npacyBaHHЯHaNTCKaHTe Ha KHOKNy po3nJIIOBAAHH BODI (7), i BOda 3 po3nJIIOBAJIbHOi φopcyHKn (10) 6pn3kATmHe Ha OJr.
IapOBn yIap (7)
Dana fynkui MoXe BnKOpNCTOByBaTnCnIy CynHnCTiIKnx 3MopwO a6o fikcau cTpiOK Ta nice. Lho fynkuio He moxHa BnKOpNCTOByBaTH3 pexHMOM npacyBaHHn CnHTeTKn Ni d Yac npacyBaHH deJIkaTHnx TkaHN.
- YctahOBiTb peryIaTOp TempepaTypn (15) Ha no3HaUky a6o max.
- YctahOBiTb peryIaTOp napHa no3HaCy max.
- Kijbka pa3iB HatnciTb Ha KhoNky napOBoro ydapy (6)Ha pyuCi 3 INTEpBaIOM y 5 CeKyHd.
BepTnkaJIbHa napa (8)
DanaФункиIMOKe BnKOpNCTOByBaTnCnДnBnIaJIeHnI 3MOpWOK Ha nIDBiUeHOMy OJr3i,UTopax ToIO.
yBara!
He npacyte Hndaryhyn oja!
HikoJHe po3nHouTe Body n He cnpaMOBynt npy Ha IIOde i TBapuH!
- YctahOBiTB peryIaTOp TempepaTyPi (15) Ha no3HaKy
afo max, a peryjTOp napn Ha no3HaKy
- TpmaIte npacky y BepTnKaJIbHOMy noJoxKeHHi Ha BiIcTaHI 15cm BiI dOJrgy, kNBI o6po6JIraTe napoIO.
- Hatncihb Ha KhoNky noaqi napi (2). MoXHa DoataKoBO HATnCKaTn Ha KhoNky napOBoro ynapy (6) Ha pyu3 iHTepBaJom y 5 cekyH. Ondak nicra 4 napOBnx yapib 3auekaTe 10 cekyH, 0o6 3a6e3neuTn 6e3nepeBHe rehepyBaHH napi.
CnCTema BndaJeHHaKIny (9)
3aIeKHO BiM oJeni, npacku iei cepi MaIOMb Taki cyHKui BnDaneHn Hakiny AntiCalc:
1.Функш self-clean
Фльт самочишн Мік рзерыapom Дг BODI Ta NOMIO 3anobira NOWKODXeHHIO CNTEMn rehepyBaHЯ napи habINOM N3a6e3neyuC ONTIMaJIbHe rehepyBaHЯ napi.
2.Функця anti-calc
Kaptpnck anti-calc npn3haeHn Dn 3MeHwHnYyTbOpHHHaKnpy npoTgrom npacyBaHH3napoIO,0do3BolIe npoD8kTN TepmH ekCnnyatauII npNCTpOIO. Ane Kaptpnck anti-calc He MoKe BuaJNTu BeCb HaKnI, 0yTbOpOEtbcn iD qac BnkOpNCaHH npNCTpOIO.
3.Функцic calc'n clean
Функця calc'n clean donomarae BuaanTu 3 napoBoi kamepnpewtkn Hauiny. Kaio Boda y Baowomy perioHi dyke KopctKa, BnKOpncToByTe IIO phyHKuio np6Jn3Ho pa3 Ha 2 TnKHi.
ДиTe 3a OINcaHOU HnKYe npOeDpyoK:
a) BnMItb wTecenb 3 po3eKn, OOHeKaIteCg oxoNoJKeHH npackn n CnpOxHITb pe3epByap dnn BOHN (11).
b) YctaHObitb peryIaTOp TempepaTypn (15) H aNo3HaCy cal'n clean.
c).3anOBHITbpe3epByapIJIa BOIN (11)do BIIMitKIMAKCImaJIbHOrO pIBH YAICTOIO BOHO 3 KpaHa.
d)Пикнчiy npackуdo eNeKtpomepexi o6eipbpexIM MaKcImaJIbHOI noaHi napn max 3a donomoroi KhoNKn Bn6Opy peximy noaHi napn (4).
e)Пидимить пackу Нд Кхоню paKOBиню a60 MICTKOIO NOcYdINHOДЯ 3бору BODN.
f). TpmaIte npacky 3a pyky (1), nokn pe3epByap dna BOn (11) He cnopoxHntbcr. Lc moKe TpnbAtn dekiIbka XbuiH.
g) NOBTOPIb 10 npoceDpy kInbka pa3iB,doKn 3 niOuBN (13) He nepeCTaHe BxOOnTu HAKIN.
h) YcTaHOBiTb peryIaTOp TemnepaTypn (15) Ha MAKcImaJIbHy nO3HaCy. IpaKaNouHe BnNyckatn npy. OoekaiTeCn, nOK N Bci peuTkN BOiN He nepetBopraTbca Ha npay i He BnDyTb 3 npackn.
i) Ounctitnb niioowBy (13) npackn.
4.Функцic calc'n clean 3 piДиHOIO dIЯ BuaIaIeHHaHaknny
(y DeaeknX MoJeIax)
ДлбьшякIHOR BnIaJIeHЯнKINy BnKOpNCTOBYte piINHy IINBnIaJIeHЯн HAKIny (17), lo BXoIbTbdo KOMNKeTу nOcTaHaHH.
LIO npoceDpy Tpe6a BnKOnHyBaTn KoxHi 3 Micai.
Pidiny dny BidaaHnHa HAKNY (17) MoKHa npu6aTu y BiDini nicnaipodaJxHoro 06cnyroByBaHHa a6o B cneian3OBAHx Mara3Hax.
Ha pyuqi 6nmae iHdkatop activeControl Plus (3), nomna He npaue.
TKaHnH (10)
(y DeAeknX MoJeIAX)
Hacadka qni ndeJIkaTHx TKAHH BnKOpNCTOBYbCra n863neuHoro npacyBaHHa DeJIkaTHx TKAHH Ha MaKcMaIbHi TemnepaTypi 3 BnKOpNCTaHHm nap.
BnKOpNCaHHHaCaNqN niNiklaKn DnA DeNikatHnx TkaHH TaKoX 3Himae Notpe6y KopnCTyBaTncraHupkoIO dny yHnKHeHH NcKy Ha TEMHX TkaHHax.
PekomeHnyeTbc po3noaTu npacyBaHHHa HeBeNkii dInnHbHTpiuHbOi nobepxHi Odary Ta nepeBipNTu pe3yIbTat.
Hn Hacay, yctahobitb Hic npack B cepenHy kpaHacaikn Dn deJIkathnx TKAHH Ta HATNCHTb Ha 3aHIO qactHy Hacakn DOROpN, DOKHe NOUYeTe KnaaHn. Uo6 3Hn Hacaiky DnA DeIiKaTHNX TKAHH, NOTrHtB 3a 3aHni Hikcatop DOHN3y Ta BNTARHtB npacky.
OuHueHHa (11)
ΔYbara!Ichye He6e3neka onikib!
Ipeed 6ydb-ram 3axoamn 3 ouuueHHra Ta DORJr4y 3a npncptpoem 3abxdn BmukaiTe Noro 3 po3eKn.
- RaKo npacka 3nerka 3a6pydHnIacra, BntarHITb Wtencelb 3 po3eKn i daTe niOwBi (13) oxonohytn. IpotpiB Kopnyc i niOwBy BONoro TkAHHO.
- KaHc HnHa TkaHnHa po3nnabnacn iBnBOM 3aHaTTO BucOKoi Tempeatypn nIOoBn (13), BiKIOuHTb NODay npu Ni BiDpa3y X 3uCTITb HAINPiM MaTePian 3a DonomoroO cyXOI GabOBHHOI TKAHNi,CKNaDEHOI DekiIbKa pa3IB.
-Ⅲo6 niTpmyBaTn NOBepxHIO NiOswBn (13) rnaDeHbKOHO, cIiD yHnKaTHPi3KOro KOHTaKTy 3 MeTaJIeBIMN IpEIMeTAM.NyXODHomy pa3i He BnKOpNCTOByIe DnA OOnuEHH NIOoWBN XOpCTKi ry6Kn dIg MNTTЯ NocCyHy XiMHi peYOBHN.
Hikon He BnndaIe Haknn 3 peepByapa nn BOiN (11) 3a DonomoroIO MNouhX 3aco6iB a6o po3uHHNKIB, iHaKwe i3 npackn NiJ cac npacyBaHHra 3 napoi 6ynde npocOuyBaTnca BOJa.
36epirahn (12)
- BiДкриTe кршky 3аинвого оТьору (9).
Поверніть пpackу tak,цоб Нocик 6by Спразмовий Долиць, iЗлэрka notрясіть ii, noki peзервayap дя Bodи (11) He cnopoxnHtbcr. - NocTaBTe npacky y BepTnKaJIbHe nOIOXeHHa DnA OXONODKeHHa.
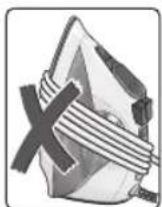
- Ipeep36epiraHHm HeuiNbHO HamotaTe uHyp XnBHeHHa (16) Ha HxNIO qactHy npackn.
36epiraTe npacky y BepTKaIbHomy nOIOKeHHi.
Iopadn 0do ekOHomii eheprii BODn
Bilbwe Bcboro eHeprii BNtpaayctbca Ha yTBOpEHnnapu. 063aouaadntneEkeKtpoeHepriio, doTPmmyTecbTaknx npa:
-Почнай Te npacyвань 3 6iIN3H,IIO notpe6ye HauHHKQTO TemnepaTyphoro peKIMy. PekomeHdoBaHy TemnepaTy npacyBaHHMOxHa NOdBUTCnHa eTNKeTkax peHcN.
Bippernyi noauy npn BiinobiHno do obaHoro TemnepauphoropexmymnpacyBaHH,doTPmyoHncb Bka3ibok ciie iHctpykui 3 ekcnnyataui. Ipacynte B pexmi noaapi npn eco (DVB. po3diN «PeyniobaHH noaichi napu').
- HamaraiTeCe npacyBaTn 6iIm3Hy, nOKn BOHa ige BONORA, BCTAHOBIOUOpyeKIM NOaHi napn Ha MeHHe 3NaueHHra. TaKIM YINHom npapa yTBOPIOBATUMeTbc BCEpeDInHi TkaHHn, a He B npacuI. JaKIo BN KOpNCyTeCtcb cyuNlboHO MaunHO, oBpaTe nporpamy «NiD npacky
- Kkto TkaHnHa DoCTaTHbO BONora, BiDknIOuTb noaynapn (DNB. po3dIn «IpcacyBaHH6e3 napn)
PekomeHdaa3i3 yTnJI3a3i
Hawi ToBapn Noctaaytbcy nokpauehen ynaKobci.
Le o3Hauaec, 0o dIe Hei BnKOpncTObyTbC MaTepiAIn,
OHe BnKNkAIOb 3a6pydHEnHr HABKOnNshBoRo
cepeoBnuca, rki cniD BiDaTn Do MiccEBOI CnyXbN
yTuJl3aui BiXxDIB Rk BTOpNHHy CnpOBHy. Y MicCeBm
padi BaWoro MicTa Bn 3MoKeTe OTpMaTHn IHOpmaCiIO
npo Te, k cnD yTuJI3yBatn CTapi eNEKtpponpcTpoi.
Данн ппсстри Марковани BiДноВдно do BИМОг БроЕncькоi ДиректNBn 2002/96/EG zuo do eJektpuHnx Ta eJektpoHHnx npucTpoIB, zuo BmUHn 3 eKcnnyataci (BixxOdIB iD eJektpuHnx Ta eJektpoHHnx npucTpoIB - WEEE).
Ihctpykci3 ycyHeHHa dpi6Hnx HecnpaBHOCTe
- TenepepoBaHne npa npekpaaaetc.
- Haynhaet MuraTb CBeTOBOn INHdNkATop activeControl Plus (3).
- yTHOr aBtOMaTnueeCKN OTKInOuaeTcR. EcIN B3rTbCra 3a pyuKy, yTHOr cHOBa BkInOuaeTcR.
Ecn yTTOCTaETC NOKJIIOUeHHbIM K cETN HcNOB3yETc B TeueHHe HeCKOJIbKIN MHyT:
- Ecnn ChOBA KocHybC pyuKN (1) INn HaxKaTb Ha KNOHky NODaynapa (2), HauHHaet MURatb 3eJIeHbI INHdNKATOp.
- 蕴能回府安国 napa CtaHET BO3MOXHBIM TOJIbKO Upee3 HeckoBko CekyH, Nocne DocTnxKeHHa COOTBeCTByIOUe pa6Oey TemnepaTypbl.
TnaxKeHne c napom (4)
PerynTnpapa nncnoNb3yETcI pyerynipOBKn KOINueCTBa reHepnpyemoro npap BO BpeM rnaXeHn (cm. pa3dEe «PeynpoBHaHe KOINueCTBa npa').
Bo3MOKhbl DbTa Tnna reHepnpoBaHn npa:
1. HenpepbIBHoe reHepnObaHne napa:
- YctaHOBNTe peryIaTOp npapa Ha OTMeTKy eco nnn max.
-Bo3bMntecb3a pyky(1).
2.Пар no Tpe6oBaHnIO:
- UctahOBHTe peryIaTOp npa B nOIOKeHHe, YTo6bI OTKJIOnHTb HnpepbIBHoe reHepnpoBaHHe npa npu ydepXHBaHH npyk (1).B 3tOM pexmep npreHepnpyeTc TOLbKO npn HaKaTHN KHOKN IOnaH npapa (2) noD pyko.
- Haxmnte Ha KhoNky noaun napa (2).
BaxHo:
- Пар 6удET BыхоДиТь ТольКО, ecn ТерморулгтОр
(15) уетановпен мжdy симвогамma napa - -
mжdy OTmetkamn ** n max.
3aata Te Temnepatypbmy pekm, 3aTeM oTpeynpuTe npaCy npa B COOTBeCTBn CO cNeyuOe Tabniue. Nap 6ydt reHepnpoBaTbcra ABtOMaTHueckn.
HnkOrda He pacnbIyIte Body n He HnpaBnIte nap Ha IIOeN XNBOThbIX!
- YctaHOBInTe TepMoperyIaTOp (15) Ha OTMeTKy ... Hn max, a perynlToP npapa Ha OTMeTKy
-Деркinte yIor B BepTnkaJIbHOM NOLOKeHHHa pacCToHHN 15cmOT OdEJdbI, KOToPAOBpa6aTaBbAetc npom. - Haxmte Ha KhoNky noaun npap (2). Moxho DononHnTeJbHo HaxmMaTb Ha KhoNky napoBoro yapa (6) Ha pyuKe c nHTepBaIom B 5 cekyHd. Nocne 4 napobbx ynapOB cdeJaIte 10-ceKHyHnyo naayy, UTo6bl oBeCneuTb HenpepbIBHOe rehepnpObaHne npap.
MhorokyHKnOHaJIbHa cncTeMa ydaIeHnaHaknn (9)
B 3aBnCmOCTOn OT moDen, yTOrn 3ToN cepnn nMeHOT cNeDyUoIe FyHKuIN ydaIeHnra HAKnN AntiCalc:
1.Функцura self-clean
ФиьтсамоочкmexkyemKoctbOДЯ BODы HacocomпретВрааETCKONJIeHNEHaKINNBCNTeme reHepuOBAHn npa nObecneHBAET ONTImaJbHoRe reHepuOBaHne npa.
2.Функця anti-calc
Kaptpndk anti-calc npedHa3HaueH dnn CHnkeHnna 6b0aBnna Haknn npn IaKeHN C napom, yTO nOMoraet npoDnltcpoK cnjXbbl yTOra. Tem He MeHee Kaptpnck anti-calc He MoKet ycTaPAnHb BCHO HAKINb, eCTeTBeHHO 6pa3yIOUyIOc CO BpeMeHem.
3.Функця calc'n clean
Функця calc'n clean nomoraet ydaJIntb MeIknE qaCTnIbI HAKINI n3 KAMepbl npoo6pa3ObaHnR. Ecnn BODa B BaWem perNoHE JecTka, 3Ty fYHKUIO cJeDyET NcNOJb3OBaTb Pn6nN3NTeBHO pa3 B 2 HeDenN.
CneyuTe onucaHHo Hnke npoeDype:
a) BbHbTe wTencelbHyu BuJky u3 po3eKn, DoXknteCboXJaKeHna yTHora n onopoxHNte emKocTb dIra BOdbl (11).
6) YctaHOBNTe TepMoperyTApTOp (15) Ha oTMetky calc'n clean.
B) 3aONJIHnTe eMKOCTb IJRA BOJBI (11) Do OTMeTkn MaKcImaJIbHorO yPOBHH YIcTOn BOIOI N3 KpaHa.
r) NIOKJIIOUHTe yTHOr K cETn N BbI6epNTe peXIM MaKcImaJIbHOJ IOdaun npa max, Haxab Ha KhoNky BbI6opa pexima IODau n npa (4).
Д)ПОДИМЛТЕ yTIOr HAD paKOBINHOI nIN EMKOCTbIO DnRA c6Opa BOdBi.
e)ДерхиTe yTHor 3a pyky (1), noka emKOCTb dIЯ BOdBi (11) He onopoxKHITc. 3To MOKET 3aHrTb HeCKOJIbKO MInHyT.
K) NOBTOPRNe 3Ty npoceDpy Do Tex nop, noka n3 noDoWBbl yTora (13) He nepeCTaHET BbIXOHTb HAKINb.
3) YctaHOBnte TepMOperyIaTOp (15)HaMaKcMaJIbHyIO OTMeTKy. 3 yTHOra NaHHT BbIXOHTb nap. DoXdntecb, NOKA BcR BOJa BbIeT n3 yTHOra B BIne napa.
n) OoHCTnTe noOuBBy yTOra (13).
4.Функци calc'n clean c KndKocTbIO dnydaneHnHaKnnn
(B HeKoTOpbIX MoJeIaX)
Дяболee OCHOBaTeIbHOrу ydaJIeHЯ haKINn
NcNoIb3yIte KUdKocTb ДЯ ydaJIeHЯ haKINn (17), BXOJaIyU B KOMJIeKT NOCTaBKn.
3Ty npoceDpy Heo6xOdmo BbIIOJIHrTb KaKdble 3 Mecaua.
Kndkoctb dny ydaenHna Haknn (17) MoKHO npno6pcntBnBOTdeJeNocIepNoDaXHo06cJyKNaBaHn nIN B CneuaaN3npoBaHHbx MaraunHax.
Ha pyuKe Miraet CBETOBH INDnKaTOp activeControl Plus (3), Hacoc He pa6oTaE.
3aunTHa TeKCTnIbHa noDOWBa (10)
(B HeKOTOpbIX MoJeIaX)
HacaKa n noKnada Ka dna DeNkathbIX TkaHei NCNoJb3yOTc Dn 6e3oNaCHoro rnaKeHn ADeNkathbIX TkaHei Ha MaKcMaJIbHOI TemnepaType C NcNoJb3OBAHnem npa.
IpimHeHHe HacaKn IIN NOkKaIKn DnIeNkATbIX TkaHei TaKke CHImaet Heo6xOIMocTbB NcNoJIb3OBAHm TpaINuHOHOr TprNOUKN DnI npedOTBaPaeHn BO3HnKHOBeHn Jocka Ha TEMhIX TkaHx.
PekomeHnyetc Chauana npornaTb He6oBwOy yactOK TkaHN C n3HaHKn, YTo6bl npOBepntbpe3ynbTaT.
YTo6bHaJeTb Ha yTIOH HacaIKy IINr rnaKeHnA DeIINKaTHbIX TkaHei, NOMEcHTne HOC yTIORa B KOHeu HacaIKN INoDTONKHNTe 3aHIOU YAcTB HacaIKN BBepx Do UeJyKa. YTo6bCHrTb HacaIKy IINr rnaKeHnA DeIINKaTHbIX TkaHei, NotAHNTe KpeJIeHne B 3aHHei YacTN HacaIKBHN3 IN BbITaUNTe yTOr.
OuncTkka (11)
△BnMaHHe! CyueCTByeT onaChoctb oxorob!
Ipeep npoBeHnem IIO6bIX pa60T no ouhCTke HnTexHnueckomy 06cnykHBaHNO Bcerda BbIHMaTe WtencelbHyIO BuNky npu6opa n3 po3eKn.
- Ecnn yTIOr cIeRka 3aRpa3HNICRA, BbITAHNTe BNIKy n3 po3ETKn n daIte noDoWBe yTHora (13) ocTbITb. Ipotpnte Kopnyc n noDOWBy yTOra BlaXHOH TKAHbIO.
- EcIn CNHTeTnueckar TkAhb paCnJaBnJacb noD BO3DeIcTBnEM CInuKOM BblCOKoI TemNepaTypbI NOOUBBy yTHora (13),OTKlIOHTe nOdaU npa n Cpa3y Je cHCTnTe HaJIINiM MaTePnAJI C NMOUBO cyXoI XNONaTObymaxHO TKAHN, CNOXeHHoB B HeCKONbKO CNoEB.
-Дя coханенгладкости NOOWBbl yTOra (13) cneJyET n36eRaTb ee pezKoro KOHTaKa Tc MeTaNueCKMn PpeDMeTaMn. HN B KOem Cnyuae He NcNoB3yIte DЯ ONUCTKN NOOWBbl yTHOra JECTKNe ry6Kn DЯ MblTb NOCyDbI XIMNUeCKNe BEUeCTBa. - Hikorda He ydaIaIte HakInb n3 emKocTn (11) c NOMOUBIO MOUxN CpeCDTB nIN pactBopnteJe. B npOTNBOM Cnyae n3 yTOra BO Bpemr rnaXeHnC npam 6yDet npocauBaTcB Oda.
XpaHeHne (12)
- OTkpoIe KpbIuKy 3aIIINBHOrO OTBepCTnA (9).
- NObepHnTe yTOr HocKoM Bn3 n CneRka NotPrcnte erO, noka emKoCTb dIra BoDbl (11) He onopoxHnTc.
- NocTaBbTe yTnB B BepTuKaJIbHoe NOJIOKeHne IIN OXnaJdeHn.
- Ipepe xpaheHnem HennoTHo HAMoTaIe shHyp nHTaHn (16) Ha HxKHOu yactb yTOra.
XpaHnTe yTHOr B BepTuKaJIbHOM NOJIOKeHN.
CoBeTbI NO 3KOHOMN 3Heprn N BOdBi
Bolbue Bcero 3Heprn pacxoyetc Ha Bbipa60kny napa. YTo6bl cokpaTb notpe6neHne 3Heprn, npndepKnuBaTeCb CneDyUOux peKoMeHdaun:
- HayinHaIte rnaKeHne c 6enb, KOtOpoe Tpe6yET MNHmAlbHoro TemnepaTpHoro peKIma rnaKeHn. PekomeHnyEmy ToemnepaTpy rnaKeHn MoXHO NocMOTpeTB Ha npblke n3dEInr.
- Perynpyne noa npa B COOTBeTCTBn C Bb6paHHbIM TempepatHybIM pexNMOM rnaXeHnA, CneDy INcTpyKunm DaHOrO pyKOBOdCTBa. TnabTe B pexMe noa npa eco (cm. pa3deN «PerynpoBaHne KOnuecTba napa').
CTapaaTeec rnaDnTb cIeKa BnaxKhBie n3dJIyN, NOCTaBnB peryJrTop npa Ha MeHbSyUo OTMeTKy. PpN 3Tom nap 6yDenO6pa3OBbIBaTBcR B Camo TKaHN, a He B yTIORE. EcnB bbl cyuNTe 6eJIbe B cyuINbHOm MaunHe, nCNoB3yIne nporpamMy «NOd yTOrI» - Ecni TkaHb DoCTaTOHOb BJaXHa, OTKIIOHTe IOnaCy npapa (cm. pa3dEn «TnaKeHne 6e3 npapa»)
YtJIN3aunr OTOXoOB
Ynakobka Haux TOBAPOB ONTmMaIbHO npOyMaHa. OHa B OCHOBHOM COCTOHT N3 MaTePnaIOB, NOJNEXKaUnx NOBTOPHOH nepepa6OTKe, KOtOpbIE MOKHO cAaTB B MeCTHyO ClyX6y C6opa OTxOIOB. INΦopMaunio TOM, KAK NoCTyInTB C OTPa6oTAbuM 3JeKTPoPn6Opom, Bbl MoKTe NOnyUnTB MecTHbIX Oprahax aDMNHcTpaun.
Даньи np6op HeMeT OTMeKy B COOTBeTCTBn EBponeckm HopMaM 2002/96/EG yTNJIn3aun 3NeKtpuecknx n 3NeKtpoHHbIX np6opOB (waste electrical and electronic equipment - WEEE).

Ta3n DnpekTnBa perIamEnTpna BaJIuNDHnTe B pAMKIne Ha EC npaBnla 3a
PnmeMaHn3NoJ3BaHeHaCTapu ypeDn.
HCTpykunno yctpaHeHIO MeIKNX HncnpaBHOtei
a a a a a a a a a a a a a a a a a a a a a a a a a
Siemens 45
(12)
(9) all & a.e. b.c. & c.e. .
gll. ggl 1s jgsj gssgall galsal
.(11) all jzjzj
jol jol jol jol jol (16) 10
- ( a + b) ( a^2 - ab + b^2) = a^3 + b^3
eallll
ailll 1 jy 5y1 e jll lglai jll yjlaoc jll yjlaoc Jdx 2 gjj aiaiall aalll jnss
1 1 1 1 1 1 1 1 1 1 1 1 1 1 1 1 1 1 1 1 1 1 1 1 1 1 1 1 1 1 1 1 1 1 1 1 1 1 1 1 1 1
J 1 J 1 1 1 1 1 1 1 1 1 1 1 1 1 1 1 1 1 1 1 1 1 1 1 1 1 1 1 1 1 1 1 1
()
aill 8 jg21 n a
aaii 1 aaii iaiiaai aiaiai iaiai
aagaa aagaa aagaa aagaa aagaa aagaa aagaa aagaa aagaa aagaa aagaa aagaa aagaa aagaa aagaa aagaa aagaa aagaa aagaa aagaa aagaa aagaa aagaa aagaa aagaa aagaa aagaa aagaa aagaa aagaa aagaa aagaa aagaa aagaa aegaa
jia jia jia jia jia jia jia jia jia jia jia jia jia jia jia jia jia jia jia jia jia jia jia jia jia jia jia jia jia jia jia jia jia jia jia jia jia jia jia jia jia jia jia jia jia jia jia jia jia jia jia
(1)(2)(3)
aallll lallll allll lal
"..." 15) 2
max 1
a 13)
Jiaall bialgai jaiIbail
j
(5) all
:5a1g aiaaa aaannnai gaiy
ec0 5uaiy baiial g jyjuy
j0g 5)cl
(3) "activeControl Plus"
golssll (1) jaoa pia Lioic aill oia 14 g hiae g xie (2) Jll Jc baiall yia
:
(3) "activeControl Plus"
jai jgi jglg jg jaoall aiaaill
:(1)
J 1
(3) "activeControl Plus"
Jie 1y jiaolal 2g. yjio g oI sall .
:
(2) jai jia jia jia jia (1) jiaall
a
Jss
aiaial all oaiy a
(4)
()
:
:J.1
"eco"
max
(1)
J.2
J 150000000000000000000000000000000000000000000000000000000000
(1)
i
.9) aJall aia 1aie
aal gina aale 1d jall jgljy J. (12)
.0000000000000000000000000000000000000000000
.15
.16
*ailllll jil.17
*gaii iagjia -aigai! 18
Jgall
g 1 gai i gai pia
a
.(13)
aalal alalalalalalalal
AaBg Aigie Jy Sll Aigb Juaauiu Jus
a
aXuill aale caij
1
jSall clogjell liagllal jglal 128 Jusgi
C. = , =
J 15
Jia liang 100000000000000000000000000000000000000000
a 16
aall 1
A
jgl jgl jgl g k jall jal jai jai al
a a
jio 2018 j5 10
hduo jao gaiy jalal Jalallge jaliqie
Jolal 1
y


INDEX
DEUTSCH 4
ENGLISH 10
FRANCAISE 16
ITALIANO 22
NEDERLANDS 28
DANSK 34
NORSK. 40
SVENSKA 45
FINNISH 50
ESPANOL 55
PORTUGUES 61
EMHNIKA 67
TURK 73
POLSKI 79
MAGYAR. 85
UKRANIANO 90
PYCCKN 96
ROMAN 102
- yell 113
SIEMENS
001 TS12.-B/11/11
de,en,fr,lt,na,do,no,sv,fi,es,pt,el,tr,pl,hu.uk,ru,ro,ar

- General safety warnings
- Danger of electric shocks or fire!
- Description
- Before using the iron for the first time
- i Remove any labels or protective covering from the soleplate (13).
- Filling the water tank (1)
- Unplug the iron from the mains!
- Any damage caused by the use of the aforementioned products will make the guarantee void.
- Setting the temperature (2)
- The temperature control (15) adjusts the temperature of the soleplate (13).
- Setting the steam amount (3)
- sensorSteam
- When plugging the iron in, during the first minute:
- en
- After the initial 1 minute period:
- From this moment on, when the handle (1) of the iron is gripped or if the steam activation button (2) is pressed at steam setting:
- If the handle (1) is released:
- If the iron remains plugged in and is not used for several minutes:
- Ironing with steam (4)
- The steam control is used to adjust the amount of steam produced when ironing (see "setting the steam amount" section).
- Continuous steam generation :
- Steam on demand :
- Important :
- Ironing without steam (5)
- This enables the iron to be used for dry ironing.
- Spray (6)
- This can be used to remove stubborn wrinkles.
- Shot of steam (7)
- This can be used to remove stubborn wrinkles or to press in a sharp crease or pleat. It cannot be used on a synthetic setting for delicate items.
- Vertical steaming (8)
- This can be used to remove creases from hanging clothes, curtains etc.
- Warning!
- Do not iron clothing while it is being worn!
- Never spray or aim the steam at persons or animals!
- Multiple descending system (9)
- 1.self-clean
- anti-calc
- calc'n clean
- calc'n clean with descending fluid
- Anti-drip system
- Fabric-protection soleplate cover (10)
- Cleaning (11)
- Storing (12)
- Tips to help saving energy and water
- Advice on disposal
- fr
- Indstilling at temperatures (2)
- Temperaturvaelgeren (15) indstiller bundpladens temperatur (13).
- Damp after behov:
- Stalla in temperature (2)
- Temperaturkontrollen (15) justerar strykplattans temperatur (13).
- Ipeed nepnIM BnKOpncTaHHaM npackN
- HanoBHeHHpe3epByapa Ia BOn (1)
- Bicnne npackn BiEeKtpomepexi!
- NoukoJKeHHBhAcNiIDOK BnKOpNCaHHBnueBkA3aHx DOMiWOk PpN3BODNTb Do anHyIIOBaHHrapaHTt.
- PerylIOBaHH TeMnepeatypn (2)
- Temnepatypa nioobu (13) perynoctbcra 3a donomoro opeyraTopa temnepatypu (15).
- PeryuBoHHn noaui napn (3)
- Ppotarom nepwoi XBUNHH nicnBKNUoyehn npackn do eJekTpomepeki:
- uk
- Iicna 3akHcHnepioy BkHoueHHa TpBbnicHO B ONDHYXBNNHy:
- Kuo BiDnyctn pyky (1):
- Kuo npacka 3annaaetbcer niknueho do Mepeke XNBHeHH He BnKOpncTOBycBcnnpotrom KInbKOx XBnnH:
- PpacyBaHHa 3 npoO (4)
- PerynTop napn BnKOpNCTOByEcTbcA nperynoBaHH KInbKocti napu, 0reHepyctbcn iic npacyBaHH (INB. po3diN «PerynoBaHH noaichi napu').
- NocTiHre reHepyBaHHn napu
- Napa 3a Bmoroio
- Baxnbo:
- Cey peKHM DO3BOJNE BKNOPNCTOByBaTN npacky dny cyXOrnpacyBaHH.
- Po3nIIOBaHHB ODN 6
- DanaФункIMOKe BnKOpNCToByBaTnCnДnA yCyHeHHCTiIKx3MOpWOK.
- IapOBn yIap (7)
- Dana fynkui MoXe BnKOpNCTOByBaTnCnIy CynHnCTiIKnx 3MopwO a6o fikcau cTpiOK Ta nice. Lho fynkuio He moxHa BnKOpNCTOByBaTH3 pexHMOM npacyBaHHn CnHTeTKn Ni d Yac npacyBaHH deJIkaTHnx TkaHN.
- BepTnkaJIbHa napa (8)
- yBara!
- CnCTema BndaJeHHaKIny (9)
- 1.Функш self-clean
- 2.Функця anti-calc
- 3.Функцic calc'n clean
- 4.Функцic calc'n clean 3 piДиHOIO dIЯ BuaIaIeHHaHaknny
- TKaHnH (10)
- OuHueHHa (11)
- 36epirahn (12)
- Iopadn 0do ekOHomii eheprii BODn
- PekomeHdaa3i3 yTnJI3a3i
- Ecn yTTOCTaETC NOKJIIOUeHHbIM K cETN HcNOB3yETc B TeueHHe HeCKOJIbKIN MHyT:
- TnaxKeHne c napom (4)
- PerynTnpapa nncnoNb3yETcI pyerynipOBKn KOINueCTBa reHepnpyemoro npap BO BpeM rnaXeHn (cm. pa3dEe «PeynpoBHaHe KOINueCTBa npa').
- HenpepbIBHoe reHepnObaHne napa:
- 2.Пар no Tpe6oBaHnIO:
- BaxHo:
- MhorokyHKnOHaJIbHa cncTeMa ydaIeHnaHaknn (9)
- 1.Функцura self-clean
- 3.Функця calc'n clean
- 4.Функци calc'n clean c KndKocTbIO dnydaneHnHaKnnn
- 3aunTHa TeKCTnIbHa noDOWBa (10)
- OuncTkka (11)
- XpaHeHne (12)
- CoBeTbI NO 3KOHOMN 3Heprn N BOdBi
- YtJIN3aunr OTOXoOB
- eallll
- aill 8 jg21 n a
- (1)
- g 1 gai i gai pia
- aXuill aale caij
- 1
- INDEX
- SIEMENS
Brand : SIEMENS
Model : TS12150
Category : Iron