Pictureline 8000 - Digital photo frame ROLLEI - Free user manual and instructions
Find the device manual for free Pictureline 8000 ROLLEI in PDF.
User questions about Pictureline 8000 ROLLEI
0 question about this device. Answer the ones you know or ask your own.
Ask a new question about this device
Download the instructions for your Digital photo frame in PDF format for free! Find your manual Pictureline 8000 - ROLLEI and take your electronic device back in hand. On this page are published all the documents necessary for the use of your device. Pictureline 8000 by ROLLEI.
USER MANUAL Pictureline 8000 ROLLEI
Precautions and maintenance
For indoor use only
- To avoid risk of fire or electric shock, do not expose the unit to moisture or condensation.
- To avoid overheating, do not block the ventilation holes on the back of the Digital Photo Frame.
- Keep the Digital Photo Frame out of direct sunlight.
- Do not dismantle the Digital Photo Frame. There is a risk of electric shock and there are no user-serviceable parts inside. Dismantling the Digital Photo Frame will void your warranty.
Cleaning the LCD Screen
- Treat the screen carefully. Because the screen of the Digital Photo Frame is made of glass and it would easily be broken or scratched.
- If fingerprints or dust accumulate on the LCD screen, we recommend using a soft, non-abrasive cloth such as a camera lens cloth to clean the LCD screen.
- Moisten the cleaning cloth with the cleaning solution and apply the cloth to the screen.
WARNING:
To reduce the risk of electric shock, do not expose the unit to rain or excessive moisture.
This device is intended for private use and not suitable for commercial use!
Introduction:
Thank you for your purchase of the Digital Photo Frame. It is designed to allow quick and easy view of photos taken from your digital camera, mobile phone, or from a memory storage card. Please read this User Manual carefully to learn the correct way to use the Digital Photo Frame.
Features:
- Support Photo format: JPEG
- Support Memory Card: SD/SDHC/MMC
- USB Connection: USB2.0 HOST
- Built-in 8M Flash Memory
- Support viewing pictures in preview mode
- Auto Slideshow when insert Memory Card
- Built-in Clock and calendar with slideshow
- Copy and delete function
- Image-display mode: slideshow, preview, zoom, rotate function.
- Adjustable slideshow speed and above 10 kinds of transition slideshow
- Adjustable brightness, contrast, saturation
- Slideshow mode: single / Two / triple / four windows.
- OSD language: German, English, French, Spanish, Portuguese, Italian, Greek, Czech, Hungarian, Polish, Russian, Danish, Swedish, Norwegian, Finnish, Dutch
Packaging Check List:
- 8 inch digital photo frame
- User manual
- AC/DC adapter 1
- Remote control
- Warranty card
1 piece
1 piece
piece
1 piece
1 piece
CONTENTS
1.Product Diagram 4
1.1 Remote Control 4
1.2 Left Side of Frame 5
- Installing & Replacing the Battery 5
- Getting Started 6
- Operating Instruction 6
4.1 Card and US 6
4.2 Picture Mode 7
4.3 Copy & Delete function 8
- File 8
- Calendar 9
- Setup 9
- Stand Instruction 11
- PC Connection 11
- Technical Specifications 12
- Troubleshooting Guide 12
1. Product Diagram
1.1 Remote Control
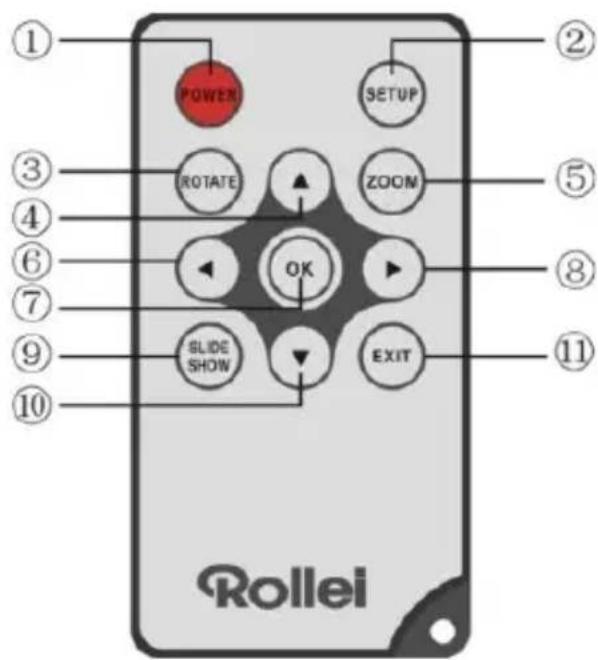
- POWER—Switch On/Off
- SETUP - Enter copy & delete interface.
- ROTATE -In single-frame mode, pause the image 90^ counterclockwise.
-
- Functional selection button from the bottom to the top cursor.
- ZOOM-In the pause status of single picture, magnify picture display size.
-
- Functional selection button from left to right cursor
- OK— Press to confirm. Play/pause: In single picture mode, press it to start slideshow; In slideshow mode, Press it to pause, then repress it to play.
- Functional selection button from right to left cursor
- SLIDE SHOW- Press to start slideshow directly
-
- Functional selection button from the top to the bottom cursor.
- EXIT—Press to return to upper page, or enter the main menu
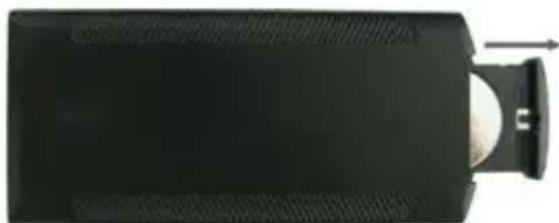
1.2 Left Side of Frame
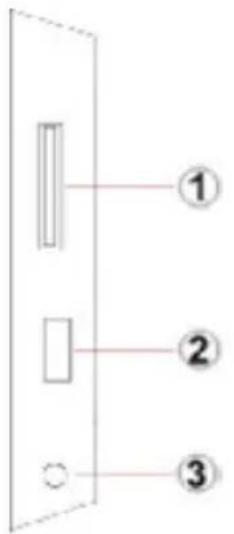
- Slot for SD / MMC /
SDHC Card
- USB host port
- Power cable connector
1.3 Rear of Frame
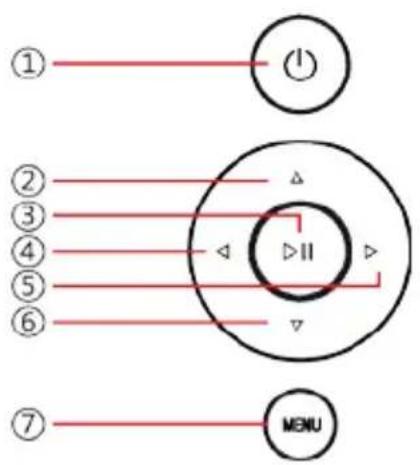
- Power on/Off
- Next / Down cursor
- Play / Pause / OK
- VOL + / cursor to right
- VOL - / cursor to the left
- Back / cursor to top
- Menu
2. Installing & Replacing the Battery
To open the battery compartment of the remote control, press the battery cover and pull the drawer out, Insert a CR2025 lithium button battery with the "+" side facing up. Close the drawer
3. Getting Started
3.1 Extend the digital photo frame bracket on the back of the frame to the widest position for greatest stability, and then plug one end of the included AC adapter into a standard 110-240V AC electrical outlet and the other end into the right side the frame.
3.2 Remove the protective film covering the LCD.
3.3 Remove the plastic battery insulator from the battery compartment and make sure the remote control has a battery inside. Please refer to "Installing & Replacing Battery" if you need a new battery.
3.4 Power on the unit by pressing the Power button on the remote control.
4. Operating Instruction
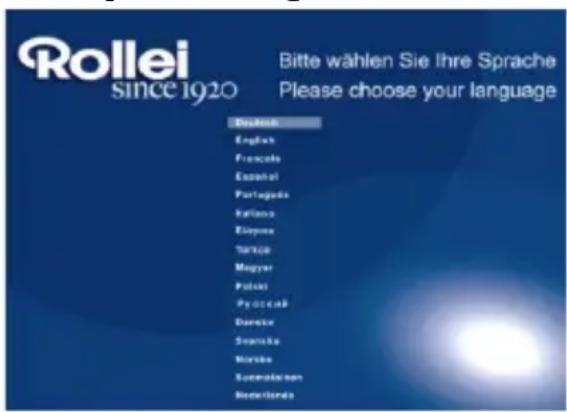
When the frame is switched on for the very first time, a menu for the selection of the default language appears. Please select the desired language and confirm with the "OK"-Button.
To open the "Language-Selection" again, please use the "Reset" Function in the Menu "Set UP".
4.1 Card and US
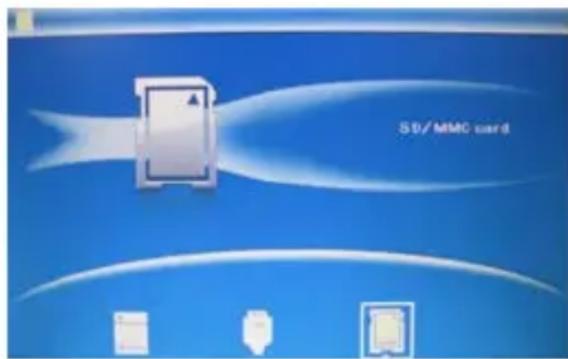
Press EXIT 3 time to enter the interface to select the source memory: The Internal Memory, a USB 2.0 device or a SD/SDHC/MMC-Card.

The Frame supports
SD/SDHC/MMC and USB 2.0.
After inserting a card or USB device, the frame plays automatically a slideshow of the pictures from the selected source. Press EXIT twice to access to Photo, File, Calendar and Setup. Press OK to confirm.
Note: Make sure there are supported picture files in the Card or USB device.
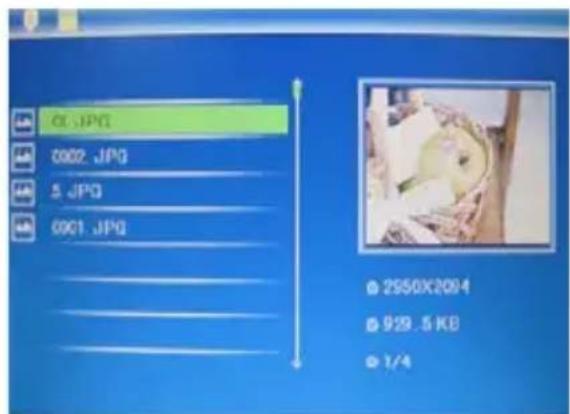
4.2 Picture Mode

Note: In preview mode, press OK to select the picture, press OK again to start slideshow

Press SLIDESHOW to start slideshow pictures in the selected slide mode.
4.3 Copy & Delete function

Copy pictures to built-in memory : In the pause state of single picture, press SETUP to enter copy interface, press OK to copy the picture to built-in memory.
Note: System will show "Memory Full" if remaining built-in memory size is not enough to store the photo. Of course, you can delete the pre-loaded picture in the internal memory, and copy pictures to the frame.

Delete pictures on built-in memory or memory card:
In preview mode, use to select the picture you want to delete, then press SETUP to enter the delete interface, press OK to confirm.
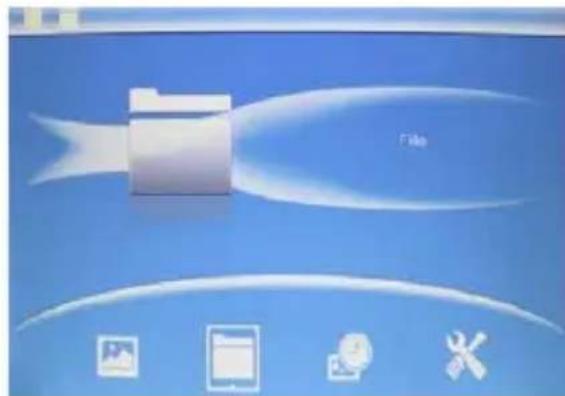
5. File
Select File, then press OK to access to file interface. In this mode, you can browse all the files in the memory card or the built-in memory.
Delete
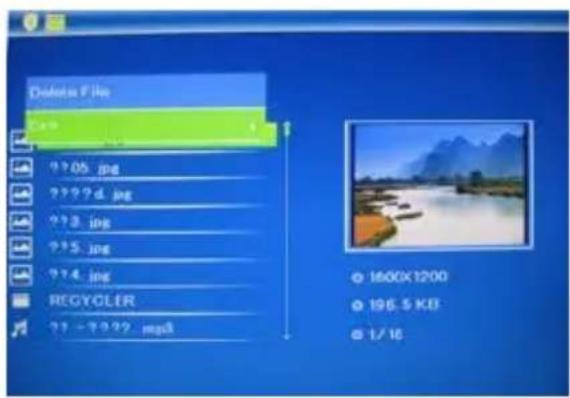
Use to select the picture you want to delete. Press SETUP to enter the delete interface, press OK to confirm.
6. Calendar
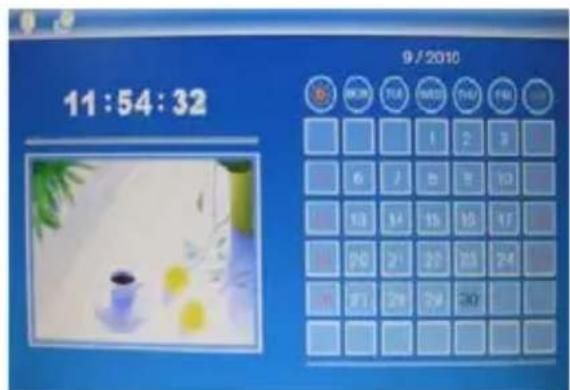
Select Calendar from the main menu, press OK to enter. The calendar is displayed and any photos on the connected memory are shown as a slideshow in a small windows close to the calendar. Browse the calendar by using
7. Setup
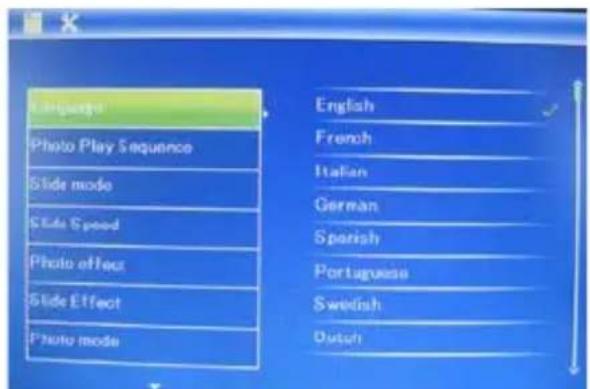
Press Setup from the main menu, then press OK to access to Setup interface. Use to select the item you want to set up. Press OK to show the sub menu, select with , then press OK to confirm.
7.1 Language: German, English, French, Spanish, Portuguese, Italian, Greek, Czech, Hungarian, Polish, Russian, Danish, Swedish, Norwegian, Finnish, Dutch
7.2 Photo Sequence: Sequence, Random
7.3 Slide mode: Single window, Two windows, Triple windows, Four windows
7.4 Slide speed: 3/5/15/30seconds, 1/5/15/30minutes and 1hour
7.5 Photo effect: Color, Mono, Sepia
7.6 Slide effect: random, Windows, Jalousie, Fade, Insert, Reel, Brick, 3D Float, Release, 3D Mix, Comb, 3D Circle, 3D Cube
7.7 photo mode: Auto Fit, Optimal, full
7.8 Display
Contrast: Press ok and Use to select from 00 (lowest) to 40 (highest).
Brightness: Press ok and Use to select from 00 (lowest) to 40 (highest).
Saturation: Press ok and Use to select from 00 (lowest) to 40 (highest).
Tint: Press ok and Use to select from 00 (lowest) to 40 (highest).
7.9 Set time/date: Press OK to enter, Press and OK to select, then use to select, then press "Save Time" to save the setting.
7.10 Set Time format: 12/24, Press ▲▼ to set, use OK to confirm
7.11 Auto Power On
7.12 Auto Power Off
7.13 Format build-in memory:
Press OK enter, use to select or unselect to format the built-in memory.
7.14 Reset setting:
Press OK enter, use to select or unselect to reset all settings to default values, press OK to confirm.
7.15 Exit: Press to exit.
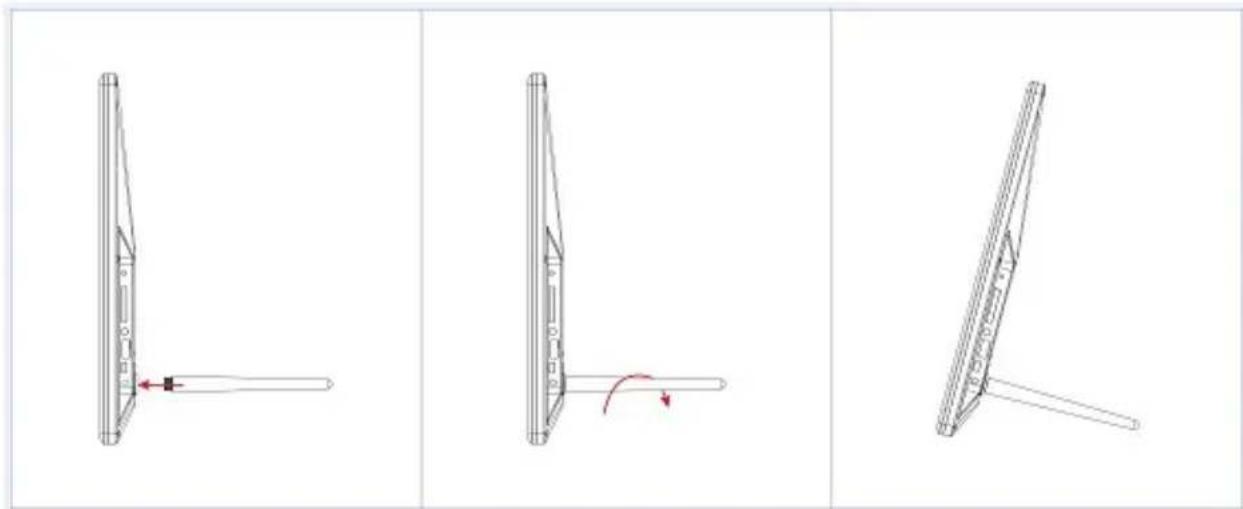
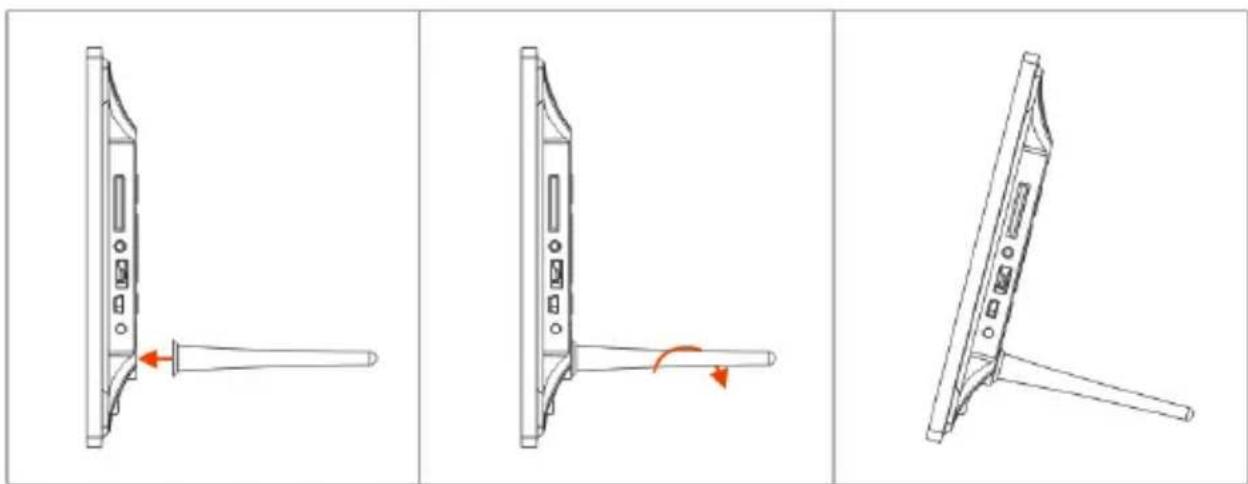
8. Stand Instruction
Insert the bracket into the slot of the digital photo frame and rotate the bracket clockwise. Please make sure the stand is locked before then put it on the table steadily. Please refer to the illustration showing below.
9. PC Connection
You can connect the unit to the external equipment by using USB Cable for file copy &delete or edit Operation.
A. Please turn on the digital photo frame, then connect it with your PC supported Windows 2000/XP system by using USB cable
B. The unit will be automatically detected and it will display "USB Device Connected" Icon, then you can copy& delete & edit files between built-in memory and other storage device. You need to restart the digital photo frame after you finished the copy/delete or inserted or edit Operation.
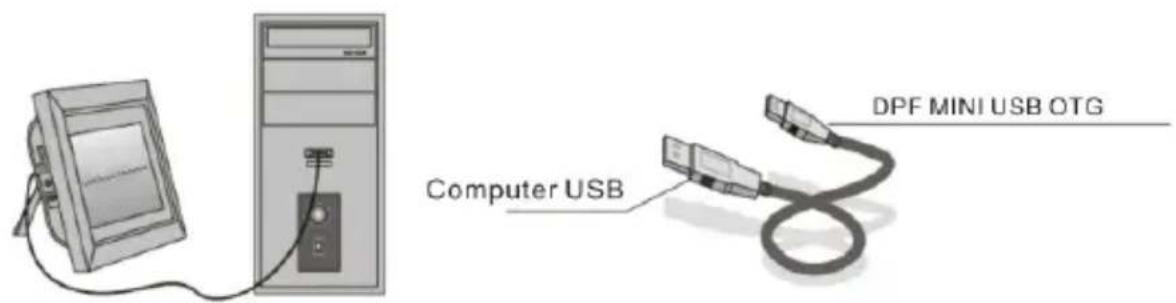
NOTE: Never disconnect the USB cable when files are transferring or running. Doing so may damage your DPF. Press Safely Remove Hardware Icon in the computer is the right operation way.
10. Technical Specifications
- Adapter:
Input: AC 100-240V 50/60HZ 350mA
Output: DC 5V/1A
- Picture Format: JPEG
- Memory Cards: SD/SDHC/ MMC
- USB connection: USB 2.0
- Screen Parameter:
Screen Size: 8 inch TFT
Resolution: 800^*600
Contrast: 300:1
Aspect Ratio: 4:3
Brightness: 250-300 cd/m²
Response Time: 20ms
Viewing Angle: 60^ (left/right/vertical), 40^ (horizontal)
Working Temperature: 0^ 40^ , Humidity: 10 - 85%
11. Troubleshooting Guide
If you come across when using the photo frame on problems, consult the suggested solutions below, and the corresponding sections of this manual. If you need additional assistance, please contact technical support.
No power:
Please check whether the plug is inserted correctly.
- Remote control no function:
Please check whether the battery has power (the battery can be used for half a year in normal conditions). Replace with new battery
if necessary.
- Can not read the Memory Card or USB Device:
Please confirm whether there is storage on the card or USB device.
Empty devices cannot be read.
- Can not play the file:
Please confirm if the file format is compatible with the player.
- Display too bright or too dark:
Please adjust the brightness or contrast in the setup menu.
- The color is light or no color:
Please adjust the color and contrast setup.
Attention:
1 piece
1 piece
1 piece
1 piece
1 piece
Contenu
10. Specifications techniques
- Alimentation: Entreee AC 100-240V 50/60HZ 350mA
Sortie DC 5V/1A - Format de lecture: JPEG
- Port cartememoire:SD/SDHC/MMC
- Port USB 2.0
Ecran: - Taille de l'écran: 8 pouces
Resolucao: 800^*600
Contraste: 300:1
7.7 photo mode: Auto Fit, Optimal, full
7.8 Display
Contrast: Premere OK e Use to select from 00 (lowest) to 40 (highest).
Brightness: Premere OK e Use to select from 00 (lowest) to 40 (highest).
Saturation: Premere OK e Use to select from 00 (lowest) to 40 (highest).
Tint: Premere OK e Use to select from 00 (lowest) to 40 (highest).
7.9 Set time/date: Press OK to enter, Press and OK to select, then use to select, then press "Save Time" to save the setting.
7.10 Set Time format: 12/24, Press ▲v to set, use OK to confirm
7.11 Accensione Automatica
7.12 Spegnimento Automatico
7.13 Format build-in memory:
Press OK enter, use to select or unselect to format the built-in memory.
7.14 Reset setting:
Press OK enter, use to select or unselect to reset all settings to default values, press OK to confirm.
7.15 Exit: Press to exit.
8. Instruktion FÖR Stället
3 pa3a haXmnte EXIT (BblXOД), YTO6bI BbIBecTn INHTeppein C Bbl6opa KapTbI NaMRTN, BCTpoEHHOJ NaMRTN, USB n KApTbI SD/SDHC/MMC.
7.4 INTEpBaI: 3/5/15/30 cekyHd, 1/5/15/30 mHyT n 1 cac
7.5 ΘΦΦeK T ΦOTorpaФи: LBeTHa, OДHoцВeTHa, CENЯ
7.6 ΘΦΦeKT CMeHbI CnaiDoB: CnyaHbIe, OKHa, JkaJIIO3N, yBraTe, Insert, Reel, KnpnU, 3D Float, Release, 3D-Mix, paCyecka, 3D kpyr, 3D Cube
7.7 Pexim oTo6paxeHn: ABtOMaTnueckoe, ONTImaJIbHOe, NOJIHOe
7.8 OTo6paXeHne
KoHTpactHocTB:HaXMITE OK n Pn nOMOuN KHOJOK BbI6epNTe yPOBeHb OT 00 (cMbI HN3Kn) Do 40 (cMbI BbICOKN). RaKocTB:HaXMITE OK n Pn nOMOuN KHOJOK BB6epNTe yPOBeHb OT 00 (cMbI HN3Kn) Do 40 (cMbI BbICOKN). HaBSeHHocTB:HaXMITE OK n Pn nOMOuN KHOJOK BbI6epNTe yPOBeHb OT 00 (cMbI HN3Kn) Do 40 (cMbI BbICOKN). NHTeHCNBocTB:HaXMITE OK n Pn nOMOuN KHOJOK BB6epNTe yPOBeHb OT 00 (cMbI HN3Kn) Do 40 (cMbI BbICOKN).
7.9 YcTaHOBka BpeMeHn/daTbI: HaxMITE OK nJaBXOJa, 3aTeMHxMITE NOK nOK nJaBbOpa, daJee nCnOJIb3yJTe BBbOpa n, HakoHeu, HaxMITE "CoXpaHnTB BpeMa" nJa 3aIncn NapaMeTpOB HacTpoiKn.
7.10 YctaHObKaΦopMaTa YacOB: 12/24 BbIbePteΦopMaT pRn NOMOUs n HaxMITE OK dJa NOdTBePxxDeHnRA BbIbopa.
7.11 ABTO BkI
7.12 ABTO BbIKJ
7.13ФopMaTnpoBaHne BCTpOeHHoN nAMrTn: IJRAIOCTyNa K DaHHoN cyHKcIN HaXMMTe OK, a 3aTEM KHOPIK N V, YTO6bI BbIbpaTb, fOpMaTnpOBaTb BHyTpEHHIO nAMrTb HJIH Het.
7.14 IpeyeCTaHOBka yCTaHOBOK: IJIyIOCTUa K DaHHOJ cyHKcIIN HaxMITE OK, a 3aTeM KHOJIKV, YTO6bl BbIbpaTb, IpeyeCTaHaBJIbBaTb BCE yCTaHOBKn ObaTHO B CTAHdApTHbIe IJIH HeT. HaxMITE OK IJIЯ NOITBepKJeHnI.
7.15 BbIXoI: BbIITn n3 IpaBHOrO MeHIO.
8.Инструкеля缝隙пodeТаВКи
BcTaBbTe KpOHSteH B OTBepCTne cHpOBoN pOTopAMn I NOBepHInTe KpOHSteH nO yacOBo CtpeJIke. PoKaIyIcTa npOBepbTe, YTO POnCTaBka 3aΦnKcnpOBAHa n TOJbKO 3aTEM NocTaBbTe yCTpoIcTBO Ha CToI. PoKaIyIcTa, CM. PnCyHOK HIXKe.
He pa6oTaET npIbT dncTaHcNoHHoro ynpaBJIeHnA
Пюверьт, He 3akOHuINcЯ Л 3apyd y 6aTapei (cpoK cIyX6bl 6aTapei - o6bUHNo noJIroda). Пpr Heo6xOIMocTn, 3aMeHnte ee Ha HOByHO.
He yntaOTcKapTa namrtn nn USB-hakonnteJb
IpoBepbTe, coePHT Jn HAKONITbHoe yCTPOINCTBO paJIbIB DOynCTHMOM φopMate. NycTbie yCTPOINCTBa YNTaTbcr He MOryT.
HeBo3MOxHOBocnpOn3BecTnФaJl
PpOBepbTe, yBJIeTcR Jn fOpMaT faiJa dOnyCTmblM.
- OTo6paXeHne HaДиCpJIee CInuXkOMЯрKoe NJIcInuXkOM TemHoe
I3MeHnte yCTaHOBKn IpKOCTn I KOHTpaCTHOCTN B yCTaHOBOUHOM MEHIO.
- 3KpaH CInsKOM CBeTbI INI 6ecuBeTHbI
I3MeHnte yCTaHOBKn ZbEta N KOHTpactHOCTN.