
BV850 - Blender FAGOR - Free user manual and instructions
Find the device manual for free BV850 FAGOR in PDF.
| Brand | Fagor |
| Model | BV850 |
| Product type | Blender |
| Bowl capacity | 1500 ml |
| Bowl material | Glass |
| Number of speeds | 2 (slow speed 1, fast speed 2) + pulse function (P) |
| Pulse function | Yes, intermittent mode (P) |
| Blade type | Stainless steel blades |
| Seals | Watertight rubber seal |
| Included accessories | Dosing cap, lid, bowl, seal, blades, union piece, motor unit, power selector |
| Power supply | See rating plate (mains) |
| Power consumption | Not specified (standard ~500-800 W) |
| Maximum continuous operation time | 2 minutes |
| Maintenance and cleaning | Motor unit with damp cloth; bowl, lid and cap: soapy water; do not wash blades in dishwasher |
| Safety | Automatic shut-off in case of overload; safety lid lock; mandatory grounding |
| Spare parts and repairability | Original spare parts available; repair by authorized service only |
| Use | Domestic only |
| Country of origin | Not specified |
| Dimensions (approx.) | Not specified (height ~40 cm, width ~20 cm) |
| Weight (approx.) | Not specified (~2 kg) |
Frequently Asked Questions - BV850 FAGOR
User questions about BV850 FAGOR
0 question about this device. Answer the ones you know or ask your own.
Ask a new question about this device
Download the instructions for your Blender in PDF format for free! Find your manual BV850 - FAGOR and take your electronic device back in hand. On this page are published all the documents necessary for the use of your device. BV850 by FAGOR.
USER MANUAL BV850 FAGOR
The image is too blurry to recognize any text content.

ENERO 2012
FAGOR

ES - MANUAL DE INSTRUCCIONES PT - MANUAL DE INSTRUÇÕES EN - INSTRUCTIONS FOR USE FR - MANUEL D'UTILISATION HU - HASZNÁLATI ÚTMUTATÓ CZ - NÁVOD K POUŽITÍ
SK - NAVOD NA POUZITIE BG - ИНСТРУКЦИЯ ЗА УПОТРЕ RU - ИНСТРУКЦИЯ ПО ЭКОПЛУТА AR - دييل الإستعمال RO - MANUAL DE UTILIZARE EU - ERABILERA-ESKULIBURUA

natural_image
Line drawing of a blender with handle and control panel (no text or symbols)BATIDORA DE VASO / BATEDEIRA CM JARRO / JUG MIXER / MIXEUR BLENDER / STANDMIXER AUS GLAS / FRULLATORE CON BICCHIERE / Mirkávtrp / KELYHES TURMIXGÉP / STOLNÍ MIXÉR / STOLNÝ MIXÉR / MIKSER / MIKCEP C KAHA / BLENDEP / خان بکاس / BLENDER / ONTZIDUN IRABIAGAILUA
MOD.: BV-850
N.I.F. F-20.020.517 - B°. San Andrés, n° 18 • Apartaco 49 - 20503 MONDRAGON (Gurp/zooz) ESPAÑA

FAGOR

ES
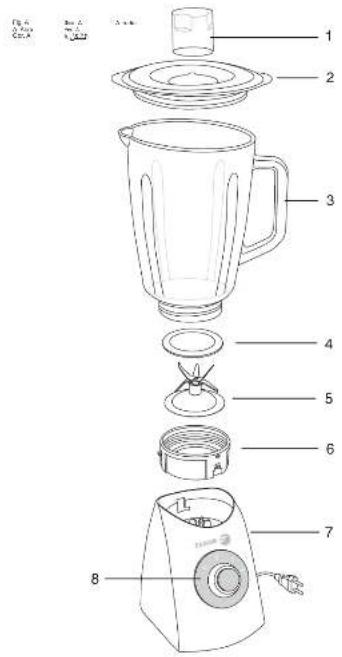
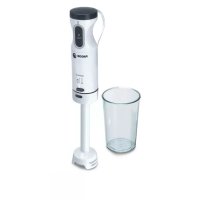
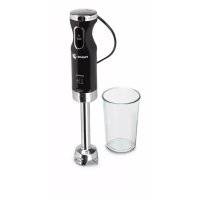
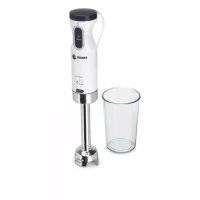
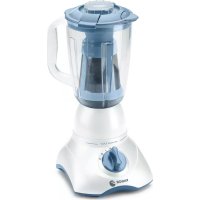
1. DESCRIPCION (FIG. A)
- Dispenser cap
- Lid
- Jug
- Rubber seal
- Blade unit
- Blade unit joint
- Motor base
- Dial
2. TECHNICAL CHARACTERISTICS
See characteristics plate.
This product complies with the European Directives on Electromagnetic Compatibility and Low Voltage.
3. SAFETY PRECAUTIONS
- Before using this appliance for the first time, read the following instructions carefully and keep them for future reference.
- Make sure that the mains voltage in your home corresponds to that indicated on the appliance.
- In the event of incompatibility between the mains socket and the appliance plug, replace the socket with a suitable one, using a qualified professional.
- The electrical safety of the appliance is only guaranteed if it is connected to an efficient earth installation, as foreseen in applicable electrical safety regulations. If in doubt, contact a qualified professional.
- The use of adaptors, multiple sockets and or extension cables is not recommended. Where it is not possible to avoid their use, only adaptors or extensions that comply with applicable safety regulations should be used, and ensuring that the indicated voltage limit is not exceeded.
- After removing the packaging, check that the appliance is in perfect condition, if in doubt, contact the
nearest Technical Support Service.
- Packaging elements (plastic bags, polystyrene foam, etc.), should not be left within the reach of children because they can be dangerous.
- The appliance is for domestic use only. Any other use is considered unsuitable or dangerous.
- The manufacturer shall not be responsible for any damages that may arise from improper or inadequate use, or for repairs conducted by non-qualified personnel.
- Do not touch the appliance with wet or damp hands or feet.
- Keep the appliance separate from water or other liquids, to avoid electric shock; do not connect the appliance to the mains if it is on a damp surface.
- Place the appliance on a dry, firm and stable surface.
- Do not allow children or the disabled to handle the appliance unsupervised.
- This appliance should not be used by physically, sensorially or mentally handicapped people or people without experience or knowledge of it (including children), unless they are supervised or instructed in the use of the appliance by a person responsible for their safety.
• Children should be watched to ensure they do not play with the appliance. - For greater protection, we recommend installing a residual current device (RCD) with an operational residual current not exceeding 30 mA. Ask your installer for advice.
- Do not leave the appliance unattended when it is turned on because it can be dangerous.
- When removing the plug never pull on the cable.
- Unplug the appliance before cleaning or maintenance.
- In the event of fault or malfunction where the appliance is not to be used, turn off the appliance and do not attempt to repair. If a repair is required, contact a Technical Assistance Service authorised by the manufacturer and request the use of original spare parts.
- If the cable for this appliance is
damaged, contact an authorised Technical Assistance Service for it to be replaced.
- Do not leave the appliance exposed to the elements (rain, sun, ice, etc.).
- Do not use or let any part of the appliance come into contact or near hot surfaces (kitchen gas or electric hobs or ovens).
- Do not use detergents or abrasive sponges to clean the appliance.
- Do not touch the hot surfaces. Use the handles.
- Do not let the cable come into contact with the hot parts of the appliance.
- The blade is very sharp. Handle it carefully to avoid cuts.
- Do not fill the blender any higher than the maximum level (1500 ml).
- Do not remove the jug from the motor base when the appliance is functioning.
- Ensure the jug lid is properly fitted before using the blender.
- Do not place your hands or any objects in the jug when the blender is functioning. If necessary, disconnect the appliance and use a spatula to remove any food stuck to the walls of the jug.
- Do not submerge the motor base in water or any other liquid.
- Do not touch the rotating parts while they are in movement. Always wait for them to stop.
- This appliance must only be used for processing food.
- This appliance is not intended for use by persons (including children) with reduced physical, sensory or mental capabilities, or lack of experience and knowledge, unless they have been given supervision or instruction concerning use of the appliance by a person responsible for their safety.
- Children should be supervised to ensure that they do not play with the appliance
- When mixing hot liquids/foods excess pressure may build up inside the blender and this could make the lid come off and the contents splash out. We therefore recommend that you
avoid mixing excessively hot foods and that you only put very small quantities of hot liquids or foods into the blender.
- Do not use the blender for very hard food products, such as bones, shelled nuts, frozen meats etc., which could either damage the blade or cause the motor to seize.
- CAUTION: Do not use the unit continuously more than 2 minutes.
4. OPERATING INSTRUCTIONS
Before using the blender for the first time, clean the dispenser cap, jug lid, jug and blade in warm soapy water and dry them thoroughly before assembling them again.
ASSEMBLY
Unplug the appliance before carrying out any dismantling or assembly operations.
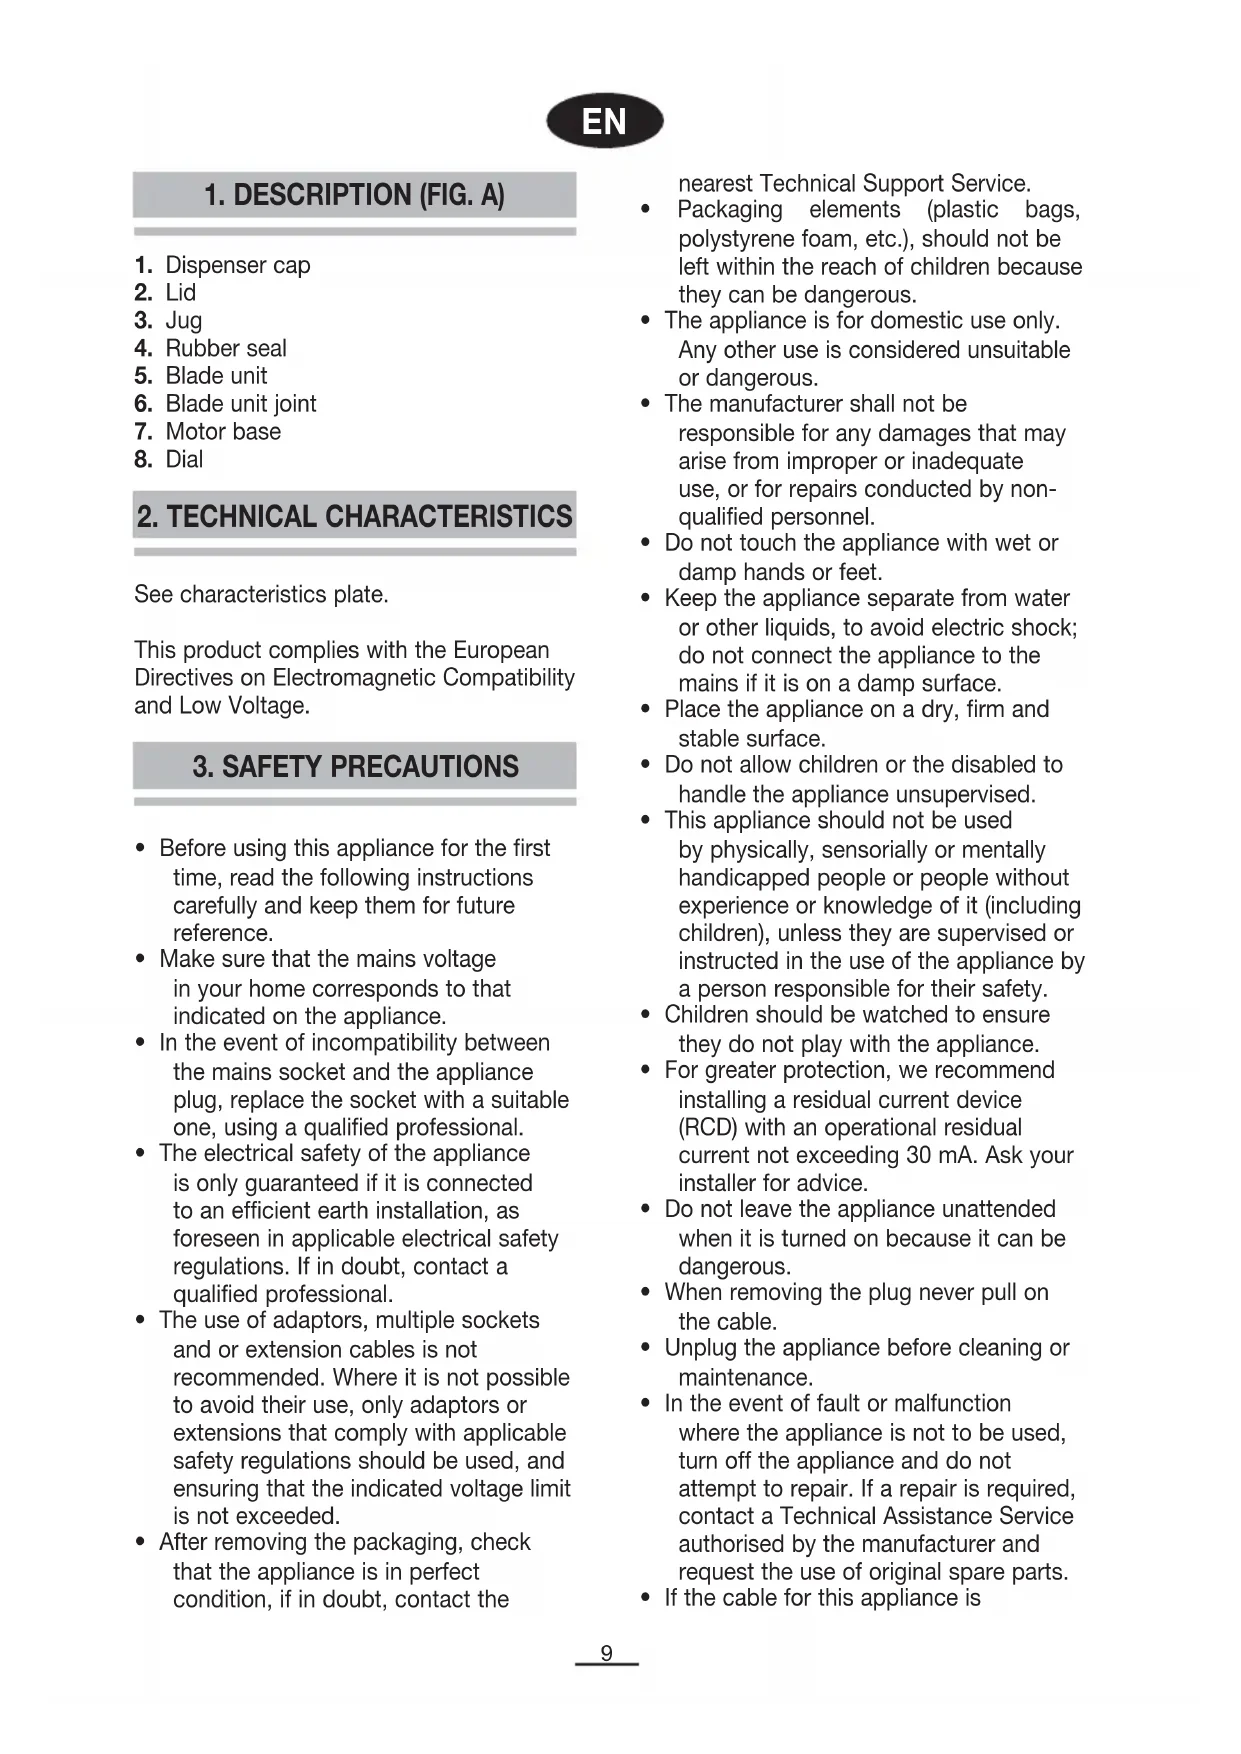
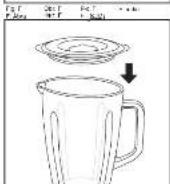
- Place the rubber seal (4) on the edge of the blade unit (5) (Fig. B).
- Insert the blade unit (5) in the joint (6) (Fig. C).
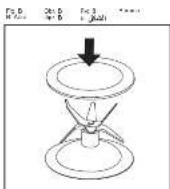
- Screw the bottom part of the glass jug (3) onto the joint (6) and turn it anticlockwise (Fig. D).
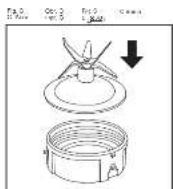
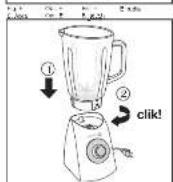
- Fit the jug onto the motor base (7), aligning the jug with the grooves on the motor base (7), and then turn it clockwise (Fig. E)
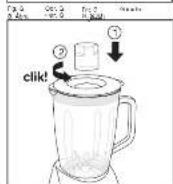
- Firmly close the lid (2) (Fig. F).
- Place the dispensing cap (1) in the hole in the lid and turn it anti-clockwise (Fig. G).
To dismantle the blender, to clean it for example, carry out the assembly process in reverse order.
Set up
- Place the mounted blender on a stable surface.
- Before switching on the blender, make sure the jug is correctly fitted onto the base.
- Make sure the selector (8) is turned to "0".
- Plug the appliance in.
-
Place or pour the ingredients or beverages to be mixed into the jug through the jug opening or lid (2).
-
Replace the lid (2) along with the top lid (1) (Fig. G) and switch the mixer on.
- To work continuously, place the selector (8) in position '1', '2'.
- To work at a low speed, turn the selector to position '1'.
- To work at a high speed, turn the selector to position '2'.
- For functioning in discontinuous mode, turn the selector to P and hold it on this setting. When you release the selector, the blender will automatically return to the "0" setting.
5. PRACTICAL ADVICE
When using the mixer for making drinks, wash all ingredients well and cut them into pieces so that they fit into the mixer opening.
- For optimum results, it is best to mix small rather than large quantities of food, especially when the item in question is very thick or heavy.
- Remove the top lid (1) from the jug lid (2) in order to add ingredients to the jug (3) while the motor is running.
- To avoid spillage, it is best to insert a small quantity of food into the jug through the lid opening, and then top up little by little as the food is mixed.
- Do not fill the jug up to more than 2/3 of its capacity, since the action of the blades may cause it to overspill.
- It is best to place liquid ingredients into the jug before solid ones. The liquid helps to mix the items more quickly and at a lower speed.
- Mix the ingredients for short times only (between 5 and 30 seconds). Then check the consistency and continue processing until you obtain the consistency you require.
-
If the consistency you require is not obtained rapidly, stop the appliance by turning the selector to '0' and:
-
Turn the selector to the P position a few times in a row.
- Remove the jug lid and mix the food items using a spatula.
-
Reduce the quantity of food to be mixed.
-
All fruit should be peeled and chopped and all stones, pips, etc. removed before being placed in the jug.
- Some vegetables, such as tomatoes, should also be peeled and chopped before being processed.
- When you begin mixing, hold the mixer lid down firmly.
- Remove any dampness or liquid on the mixer base immediately, using kitchen paper.
-
Do not work with thick mixtures or heavy food items. If the motor is unable to work freely, it will stop. If this happens:
-
Add a little liquid to the mixture.
- Set tdP mode.
- Stop the mixer for a few seconds and use a spatula to clean the sides of the jug and push the ingredients towards the blades.
- Empty the jug a little.
NOTE: CUT ALL INGREDIENTS INTO CUBES (OF APPROX. 2-3 CM) IN ORDER TO ENSURE A UNIFORM MIX.
To mix ice, follow the steps outlined below:
- Insert the ice cubes into the jug.
- Replace the lid and press and hold P until the mixture obtains a snow-like texture.
NOTE: WHEN MIXING ICE, ALWAYS HOLD THE JUG LID IN PLACE WITH YOUR HAND.
- Always add a cup of liquid when mixing ice.
6. MAINTENANCE AND CLEANING
MAKE SURE THAT THE MIXER IS SWITCHED OFF AND UNPLUGGED BEFORE ADDING OR REMOVING ANY OF THE PARTS.
- We recommend that you clean the appliance immediately after use. Remove the jug. Remove the lid and blades before inserting your hand or fingers into the jug in order to clean it.
- Never try to assemble or disassemble the mixer for cleaning purposes without first unplugging it from the mains.
- Use a small toothbrush (not provided) to remove any food that may have become
wedged under the blades.
- Clean the motor housing with a damp cloth. Do not use abrasive cleaners or metal scourers.
- It is easier to clean the mixer immediately after use. Pour warm soapy water into the jug and switch the mixer on for a few seconds. Switch the mixer off ('0') and remove the jug from the base. Rinse and dry thoroughly.
- IMPORTANT: Do not wash the blades in the dishwasher. The pressure and heat of the water may damage the assembly and prevent it from rotating, which in turn may provoke other damage in the mixer.
- Unplug the mixer from the mains after each use and before carrying out any maintenance or cleaning operation.
- Do not let the cable or plug become damp or wet.
7. INFORMATION FOR THE CORRECT DISPOSAL OF ELECTRICAL AND ELECTRONIC APPLIANCES
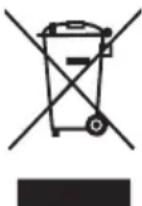
At the end of its working life, the product must not be disposed of as urban waste. It must be taken to a special local authority differentiated waste collection centre or to a dealer providing this service. Disposing of a household appliance separately avoids possible negative consequences for the environment and health deriving from inappropriate disposal and enables the constituent materials to be recovered to obtain significant savings in energy and resources.
To remind you that you must collaborate with a selective collection scheme, the symbol shown appears on the product warning you not to dispose of it in traditional refuse containers.
For further information, contact your local authority or the shop where you bought the product.
1. DESCRIPTION (FIG. A)

- ES
- DESCRIPCION (FIG. A)
- TECHNICAL CHARACTERISTICS
- SAFETY PRECAUTIONS
- OPERATING INSTRUCTIONS
- ASSEMBLY
- Set up
- PRACTICAL ADVICE
- MAINTENANCE AND CLEANING
- MAKE SURE THAT THE MIXER IS SWITCHED OFF AND UNPLUGGED BEFORE ADDING OR REMOVING ANY OF THE PARTS.
- INFORMATION FOR THE CORRECT DISPOSAL OF ELECTRICAL AND ELECTRONIC APPLIANCES
- DESCRIPTION (FIG. A)
Brand : FAGOR
Model : BV850
Category : Blender