SpeedXL HQ7895 - Shaver PHILIPS - Free user manual and instructions
Find the device manual for free SpeedXL HQ7895 PHILIPS in PDF.

User questions about SpeedXL HQ7895 PHILIPS
0 question about this device. Answer the ones you know or ask your own.
Ask a new question about this device
Download the instructions for your Shaver in PDF format for free! Find your manual SpeedXL HQ7895 - PHILIPS and take your electronic device back in hand. On this page are published all the documents necessary for the use of your device. SpeedXL HQ7895 by PHILIPS.
USER MANUAL SpeedXL HQ7895 PHILIPS
Register your product and get support at
www.philips.com/welcome
HQ7895, HQ7890

ENGLISH 6
DANSK 18
DEUTSCH 30
ESPÁNOL 44
SUOMI 57
FRANÇAIS 69
NEDERLANDS 82
NORSK 95
PYCCKH 107
SVENSKA 120
ITALIANO 132
Introduction
Congratulations on your purchase and welcome to Philips! To fully benefit from the support that Philips offers, register your product at www.philips.com/welcome.
Important
Read this user manual carefully before you use the shaver and the Jet Clean system. Save the user manual for future reference.
Danger
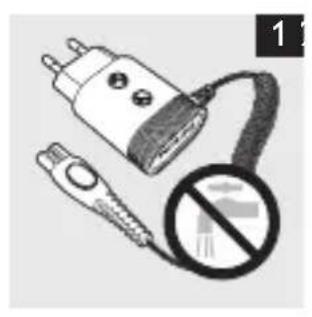
- Make sure the adapter does not get wet (Fig. 1).
Warning
- Be careful with hot water. Always check if the water is not too hot, to prevent your hands from getting burnt.
- The adapter contains a transformer. Do not cut off the adapter to replace it with another plug, as this causes a hazardous situation.
- The shaver and the Jet Clean system are not intended for use by persons (including children) with reduced physical, sensory or mental capabilities, or lack of experience and knowledge, unless they have been given supervision or instruction concerning use of the appliances by a person responsible for their safety.
- Children should be supervised to ensure that they do not play with the shaver and the Jet Clean system.
Caution
- Do not use the shaver or the Jet Clean system if it is damaged.
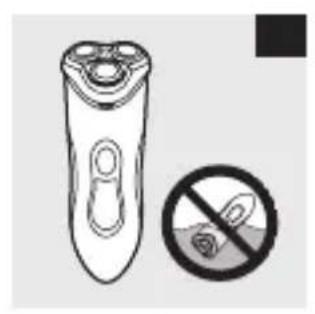
- Do not immerse the shaver in water (Fig. 2).
- This shaver is not suitable for shaving in the shower.
- Charge, use and store the shaver at a temperature between 5^ C and 35^ C .
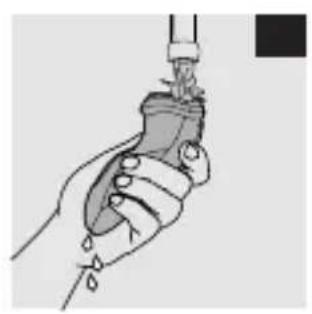
- Water may leak from the socket at the bottom of the shaver when you rinse it. This is normal and not dangerous because all electronics are enclosed in a sealed power unit inside the shaver (Fig. 3).
-
Always put the protection cap on the shaver to protect the shaving heads when you are travelling.
-
The shaver, the Jet Clean system and the other accessories are not dishwasher-proof.
- Only use the adapter supplied.
- If the adapter is damaged, always have it replaced with one of the original type in order to avoid a hazard.
- Only use the Jet Clean systemwith the original HQ200 cleaning fluid.
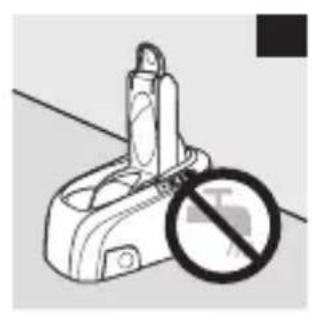
- Do not immerse the Jet Clean system in water nor rinse it under the tap. (Fig. 4)
- Use and store the Jet Clean system at a temperature between 5^ and 35^ .
- Always place the Jet Clean system on a stable, level and horizontal surface to prevent leakage.
- Always place the Jet Clean system on a fluid-resistant surface.
- When the Jet Clean system is ready for use, do not move it to prevent leakage of cleaning fluid.
- The Jet Clean system thoroughly cleans but does not disinfect your shaver, therefore do not share the shaver with others.
Compliance with standards
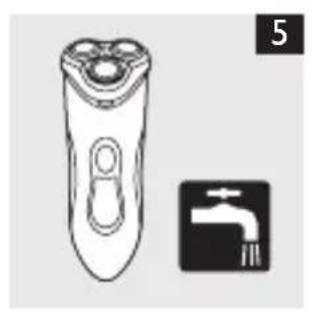
- The shaver complies with the internationally approved IEC safety regulations and can be safely cleaned under the tap (Fig. 5).
- The shaver and the Jet Clean system comply with all standards regarding electromagnetic fields (EMF). If handled properly and according to the instructions in this user manual, the appliances are safe to use based on scientific evidence available today.
General
- The adapter transforms 100-240 volts to a safe low voltage of less than 24 volts.
Charging
Make sure the shaver is switched off before you charge it.
Charging takes approx. 1 hour.
You can also shave without charging by connecting the shaver to the mains.
A fully charged shaver has a cordless shaving time of up to 55 minutes.
1 Charge the shaver when the bottom light flashes orange.
Charge indications
Charging
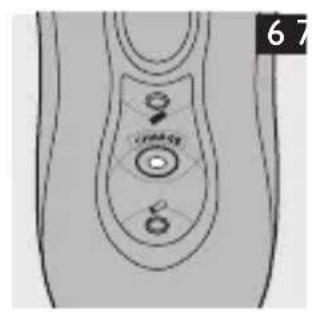
- When you start charging the empty shaver, the bottom light flashes orange. When the battery contains enough power for one shave, the middle charging light starts flashing green (Fig. 6).
Battery fully charged
- When the battery is fully charged, the top charging light lights up green continuously.
Battery low
- When the battery is almost empty i.e. when there are only 5 or less shaving minutes left, the bottom charging light starts to flash orange. When you switch off the shaver, this light still flashes orange a few times.
Charging with the adapter
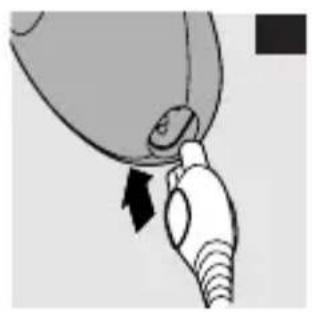
1 Put the appliance plug in the shaver (Fig. 7).
2 Put the adapter in the wall socket.
3 Remove the adapter from the wall socket and pull the appliance plug out of the shaver when the battery is fully charged.
Charging in the Jet Clean system
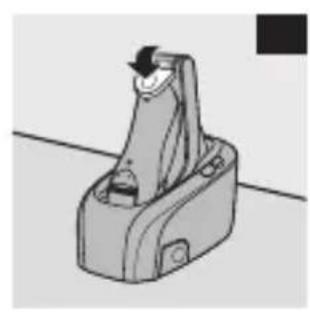
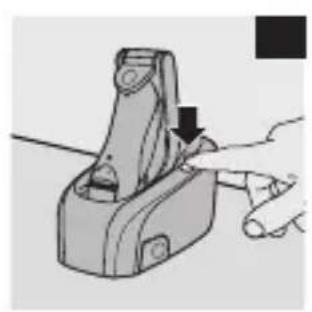
1 Place the shaver in the holder and completely push down the lever to lock the shaver into place (Fig. 8).
- The charging light on the Jet Clean system flashes to indicate that the shaver is charging.
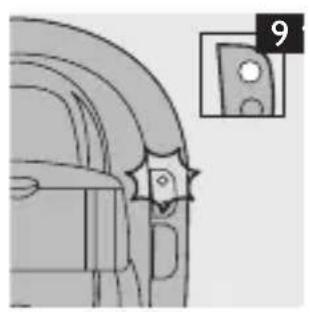
- When the charging light lights up continuously (after approx. 1 hour), the shaver is fully charged (Fig. 9).
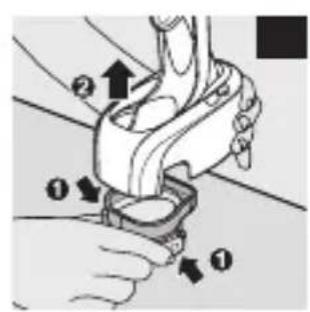
2 Move the lever upwards until it does not go any further (1) and remove the shaver from the Jet Clean system(2). (Fig. 10)
The charging light goes out.
Using the shaver
Shaving
1 Press the on/off button once to switch on the shaver.
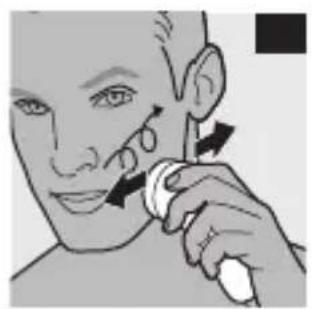
2 Move the shaving heads over your skin in circular movements (Fig. 11).
- Shaving on a dry face gives the best results.
- Your skin may need 2 or 3 weeks to get accustomed to the Philips shaving system.
Note: Do not make straight movements.
3 Press the on/off button once to switch off the shaver.
4 Clean the shaver (see chapter 'Cleaning and maintenance').
5 Put the protection cap on the shaver every time you have used it, to prevent damage (Fig. 12).
Trimming
You can use the trimmer to groom your sideburns and moustache.
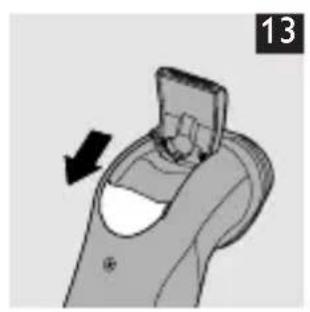
1 Push the slide downwards to open the trimmer (Fig. 13).
Note: You can activate the trimmer while the motor is running.
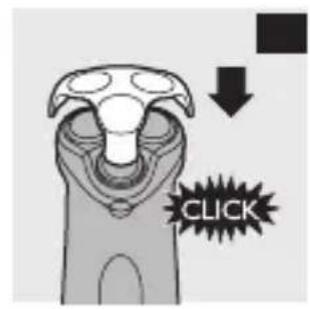
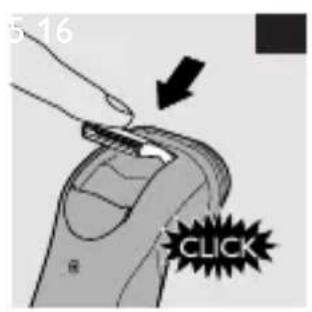
2 Close the trimmer ('click') (Fig. 14).
Cleaning and maintenance
The best and most hygienic way to clean the shaver is in the Jet Clean system. You can also clean the shaver by rinsing it under the tap or with the brush supplied.
Regular cleaning guarantees better shaving performance.
Note: Water may leak from the socket at the bottom of the shaver when you rinse it. This is normal and not dangerous.
Cleaning the shaver in the Jet Clean system supplied
Preparing the Jet Clean system for use
Fill the cleaning chamber before first use and when the cleaning light flashes to indicate that the fluid level is too low. When the fluid level drops below the minimum level, the cleaning light flashes with intervals and the holder returns to its starting position.
If you use the Jet Clean system to clean the shaver every day, refill the cleaning chamber approx. every 15 days.
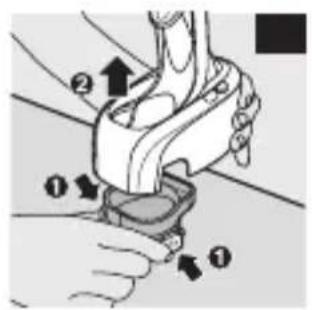
1 Simultaneously press the release buttons on both sides of the cleaning chamber (1) and lift the Jet Clean system off the cleaning chamber (2) (Fig. 15).
The cleaning chamber remains behind.
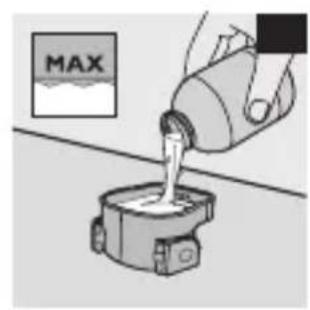
2 Unscrew the dosing cap from the bottle with HQ200 Cleaning Fluid and remove the airtight seal.
3 Fill the cleaning chamber with cleaning fluid up to the MAX indication (Fig. 16).
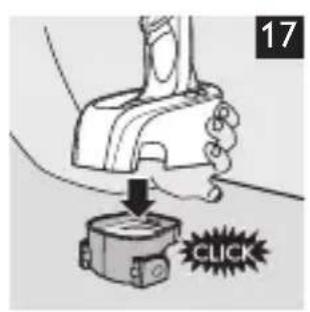
4 Place the Jet Clean system back onto the cleaning chamber (Fig. 17). Make sure the release buttons snap back into place.
5 Put the appliance plug in the Jet Clean system and put the adapter in the wall socket (Fig. 18).
Using the Jet Clean system
1 Place the shaver in the holder and completely push down the lever to lock the shaver into place.
The charging light on the Jet Clean system flashes to indicate that the shaver is being charged.
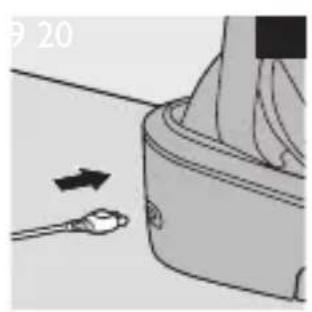
2 Press the start button to start the cleaning program. (Fig. 19)
The cleaning light starts flashing and the shaver is automatically lowered into the cleaning fluid.
During the cleaning program, which takes approx. 1 hour, the cleaning light flashes continuously.
During the first phase of the cleaning program, the shaver automatically switches on and off several times and is put in different positions.
During the second phase of the cleaning program, the shaver is placed in the drying position. It stays in this position until the end of the program. The cleaning light lights up continuously.
After the cleaning program, the shaver automatically returns to its starting position and starts charging. The charging light on the Jet Clean system flashes.
Note: If you press the start button or open the lever during cleaning, the cleaning program is aborted and reset. In this case, the cleaning light stops flashing and the holder returns to its starting position.
Note: If the adapter is removed from the wall socket during cleaning, the cleaning program is aborted. The holder remains in its current position. When the adapter is put back into the wall socket, the holder moves to the highest position.
Note: If the fluid volume in the cleaning chamber drops below the minimum level during the cleaning program, the program is aborted. The cleaning light flashes with intervals and the holder returns to its starting position.
Cleaning the Jet Clean system
The cleaning chamber is not dishwasher-proof. Clean the cleaning chamber every two weeks.
ENGLISH12
1 Simultaneously press the buttons on both sides of the Jet Clean system (1) and lift the Jet Clean system off the cleaning chamber (2). (Fig. 20)
The cleaning chamber remains behind.
2 Pour any remaining cleaning fluid out of the cleaning chamber. (Fig. 21)
You can simply pour the cleaning fluid down the sink.
3 Rinse the cleaning chamber under the tap (Fig. 22).
4 Place the Jet Clean system back onto the cleaning chamber (Fig. 23). Make sure the release buttons snap back into place.
5 Clean the Jet Clean system with a moist cloth. Cleaning the shaver under the tap
Be careful with hot water. Always check if the water is not too hot, to prevent your hands from getting burnt.
1 Switch off the shaver, remove the adapter from the wall socket and pull the appliance plug out of the shaver.
2 Press the release button to open the shaving unit (Fig. 24).
3 Rinse the hair chamber and the inside of the shaving unit under a hot tap for some time (Fig. 25).
4 Rinse the outside of the shaving unit under a hot tap for some time (Fig. 26).
5 Close the shaving unit and shake off excess water.
Never dry the shaving unit with a towel or tissue, as this may damage the shaving heads.
6 Open the shaving unit again and leave it open to let the shaver dry completely (Fig. 27).
You can also clean the hair chamber without water with the brush supplied.
Extra-thorough cleaning method
1 Switch off the shaver, remove the adapter from the wall socket and pull the appliance plug out of the shaver.
2 Open the shaving unit, turn the lock anticlockwise (1) and remove the retaining frame (2) (Fig. 28).
3 Clean the cutters and guards with the brush supplied (Fig. 29).
Note: Do not clean more than one cutter and guard at a time, since they are all matching sets. If you accidentally mix up the cutters and guards, it may take several weeks before optimal shaving performance is restored.
Put the shaving heads back into the shaving unit. Put the retaining frame back into the shaving unit and turn the lock clockwise (Fig. 30).
5 Close the shaving unit.
Cleaning the trimmer
Clean the trimmer every time you have used it.
1 Switch off the shaver, remove the adapter from the wall socket and pull the appliance plug out of the shaver.
2 Clean the trimmer with the brush supplied (Fig. 31).
3 Lubricate the trimmer teeth with a drop of sewing machine oil every six months (Fig. 32).
Storage
There are two ways to store the shaver:
- put the protection cap on the shaver to prevent damage (Fig. 12).
- store the shaver in the Jet Clean system (Fig. 33).
Replacement
For optimal shaving performance, we advise you to replace the shaving heads every 2 years.
Replace damaged or worn shaving heads with HQ8 Philips Shaving Heads only.
ENGLISH14
Note: Do not mix up the cutters and the guards to guarantee optimal shaving performance.
1 Switch off the shaver, remove the adapter from the wall socket and pull the appliance plug out of the shaver.
2 Press the release button to open the shaving unit.
3 Turn the lock anticlockwise (1) and remove the retaining frame (2) (Fig. 28).
4 Remove the shaving heads and place new ones in the shaving unit. Put the retaining frame back into the shaving unit and turn the lock clockwise (Fig. 34).
Make sure that the projections of the shaving heads fit exactly into the recesses.
5 Close the shaving unit.
Accessories
The following accessories are available:
- HQ8 Philips Shaving Heads.
- HQ110 Philips Shaving Head Cleaning Spray.
- HQ8010 Car Cord.
HQ200 Philips Cleaning Fluid.
Environment
- Do not throw away the shaver and the Jet Clean system with the normal household waste at the end of their life, but hand them in at an official collection point for recycling. By doing this, you help to preserve the environment (Fig. 35).
- The built-in rechargeable shaver battery contains substances that may pollute the environment. Always remove the battery before you discard and hand in the shaver at an official collection point. Dispose of the battery at an official collection point for batteries. If you have trouble removing the battery, you can also take the shaver to a Philips service centre. The staff of this centre will remove the battery for you and will dispose of it in an environmentally safe way (Fig. 36).
Removing the rechargeable shaver battery
Only remove the battery if it is completely empty.
1 Remove the adapter from the wall socket and pull the appliance plug out of the shaver.
2 Let the shaver run until it stops and undo the two screws in the back of the shaver (Fig. 37).
3 Undo the two screws in the hair chamber (Fig. 38).
4 Undo the three screws in the power unit (Fig. 39).
5 Bend the 4 hooks aside (1) to take out the power unit (2) (Fig. 40). Be careful, the hooks are very sharp.
6 Remove the power unit cover with a screwdriver (Fig. 41).
7 Remove the rechargeable battery. Be careful, the battery strips are very sharp.
Do not connect the shaver to the mains again after you have removed the battery.
Guarantee and service
If you need service or information or if you have a problem, please visit the Philips website at www.philips.com or contact the Philips Consumer Care Centre in your country (you find its phone number in the worldwide guarantee leaflet). If there is no Consumer Care Centre in your country, go to your local Philips dealer.
Guarantee restrictions
The shaving heads (cutters and guards) are not covered by the terms of the international guarantee because they are subject to wear.
Troubleshooting
Problem Solution
The shaver does not shave as well as it used to.
The Jet Clean system may not have cleaned the shaver properly because the cleaning fluid in the cleaning chamber is soiled or the cleaning fluid level is too low. Clean the shaver thoroughly before you continue shaving. If necessary, clean and refill the cleaning chamber (see chapter 'Cleaning and maintenance').
The shaving heads may be damaged or worn. Replace the shaving heads (see chapter 'Replacement').
Long hairs may obstruct the shaving heads. Clean the cutters and guards with the brush supplied (see chapter 'Cleaning and maintenance').
The shaver does not work when I press the on/off button.
The battery may be empty. Recharge the battery (see chapter 'Charging') or connect the shaver to the mains.
The shaver may not be connected to the mains. Put the appliance plug in the shaver and put the adapter in the wall socket.
The shaving unit has come off the shaver.
The shaving unit was not placed correctly. Put the shaving unit back onto the shaver by inserting the hinge into the slot in the rim of the hair chamber. Then push the shaving unit home until it locks into place ('click').
Problem Solution
The shaver is not entirely clean after I clean it in the Jet Clean system.
The cleaning fluid in the cleaning chamber may be soiled. Empty and rinse the cleaning chamber.
The cleaning fluid level may be too low. If the fluid volume in the cleaning chamber drops below the minimum level during the cleaning program, the program aborts. The cleaning light flashes with intervals and the holder returns to its starting position. Refill the cleaning chamber with cleaning fluid up to the MAX indication (see chapter 'Cleaning and maintenance').
You may have used another cleaning fluid than the original Philips cleaning fluid. Only use Philips HQ200 Cleaning Fluid.
The Jet Clean system does not work when I press the on/off button.
The Jet Clean system may not be connected to the mains. Put the appliance plug in the Jet Clean system and put the adapter in the wall socket.
You have not placed the shaver in the Jet Clean system properly. Make sure you push down the lever completely to lock the shaver into place.
Introduktion
- He IncnoB3yIe 6pntBy n cncTeMy oynctKn Jet Clean npn haunnn noBpeJdEHH.
- 3anpeuetaertcnorgykaTb6pntByBBOdy(Pnc.2).
- Θа 6рИТВа He ппгоДна Ддя ИСПОБаня В душ.
- Историяе плены,有很大 majority of the population in the country. In 1980-2000 years, there were approximately 3 million people living in the country.
PYCCKN108
- Прп помьвани 6рNTын 3 ГездашTekepa может ВыTeKaTb BODa.TO HopMaALbHO n He npeCTaBЯET ONaCHOCTn рп ИСПОВЗOBAHи 6рNTы,Тak КаK ЗALEKTPOЗЕм entb BHHTPN 6pNTbI NaXOДЯТСВ rePMeTHHOM 6LoKe PNTaHn (Pnc.3).
-ДЯпразоведи NOBpeKdEн BO BpeMЯ NOe3OK HaDeBaITe Na 6pNTBy 3auntbI KOAnaYok. - Бптва, систema оочтки Jet Clean и дугne akceccуары He\ праздаз nause给他们 оочтки в посудомоецн Maшине.
- Πολb3yιTEcB TOΛbKO aΔaΠTeρΟ, BXODΑΙΜ B KOMπΑΕΚΤ ΝΟCTestαΒΚΙ.
- Ecam aan an terp noBpeKdeH, 3aMeHnTe ero ToAbo KaHm JKe aan Tepom, yTo6bI oBeCneuTb 6e3OpaChyIO kCnAyaTaunio npnbopa.
-ДЯ системы оочтки Jet Clean Incnoλb3уITE TOλbKO opINHaλbHyU ЧИСТЯПУЖИДКОCTь HQ200. - 3anpeuetaTcI norgykaTb cncTeMy ouncTkJet Clean B BOdy, a TaKke npomblaTb ee IOD cTpyeB Odbi. (Pnc. 4)
- История симпь оочтахл Jet Clean и等着 Хашиные дожны пою ведя пою ведя ог戒.
- Доступные релегатураховские релегатураховские релегатураховские релегатураховские релегатураховские релегатураховские релегатураховshire релегатураховshire релегатураховshire релегатураховshire релегатураховshire релегатураховshire релегатураховshire релегатураховshire релегатураховshire релегатураховshire релегатураховshire релегатураховshire pelen
- Доступные релегату релегату релегату релегату релегату релегату релегату релегату релегату релегату релегату релегату релегату релегату релегату релегату релегату релегату релегату релег�
- Достotypical релегату релегату релегату релег�
- Достotypical релегatic
- Достotypical релегatic
- Достotypical релегatic
- Достotypical релегatic
- Дostical pelen
- Дostical pelen
- Дostical pelen
- Дostical pelen
- Дostical pelen
- Дostical pelen
- Дostical pelen
- Дostical pelen
- Дostical pelen
- Дostical pelen
- Дostical pelen
- Дostical pelen
- Дostical pelen
- Дostical pelen
-
Дostical pelen
- Дostical pelen
- Дostical pelen
- Дostical pelen
- Дostical pelen
- Дostical pelen
- Дostical pelen
- Дostical pelen
- Дostical pelen
- Дostical pelen
- Дostical pelen
- Дostical pelen
- Дostical pelen
- Дostical pelen
- Дostical pelen
- Dostical pelen
- Dostical pelen
- Dostical pelen
- Dostical pelen
- Dostical pelen
- Dostical pelen
- Dostical pelen
- Dostical pelen
- Dostical pelen
- Dostical pelen
- Dostical pelen
- Dostical pelen
- Dostical pelen
- Dostical pelen
- Dostandal pelen
- Dostandal pelen
- Dostandal pelen
- Dostandal pelen
- Dostandal pelen
- Dostandal pelen
- Dostandal pelen
- Dostandal pelen
- Dostandal pelen
-УTO6bI YNCTaJa JnKIOCTb He npOAnAacb, O6ra3aTeAho yCTaHaBANBaIte cncTeMy OuncTKn Jet Clean Ha rOpN3oHTaMbHOJ, POBHOI yCTOuHBOI NOBepXHOCTN. - CnCTemy ounstkn Jet Clean hyxho o6aTeaBHO yCTaHaBANBaTb Ha BOAOYCTOINByIO NOBepxHOctb.
- Korda cnctema ounstkn Jet Clean rotoBa K pa6ote, ee HeIb3r nepemeaTb, yTo6bl He pa3AHTb YnCTraUO XnDKoCTb.
- CnCTema ouncTkJet Clean TuaTeaHo ouuuaeT, Ho He Ae3HΦuIpyeT 6pntBy, NO3Tomy 6pntBa DOAxAHa OCTaBaTbcr IpeMeTOM INDINDAyaAhoRO NcnoAboHnra.
CoOTBcTbHe cTaHApTaM
-Прибор COOTBETCTByeT MeЖДуHApOДHOMy CTaHДapTY TeXHnKn 6e3oNaChocTn IEC.Еro можно помьВаТь NOД cTpyeN BOAbI (Pnc.5).
- Брита и систema оочтки Jet Clean coOTbETCTBYOT cTaHdapTam NO заEkTpomarHHTbIM noIam (3MП).При праиьHom образецьВ COOTBeTCTBnC INHCTpyKUЯМN DAHHORO pYKOBOdCTBa NOλБЗOBaTeA, рпименыпрИборов 6e3ОпаCHO, КАК ПOKa3bIBAIOT COBpeMeHHbIe hayHbIe daHHbIe.
O6uHe cBeAeHn
AkkymyAToP nOAnHOCTbIO 3apJxKeH
- KOrda aKKMyAToP 3apJKeH NOAHOCTbIO, BepxHn INDAKaTOp 3apJKn IPOAOXHTeABHO TOpNT 3eAeHBIM.
Hn3kn ypoBeNb 3apra aKKymyATopa
IcnoB3OBAHne 6pNTbbl
БрптBE
1 HaKMTe KHOIIky BKAIOUeyHry/BBIKAIOUeyHry AAR BKAIOUeyHry np6opa.
2Перемаite 6pntBeHHbIe roAOBkn no KOKxe, COBepaKpyroBbIe ABnKeHna (Pnc.11).
- Hanluyuine pe3yabTaTbI 6pntbI DOCTnraOTc npi cyxoiKOKe.
-Дя aanTaun K 6pntBehno cnCTeme Philips Bawei KoKe moKeT noTpe6oBaTbcra 2-3 HeaI.
IpmeaHne. He nepemeaime 6pmby no koke npmbimn gBxkeHHaMn.
3 HaKmTe KHOIIky BKAIOueHn/BBIKAIOueHn AAR BBIAIOueHn np6opa.
4 OuInTe 6pntBy (cM. pa3AeI "OuInCTka n yxoA").
5 Посае ИспОваня заEkТрОБРNTВы NaДeВaITe Ha Hee 3auntHbI KOАпayOK ДЯ пpeДOTВрашЕня NOВржден (Pnc. 12).
PoaBHBaHne
TpIMMep MOXHO NcnoB3OBaTb AIA IOpaBHNBaHnYCOB IN BnCKOB.
1 OTKpoTe TpHMMep, CABHHyB NOA3yHKOBbI NepeKaIOaTeAb BHN3 (Pnc. 13).
YnCTaIyIO JxNkOcTb MOXHO BblNTb B paKOBnHy.
3PpomoeOTceK AAn OunchKn IOnA CtpyeB BoAbI (Pnc. 22).
4 YcTaHOBInTe CnCTeMy OuNCTKJ Jet Clean o6paTHo B OTceK AAn OuNCTKN (Pnc. 23).
Y6eAnTEcB, YTO KHOPIK NOTCOEAnHeHnC ⅢeAukOM BCTaAN Ha MeCTO.
5 CnCTemy ouHcTKn Jet Clean moXHO ouHCTntb BAAxHOJ TkaHbIO.
PpOmbiBka 3AekTp06pntTbbl NOA cTpyeBBOAbI
Co6IIOaIte octopoxKHOCTb npn o6paueHn C rOpayeB BOAOI.
PpOBepaTe TeMpeatpy BOaI, uTo6bl n36eKaTb OxKOrOB.
1 BbIKIOUHTe 6pNTBy, BbIHbTe BNAky aaantepa n3 po3eTKn 3AekTPOcETn n OTCoeAHHnTe wTeKepe Hypa ot 6pNTBbl.
2 OTKpoIe 6pHTBeHHbI 6AOK, HaxaB KHOIIky OTKpbIBaHn (Pnc. 24).
3 ΠροМоΙTe OTceK AλΑ BΟΛΟ N BΗΥTpεHΗΝ ηας έντη 6ριΤΒeHHΟΓΟ 6λΟΚa έΟΑ ΚτργΕι έρχΕι ΒΟΔβι (Pιс. 25).
4ПомоTe 6pntBENHbI 6AOK chapxN IOa cTpyeI ropayeI BOAbI (Pnc.26).
5 3aKpoIe 6pHTBeHHbI 6AOK I CTpXHnTe BOy.
3aIpeucaetcBbITnpaTb 6pHTBeHHbI 6AOK NOAOTeHcEm HAn caAeTKoJ. 3TO MOKeT IOBpeAHtB 6pHTBeHHbIe rOAOBKn.
6 CHOBA OTKPOIte 6pNTBHeHbI 6AOK. OCTaBBTe erO OTKpbITbIM AIA NOAHOROBbICbIXaHHa (Pnc.27).
CyuEcTByeT DBA cnoco6a xpaHeHn8 6pNTBbl:
-ДЯпpeДOTВРашени NOBpeЖдЕн HaDEBaIte Ha 6pNTBy 3auntHbI K0ApaYOK; (Pnc.12)
-xpaHnTe 6pntBy B cnCTeme Jet Clean (Pnc. 33).
3aMeHa AeTaAeI
Ara OITMaIbHOrO KaueCTBa pa6oTbI 6pNTBbl peKOMeHdyeTc npOn3BOaHTb 3aMeHy 6pNTBeHHbIX rOAnOBOK KaJDbie 2 roDa.
Bo3MOxHNo, 6pNTBa He IoAkaUoyeHa K 3AeKTpocTeN.
PiOaKaIOuHTe WTeKepe K 6pNTBe N BCTaBbTe BNAky B
po3eTKy 3AeKTpocTeN.
БрNTBeHHbI
6AOK
OTCOeAnHnAÇa
OT
3AeKTpo6pNTBbl.
Bo3MOxHNO, 6pNTBeHHbI 6AOK 6bIA HeNpaBnAbHO yCTaHOBaeH. YcTaHOBInTe 6pNTBeHHbI 6AOK Ha 6pNTBy, BCTaBnB 7apHnP B Inpope3b Ha KpaIO OTceKa AAn BOLOC, N HaDaBInTe Ha 6AOK DO IeAUKa.
PpO6Aema Cnooc6bpeweHn
Iocae Ounchkn B cncTeMe Jet Clean Ha 6pntBe BCEtakn OCTaOTc3aqr3HeHna.
Bo3MOxHNO, uNCTaJg KNDKOCTb B OTceKe dA OuNCTKn rpa3Ha. CaeIe KNDKOCTb n IpOMoTc OTcEK dA OUNCTKn.
Bo3MOxHOb, yOBeHb YnCTaIeJ XnDKoCTn CAnXKOM Hn3Kn. ECan ObbeM XnDKoCTn B OTCeKe dAry OUnCTKn HnKe MInHMaIbHOrO, IpOgpaMMA OUnCTKn 6yDeT npeBaHa. NnDKaTOP OUnCTKn MnraeT, a pyuKa BO3BpaaetcB INCXoADHoe IIOAOJKeHne. 3aJeTe B OTceK dAry OUnCTKn YnCTaIyU OKnDKoCTb DO OTMeTKN MAX (cm. rAaby "OUnCTKa n yxoA").
Bo3MOxHNO, Bbl BOCnOaB3OBaAHCb AyrOu YnCTraeJ KIOCTbIO. IoAbyTeCb ToAbo YnCTraeJ KIOCTbIO Philips HQ200.