INTERPHONEF3EU - Earphones Cellular Line - Free user manual and instructions
Find the device manual for free INTERPHONEF3EU Cellular Line in PDF.
| Product Type | Bluetooth Kit for Motorcycle Helmet |
| Brand | Cellular Line |
| Model | INTERPHONEF3EU |
| Dimensions | 90 x 46 x 20 mm |
| Weight | 83 g (with earpiece and microphone) |
| Power Supply | Rechargeable Lithium Battery |
| Battery Type | Lithium |
| Talk Time | Up to 8 hours |
| Standby Time | Up to 700 hours |
| Charging Time | Approximately 3 hours |
| Charge Indicator | Red light (charging), green light (charged) |
| Bluetooth Version | Bluetooth v2.0 |
| Supported Bluetooth Profiles | Headset, Handsfree |
| Number of Pairing Devices | Up to 8 devices |
| Main Functions | Phone, Intercom (full duplex), GPS Audio, Voice Answer (VOX), Voice Call |
| Intercom Range | Up to 700 meters (in open field, typical) |
| Noise Reduction | DSP Filter (digital wind cancellation) |
| Automatic Volume Adjustment | Yes, according to speed and ambient noise |
| Protection Rating | IP67 (fully waterproof) |
| Mounting | Adhesive or clip mount (removable) |
| Installation | 5 minutes, tool-free (screwdriver included for clip) |
| Helmet Compatibility | All types of helmets (does not affect homologation) |
| Package Contents | 2 Bluetooth modules, 2 earpieces with microphone, 2 mounts (adhesive + clip), double AC charger, Velcros, screwdriver |
| Cleaning | Sponge soaked in water or mild soap (connector plugged to ensure waterproofness) |
| Warranty | In accordance with applicable legislation |
Frequently Asked Questions - INTERPHONEF3EU Cellular Line
User questions about INTERPHONEF3EU Cellular Line
0 question about this device. Answer the ones you know or ask your own.
Ask a new question about this device
Download the instructions for your Earphones in PDF format for free! Find your manual INTERPHONEF3EU - Cellular Line and take your electronic device back in hand. On this page are published all the documents necessary for the use of your device. INTERPHONEF3EU by Cellular Line.
USER MANUAL INTERPHONEF3EU Cellular Line
interphone F3 PASSENGER
INSTRUCTION MANUAL


IP67 aPPROvEd
INTERPHONE F3, complies with CEI EN 60529/1997
(ex CEI 70-1), and is certified as:
(6) totally protected against dust

- (7) protected against the effect of temporary immersion
0
For more informations: www.interphone.cellularline.com/ip67
interphone F3
interphone F3

Get the most out of your
INTERPHONE F3
see:
www.interphone.cellularline.com
interphone F3


intercompstelecom
interphone F3
IT Motorbike Wireless Entertainment System
Manuale di istruzioni 12
EN Motorbike Wireless Entertainment System Instruction manual 20
FR Motorbike Wireless Entertainment System Mode d'emploi 28
ES Motorbike Wireless Entertainment System Manual operativo. 36
DE Bluetooth Entertainment System für Motorradhelme BEDIENUNGSCANLEITUNGEN 44
Motorbike Wireless Entertainment System Manual do utiliser 52
NL Draadloos entertainment system voor motorrijders Handleiding 60
RU BecepnoBHOoe neperoBOPhoe yctpoiCTBO dIa MOTOUKNICTOB (Hands Free rapHnTypa) RykoBoCTBO no EKcnnyatauui 68
Motorbike Wireless Entertainment System
Instrukcja obslugi 76
SV Tradlost kommunikationsystem for motorcyklar Bruksanvising 84
F1 Motorbike Wireless Entertainment System Käytöohje. 92
JP 毫一夕一専克川用刀伊ヤレ斯工夕一テイ蒙卜·斯式取极説明書 100
interphone F3
interphone F3
7
7.1
8
9
9a
9b
interphone F3
MANUALE ISTRUZIONI
interphone F3
interphone F3
INDICE
INTERPHONE F3 is a Bluetooth® helmet system for communicating and getting information while riding your motorcycle.
INTERPHONE F3 is compatible with all mobile phones and GPS navigators with Bluetooth technology. The control unit is covered by a special weather protection skin membrane making it fully waterproof. Its aerodynamics has been designed to avoid any disturbances generated by air turbulence, and to allow water, if raining, to slide away. Its controls and shape have been designed to allow for quick and easy identification and access whilst riding wearing gloves.
INSTALLATION
INTERPHONE F3 can be installed on any helmet, without effecting structure or finish. Once installed, it can be removed at any time. INTERPHONE F3 does not affect helmet homologation.
WHILST RIDING
Always prioritise your riding, not telephone calls. During a telephone conversation, or whilst using the interphone, reduce your speed and concentrate on your riding. In bad weather and/or heavy traffic, we recommend pulling over and stopping, before answering. Always ride carefully and in accordance with the current highway code.
WHEN STOPPED
To avoid theft, if leaving the helmet on the motorcycle, IN-TERPHONE F3 is fitted with a quick release button to allow you to remove the external Bluetooth® control unit and take it with you.
FUNCTIONS
Telephone functions

Voice response
Voice call
Call refuse
telecom
Intercom functions

- Pilot-passenger interphone connection
- Interphone connection with enable button
- Telephone ring warning
intercom
GPS functions

Audio information from Bluetooth GPS navigator
Telephone ring warning
gps
CHARACTERISTICS
Full duplex communication
- DSP filter (digital cancellation of wind and background noise)
Automatic volume adjustment (adjusts automatically to suit speed and environmental noise)
Fully waterproof (IP67)
Installation in just 5 minutes
- Removable control panel
Lithium battery
Active use autonomy: up to 8 hours (indicative time of use alternating the various functions)
- Stand-by time: up to 700 hours
- Recharge time: 3 hours
- Dimensions: 90x46x20 (mm)
Weight: 83g including ear phones and microphone
NOTES ON AUTONOMY
Active use autonomy is indicative. It has been calculated by
interphone F3
alternating the use of all the INTERPHONE F3 functions and, given the varied use of these; it can vary significantly from one use to another.
During Intercom communication, one of the two Interphone or INTERPHONE F3 devices has a greater battery consumption: this is due to the wireless recharge procedure that one of the control panels carries out in order to remain connected to the other. It can even lead to a difference in autonomy of 60/90 minutes.
On long journeys, to optimise battery duration, we advise enabling Intercom mode only when you wish to communicate, remaining in stand-by or an alternative mode when not actually communicating.
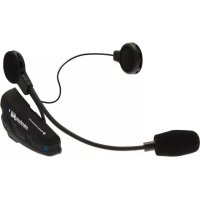
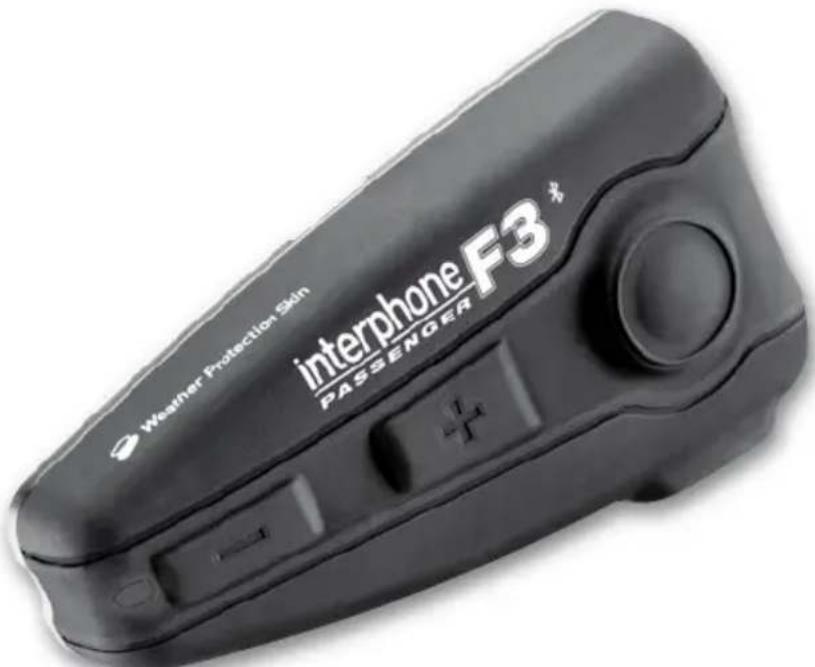
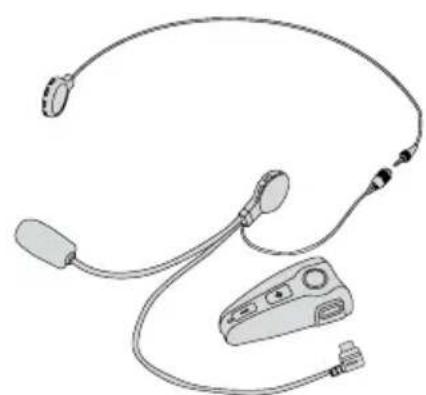
PRODUCT DESCRIPTION
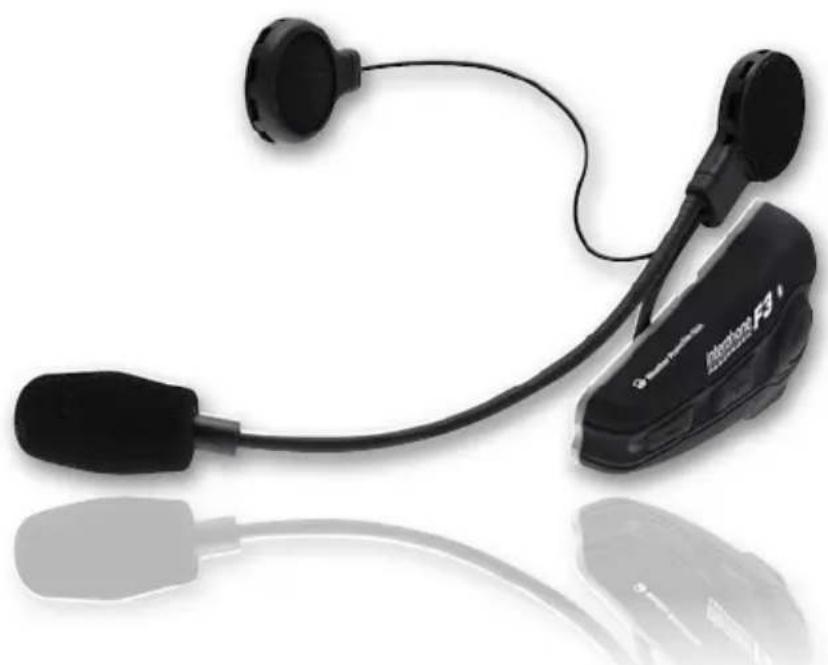
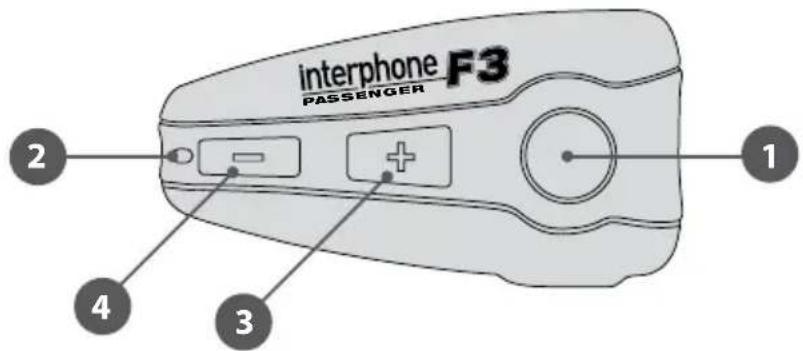
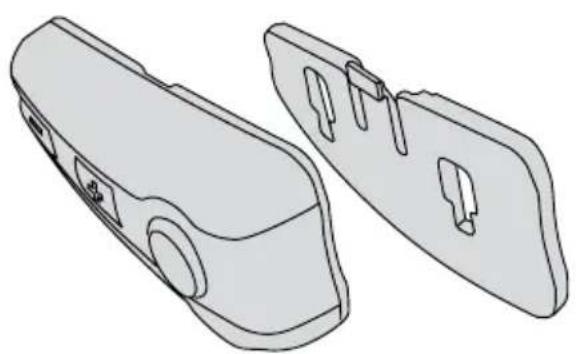
Bluetooth*control panel
- Multipurpose button
- Multipurpose LED
- Volume adjustment button +
- Volume adjustment button
- Recharge / Multipurpose socket and accessories
- Bluetooth® control panel connection guide
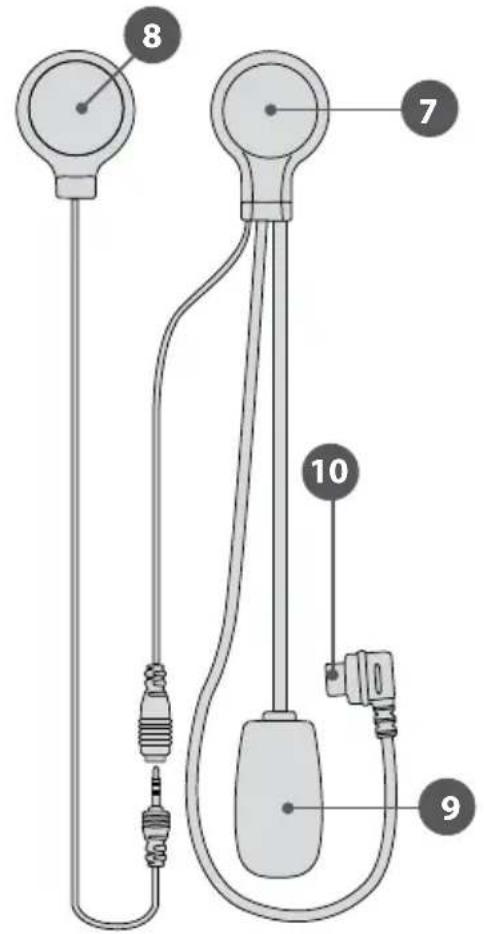
Speaker with anti-wind microphone
7/8. Speaker
9. Microphone with anti-wind sock
10. Speaker/microphone connector
PACKAGE CONTENTS*
- 2 bluetooth® control panel
- 2 speaker with anti-wind microphone
- 2 removable control panel support with clip and screws (2 screws)
2 adhesive control panel support
-2clip adaptor - Mains battery charger with double connector
4 adhesive Velcro
Screwdriver
1 FIRSTUSE
1.1 Charging
Before using INTERPHONE F3 you will need to charge it up. Connect the battery charger to a mains socket (110-220 V) and the recharger connector to the INTERPHONE F3 charging socket.
When charging, the LED indicator is red.
Once charging is complete, the LED turns green, to show that the battery has been fully charged.
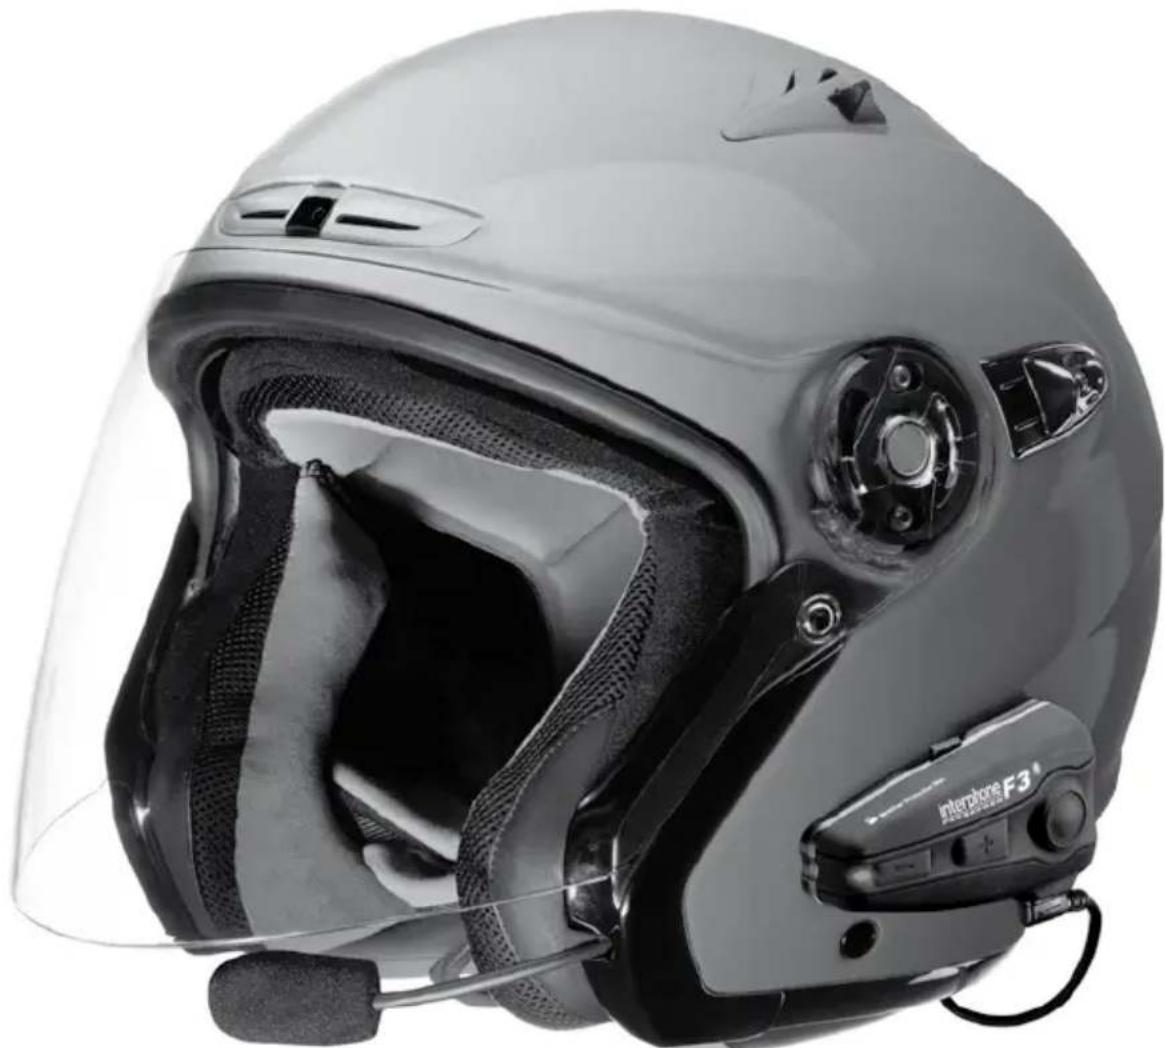
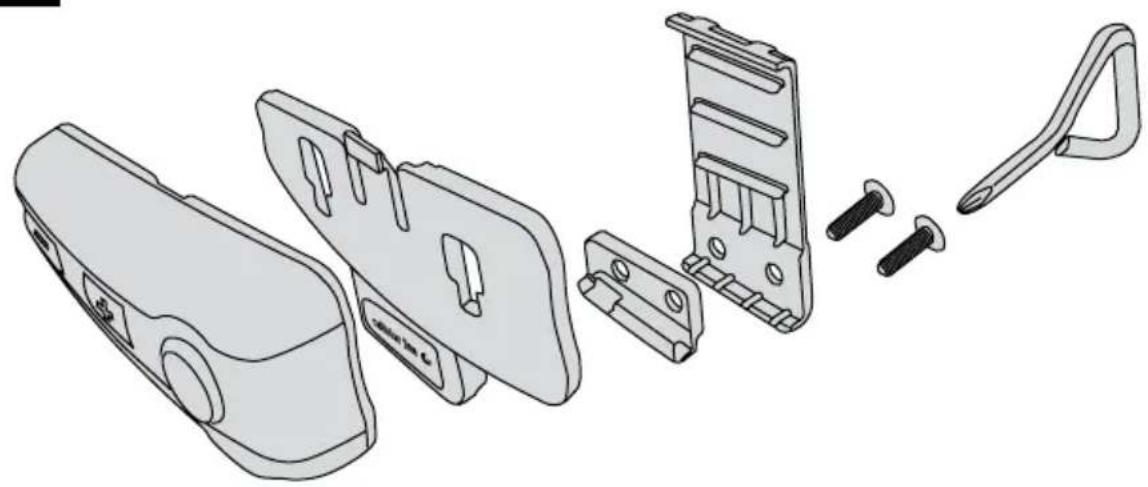
1.2 Installation
The kit includes two types of slide support, one adhesive (fixed) and the other with clamp clips (removable). Use the support that best adapts to your use and helmet type.
NOTES ON POSITION
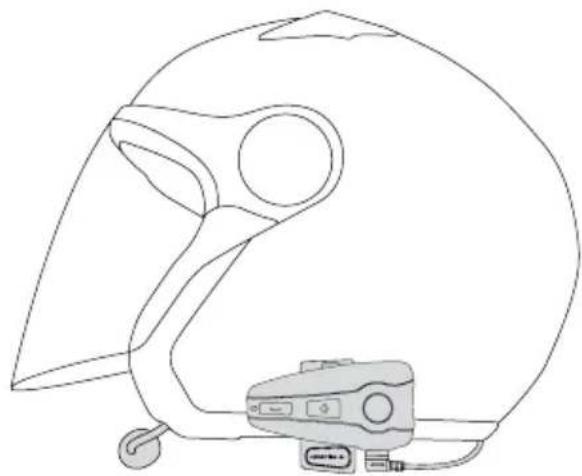
Although it can be mounted on either side of the helmet, IN-TERPHONE F3 has been designed to be fixed on the left: this allows the motorcyclist to give commands with his left hand, keeping the right on the accelerator.
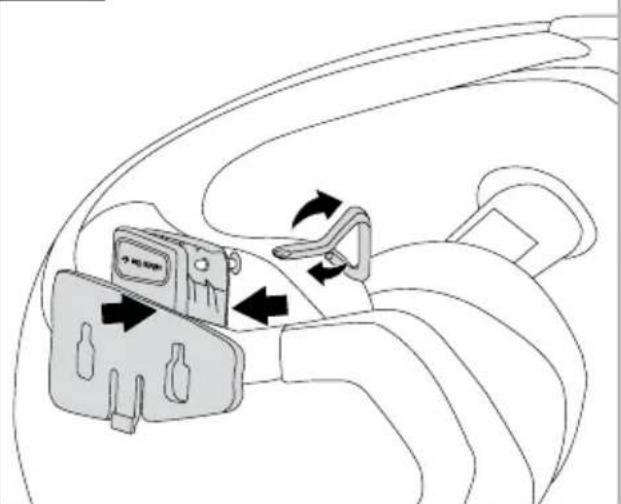
ASSEMBLY OF THE SLIDE SUPPORT WITH REMOVABLE CLIP (7)
Take the support and note the best place to fasten it to the side of the helmet. Insert the rear part of the clip into the helmet and couple the other part on the outside.
Insert the screws and tighten gently. Check position and move the support if necessary, by sliding it along. Tighten the screws with the screwdriver supplied.
N.B.: the support also includes an adaptor to offset any possible differences in thicknesses that there can be between helmets.
Mount the adaptor between the two parts comprising the slide support, using the longer screws supplied with the kit.
ASSEMBLY OF THE ADHESIVE SLIDE SUPPORT (8)
Take the adhesive support and look for the best side and place to position it. Clean and de-grease the part of the helmet where you are going to stick the support (do not use any detergents that could damage the helmet's finish). Remove the protective film from the bi-adhesive, and apply the support to the helmet.
As the support will not be able to be moved once stuck
interphone F3
onto the helmet, take great care with its positioning, when applying.
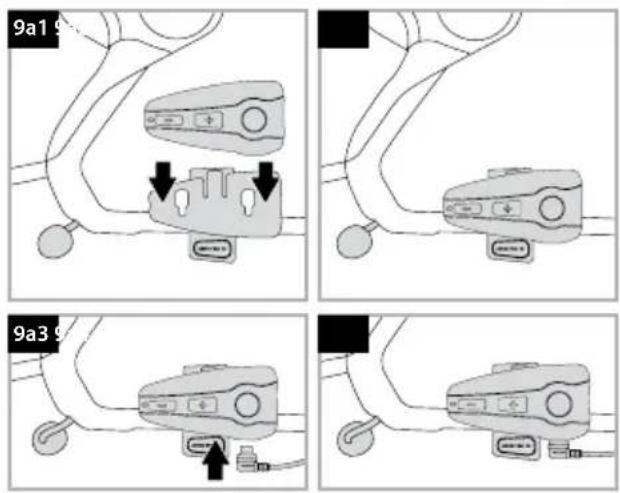
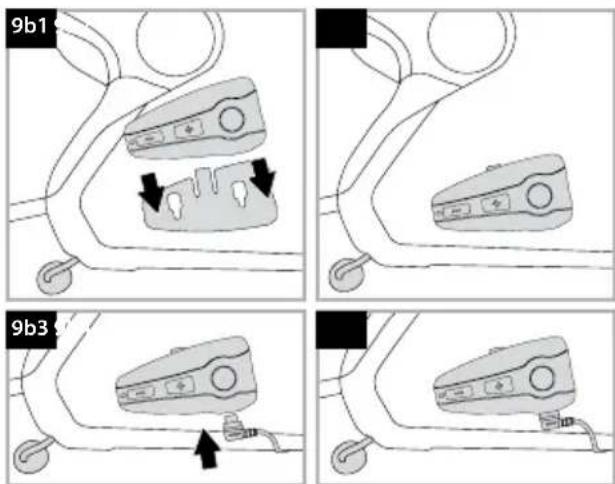
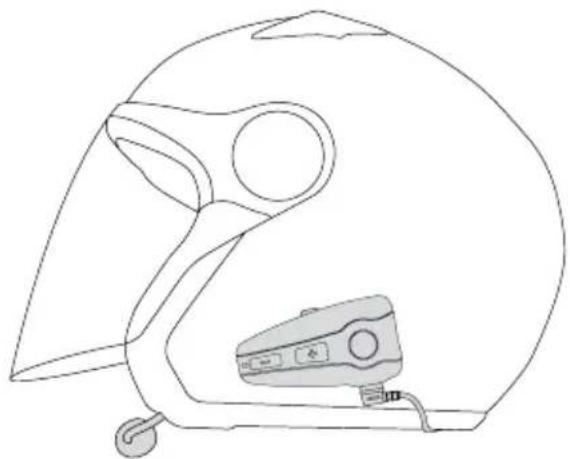
FIXING THE CONTROL PANEL (9)
After having assembled the support onto the helmet, take the Bluetooth® control panel, and insert into the guide, from top to bottom.
Check that the Bluetooth control panel is correctly locked in its casing by trying to remove it, pulling upwards.
The control panel must always be inserted from top to bottom, regardless of whether the kit is positioned to the right or left of the helmet. The connector for the speaker with microphone must always be beneath the Bluetooth® control panel.
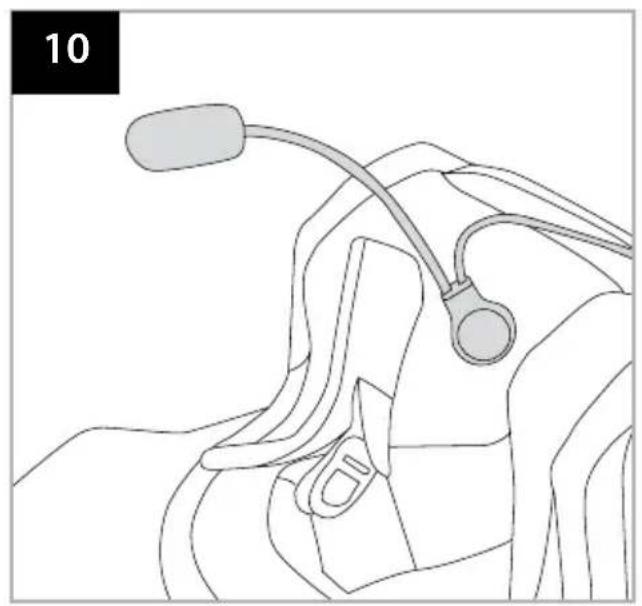
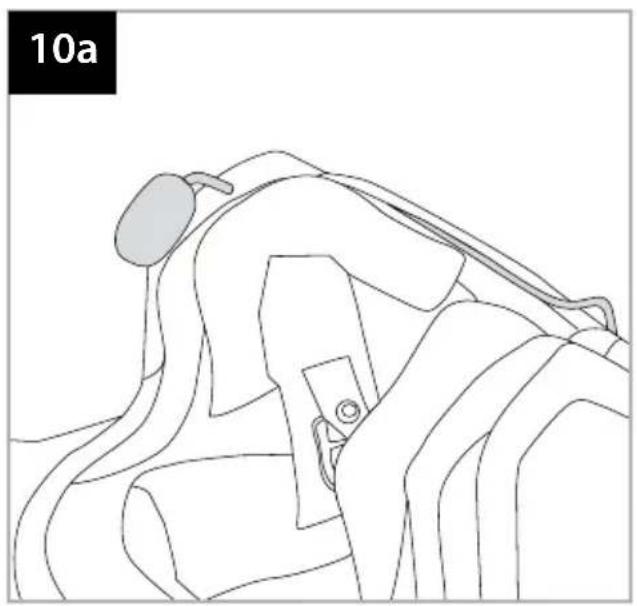
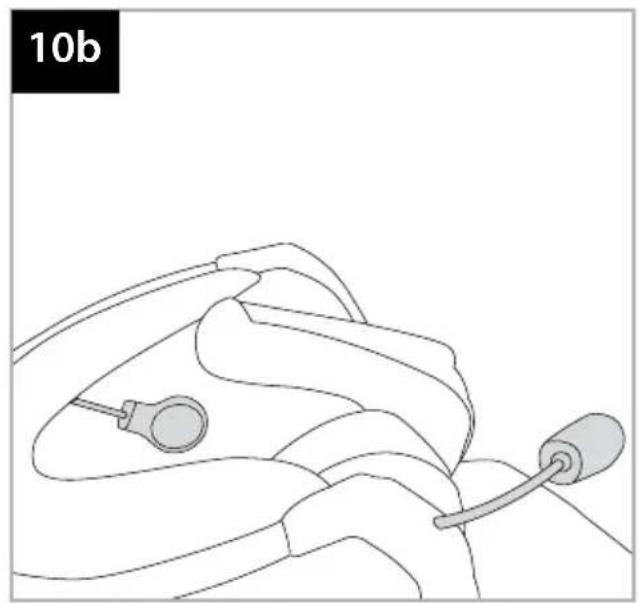
SPEAKER WITH MICROPHONE ASSEMBLY (10)
Take the piece of Velcro and apply to the inside of the helmet with the bi-adhesive, positioning it at your ear.
N.B.: before positioning the Velcro, it is a good idea to try it out. Put the helmet on and check the most suitable position for fixing.
Apply the speaker with microphone to the Velcro you have just installed in the helmet.
Connect the speaker with microphone connector to the socket on the Bluetooth control panel (the connector can only be inserted in one position).
Any excess wire must be gathered up into the helmet, beneath the padding.
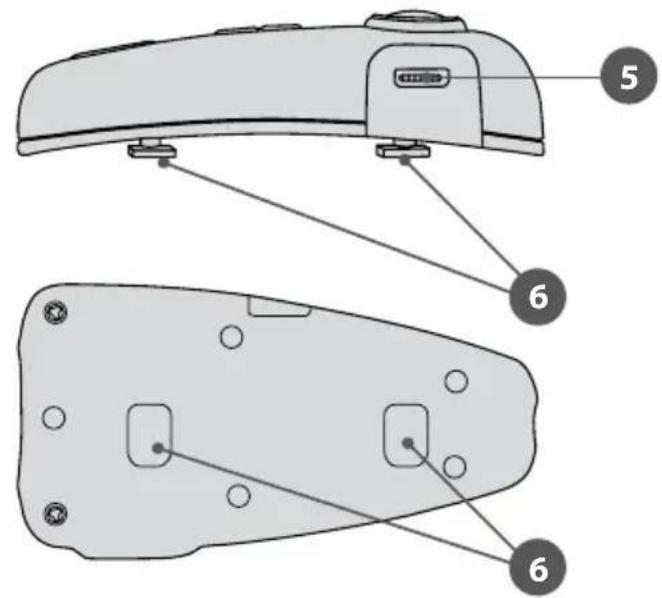
REMOVING THE BLUETOOTH\* CONTROL PANEL FROM THE HELMET
To remove the Bluetooth control panel, press the locking lever against the helmet shell and, keeping it pressed, allow the Bluetooth control panel to slide upwards.
1.3 Turning on /Turning off TURNING ON
Press and hold the MFB button for approximately 3 seconds. The speaker will sound an acoustic warning and the LEDs will begin flashing quickly for around 3 seconds.
Subsequently, in stand-by mode, the LED will flash approximately once every 5 seconds.
TURNING OFF
Press and hold the MFB button. The speaker will sound a prolonged acoustic warning and the LED will flash red prior to turning off.
2 PAIRING
2.1 Telephone
Pairing
INTERPHONE F3 can be used with a mobile telephone.
After having turned INTERPHONE F3 off, press and hold the MFB button until the warning light alternates red and blue flashes. This will take about 8 seconds.
When the light is flashing red/blue alternately your INTERPHONE F3 is in pairing mode, go to the Bluetooth menu in your telephone and select search for devices (please refer to the telephone or navigator manual).
The telephone or navigator will detect INTERPHONE F3. Simply select it, and enter the numerical code 0000.
To use with a mobile telephone and GPS navigator at the same time, see point 2.4.
2.2 Intercom
Pairing
After having turned the two INTERPHONE F3s off, press and hold the MFB buttons on both until the warning light alternates red and blue flashes. This will take about 8 seconds. When both LEDs flash red/blue alternately, press and release the MFB button on one of the two INTERPHONE F3s.
The two INTERPHONE F3s are connected when both LEDs show a fixed blue light.
NOTE ON COMPATIBILITY WITH OTHER INTERPHONE MODELS
The INTERPHONE F3 intercom connection is also compatible with previous INTERPHONE4/INTERPHONE Cellular Line devices.
Pairing: press and hold the MFB buttons on both until the warning light alternates red and blue flashes. For INTERPHONE F3/F4 this will take about 8 seconds, for INTERPHONE, about 5 seconds.
When both devices flash red/blue alternately, press and release the INTERPHONE F3 multipurpose button (the red and blue LED will flash more quickly).
Wait a few seconds, and when the devices are connected,
interphone F3
the INTERPHONE F3 LED will remain fixed blue, whilst that of INTERPHONE will flash blue quickly.
2.4 Audio GPS
Pairing
GPS NAVIGATORS use the TELEPHONE (headset) profile for audio connection: to use a telephone whilst using a navigator, you will need to use the specific function of the GPS device. For further information and settings, please consult the navigator manual.
3 USE
3.1 Telephone function

To answer a call: as a call comes in, the speaker produces a warning sound or the telephone's ring: to answer, simply press and release the MFB button.
To end a call: to end a call, simply press and release the MFB button.
Vocal call: some telephones allow you to make a vocal call simply by pressing and releasing the MFB button.
To refuse a call: to refuse the call, press and hold the MFB button for approximately 4 seconds.
To refuse a call in VOx mode, follow the instructions given in the VOX FUNCTION section.
Volume adjustment: to adjust the volume, press the buttons Volume + or Volume -, depending on the desired volume level.
3.2 Intercom function

To enable intercom function: to enable the conversation in an intercom profile, press the MFB button on one of the two INTERPHONE F3s, and hold for about 3 seconds. An audible
intercom
warning will advise you when connection has occurred. Conversation in intercom mode is full-duplex.
To disable intercom function: to disable intercom function, simply press and release the MFB button.
Volume adjustment: to adjust the volume, press the buttons Volume + or Volume -, depending on the desired volume level.
3.3 Telephone + Intercom function

telecom

intercom
With this combination, the connection to the telephone function takes priority.
-
During a telephone conversation, the question is not permitted.
-
To enable the intercom function, there cannot be a telephone call underway: press and hold the MFB button for around 3 seconds. An acoustic sound will advise you of connection. Conversation in intercom mode is full-duplex.
- To end a conversation in intercom mode, simply press and release the MFB button.
- During an interphone conversation, you can answer or refuse a telephone call received. Intercom communication will be interrupted and re-activated automatically at the end of the call.
- To answer a telephone call, press and release the MFB button.
- To end a telephone call, press and release the MFB button.
- To refuse the call, press and hold the MFB button for approximately 4 seconds.
- To adjust the volume, press the buttons Volume + or Volume -, depending on the desired volume level.
3.4 Voice response (VOX)

telecom
The voice response function allows you to answer a call without having to press any buttons. Enabling voice response: Press and hold the Volume + button for approximately 5 seconds.
An acoustic sound will advise you that this has been done. Disabling voice response: Press and hold the Volume - button for approximately 5 seconds. An acoustic sound will advise you that this has been done.
To answer a call: When receiving a call, simply say a word (e.g. 'HELLO') within ten seconds, to enable the line.
To refuse a call: When receiving a call, simply allow ten seconds to pass and it will be refused.
3.5 Voice call

telecom
The voice call function allows you to make a call without using the telephone keys. INTERPHONE F3 is compatible with the voice call function of various different mobile Bluetooth® telephones:
interphone F3
to enable it and access the controls, please refer to your telephone instruction manual.
Please refer to the section Use - Telephone section.
4 BLUETOOTH® SPECIFICATIONS
Bluetooth®: v2.0
Supported profiles: Headset - Handsfree
Pairing: up to 8 devices
5 CARE AND MAINTENANCE
If not using the kit for long periods of time, the battery must be charged every two/three months, to avoid damage.
Do not use solvents or de-greasers to clean the kit as these can damage it. Clean with a damp sponge and neutral soap if required.
N.B.: When cleaning, to avoid water filtering through the connector and damaging the control panel, please ensure that you have placed the battery charger plug into the socket. If mounted on the helmet, leave the speaker connector connected. Kit waterproofing is only guaranteed when the connector is connected.
6 ASSISTANCE AND WARRANTY
The product is covered by a warranty in accordance with current provisions of law.
All information necessary for product assistance or spare parts can be found on our website www.interphone.cellu-larline.com.
interphone F3

(Applicable in those countries of the European Union with recycling systems)
The symbol shown on this product or on its documents indicates that the product must not be disposed of with other domestic refuse at the end of its life cycle. To avoid damage to the environment or to health caused by the inappropriate disposal of refuse, the user is requested to separate this product from other refuse and to recycle it responsibly to favour the sustainable re-use of material resources.
Domestic users are invited to contact the sales point where the product was purchased or the local office with information regarding recycling of this type of product.
Business users are invited to contact their suppliers and to check terms and conditions of purchase. This product must not be disposed of together with other commercial refuse.

This product bears the CE mark in conformity with the regulations of the R & TTE Directive (99/5/EC). Cellular Italia S.p.A. hereby declares that this product conforms to essential standards and other norms under Directive 1999/5/EC. The user is forbidden from making variations or modifications of any kind to the device. Any variations or modifications not expressly approved by Cellular Italia S.p.A. will cancel the user's authorisation for the use of the device. The Bluetooth® trademark is the property of Bluetooth SIG, Inc.
MODE D'EMPLOI
interphone F3
interphone F3
TABLE DES MATIÈRES:
INSTALLATION 30
PENDANT LA CONDUITE 30
PENDANT L'ARRET 30
FONCTIONS 30
Fonctions telephone 30
Fonctions Intercom 30
Fonctions GPS 30
CHARACTERISTIQUES 30
NOTES SUR L'AUTONOMIE 30
DESCRIPTION PRODUIT 31
CONTENU DE L'EMBALLAGE 31
1 PREMIÈRE UTILISATION 31
1.1 Recharge 31
1.2 Installation 31
MONTAGE DU SUPPORT A GLISSIERE
AVECCLIPAMOVIBLE 31
MONTAGE DU SUPPORT A GLISSIERE ADHESIF 31
FIXATION DU MODULE 32
INSTALLATION DU MICRO/ECOUTEUR 32
RETRAIT DU MODULE BLUETOOTHDU CASQUE 32
1.3 Marche / Arret 32
2 COUPLAGE 32
2.1 Telephone 32
2.2 Intercom 32
2.3 Audio GPS 33
3 UTILISATION 33
Aragon, the most powerful of the two cities. It is located in the center of the Pyrenees. It is a city located approximately 100 miles from the capital city of Barcelona. It is also located in the center of the Pyrenees. Apart from its main city, it is also located in the central region of the Pyrenees. It is located in the center of the Pyrenees.
MONTAJE DEL SOPORTE DESLIZABLE CON CLIP DESMONTABLE (7)
YCTAHOBKA DEPKATELA CO CbEMHOI KJUNCOI (7)
OnpeDenTe Han6oJee NoxDxOJaUe MeTo dny UCTaHOBKn rapHNTpybHa 7IeMe, yCTaHOBtE 3aDnIOu cAcb KINncbl BHTPN 7IeMa,a BTOpyo aCtB Ha BHeHne CTopoHe 7IeMa.
BCTaBnTb BNTbI n CnerKa 3aBHTNb IX I npoBepntb
npaBnIbHOCTb NOLOKeHn, Pn Heo6xOIMOCtN,
NEpeMeCtNb NODcTaBky, 3aTeM 3aBHTNb BHTbI pN
NOMOuN OTBePTKn, BXOJaSeB B KOMPNeKtaUNo.
IPIMMEUAHNE: IOpCTaBka IMeet TaKke aanTep nKa KOMnEHCauu BO3MOXbIX pa3JIHm TOnIHb HJNeMa.
YCTAHOBITb aadTep MEXy DByM CTOPOHAMN NOCTABKN, INCNOB3yA
interphone F3
B3aTb DepeKaTeNb, Bb6paTb Han6oOee npXoJauee MeCTO Dnla yCTaHOBKn raphHTypbl, ONUCTNTb MeCTO yCTaHOBKn Ha WlneMe (He NcNoJIb3OBaTb YNCTaIINx CpeDCTB, KOTOpBle MOrTy NOBpeDNTb OKpacky WlneMa), CHrTB 3aunTHyo IJIeHKy C DByCTopoHHeRo KNeKORO 3JeMeHTa IN yCTaHOBtB IOdCTaBky Ha WlneM.
Heo6xOIMO BHIMATEbHO BbIbpaTb MeCTO KpeJIeHnA, TAK KAK NocIe npIKNeBAHn IOnCTaBKn NepeMeCTNTb ee 6ydt HeBO3MOxHo.
KPEINJIENHE BLOKA (MOyJIA) (9)
Iocne yctahOBKn DepeKaTeHa 7JIeMe, yCTAHOBnTb 6JOK Bluetooth® no HapabJIOUeI CBepxBy BHN3
IpoBepntb npaBnHbOcTb uKcnpOBaHna 6noka Bluetooth, nonbTaBwncB BbHyTb erO, notHyB BBepx.
BLOK yCTaHaBnBaEeTcBepxBy BHN3, KaC c npaBOi, TaK n C neBOI CTopoHbI WlneMa, a CoeINHInTehBi pa3bEm dJa HayuHnka C MmKpOfoHOM DoJKeH HaxoDnTbcr Bcerda CHN3y NOd MoDyem Bluetooth°.
YCTAHOBKAДИHAMNKACMVKPOOOHOM(10)
B3aTb Kcok KpeHnHa LnNyUke (Velcro) n yctaHOBtB erO npn NOMOUs DByXCTOpOHHe LnKoJ JeHTbl BHyTpN JIema Ha ypOBHe yxa.
PIMMEUAHNE: nepekpenneHem IINKoI NeHTb JKeaTeNbHO OcyueeCTBnTb PImepky: HaeTb WJEM INOppeNtB Han6Oone NOxOJaee MeCTo DnKpeNHeHMaMKpOfoHa C HayUnHkOM.
YcTaHOBtMbMKpOfoH C HayuHnKOM Ha KpenneHne Velcro, npNKpeNHeHoe K Wemy.
Pn nmoo CoeINHtBHO rpoBa coeHNHTb yctpoCTBO C 6Iokom Bluetooth (WtbpcoeHNHTBHO npOBoA NOxOHT TOJbKO Jn OHOrO pa3bema Ha 6nKe).
U3nIuNpOBOaMOxHO CnpTaTb C BHyTpEHHe NCTOpHbI UJMa NpNpOKJaKoN.
CHRTME MOyIbLUETOOTH CO WJIEMA
ДясгетяблokaBluetooth®,нжаь HabблokиpoBouHbIMpbuharИ,дерха ergв нахатOMcoCTOHN,БытuaNTbблOKBluetooth® no HanpaBNeHIO BBepx.
1.3.BKIOUeHne/BbIKIOUeHne BKIOUeHNE
HaxaTb n depKaTb MHorOfoyHKUHOHaJIbHyIO KhoNky MFB (1) B TeueHeNe 3 cekyHd.
BpeXnme OxndaHnCBeToaNoI 6ydtMgraTb npImepHo kaxdble 5cekyH
BbIKIOYEHNE
HaxaBn depXaTb MHOROyHKUHOHaIbHyIO KONky (1), BblcblWNTe DnHHbI CNrHan, a CBETODnOd 6yDet Mrratb KpaChbIM CBETOM DO BblKlHoyehna.
2 CoBmeueHne
2.1 TeneoH
Conpexene
Moxho nCnoB3OBaTb INTERPHONE F3 BmecTe C MOhNbHbIM TelefoHom,ДЯТоTO HeoXOJMo yCTaHOBtB yCTpoCTBO BpeKIM cOnpJKeHn(cnapuBaHHa):
Iocne BbIKIOueHn INTERPHONE F3 HxKaTb N depKaTaB B HxKATOM IIOJOKeHH MHOFOyHKUHOHaJIbHyIO KHOKNy MFB Do IepemEHORO MIRaHn KpaCHOro n CnHero UBeTob B TeueHne npIMepHo 8 cekyH.
OcuyectBNTb NONCK yCTPOnCTB C TeNeoHa (CM. pyKOBoDCTBO NO EKcnnyataa TeneoHa Hn HabnraTopa).
Korda TeneoHnn HauRaTOp HaJeT yCToPcTBO INTERPHONE F3, Bb6paTb erO n BBecn uNphiPoBoN KOI -0000.
Дя OДНОВЕРЕМЕнHOrO COBMeUeHnA C MOБиЛьнБИМ TelenpoHOM n GPS-HaBnRaTOpOM CM.NYHKT 3.4.
2.2 BHytpenHcB3b (Intercom) CoBmeueHne
Iocne BbIKUeHn IByx yCTpoiCTB INTERPHONE F3 HaKaTb N depKaTb HaxaTOM NIOXKeHm MHOrOfoYHKUHOHaJIbHyO KhoNky MFB do nepemeHHoro MraHn KaPCHOro n CnHero cBeToB B TeueHne npImepHo 8 cekyHd.
Korda CBeToNDbI OboxuCTpoNCTB HauHyT NonepeMeHOMMIRaTB KpaChbIM/CnHM UBeTaMn, HaKaTb HeHaDoJrMOHorOphiYHKUHOHaJIbHyIO KHONKy MFB Ha ODNHom 3yCTPOCTB INTERPHONE F3.
Obslugiwane profile: Headset - Handsfree
TOIMINNOT (FUNCTIONS)
Puhelimen toiminnot

一元一元一元一元一元一元一元一元一元一元一元一元一元一元一元一元一元一元一元一元一元一元一元一元一元一元一元一元一元一元一元一元一元一元一元一元一元一元一元一元一元一元一元一元一
export@cellularline.com
www.cellularline.com
www.interphone.cellularline.com