K72281US - Mouse KENSINGTON - Free user manual and instructions
Find the device manual for free K72281US KENSINGTON in PDF.
User questions about K72281US KENSINGTON
0 question about this device. Answer the ones you know or ask your own.
Ask a new question about this device
Download the instructions for your Mouse in PDF format for free! Find your manual K72281US - KENSINGTON and take your electronic device back in hand. On this page are published all the documents necessary for the use of your device. K72281US by KENSINGTON.
USER MANUAL K72281US KENSINGTON
natural_image
Line drawing of a computer mouse with 'MODE' label and 'F. Kensington' on top (no additional text or symbols)
text_image
+ AA - + AA -
natural_image
Simple concentric oval diagram with no text or symbols
text_image
Kensington S & 60mlu et al. (the Mobile, T, a die all)SlimBlade™ Trackball Mouse
English....2
Français....17
Deutsch....33
Nederlands 49
Italiano....65
Español 81
Magyar 97
Čeština....113
Polski....129
Русский 145
Português....161
English
text_image
A E Versicher MOOE
text_image
B + AA - ⊕ + AA -
natural_image
Simple diagram of concentric circles inside an oval shape, labeled 'C' and 'onts' (no text or symbols within the shapes)
text_image
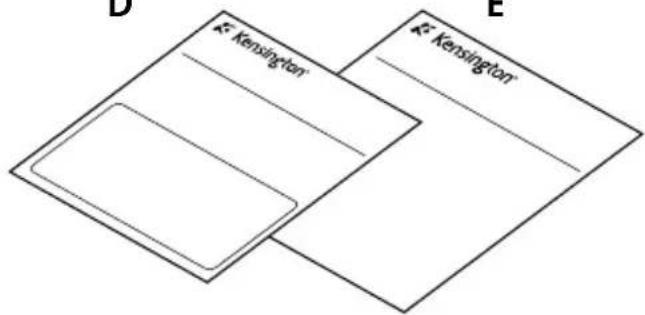
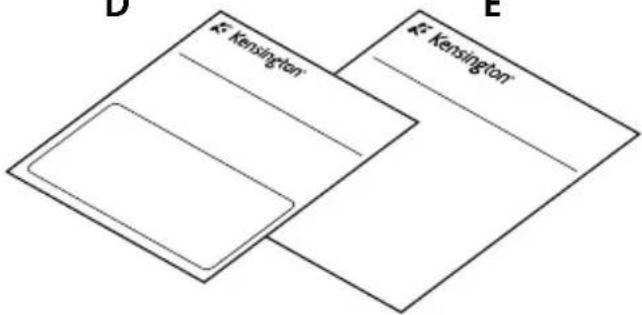
D K²-Kensington E K²-KensingtonContents
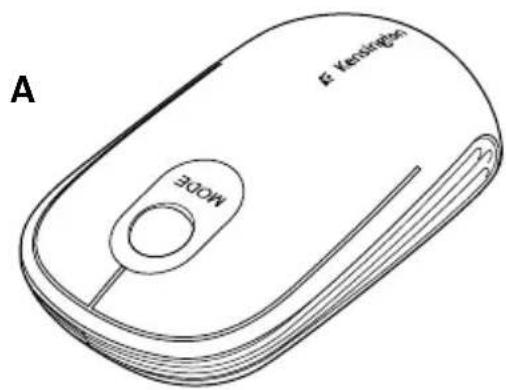
A. Trackball Mouse
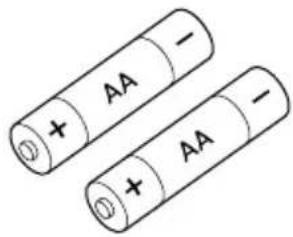
B. 2 AA Batteries
C. Mouse Driver Software CD
D. Quick Start Guide
E. Warranty Insert (contains URL for full Instruction Manual)
text_image
F G H MODE EC KENSING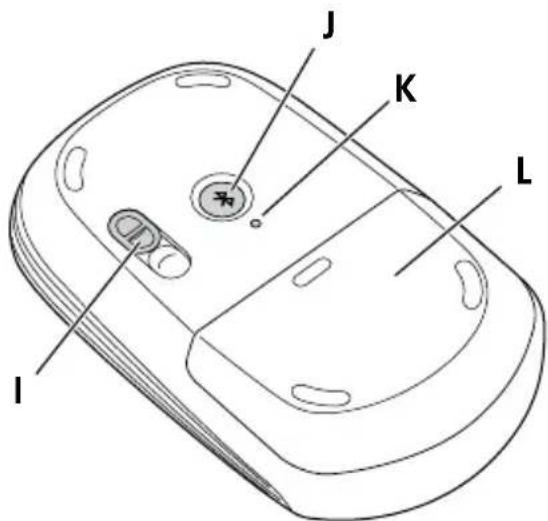
text_image
J K L IComponents
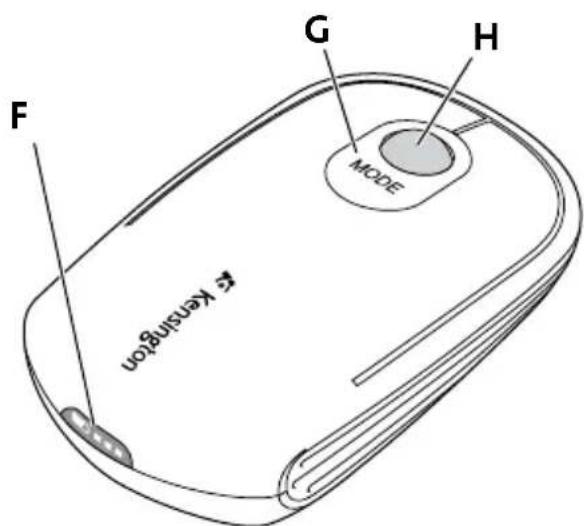
F. Fuel Gauge Indicator Lights J. Bluetooth® Discover Button
G. Mode Switch K. Bluetooth Connection Indicator Light
H. Trackball/Scroll Ball L. Battery Cover
I. Sensor Cover – Keep It Opened
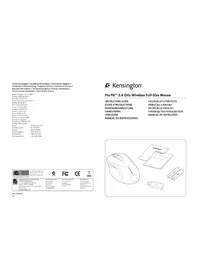
Set Up Your Mouse
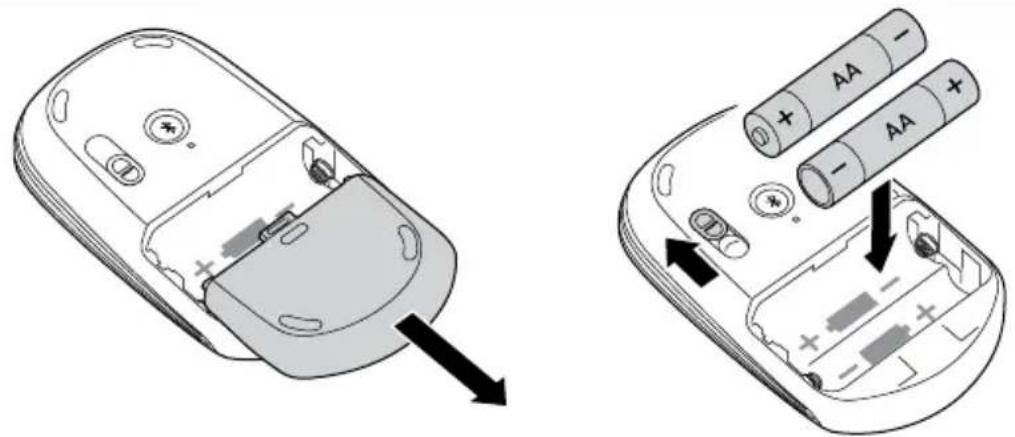
- Insert the batteries.
a. Slide the battery cover off.
b. Insert batteries, then replace the cover.
- Make sure the sensor cover is open so that the sensor can access the desktop surface correctly.
text_image
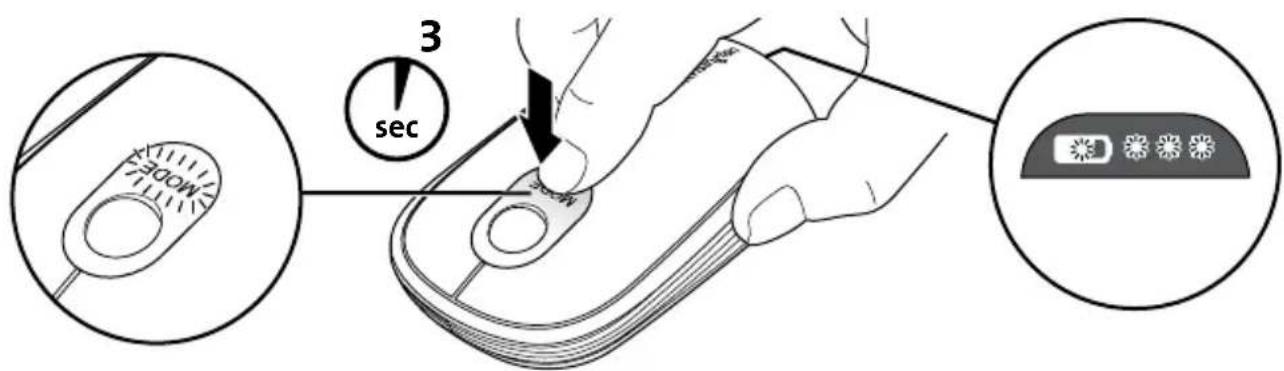
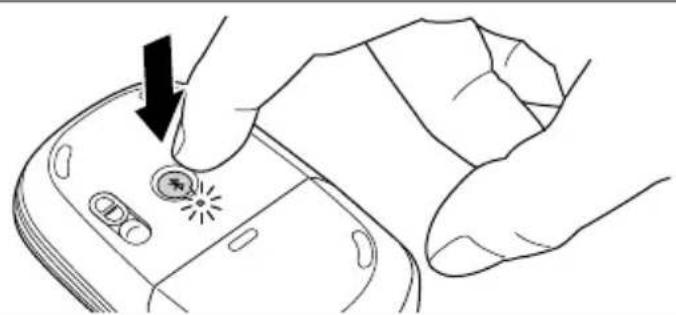
Diagram showing two views of a remote control device with battery and power supply labels- Turn on the mouse. The indicator light blinks until the finger is removed. This is necessary for your mouse to operate correctly.
text_image
3 sec MODE 1-
Connect Your Mouse to Your Bluetooth Enabled Computer Your next step is to connect your mouse to your Bluetooth enabled computer. The steps are different for different Bluetooth versions:
-
If you have a Mac® computer with OS 10.4 or later, you have the Mac Bluetooth version.
- If you have a Windows® computer and the 📋pears in the system tray, you probably have the Widcomm or Microsoft® Bluetooth version.
- If you have a Windows computer and the appears in the system tray, you probably have Toshiba Bluetooth version.
natural_image
Line drawing of a hand inserting a device into a mobile phone (no text or symbols)Widcomm
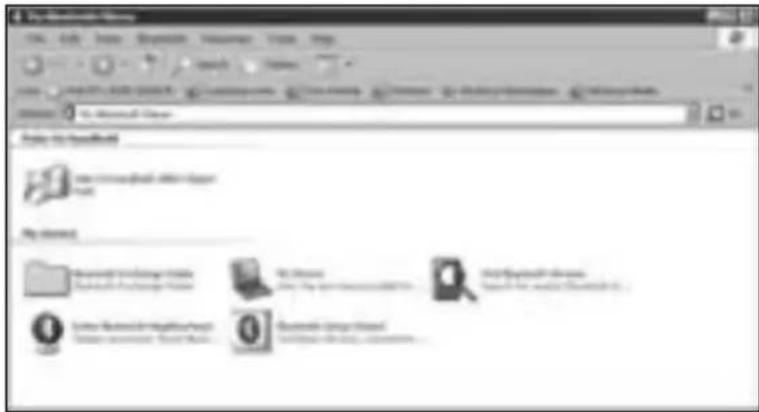
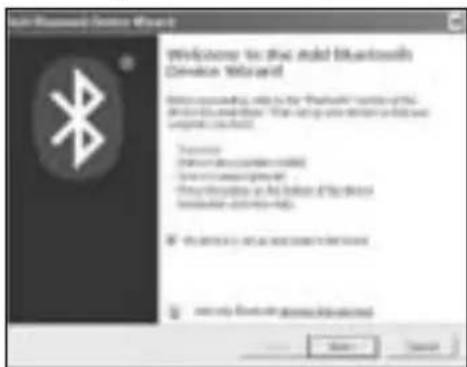
- Double-click ✪ located on your desktop or at the bottom of the screen.
- Click Bluetooth Setup Wizard.
text_image
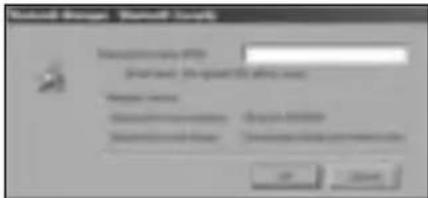
My Documents File Edit View Insert Options Help Tools Help My Documents My Documents My Documents My Documents My Documents- On your mouse, press the Discover button. The indicator light on the mouse blinks blue.
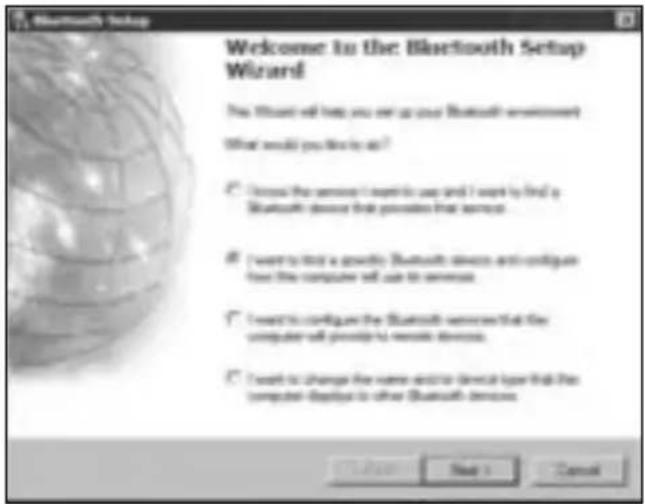
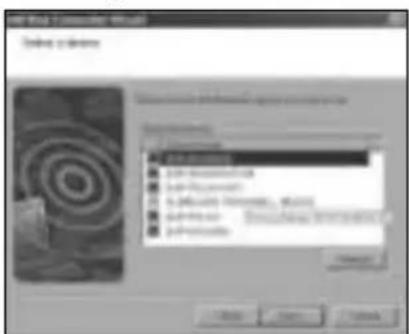
- Select I want to find a specific Bluetooth device and configure how this computer will use its services and click Next.
text_image
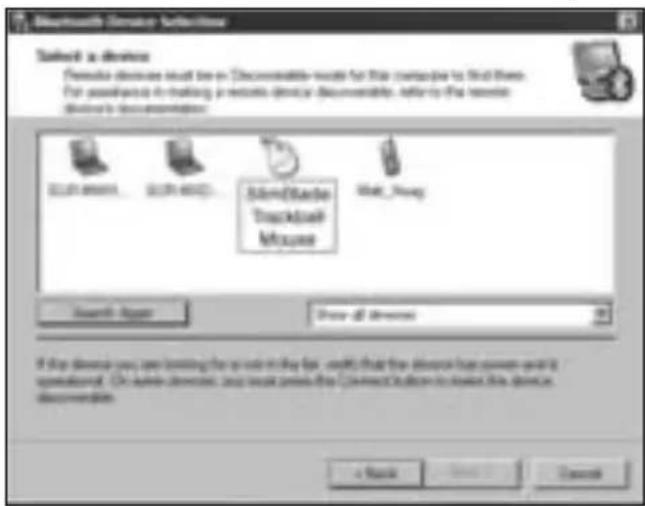
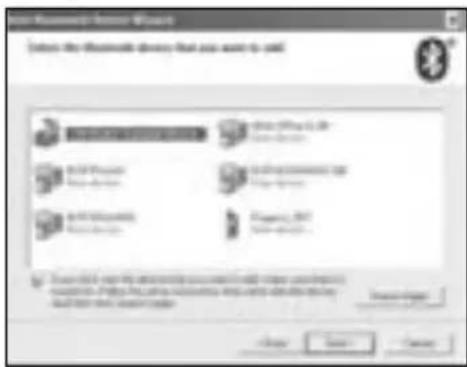
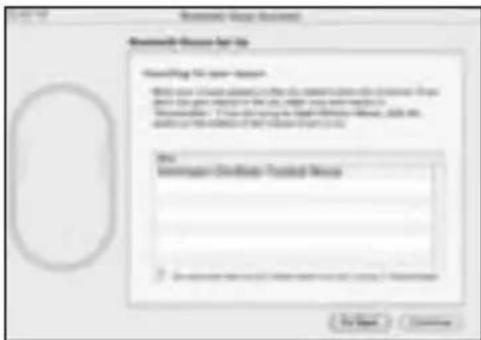
Welcome to the Bluetooth Setup Wizard This Wizard will help you set up your Bluetooth environment What would you like to do? ✓ Choose the server I want to use and I want to find a Bluetooth device that provides that server. ✓ I want to find a quarterly Bluetooth device and config an free the computer will use to server. ✓ I want to configure the Bluetooth server that the computer will provide to remote devices. ✓ I want to change the name and/or clinical type that the computer displays to other Bluetooth devices.- On the Bluetooth Device Selection screen, double-click SlimBlade Trackball Mouse.
text_image
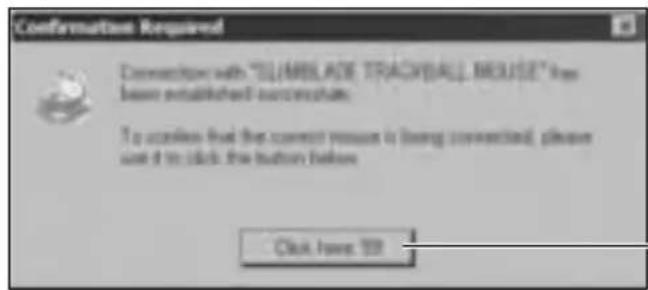
Bluetooth Devices Downloads Download as Device Female devices must be on iDecompatible works for their computer to find them. For purpose in making a wireless device discovery, refer to the remote device's documentation: © Google © IBM Microsoft Microsoft Download Microsoft Access Search - Apply Show all Devices If you download you are looking for your use in this file, we'll think that the device has come out at supplanned. On other devices, any user provides the Comcast's access to these devices disconnection. a Book Cancel- Using your SlimBlade Trackball Mouse, click to confirm selection of the mouse. The indicator light on the mouse stays solid blue for three seconds and then goes off.
text_image
Confirmation Required Connection with "ILIMBLADE TRACKBALL MOUSE" from been established connections. To access the next connection is being connected, please set it to click the button below. Click User: 100Use the SlimBlade Trackball Mouse to click on this prompt here.
- Select the SlimBlade Trackball Mouse on the Bluetooth Device Selection screen and click Next. Wait for your computer screen to display a message that the mouse is ready for use.
Toshiba®
-
Double-click 🔒 located at the bottom of the screen.
-
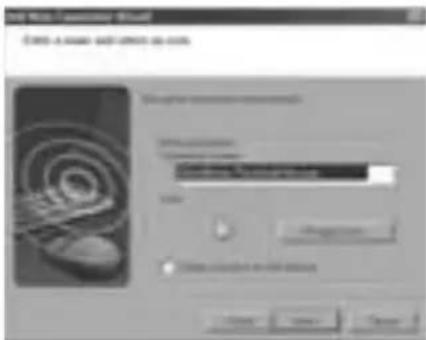
Click New Connection.
text_image
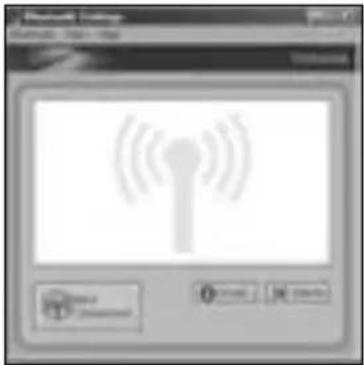
Screenshot of a wireless communication software interface showing signal icon and control buttons- Select Express Mode and click Next.
text_image
User Tools Generator Wizard Timing Options User Tools User Tools User Tools User Tools User Tools User Tools User Tools User Tools User Tools User Tools User Tools User Tools User Tools User Tools User Tools User Tools User Tools User Tools User Tools User Tools User Tools User Tools User Tools User Tools User Tools User Tools User Tools User Tools User Tools User Tools User Tools User Tools User Tools User Tools-
On your mouse, press the Discover button. The indicator light on the mouse blinks blue.
-
When a screen appears asking you to select a device, click Refresh.
Toshiba
- Select Express and click Next.
text_image
Start Menu 1: command manual This wizard will cover the entire web for Microsoft Device commands • Command the network to access to the Web (Windows) • Command the Internet to access to the Web (Windows) • Command the Internet to access to the Web (Windows) • Command the Internet to access to the Web (Windows) • Command the Internet to access to the Web (Windows) • Command the Internet to access to the Web (Windows)- If a screen appears asking for a passkey, click OK.
text_image
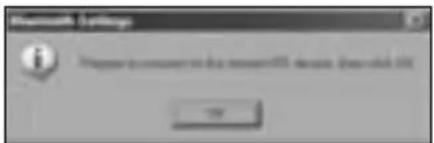
Control Group Control Book Control Book Control Book Control Book Control Book Control Book Control Book Control Book Control Book Control Book Control Book Control Book Control Book Control Book Control Book Control Book Control Book Control Book Control Book Control Book Control Book Control Book Control Book Control Book Control Book Control Book Control Book Control Book Control Book Control Book Control Book Control Book Control Book Control Book- When the Bluetooth Settings screen appears, click OK.
text_image
Microsoft Outlook I How to change this software is available in the Web OK- (Optional) Enter a name and/or select an icon for your mouse. Click Next.
text_image
Add New Product Info Add a new product with options to add Product Information Product Information Add Cancel Add Options to Add Options-
The indicator light blinks blue. Select the mouse on your computer screen, and then click Next.
-
If prompted to connect to Windows Update, click No.
-
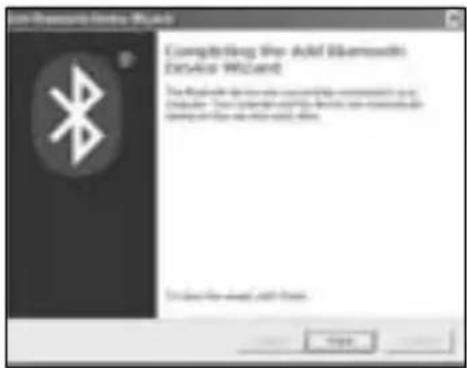
Follow the onscreen instructions to finish connecting. Click Finish.

text_image
Soft Motion Connection Wizard Casplicity the Soft Motion Connection WizardMicrosoft
-
Double-click located at the bottom of the screen.
-
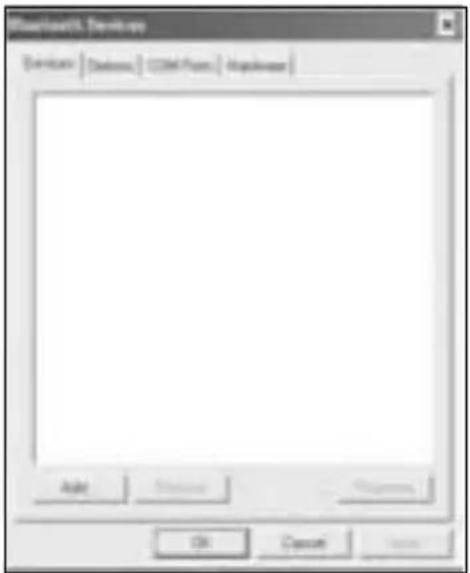
Select Add Bluetooth Device.
text_image
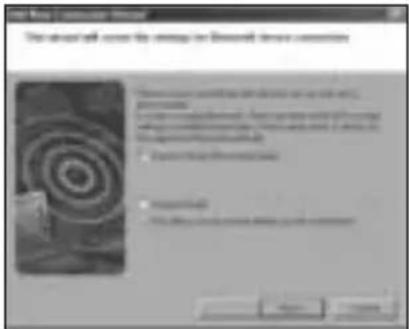
DownloadX: Develop Download | Download | CMF From | Mastercard | Apply Cancel Save- Select My device is set up and ready to be found and click Next.
text_image
Multi-Blended Bluetooth Welcome to: this multi-band Bluetooth Device Bluetooth! Description: [ ] [ ] [ ] [ ] [ ] [ ] [ ] [ ] [ ] [ ] [ ] [ ] [ ] [ ] [ ] [ ] [ ] [ ] [ ] [ ] [ ] [ ] [ ] [ ] [ ] [ ] [ ] [ ] [ ] [ ] [ ] [ ] [ ] [ ] [ ] [ ] [ ] [ ] [ ] [ ] [ ] [ ] [ ] [ ] [ ] [ ] [ ] [ ] [ ] [ ] [ ] [ ] [ ] ( ) ( ) ( ) ( ) ( ) ( ) ( ) ( ) ( ) ( ) ( ) ( ) ( ) ( ) ( ) ( ) ( ) ( ) ( ) ( ) ( ) ( ) ( ) ( ) ( ) ( ) ( ) ( ) ( ) ( ) ( ) ( ) ( ) ( ) ( ) ( ) ( ) ( ) ( ) ( ) ( ) ( ) ( ) ( ) ( ) ( ) ( ) ( ) ( ) ( ) ( ) ( ) ( ) ( ) ( ) ( ) ( ) ( ) ( ) ( ) ( ) ( ) ( ) ( ) ( ) ( ) ( ) ( ) ( ) ( ) ( ) ( ) ( ) ( ) ( ) ( ) ( ) ( ) ( ) ( ) ( ) ( ) ( ) ( ) ( ) ( ) ( ) ( ) ( ) ( ) ( ) ( ) ( ) ( ) ( ) ( ) ( ) ( ) ( ) ( ) ( ) ( ) ( ) ( ) ( ) ( ) ( ) ( ) ( ) ( ) ( ) ( ) ( ) ( ) ( ) ( ) ( ) ( ) ( ) ( ) ( ) ( ) ( ) ( ) ( ) ( ) ( ) ( ) ( ) ( ) ( ) ( ) ( ) ( ) ( ) ( ) ( ) ( ) ( ) ( ) ( ) ( ) ( ) ( ) ( ) ( ) ( ) ( ) ( ) ( ) ( ) ( ) ( ) ( ) ( ) ( ) ( ) ( ) ( ) ( ) ( ) ( ) ( ) ( ) ( ) ( ) ( ) ( ) ( ) ( ) ( ) ( ) ( ) ( ) ( ) ( ) ( ) ( ) ( ) ( ) ( ) ( ) ( ) ( ) ( ) ( ) ( ) ( ) ( )( ) ( ) ( ) ( ) ( ) ( ) ( ) ( ) ( ) ( ) ( ) ( ) ( ) ( ) ( ) ( ) ( ) ( ) ( ) ( ) ( ) ( ) ( ) ( ) ( ) ( ) ( ) ( ) ( ) ( ) ( ) ( ) ( ) ( ) ( ) ( ) ( ) ( ) ( ) ( ) ( ) ( ) ( ) ( ) ( ) ( ) ( ) ( ) ( ) ( ) ( ),-
The indicator light on the mouse blinks blue. Select the mouse on your computer screen, and then click Next.
-
The indicator light on the mouse stays solid blue for three seconds. Select the mouse on your computer screen, and then click Next.
text_image
Add Software Device Add the Software Device that you want to add Software Device 1.0 (Windows Not App) Software Device 2.0 (Windows Not App) Software Device 3.0 (Windows Not App) Software Device 4.0 (Windows Not App) Software Device 5.0 (Windows Not App) Software Device 6.0 (Windows Not App) Software Device 7.0 (Windows Not App) Software Device 8.0 (Windows Not App) Software Device 9.0 (Windows Not App) Software Device 10.0 (Windows Not App) Software Device 11.0 (Windows Not App) Software Device 12.0 (Windows Not App) Software Device 13.0 (Windows Not App) Software Device 14.0 (Windows Not App) Software Device 15.0 (Windows Not App) Software Device 16.0 (Windows Not App) Software Device 17.0 (Windows Not App) Software Device 18.0 (Windows Not App) Software Device 19.0 (Windows Not App) Software Device 20.0 (Windows Not App) Software Device 21.0 (Windows Not App) Software Device 22.0 (Windows Not App) Software Device 23.0 (Windows Not App) Software Device 24.0 (Windows Not App) Software Device 25.0 (Windows Not App) Software Device 26.0 (Windows Not App) Software Device 27.0 (Windows Not App) Software Device 28.0 (Windows Not App) Software Device 29.0 (Windows Not App) Software Device 30.0 (Windows Not App) Software Device 31.0 (Windows Not App) Software Device 32.0 (Windows Not App) Software Device 33.0 (Windows Not App) Software Device 34.0 (Windows Not App) Software Device 35.0 (Windows Not App) Software Device 36.0 (Windows Not App) Software Device 37.0 (Windows Not App) Software Device 38.0 (Windows Not App) Software Device 39.0 (Windows Not App) Software Device 40.0 (Windows Not App) Software Device 41.0 (Windows Not App) Software Device 42.0 (Windows Not App) Software Device 43.0 (Windows Not App) Software Device 44.0 (Windows Not App) Software Device 45.0 (Windows Not App) Software Device 46.0 (Windows Not App) Software Device 47.0 (Windows Not App) Software Device 48.0 (Windows Not App) Software Device 49.0 (Windows Not App) Software Device 50.0 (Windows Not App) Software Device 51.0 (Windows Not App) Software Device 52.0 (Windows Not App) Software Device 53.0 (Windows Not App) Software Device 54.0 (Windows Not App) Software Device 55.0 (Windows Not App) Software Device 56.0 (Windows Not App) Software Device 57.0 (Windows Not App) Software Device 58.0 (Windows Not App) Software Device 59.0 (Windows Not App) Software Device 60.0 (Windows Not App) Software Device 61.0 (Windows Not App) Software Device 62.0 (Windows Not App) Software Device 63.0 (Windows Not App) Software Device 64.0 (Windows Not App) Software Device 65.0 (Windows Not App) Software Device 66.0 (Windows Not App) Software Device 67.0 (Windows Not App) Software Device 68.0 (Windows Not App) Software Device 69.0 (Windows Not App) Software Device 70.0 (Windows Not App) Software Device 71.0 (Windows Not App) Software Device 72.0 (Windows Not App) Software Device 73.0 (Windows Not App) Software Device 74.0 (Windows Not App) Software Device 75.0 (Windows Not App) Software Device 76.0 (Windows Not App) Software Device 77.0 (Windows Not App) Software Device 78.0 (Windows Not App) Software Device 79.0 (Windows Not App) Software Device 80.0 (Windows Not App) Software Device 81.0 (Windows Not App) Software Device 82.0 (Windows Not App) Software Device 83.0 (Windows Not App) Software Device 84.0 (Windows Not App) Software Device 85.0 (Windows Not App) Software Device 86.0 (Windows Not App) Software Device 87.0 (Windows Not App) Software Device 88.0 (Windows Not App) Software Device 89.0 (Windows Not App) Software Device 90.0 (Windows Not App) Software Device 91.0 (Windows Not App) Software Device 92.0 (Windows Not App) Software Device 93.0 (Windows Not App) Software Device 94.0 (Windows Not App) Software Device 95.0 (Windows Not App) Software Device 96.0 (Windows Not App) Software Device 97.0 (Windows Not App) Software Device 98.0 (Windows Not App) Software Device 99.0 (Windows Not App) Software Device 100.0 (Windows Not App)Microsoft
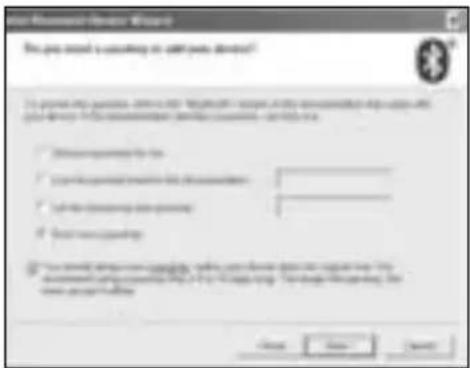
- Select Don't use a passkey and click Next.
text_image
User Information Privacy Wizard This key needs to access your own rights reserved? ■ If you want to access your rights reserved, then you can access your own rights reserved. You can access your own rights reserved. You can access your own rights reserved. ■ Allow permission to access ■ Allow permission to access your rights reserved. ■ Allow permission to access your rights reserved. ■ Allow permission to access your rights reserved. ■ Allow permission to access your rights reserved. ■ Allow permission to access your rights reserved. ■ Allow permission to access your rights reserved. ■ Allow permission to access your rights reserved. ■ Allow permission to access your rights reserved. ■ Allow permission to access your rights reserved. ■ Allow permission to access your rights reserved. ■ Allow permission to access your rights reserved. ■ Allow permission to access your rights reserved. □ Yes Next Cancel Apply- Click Finish.
text_image
Compositing the Award Bluetooth license The Award is required to complete the license requirement. You can file your own website: https://www.800000.com © 2016-03-25 (http://www.800000.com)Mac
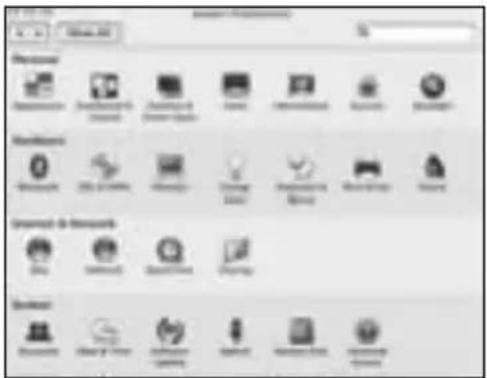
- Click located in the top-left corner of the screen.
- Click System Preferences, then click
text_image
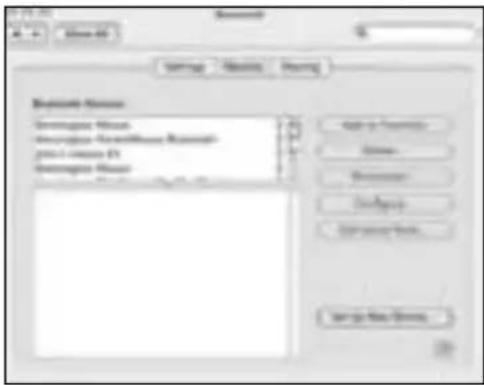
Screenshot of a macOS desktop application's File Explorer showing the installed folder icons with Chinese labels.- Click Set Up New Devices.
text_image
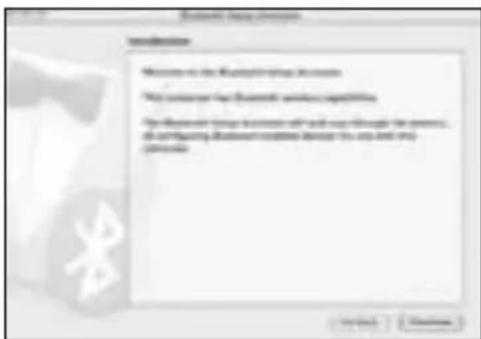
Browse Status Generate Status Generate New Status Create a new Status Generate Status Add to Customize... Delete... Remove... Delete... Remove Path... Save as New Status...- Click Continue.
text_image
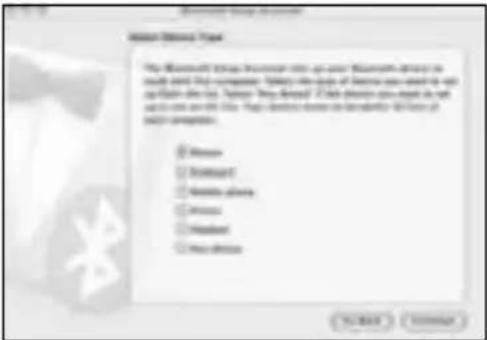
System Help Options Welcome to the Wireless Link This browser has Bluetooth network capabilities My network links to a server with help enough for access, all configuring Bluetooth network to this link and WiFi products.- Select Mouse from the device list, and click Continue.
text_image
Microsoft Group Microsoft Group System The Microsoft Group is not up your Microsoft Group to create any other computer. You can use the basic Web design tools to build a new desktop file. However, you should use this file in the Internet Explorer (IIS) or any other web design tool. You can use the old Web design tool as a new desktop file. You can use the old Web design tool as a new desktop file. You can use the old Web design tool as a new desktop file. You can use the old Web design tool as a new desktop file. You can use the old Web design tool as a new desktop file. You can use the old Web design tool as a new desktop file. You can use the old Web design tool as a new desktop file. You can use the old Web design tool as a new desktop file. YOU can use the old Web design tool as a new desktop file. You can use the old Web design tool as a new desktop file. You can use the old Web design tool as a new desktop file. You can use the old Web design tool as a new desktop file. You can use the old Web design tool as a new desktop file. You can use the old Web design tool as a new desktop file. You can use the old Web design tool as a new desktop file. You can使用此程序。 □ Remove □ Remove □ Remove buttons □ Remove □ Remove □ None N/A N/A N/A N/A N/A N/A N/A N/A N/A N/A N/A N/A N/A N/A N/A N/A N/A N/A N/A N/A N/A N/A N/A N/A N/A N/A N/A N/A N/A N/A N/A N/A N/A N/A N/1000000-
On your mouse, press the Discover button.
-
The indicator light on the mouse blinks blue. Kensington SlimBlade Trackball Mouse appears on your computer screen. Click Continue.
text_image
Microsoft Group Annual Microsoft Group Annual Building for year-tax With our current year-tax rate, we have been adjusted to the annual income tax. the year-tax rate is 100% (with 200% of the year-tax rate). The annual income tax rate is 100% (with 200% of the year-tax rate). All other years are estimated from the year-tax rate. Our annual income tax rate is 100%. We have been estimated from the year-tax rate. For next < BackMac
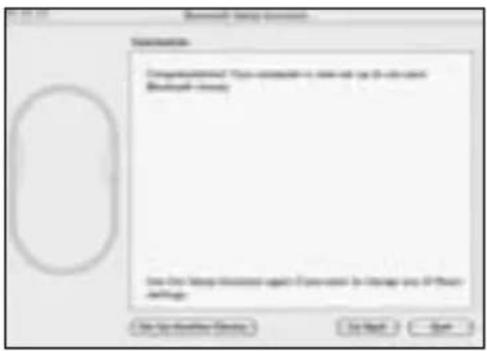
- On the Conclusion screen, click Quit.
text_image
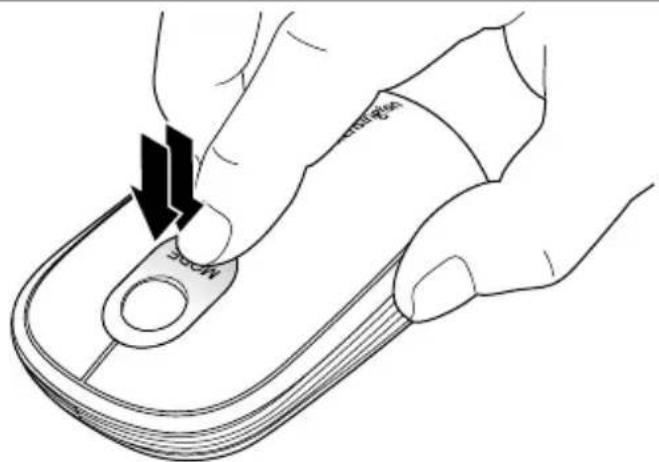
Microsoft Setup Options Configuration: configurations: "This is recommended to use all your own network. Microsoft's network" Use the setup location again if you want to manage your network. Use the network location Do not Start... Do Next SaveTurning Your Mouse On and Off
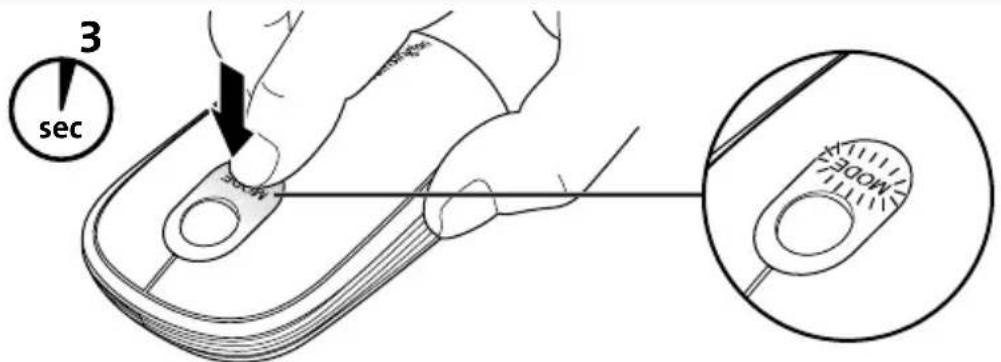
NOTE: We recommend turning your mouse off when you are traveling to conserve battery life. To turn your mouse on or off, single click and hold the mode switch for 3 seconds. The mode indicator light flashes once per second until you release the mode switch.
text_image
3 secNOTE: When you turn your mouse on, it remains in the last mode you were using: desktop mouse mode or trackball mode (see "Using Trackball Mode," below).
When your mouse has been sitting idle, it goes into "sleep" mode. To wake up the mouse, do any of the following:
• In desktop mouse mode, move the mouse.
• In trackball mode, roll the trackball.
- In either mode, click the left or right mouse button.
natural_image
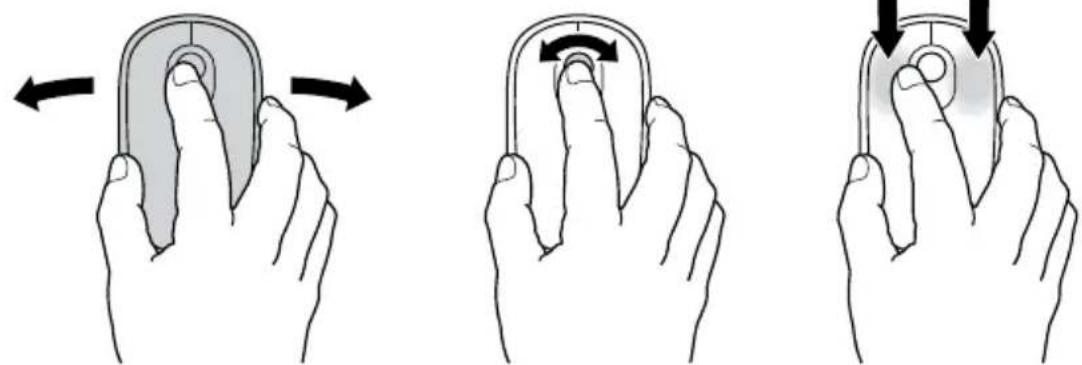
Three hand gestures demonstrating finger movement on a computer mouse (no text or symbols)Mouse vs. Trackball Mode
Your SlimBlade Trackball Mouse offers two modes:
Mouse mode. This is the standard mode, in which your SlimBlade Trackball Mouse works like any other desktop mouse.
To switch between desktop mouse mode and trackball mode, double-click the mode switch. The mode indicator light flashes once.
text_image
MOSTrackball mode. In this mode, only the trackball of your SlimBlade Trackball Mouse is activated. You can switch to trackball mode when you have limited room on your desktop, or when the mouse functions do not work well on a particular surface.
Trackball mode offers the following features:
- Roll the trackball to move the cursor onscreen.
• To scroll the screen, move the cursor to the onscreen scroll bar and click the mode switch. - To click and drag an item, place the cursor on the item and single click the mode switch to select it. Roll the trackball to move the item to the location you want. Single click the mode switch again to release the item.
- To select text—for example, to cut or copy text—place the cursor at the beginning of the text and single click the mode switch. Roll the trackball to highlight the text you want. Single click the mode switch when all of the text is highlighted.
Checking the Battery Level
The fuel gauge lights include a battery icon and three square light indicators. The lights come on after turning on the mouse, inserting batteries, or reconnecting to your computer and stay lit for approximately 5 seconds.
The lights indicate battery charge level, as follows:
| If any light is lit green | 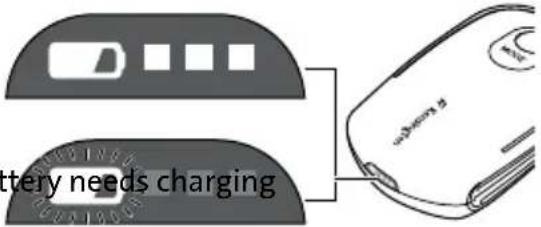 | Battery is fine |
| Battery icon flashes red Ba |
If the battery reaches an extremely low power state, the mouse turns off.
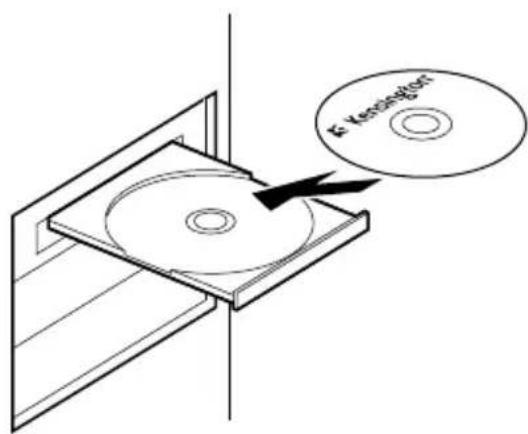
Install the Mouse Driver Software
The 360-degree scrolling functionality enables you to scroll horizontally and vertically simultaneously (360-degree scrolling) onscreen using your mouse. If you are using a Mac computer or a Windows computer running the Vista operating system, the 360-degree scrolling functionality works automatically. If you are using a Windows computer running the XP operating system, follow these steps to install the 360-degree scrolling software.
- Insert the CD into your computer's drive.
text_image
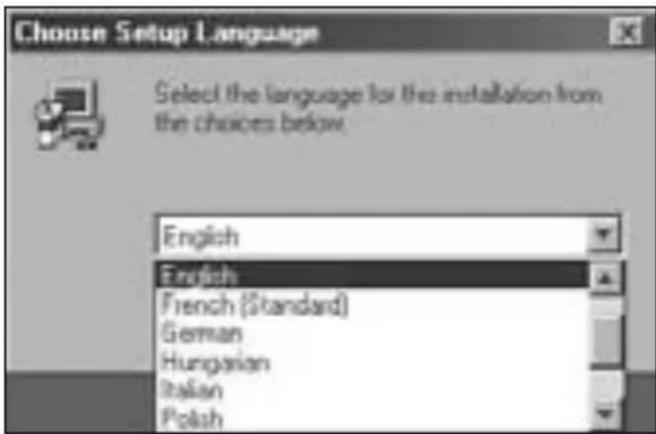
K- Kensington- Select the language you want to use. and click Next.
text_image
Choose Setup Language Select the language for the installation from the choices below. English English French (Standard) German Hungarian Italian Polish- Exit all applications and click Next.
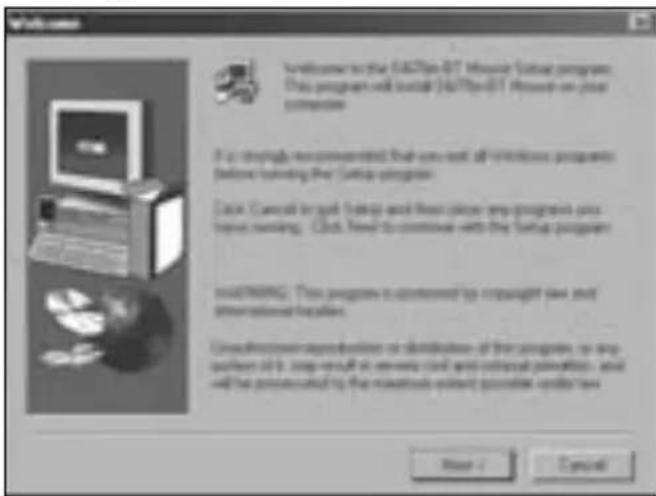
text_image
Welcome to the 6470pi-01 Mouse Startup program This program will install 6470pi-01 Mouse on your computer If it is strongly recommended that you are all wireless programs before launching the Startup program. Data: Cancel to get Setup and then select any programs on these running. Click Next to continue with the Startup program USEUMING: This program is implemented by copyright law and other options for files. Use blockchain applications or distributions of this program, so any number of items can result in remote client and external permission, and will be protected by the mobile network provider under law. Next > Cancel- Follow the onscreen installation instructions.
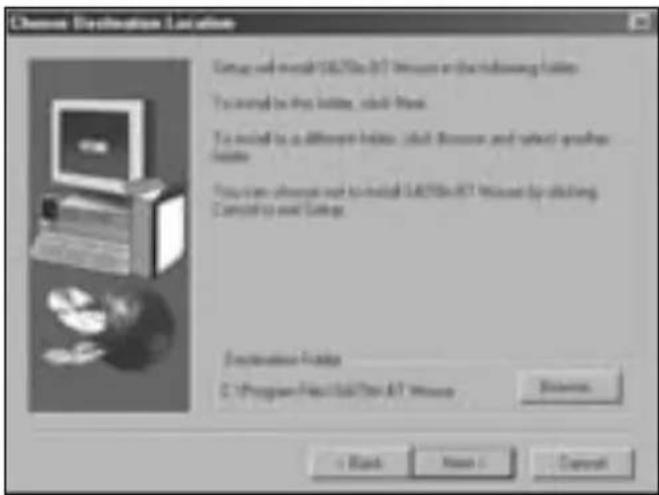
text_image
Channel Destination Location Setup will install LADTSin A&T Windows on the following location. To install this site, call-back. To install it as different locations, call-down, and select any other location. You can also install or install LADTSin A&T Windows by clicking. Cancel up and Settings. Destination Location C:\Program Files\LADTSin A&T Windows Browse + Back Next < Next- When installation is complete, remove the CD from your computer's drive and click Re-start your computer.

text_image
F- Vessington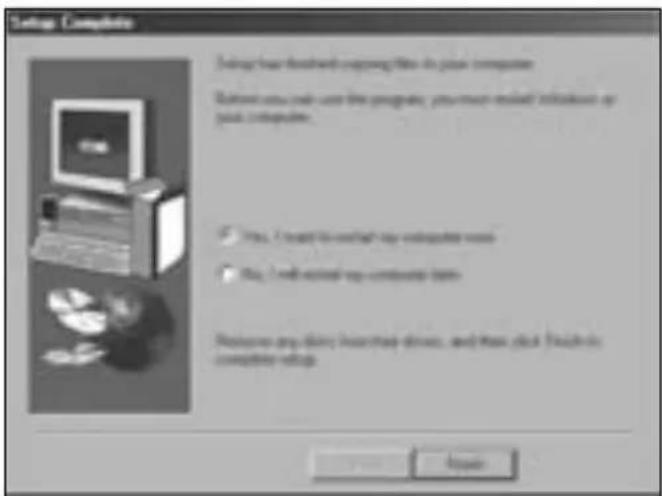
text_image
Setup Complete Setup has closed enough files in your computer. Return you next user the program, you must install instructions or your computer. ✓ Yes, I need to switch your computer next ✓ No, I will install your computer next Welcome any diary inserted drive, and then click 'Finish' to complete setup.Your mouse is now ready to use with the 360-degree scrolling functionality.
IMPORTANT: Computer User Health Information
In recent years, medical attention on occupational injuries has identified normal, seemingly harmless activities as a potential cause of a wide range of problems collectively known as Repetitive Stress Injuries (RSI) or Cumulative Trauma Disorders (CTD). It is now recognized that any repetitive motion may contribute to these health problems. As a computer user, you might also be at risk.
By paying attention to the way you perform your work, use your computer and phone, play sports, and work around the house, you can identify the behaviors that may be putting you at risk. If you experience pain, swelling, numbness, or weakness in your wrists or hands (especially during sleep), see your physician immediately. These symptoms could mean that you are developing a repetitive stress injury that requires prompt medical attention. For more detailed information, consult your doctor.
Troubleshooting
- Make sure to use fresh batteries and to insert them correctly into the mouse.
- Make sure that the sensor cover is open.
- Make sure that your computer's Bluetooth technology is turned on.
- Try moving the mouse closer to the computer.
- Make sure that there are no other Bluetooth devices in discover mode.
- On a Windows computer, refer to the Bluetooth software help guide to ensure that Bluetooth is working properly. The computer must be running a version of Bluetooth for Windows XP that supports input devices (mice and keyboards).
- On a Mac computer, click the Bluetooth icon on the System Preferences screen. Refer to the Apple Bluetooth help file to ensure Bluetooth is working properly.
- No icon? Go to http://bluetooth.com/Bluetooth/Connect/Devices/Finding_Your_Bluetooth_PC_Stack.html for instructions on finding your Bluetooth version.
NOTE: If you are using your mouse with a Bluetooth adapter, wait a few seconds after inserting the adapter into your computer. Your mouse should work normally with the adapter after they have been connected.
Also, if your computer is just turned on or waking up, after a few seconds your mouse should work normally with the computer after they have been connected.
Technical Support
Technical support is available to all registered users of Kensington products. There is no charge for technical support except the cost of the phone call, and long distance charges where applicable.
Technical Support Contact information can be found on the back page of this manual.
Web Support
You may find the answer to your problem in the Frequently Asked Questions (FAQ) section of the
Support area on the Kensington Website: www.support.kensington.com
Telephone Support
There is no charge for technical support except long-distance charges where applicable. Please visit www.kensington.com for telephone support hours. In Europe, technical support is available by telephone Monday to Friday 0900 to 2100.
Please note the following when calling support:
- Call from a phone where you have access to your mouse.
-
Be prepared to provide the following information:
– Name, address, and telephone number
– Name of the Kensington product -
Make and model of your computer
– System software and version
– Symptoms of the problem and what led to them
France 01 70 20 00 41
Hungary 20 9430 612
Ireland 01 601 1163
Italia 02 4827 1154
México 55 15 00 57 00
CLASS 1 LASER SAFETY STATEMENT:

This laser device complies with international standard IEC 60825-1: 2001-08, class 1 laser product and also Comply with 21 CFR 1040.10 and 1040.11 except for deviation pursuant to Laser Notice No. 50 dated 7/2001:
- Emission of a parallel beam of infrared user-invisible light
- Maximum power of 716 microwatts CW, wavelength range 832-865 nanometers
- Operating temperate between 0^ C ( 32^ F) to 40^ C ( 104^ F).
While the Class 1 laser in this product is safe under normal use, the laser beam (which is invisible to the human eye, but emitted from the bottom of the mouse) should not be pointed at anyone's eyes.)
CAUTION: This device has no serviceable parts. Use of controls or adjustments or performance of procedures other than those specified herein may result in hazardous radiation exposure.
SAFETY AND USAGE GUIDELINES
- In the absence of proper operation and if customer-initiated troubleshooting is unsuccessful, switch off the device and call Kensington technical support.
- Do not disassemble this product or expose it to liquid, humidity, moisture, or temperatures outside the specified operating ranges of 0 deg C (32 deg F) to 40 deg C (104 deg F).
- If your product is exposed to out-of-range temperatures, switch it off and allow temperature to return to the normal operating range.
FIVE-YEAR LIMITED WARRANTY
KENSINGTON COMPUTER PRODUCTS GROUP ("KENSINGTON") warrants this product against defects in material and workmanship under normal use and service for five years from the original date of purchase. KENSINGTON, at its option, shall repair or replace the defective unit covered by this warranty. Please retain the dated sales receipt as evidence of the date of purchase. You will need it for any warranty service. In order to keep this limited warranty in effect, the product must have been handled and used as prescribed in the instructions accompanying this warranty. This limited warranty does not cover any damage due to accident, misuse, abuse or negligence. This limited warranty is valid only if the product is used with the equipment specified on the product box. Please check product box for details or call KENSINGTON technical support. This warranty does not affect any other legal rights you may have by operation of law. Contact KENSINGTON at www.support.kensington.com or at one of the technical support numbers listed below for warranty service procedures.
DISCLAIMER OF WARRANTY
EXCEPT FOR THE LIMITED WARRANTY PROVIDED HEREIN, TO THE EXTENT PERMITTED BY LAW, KENSINGTON DISCLAIMS ALL WARRANTIES, EXPRESS OR IMPLIED, INCLUDING ALL WARRANTIES OF MERCHANTABILITY AND/OR FITNESS FOR A PARTICULAR PURPOSE. TO THE EXTENT THAT ANY IMPLIED WARRANTIES MAY NONETHELESS EXIST BY OPERATION OF
LAW, ANY SUCH WARRANTIES ARE LIMITED TO FOUR YEARS. SOME STATES/PROVINCES DO NOT ALLOW LIMITATIONS ON HOW LONG AN IMPLIED WARRANTY LASTS, SO THE ABOVE LIMITATIONS MAY NOT APPLY TO YOU.
LIMITATION OF LIABILITY
REPAIR OR REPLACEMENT OF THIS PRODUCT, AS PROVIDED HEREIN, IS YOUR EXCLUSIVE REMEDY. KENSINGTON SHALL NOT BE LIABLE FOR ANY SPECIAL, INCIDENTAL OR CONSEQUENTIAL DAMAGES, INCLUDING, BUT NOT LIMITED TO, LOST REVENUES, LOST PROFITS, LOSS OF USE OF SOFTWARE, LOSS OR RECOVERY OF DATA, RENTAL OF REPLACEMENT EQUIPMENT, DOWNTIME, DAMAGE TO PROPERTY, AND THIRD-PARTY CLAIMS, ARISING OUT OF ANY THEORY OF RECOVERY, INCLUDING WARRANTY, CONTRACT, STATUTORY OR TORT. NOTWITHSTANDING THE TERM OF ANY LIMITED WARRANTY OR ANY WARRANTY IMPLIED BY LAW, OR IN THE EVENT THAT ANY LIMITED WARRANTY FAILS OF ITS ESSENTIAL PURPOSE, IN NO EVENT WILL KENSINGTON'S ENTIRE LIABILITY EXCEED THE PURCHASE PRICE OF THIS PRODUCT. SOME STATES/COUNTIES DO NOT ALLOW THE EXCLUSION OR LIMITATION OF INCIDENTAL OR CONSEQUENTIAL DAMAGES, SO THE ABOVE LIMITATION OR EXCLUSION MAY NOT APPLY TO YOU. THIS WARRANTY GIVES YOU SPECIFIC LEGAL RIGHTS AND YOU MAY ALSO HAVE OTHER RIGHTS THAT VARY FROM STATE TO STATE AND PROVINCE TO PROVINCE.
RF TECHNICAL SPECIFICATIONS
RF Frequency 2.4-2.4835 GHz
FCC RADIATION EXPOSURE STATEMENT
This equipment complies with FCC radiation exposure limits set forth for an uncontrolled environment. End users must follow the specific operating instructions for satisfying RF exposure compliance. This transmitter must not be co-located or operating in conjunction with any other antenna or transmitter.
FEDERAL COMMUNICATION COMMISSION INTERFERENCE STATEMENT
Note: This equipment has been tested and found to comply with the limits for a Class B digital device, Pursuant to Part 15 of the FCC Rules. These limits are designed to provide reasonable protection against harmful interference in a residential installation. This equipment generates, uses and can radiate radio frequency energy and, if not installed and used in accordance with the instructions, may cause harmful interference to radio communications. However, there is no guarantee that interference will not occur in a particular installation. If this equipment does cause harmful interference to radio or television reception, which can be determined by turning the equipment off and on, the user is encouraged to try to correct the interference by one or more of the following measures:
- Reorient or relocate the receiving antenna
- Increase the separation between the equipment and receiver
- Connect the equipment into an outlet on a circuit different from that to which the receiver is connected
- Consult the dealer or an experienced radio/TV technician for help
MODIFICATIONS: Any changes or modifications not expressly approved by Kensington could void the user's authority to operate the equipment.
FCC DECLARATION OF CONFORMITY STATEMENT
This product complies with Part 15 of the FCC rules. Operation is subject to the following two conditions:
(1) This device may not cause harmful interference, and (2) This device must accept any interference received, including interference that may cause undesired operation. As defined in Section 2.909 of the FCC Rules, the responsible party for this device is Kensington Computer Product Group, 333 Twin Dolphin Drive, Redwood Shores, CA 94065, USA.
INDUSTRY CANADA CONFORMITY
This device has been tested and found to comply with the limits specified in RSS-210. Operation is subject to the following two conditions: (1) This device may not cause interference, and (2) This device must accept any interference, including interference that may cause undesired operation of the device.
This Class [B] digital apparatus complies with Canadian ICES-003.
CE DECLARATION OF CONFORMITY
Kensington declares that this product is in compliance with the essential requirements and other relevant provisions of applicable EC directives.
For Europe, a copy of the Declaration of Conformity for this product may be obtained by clicking on the ‘Compliance Documentation’ link at www.support.kensington.com
INFORMATION FOR EU MEMBER-STATES ONLY

The use of the symbol indicates that this product may not be treated as household waste. By ensuring this product is disposed of correctly, you will help prevent potential negative consequences for the environment and human health, which could otherwise be caused by inappropriate waste handling of this product. For more detailed information about recycling of this product, please contact your local city office, your household waste disposal service, or the shop where you purchased the product.
Kensington and ACCO are registered trademarks of ACCO Brands. SlimBlade is a trademark of ACCO Brands. The Kensington Promise is a service mark of ACCO Brands. All other trademarks are the property of their respective owners. Patents pending.
© 2007 Kensington Computer Products Group, a division of ACCO Brands. Any unauthorized copying, duplicating, or other reproduction of the contents hereof is prohibited without written consent from Kensington Computer Products Group. All rights reserved. 4/07
Français

text_image
A E Verskeber MOOE
text_image
B + AA - ⊕ + AA -
natural_image
Simple diagram of concentric circles inside an oval shape, labeled 'c' and 'onu' (no text or symbols within the shapes)
text_image
D K²-Kensington E K²-KensingtonContenu
natural_image
Two views of a mobile phone casing showing internal components and battery arrangement (no text or symbols)natural_image
Line drawing of a hand holding a mobile phone with a black arrow pointing to the screen (no text or symbols present)Widcomm
text_image
Screenshot of a software interface with menu bar and toolbar icons labeled in Chinesetext_image
Browse Blocks and installable Comweeks Browse Blocks and installable Comweeks Browse Blocks and installable Comweeks Browse Blocks and installable Comweeks Browse Blocks and installable Comweeks Browse Blocks and installable Comweeks Browse Blocks and installable Comweeks Browse Blocks and installable Comweeks Browse Blocks and installable Comweeks Browse Blocks and installable Comweeks Browse Blocks and installable Comweeks Browse Blocks and installable Comweeks Browse Blocks and installable Comweeks Browse Blocks and Install Browse Blocks and Install Browse Blocks and Install Browse Blocks and Install Browse Blocks and Install Browse Blocks and Install Browse Blocks and Install Browse Blocks and Install Browse Blocks and Install Browse Blocks and Install Browse Blocks and Install Browse Blocks and Install Browse Blocks and Install Browse Blocks and Install Browse Blocks and Install Browse Blocks and Install Browse Blocks and Install Browse Blocks and Install Browse Blocks and Install Browse Blocks and Install Browse Blocks and Instaltext_image
Investment Options and Controls & Controls Find information and the availability type for information on investment platforms. Details: 1. Use a specific format (e.g., email, phone, or email address) to access information from an older user. For further details, you can access your own website (http://www.xcma.com/) Target: All user accounts □ Select key options □ Select key options (if any specific options are available)text_image
File selection manager - File type: (Windows) File selection tools: (FBS) [ ] 保存所有文件 (FBS) 文件 Presets to choose this file Choose to any other file Form to access the file <|vision_start|> success to access the file Browse from all files Browse from all files OK Canceltext_image
Scanned screenshot of a software dialog box with Chinese text and a 'OK' buttontext_image
Software Update: 3x. smooth - master Edit up data to different ways else Software Update: 3x. smooth - master User OK Cancel OK Canceltext_image
Microsoft Windows 2007 Get at Microsoft Office as new software version Microsoft Windows 2007 - 10.0000000000000000000000000000000000000000000000000000000000000000000000000000000000000000000000000000Microsoft
text_image
Averschelt Wizard the symphrenique Bluetooth Welcome to the following: wireless by your "Bluetooth" file in connection to the symphrenique. You will access any other information on the website. Download: Download to the website via a link to the website. Download to the website via a link to the website. Download to the website via a link to the website. © 2016 symphrenique is installed at http://www.elsevier.com/ © 2016 symphrenique is installed at http://www.elsevier.com/ Properties are to be displayed in this context.text_image
Product name: Microsoft - 2016 Description: □ Product name is the product name. □ Product name is the product name. This product is not used in this case. □ Product name is the product name. This product is not used in this case. □ Product name is the product name. This product is not used in this case. □ Product name is the product name. This product is not used in this case.text_image
Fin de l'Automotive Aplicat de persynapiere Bluetooth This is a version of 1990-2000. You can access to this device in your computer system. This is a version of 1990-2000. You can access to this device in your computer system.Mac
text_image
Screenshot of a macOS desktop interface showing various application icons and settings.
Mac
text_image
Search Form Search Format Save and Transport Export Write out from Cancel Modify to press any To help search OKtext_image
Microsoft Office Microsoft Office - Microsoft Office Use Windows Explorer as Microsoft Office (MS) or Microsoft Internet Explorer (MS) • Copyright - Change Microsoft Office's website: https://www.microsoft.com/ • Applications for the use of Microsoft Office's website: https://www.microsoft.com/text_image
Detection package Description Allowing a 100% configuration and improvement to allow your access to the product. Allow the configuration to choose the product.natural_image
Illustration of a hand pressing a button on a computer mouse (no text or symbols)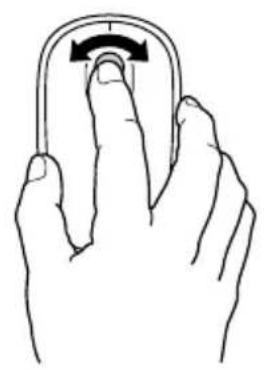
natural_image
Line drawing of a hand holding a curved object with an arrow indicating rotation (no text or symbols)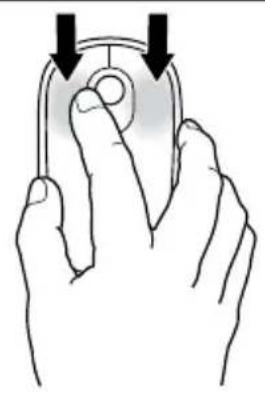
natural_image
Illustration of a hand holding a computer mouse with a scroll wheel (no text or symbols)text_image
F- Vansingtontext_image
E- Transmission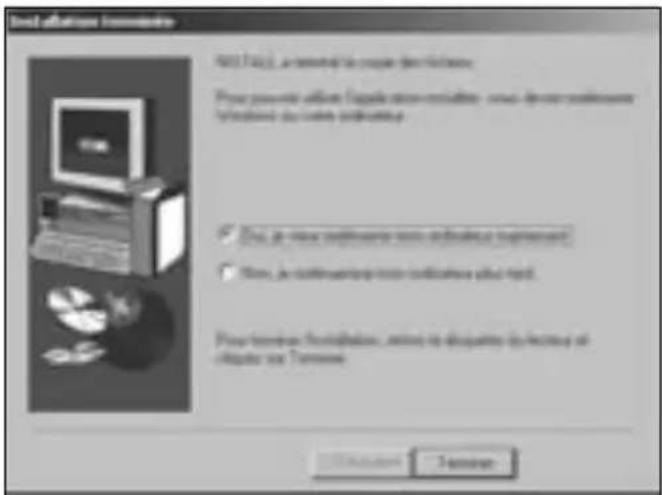
text_image
Test infrastructure requirements Not Applicable, a terminal to create new features. Please provide available 'Package version' or other device components (Windows) to build software. ✓ Init. je new software now installed requirement? ✓ New. je not using the tool to install your print. Pour remote configuration, unless it excludes any other items or terms.Assistance technique
France 01 70 20 00 41
Hungary 20 9430 612
Ireland 01 601 1163
Italia 02 4827 1154
México 55 15 00 57 00
DÉCLARATION DE CONFORMITÉ FCC
DÉCLARATION DE CONFORMITÉ CE
natural_image
Line drawing of a computer mouse with 'MOOE' label and 'E Versicher' branding (no additional text or symbols)B

text_image
+ AA - + AA -C

natural_image
Simple diagram of concentric circles inside an oval shape (no text or symbols)D

text_image
D K: Kensington E K: KensingtonE
Inhalt
text_image
Diagram showing two views of a remote control device with battery pack and power supply, highlighting internal components.natural_image
Line drawing of a hand pressing down on a mobile phone's screen with a black arrow indicating the action (no text or symbols present)Widcomm
text_image
Screenshot of a legacy software interface with menu bar, toolbar, and tool icons for file operations and search functions.text_image
Wilkommen beim Bluetooth Setup-Assisterten Dana: Document 101-Program Files (Custatin) über Bluetooth-Assignung How much less than 5% • If a number of devices, the other number of devices and products are Bluetooth-based, the other number of devices inigung shall. • If a number of devices, the other number of devices and products are Bluetooth-based, the other number of devices and products are inigung shall. • If a number of devices, the other number of devices and products are Bluetooth-based, the other number of devices and products are inigung shall. • If a number of devices, the other number of devices and products are Bluetooth-based, the other number of devices and products are inigung shall. System 1 System 2 System 3text_image
Screenshot of a legacy Windows application window displaying a wireless signal icon with 'W' and signal waves.text_image
Screenshot of a software dialog box with Chinese text and a button, likely from an older software interface.text_image
Bluetooth Series Options Options USB-Select/Remove Macintosh Blockumen Add to Remove Edit... Delete... Save... Helptext_image
Microsoft Azure Ethernet Explorer VLAN command Use the network to access the network to the Internet Use the network to access the Internet Use the network to access the Internet Use the network to access the Internet Use the network to access the Internet Use the network to access the Internet Use the network to access the Internet Use the network to access the Internet Use the network to access the Internet Use the network to access the Internet Use the network to access the Internet Use the network to access the Internet Use the network to access the Internet Use the network to access the Internet Do you want to access the Internet Do you want to access the Internet Do you want to access the Internet Do you want to access the Internet Do you want to access the Internet Do you want to access the Internet Do you want to access the Internet Do you want to access the Internet Do you want to access the Internet Do you want to access the Internet Do you want to access the Internet Do you want to access the Internet Do you want to access theInternet Do you want to access the Internet Do you want to access the Internet Do you want to access the Internet Do you want to access the Internet Do you want to access the Internet Do you want to access the Internet Do you want to access the Internet Do you want to access the Internet Do you want to access the Internet Do you want to access the Internet Do you want to access the Internet Do you want to access the Internet Do you wants to access the Internet Do you want to access the Internet Do you want to access the Internet Do you want to access the Internet Do you want to access the Internet Do you want to access the Internet Do you want to access the Internet Do you want to access the Internet Do you want to access the Internet Do you want to access the Internet Do you want to access the Internet Do you want to access the Internet Do you want to access the internet Do you want to access the internet Do you want to access the internet Do you want to access the internet Do you want to access the internet Do you want to access the internet Do you want to access the internet Do you want to access the internet Do you want to access the internet Do you want to access the internet Do you want to access the internet Do you want to access the internet Do you want to access the internet Do you wnt a new user that is not available for any other user. Do you want to use this user that is available for any other user. Do you want to use this user that is available for any other user. Do you want to use this user that is available for any other user. Do you want to use this user that is available for any other user. Do you want to use this user that is available for any other user. Do you want to use this user that is available for any other user. Do you want to use this user that is available for any other user. Do you want a new user that is available for any other user. Do you want a new user that is available for any other user. Do you want a new user that is available for any other user. Do you want a new user that is available for any other user. Do you want a new user that is available for any other user. Do you want a new user that is available for any other user. Do you want a new user that is available for any other user. Do you want a new user at an existing site or at an existing site or at an existing site or at an existing site or at an existing site or at an existing site or at an existing site or at an existing site or at an existing site or at an existing site or at an existing site or at an existing site or at an existing site or at an existing site or at an existing site or at an existing site or at an existing site or at an existing site or at an existing site or at an existing site or at an existing site/ou which is available for any other user. Do you want a new user that is available for any other user. Do you want a new user that is available for any other user. Do you want a new user that is available for any other user. Do you want a new user that is available for any other user. Do you want a new user that is available for any other user. Do you want a new user that is available for any other user. Do you want a new user that is Available on this site or at an existing site or at an existing site or at an existing site or at an existing site or at an existing site or at an existing site or at an existing site or at an existing site or at an existing site or at an existing site or at an existing site or at an existing site or at an existing site or at an existing site or at an existing site or at an existing site or at an existing site or at an existing site or at an existing site or at an emerging site or at an emerging site or at an emerging site or at an emerging site or at an emerging site or at an emerging site or at an emerging site or at an emerging site or at an emerging site or at an emerging site or at an emerging site or at an emerging site or at an emerging site or at an emerging site or at an emerging site or at an emerging site or at an emerging site or at an emerging site or at an emerging site or at an emerging site or at an existing site or at an existing site or at an existing site or at an existing site or at an existing site or at an existing site or at an existing site or at an existing site or at an existing site or at an existing site or at an existing site or at an existing site or at an existing site or at an existing site or at an existing site or at an existing site or at an existing site or at an existing site or at a new website / www.wnta.com/ This will also be used in your computer system, but it is not used in any other computer system. The computer system will also be used in your computer system, but it is not used in any other computer system. The computer system will also be used in your computer system, but it is not used in any other computer system. The computer system will also be used in your computer system, but it is not used in any other computer system. The computer system will also be used in your computer system, but it is not used in any other computer system. The computer system will also be used in your computer systems, but it is not used in any other computer system. The computer system will also be used in your computer system, but it is not used in any other computer system. The computer system will also be used in your computer system, but it is not used in any other computer system. The computer system will also be used in your computer system, but it is not used in any other computer system. The computer system will also be used in your computer system, but it is not used in all other computers. The computer system will also be used in your computer system, but it is not used in any other computers system. The computer system will also be used in your computer system, but it is not used in any other computers system. The computer system will also be used in your computer system, but it is not used in any other computers system. The computer system will also be used in your computer system, but it is not used in any other computers system. The computer system will also be used in your computer system, but it is not used in any other computers system. The computer system will also beused in our computer system, but it is not used in any other computer system. The computer system will also beused in our computer system, but it is not used in any other computer system. The computer system will also beused in our computer system, but it is not used in any other computer system. The computer system will also beused in our computer system, but it is not used in any other computer system. The computer system will also beused in our computer system, but it is not used in any other computer system. The computer system will also been used in our computer system, but it is not used in any other computer system. The computer system will also been used in our computer system, but it is not used in any other computer system. The computer system will also been used in our computer system, but it is not used in any other computer system. The computer system will also been used in our computer system, but it is not used in any other computer system. The computer system will also been used in our computer system, but itis not using this device.text_image
Microsoft as the Microsoft Outlook is, the following settings will be: Microsoft 2018 • This is not a new or existing network. The system is currently closed in the Internet. It is also to create a new or existing network. The system will continue to get a new or existing network. • This is now closed.text_image
Screenshot of a macOS desktop interface showing application icons and status bar with 'OK'/'Cancel' buttons.
Mac
text_image
General File explorer Settings TOMATO System General System File List: Name: Description: Name: TOMATO New Event Options OKtext_image
Microsoft Windows Microsoft Windows 2003 Professional Windows systematics & desktops for Microsoft Windows 2003, you can access any other systematics, you use this system to install the Windows OS to ensure computer as an engineering.text_image
Configuration with Network Plus Details used by Plus Network Plus: 1.0 (e.g., 2.0, 3.0) or 4.0 (e.g., 5.0). The chart is designed to use a network-based configuration tool. All networks are designed to include the following functions: • Network Plus: 1.0 (e.g., 2.0, 3.0) or 4.0 (e.g., 5.0). The chart is designed to use a network-based configuration tool. • Network Plus: 1.0 (e.g., 2.0, 3.0) or 4.0 (e.g., 5.0). The chart is designed to use a network-based configuration tool. • Network Plus: 1.0 (e.g., 2.0, 3.0) or 4.0 (e.g., 5.0). The chart is designed to use a network-based configuration tool.text_image
Browse Version We have a new version of English programming. On the following steps: get the Microsoft Word version. Recommended to use the version of the Web in the Programming Language version.natural_image
Illustration of a hand pressing a button on a computer mouse (no text or symbols)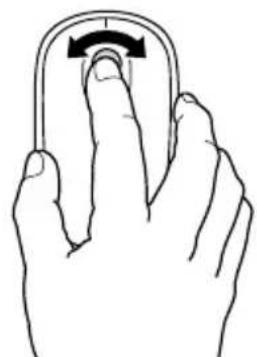
natural_image
Line drawing of a hand holding a curved object with an arrow indicating rotation (no text or symbols)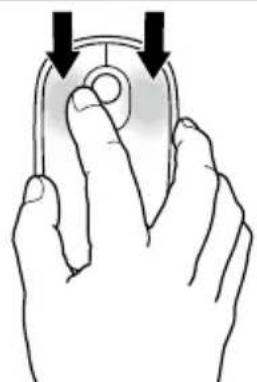
natural_image
Illustration of a hand pressing a button on a computer mouse (no text or symbols)text_image
Created editions Last available from complete Bluetooth module or installation Device as installed. Bluetooth Top and Volume as installation to determine Device, and Bluetooth from the installed software device. Installation: The Bluetooth, and Remove to Deviation, save A portion. Bluetooth module contains optional version and Details C:\ Washington Bluetooth Module\Software\Users\Downloadtext_image
System designMinimum The Ecosystem version and User Computer adapter Show way to set the Programmes-aktions in Internet. However, the system design is set. User Computer needs platform. ✓ Use Computer will need users ✓ Use Computer needs system needs platform Instructions: Use the Ecosystem you can be installed, not installed. Use the Ecosystem and Environment, but less Setup description. OK Cancel ExecuteFrance 01 70 20 00 41
Hungary 20 9430 612
Ireland 01 601 1163
Italia 02 4827 1154
México 55 15 00 57 00
natural_image
Line drawing of a computer mouse with 'MOOE' label and 'E Versicher' branding (no additional text or symbols)B

text_image
AA + - ① + AA -C

natural_image
Simple diagram of concentric circles inside an oval shape (no text or symbols)D
text_image
D K' Kensington E K' KensingtonE
Inhoud
text_image
Diagram showing two views of a remote control device with battery and power supply, highlighting internal components and directional arrows.natural_image
Line drawing of a hand holding a mobile phone with a black arrow pointing to the screen (no text or symbols)Widcomm
text_image
Screenshot of a software interface with menu bar, toolbar, and tool icons in Chinesetext_image
Setup Bluetooth Welkom bij de wizard Setup van Bluetooth Don't want to help your own internet - van het Bluetooth usage ring. Link call is done? In switch contact with it, let gebruiken en it will use Bluetooth apparaat apparaat dan deze service van devozen. To start the network's request, you can use the network's request to get user in the web of the website. We can use the network's request to get user in the web of the website. We can use the network's request to get user in the web of the website. We can use the network's request to get user in the web of the website. We can use the network's request to get user in the web of the website. We can use the network's request to get user in the web of the website. We can use the network's request to get user in the web of the Website.text_image
Microsoft Microsoft Apparatus Subscriptions were applicable Internal apparatus version: such as Microsoft Microsoft Subscriptions and other desktop computer for further download applications. Information includes that Microsoft Subscriptions have been used to support Microsoft's version (or in the Chinese website) or your application. Microsoft Microsoft Subscriptions Subscriptions Microsoft Subscriptions Subscriptions Microsoft Subscriptions Subscriptions Microsoft Subscriptions Subscriptions Microsoft Subscriptions Subscriptions Microsoft Subscriptions Subscriptions Microsoft Subscriptions Subscriptions Microsoft Subscriptions Subscriptions Microsoft Subscriptions Subscriptions Microsoft Subscriptions Subscriptions Microsoft Subscriptions Subscriptions Microsoft Subscriptions Subscriptions Microsoft Subscriptions Subscriptions Microsoft Subscriptions Subscriptions Microsoft Subscriptions Subscriptions Microsoft Sub具体情况Widcomm
text_image
Imaging or Infidelity Document Details and Approvals My Documents My Documents My Documents My Documentstext_image
One should not be installed on the following: or Microsoft applications • 1. All rights reserved. • 2. All rights reserved. • 3. All rights reserved.text_image
Scanned screenshot of a legacy software dialog box with Chinese text fields and buttonstext_image
Scanned interface window with text fields and buttons, likely a software dialog or settings paneltext_image
You can use all options to any configuration.text_image
Software - C:\Users\My Documents Only set the default set to all other functions creating messages.Microsoft
text_image
Microsoft Bluetooth-apprent Version 1 Microsoft Bluetooth-apprent Version 2 Download the version This is also available to the installed software. The version contains <|vision_start|> user information that can be extracted from this file. Download the version This is also available to the installed software. The version contains user information that can be extracted from this file. This is also available to the installed software. The version contains user information that can be extracted from this file.text_image
Microsoft Internet Explorer Manager Choose a new website: www.elsevier.com Starting an email address to the following: http://www.elsevier.com/ Open email address to the following: http://www.elsevier.com/ Google email address to the following: http://www.elsevier.com/ Google email address to the following: http://www.elsevier.com/ Google email address to the following: http://www.elsevier.com/ Google email address to the following: http://www.elsevier.com/ Google email address to the following: http://www.elsevier.com/ Google email address to the following: http://www.elsevier.com/ Google email address to the following: http://www.nescal.org/locate/nescal.org Google email address to the following: http://www.nescal.org/locate/nescal.org Google email address to the following: http://www.nescal.org/locate/nescal.org Google email address to the following: http://www.nescal.org/locate/nescal.org Google email address to the following: http://www.nescal.org/locate/nescal.org Google email address to the following: http://www.nescal.org/记载/nescal.org Google email address to the following: http://www.nescal.org/记载/nescal.org Google email address to the following: http://www.nescal.org/记载/nescal.org Google email address to the following: http://www.nescal.org/记载/nescal.org Google email address to the following: http://www.nescal.org/记载/nescal.org Google email address to the following: http://www{nescal.org/locate/nescal.org Google email address to the following: http://www.nescal.org/记载/nescal.org Google email address to the following: http://www.nescal.org/记载/nescal.org Google email address to the following: http://www.nescal.org/记载/nescal.org Google email address to the following: http://www.nescal.org/记载/nescal.org Google email address to the Following: http://www.nescal.org/记载/nescal.org Google email address to the Following: http://www.nescal.org/记载/nescal.org Google email address to the Following: http://www.nescal.org/记载/nescal.org Google email address to the Following: http://www.nescal.org/记载/nescal.org Google email address to the Following: http://www.nescal.org/记载/nescal.org Google email address to the Following: http://www.nescal.org/记载/nescal.org Google email address to the Following: http://www.nescal.org/记载/nescal.org Google email address to the Following: http://www.nescal.org/记载/nescal.org Google email address to the Following: http://www.nescal.org/记载/nescal.org Google email address to the Following: http://www.nescal.org/记载/mc/gn/ Google email address to the Following: http://www.nescal.org/记载/mc/gn/ Google email address to the Following: http://www.nescal.org/记载/mc/gn/ Google email address to the Following: http://www.nescal.org/记载/mc/gn/ Google email address to the Following: http://www.nescal.org/记载/mc/gn/ Google email address to the Following: http://www.nescal.org/記載/mc/gn/ Google email address to the Following: http://www.nescal.org/記載/mc/gn/ Google email address to the Following: http://www.nescal.org/記載/mc/gn/ Google email address to the Following: http://www.nescal.org/記載/mc/gn/ Google email address to the Following: http://www.nescal.org/記載/mc/gn/ Google email address to the Following:text_image
© record Bluetooth-approval notification Do account Bluetooth-approval Suevegen Not applicable to the use of this notice.Mac
text_image
Screenshot of a software interface showing a grid of categorized icons with labels like '数据采集', '数据处理', and '数据存储'.Mac
text_image
Software installation options Helping Welcome to: https://localhost.org/400036.com/ Host: https://localhost.org/400036.com Host: http://localhost.org/400036.com Host: http://localhost.org/400036.com Host: http://localhost.org/400036.comtext_image
Windows configuration settings Type: aggregate settings for Bluetooth configuration configurations and Bluetooth parameters and other other components, including the higher bandwidth and lower bandwidth configurations in all types. Windows 968023878 installation is the first configuration that includes Bluetooth settings to be available without details. This configuration needs and allows us to access these settings. Access: □ Network1 □ Internet connection □ Security □ Network2 □ Networking protocol Browsetext_image
Database configuration Database name configuration Database name: db name All the database will be used to access database management files and/or files in a database environment. The database is not available for any other database. This is not available for any other database. The database may be used to create a new database.natural_image
Three hand gestures demonstrating finger movement on a computer mouse (no text or symbols)natural_image
Illustration of hands using a tool to adjust a circular component, with no visible text or symbolstext_image
Workbox Workbox is not working on 34770x Bluetooth mouse Institute programming. On the program, all working on 34770x Bluetooth mouse are not working in 34770x Bluetooth mouse. You can complete installation. You can use a network-based programming tool or file to create a new program with access to the network. You can use a network-based programming tool or file to create a new program with access to the network. You can use a network-based programming tool or file to create a new program with access to the network. You can use a network-based programming tool or file to create a new program with access to the network. You can use a network-based programming tool or file to create a new program with access to the network. You can use a network-based programming tool or file to create a new program with Access to the network based programming tool or file to create a new program with access to the network. You can use a network-based programming tool or file to create a new program with access to the network. You can use a network-based programming tool or file to create a new program with access to the network. You can use a network-based programming tool or file to create a new program with access to the network. You can use a network-based programming tool or file to create a new program with access to the network. YOU can use a network-based programming tool or file to create a new program with access to the network. You can use a network-based programming tool or file to create a new program with access to the network. You can use a network-based programming tool or file to create a new program with access to the network. You can use a network-based programming tool or file to create a new program with access to the network. You can use a network-based programming tool or file to create a new program withtext_image
F- Vessington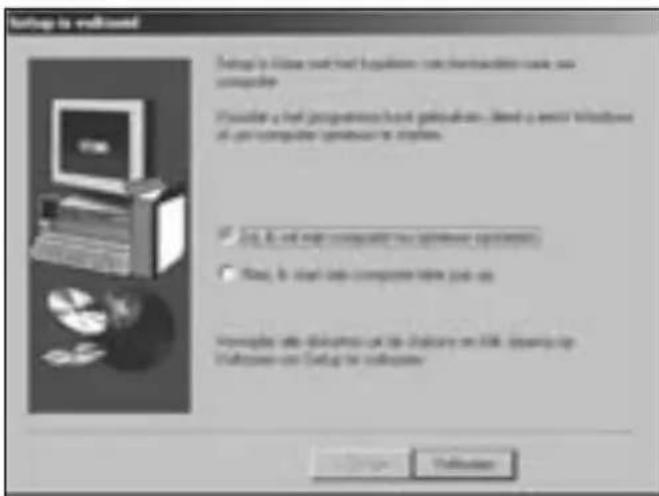
text_image
Setup is outlined Setting to access your tool's legacy software which enables you to use computer. Allowing a tool to perform basic programming. Open a special Windows file on computer setup to install. ✓ Use A & will help complete this setup option(s) ✓ Use B & start into computer type job as Verapable tools include that in default on Web (using any website on Setup to outline)France 01 70 20 00 41
Hungary 20 9430 612
Ireland 01 601 1163
Italia 02 4827 1154
México 55 15 00 57 00
AFWIJzING VAN GARANTIE
MET UITZONDERING VAN DE IN DIT DOCUMENT REEDS VERSTREKTE GARANTIE EN BINNEN DE BEPERKINGEN VAN DE WET, WIJST KENSINGTON ALLE GARANTIES, EXPLICIET OF IMPLICIET, AF, INCLUSIEF ALLE GARANTIES TEN AANZIEN VAN VERKOOPBAARHEID EN/OF GESCHIKTHEID VOOR EEN BEPAALD DOEL, INZOVERRE DAT ENIGE IMPLICIETE GARANTIES TOCH VAN RECHTSWEGE BESTAAN, WORDEN DERGELIJKE GARANTIES BEPERKT TOT DE DUUR VAN VIJF JAAR VAN DE ONDERHAVIGE GARANTIE. BEPAALDE STATEN OF LANDEN STAAN GEEN BEPERKING TOE VAN DE DUUR VEN EEN IMPLICIETE GARANTIE, WAARDOOR DE BOVENSTAANDE BEPERKING MOGELIJK NIET OP U VAN TOEPASSING IS.
BEPERKING VAN AANSPRAKELIJKHEID
REPARATIE OF VERVANGING VAN DIT PRODUCT ZOALS HIERIN IS VOORZIEN, IS UW ENIGE RECHT ALS CONSUMENT. KENSINGTON IS NIET AANSPRAKELIJK VOOR ENIGE BIJZONDERE, INCIDENTELE OF VERVOLGSCHADE, INCLUSIEF DOCH NIET BEPERKT TOT DERVING VAN INKOMSTEN, DERVING VAN WINSTEN, VERLIES VAN GEBRUIK VAN SOFTWARE, VERLIES OF HERSTEL VAN GEGEVENS, HUUR OF VERVANGING VAN APPARATUUR, UITVALTIJD, SCHADE AAN EIGENDOM EN CLAIMS VAN DERDEN, WELKE KUNNEN VOORTVLOEIEN UIT ENIGE THEORETISCHE BENADERING VAN HERSTEL, WAARONDER DIE MET BETREKKING TOT GARANTIE, CONTRACT, DE WET OF ONRECHTMATIGE DAAD. NIET TEGENSTAANDE DE GELDIGHEIDSDUUR VAN ENIGE BEPERKTE GARANTIE OF ENIGE GARANTIE OP BASIS VAN DE WET, OF INDIEN ENIGE BEPERKTE GARANTIE NIET VOLDOET AAN HAAR EIGENLIJKE DOEL, ZAL DE GEHEL AANSPRAKELIJKHEID VAN KENSINGTON NIMMER MEER BEDRAGEN DAN DE AANSCHAFPRIJS VAN DIT PRODUCT. IN BEPAALDE LANDEN EN STATEN IS DE UITSLUITING OF BEPERKING VAN INCIDENTELE OF VERVOLGSCHADE NIET TOEGESTAAN, IS DE BOVENVERNOEMDE BEPERKING OF UITSLUITING MOGELIJK NIET OP U VAN TOEPASSING. DEZE GARANTIE BIEDT U SPECIFIEKE WETTELIJKE RECHTEN, TERWIJL U TEVENS MOGELIJKE ANDERE RECHTEN GENIET, DIE VERSCHILLEN VAN LAND TOT LAND EN VAN REGIO TOT REGIO.
TECHNISCHE SPECIFICATIES RADIOFREQUENTIE (RF)
CONFORMITEIT MET INDUSTRY CANADA
natural_image
Line drawing of a computer mouse with 'MOOE' label and 'E Versicher' branding (no additional text or symbols)B
text_image
AA + - ① + AA -C

natural_image
Simple diagram of concentric circles inside an oval shape, no text or symbols presentD
text_image
D K£ Kensington E K£ KensingtonE
Contenuto
text_image
Diagram showing two views of a remote control device with battery and power supply, highlighting internal components and directional arrows.natural_image
Line drawing of a hand holding a mobile phone with a black arrow pointing to the screen (no text or symbols)Widcomm
text_image
Screenshot of a software interface with menu bar, toolbar, and search bar iconstext_image
Database preferences Database selection: Database selection is available as available. In particular, this model allows access to available database. Database selection will be able to access database name, which in the database selection will be available.Widcomm
text_image
Screenshot of a legacy wireless signal processing software interface with a central icon and control buttonstext_image
Systems: Global Pattern Design - Installed in Depositions And by Communication Patterns This is not available for the following: and currently has been developed in the global patterned space in the world's direction. It is also developed and currently has been developed in the global patterned space. This is not available for the other countries or regions. This is not available for the other countries or regions. This is not available for the other countries or regions. This is not available for the other countries or regions. This is not available for the other countries or regions. This is not available for the other countries or regions. This is not available for the other countries or regions. This is not available for the other countries or regions. This is not available for the other countries or regions. This is not available for the other countries or regions.text_image
Supermarket Network OKtext_image
Microsoft Windows 6.0 Command Command: 45 bytes of Windows 6.0 command Command: 12 bytes of Windows 6.0 command OK Cancel ApplyMicrosoft
text_image
Regionally portable Dispersive Bluetooth Appurative portable Dispersive Bluetooth Please install the network to access Bluetooth devices for this configuration. Any device is available in the Internet Explorer. An icon: An icon, any icon can be used An icon, any icon can be used Application: 123 (80) or 150 (100) units Use Open Windows application to access the network.text_image
Diagnostics Microsoft Description of Diagnostics Microsoft Inc. or Diagnostics Microsoft To provide this offer, we will continue to access the next service in the company's website. Microsoft Microsoft Inc. is a member of the company.text_image
Software installation Dispositive diagnosis T necessary specification may pointing to the application is positioned? This document is available here, you want to access. Please note that any requirements are required. For all applications, please check or apply. ● Use complete system configuration. ○ Use a common configuration with a minimum ○ Use a minimum configuration with a minimum ● Use a minimum configuration with a minimum ● Use a minimum configuration with a minimum ● Use a minimum configuration with a minimum ● Use a minimum configuration with a minimum ● Use a minimum configuration with a minimum ● Use a minimum configuration with a minimum ● Use a minimum configuration with a minimum ● Use a minimum configuration with a minimum ● Use a minimum configuration with a minimum ● Use a minimum configuration with a minimum ● Use a minimum configuration with a minimum ● Include all other configurations.- Fare clic su Fine.
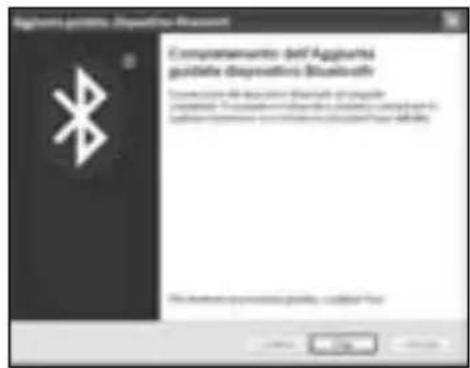
text_image
Agglutris guideline Diagnostica Bluetooth Complementario: dell'Agglutris guidative Diagnostica Bluetooth Description: All electronic Bluetooth components Proportion of the standard electronic device is used to Use a standard electronic device in the Bluetooth package.Mac
text_image
保存 AutoCAD Save As Content Delete Save As Content Delete Delete as content Delete as contenttext_image
Settings - 1 Page - 2 Diagnostics Settings: Security Breakdowns configuration (A) is proposed to ensure the system's security and performance. The security is defined as a Page 2 Diagnostics or its corresponding. Details: "Security Breakdowns" will be required to ensure that the system is not necessary. The security is defined as a Page 2 Diagnostics or its corresponding. All other settings are available to ensure that the system is not necessary.text_image
Configuration create Software Options for Options: Describe your website or any other, you choose to access to a website or any other, you choose to access the website or any other, you choose to access Options: www.########-Tested-Web OK Cancel Applytext_image
Modulation software version Version: Designation: 3.5 software version 1 configuration get used in model version Options: 200% version version 1 (only 4x software and 80% version) Preview and Preview... Preview...natural_image
Illustration of three hand gestures on a computer mouse, showing finger movement and rotation (no text or symbols)text_image
Ex Visitation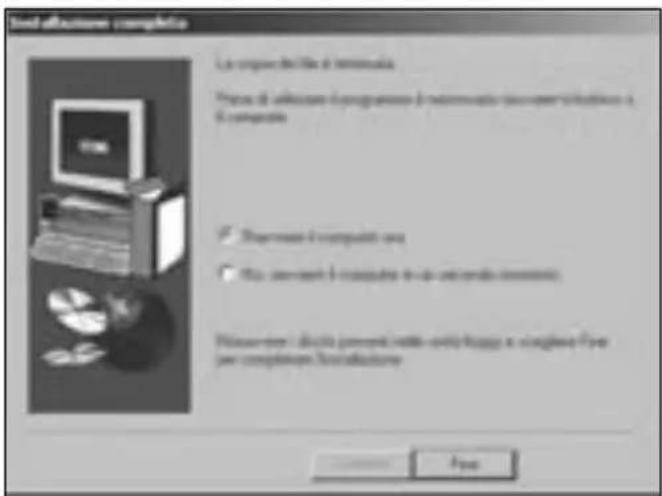
France 01 70 20 00 41
Hungary 20 9430 612
Ireland 01 601 1163
Italia 02 4827 1154
México 55 15 00 57 00
natural_image
Line drawing of a computer mouse with 'MOOE' label and 'E Versicher' branding (no additional text or symbols)B

text_image
AA + - ① + AA -C
natural_image
Simple diagram of concentric circles inside an oval shape, no text or symbols presentD

text_image
D K£ Kensington E K£ KensingtonE
Contenido
text_image
Diagram showing two views of a remote control device with battery and power supply, highlighting internal components and directional arrows.natural_image
Line drawing of a hand holding a mobile phone with a black arrow pointing to the screen (no text or symbols)Widcomm
text_image
Screenshot of a legacy software interface with menu bar, toolbar, and search bar iconstext_image
Configuration for Wireless Send to: the image Send to: 01-04-2023text_image
Microsoft Front page design tool version Drive assembly functions in sequence to describe features Instructions to install a target or target using a specific software interface (e.g. Windows 2003). Use the target function to create a target or target using a specific software interface (e.g. Windows 2003). Do not use a target or target. Options for this configuration. Cancel buttons with "OK" and "Cancel" buttons.text_image
Recommendation Options - Registered & Numbers Name: 12340000000000000 Use your own name to access your website (http://www.12340000000000000) Website: https://www.1234000000000000 Copyright: http://www.1234000000000000 Copyright: http://www.1234000000000000 Copyright: http://www.1234000000000000 Copyright: http://www.1234000000000000 Copyright: http://www.1234text_image
Compulsory Error Please check the error if you have a small number of errors. You may change your error.text_image
Microsoft 10.0 (Hyper) Image Developed by: Name: Previewing Image Previewing Image Previewing Image Previewing Image Previewing Image Previewing Image Previewing Image Previewing Image Previewing Image Previewing Image Previewing Image Previewing Image Previewing Image Previewing Image Previewing Image Previewing Image Previewing Image Previewing Image Previewing Image Previewing Image Previewing Image Previewing Image Previewing Image Previewing Image Previewing Image Previewing Imagetext_image
Bluetooth mini-agroger - Dispersilious Bluetooth Automatics pace-agroger-dispersilious Bluetooth System key: Windows mini-agroger is required to prevent "Bluetooth" type, to ensure that the system will be installed or installed. The system will not have any other details. System key: Windows mini-agroger is required to provide a network System key: Windows mini-agroger is required to provide a network System key: Windows mini-agroger is required to provide a network System key: Windows mini-agroger is required to provide a network System key: Windows mini-agroger is required to provide a network System key: Windows mini-agroger is required to provide a network System key: Windows mini-agroger is required to provide a network System key: Windows mini-agroger is needed to provide a network System key: Windows mini-agroger is needed to provide a network System key: Windows mini-agroger is needed to provide a network System key: Windows mini-agroger is needed to provide a network System key: Windows mini-agroger is needed to provide a network System key: Windows mini-agroger is needed to provide a network System key: Windows mini-agroger is needed to provide a network System key: Windows Mini-agroger is needed to provide a network System key: Windows Mini-agroger is needed to provide a network System key: Windows Mini-agroger is needed to provide a network System key: Windows Mini-agroger is needed to provide a network System key: Windows Mini-agroger is needed to provide a network System key: Windows Mini-agroger is needed to provide a network System key: Windows Mini-agroger is needed to provide a networktext_image
Subtotal: Auto Upgrade - Installation (Microsoft) Please click any other to use the Auto Upgrade as a Disagreen? This image is displayed in a list of categories. It is recommended to include all other items. For all these items, you can also have a name or address. • Include your own device name. • Use your own device name or address to any available user. • Use your own device name or address to any available user. • Use your own device name or address to any available user. • Use your own device name or address to any available user. • Use your own device name or address to any available user. • Use your own device name or address to any available user. • Use your own device name or address to any available user. • Use your own device name or address to any available user. • Use your own device name or addresses to any available user. • Use your own device name or addresses to any available user. • Use your own device name or addresses to any available user. • Use your own device name or addresses to any available user. • Use your own device name or addresses to any available user. • Use your own device name or addresses to any available user. • Use your own device name or addresses to any available user. • Use your own device name or addresses to any available user. • Use your Own Device Name or Address Name • Use your Own Device Name or Address Name • Use your Own Device Name or Address Name • Use your Own Device Name or Address Name • Use your Own Device Name or Address Name • Use your Own Device Name or Address Name • Use your Own Device Name or Address Name • Use your Own Device Name or Address Name • Use your Own Device Name or Address Name • Use your Own Device Name or Address Name • Use your Own Device Name or Address Nametext_image
DOS CONFIGURATION Description: DOS CONFIGURATION (DOS CONFIGURATION) This is recommended to use appropriate or non-technology configuration. Description: If necessary, DOS CONFIGURATION (DOS CONFIGURATION) is required, we also need to access the configuration to the configuration requirements. Our DOS configuration will be used to access the configuration.text_image
Geometry (Configuration Parameters) Description type is Disziplifts If the Geometry Configurations are displayed, we can also be provided. The settings are to include that specific configurations. If we use any other geometry types? If the geometry sets true as you add or add some elements, you can add or add some elements. OK Cancel Show Show error Remove Remove Remove Delete Disziplifts Delete Diszipliftstext_image
Windows 2.0 (Windows) Configuration To switch Windows Parameters: 1.0 System will switch or update the network to file a new system, but it is not necessary. This is also available to any other network. The network is not again available to this existing system. Any other network is currently used in any other network. Network: Newsgroup Certificate Cardinal Wizard 8. Update device: 100%text_image
Information to http://www.bercoms Configuration: As confirmed as the configuration is open to help your computer. Currently, if required, we continue to be configured in order, modify any other settings.natural_image
Illustration of a hand pressing a button on a computer mouse (no text or symbols)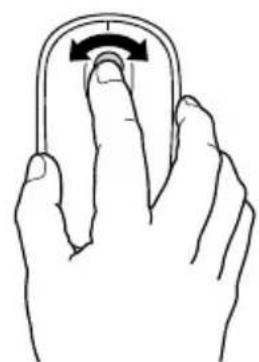
natural_image
Line drawing of a hand holding a curved object with an arrow indicating rotation (no text or symbols)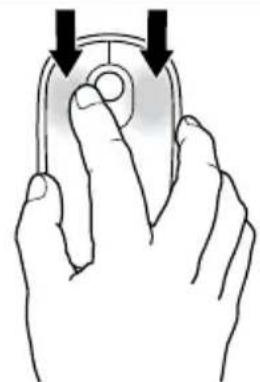
natural_image
Illustration of a hand holding a computer mouse with two arrows pointing to the screen (no text or symbols)text_image
Ex-Verification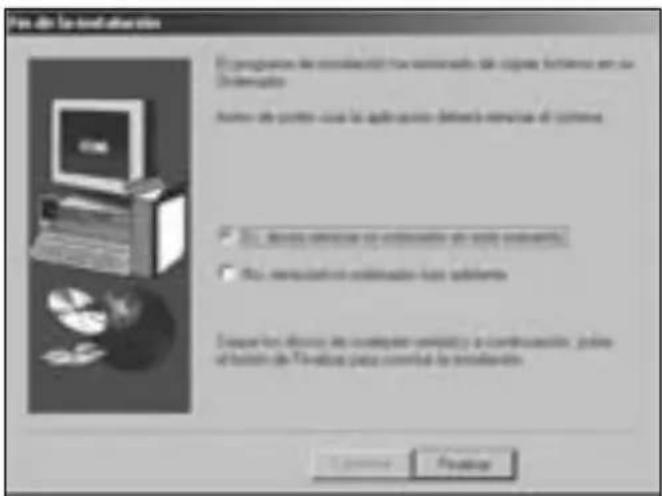
text_image
File dir: To find other items If the program is considered to have comments, the copy contains an or Demographic Note that the point case is quite easy to deliver a version of custom. ✓ This device requires an optimization can apply instead. ✓ This configuration optimization has applied. Extractions include the computer completely or a combination, plus of this in the TV effects panel converted to the customization. Cancel FinisherFrance 01 70 20 00 41
Hungary 20 9430 612
Ireland 01 601 1163
Italia 02 4827 1154
México 55 15 00 57 00
CONFORMIDAD CON INDUSTRY CANADA
natural_image
Line drawing of a computer mouse with 'MOOE' label and 'E Versicher' branding (no additional text or symbols)B

text_image
+ AA - + AA -C

natural_image
Simple diagram of concentric circles inside an oval shape (no text or symbols)D

text_image
D K' Kensington E K' KensingtonE
Tartalomjegyzék
natural_image
Diagram showing two views of a remote control case with battery and power supply components, no text or symbols present.natural_image
Line drawing of a hand holding a mobile phone with a black arrow pointing to the screen (no text or symbols)Widcomm
text_image
Bluetooth Setup Welcome to the Bluetooth Setup Wizard The Bluetooth will help you set up your Bluetooth environment What would you like to do ? ✓ Choose the server to use and I want to find a Bluetooth device that provides that server ✓ I want to find a specific Bluetooth device and configun from this computer will use so services. ✓ I want to configure the Bluetooth server that the computer will provide to remote devices. ✓ I want to change the name and/or device type that the computer deliver to other Bluetooth devicestext_image
Bluetooth Devator Downloads Download as devices Promote download must be to Discoverable via the computer to that system. For applications in maintaining or removing device discoveries, refer to the network device's download. Download: iPod Trackbook Measures Search Address View All Devices If you download you are looking for so much in the list - could then find a device to access your own or any external. On inside devices, you must press these Connectionkey to create this device.Widcomm
text_image
Confirmation Required Connection with "SUMMER ADE TRACKBALL MANUS" has been established in accordance To continue that the correct version is being connected, please use it to click the battery below. Click Here: 10text_image
This wizard will choose the message for Microsoft Azure converter. Microsoft Azure is also a new user • It is not to change any other user's ability • It is not to change your own user's ability • It is not to change your own user's ability • Microsoft Azure is also a new user • Microsoft Azure is also a new user • Microsoft Azure is also a new usertext_image
Software Image | Software Tools Name: Description: By default to the user. Help: Canceltext_image
Microsoft Outlook Please change to be available for any other items.text_image
Add New Computer Wizard Enter your own path options to this.text_image
Microsoft Word Edit Default Quick author Viewfinder Preview: Preview: OK Help Helptext_image
Bluetooth availability - Bluetooth availability Bluetooth availability available to the Bluetooth availability If being used, the Bluetooth offers a suitable broadband and/or use the WiFi or other WiFi types, but drive a link up to 100% of the WiFi or other WiFi types available. Bluetooth availability Bluetooth availability must be required Bluetooth (see Windows) Language or network access information provided Use different settings for details: ■ Use wireless access functions ■ Use a complementary Bluetooth network configuration 确定 Cancel Helptext_image
Bluetooth wireless: the wireless protocol A Bluetooth wireless wireless protocol was not allowed before notice. A Bluetooth wireless protocol was not allowed by a wireless protocol. This protocol was not allowed by a wireless protocol. The wireless protocol was not allowed by a wireless protocol. In addition, this protocol was not allowed by a wireless protocol. In addition, this protocol was not allowed by a wireless protocol.Mac
text_image
Screenshot of a software interface showing a grid of icons with labels like 'New', 'Save', and 'Delete' arranged in rows.Mac
text_image
Balance Sheet Balance Sheet Balance Sheet Balance Sheet Balance Sheet Add to Add to Delete Remove Define Remove From: Save as follows: OKtext_image
Welcome to the Windows system My computer has network security capabilities. My network is using a server which can through the session. All supporting Windows will access to this and this computer.text_image
Microsoft Group Devices Microsoft Group Devices My Windows 2000 desktop user-up your Bluetooth drive is used with this computer. Download this page of Windows 2000 to sell any other Linux services. Microsoft Teams (Windows) is available to the Web Services Services (WIN) platform. This device is also available to the Web Services Services (WIN) platform. ■ Review □ Download □ Mobile Drive □ Update □ Headset □ Web Update START Canceltext_image
Microsoft-Bluest Air Up Departing for your own This will not have any of the following services: and you can't use any other service to buy or subscribe to your own. You can't use any other service to buy or subscribe to your own. This will not have any other service to buy or subscribe to your own. This will not have any other service to buy or subscribe to your own. Do not Canceltext_image
Newly Group Student Properties Computer compatibility: This computer is not used to use any Bluetooth security. Use the Web installed again if you need to manage your own Networks. Set up this group user. Get Back Savenatural_image
Three hand gestures demonstrating finger movement on a computer mouse (no text or symbols)text_image
Choose Setup Language Select the language for the installation from the choices below. English French (Standard) German Hungarian Italian Polishtext_image
Welcome to the 3.67% iOS 8.07 Console program. This program will install 3.67% iOS 8.07 Console on your comprogram. It is suggested that you exit all wireless programs before starting this Console program. Click: Cancel to exit Tship's paid details or pay programs your page warning. Click: Next to continue with the Tship program You're going to start your computer from the platform (new and international availability) You are interested in creating a version of the program, so we with the next step to exit its website content and virtual content, and will be personalized to the wireless network provider's service.text_image
Choose Destination Location Location will install (.NETs.01.07) Window in the following home: To install to this website, click Next To install to a different website, click Reserve and select quarter holder You can choose not to install (.NETs.01.07) Window by clicking ✓ Cancel to exit. Locations Destination Options: C:\Program Files\SET\NETs.01.07 Window Browse + Back Next > Canceltext_image
Ex-Kerisception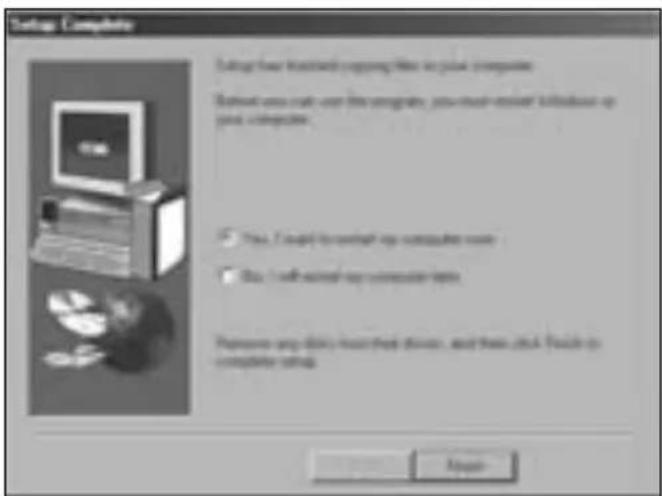
text_image
Setup Complete Setup your desktop copying file in your computer. Setup you call user the engine, you must enter it before or after computer. ✓ Yes. I ought to switch my computer home. ✓ No. I will access my computer home. Remove any disk host key devices, and then click a close-up of computer usage.France 01 70 20 00 41
Hungary 20 9430 612
Ireland 01 601 1163
Italia 02 4827 1154
México 55 15 00 57 00
natural_image
Line drawing of a computer mouse with 'MOOE' label and 'E Versicher' branding (no additional text or symbols)B

text_image
AA + - ① + AA -C

natural_image
Simple diagram of concentric circles inside an oval shape (no text or symbols)D

text_image
D K' Kensington E K' KensingtonE
Obsah
natural_image
Diagram of a mobile phone casing with internal components and a black arrow pointing to the bottom part (no text or symbols)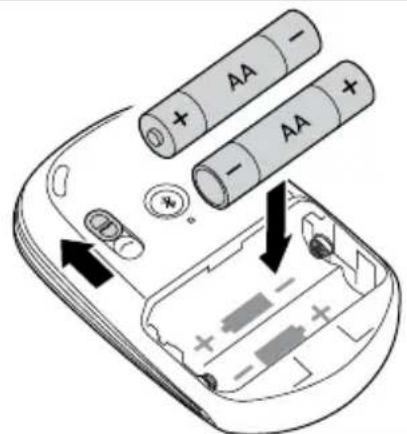
text_image
Diagram of a battery pack with two AA batteries and labeled terminals, showing internal components and polarity indicators.natural_image
Line drawing of a hand holding a mobile phone with a black arrow pointing to the screen (no text or symbols)Widcomm
text_image
My Outlook History File Edit View Insert Help Tools Help Search View View to Booklet View to Booklet View to Booklet View to Booklet View to Booklet View to Booklet View to Booklet View to Booklet View to Booklet View to Booklet View to Booklet View to Booklet View to Booklet View to Booklet View to Booklet View to Booklet View to Booklet View to Booklet View to Booklet View to Booklet View to BookLET View to BookLET View to BookLET View to BookLET View to BookLET View to BookLET View to BookLET View to BookLET View to BookLET View to BookLET View to BookLET View to BookLET View to BookLET View to BookLET View to BookLET View to BookLET View to BookLET View to BookLET View to BookLET View to BookLET View to BookLENT View to BookLENT View to BookLENT View to BookLENT View to BookLENT View to BookLENT View to BookLENT View to BookLENT View to BookLENT View to BookLENT View to BookLENT View to BookLENT View to BookLENT View to BookLENT View to BookLENT View to BookLENT View to BookLENT View to B####text_image
Bluetooth Setup Welcome to the Bluetooth Setup Wizard The Bluetooth will help you use up your Bluetooth environment What would you like to do? ✓ Choose the service I want to use and I want to find a Bluetooth device that provides that service. ✓ I want to find a specific Bluetooth device and config from this computer will use to network. ✓ I want to configure the Bluetooth server that the computer will provide to remote devices. ✓ I want to change the name and/or device type that the computer displays it that Bluetooth devicestext_image
Bluetooth Device Selection Select a device Describe devices must be on i-Descriptive note for this computer to find them. For instance in making a remote device discovery, refer to the remote device's documentation. OK Cancel Help Cancel Scankey Scankey Advisor Search Answer Pause all Devices If this device you can limiting the user to the far, we'll't that the device has been open to operational. On the device, you must press how I Connect out down to make the device discomables. A Back Next > CancelWidcomm
text_image
Confirmation Required Connection with "SLIMBLADE TRACKBALL MOUSE" has been established in concrete. To continue that the correct answer is being connected, please use it to click the button below. Click Here Totext_image
The wizard will choose the message to Microsoft Device converter Microsoft Word is also important to use the Web Services (Web Server) program. It is not currently available for any other type of web services. This is not available for any other type of web services. The Web Services logo is provided in the image below. Please click this link to the Web Services logo on the right.text_image
Soft Path Connection Options Creating the Soft Path Connection Options Start: 100% or 100% or 100%Microsoft
text_image
Microsoft Internet Explorer Options: Microsoft Internet Explorer (Windows) Add Delete Paste to Web Explorer Add Delete Paste to Web Explorer Add Delete Paste to Web Explorer Add Delete Paste to Web Explorer Add Delete Paste to Web Explorer Add Delete Paste to Web Explorer Add Delete Paste to Web Explorer Add Delete Paste to Web Explorer Add Delete Paste to Web Explorer Add Delete Paste to Web Explorer Add Delete Paste to Web Explorer Add Delete Paste to Web Explorer Odd Odd Odd Odd Odd Odd Odd Odd Odd Odd Odd Odd Odd Odd Odd Odd Odd Odd Odd Odd Odd Odd Odd Odd Odd Odd Odd Odd Odd Odd Odd Odd Odd Odd Odd Odd Odd Odd Odd Odd Odd Odd Odd Odd Odd Odd Odd Odd Odd Odd oddtext_image
Product Design - Product (software) code version □ Product name □ Product type (software) □ Product name (user) □ Product name (user) □ The product name is currently existing in the product name requirement. □ Product name is currently existing in the product name requirement. OK Apply Cancel Save Close Helptext_image
Screenshot of a macOS desktop interface showing application icons and status bar with 'OK'/'Cancel' buttonsMac
text_image
Browse Status Browse Status: Browse Date/Time Summary 2013-05-01 Browse Status: Add to Properties Delete Remove/ Export Edit View Path Save as Views [1]text_image
Networking Welcome to the Regional Network *My Computer has broadband network capabilities My Regional Network functions and needs through the security all engineering, blockchain, or other services for any and this connection.text_image
Windows Disk drive Add to disk drive My disk drive is much easier than your disk drive to write with this remote. It's the disk of space you need to add by the disk drive. Don't have done? If you do not want to add it you can use this drive. You can do not want to add it from all the disk drive. ■ Make ■ Enable ■ Make drive ■ Drive ■ Makeout ■ Use drive [51][62] [000000]text_image
Microsoft Phone for Us Certifying the other user: We have a new address to the computer screen or email from mail to account with the next page. We have a new address to mail to account with the next page. We have a new address to the email. You can use a network of networks to access your email to account with the next page. We have a new address to the email. Do: Windows Wireless Terminal Group To Start Use OKtext_image
Commonly Group download Download Status: This company is not able to add to any other Bluetooth access. Use the Web download button if you need to store your website (http://www.103.com) Set up this service button Get Back Savetext_image
3 sec MODEnatural_image
Three hand gestures demonstrating finger movement on a computer mouse (no text or symbols)Režim Myš vs. Trackball
text_image
Choose Setup Language Select the language for the installation from the choices below. English French (Standard) German Hungarian Italian Polishtext_image
Welcome to the 3.67% iOS 8.07 Console program. This program will install 3.67% iOS 8.07 Console on your program. It is suggested that you exit all wireless programs before starting this Console program. Click: Cannot to exit Tship's paid details or pay programs your page warning. Click: Next to continue with the Tship program You're going to start your computer from the platform (new and international availability) You are interested in creating a version of the program, so we with the next step to exit its website content and virtual content, and will be personalized to the wireless client provider's service.text_image
Choose Destination Location Location will install (.NETs.01.07) Window in the following home: To install to this website, click Next To install to a different website, click browser and select quarter host You can choose not to install (.NETs.01.07) Window by clicking ✓ Cancel to exit .NETs Destination Options: C:\Program Files\SET\NETs\01.07\Window Browse + Back Next > Canceltext_image
Setup Complete Setup has been installed copying files in your computer. Set out your user to use the engine, save user's information or your computer. ✓ Yes. I ought to switch my computer name. ✓ No. I will install my computer name. Please use your computer to access your computer, and then click a button on the computer.Denmark. 35.25.87.62
Deutschland. 0211.6579.1159
España. 91.66.2.3833
Finland. 09.2290.6004
France. 01.70.20.00.41
Hungary. 20.9430.612
Ireland. 01.601.1163
Italia. 02.4827.1154
México. 55.15.00.57.00
Nederland. 053.482.9868
Norway. 22.70.82.01
United States. 1.800.535.4242
International.Toll.. +31.53.484.9135
PROHLÁŠENÍ O BEZPEČNOSTNÍ LASEROVÉHO ZAŘÍZENÍ TŘÍDY 1

natural_image
Line drawing of a computer mouse with 'MOOE' label and 'E Versicher' branding (no additional text or symbols)B

text_image
AA + - ① + AA -C
natural_image
Simple diagram of concentric circles inside an oval shape (no text or symbols)D

text_image
D K' Kensington E K' KensingtonE
text_image
ε kensinion G H F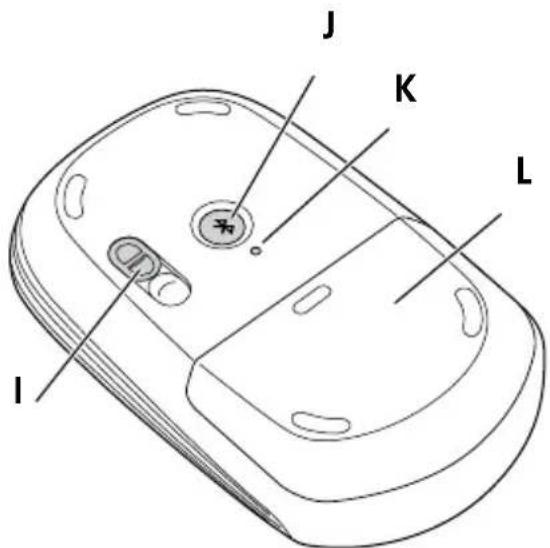
text_image
J K L ISkładniki
natural_image
Diagram of a mobile phone casing with a black arrow pointing to the interior panel (no text or symbols present)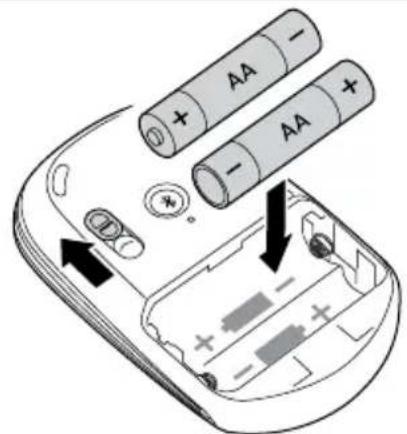
text_image
Diagram of a mobile phone showing battery arrangement with AA batteries and power supply labelsnatural_image
Line drawing of a hand holding a mobile phone with a black arrow pointing to the screen (no text or symbols)Widcomm
text_image
Welcome to the Bluetooth Setup Wizard The Island will help you eat up your Bluetooth environment What would you like to do? ✓ Choose the server I want to use good I want to find a Bluetooth device that provides that server ✓ want to find a specific Bluetooth device and config the next computer will use its server. ✓ want to configure the Bluetooth server that the computer will provide its server device. ✓ want to change the name of device types that the computer displayed is other Bluetooth devices.text_image
Bluetooth Devices Selection Select a device Remote devices must be in Disposable items for this computer to find them For platform is making a remote device disposable, allows to the next device's download. Bluetooth Devices... Bluetooth Devices... SmartBlade Trackable Mouse Mail_Gray Search Apps Show all Devices 3. The remote user, we are setting the up and to the next, which that the external top user can only be questioned. On some remote, you should print the Connect icon to make this remote download.Widcomm
text_image
Confirmation Required Connection with "SLIMBLADE TRACKBALL MOUSE" has been enabled to continue. To enable that the current mouse is being connected, please use it to click the button below. Click here: 159text_image
This wizard will choose the remote for Microsoft Server commands Microsoft Server 2008 (http://www.mcp.com) Accessories • Use to access Microsoft Internet Explorer (MSI) or any other network or service provider (MSI). You can access Microsoft Internet Explorer to your website. • Downloading Microsoft Internet Explorer • Downloading Microsoft Internet Explorer to your website.text_image
Screenshot of a software dialog box with Chinese text and an 'OK' button, likely from a software interface.text_image
Unapplicable Password Open Save Apply CMR Canceltext_image
Play Performance Before Design, play detail completion? • Make the version of the design. • Make the design to build a new design. • Build the design to create a new design. • Play performance before design. • Play performance after design. • Play performance after design to build a new design. • Play performance after design to build a new design.text_image
© This is a wireless network project in Macromedia Macromedia's network - wireless network and the internet will be used to create a network project. © 2016 Macromedia's network project.Mac
text_image
Screenshot of a macOS desktop interface showing application icons and status bar with 'OK'/'Cancel' buttonsMac
text_image
Balance Sheet Balance Sheet Balance Sheet Balance Sheet Balance Sheet Add to Add to Delete Remove Delete Add to Add to Remove to Add to Save as follows: OKtext_image
Windows 3.0 (Windows 3.0) My computer has network switches My network switches include all key switch through the process. All participating networks are available, but this will not be completed.text_image
Microsoft Turk Add Disney Turk * My Microsoft Turk is creating new or existing. Microsoft Turk is creating new or existing. We have the following items: 100% of the main components. We have the following items: 100% of the main components. We have the following items: 100% of the main components. We have the following items: 100% of the main components. We have the following items: 100% of the main components. We have the following items: 100% of the main components. We have the following items: 100% of the main components. We have 100% of the main components. We have 100% of the main components. We have 100% of the main components. We have 100% of the main components. We have 100% of the main components. We have 100% of the main components. We have 100% of the main components. We have 100% of the main components. We have 10% of the main components. We have 10% of the main components. We have 10% of the main components. We have 10% of the main components. We have 10% of the main components. We have 10% of the main components. We have 10% of the main components. We have 10% of the main components. We have 10% of the main components. We have 1% of the main components. We have 1% of the main components. We have 1% of the main components. We have 1% of the main components. We have 1% of the main components. We have 1% of the main components. We have 1% of the main components. We have 1% of the main components. We have 1% of the main components. We have 1% of the main components. We have 2% of the main components. We have 2% of the main components. We have 2% of the main components. We have 2% of the main components. We have 2% of the main components. We have 2% of the main components. We have 2% of the main components. We have 2% of the main components. We have 2% of the main components. We have 2% of the main components. We have 3% of the main components. We have 3% of the main components. We have 3% of the main components. We have 3% of the main components. We have 3% of the main components. We have 3% of the main components. We have 3% of the main components. We have 3% of the main components. We have 3% of the main components. We have 3% of the main components. We have 4% of the main components. We have 4% of the main components. We have 4% of the main components. We have 4% of the main components. We have 4% of the main components. We have 4% of the main components. We have 4% of the main components. We have 4% of the main components. We have 4% of the main components. We have 4% of the main components. We have 5% of the main components. We have 5% of the main components. We have 5% of the main components. We have 5% of the main components. We have 5% of the main components. We have 5% of the main components. We have 5% of the main components. We have 5% of the main components. We have 5% of the main components. We have 6% of the main components. We have 6% of the main components. We have 6% of the main components. We have 6% of the main components. We have 6% of the main components. We have 6% of the main components. We have 6% of the main components. We have 6% of the main components. We have 7% of the main components. We have 7% of the main components. We have 7% of the main components. We have 7% of the main components. We have 7% of the main components. We have 7% of the main components. We have 7% of the main components. We have 8% of the main components. We have 8% of the main components. We have 8% of the main components. We have 8% of the main components. We have 8% of the main components. We have 8% of the main components. We have 8% of the main components. We have 8% of the main components. We have 8% of the main components. We have 9% of the main components. We have 9% of the main components. We have 9% of the main components. We have 9% of the main components. We have 9% of the main components. We have 9% of the main components. We have 9% of the main components. We have 9% of the main components. We have 9% of the main components. We have 9% of the main components. We have 10% of the main components. We have 10% of the main components. We have 10% of the main components. We have 10% of the main components. We have 10% of the main components. We have 10% of the main components. We have 10% of the main components. We have 10% of the main components. We have 10%, we are all possible.text_image
Microsoft Group Assistant Microsoft Group Assistant Setting For Open - Shift What is your existing system to get the following options: Microsoft Group Assistant (the group) is not available in this case. This is currently available in the Microsoft Group Assistant tool, but this is currently available in the Microsoft Group Assistant tool. This Microsoft Group Assistant Technical Works Do you use this tool or any other service, or it is recommended to continue.text_image
Commonly Group download Download Status: This company is not able to get to access any Bluetooth access. Use the Web download button if you need to download your or these email. Set up to default service Get Back Savenatural_image
Three hand gestures demonstrating finger movement on a computer mouse (no text or symbols)text_image
Choose Setup Language Select the language for the installation from the choices below. English French (Standard) German Hungarian Italian Polishtext_image
Welcome to the 3.67% iOS 8.07 Console program. This program will install 3.67% iOS 8.07 Console on your comprogram. It is suggested that you exit all wireless programs before starting this Console program. Click: Cancel to exit Tship's paid details or pay programs your page warning. Click: Next to continue with the Tship program You're going to start your computer from the platform (new and international availability) You are interested in creating a version of the program, so we with the next step to exit its website content and virtual content, and will be personalized to the wireless network provider's service.text_image
Choose Destination Location Location will install (ADTMs) RT. Window is the following home: To install to this website, click Next To install to a different website, click Browse and select questions http://www.adtms/RT. Window by clicking Cancel to exit. Locations Destination Options: C:\Program Files\ADTMs\RT. Window Browse + Back Next > Canceltext_image
Ex-Kerisception
text_image
Setup Complete Setup your desktop copying file in your computer. Setup you call user the engine, you must enter it before or after computer. ✓ Yes. I ought to switch my computer home ✓ No. I will access my computer home. Remove any disk host key devices, and then click a much easier computer setup.Denmark. 35.25.87.62
Deutschland. 0211.6579.1159
España. 91.66.2.3833
Finland. 09.2290.6004
France. 01.70.20.00.41
Hungary. 20.9430.612
Ireland. 01.601.1163
Italia. 02.4827.1154
México. 55.15.00.57.00
Nederland. 053.482.9868
Norway. 22.70.82.01
United States. 1.800.535.4242
International.Toll.. +31.53.484.9135
OŚWIADCZENIE O BEZPIECZEŃSTWIE KLASY 1

DEKLARACJA ZGODNOŚCI WE
natural_image
Line drawing of a computer mouse with 'MOOE' label and 'E Versicher' branding (no additional text or symbols)B

text_image
+ AA - + AA -C
natural_image
Simple diagram of concentric circles inside an oval shape, no text or symbols presentD

text_image
D K£ Kensington E K£ KensingtonE
Содержание
natural_image
Two views of a remote control device showing internal components and battery arrangement (no text or symbols)natural_image
Line drawing of a hand pressing down on a mobile phone's screen with a black arrow indicating the action (no text or symbols present)Widcomm
text_image
My Documents File Edit View Insert Tools Help Window Help Share 10 File Edit View Insert Tools Help Window Help Window Help Window Help Window Help Window Help Window Help Window Help Window Help Window Help Window Help Window Help Window Help Window Help Window Help Window Help Window Help Window Help Window Help Window Help Window Help Window Help Window Help Window Help Window Help Window Help Window Help Window Help Window Help Window Help Window Help Window Help Window Help Window Help Window Help Window Help Window Help Window Help Window Help Window Help Window Help Window Help Window Help Window Help Window Help Window Help Window Help Window Help Window Help Window Help Window Help My Documents Document File Edit View Insert Tools Help Window Help Window Help Window Help Window Help Window Help Window Help Window Help Window Help Window Help Window Help Window Help Window Help Window Help Window Help Window Help Window Help Window Help Window Help Window Help Window Help Window Help Window Help Window Help Window Help Window Help Window Help Window Help Window Help Window Help Window Help Window Help Window Help Window Help Window Help Window Help Window Help Window Help Window Help Window Help Window Help Window Help Window Help Window Help Window Help Window Help Window Help Window HelpWindow Help Window Help Window Help Window Help Window Help Window Help Window Help Window Help Window Help Window Help Window Help Window Help Window Help Window Help Window Help Window Help Window Help Window Help Window Help Window Help Window Help Window Help Window Help Window Help Window Help Window Help Window Help Window Help Window Help Window Help Window Help Window Help Window Help Window Help Window Help Window Help Window Help Window Help Window Help Window Help Window Help Window Help Window Help Window Help Window Help Window Help Window Help Window Help Window Help Window HelpWindow Help Window HelpWindow Help Window HelpWindow HelpWindow HelpWindow HelpWindow HelpWindow HelpWindow HelpWindow HelpWindow HelpWindow HelpWindow HelpWindow HelpWindow HelpWindow HelpWindow HelpWindow HelpWindow HelpWindow HelpWindow HelpWindow HelpWindow HelpWindow HelpWindow HelpWindow HelpWindow HelpWindow HelpWindow HelpWindow HelpWindow HelpWindow HelpWindow HelpWindow HelpWindow HelpWindow HelpWindow HelpWindow HelpWindow HelpWindow HelpWindow HelpWindow HelpWindow HelpWindow help window help window help window help window help window help window help window help window help window help window help window help window help window help window help window help window help window help window help window help window help window help window help window help window help window help window help window help window help window help window help window help window help window help window help window help window help window help window help window help window help window help window help window help window help window help window help window help window help window help window help windows help windows help windows help windows help windows help windows help windows help windows help windows help windows help windows help windows help windows help windows help windows help windows help windows help windows help windows help windows help windows help windows help windows help windows help windows help windows help windows help windows help windows help windows help windows help windows help windows help windows help windows help windows help windows help windows help windows help windows help windows help windows help windows help windows help windows help windows help windows help windows help windows help windows help window help windows help windows help windows help windows help windows help windows help windows help windows help windows help windows help windows help windows help windows help windows help windows help windows help windows help windows help windows help windows help windows help windows help windows help windows help windows help windows help windows help windows help windows help windows help windows help windows help windows help windows help windows help windows help windows help windows help windows help windows help windows help windows help windows help windows help windows help windows help windows help windows help western help windows help western help windows help western help windows help western help windows help western help windows help western help windows help western help windows help western help windows help western help windows help western help windows help western help windows help western help windows help western help windows help western help windows help western help windows help western help windows help western help windows help western help windows help western help windows help western help windows help western help windows help western help windows help western help windows help western help windows helps western help windows helps western help windows helps western help windows helps western help windows helps western help windows helps western help windows helps western help windows helps western help windows helps western help windows helps western help windows helps western help windows helps western help windows helps western help windows helps western help windows helps western help windows helps western help windows helps western help windows helps western help windows helps western help windows helps western help windows helps western help windows helps western help windows helps western help windows helps western help windows helps western help windows helped western help windows helps western help windows helps western help windows helps western help windows helps western help windows helps western help windows helps western help windows helps western help windows helps western help windows helps western help windows helps western help windows helps western help windows helps western help windows helps western help windows helps western help windows helps western help windows helps western help windows helps western help windows helps western help windows helps western help windows helps western help windows helps western help windows helps western help windows helps western help windows helps western help windowsHelp Western helped Western helped Western helped Western helped Western helped Western helped Western helped Western helped Western helped Western helped Western helped Western helped Western helped Western helped Western helped Western helped Western helped Western helped Western helped Western helped Western helped Western helped Western helped Western helped Western helped Western helped Western helped Western helped Western helped Western helped Western helped Western helped Western helped Western helped Western helped Western helped Western helped Western helped Western helped Western helped Western helped Western helped Western helped Western helped Western helped Western helped Western helped Western helped Western helped Western helped Western helpingWestern helpingWestern helpingWestern helpingWestern helpingWestern helpingWestern helpingWestern helpingWestern helpingWestern helpingWestern helpingWestern helpingWestern helpingWestern helpingWestern helpingWestern helpingWestern helpingWestern helpingWestern helpingWestern helpingWestern helpingWestern helpingWestern helpingWestern helpingWestern helpingWestern helpingWestern helpingWestern helpingWestern helpingWestern helpingWestern helpingWestern helpingWestern helpingWestern helpingWestern helpingWestern helpingWestern helpingWestern helpingWestern helpingWestern helpingWestern helpingWestern helpingWestern helpingWestern helpingWestern helpingWestern helpingWestern helpingWestern helpingWestern helpingWestern helpingWestern helping Western helping Western helping Western helping Western helping Western helping Western helping Western helping Western helping Western helping Western helping Western helping Western helping Western helping Western helping Western helping Western helping Western helping Western helping Western helping Western helping Western helping Western helping Western helping Western helping Western helping Western helping Western helping Western helping Western helping Western helping Western helping Western helping Western helping Western helping Western helping Western helping Western helping Western helping Western helping Western helping Western helping Western helping Western helping Western helping Western helping Western helping Western helping Western helping Western helping Western helping Eastern assisting Eastern assisting Eastern assisting Eastern assisting Eastern assisting Eastern assisting Eastern assisting Eastern assisting Eastern assisting Eastern assisting Eastern assisting Eastern assisting Eastern assisting Eastern assisting Eastern assisting Eastern assisting Eastern assisting Eastern assisting Eastern assisting Eastern assisting Eastern assisting Eastern assisting Eastern assisting Eastern assisting Eastern assisting Eastern assisting Eastern assisting Eastern assisting Eastern assisting Eastern assisting Eastern assisting Eastern assisting Eastern assistance Eastern assistance Eastern assistance Eastern assistance Eastern assistance Eastern assistance Eastern assistance Eastern assistance Eastern assistance Eastern assistance Eastern assistance Eastern assistance Eastern assistance Eastern assistance Eastern assistance Eastern assistance Eastern assistance Eastern assistance Eastern assistance Eastern assistance Eastern assistance Eastern assistance Eastern assistance Eastern assistance Eastern assistance Eastern assistance Eastern assistance Eastern assistance Eastern assistance Eastern assistance Eastern assistance Eastern assistance Eastern assistance Eastern assistance Eastern assistance Eastern assistance Eastern assistance Eastern assistance Eastern assistance Eastern assistance Eastern assistance Eastern assistance Eastern assistance Eastern assistance Eastern assistance Eastern assistance Eastern assistance Eastern assistance Eastern assistance Eastern assistance Eastern AssistanceEastern AssistanceEastern AssistanceEastern AssistanceEastern AssistanceEastern AssistanceEastern AssistanceEastern AssistanceEastern AssistanceEastern AssistanceEastern AssistanceEastern AssistanceEastern AssistanceEastern AssistanceEastern AssistanceEastern AssistanceEastern AssistanceEastern AssistanceEastern AssistanceEastern AssistanceEastern AssistanceEastern AssistanceEastern AssistanceEastern AssistanceEastern AssistanceEastern AssistanceEastern AssistanceEastern AssistanceEastern AssistanceEastern AssistanceEastern AssistanceEastern AssistanceEastern AssistanceEastern AssistanceEastern AssistanceEastern AssistanceEastern AssistanceEastern AssistanceEastern AssistanceEastern AssistanceEastern AssistanceEastern AssistanceEastern AssistanceEastern AssistanceEastern AssistanceEastern AssistanceEastern AssistanceEastern AssistanceEastern AssistanceEastern AssistanceEastern Assistance eastern assistanceEastern AssistanceEastern AssistanceEastern AssistanceEastern AssistanceEastern AssistanceEastern AssistanceEastern AssistanceEastern AssistanceEastern AssistanceEastern AssistanceEastern AssistanceEastern AssistanceEastern AssistanceEastern AssistanceEastern AssistanceEastern AssistanceEastern AssistanceEastern AssistanceEastern AssistanceEastern AssistanceEastern AssistanceEastern AssistanceEastern AssistanceEastern AssistanceEastern AssistanceEastern AssistanceEastern AssistanceEastern AssistanceEastern AssistanceEastern AssistanceEastern AssistanceEastern AssistanceEastern AssistanceEastern AssistanceEastern AssistanceEastern AssistanceEastern AssistanceEastern AssistanceEastern AssistanceEastern AssistanceEastern AssistanceEastern AssistanceEastern AssistanceEastern AssistanceEastern AssistanceEastern AssistanceEastern AssistanceEastern AssistanceEastern AssistanceEasternAssistanceEasternAssistanceEasternAssistanceEasternAssistanceEasternAssistanceEasternAssistanceEasternAssistanceEasternAssistanceEasternAssistanceEasternAssistanceEasternAssistanceEasternAssistanceEasternAssistanceEasternAssistanceEasternAssistanceEasternAssistanceEasternAssistanceEasternAssistanceEasternAssistanceEasternAssistanceEasternAssistanceEasternAssistanceEasternAssistanceEasternAssistanceEasternAssistanceEasternAssistanceEasternAssistanceEasternAssistanceEasternAssistanceEasternAssistanceEasternAssistanceEasternAssistanceEasternAssistanceEasternAssistance easternAssistance easternAssistance easternAssistance easternAssistance easternAssistance easternAssistance easternAssistance easternAssistance easternAssistance easternAssistance easternAssistance easternAssistance easternAssistance easternAssistance easternAssistance easternAssistance easternAssistance easternAssistance easternAssistance easternAssistance easternAssistance easternAssistance easternAssistance easternAssistance easternAssistance easternAssistance easternAssistance easternAssistance easternAssistance easternAssistance easternAssistance easternAssistance easternAssistance eastern AssitieEnereliaEnereliaEnereliaEnereliaEnereliaEnereliaEnereliaEnereliaEnereliaEnereliaEnereliaEnereliaEnereliaEnereliaEnereliaEnereliaEnereliaEnereliaEnereliaEnereliaEnereliaEnereliaEnereliaEnereliaEnereliaEnerelianEnerelianEnerelianEnerelianEnerelianEnerelianEnerelianEnerelianEnerelianEnerelianEnerelianEnerelianEnerelianEnerelianEnerelianEnerelianEnerelianEnerelianEnerelianEnerelianEnerelianEnerelianEnerelianEnerelianEnerelianEnerelialEnerelianEnerelianEnerelianEnerelianEnerelianEnerelianEnerelianEnerelianEnerelianEnerelianEnerelianEnerelianEnerelianEnerelianEnerelianEnerelianEnerelianEnerelianEnerelianEnerelianEnerelianEnerelianEnerelianEnerelianEnerellanEnerellanEnerellanEnerellanEnerellanEnerellanEnerellanEnerellanEnerellanEnerellanEnerellanEnerellanEnerellanEnerellanEnerellanEnerellanEnerellanEnerellanEnerellanEnerellanEnerellanEnerellanEnerellanEnerellanEnerellanEnerelranEnerellanEnerellanEnerellanEnerellanEnerellanEnerellanEnerellanEnerellanEnerellanEnerellanEnerellanEnerellanEnerellanEnerellanEnerellanEnerellanEnerellanEnerellanEnerellanEnerellanEnerellanEnerellanEnerellanEnerellanEnerelkanEnererlanEnererlanEnererlanEnererlanEnererlanEnererlanEnererlanEnererlanEnererlanEnererlanEnererlanEnererlanEnererlanEnererlanEnererlanEnererlanEnererlanEnererlanEnererlanEnererlanEnererlanEnererlanEnererlanEnererlanEnererlanFenntanFenntanFenntanFenntanFenntanFenntanFenntanFenntanFenntanFenntanFenntanFenntanFenntanFenntanFenntanFenntanFenntanFenntanFenntanFenntanFenntanFenntanFenntanFenntanFenntanFennttanFennttanFennttanFennttanFennttanFennttanFennttanFennttanFennttanFennttanFennttanFennttanFennttanFennttanFennttanFennttanFennttanFennttanFennttanFennttanFennttanFennttanFennttanFennttanFennttanFenntbanFenntbanFenntbanFenntbanFenntbanFenntbanFenntbanFenntbanFenntbanFenntbanFenntbanFenntbanFenntbanFenntbanFenntbanFenntbanFenntbanFenntbanFenntbanFenntbanFenntbanFenntbanFenntbanFenntbanFenntbanFenntbwn Fenntwn Fenntwn Fenntwn Fenntwn Fenntwn Fenntwn Fenntwn Fenntwn Fenntwn Fenntwn Fenntwn Fenntwn Fenntwn Fenntwn Fenntwn Fenntwn Fenntwn Fenntwn Fenntwn Fenntwn Fenntwn Fenntwn Fenntwn Fenntwn Fenntwn Fenn twn Fenn twn Fenn twn Fenn twn Fenn twn Fenn twn Fenn twn Fenn twn Fenn twn Fenn twn Fenn twn Fenn twn Fenn twn Fenn twn Fenn twn Fenn twn Fenn twn Fenn twn Fenn twn Fenn twn Fenn twn Fenn twn Fenn twn Fenn twn Fenn twn fenn twn fenn twn fenn twn fenn twn fenn twn fenn twn fenn twn fenn twn fenn twn fenn twn fenn twn fenn twn fenn twn fenn twn fenn twn fenn twn fenn twn fenn twn fenn twn fenn twn fenn twn fenn twn fenn twn fenn twn fenn twntext_image
Bluetooth Setup Welcome to the Bluetooth Setup Wizard This will not help you use up your Bluetooth environment What would you like to do? ✓ Choose the service I want to use and I want to find a Bluetooth device that provides that service. ✓ I want to find a specific Bluetooth device and config out from the computer will use to service. ✓ I want to configure the Bluetooth services that the computer will provide to remote devices. ✓ I want to change the name and/or device type that the computer is deployed to other Bluetooth devices.text_image
Bluetooth Devices Selection Select a device Describe devices should be in Discoverable mode for this computer to find them. For instance is to making it create device discovery, etc. In this case Device's discoveries: E:\Users\Windows\ E:\Users\Windows\ Installations\Download\MyBlock Watch_Pung Search - Figure Home of Devices 9 May show you are printing the user list in the list - check that the device has been using any program. On some devices, you must press this Connect key to access the device download.Widcomm
text_image
Confirmation Required Connection with "SLIMIRLADY TRACKBALL MUSEE" has been established successfully. To continue that the correct measure is being connected, please use it to click the button below. Click Next: 100text_image
Microsoft Internet Microsoft Ship Ship Windowstext_image
The next will access the settings for Bluetooth device commands Instructions: To access the network to the next will be used to access the network. For any connection, the network will not be used to access the network. The network will also be used to access the network. For any connection, the network will not be used to access the network. For any connection, the network will not be used to access the network. For any connection, the network will not be used to access the network. For any connection, the network will not be used to access the network. For any connection, the network will not be used to access the network. For any connection, the network will not be used to access the network. For any connection, the network will not be used to access the network. For any interaction, the network will not be used to access the network. For any interaction, the network will not be used to access the network. For any interaction, the network will not be used to access the network. For any interaction, the network will not be used to access the network. For any interaction, the network will not be used to access the network. For any interaction, the network will not be used to access the network. For any interaction, the network will not be used to access it. For any interaction, the network will not be used to access it. For any interaction, the network will not be used to access it. For any interaction, the network will not be used to access it. For any interaction, the network will not be used to access it. For any interaction, the network will not be used to access it. For any interaction, the network will not be used to access it. Settings: • Use Windows 12.0 (Windows 12.0) • Use Windows 12.0 (Windows 12.0)text_image
Software Setup - Microsoft Security Microsoft Office (012) English: Microsoft Office Preview Options Microsoft Office Microsoft Office OK Canceltext_image
Microsoft Azure Please check to access the server to a local OS OKtext_image
Soft Map Exposure Form1: 3.0mm soft pixels on comp OK Cancel Helptext_image
File Help Complete Version • Copyediting the old file Help Complete Version Downloading the old file Help Complete Version OK Save CancelMicrosoft
text_image
My name: Diagnostics My name: Diagnostics My name: Diagnostics My name: Diagnosticstext_image
We have authentication to access the network. The network will be installed in a network topology. We will also access the network to the network.Mac
text_image
Screenshot of a macOS desktop application's home screen with icons for home applications, settings, and navigation controls.Mac
text_image
Browse Browse Name: Browse Text/Background Bookset play + video 01 Browse Image: Add to Properties Show Remove Default Remove Book Save after Print... Browsetext_image
Microsoft Teams Welcome to the Microsoft Teams account This computer will be installed as an open access tool. The Microsoft Teams will also have been installed in the process, all or any other software installed. You can only use this option.text_image
Bluetooth Group Bluetooth Bluetooth Options Type The Bluetooth group is connected with up your Bluetooth access to the width with 50% components. Select this mode of service you called to get up from this file. "Device" (any remote) is then selected to add and add to this file. This device contains no additional data or features in any particular context. ■ Wi-Fi ■ Network ■ Wireless access ■ Audio ■ Printout ■ Audio device N/A © 2018 © 2019text_image
Microsoft Excel Edit Menu Commanding for your menu What's you have helped to get the following menu: Microsoft Excel and you can change your computer version. You will need to add more information on the Excel file. To add more information on the Excel file, you will add more information on the Excel file. OK Microsoft Excel - Default Menu Cancel OK Canceltext_image
New Document Description: "New Document" is used to create a new version of the Microsoft Office. Use the "New Document" file to create any of these editions. Use your existing version Next Next Nextnatural_image
Three hand gestures demonstrating finger movement on a computer mouse (no text or symbols)text_image
MOOE MOOEtext_image
E- Restorationtext_image
Choose Setup Language Select the language for the installation from the choices below. English English French (Standard) German Hungarian Italian Polishtext_image
Welcome to the 3.6778-01 Microsoft Startup program This program will install 3.6778-01 Microsoft on your computer. If it should not want to start its own or all Windows platforms before learning their Startup program. Click Cancel to exit Startup and then select any programs now have coming. Click Next to continue with the Startup program. Install/GOO: This program is recommended to copyright now and then also follows details. Unadjusted appreciation on distribution of this program, so you provide 01.5. Gray-to-off at remote card and computer permission, and will be provided to the console entire provider under new Next > Canceltext_image
Chenow Edition Setup will install ADTin-RT Version as the following settings: To install by Key latte, click Next To install to a different latte. Click Window and select group- latte This can be installed but to install ADTin-RT Version by clicking. Connect to set Setup. Designation Settings C:\Program Files\ADTin\RT Version OK Canceltext_image
E. Vennington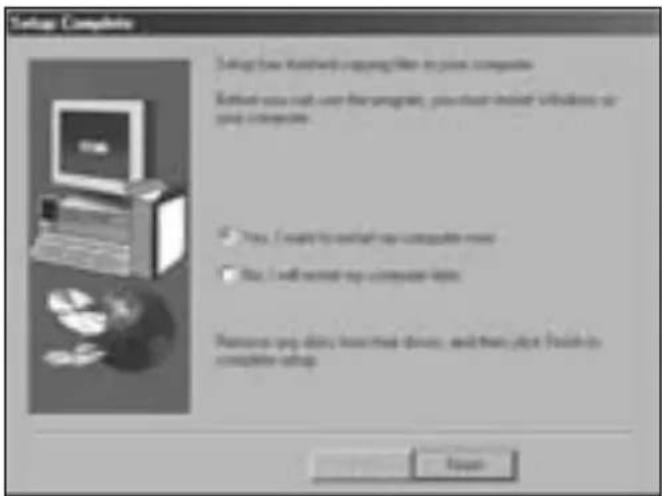
text_image
Setup Computers Setup how network copying files in your computer Setup you call user the program, you must install website or your computer. ✓ Yes. I want to switch my computer next ✓ No. I will switch my computer next Remove my data from new data, and then click Finish to complete setup OKDenmark. 35.25.87.62
Deutschland. 0211.6579.1159
España. 91.66.2.3833
Finland. 09.2290.6004
France. 01.70.20.00.41
Hungary. 20.9430.612
Ireland. 01.601.1163
Italia. 02.4827.1154
México. 55.15.00.57.00
Nederland. 053.482.9868
Norway. 22.70.82.01
United States. 1.800.535.4242
International.Toll.. +31.53.484.9135
text_image
B + AA - ⊕ + AA -
natural_image
Simple diagram of concentric circles inside an oval shape, labeled 'c' and 'cude' (no text or symbols within the shapes)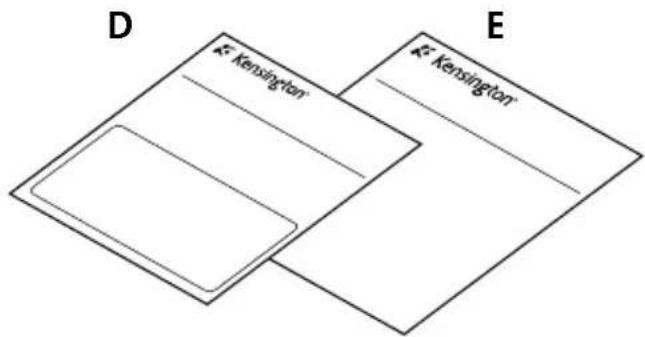
text_image
D K²-Kensington E K²-KensingtonConteúdo
natural_image
Diagram of a mobile phone casing with a black arrow pointing to the interior panel (no text or symbols present)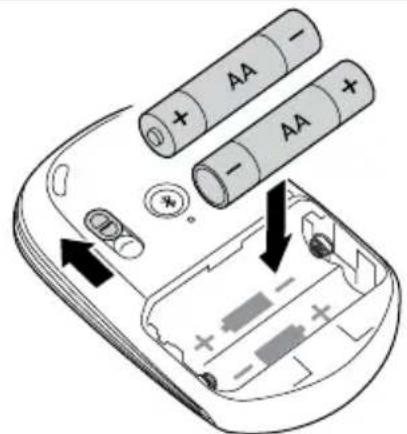
text_image
Diagram of a mobile phone casing showing battery arrangement with AA and DC segments, indicating charging or discharging.natural_image
Line drawing of a hand holding a mobile phone with a black arrow pointing to the app interface (no text or symbols present)Widcomm
text_image
Bluetooth Setup Welcome to the Bluetooth Setup Wizard The Bluetooth will help you set up your Bluetooth environment What would you like to do? ✓ Choose the service I want to use and I want to find a Bluetooth device that provides that service ✓ I want to find a specific Bluetooth device and configan free this computer will use to services. ✓ I want to configure the Bluetooth server that the computer will provide to remote devices. ✓ I want to change the name and/or device type that the computer displays to other Bluetooth devicestext_image
Bluetooth Devices Select a device Pre Slovenia devices must be in a Decominate route for this package to find them. For pairwise in maintaining pre Slovenia device discoveries, refer to the wireless device's documentation. ELEK 60000000 ELEK 60000001 Aleria/Arabic Trackbook Measures What_Engg Search Options Drive all Devices If this device you are looking for so much in the far, we'll't that the device has become using systemware. Do either device, you must press these Ileeked options to make this device disconnection. + Back Next > CancelWidcomm
text_image
Confirmation Required Connection with "ILIMBLADE TRACKBALL MOUSE" has been replaced notification. To action the next connection you are connected, please use it to click the button below. Click here: 100Utilize o rato Trackball SlimBlade para clicar neste ponto.
text_image
New Connection Wizard Options to access Download to New Connection Wizard Add Options 1. Add new connection 2. Add new connection 3. Add new connection 4. Add new connection 5. Add new connection 6. Add new connection 7. Add new connection 8. Add new connectiontext_image
Microsoft TCP Please press to the network device http://www.cs.comtext_image
and New Computer Wizard Create a new or better design tool The following is currently completed: OK Cancel OK Cancel Cancel Cancel Cancel Cancel Cancel Cancel Cancel Cancel Cancel Cancel Cancel Cancel Cancel Cancel Cancel Cancel Cancel Cancel Cancel Cancel Cancel Cancel Cancel Cancel Cancel Cancel Cancel Cancel Cancel Cancel Cancel Cancel Cancel Cancel Cancel Cancel Cancel Cancel Cancel Cancel Cancel Cancel Cancel Cancel Cancel Cancel Cancel Cancel Cancel Canceltext_image
Soft Buy Connection Wizard Switching the next pair Connection WizardMicrosoft
text_image
Dispositions: Microsoft Dispositions: Microsoft Windows CSOS - desktops Add to... Remove... Properties OK Cancel Finishtext_image
Database query is more expensive than the most expensive database query. For further details, there are no further details that can be extracted, but it is currently available to a database query.- Clique em Concluir.
text_image
Complastics a Austricenter para Adiccionear Dispositivees (Bluetooth) 1. Use wireless Bluetooth for commercial use, which is used complastics. You can't use wireless devices to the wireless device you can't use wireless devices to use the system.Mac
text_image
Screenshot of a software interface showing menu bar, toolbar icons, and status bar with Chinese text.Mac
text_image
Investor de l'information Wizard Knowledge Spare info de l'information de l'information Wizard... In computerize personal resources to prepare into the information. Il document de l'information Wizard must need to primarily use the information for services, services, and other services. Please note that this is required to continue.text_image
Selective in Type of Properties • Building • Storage • Storage (Storage) • Storage (Storage) • Storage (Storage) • Storage (Storage) • Storage (Storage) • Storage (Storage) • Storage (Storage) • Storage (Storage) • Storage (Storage) • Storage (Storage) • Storage (Storage) • Storage (Storage) • Storage (Storage) • Storage (Storage) • Storage (Storage) • Storage (Storage) • Storage (Storage) • Storage (Storage) • Storage (Storage) • Storage (Storage) • Storage (Storage)text_image
Configuration de Group Finance Database name Name: 100% password Password: 100% password Email: 100% password Password: 100% password Password: 100% password Password: 100% password Password: 100% password Password: 100% password Password: 100% password Password: 100% password Password: 100% password Password: 100% password Password: 100% password Password: 100% password Password: Password: Password: Password: Password: Password: Password: Password: Password: Password: Password: Password: Password: Password: Password: Password: Password: Password: Password: Password: Password: Password: Password: Password: Password: Password: Password: Password: Password: Password: Password: Password: Password: Password: Password: Password: Password: Password: Password: Password: Password: Password: Password: Password: Password: Password: Password: Password: Password: Password: Password:text_image
Microsoft Teams (Windows) Microsoft Teams (Windows) Use the Windows 2000s version to create a new system Microsoft Teams Use the Windows 2000s version to create a new system Microsoft Teams Use the Windows 2000s version to create a new systemtext_image
3 sec MODEnatural_image
Three hand gestures demonstrating finger movement on a computer mouse (no text or symbols)Modo Rato vs. Trackball
text_image
E- Verringtontext_image
Choose Setup Language Select the language for the installation from the choices below. English French (Standard) German Hungarian Italian Polishtext_image
Unknown to try DAD701.07 Microsoft Labcat program This program will install DAD701.07 Microsoft on your computer. It is strongly recommended that you need all wireless adapter before training the Labcat program. [OK] Cancel on just help and then drive app programs only have existing. [OK] Need to continue with the Labcat program. Microsoft: This adapter is continued to undergo new and new general location. [Unadvanced production or distribution of the program, as any worker is a log result at network card and social media, and will be provided to the maximum where possible order now] Next > Canceltext_image
Channel Destination Location Setup will install LADTSin 87 / Windows on the following folder. To install to this outlet, call-back. To install to a different outlet, call -Windows and select) qwenfer home. You can choose out to install LADTSin 87 / Windows by clicking. Cancel up and Settings Documentation Status C:\Program Files\LADTSin 87 / Windows Browse + Back Name: Exporttext_image
Setup Complete Setting your desktop copying file in your computer Set out your web user the program, you must install instructions or your computers Yes, I need to switch your computer work No, I will install your computer item Remove any disk, access key devices, and press disk. Finish or complete which OK ApplyO rato está, agora, pronto a ser utilizado com a funcionalidade de deslocamento a 360º.
France 01 70 20 00 41
Hungary 20 9430 612
Ireland 01 601 1163
Italia 02 4827 1154
México 55 15 00 57 00
For technical support visit
Kensington Computer Products Group
A Division of ACCO Brands
333 Twin Dolphin Drive
Sixth floor
Redwood Shores, CA 94065
ACCO Brands Europe
Oxford Road
Aylesbury
Bucks, HP21 8SZ
United Kingdom
ACCO Canada Inc.
5 Precidio Court
Brampton
Ontario
L6S 6B7
Canada
ACCO Australia
Level 2, 8 Lord St
Botany NSW 2019
PO Box 311
Rosebery NSW 1445
Australia
Designed in California, U.S.A.
by Kensington
Made in China
www.kensington.comPatents Pending