Music Racer - Mp3 player INTENSO - Free user manual and instructions
Find the device manual for free Music Racer INTENSO in PDF.
User questions about Music Racer INTENSO
0 question about this device. Answer the ones you know or ask your own.
Ask a new question about this device
Download the instructions for your Mp3 player in PDF format for free! Find your manual Music Racer - INTENSO and take your electronic device back in hand. On this page are published all the documents necessary for the use of your device. Music Racer by INTENSO.
USER MANUAL Music Racer INTENSO
USB 2.0 (High Speed)
1. Contents
- Contents 1
- Notes 2
- Functions 2
- Contents of this pack 2
- Prior to use 3
- Operation 4
- Main menu 5
- Music 5
- Speech recording 8
- Playback speech recordings 8
- FM Radio 8
- System settings 10
- Troubleshooting 11
- Technical data. 12
2. Notes
- Prevent the device from dropping.
- Do not use the device in extremely cold, hot, humid or dusty areas. Do not expose it to direct sunlight.
- Back up your device regularly to avoid possible data loss.
- Avoid using your player in strongly magnetic fields.
- Protect the device from moisture. Should moisture seep into the device, please switch it off immediately and clean and dry the device afterwards.
- Do not use any chemical solutions to clean the device. Use a dry cloth only.
- We are not liable for damages or data loss caused by malfunctions, incorrect operation, repairs done by you or changing of the battery.
- Please do not disassemble the device into components and do not try to repair it yourself as the warranty expires in this case.
- The use of earphones or headphones at high volume can cause permanent damage to your sense of hearing.
3. Functions
- Playback of MP3, WMA and ASF files
- Folder navigation
- Speech recording
FM radio
SRS WOW Sound Effect
Built-in re-chargeable Li-polymer battery
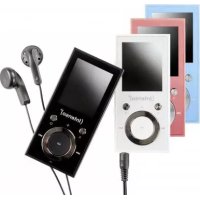
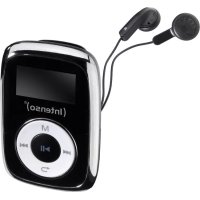
4. Contents of this pack
- Intenso MP3-Player
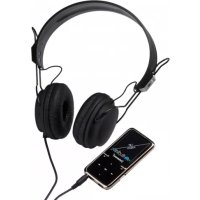
- Stereo headphones
USB cable - User manual
Warranty card
5. Prior to use
Connect to the PC
Please install a driver for OS Windows 98/SE prior to connecting the player with the PC. (download from www.intenso.de). No driver installation is required for OS WIN 2000/XP/ME.
Please proceed as follows:
(1) Connect the player with the USB-port of the PC
(2) The window "Intenso" opens. Now you can store the data from your hard disk on the player.
Safe removal from PC
For Windows 2000/XP/ME/Vista:
Click with the right mouse button bottom right in the task bar onto the symbol "safe removal of hardware". Select "remove USB flash drive" with the left mouse button from the appearing context menu. Please ensure that the data transfer has been finished completely.
Now you can remove the device.
For Windows 98/SE:
Select the device in the "device manager" using the left mouse button. Now click on the menu item "remove". Please also ensure here that the data transfer has been finished completely. The device can now be disconnected from the PC.
Charging the battery:
The device has a built-in re-chargeable Li-polymer battery. The battery is charged via the USB connection to your PC. Before using the device for the first time, please make sure that the battery is fully charged. This usually takes about 3 hours.
To charge the battery, connect the device to the PC using the USB cable. The charging procedure begins automatically.
To check the state of charge, control the symbol on the display of the MP3 player.
Note: for optimum performance, the re-chargeable Li-polymer battery must be used regularly. If this is not the case, fully charge the battery at least once per month.
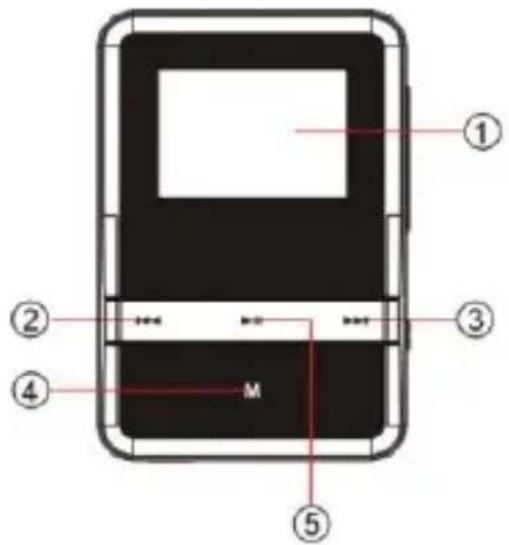
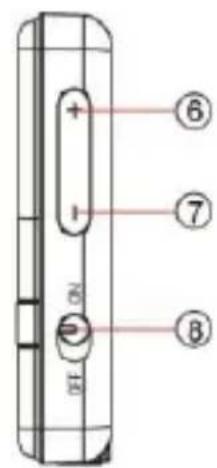
Controls
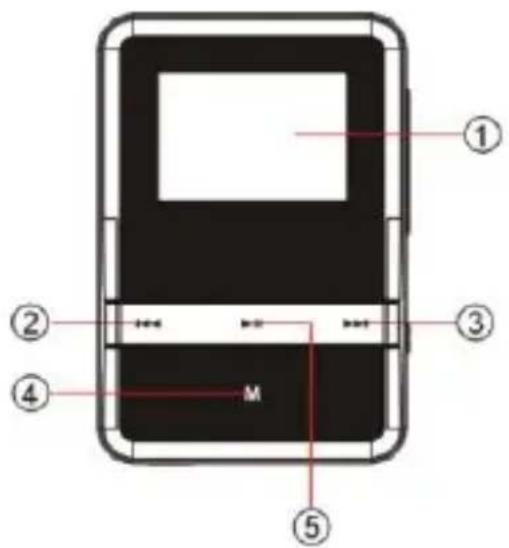
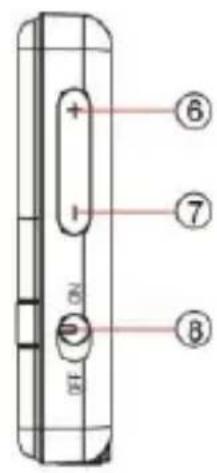
(1) LCD Display
(2) Track back / rewind
(3) Track forward / fast forward
(4) Menu - button
(5) Play/Pause button
(6) VOL+ button
(7) VOL - button
(8) On/Off
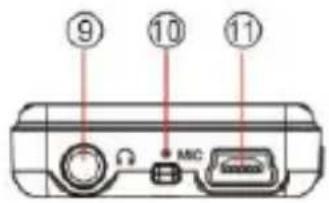
(9) line-in jack/headphones jack
(10) microphone
(11) USB port

6. Operation
On/Off
The On / Off-button has to be put into the "On" position. Press and then keep the button pressed until the Intenso logo appears on the display. To switch-off press and hold down the button until the Intenso logo appears on the display and then put the On / Off-button into the "Off"-position.
Play / Pause
Press the button for playback or stopping of a track.
Adjust volume
Press the VOL + or - VOL - button in order to increase or lower the volume.
Forward/Back
Press the 14 button to go to the previous or to the next track.
Fast forward
Press and hold down the button to fast forward within the track.
Rewind
Press and hold down the button to rewind within the track.
Key lock
In order to prevent the buttons from being pressed by mistake you can set an automatic key lock in the setup menu.
7. Main menu
After switching on the MP3 player the main menu appears. Here you can choose between the functions music, recording, playback, radio and setup.
Press the /buttons for selection and confirm your selection with the Menu button.
8. Music
Select Music from the main menu.
Now you can playback the stored tracks as described under "First steps".
- Call folder navigation
(1) If required, press the button to stop the current playback.
(2) Press the menu button to call the "setup" menu.
(3) Select "folder" and confirm your selection by pressing the menu button
(4) Select pressing the 14 / 15 buttons the required folder and confirm your selection by pressing the menu button.
(5) Confirm your selection with the menu button in order to start playback mode or press the Play/Pause button to close the selected folder afterwards and to exit the folder navigation.
- Delete track
To delete a single track do the following:
(1) If required, press the button to stop the current playback.
(2) Press the Menu button to call the "setup" menu.
(3) Select "delete file" and confirm with the menu button.
(4) Press the /Ibucto ns to select Yes or No. Confirm your selection with the menu button or press the Play/Pause button to return to the sub-menu.
- Delete all tracks
To delete all stored tracks do the following:
(1) If required, press the button to stop the current playback.
(2) Press the menu buttons to call the "setup" menu.
(3) Select "delete all" and confirm with the menu button.
(4) Press the /I1 buttons to select Yes or No. Confirm your selection with the menu button or press the Play/Pause button to return to the sub-menu.
A-B Repeat
To repeat a special section of a track do the following:
(1) During playback of a track press the menu button to go to the "play setup" menu.
(2) Press the / buttons to select "A-B repeat" and confirm your selection with the menu button.
(3) At the desired start point press the menu button to specify the start of the A-B repeat.
(4) At the desired end point press the menu button to specify the end of the A-B repeat.
(5) The section between the start and the end point will now be repeated.
(6) To end the A-B repeat press the menu button once more.
-Playback modes:
Normal - Plays all tracks once and stops the playback afterwards
Repeat track - repeats the current track
Folder - Plays all tracks in the selected folder once
Repeat folder - Plays and repeats all tracks in the selected folder
Repeat all - Plays all tracks and starts again from the beginning
Random - plays all tracks in random sequence
Intro - plays the first 10 sec. of each track
To select a playback mode do the following:
(1) During playback of a track press the menu button to go to the "play setup" menu.
(2) Press the A+ buttons to select "repeat" and confirm your selection with the menu button.
(3) Press the /I<buttons to select the desired playback mode. Confirm your selection with the menu button or press the Play/Pause button to return to the sub-menu.
Equalizer
You can choose from the following sound effects for playback: flat, rock, pop, classic, soft, jazz, DBB and user EQ.
To select an equalizer setting do the following:
(1) During playback of a track press the menu button to go to the "play setup" menu.
(2) Press the /Ibucto ns to select "equalizer" and confirm your selection with the menu button.
(3) Press the /Ibucto ns to select the desired equalizer setting. Confirm your selection with the menu button or press the Play/Pause button to return to the sub-menu.
User-defined equalizer
(1) During playback of a track press the menu button to go to the "play setup" menu.
(2) Press the /Ibucto ns to select "equalizer" and confirm your selection with the menu button.
(3) Press the / buttons to select "User EQ" and confirm your selection with the menu button.
(4) Press the /按钮 to change the equalizer column and the VOL+/VOL-to set the desired values.
(5) Press the menu button to confirm the settings.
- SRS and WOW sound effects
The MP3-player offers the sound effects SRS and WOW to extend your musical experience. To activate the effects do the following:
(1) During playback of a track press the menu button to go to the "play setup" menu.
(2) Press the 14 / 3 buttons to select the "SRS WOW mode" and confirm your selection with the menu button.
(3) Press the 144 / 14 buttons to select "SRS WOW" and confirm your selection with the menu button.
Adjusting WOW settings:
a. Select "adjust WOW" and confirm with the menu button.
b. Select using the (\text{串串串串串串串串串串串串串串串串串串串串串串串串串串串串串串串串串串串串串串串串串串串串串串串串串串串串串串串串串串串串串串串串串串串串串串串串串串串串串串串串串串串串串串串串串串串串串串串串串串串串单击“SRS 3D”,“TruBass”或“FOCUS”和 confirm with the menu button. Press the VOL + or VOL - button to adjust the settings.
c. Confirm your settings with the menu button.
Note: WOW, SRS and the symbol are trademarks of SRS Labs, Inc. The WOW technology is licensed by SRS Labs, Inc.
- Exit music mode
Keep the menu button pressed for 3 seconds to go to the main menu.
9. Speech recording
In the main menu select the function record.
You can record speech via the built-in microphone.
- record
(1) Press the button to start recording.
(2) During recording you can stop and/or resume the recording by pressing the button.
(3) Press the menu button to stop and save the recording.
Attention: Do not switch off the device during recording. The recording will not be saved and is lost.
- Exit the function record
Keep the menu button pressed for 3 seconds to go to the main menu.
10. Playback speech recordings
In the main menu select the function playback.
You can playback previously recorded speech.
- playback
(1) Select the desired file using the buttons and start playback with the button.
- Exit playback function
Keep the menu button pressed for 3 seconds to go to the main menu.
11. FM Radio
In the main menu select the function radio.
You can receive radio stations with your MP3 player.
Automatic station scanner
(1) Press the Menu button to call the "setup" menu.
(2) Press the 144 / 14 buttons to select "station scan" and confirm your selection with the menu button.
(3) The player scans automatically for radio stations in the set frequency range. The search is ended as soon as a station is found. All stations found will be saved.
- Manual scan for radio stations
(1) Press the buttons to change the frequency.
- Save radio stations
(1) Press the Menu button to call the "setup" menu.
(2) Press the /Ibucto ns to select "save and confirm your selection with the menu button.
(3) Press the /Ibucto ns to select Yes or No and confirm your selection with the menu button.
- Select saved radio stations
(1) Press the button to go to the next saved radio station.
- Delete saved radio stations
(1) Select the radio station to be deleted by pressing the button.
(2) Press the menu button to call the "setup" menu.
(3) Press the A buttons to select "delete" and confirm your selection with the menu button.
(4) Press the /I+ buttons to select Yes or No and confirm your selection with the menu button.
- Select frequency range
The MP3 player supports two frequency ranges. The European range (87.5~108MHz) and the Japanese range (76~90MHz). Depending on the region you can switch between the two frequency ranges.
(1) Press the Menu button to call the "setup" menu.
(2) Press the / buttons to select "Europe" or "Japan" and confirm your selection with the menu button.
- Record radio programmes
You can report the current radio programme on air.
(1) Select the radio station to be recorded by pressing the button.
(2) Press the Menu button to call the "setup" menu.
(3) Press the A+ buttons to select "record" and confirm your selection with the menu button.
(4) Press the button to start recording.
(5) During recording you can stop and/or resume recording by pressing the button.
(6) Press the menu button to stop and save the recording.
- Exit radio function
Keep the menu button pressed for 3 seconds to go to the main menu.
12. System settings
To set your MP3 player individually do the following:
(1) In the main menu select the function setup.
(2) Press the / buttons to select the desired setting (see table). Confirm your selection with the menu button or press the back button to return to the main menu.
| Setting | Description: |
| Display | Brightness – adjust display brightness |
| LCD Off time – After the set time has elapsed, the display will be switched to dark in order to save energy. | |
| Language | Select the desired language. |
| Save energy | Off time – The player switches itself off automatically after the preset time provided that the player is not in use. Sleep-Timer – After the set time has elapsed the player will be switched off. |
| Key lock | Select the desired time lapse after which the key lock will be activated. When choosing 0 seconds the key lock will be deactivated. |
| Memory info | Shows the memory used in percent |
| Firmware version | Shows the software version. |
| Firmware Upgrade | To upgrade the MP3 player firmware. |
| Default Setting | loads factory settings |
13. Troubleshooting
The display is blank.
(1) The battery is empty. Charge the battery.
(2) The keys are locked. Press and hold the menu button down to unlock the keys.
- No sound during playback of a file.
(1) The volume is too low. Increase the volume.
(2) The audio file is defective. Please transfer the file again.
- No connection can be established with the PC.
(1) The driver was not installed properly. Re-install the driver.
(2) Please carry out a main board update. (Please refer to the manufacturer's instructions)
- The track time displayed keeps on changing.
(1) The bit rate of the MP3 file changes during playback. Please use a universal bit rate for compression.
- The PC shows an error on connection with the player.
(1) The player was disconnected during data transfer from the PC. Never disconnect the player during data transfer.
- The memory indicated by the player does not match the actual memory.
(1) Part of the memory is used for software and display properties.
- MP3 data is not played properly.
(1) The MP3 data was compressed in a wrong format, e.g. in MPEG 1 or 2. Delete the file formats that are not supported.
14. Technical data
Item
LCD Display
Battery type
Battery run-time
Record format
Record duration (max.)
Supported music formats
Bit Rate
Output frequency
SNR
Channel separation
Frequency response
Output line headphones
USB port
Parameter
96 x 64 pixel
re-chargeable Li-polymer battery
Max. 7 hours
ACT
approx. 280 hours having 1GB free memory
MP3, WMA, ASF
MP3/WMA: 8kbps ~ 320 kbps
ASF: 8 kbps ~ 448 kbps
20Hz ~ 20kHz
>=90 dB
=40dB
<=3dB (20Hz ~ 20kHz)
L 4mW, R 4mW
USB 2.0 (High Speed)
1. Indice
USB 2.0 (High Speed)
USB 2.0 (High Speed)
(INTENSO)
49377 Vechta
Germany
www.intenso.de


1. Contenso
USB 2.0 (High Speed)
1. Conteudo
USB 2.0 (High Speed)
1. Zawartość
USB 2.0 (High Speed)
1.Ob3op coepekaHnA
- 063op copejkaHnla 1
- 3ameyaHn: 2
- 2
- CodepkaHne naketa 2
- Ipeep nCnoJb3ObaHnem 3
- 06cnykBaHne 4
- 5
- My3bika 5
- 3Byko3aPiNcB 8
- Bocnpon3BeDHeN 3Byko3aPiNc 8
- PaDno FM 9
- Hacrpoika cncTeMbI 11
- YcTpaHHeH HeNoJaOk 12
- TexHHueckne daHHbIe 13
2. 3ameyaHnY:
- I36eraIte cIbIbIX yIapOB npIbopa.
He nCnoJIb3yIe np6Op B 3KCTpeMaJIbHO XOJOnHbIX, rOpAUYX, BnAaXHbIX NJI NBJIbHbIX oBlaactx. He noDJaBaIe np6Op TaKKe npRMy BO3JeICTBNU COJHeuHbIX Jyuei. - PnOBoNDTe peRyIaRHyIO 3aINcB daHHbIX, YTO6bI n36eKaTb NOTepeN daHHbIX.
- I36eraIte IcNoJIb3OBAHnB B CInJbHbIX MaHHTHbIX NOJIaX.
3aunuainepn6opOTBnaXnoCTn.EcInB np6op npOnHKet BnaXnoCTb, OTKIOHTe ero HeMeIeHHO, nocne 3TOro noHCTnte N BBicUHTe np6op.
He nCnoJb3yIte dIy uNcTKn npi6opa xHmUeCKne paCTBOpbl. IJIa 3TOrO nCnoJb3yETcra TOnbKO cyXa TpIgKa. - Мы He OTbeyaem 3a NOBpeXdEHHN IJI N NOTepIO DaHhbIX, BO3HNKUyIO npi HEnCnpaBHOCTx, HEnpaBnIbHOM O6cnykINBaHIn, CO6CTBeHHOpyHOrO peMOHTa IJI 3amHe 6aTapen.
- He packkaadbai Te npibop Ha OTdeJIbHbIe qactn I He nbTaIaTeCb peMOHTnpoBaTbe ro co6CTBeHHOpyuHo, TaK KaB B 3Tom Cnyuae TepraTe rapaHTn.
- Исторынец Надларов Слишков Великий 3ByKOM может пубectи Кдоговеременю поpeжdenю сныа.
3.Функци
- Понрьване Форматов MP3, WMA n ASF
Habiracnno nankam
3Byko3aanncb - PaДио FM
3BykoBoi 3ΦΦeKr SRS WOW
BCTPOEHHnapeepaemag6atapeLi-polymer
4. CodepkaHne naketa
- Πηερ MP3 ΜιντεHCO
CTepeo-HayuHnKn
Ka6enb USB - INHCTpykunogobcJyKbAHnA
- rapaHTnHaJa KaPaTa
5. Перацпобьовиме
IopdoeHHnTe npn6op K
Ecn y Bac pa6o7a cncTeMa Windows 98/SE, ycTaHOBnTe dpaBep, npexJe Yem coeHNITb nIeep c NK. (Ero Bb CMOXeTe ckaaTb co cTpaHnUb www.intenso.de).ДЯ cnCTem WIN 2000/XP/ME ycTaHOBk a dpaBep He Tpe6yeTcra.
Cdetae cJeDyUoJne warn:
(1) PódkoeDInHnTe nIeep Ko rHe3ny USB Ha PIK.
(2) OTKpoetcra OKHO "INHTeHCO". Tenepb MoXHo 3aNtcaTb daHHbIe n3 JecTkOrO DbICKa Ha nepeHocHoi HocnteJIb daHHbIX.
HaedxHoe oTcoeDnHeHne ot PK
Дя Windows 2000/XP/ME/Vista:
HaXMMTe npaBoi KHOKNoM MbIuBn Bn3y CnpBaB CTPOKe 3aDaHn Ha CmBOJ "HaDExKHO ydaNTb np6Op". I3 nOraBnBWeOcR MeHIO KOHTeKCTa Bbl6epnte JbeOi KHOKNoMbIuN pyHKT ,YdaNTb 3anOMnHaIoUe e yCTBOIcTBO USB". Y6eDiNTecb, noJIHOCTbI0 JIn 3aKOHNCLrpeHoc DaHHbIX.
Tenepb MoKHO ydaJIntb npI6Op.
Дя Windows 98/SE:
BbIbePte B "MeHeJxpe np6opOB" neBOH KHOKo DAHHbI np6op. HaxMITE Ha nyHKT MeHIO "YdaNTb". Y6eINTecb TaKKe, NOJIHOCTbIO JN 3aKOHcINcI nepeHoc DaHHbIX. TeNEpb np6op MOxHO OTKnIOuHTb OT PK.
3apka 6aTapeu:
YcTPOICTBO IMeET BCTPOEHHyIO JNTHeBO-NOHHyIO 6aTapeIO. BaTapeI 3apJxKaETcI npI NOkJIooHEN yCtPOIcTBa Ko BXOy USB BaJero KOMNbIoTepa. PnI nepBOM IcNoIb3OBAHIN yCtPOIcTBa y6eIITecb B TOM, YTObI 6aTapeI 6blA NOJHOCTbIO 3apJxKeHa. 3apJxka, KaK npabInlo, DnITcR 3 Yaca. IJN 3apJxKn 6aTapeI NOKlIOHTe BaIe yCtPOIcTBO C nOMoUbIO KaBeJIa USB K BaJemy KOMNbIoTepy. IPouecc 3apJxKn NauchETcA ABToMaTIuCeKN. IJN pOBepKn COCTOAHNIA 3apJxKn CJIeDITE 3a CNMBOJOM Ha DnucPlee nPeepa MP3.
BHHMaHHe: IyTOIyO6bI yCTpoiCtBO pa6oTaIIO ONTImaJIbHO, IITNeBO-NOHHyO 6aTaapeIo cIeMyET peryIyIrpHo nCNoJIb3ObaTb. EcII 6aTaapeI nCNoJIb3yETcH epeRyIrpHO, Bam cIeDyET noNHOCTbIO 3apJxAtb ee He MeHee OndHO rpa3a B Mecra.
3JemeHTbI ynpaBneHnA
(1)Диспгй LCD
(2)Ha3aI/PpokpyuBaHne Ha3aI
(3) Bnep/IpokpyuBaHne Bnep
(4) KhoNka MeHoo
(5) KhoNka Play/Pause
(6) VOL + KhoIIa
(7) KhoNka 3Byka VOL
(8) BkJIIOHTb/BbIKIIOHTb
(9) NookHeHne HayuHnKOB
(10) Minkpooh
(11) NopT USB
6.ОБслужиBaHne
BkJIOHTb/BbkJIOHTb
BknioateIb / BblKnIOyateIb DOJKeH HaxoNTcB No3uNn "Bkn." (On"). HaKmnte I depKInTe KhoNkY Ioka Ha DncJIee He NpOBNTc JorOTn φnpMbI INHTeHCO.
YTo6bI BbIKNIOHTb np6Op, HaxMNTe N DepxNTE KHOKky Ioka Ha DnCnnee He NOBNTcra IOROTIN npMbI INTeHCO N npBeDNTe Nocne 3TOro BKIOUaTeJIb / BbIKNIOuATeJIb B No3nIO "BbIKI." (Off).
Play/Pause
HaxmTe KhoNky nI npOnpBbAHn nn 3aepKneCHn.
PerynpoBka 3Byka
HaxMMTe KhoNky VOL+ uNn VOL-, yTo6bl NOBbICntb uNn NOHN3NTb 3ByK.
Bneped /Ha3a
HaxmTe KhoKy / TTo6bI nepeTn K npdeBlyuee nnn K cneDyUoae 3aNcN.
PpokpyuBaHne Bnep
HaxmTe KhONky ITO6bl npokpyTntb 3aIncb BnepEi.
PpokpyuBaHne Ha3a
Haxmte n depknte KhoNky, To6bl npokpyTb 3aInncb Ha3a.
Блokировka Khoнки
UTo6bI 6JIOKINPOBaTb KHONIK OT CnyaHORO HaxaTHN, B MEHIO MOXHO pOn3BecTN HAcTpoiKy Ha aBTOMaTnueckyio 6JIOKINPOBky KHONoK.
7. Гльвhoe MeHIO
PJIeepom MP3 moXHO npHnMaTb paIIOCTaHcUN.
- ABTomatueckn NOUCK paDIOCTAHcN
(1) HaxmTe KhoNky MeHIO yTo6bl BbI3BaTb MeHIO HaCTpoNk.
(2) HaxmTe KhoNk / TTo6bI BbI6paTb "POnck paAnocTaHcun" I noDTBepnTe BaW BbI6op KhoNko MeHIO.
(3) Плесьговский Дурацентовский Дурацентовский Дурацентовский Дурацentsя. Всяк постордурацентовский Дурацentsя. Всяк постордурацentsя. Всяк постордурацentsя. Всяк постордурацentsя. Всяк постордурацentsя. Всяк постордурацentsя. Всяк постордурацentsя. Всяк постордурацentsя. Всяк постордурацentsя. Всян дурацentsя. Всян дурацentsя. Всян дурацentsя. Всян дурацentsя. Всян дурацentsя. Всян дурацentsя. Всян дурацentsя. Всян дурацentsя. Вsteadа радостацента радостацentsя. Вsteadа радostацentsя. Вsteadа радostацentsя. Вsteadа радostацentsя. Вsteadа радostацentsя. Вsteadа радostацentsя. Вsteadа радostацentsя. Вsteadа радostацentsя. Вsteadа радostацentsя. Вsteadа радostацentsя. Вsteadа радostaцentsя. Вsteadа радostацentsя. Вsteadа радostацentsя. Вsteadа радostацentsя. Вsteadа радostацentsя. Вsteadа радostацentsя. Вsteadа радostацentsя. Вsteadа радostацentsя. Вsteadа радostацentsя. Вsteadа радostа�сcentацentsя. Вsteadа радostа�сcentацentsя. Вsteadа радostа�сcentацctsя. Вsteadа радostа�сcentацctsя. Вsteadа радostа�сcentацctsя. Вsteadа радostа�сcentацctsя. Вsteadа радostа�сcentацctsя. Вsteadа радostа�сcentацctsя. Вsteadа радostа�сcentацctsя. Вsteadа радostа辱сcentацctsя. Вsteadа радostа辱сcenta-цctsя. Вsteadа радostа辱сcenta-цctsя. Вsteadа радostа辱сcenta-цctsя. Вsteadа радostа辱сcenta-цctsя. Вsteadа радostа辱сcenta-цctsя. Вsteadа радostа辱сcenta-цctsя. Вsteadа радostа辱сcenta-цctsя.
(4) Роставая симпун�хштейки в г�дат的基础上,在 1980 年 12 月 1 日,俄国驻华大使馆代表在中华人民共和国政府新闻发布会上发表文章指出,中国共产党领导的社会主义国家是“真正的民主主义国家”。
- Puchon nonck paanoctahnci
(1) Haxmnte KhoNkn /yTo6bI nOmeHrtb yactOTy.
3anomnHaHne paAnocTaHcnn
(1) Haxmte KhoNky MeHoo TTo6bl BbI3BaTb MeHoo HaCTpoNk.
(2) HaxmTe KhoNkI / yTo6bI BbI6paTb "3anomHHTb" n noDTBepdnte BaW BbI6Op KhoNkoM MeHIO.
(3) HaxmTe KhoNkI / , yTo6bI BbI6paTb Da nnn HeT n noDTBepdnte BaW BbI6Op KhoNkoM MeHIO.
BbI6op OTIOKeHHbIX B naMaTn paAnocTaHcN
(1) HaxmTe KhoNky 11 cyO6bl nepeuTn K cneDyUoSei OTIOXeHHO B naMaTn paAnocTaHcN.
BbItnpaHHe OTIOXeHHbIX B naMrtn paAnocTaHcun
(1) BbIbepnte KhoNkoI aHIOCTaHcUN, KOtOpBie Bbl XOTnTe BbltepeTb.
(2) Haxmte KhoNky MeHIO yTo6bl BbI3BaTb MeHIO HaCTpoNk.
(3) HaxmTe KhONkN / , yTo6bI BbI6paTb "CtepeTb" n noDTBepDnTe BaW BbI6Op KhONKO MeHIO.
(4) HaxmTe KhoNkI / , yTo6bI BbI6paTb Da nHt N noDTBepdnte BaW bI6Op KhoNkoM MeHIO.
IcnoJIb3yIte npn cKaTIN OaIIIOB ODNHaKOBOE KOJIuYeCTBO 6NT.
- Yka3aHHbI OsbE M nAMrN pNeepa He COOTBeTCTByeT DeiCTBHTeHOMy oBbEMy nAMrN.
(1) Yactb namrtn nCnojB3yETcI nI nporpaMM nIJI dNcPiJe.
- ΦαιNbI MP3 He npoɪrpɒbIbaɪtca KaK Naɪɔ.
MP3/WMA: 8k6/ceK ~ 320k6/ceK
ASF: 8κδ/ceκ ~ 448κδ/ceκ
20_U 20 _U
90 έБ
> = 40口
<=3nB(20Γu~20KΓu)
L 4MBT, R 4MBT
USB 2.0 (BbICOKOCKOPoCTHoe)