TC 904 OR FVI - Cooker CATA - Free user manual and instructions
Find the device manual for free TC 904 OR FVI CATA in PDF.
User questions about TC 904 OR FVI CATA
0 question about this device. Answer the ones you know or ask your own.
Ask a new question about this device
Download the instructions for your Cooker in PDF format for free! Find your manual TC 904 OR FVI - CATA and take your electronic device back in hand. On this page are published all the documents necessary for the use of your device. TC 904 OR FVI by CATA.
USER MANUAL TC 904 OR FVI CATA
Operating and maintenance instructions for hobs
1
THIS APPLIANCE IS CONCEIVED FOR DOMESTIC USE ONLY. THE MANUFACTURER SHALL NOT IN ANY WAY BE HELD RESPONSIBLE FOR WHATEVER INJURIES OR DAMAGES ARE CAUSED BY INCORRECT INSTALLATION OR BY UNSUITABLE, WRONG OR ABSURD USE.
The manufacturer declares that this product meets all the essential requirements for low voltage electrical material set out in European directive 2006/95/EEC of 12 December 2006 and for electromagnetic compatibility as required by European directive 2004/108/EEC of 15 December 2004.
User's Instructions Installation
All operations relative to installation (electric connection) should be carried out by skilled personnel in conformity with the rules in force.
As for the specific instructions see part pertaining to installer.
Use TOUCH CONTROL HEATING ELEMENTS
Touch sensitive keys All operations can be performed using touch sensitive keys (capacitive sensors) located on the front of the control board; each key has a corresponding display. All actions are confirmed by an audible signal.
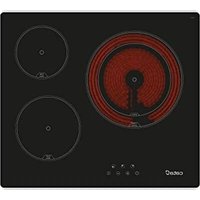
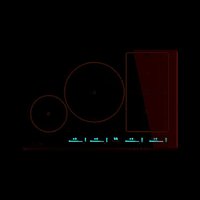
TOUCH CONTROL A (Fig. 1)
1 Power ON/Power OFF
2 cooking zone
3 setting display
4 minus
5 plus
6 dual circuit
7 timer
8 timer display
9 lock function
10 dual circuit indicator light
11 timer indicator lights
12 lock indicator light
13 decimal point
14 pause
Switching the appliance on and off Touch control
- Touch the touch key ON/OFF for 2 seconds. The control is powered on: the power level indicators (3) show "0" and the decimal points (13) flash. The next operation must be performed within 10 seconds or the appliance will automatically switch off.
Switching on a cooking zone
After switching on the appliance by pressing (1), a cooking zone must be switched on within 10 seconds as follows:
- Press the key (2) corresponding to the cooking zone. The relative display will show "0". The decimal point of display (13) will light up, indicating that the zone is now on.
- Set the power level (1 to 9) using the keys "+" and "-" (5/4). The keys "+" and "-" have a repeater function, i.e. holding
these keys pressed will increase or reduce the setting by one unit every 0.3 seconds. Only one cooking zone may be switched on at a time, so only one decimal point is lit up.
Switching off a cooking zone
- The cooking zone must be on. The corresponding decimal point (13) must be lit up.
- Reduce the power level to "0" by pressing (4). After 3 seconds the cooking zone will switch off automatically.
Rapid switch off:
- The cooking zone must be on and the corresponding decimal point (13) must be lit up.
- Press keys "+" and "-" (5/4) simultaneously and the zone will switch off immediately.
Residual heat indicators.
While the cooking zone is still hot enough to cause burns, the corresponding display shows the symbol "H" (residual heat). The symbol only disappears when the temperature falls below 60^ and there is no longer any risk of burns. The display shows "0" as long the temperature remains below 60^ , switching to "H" only when the temperature rises above 60^ .
To save energy, switch off the cooking zone before cooking is completed in order to make use of the residual heat.
The residual heat indicator "H" will go out if the power supply is interrupted for more than 3 seconds.
Switching off the appliance
The appliance may be switched off at any time by pressing the power key (1).
Dual circuit cooking zone.
Two cooking zones may be equipped with a dual circuit, e.g., a central disc and an outer ring. You can either use the central zone alone or both zones together and thus adapt the cooking area to suit the size of the pan.
Switching on a dual circuit zone.
- The relative zone must be on. The decimal point (13) on the corresponding display must be lit up.
- Select the desired power level (1 to 9).
- Switch on the second circuit by pressing the dual circuit key (6).
The indicator light (10) of the selected zone will illuminate; the second circuit is switched on together with the first.
Switching off the second circuit of a dual circuit zone.
- The dual circuit zone must be on. The decimal point (13) on the corresponding display must be illuminated.
- Touch the dual circuit key (6). The indicator light (10) goes out and the second circuit is switched off.
Appliance lock function and automatic safety switch off
Appliance lock function
The entire appliance may be locked to prevent unintentional operation by pressing the lock key (9). This also serves a child safety function. If the lock function is not deactivated before the appliance is switched off, it will still be active when the appliance is next switched on.
While the lock function is activated, operating the keys will have no effect.
Automatic safety switch off
If one or more of he cooking zones is left on by mistake, the control will automatically switch them off after a certain time limit.
In the event of automatic safety switch off, the symbol "H" is displayed.
To prevent automatic switch off, simply touch the zone selection key or the "+" and "-" keys before the time limit expires.
Automatic preheating
This function simplifies the cooking process as it obviates the need for human intervention. The cooking zone is first preheated at maximum power to rapidly bring the zone up to the cooking temperature, after which the power is automatically reduced to the preset level.
Activating the automatic preheating function.
Select the cooking zone by pressing key (2). Select power level 9 using the "-key, then select level 9 using the "+" key. Now select the desired power level, e.g. 6, using the "-" key.
In automatic preheating mode, the cooking zone display will alternately show the set level ("6") and the symbol "A".
Changing the power level setting during automatic preheating
-
The relative cooking zone must be on. The decimal point (13) on the corresponding display must be lit up.
-
Change the power level using the keys "+" and "-". If the level is increased, the new preheating time will be calculated taking account the time elapsed since the previous setting. Example: Level 1 is first selected, corresponding to a preheating time of 1'.
After 30", the power level is increased to 4, which requires a preheating time of 6'30".
After changing the level, the automatic preheating will last a further 6^ (6'30'' - 30'') .
Deactivating the automatic preheating function.
With the zone display showing the symbol "A":
-
the relative zone must be on. The decimal point (13) on the corresponding display must be lit up;
-
press " -" (4) after the function has been activated for at least 10 seconds.
Timer Function
This automatic function also obviates the need for human intervention during the entire cooking cycle. The cooking zone is automatically switched off after the set time period. If none of the zones is specifically programmed for this function, the timer operates as a simple minute counter (see section "Using the timer function as a minute counter").
Activation of the timerfunction.
- the zone to be programmed must be on. The decimal point (13) on the corresponding display must be lit up;
- Select a level between 1 and 9.
- Press the timer key (7): the timer display will show "00".
- Select the cooking time (from 0 to 99 minutes) using keys "+" and "-" (5 and 4).
The timer function is automatically activated within a few seconds.
The indicator light (11) corresponding to the programmed zone illuminates.
To rapidly adjust the cooking time, hold pressed the "+" or - keys.
The timer function applies to one cooking zone.
Changing a previously set cooking time.
The programmed cooking time may be changed at any time.
- the relative zone must be on. The decimal point (13) on the corresponding display must be lit up.
- Press the timer key (7).
- Set a new cooking time using the keys "+" and "-" (5 and 4).
To rapidly adjust the cooking time, hold pressed the "+" or - keys.
Deactivating the timer function.
When the set cooking time has elapsed, an audible signal sounds for 2 minutes.
To interrupt the signal, simply press any key. The cooking zone is now switched off.
If you want to interrupt the timer before the programmed time period has elapsed:
- the relative zone must be on. The decimal point (13) on the corresponding display must be lit up.
- Press the timer key (7).
- Zero the time by pressing " - " (4).
The timer is now deactivated but the cooking zone will remain on until it is switched off manually.
Rapid switch off:
- the relative zone must be on. The decimal point (13) on the corresponding display must be lit up
- Press keys "+" and "-" (5 and 4) simultaneously; the cooking zone is switched off immediately. The timer will also be deactivated.
Using the timer function as a minute counter
If the timer function is not being used to program a specific cooking zone, it may be used as a simple minute counter. Setting the minute counter If the appliance is switched off:
- press the power key (1);
- press the timer key (7);
- set the required time using "+" and "-"
If the appliance is switched on and one of the cooking zones is also on:
- deselect the zone by pressing the relative key (2): the decimal point(13) will go out;
- press the timer key (7);
- set the required time using "+" and "-".
Switching off the minute counter function.
When the set time period has elapsed, an audible signal sounds for 2 minutes. To interrupt the audible signal simply press any of the keys.
If you want to interrupt the timer before the set time period has expired:
- press the timer key (7);
- zero the time by pressing
“-”(4).
Rapid switch off:
- on pressing the keys "+" and "-" (5 and 4) simultaneously, the timer is deactivated.
Pause mode
Activating the Pause function:
While at least one cooking zone is working, the cooking zones can be switched off by touching the "Pause" key for more than 1 sec
During the pause:
Timers already programmed are discontinued and remain in this condition during the pulse.
The pause mode can last for max. 10 min. If the status is not cancelled within this period, the control unit switches off. The cooking zone can be switched off via the ON/OFF key any time, a possible break mode is, thus, aborted.
Terminating the Break mode:
Touching Pause key together with any other one key within 10 sec causes a re-establishment of the state prevailing prior to the break mode. If no further key is touched within 10 sec, the cooking zone also switches off.
Precautions (Fig. 3)
- When one makes use of heating elements, we advise receptacles with flat bottom having same diameter or lightly higher than that of the hot area.
- Avoid overflows of liquid, therefore when boiling has happened, or in any case when liquid is heated, reduce the heat supply.
- Don't leave the heating elements on without receptacles on the top or with void pots and pans.
- If the surface of the hob is damaged, immediately disconnect the appliance from the mains to prevent the possibility of electric shock.
- Never use a steam cleaner to clean the hob.
- This appliance is not designed to be used by people (including children) with reduced physical, sensorial or mental capacity, or who lack experience or knowledge about it, unless they have had supervision or instructions on how to use the appliance by someone who is responsible for their safety.
- Children must be supervised to ensure that they do not play with the appliance.
Maintenance (Fig. 4)
By means of a scraper immediately remove any alluminium foil bits, food spills, grease splashes, sugar marks and other high sugarcontent food from the surface in order to avoid damaging the hob.
Subsequently clean the surface with some towel and appropriate product, rinse with water and dry by means of a clean cloth. Under no circumstance should sponges or abrasive cloths be used; also avoid using aggressive chemical detergents such as oven sprays and spot removers.
Installer's Instructions
Installation
These Instructions are for the qualified technician, as a guide to installation, adjustment and maintenance, according to the laws and standards in force. These operations must always be carried out when the appliance has been disconnected from the electric system.
Positioning (Fig. 5)
1 Front view
2 Front side
The appliance can be fitted into a working area as illustrated on the figure. Apply the seal supplied over the whole perimeter of the working area.
Electrical connection
Prior to carrying out the electrical connection, please ensure that:
the plant characteristics are such as to follow what is indicated on the matrix plate placed at the bottom of the working area;
- that the plant is fitted with an efficient earth connection, following the standards and law provisions in force.
The earth connection is compulsory in terms of the law.
Should there be no cable and/or plug on the equipment, use suitable absorption material for the working temperature as well, as indicated on the matrix plate. Under no circumstance must the cable reach a temperature above 50^ of the ambient temperature.
Should a direct connection to the network be required, it will be necessary to interpose an omnipolar switch with min. aperture between the 3mm contacts, dimensioned to bear the plate load and it must follow the standards in force (the yellow/green earth cable must not be interrupted by the switch). The plug or omnipolar switch must be easily reached on the installed equipment.
The manufacturers decline any responsibility in the event of non-compliance with what is described above and the accident prevention norms not being respected and followed.
To avoid all risk, if the power cable becomes damaged, it must only be replaced by the manufacturer, by an authorised service centre, or by a qualified electrician.

QUESTO PRODOTTO E STATO CONCEPITO PER UN IMPIEGO DI TIPO DOMESTICO. IL COSTRUTTORE DECLINA OGNI RESPONSABILITA NEL CASO DI EVENTUALI DANNI A COSE O PERSONE DERIVANTI DA UNA NON CORRETTA INSTALLAZIONE O DA USO IMPROPrio, ERRONEO OD ASSURDO.
Aktivering at pause mode
Ophaevelse at pause mode:
"TOUCH CONTROL"A (Fig.1)
1 ON/OFF (Pa/Av)
2 Kokzon
3 Display fürutbestamt.Varde
4 Minskning
5 Okning
6 Dubbel krets
7 Tidmātare
8 Display tidmātare
9 Blockering
10 Lampa dubbel krets
11 Lampa timer
12 Lampa blockering
13 Decimalpunkt
14 Pausläge
ON/OFF Touch Control-systemet
HnctpyKnnn nn noJb3OBateJ MoHTaK
Bce onepaunn no MOHTaKy (JNEKTPnueckne IIOJIIOHeHH) IOJIJKHbI IPOHN3BOIDTBcR TOJBKO KBaIIHΦHnIPoBAHHBM IepcoHaIOM H B COOTBeTCTBHn C cyIeCTBYIOHMn HOpMaTHBaAMn. B Pa3Je "DIA MOHTaKHnKa" IIpHBcEhB Ice IIOIpO6HoCTH MOHTaKa.
IIpHMeHeHHc 3JIEMEHTbI HAFPEBAHHa TOUCH CONTROL (ynpabJIeHHe IprHKoCHOBehm)
Kabuua Jekko haKamur KJIaBnHJERKOrO HAKATN (HIN cecOpb TIIa EMKocTbIX DaTHKOB) IpeHa3HaueHbI JINB BbHOJIHeHH JIO6o BIePAUHN paCIOJOKeHb HA pOHTaIBHOH qAcTH KAPTOKN, INpHuEM JIA KaKdo KAPTOKN IpeYcMOTpeh COOTBeTCTBYIOHN JHCIIeB. BbIOJIHeHne JIO6o Ro JeCTBn IOITBePjJaETc 3ByKOBBIM CHTHAJOM.
TOUCH CONTROL A (Pnc.1)
1 BkIOUCHNC/ BBKIOUCHNC ON/OFF
230HaBapKN
3 DnHcPiEe 3aDaHHo 3HaueHHa
4 McbIc
5 BoJIbIe
6Iya.IbHaJcXema
7 TaHmep
8 DnncPiIe TaHMcpa
9 BIoKnPoBkA
10NoCBETKa HnHKaTopa AyabHO cxembl
11Подсветка HнДнКаТopaТаймсра
12 PioDCBcTka HnHkATopa 6IOKHpOBKn
13 DcTaTHNaToKa
14Iay3a
BkIOueHHe N BbIKIOueHne Touch control
- HaKaTa b Ha ceHcOpHyIO KJIaBbIy ON/OFF B TeueHne 2 cekyHn. BkIIIOHaTeC KOnTpoJb: HIIhKATOpbI ypOBHn peryIHPoBKn (3) IOKa3bBAOT "0", a DecrTHNHe ToQKn (13) MHTAOT. CJIeNyIOua
OeepaHnIIOJkHa 6bTb IpoH3BcIcHa B TcUChNc 10 cckyH, HHaue IpoH3OHET aBTOMaTHUcCKoe BHKIOUcHHe CHTeMbl.
Bkouenue 30nbi 6apku
IIph BkIOueHHn ChTeMbI IocpeCTBOM KJIABHIN (1), cIeIyET BkIOHTb 3OHy BapKN B TeueHHe IocJIeIyIOIHx 10 ceKyHN CJIeIyIOHM Opa3OM:
-
HαKaTb Ha KJIaBnHl (2), OTHOcIyIOcK Tpe6yEmoB Bam 3OHe BapKn. Ha COOTBeCTByIOIeM IHCIIeE IOBHTcR "0". 3arOpHTcRe DECHTHaHTo4Ka Ha IHCIIeE (13), yKa3bBaHa To, YTO BKIOUeHa COOTBeCTByIOIIa 3OHa.
-
OtperyIINpOBaBb ypoBeH MoIOHOCTH (OT 1 Do 9) C HOMOIIbKJIABHI “+” n “-” (5/4). JIg KJIABHI “+” n “-” IpeYCMOTpeHa fYHKIIH IOBTOpa. IIpn IocToHHOM HkaKaTHn Ha OJHy H3 3THX KJIABHI Bbl ybeJIuHbAeTe Hn YMeHbIaTe 3aJaAHoe 3HaueHHe IJIA KAKdoN KJIABHI B NcpHOl 0,3 cekyHbIb.
ToIbKO OHa 3OH MOKeT BKJIIOuAteBcB pa6Ory IPh OINHOIepaIHn, H IO3rOMy ToIbKO OHa DecaTHHnA ToKa ByET BKIIIOUChHa.
BbkioueHue 3oHbEapku
1.30HaBapKn DIOJKHs6bITB BKIOHcHnBa paOToy. DecaTHHnA ToKa (13) COOTBeTCTByIOUeN 30Hb BApKn 6dyTe NIOCEueHa.
2.CIHOOMIOHBOKJIABHHN(4)BbIECTH3aHaHHoe 3HaueHHe Ha“0” Upe33ckyHb3oHaBapKn ABToMaTHYeCKN BbIKIOHTcR.
BbCmpoe bcknouehe:
- Tpe6yMaHa 30Ha BapKn IJIKNbI 6bITB BKIOUcHa, a IccrTHuHa ToYka (13) coOTbcTCTByIOeH 30HbI bEyET IOcBeueHa.
2.IIphOIOHOBpemHOMHaKaTHNHaKJIaBHIN“+”H“-(5/4),30HaBapKN TYK BbIKIOHTc.
Houkamopb ocmano020 menia
B TOM cIyHae, eCIN TcMIepaTypa B 30He BApKN IOKa cIe BICOKa- yTO MOKET IIpNBecTH K OKOrAM - Ha IINCIJIe DaHHO 3OHbI BAPKN IIOBBNTcra CHMBOI “H” (ocTaTOHoe TEIIIO). IAHIIbI CHMBOI Hcye3HT ToIbKO B TOM cIyHae, eCIN OIIaCHIOCTN OKOROB 6OJIbIe He cyuieCTByET (IPN 60°C). Ha IINCIJIe IOBHTcra “O”, IOKa TcMIpePaTypa bYdET IIOJIepKHaTbcRA Ha YPOBHe HIXKe 60°C, aB TOM cIyHae, eCIN TcMIepaTypa IIpeBbIIHaer 60°C, bI yBnIHte CHMBOI «H».
IIKHOOMHH NKTPOHcprH Mb COBcTcM BIKIOHTb 3OHy BAPKN 3apaHee, IIH HcNOJIb3OBaHH OCTaTOHOro TEJIJa.
O6o3NaChHe OCTaTOHOro TnJa H" Hee3AcT NocJe OTKIOOHCHH IOaAH 3JKeTPOoHcPrHN B TeChHe IcpHOa BpeMeHH, IIpeBbIIaIOIero 3 ckyIbI.
Bbkuoyuen annapama
BbMOKTe BbIKIOHTb aIIHapat B JIOOOMeHT C IIMOIOIbIO KHOINB KIOOHEN (1).
301aBapknIya.IbHoiCxembl
DyaIbHn cxema IpeIycmOTpeHa IIIN IByX 30H BapKn, a HMeHHo: IeHTpaJIbHbI nnck H BHeIIHee KOJIbIO. Bbl MoKete BKIOHTb TOJIbKO IeHTpaJIbHyIO 3OHy IIIN o6c 3OHI bOIOHO.3To IOMoKet Bam BB6paTb 3OHy HArpeBaHnB COOTbcTbHN C IIHaMCTpOM HcNOJIb3yCMOn IOcyIb.
Bknouenue oonoi 3onbi uu dyanbno cxembl
- Heo6xOHNMO BKNIOHTb 30Hny DaJIbHO cxEMbl. Ha HcJIe e daHHo 30Hb HOBHTC DecaTHHa TaKa (13).
- Bb6paTbTre6yEmbYyPoBeHb(1÷9).
- BkHouHTb BTopyIO cxemy c IOMOIIbIO KJIaBHINI dyaiBHO cxembl (6).
JaHIOUka HnHkAropa (10) COOTBcTbYIOe 3OHB BApKN 3aROpHTc, H BTOpa CXema BKJIOHTcB pa6O TY BMcCTc CJIABHO CXEMOH.
BbKIOUeHne 6mopoui cxMebl 3onbl 6apku
1.Hco6xOJHMO BKJIIOHTb 30Hy IyaJIbHOcXcMb.IHa IIHCIIe cIaHHo 3OHbI IORBHTCJeCCTHUHAR ToKa (13).
- HαKaTb Ha KJIaBnIy IyaJIbHoH cxcMbI (6).JIaMIOvKa HIIHKaTopa (10) IoracHeT, a TaKKe BbIKIOHTcB TOpa cxcMa 3OHb BapKN.
6IOKpOBKa anHapata HIN 30Hb BApKn
EiokupoKa annapama
C HOMOIOI KHOIIKN 6JIOKHPOBKN (9) Bb MoKeTe 3a6IOKHPOBaTB BeCb aIIapat. IIpyeynpeKJIeHHN OcyIeCTBJIeHHN HeIIpeHnAmepEHbIX OHepaIu, N 3Ta yHKn TaKke o6ecneHBAet 6eONacHOCT JTei.
EcJH yHKnH 6IOKHPOBKn He de3aKTHBnPOBaHa nepeBbIKIOHeHem anIapata, pN cJeDyIOeM BKIOueHH OH a 6yET TaKKc aKTHBnPOBaHa.
PnakTHBpuBaHHo yHKuH 6IOKpOBKn BHe cmOKeTe paOtaTc aIapaTOM IocpeCTBOM HaKaTHKaJbHII.
ABTOMATHYIECKOE BBYKJIIOYEHHC 3aIHTHOH CHCTeMBI
EcHn OHa HnH HeckoIbKO 30H BapKn 6yDyT HeIpoH3BOJIbHO BKJIOUeHb H OCTaHyTCB KIOUOHeHHbIMN B TeueHne ONpeJeEHORO IIepHOa BpemeHH, 3aIHTHa HCTema IPOH3BeIETHX ABTOMaTHuecKoe BBIKIOUeHne IO HCTeueHHn HEKOTOPOro BpemeHH.
B ciyac ABtOMaTHueCKORo BbIKIOueHH 3aIHHTHOI cHCTeMbI, Bbl yBnINTe CHMBOJI "H".
III INOTBpaAChHn ABOMaTHCCKORBO BIKIOCHHHIOCTaTOHO HaaTb Ha KJIaBHNy BbOpa 30Hb HA KJIaBHN “+” H“-”, IO HCTeHnE TOrO IepHOJaBpMeHH.
ABTomatHueckn IIOoIrpB
ChTeMa ABROMaTHuecKO rIOIORpeBa yIPOoAeT IPOeCC BApKN, TAK KAK B 3OTOM Clyuae He tpe6yETcN IPhCYTCBHe YEIOBEKa Ha IIOPTaJIeHHB CERO IIHKJIa BAPKn. 3Ta fYHKIIHr OIPeJIeJIeT IIOIORpeB 3OHBapKn HA MaKCHMaJIbHOH MoIHOCTH, H 6bICTpo IOBOIDIT TeHepatypy B DAHHOJ 30He JO HyXHOr OyOBH. IIO HCTeueHHN ONPeJeHENHO rEPHOJa BpeMeHN, yPOBeHb MOIHOCTH BO3BpaAnaeTcK 3aDahHomy Iapametpy.
Akmuaa aomamuueckoo noozeba
Bb6paTb Tpe6yEmy 30Hy BApKN C NMOUHIO KJIABHH (2). Bb6paTb yPoBCHB 9 C NMOUHIO KJIABHH “-”; IocIc YcRO Bb6paTb yPoBCHB 9 IocpcIDCTBOM KJIABHH “+”. IocIc OTORO Bb6paTb Tpe6yEmbYyPoBEH MoIIIOCTH, HAnpHmep, yPoBEH 6, C NMOUHIO KJIABHH “-”.
BpeKHe ABTOMATHueCKOro IIOIOrpeBa,Ha HINCLIEe B COOTBeTCTBYIOIIe 30He BApKN 6yDet IIOOHepeIHO MHRATb 3aAHbI yPOBEHb (“6”) H CMBOJI “A”.
H3meneue ypo6n Maouhcmu e nepuod a6moMaumuecko2o noo2peba
1.Hc06xoHMo AKTHBnPoBaT Tpe6ymyo 3OHy. DccrTHHaar Toqka (13) COOTBCCTByIOe 3OHBI JOIXKa 3aRopctcb.
2.ИЗМСНТБурOBснпocрсдETВOMKlaBnH“+”H“-".EcIINурOBсныВсIHHTcH,HOBsIIпснODВрмСнHПОДрrcBa6yIDtpacCHTaH,IPHHMaBOBHIMaHHe yKe IIpoIeIIMNIIpeHODBpMcHH,3aHaHHbHa 3TanCпсьduIyIeroIporpaMHPOBAHn.
PnHmep: BbBbOpbaTe ypoBeHb 1, KOTOPOMy COOTBetCTByeT IepHOI BpeMeHH IOIOrpeBa, paBbH 1'.
IIO HCTeueHHN 30", yPOBeHb yBEJIuHnBaETcH IO 4. Ha ETOM yPOBHe, BpEMr IIOIOrpeBa COCTABJIER 6'30".
IocHe H3MeHcHHy yPoBHn, ABToMaTHueckn IIOOrppeB 6yIeT IpoDoJIkaTbc eIe 6' (3To pe3yJIbTaT BvHTaHaHH 6'30" - 30").
Jzakmuaba yynkuu aomamueckko nooepea
CHMBOJI“A”IOJIKeH6bITbBBBcEeHHaINCIIJIe3OHbI:
- Tpe6yecma 30Ha DoJHKHa 6bIb aKTHBHpObaHa. DecrTHHaa ToKa (13) cooTBcTcByIOiuee 30Hb DoJHKHa 6bIT bKIIIOUcHa.
- Haaatb Ha KnaBnHy "-(4) IIO HCTcHnn, IIO KpaHcH Mcpc, 10 ckyHIOncJIe AKTHBaIIHH _Y_I_II_III
ФункинТаймсра
IaHbI aBOMaTH3M TaKKe yIpoHaer IPOeCC BapKn, TaK KaK B 3TOM cIyue He Tpe6yeTcra IIpHcyTCTBHe CEIOBeka HII pOraKeHHN BCero UHKJIa BapKn. 3OHa BApKn aBTOMaTHueCKn BbIKIOHTcR IO HCTeHeHH 3aIIporpammPoBaHHOro IepHOJa BpeMeHH.
PnO TcYCTBHN HpOrpaMMHPOBaHHa KaKoJ-JIN603OHbI, yHKIIra TaMepa 6yET OpaHnueHa yHKiHei OTcHeta MNHT (o6paTHTeCb K CnCnHaJIbHOMy pa3eJy "yHKIIra TaMepa IInoOTcHeta MHHyT").
Akmuaun dyinkuu maiepea
1. Tpe6yMa3 30Ha ⅡJXHa 6bITb AKTHBHpObaHa. DecrTHHaa To4ka (13) COOTBeCTByIOeH 30HbI JIOJXHa BbCBeH BAtbC.
2. BbIbpaTb ypOeHb MeKJy 1 H 9.
3. HαKaTb Ha KπaBnHγ TaMepa (7): Ha dικηJIe TaI Mepa IOBHTcR H3O6paJKeHHe BpeMeHH “00”.
4. Bb6paTb BpemBapKn (OT 0do 99 MNHyT) C IIOMOuBIO KJIaBHII “+” n“-(5n4).
TaHmep BKIOOHCTBpa6Oty aBROMaTHueckn IIO IIPOIeCTBHN HECKOJIbKO CEKYHJ.
3arophtcIaMIOUka(11),OTHOCAK3aIPOpPAMHPOBaHHO 30HeBAPKnCfYHKnEeTaMcpa.
IIa6bIcTporo IporpaMMHPOBaHHBpeMH H BApKH,HaKaIb H He OTyckatb KJIaBHnY “+” HIN “-”.
Функпя таймета coOTIOCHTCЯ c OДHоу 3OHH BAPK.
KaK u3mnu mb 3anpoepaMMupoabaHoe 6pem 6apku.
MOKHO H3MeHHTb BpemB BapKn B JIO60MOMeHT.
1. Tpe6yemaa 30Ha ⅡOJIKHb 6bIb akTHBHpOBaHa. DecrTHHnA ToKa (13) COOTBeTCTByIOIeH 30Hb IOJIKHb BbICBEHbATbc.
2. Haxaht Ha KJIaBnIy TaImepa (7).
3. 3aIpoIpaMMHPOBaTb HOBbI IepHO BpeMeHH C IIMOIOKJIaBHII “+” N“-”(5N4).
IIa6bIcTporo IIporpaMMHPOBaHH BpMcHH BapKn, cIeDyct HkaTb HcOTIIyckatb KJIABHIIy “+” HIN “-”.
Omkouenue fynkunmaepea.
IIO HCTeueHHH 3aHaHHoRIO IepHOJa BpemcHn, Ipo3ByHT 3ByKOBoH CnHrAJI Ha IpoTJAckHHN 2 MmHyT.
EcJH BxOTHTe IpePBATb 3ByKOBOI CnHaI,IOCTaTOHIO HAKaAtb Ha IIo6yIO KJIaBHIy.
Cenac 30Ha BapKn BbKIOueHa.
Eclu Bby xomume npuocmanohumb paobmy maumepa nepeo OKOHuaHEm 3adaHoo nepuoda epemenu:
1. Tpe6yemar 30Ha IIOJHKHA 6bIb AKTHBnPOBaHa. DecrTHHnAra ToKa (13) COOTBeCTByOIOe 30Hb6yDet BBICBeHeHa.
2. Haxaht Ha KJIaBnIy TaImepa (7).
3. YcTaHOBHTb Ha HUcByIO OTMcTKy IepHO BpMcHN HaKaTHCM HA KJIaBHNIY "-(4).
Функия Таймета Ссчac OTKIOUChHa, OДHAKO 30Ha BapKN OCTaCTcR BKIOUChHOn, CC BBKIOUChHc CJIcIyCT IpoH3BcTH BpyHIIYIO.
Бсмрoe 6bKIOuOeue:
1. Tpe6yemar 30Ha JOJXHa 6bIb AKTHBnPOBaHa, DecrTHnHa ToKa (13) COOTBeCTByIOeH 30Hb 6yEt BbICBeHeHa.
2.Пи OДИНОВРЕМEHOM HAKATIN HA KIAHBHIN “+” n “-” (5 n 4), 3OHa BApKN HEMeJIeHHO BbIKJIOHTcR. TaKKe OTKJIHOaETcR n TaHMcP.
DyHKua maImepa o omcema MuHym
EcHn Bn Hc HcIOJIb3yCTaHHyIO cyHKIIIO IIO ONpCICHeHOI 30Hb BApKn, Bn MoKCTc cc HcIOJIb3OBA Tb IpocTo IIO OTCyCTa BpEmHn BmHyTax.
IporpamMnpoBaHHe OTeCtta MNHyT B TOM cJyAc, cJIN IIpHcNoCo6JIeHHe BBIKIOUcHo:
-
HaKaTb Ha KJIaBnHny BkIIOChnHa (1);
-
Haxkatah Ka KlaBnTu TaHmepa (7);
3.3aiporpaMMHPOBaTBKeJaeMoeBpeMaCIOMOIbIO KJIABHI “+” H“-”.
EcJIN INPCHIOOC6JIeHHe BKJIIOUeHO, H 3OHa BAPKN AKTHBnPOBaHa:
- OTMeHHb Bb6Op 30Hb, HauKaB Ha KJIaBHnHy Bbl6opa (2): BbIKJIOHTcA DecrTHHa TaToKa (13);
2.HaKaTbHaKJIaBnIy TaMepa(7);
3.3aiporpaMMPOBaTBKeJaemoeBpemcIIMOIObIOKJIABHIN“+”n“-”.
OmkTuoyehue dyHKuuu omcuema MuHym
IIO OKOHaHH 3aHaHHo IepHOa BpeMeHH, IIpo3ByHr 3ByKOBOI cHrA H IpoTKeHH 2 MHHr.
EeHN BxOHTHe IpePBbTb 3ByKOBo CHHaJI,IOCTaTOUHO HaKaTaB HIO6yIO KJIaBnIy.
Eclu Bby xomume npuocmanobumb dyHKmuo maImepa do OKOHua omcuema 6peMenu:
- Haxkatah Ka KlaBnTu TaiMepa (7);
2.YCTAHOBHTBpeMHaHOJB,HaKaABHaKJIaBHINH“(4).
Битсрөо omкнioчөнue:
OIOHOBpeMeHHo HaxKaTb Ha KJIaBHIIH “+” H “-” (5 n 4), n TaImePOTKJIOHouHTcR.
PcKHMnay3bl
Akmua pekuma nay3b
Ioka 30Hb BapKn HaxoTcB pa6OcM pcKHMc, Bb MoKcTe npHOCTaHOHTb nx pa6Oy HaKaTHcEM KJIaBHIN "Pausa" (nay3a) Ha IpOTJKeHH 1 cekyHbl.
Bo epemnaay3b:
3aIporpamHHpoBAHHbte TaHMePb IPhOCTaHABJIHBAOT CBOIO paOToHa Bce BpeMaIy3b. B TOM cIyIae, cCJH AKTHBPOBaH 6ycTeP, OH TAKKe IPhOCTaHABJIHBAeT CBOIO paOTo Ha IIpoTaeHH HAY3bI.
PekHM IIay3b MoKcT IINITbCMAKCHMaJIbHO 10 MHHr. EeHN BBy er He OTMeHHJIN B 3OTI NEPHoI BpeMeHH, TO BbIKIOOHTCa Touch Control. MoKHO BbIKIOOHb Touch Control B JIO6OI MOMeHT, HAKAB Ha KJIaBHIy ON/OFF, B3ROM cIyae peKHM IIay3b 6yder OTMeHeH.
Ommena peKuma nay3b:
IpiH HaaKaTHN KJIaBHN IIay3bI, COIIPOBOKJAcMbIM HaKaTHcM Ha JIO6yIO IpyrIyO KJIaBHN IIy, Bb BEpHeTecb K IIpeIbIyIeMy peKHM py60tI. EcIIH Bb HC HaxKMTeC II HA OINy H3 KJIaBHN B TcUChHc 10 cckYHIOncIe HaaKaTHHa KJIaBHN IIay3bI, To Touch Control OTKIIIOHTcR.
MepbipedeoctopoKnoctn(Pnc.3)
-MbCOBeyem Bam HcIOb3OBaTb IOcyu C IIOCKHM IHOMIINPnHrTOBJIeHHN IIHUN C IOMOIIbIO ⅡJMEHTOB HAIPeBAHH, INPHyEM dHaMeTp Hx DAIOJIkeH 6bITb paBBHM INH HeCKoJIbKO INpeBbHATb dHaMeTp,yKa3aHHbHa cepHrpafHH.
- CJIeIITb 3a TeM, qTOb6 b KHNIOKcTB He IpoJIINBaJIacb Ha IIINTy. IIO3OMy yMeHbIInTe MOUHOCTb HArpeBaHHN IIpH KIIIEHH NIN IocJIe TOrO, KaK KHNIOKcTB IOCTHJIA HyKHyO Bam TcMIpcATpy.
-He octabJIHrTe BKIOHcHbIMN ⅢIeMeHTbHarpeBaHH63HX HCIOB3OBaHHn IO HA3NaCHHH, H He CTABbTE Ha HIX IyCTbc KAcTpOIN INIINIO6yIO NocvU.
- IIph pa3JIOme IOBepxHOCTH IJIHTbI, cJIeIyET HeMeJIeHHO OTKIIIOHTb aIIIapAT OT CCTH IITaHHBO H36cKaHHc 3JIeKTPnueckoro IIoka.
-3aIpeIaetcHcIOJIb3OBaTb IapObIe aIIIapApaTb IJIa OCHCTKN IOBepxHOCTN IIINTb.
-Даннь anapat He npeHa3haueH erero HcIOIb3OBAHHJIOBMn (BKJIIOyA JctcH) c OrpaHcyehHbIMn ΦH3HueckHM,CEHCOPHBIMN HJY yMCTBeHHbIMn CIOOC6HOCTaMH, HJIN TEMNHJIIaMH, y KORO HCT IOCTaTOUHorO ONbTA HJIN 3HaHH, 3aHCKJIIOChHcM Tex CTyacB, KOrJa OTBCTCTBCHHH 3a6e30IaCHOCTb IIPOBcPHJ Hx DCHTBn H BblaJI HM BCE
COOTBCCTBYYIOHNE HNCHTpYKIIHN IIO NcIIOJIb3OBAHIO anIHaPaTa.
HeoXoHMO cJIeHTb 3a TeM, YTO6bI JeTH He HrpaJH C daHHbIM aIInapaTOM.
Yxoi (Pnc.4)
IIpn IIOIaIHIN Ha KOHΦOPKHOCTATKa aIOMHHeBOI FOJIbH, OCTaTKOB IIINHJ, KHPbIX HHTeH NIN 6pb3r KHPa, caxapa HIN OeHb caxapHCbIX INPOyKTOB, CIEyETHX HEMdJIeHNO yIaIITb C BAPOHIO IOBepXHOCTN IocpeCTBOM CIEIHaJIbHOrO CKpe6Ka BO H36eKaHHe IapAIaHHB BAPoOH NOBepxHOCTN. IocJIe 3TORO IIpOMbIT IOBepXHOCTb CIEIHaJIbHbIM INPOyKTOM C HCIOJIb3OBaHHem BYMaXHOrO IIOJIOTEHua, 3aTeM CIOJIIOChyTB BOIOH N BbCyIIIb TcHcT0r TpIIOUkO. KaterOpHueckn 3aIIpcIaCTcHcIOJB3OBaTb abpa3HBHbc rY6KN HIN IeTKN, a TaKke 3aIIpeIaETc HIOJIb3OBaTbCBA rApeCCNBbIM XHMneCKHM YHCTIHHM cpeCTBaMH HIN IITHOBBIOHTeJIaMH.
HHeTpKHHI MoHTaKHnKa
MOHTAK
HactoIIHe HnctpyKINI INpeHa3NaueHb IINHcIOJIbOaIIH B IIepHOJ MOHTaKa I JIM MOHTaKHka, 3TO pyKOBOCTBO JIM MOHTaKa, peryInpOBKn I yXoJa 3a IIINTOn B COOTBeTCTBc C cyIeCTByIOUHMn HopMaTHBaAMH. He 3abBaIte O TOM, qTO HEo6xOJIMO OTKIOHTb IIHTy IJIIBIOJIHeHHa KaHX-JIN60 oncpaIIH.
YctaHObKa(Pnc.5)
1BnCpeH
2IpeHnaTb
JaHHb anHapat npeHa3Naueh nn yctaHOBKn B COOTBeCTByIOCh 30hc TaK, KaK OTo yka3aHO Ha PcyHKc. OChb BAKHIOIIOROTOBHT bIy cTaHOBKN BeCb IIepHMETp IOBepXIOCTH C HIOJIb3OBAHHem BOIOHcnpOHIIacMOI IIeHKN, BXOJIaeB KOMIIJEKT IOCTABKN.
Jektpueeckne noiknooyenra
IpeiIOIKIOueHHeM K cTeH IHTaHH, y6eIHTEcb B ToM, TTO:
-XapakTepehCTHK yctAHOBKcOBHaJaHOc xapaKTepeHCTKamH, IIpHBeEHbMn Ha yctAHOBOCHoI IlaCTHHe, HAXOJaIeHcHa JHe IIaHEJIIN DJIaBapKn;
-Дя yctaHOBKN IIpcIyCMOTpeHO IOCTaTOUHO MOIHOC 3a3mIChHC, B COOTbcTcBHH C HopMaTHBaMH H Tpc6oBaHHMn DeIeCTbYIOIIero 3aKOHDAteJIbCTBa. 3a3emJIeHHe IIpeIyCMOTpeHO ByCTaHOJIeHHBX HOpMaTHBAX.
B TOM cIyac, cIIN IIA aIIIapata Hc IpeIyemToPCH IIHyp H - HIN PO3eTKa BKIOHoeHHN, Heo6XOHNMO HcIOJIb3OBaTb MaTePhAI, IpiHroDnBI dIg 3HaueHHN 3IEKTPHecKO rTOKa, IpiHBeIeHHbIX Ha yCTaHOBOUHOH IIactHHe C XapaKTEpHCTHKAMH, H IIN DaHHO B pa6Oey TEMIIepaTypb. 3aIIpeIaeeC HcIOJIb3OBaTb IIHyp B cIyuae erO IIepeIpeBaHHN IIpy IIpeBbIIeHHN 50^ TEIMIIepaTypb OKpykaIOUIe cpebl.
EcIN BAM Tpe6yetc IIpmaoe HIOKIIIOHHe K ceTH, CJIeIyET BCTABHT MHORIOIOHOCHbI IpekeKIOUATEJIb C MHHMaJIbHBIM pacctOraHHem MeKJy KOHTaKTamH B 3 MM, paccHTaHHbHa MOIOHOCTb IIINTb, H OTBeCAIOHN DeIcTBYKOIHm HopMaTHBaM (HHP 3a3cMIIEHHA JcTb/3cIEHb Hc JOINKe H IpcpbIbTaCBI IpekeKIOHouateJIcM). Po3tKa HIN MHOROIOIOHOCHbI IpekeKIOHouaTeJIb IOJKHI 6bITb IIPOCTb H IOCTyIIHb IJIa IIOIKIOHOeHHa YcTAHOBIEHHoro anapata.
KohctpykTOp CHMaet Cce6B Bc0 OTBETCTBEHHOCTb TOM cIyae, ecJH BCE BblIeYka3aIIHbIe Tpe6OBAHH H O6blHbIe HOpMbI IpeIOCTopOKeHOCTH He 6byT co6JIHOJIeHbI.
B cayuae noopeckenu uunypa numanu, oopamumecb K fabpukanmy 20 e2o zamehui, uTu oopamumecb 6 ynoiHOMouenbu ueimp mexnueckou nomouu, uTu Jke oobpamumecb K mexnueckomy cneuaTucmy IIOBOO zuempac nodoohmu noHOMouuMu, dny npedompaenna 6o3nuKHO6eHuaIOBOO 6uda pucko6.