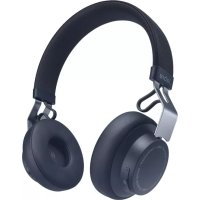
GN8120 - Receiver JABRA - Free user manual and instructions
Find the device manual for free GN8120 JABRA in PDF.
User questions about GN8120 JABRA
0 question about this device. Answer the ones you know or ask your own.
Ask a new question about this device
Download the instructions for your Receiver in PDF format for free! Find your manual GN8120 - JABRA and take your electronic device back in hand. On this page are published all the documents necessary for the use of your device. GN8120 by JABRA.
USER MANUAL GN8120 JABRA
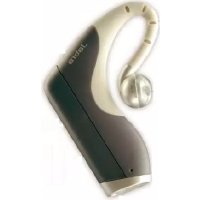
Thank you for purchasing the GN 8120 USB.
This user guide provides you with information and instructions on using your GN 8120 USB, and contains the following sections:
Contents
- About the GN 8120 USB .... 3
- Benefits and special features .... 4
- System Requirements and installation 5
- Installing software: for Windows Me and Windows 98 SE operating systems only .... 6
- Adjusting the Speaker Volume, Side Tone and Microphone Levels 8
- Frequently asked questions .... 10
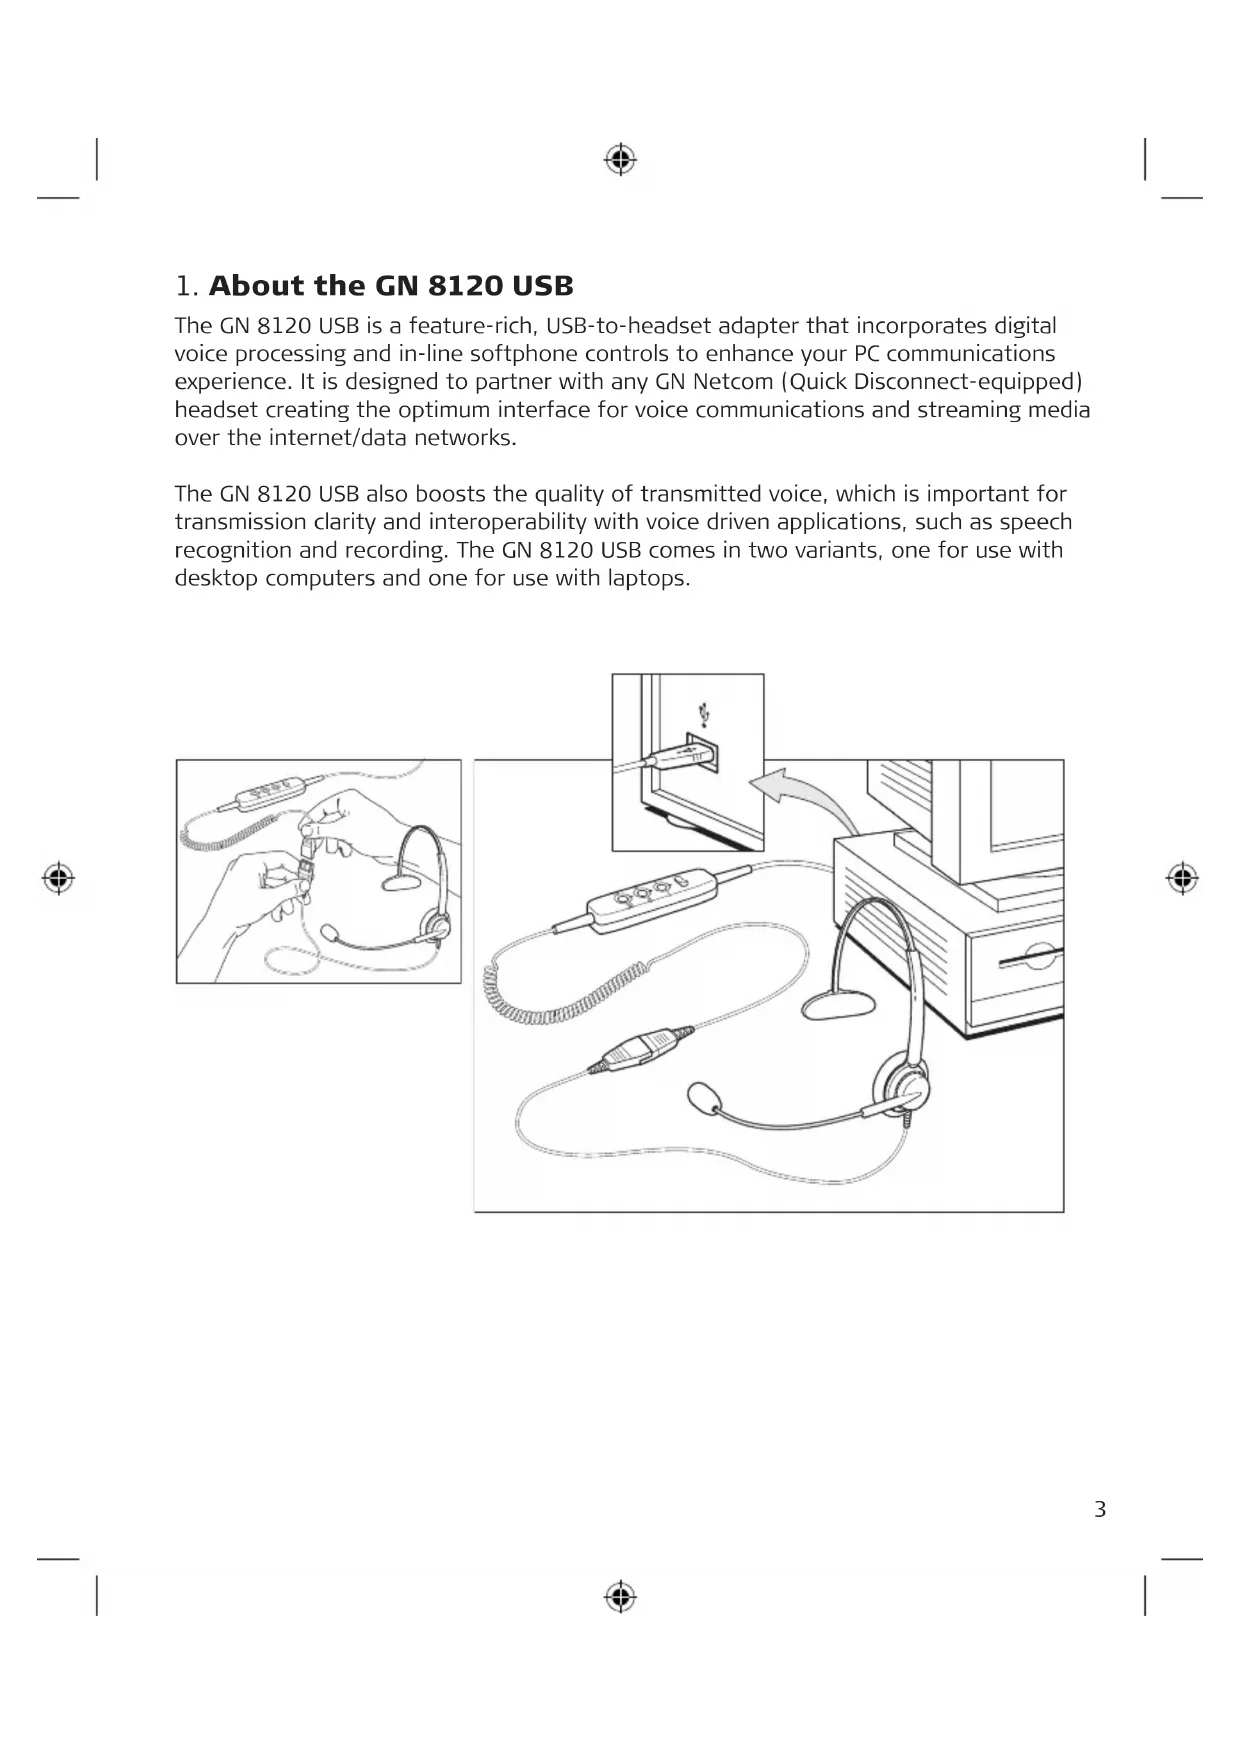
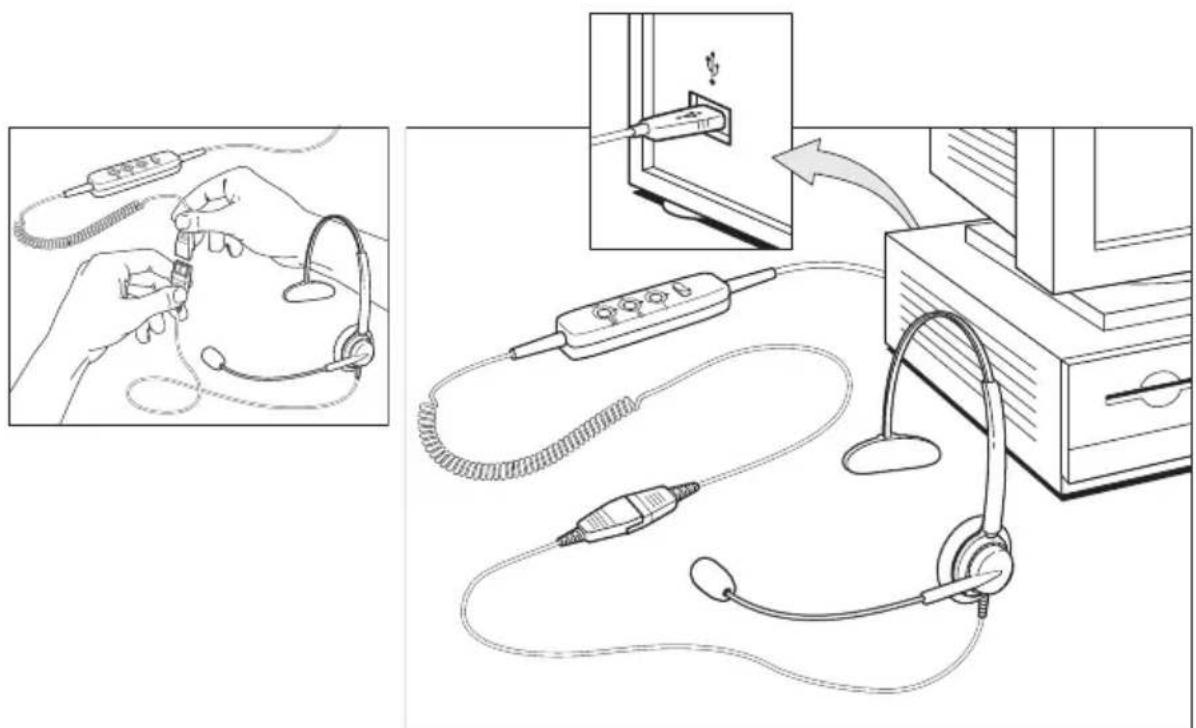
1. About the GN 8120 USB
The GN 8120 USB is a feature-rich, USB-to-headset adapter that incorporates digital voice processing and in-line softphone controls to enhance your PC communications experience. It is designed to partner with any GN Netcom (Quick Disconnect-equipped) headset creating the optimum interface for voice communications and streaming media over the internet/data networks.
The GN 8120 USB also boosts the quality of transmitted voice, which is important for transmission clarity and interoperability with voice driven applications, such as speech recognition and recording. The GN 8120 USB comes in two variants, one for use with desktop computers and one for use with laptops.
text_image
Diagram illustrating the installation and connection of audio equipment, showing earplifier, connector, and headset assembly.2. Benefits and special features
The GN 8120 USB provides unique benefits and special features to deliver superior audio quality, including:
User accessible side tone which allows you to hear your own voice in the headset speaker. Side tone is part of regular telephone calls, but is not typically a part of Internet/PC-based telephony.
SmoothStream™ digital audio correction ensures cleaner, distortion-free, high quality sound by monitoring the line for "dropouts" and "lost packets". It then smoothes the audio stream to reduce the resulting clicks, pops and hitches.
Microsoft ^® certified for use on Windows ^® 2000 and XP (also for use on Mac OS 9.0.4 or greater), the GN 8120 USB is a true plug-and-play adapter. Just plug your GN Netcom brand headset into the adapter, and plug the adapter into the USB port of your computer (desktop or laptop).
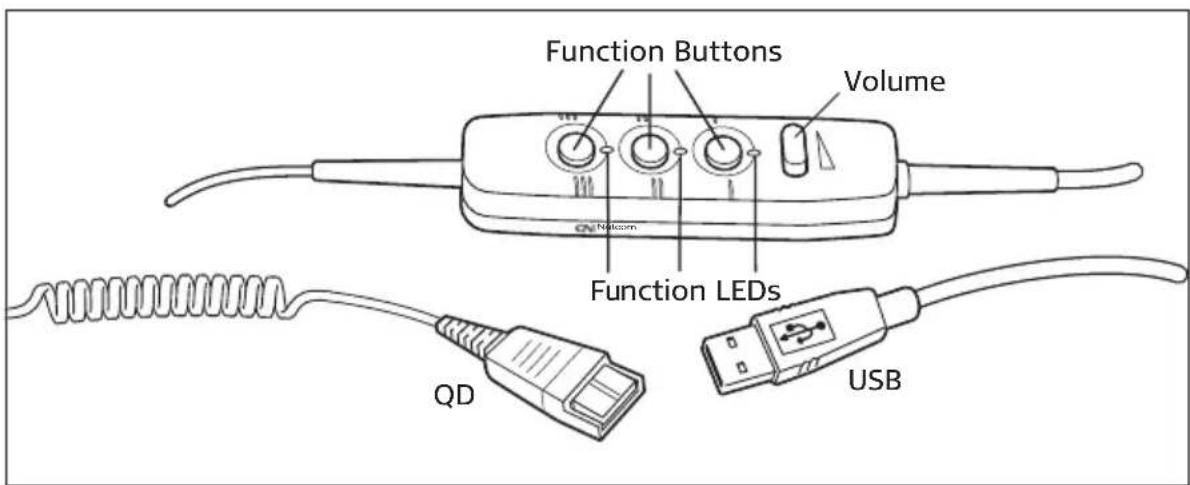
In-line Function Controls
The in-line function controls facilitate quick and easy access to the most common softphone calling functions.
- Volume Rocker Control: Quickly adjust speaker volume with the in-line volume rocker control.
Press the rocker control right to increase volume and left to decrease volume.
- Call Function Buttons: Gain quick and easy access to the most common softphone calling functions with in-line call function buttons. The functions associated with each button will vary based on softphone. A separate user guide provided in the GN 8120 USB box or directly with compatible softphones gives a detailed overview of each function.
Examples of common softphone functions are answer/end calls, emergency calling, call mute, call forward, speed dial, and answer voice mail.
- Call Function LEDs: Clear visual indication that a call function has been completed is provided through integrated multi-color LEDs located above each function button. The LED functionality will vary based on softphone. A separate user guide provided in the GN 8120 USB box or directly with compatible softphones gives a detailed overview of each LED function.
Examples of common LED visual feedback are LED flashing for an incoming call or pending voicemail, solid LED when the call is open or microphone is muted.
text_image
Function Buttons Volume Function LEDs QD USB3. System Requirements and installation
The GN 8120 USB requires the following operating systems and an available USB port:
- Windows XP
• Windows Me (Millennium Edition) - Windows 2000
• Windows 98 SE (Second Edition)
• Macintosh OS 9.0.4 (or greater).
The GN 8120 USB does not work with earlier releases of these operating systems.
Windows XP, Windows 2000 and Macintosh OS 9.0.4 (or greater) operating systems:
With the Windows XP, Windows 2000 and Macintosh OS 9.0.4 (or greater) operating systems, you are ready to use your GN 8120 USB and require no software installation. Simply plug the USB connector into any USB port on the computer.
Windows Me and Windows 98 SE:
To use the GN 8120 USB for the first time, you need to install the USB drivers necessary for the computer to recognize the device. Turn on your computer and let it complete the boot-up process. Make sure that you are not running any applications.
Plug the USB connector from the GN 8120 USB into an available USB port on the computer. The first time Windows detects that the device is connected, it recognizes that there is new hardware required and automatically launches the Add New Hardware Wizard.
Windows Me:
The Add New Hardware Wizard will launch one (1) time, installing the following driver:
- USB Audio Device (INF\WDMA_USB.INF).
Windows 98:
The Add New Hardware Wizard will launch three (3) times, installing the following drivers:
• USB Composite Device (INF\USB.INF)
- USB Human Interface Device (INF\HIDDEV.INF)
- USB Audio Device (INF\WDMA_USB.INF)
This driver is typically pre-loaded in Windows. No additional software is needed. If you upgraded your system to Windows Me, you may need to use the upgrade disk during this installation.
4. Installing software: for Windows Me and Windows 98 SE operating systems only
Plug the USB connector from the GN 8120 USB into an available USB port on the computer. The first time Windows detects that the device is connected, it recognizes that there is new hardware required and automatically launches the Add New Hardware Wizard.
Add New Hardware Wizard (1) - USB Composite Device (Windows 98 SE Installation)
- The Add New Hardware Wizard indicates that it has found the new USB Composite Device. Click Next.
- The Wizard prompts you to search for the best driver for your device or select the driver you want from a displayed list (2). Select Search for the best driver for your device. Click Next.
- Windows now searches for new drivers in a specific location (3). Uncheck all the boxes. Click Next.
- The Wizard indicates that it is ready to install the best driver for this device (4). Click Next to install the driver.
- Click Finish when the Wizard is complete.
Add New Hardware Wizard - Human Interface Device (Windows 98 SE Installation)
- Next, the Wizard automatically installs the USB Human Interface Device. The Add New Hardware Wizard (5) indicates that it has found the USB Human Interface Device. Click Next.
- The Wizard prompts you to search for the best driver for your device or select the driver you want from a displayed list (2). Select Search for the best driver for your device. Click Next.
- Windows now searches for new drivers in a specific location (3). Uncheck all the boxes. Click Next.
- The Wizard indicates that it is ready to install the best driver for this device (6). Click Next to install the driver.
- Click Finish when the Wizard is complete.
Add New Hardware Wizard - USB Audio Device (Windows 98 SE & Windows Me Installation)
- Next, the Wizard automatically installs the USB Audio Device. The Add New Hardware Wizard (7) indicates that it has found the USB Audio Device. Click Next.
- The Wizard prompts you to search for the best driver for your device or select the driver you want from a list (2). Select Search for the best driver for your device. Click Next.
- Windows searches for new drivers in a specific location (3). Uncheck all the boxes. Click Next.
- The Wizard indicates that it is ready to install the best driver for this device (8). Click Next to install the driver.
- Click Finish when the Wizard is complete.
If the Wizard Cannot Locate the Driver
If the Add New Hardware Wizard cannot locate the driver, insert your Windows Operating System CD-ROM into the CDROM drive. Once inserted, press Back, and check the box for your CD-ROM drive (usually D). Click Next. Click Finish when the Wizard is complete.
Note: Do not unplug the USB connector from the computer while an application that uses USB audio is running. This could cause a system crash.
5. Adjusting the Speaker Volume, Side Tone and Micro-phone Levels
- Test that the speaker volume in your headset is working and set at a comfortable level by adjusting the blue volume rocker control referenced in the introduction dia
gram (rock right for +, and left for -), or by clicking once on the speaker icon in the system tray.
Click on the volume adjustment slider (9) for system sound, and adjust the volume to a level that is comfortable for you.
- The transmit level for the microphone is controlled by software only. Go to the Control Panel (10). Double click on Sounds and Audio Devices (Windows XP) or Sounds and Multimedia (Windows Me and 2000) or Multimedia (Windows 98) to open the Properties window.
- The Audio tab in the Properties window (11) lets you adjust the Sound Playback or speaker levels and the Sound Recording or microphone levels.
Adjusting the Speaker Volume and Side Tone Levels with Windows OS
- Under Sound Playback (11), click the Volume button (Windows XP, Windows Me and 2000) or Playback button (Windows 98) to open the Speaker dialog box (Windows XP, 2000 and 98) or the USB Audio Device dialog box (Windows Me).
- This dialog box (12) allows you to adjust the volume output levels for different sources independently. Most levels are adjusted by the Volume sliders. Make sure that the Volume sliders are set in the middle of the control and the Mute all box is not selected.
- These sliders also allow you to adjust the amount of side tone you hear in your headset. Side tone allows you to hear your own voice in the headset speaker, creating a more natural sounding conversation.
Adjusting the Microphone Transmit Levels with Windows OS
- The Audio tab in the Properties window also lets you adjust the Sound Recording or microphone levels.
- Click the Volume button (Windows XP, Windows Me and 2000) or the Recording button (Windows 98) under Sound Recording to open the Sound Recording dialog box (11).
- The Volume slider (13) adjusts the sound recording or microphone levels. Make sure that the Volume slider is set in the middle of the control and the Mute box is not selected.
Note: These controls adjust the volume, however, many other applications contain their own volume controls. These independent applications may override the Windows controls and work independent of the GN 8120 USB sound controls. Consult your software owner's manual if you have any questions.
Adjusting the Sound Quality
- Under Sound Playback (11), click the Volume button (Windows XP, Windows Me and 2000) or Playback button (Windows 98) to open the Speaker window (Windows XP, 2000 and 98) or the USB Audio Device window (Windows Me).
- Make sure the Advanced Controls option is checked under the Options drop down menu. Double click on the Advanced tab under the Speaker Slider to open the Advanced Controls for Speaker window. (14) AGC (Automatic Gain Control) which provides automatic volume leveling, Bass Boost and Bass/Treble controls can now be selected
Adjusting the Sound Recording Quality with Windows OS
- Go to Start > Programs > Accessories > Entertainment > Sound Recorder to open the Sound Recorder dialog box (15).
- Adjust the sound quality from the default setting of 8 Bit, Mono audio attributes to 16 Bit, Stereo. To do this, go under File in the Sound Recorder dialog box. Click Properties to bring up the Properties for Sound dialog box (16). Under Format Conversion, click Convert Now.
- The Sound Selection dialog box (17) appears. Under Name, change to CD Quality. The Attributes will automatically change to 44 kHz, 16 Bit, Stereo. Click OK. Click OK again to leave the Properties for Sound dialog box.
Testing the Microphone
To test the microphone, use the sound recording utility that comes with Windows.
- Testing the Microphone Position the microphone approximately one finger's width away from your lower lip (18).
- Go to Start > Programs > Accessories > Entertainment > Sound Recorder to open the Sound Recorder dialog box (15).
- Click the Record button and record a voice file. Click the Stop button when you are done. Replay the file by clicking the Play button. If you hear your voice, the recording was successful and the microphone is working properly.
If you cannot hear your voice, go to the Frequently Asked Questions section.
Warning! Although GN Netcom professional headsets have built-in hearing protection, computers are capable of generating extremely loud sound bursts such as those made by modem connections. Always check the volume level before putting on the headset.
6. Frequently Asked Questions
How is the GN 8120 USB different from other USB adapters?
The GN 8120 USB is a quality USB system. Because it is a separate adapter, it allows you to choose any of GN Netcom's professional-quality QD-equipped headsets. Other
USB adapters are consumer grade PC headsets that are sufficient for basic use, but may not necessarily be comfortable or durable enough for all-day use.
The GN 8120 USB also incorporates in-line controls to facilitate quick and easy access of the most common softphone calling functions, creating the optimum interface for voice communications.
Which headsets can I use the GN 8120 USB with?
The GN 8120 USB is designed to work with GN Netcom professional headsets, which are equipped with a Quick Disconnect (QD) which mates to the QD jack on the device. Disconnecting at the QD allows you to walk away from your computer without removing your headset. Before using your headset, join the QD to the mating connector on the GN 8120.
Why don't the function buttons work?
The GN 8120 USB function buttons will only work with compatible softphones. A separate user guide provided in the GN 8120 USB box or directly with these compatible softphones gives detailed overview of each function. Examples of commons softphone functions are answer/end calls, emergency calling, call mute, call forward, speed dial and voice mail.
Why is my Microphone Transmit level low?
Make sure the microphone volume level is set properly. The Audio tab in Properties window lets you adjust the Sound Recording or microphone levels. Click the Volume button (Windows XP, Windows Me and 2000) or the Recording button (Windows 98) under Sound Recording to open the Sound Recording window (15). The Volume slider (13) adjusts the sound recording or microphone levels. Make sure that the Volume slider is set In the middle of the control and the Mute box is not selected.
I plugged the GN 8120 USB into my USB port, but the sound is still coming through the sound card.
Go to Control Panel. Double click on Sounds and Audio Devices (Windows XP) or Sounds and Multimedia (Windows Me and 2000) or Multimedia (Windows 98) to bring up the Properties dialog box (11). Click on the Audio tab. Under Sound Playback, choose the USB Digital Audio as the preferred device. Select the Use only default devices box. Click OK.
Why can't I listen to my RealAudio files with the GN 8120 USB?
USB audio devices do not always work with RealAudio due to the player's software design. You can listen to various digital audio files such as MP3 and Wave through the GN 8120 USB using Microsoft's MPlayer and other players.
Why can't I hear my voice when I record a voice file in the Sound Recorder?
Check that your speaker volume is set properly. Go to Control Panel. Double click on the Sounds and Audio Devices (10) (Windows XP) or Sounds and Multimedia (Windows Me and 2000) or Multimedia (Windows 98) to bring up the Properties dialog box (11). Click on the Audio tab. Under Sound Playback, click the Volume button (Windows XP, Windows Me and 2000) or Playback button (Windows 98) to open the Speaker dialog box (12) (Windows XP, 2000 and 98) or the USB Audio Device dialog box (Windows Me). Be sure that the Volume sliders are set to the middle and the Mute all box is not selected.
Check that your microphone volume is set properly. Go to Control Panel. Double click on the Sounds and Audio Devices (10) (Windows XP) or Sounds and Multimedia (Windows Me and 2000) or Multimedia (Windows 98) to bring up the Properties dialog box (11). Click on the Audio tab. Under Sound Recording, click the Volume button (Windows XP, Windows Me and 2000) or the Recording button (Windows 98) to open the Sound Recording dialog box. Be sure that the Volume slider is set to the middle of the control and the mute box is not selected.
Record a new voice file. Replay the file. If you can hear your voice, the recording was successful and the microphone is working properly. If you still cannot hear your voice, contact GN Netcom customer service.