BT100 - Hi-fi system JABRA - Free user manual and instructions
Find the device manual for free BT100 JABRA in PDF.
User questions about BT100 JABRA
0 question about this device. Answer the ones you know or ask your own.
Ask a new question about this device
Download the instructions for your Hi-fi system in PDF format for free! Find your manual BT100 - JABRA and take your electronic device back in hand. On this page are published all the documents necessary for the use of your device. BT100 by JABRA.
USER MANUAL BT100 JABRA
Introduction 4
What's in the package 5
JABRA BT100 Bluetooth Headset Features 6
Charging & Battery Time 7
Linking the Headset to the Phone 8
Choosing Right or Left Ear Wearing Style 12
Placing the Headset on your Ear 13
Speaker Volume &Volume Control Buttons 14
Microphone Mute 14
Using your JABRA BT100 Headset 15
Resetting the Headset 18
Storage of Headset 18
Audio & Visual Indicators 19
Certification and Safety Approvals / General Information 21
Warranty & Parts Replacement 22
Introduction
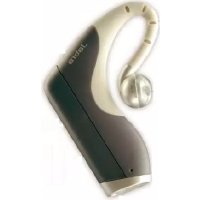
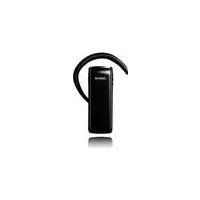
The JABRA BT100 Bluetooth Headset is a lightweight "over the ear" wireless headset utilizing Bluetooth technology. The Headset contains a microphone and a speaker, and is intended for hands free communications with mobile phones. The Headset power is provided by an integral rechargeable battery. The battery must only be charged with the supplied charger.
Any device that you want to use with the JABRA BT100 Bluetooth headset has to be compatible with Bluetooth wireless technology and support the headset profile. To be able to use the headset with a mobile phone, the phone needs to have built-in Bluetooth technology, or a compatible Bluetooth phone adapter.
The JABRA BT100 is a cordless handsfree headset based on Bluetooth wireless technology. Please read the user booklet before you start using the product and make sure that you:
Charge your JABRA BT100 headset for up to 2 hours before you use it the first time. (See page 7)
Make sure that you pair the headset with your Bluetooth phone (or other device) before you start making calls. (See page 8)
Thank you for choosing to buy the JABRA BT100, we hope that you are happy with your choice!
What's in the Package?
Your JABRA BT100 Bluetooth headset package comes equipped with a headset and charging solution.
In this package you will find:
One JABRA BT100 Bluetooth Headset
One Headset Mains Charger unit
One Headset In-car Charger Unit (Not available in some packages)
One JABRA BT100 User Guide
(Pleases use only the approved and compatible chargers for this device)
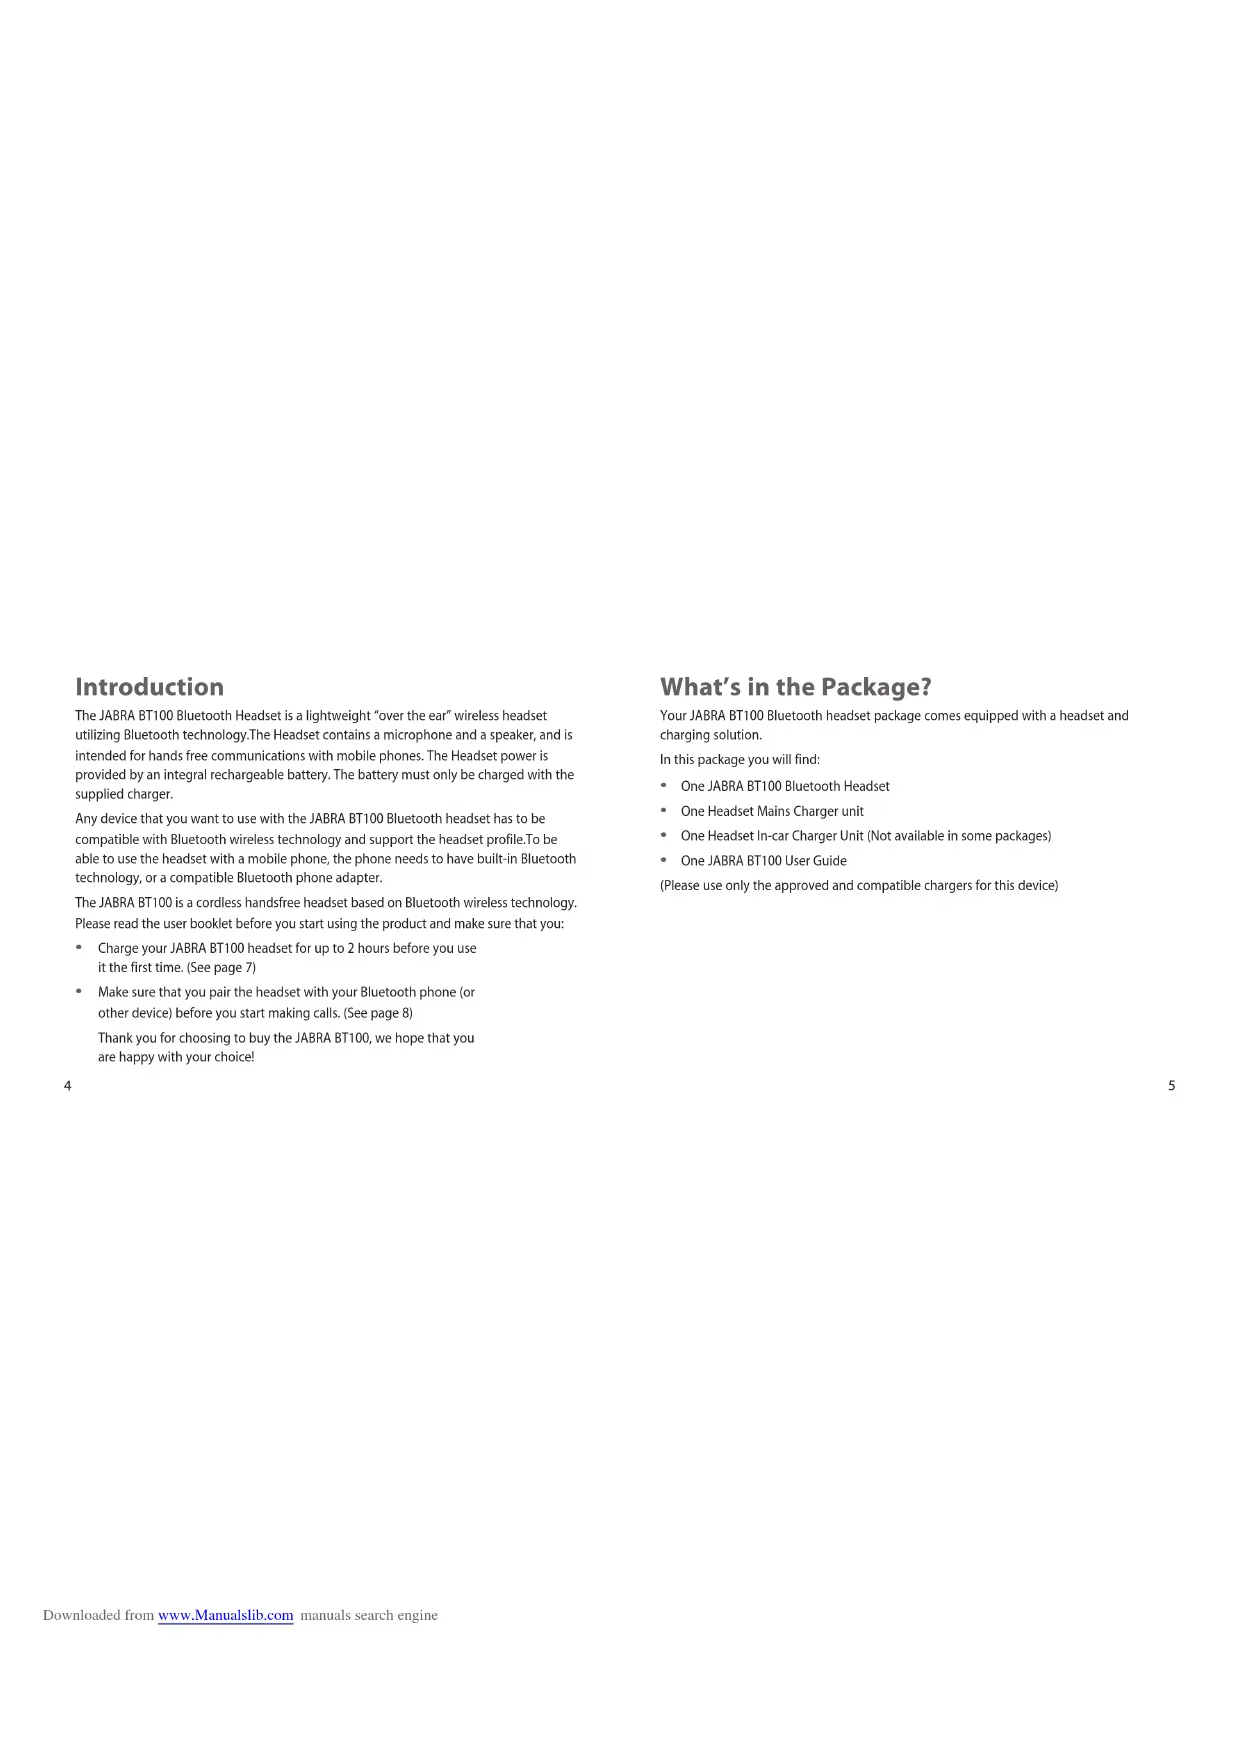
JABRA BT100 Bluetooth Headset Features
- Blue Indicator Light: provides the status of the headset (on call, standby).
- Volume Control: adjusts the speaker (receive) volume.
- Multifunction Button (MFB): controls various functions of the headset.
- Speaker: receiver for the other party's voice.
- Microphone: voice input for transmission.
- Boom: contains the microphone and controls the power (on/off) status of the headset.
- Earhook: how the headset is worn on either ear (turn around for left/right ear).
- Charging Port: receptacle for battery charger.
Charging & Battery Time
Before you can use your headset, you need to charge the headset's self-contained battery for up to two hours.
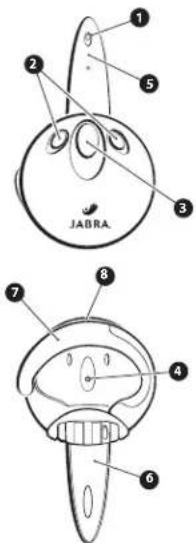
To charge the headset, please follow this guide:
- Insert the travel charger's electrical plug into an electrical outlet, or the in-car charger power socket into the socket in your vehicle.
- Plug the mains travel charger (or in car charger) into your headset charging port with the headset facing up.
- While charging, the blue headset indicator light is on and remains on until charging is complete.
- When charging is complete, the light will go out, you then remove the charger from the headset.
A fully charged battery provides over 4 hours of talk time, over 10 hours of linked standby time (Bluetooth data link - no audio), 72 hours of unlinked standby time (no Bluetooth link, boom open) and over 40 days of storage time (boom closed).
Low Battery Warning Tones: When you hear five rapid high tones through the headset's speaker at 20-second intervals, the headset needs recharging, and you will then need to follow the above steps 1-4.
Linking the Headset to the Phone (Pairing)
The Bluetooth connection between the headset and your phone can be established via a paired link. With a paired link, the phone remembers the headset's ID, eliminating the need to repeat the set up process with future use. The headset can be paired with up to eight Bluetooth devices. Devices are stored in a "Paired Device" list in memory by chronological order. When an attempt to pair to more than eight devices is made, the oldest paired device is removed from the list.
Any of the eight paired devices can initiate a paired connection to the headset.
The headset will only initiate a paired connection (via opening the boom) with the last device it was connected to. When a new device is paired to the headset it, by default, becomes the "last connected" device. Should any other of the eight devices initiate a connection to the headset afterwards, that device then becomes the "last connected" device.
Auto-Answer and Auto-Transfer functions will only work when attempted with the last device the headset was connected to.
Please use the following easy to follow guide -
a) Configuration Mode
Before you can pair your headset you need to put it into configuration mode. Configuration mode is used to perform two functions - 'pairing' and Audio mode selection. Configuration mode is entered simply by pressing and holding down the Multi-Function Button (MFB) with the headset boom closed until the Blue indicator light turns on, then release the MFB.The LED will remain on.The headset is now in configuration mode and stays in this mode for 3 seconds awaiting further user action.The headset will then return to the "off" state if no further action is taken.
b) Pairing Headset to the Phone
-
With the headset boom closed and the headset close to the phone (within 30 feet), enter configuration mode as described above. During pairing it is recommended that the headset and phone (or device) are not more than 1 metre (3 feet) apart - with no solid objects in between.
-
Within the 3 seconds, open the boom. The LED will remain on and the headset is now in pairing mode and will remain in pairing mode for 5 minutes.
Perform a "device discovery" from the mobile phone. For details on device discovery consult your phone user guide. Please Note: it may take several seconds to establish connections. - Enter the passkey 0000, when your phone menu prompts you, and the phone will start to pair the headset with the phone (the device ID is now stored in the phone's memory).
- Your phone screen will advise that pairing has been successful, and the headset indicator light flashes to let you know this also.
- If the pairing is unsuccessful, Please return to step 1 and follow the steps 1-4.
- Once the headset and phone have successfully paired you are ready to place and receive calls (see page 15 "Making a Call").
- Please note that once paired the first time, the headset automatically connects to your phone upon opening the boom.
(Note:The default headset pass key is 0000.)
c) 8 Paired Devices (Audio Mode1/Audio Mode2 Operation)
It is possible for your headset to store pairing data with 8 different Bluetooth devices. This means that you could have 8 Bluetooth phones paired, or 1 phone and 1 other device. Operation of the headset in Audio Mode1 will recall the last device that the headset paired to while in Audio Mode1. Similarly, operation in Audio Mode2 will recall the last device that the headset paired to while in Audio Mode2.
To toggle between audio modes,simply follow the procedure below.
- Starting with the boom in the closed position, enter Configuration Mode as described on page 9.
- With boom still closed, and the indicator light on solid (indicating Configuration Mode) press either Volume button.
- Watch the indicator light (one flash for Audio Mode1 or two flashes for Audio Mode2, then off).
- Open boom and verify repeated indicator light flash signal. (Single flash for Audio Mode1, double flash for Audio Mode2).
- Now the headset is ready for use in the selected mode, just follow pairing the headset on page 9.
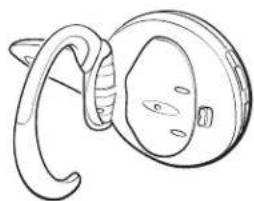
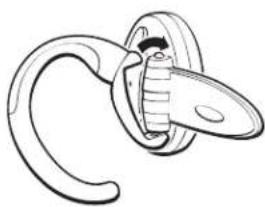
Choose Right or Left Ear Wearing Style
The JABRA BT100 Bluetooth headset comes configured for wearing on your right ear. To change for left ear wearing please use the simple instructions as follows:
- Open the boom.
- Put the earhook in its open position.
- Gently lift and pull the top of the earhook up from the upper hinge pin and pull away to remove.
- Turn the headset over.
- Hook the bottom of the earhook on to the lower hinge pin and lift and pull the top of the earhook over the upper hinge pin.
- The Volume Up/Down buttons will re-orient automatically - so up will always be up, and down will always be down.
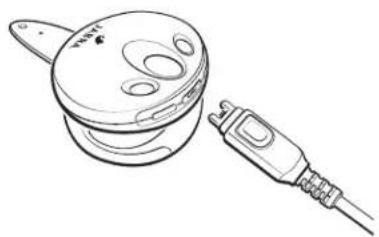
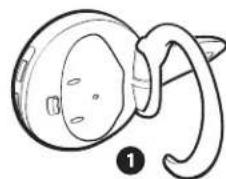
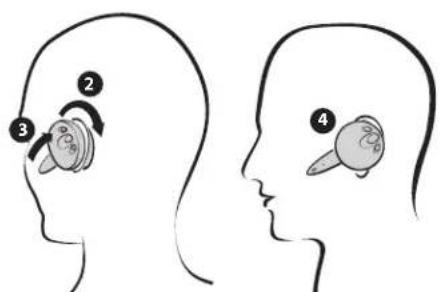
Placing the Headset on your Ear
In order to wear the headset please follow these instructions:
- Open the boom.
- Put the earhook in its open position (90^ away from the headset).
- Loop the ear hook behind your ear.
- Close the headset towards your ear.
- The boom will then point towards your mouth.
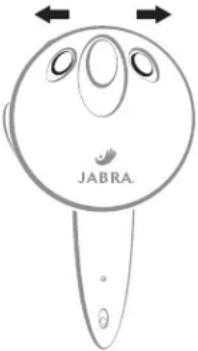
Speaker Volume & Volume Control Buttons
To increase the speaker (receive) volume, press and hold the upper volume control button until the desired level is reached. To decrease the speaker (receive) volume, press and hold the lower volume control button until the desired level is reached. An audible tone is played when either the minimum or maximum volume has been achieved.
The headset is equipped with intelligent volume re-orientation control so that it does not matter whether you are wearing the headset on the left or right ear. When you change the earhook from right to left wearing style - the top volume control button will always increase the speaker volume and the bottom volume control button will always decrease the speaker volume.
Microphone Mute
The JABRA BT100 has a mute, or call hold feature. To hold the call (mute the headset microphone), press the volume up and the volume down buttons simultaneously. While the headset microphone is muted, a double tone will be heard in the headset at a period of every 3 seconds. To disable microphone mute, and return to normal headset operation, simply depress both volume buttons momentarily again. (The double tone will stop)
Using your JABRA BT100 Headset
a) Making a call with the headset
There are different ways to make a call using your JABRA BT100 headset. (In each case you will need to make sure that you pair / link your headset and phone as described on page 9.)
If your mobile phone supports voice dialing, you can use this feature in most cases with the headset. Please refer to your phone's user documentation for more information on voice control and check whether your phone supports this feature.
Making a call from the Mobile Phone
- Place the headset on your ear in the desired wearing style.
- Using the phone's keypad, dial the phone number.
- To send the call, press the phone's SEND / CALL key - the phone initiates the call.
Making a call Using Voice Dialing (Voice dialing on your phone must be turned On and voice tags stored)
- Place the headset in the desired wearing style.
- On the Headset - Press the Multi Function Button. (MFB)
-
A tone prompts you to say the name of the person you wish to call (as entered in the phone's voiced dial phonebook directory).
-
Speak the voice tag name.
- The phone automatically dials your selection, and you see the details of the call on the phone screen.
- When connected you are free to communicate normally. (Please refer to the phone's user guide for instructions on storing voice tags. Some Mobile Phones need you to initiate voice dialing from the handset.)
b) Ending a call from the headset
To end a call when wearing the headset - press the headset's MFB button. Also if you remove the headset - the call can also be ended by closing the boom arm.
c) Disconnecting your Bluetooth link
To terminate the Bluetooth connection between the headset and your phone, turn the headset Off (just close the boom). If you are on a call when the boom is closed, the call will be held at the phone for up to 30 seconds while the user is prompted to transfer the call back to the phone. Without a response by the user, the call will be terminated after the 30 seconds.
d) Receiving/ Answering a call
When wearing the headset - On and Linked:
A ring tone will sound in your headset, just press the headset's MFB button to answer the call.
If not wearing the headset - Off position (boom closed):
Open the headset's boom to auto-answer the call through to the headset, then place the headset on your ear in the normal wearing position.
e) Transferring a Call
Transferring a call from the headset to your phone:
Must be initiated by the phone (refer to the user guide that accompanied your phone). Transferring a call from your phone to the headset:
- Open the boom to activate the Auto-Transfer feature,
or
- If boom is already open and the call is on the mobile phone, press the headset's MFB button.
Resetting the headset
If the phone and headset fail to communicate properly, you may need to reset them. To reset the headset, plug charging jack into headset with charger pulled into appropriate AC socket.Verify the LED turns on, indicating the start of charging, then remove charging jack.This resets the headset.
Storage Of Headset
- Always store the JABRA BT100 with power off and safely protected.
- Avoid storage at high temperatures (above 60 C / 134F) – such as in a hot vehicle or in direct sunlight. (Storage at high temperatures can degrade performance and reduce battery life.)
- Do not expose the headset or any of its supplied parts to rain or other liquids.
Audio & Visual Indicators
Indicator Light Chart
Headset State LED Indication State
Power Off LED OFF (no charger)
Charging In Process LED ON (charger plugged in)
Charging Complete LED OFF (charger plugged in)
Configuration Mode LED ON (no charger) with boom closed
Pairing Mode LED ON (no charger) with boom opened
Pairing Successful Series of 10 rapid flashes
Search, Park, Link Flash or Double-Flash 0.1 sec ON, 2.9 sec OFF
(pulse with 3 second interval)
Audio Link (on a call) Flash or Double-Flash 0.5 sec ON, 1.5 sec OFF
Audio Indicator Chart
Headset State Audio Indication
Volume Limit Repeated single high tone when either lower or upper limit achieved
Low Battery Tone Five rapid high tones repeated every 20 seconds
Out of Range No audio indications, deterioration of audio quality will alert user
Incoming Call Ring tone
Pairing Confirmation Single high tone
Establish Audio Link Series of 4 tones, low to high
Initiate Voice Dial Single low tone
Voice Tag not Recognized Dual high-low tone
End Call/Audio Link Closed Series of 4 tones, high to low
Power On/OFF No audible tone
Certification and Safety Approvals / General Information
This product is CE marked according to the provisions of the R & TTE Directive (99/5/EC).
Hereby, GN Netcom, declares that this product is in compliance with the essential requirements and other relevant provisions of Directive 1999/5/EC.
For further information please consult http://www.gnnetcom.com.
Please note that this product uses radio frequency bands not harmonised within EU. Within the EU this product is intended to be used in Austria, Belgium,
Denmark, Finland, France, Germany, Greece, Ireland. Italy, Luxembourg, The Netherlands, Portugal, Spain, Sweden, United Kingdom and within EFTA in Iceland, Norway and Switzerland.
Users are not permitted to make changes or modify the device in any way. Changes or modifications not expressly approved by JABRA (GNNetcom) will void the users authority to operate the equipment.
BLUETOOTH is a trademark owned by the Bluetooth SIG, Inc.
Warranty & Parts Replacement
Battery: The JABRA BT100 is equipped with a rechargeable battery. Replacement must be done at a qualified service center or returned to the manufacturer. Use only the battery supplied.
Use only the supplied and approved AC charger.
JABRA (GN Netcom) warrants this product against all defects in material and workmanship for a period of two years from the date of original purchase. The conditions of this warranty and our responsibilities under this warranty are as follows:
The warranty is limited to the original purchaser.
- A copy of your receipt or other proof of purchase is required. Without proof of purchase, your warranty is defined as beginning on the date of manufacture as labeled on the product.
- The warranty is void if the serial number, date code label or product label is removed, or if the product has been subject to physical abuse, improper installation, modification, or repair by unauthorized third parties.
The responsibility of JABRA (GN Netcom) products shall be limited to the repair or replacement of the product at its sole discretion.
Any implied warranty on JABRA (GN Netcom) products is limited to two years from the date of purchase on all parts, including any cords and connectors.
- Specifically exempt from any warranty are limited-life consumable components subject to normal wear and tear, such as microphone windscreens, ear cushions, decorative finishes, batteries, and other accessories.
- JABRA (GN Netcom) is not liable for any incidental or consequential damages arising from the use or misuse of any JABRA (GN Netcom) product.
- This warranty gives you specific rights and you may have other rights which vary from area to area.
- Unless otherwise instructed in the User Guide, the user may not, under any circumstances, attempt to perform service, adjustments or repairs on this unit, whether in or out of warranty. It must be returned to the purchase point, factory or authorized service agency for all such work.
- JABRA (GN Netcom) will not assume any responsibility for any loss or damage incurred in shipping. Any repair work on JABRA (GN Netcom) products by unauthorized third parties voids any warranty.
Français
All rights reserved. International patents and design patents pending. Design and specifications subject to change without notice.The Bluetooth name and the Bluetooth trademarks are owned by Bluetooth SIG. Inc, and are used by GN Netcom under license.
www.jabra.com