SR 4339 - Cd player/recorder AEG - Free user manual and instructions
Find the device manual for free SR 4339 AEG in PDF.
| Brand | AEG |
| Model | SR 4339 |
| Product type | CD player/recorder with FM/AM radio and USB port |
| Mains power supply | 220-240 V ~ 50 Hz |
| Battery power | 6 UM2/R14 batteries (1.5 V each) |
| Power consumption | 12 W |
| Net weight | 1.34 kg |
| Radio frequency ranges | FM 88 – 108 MHz, AM 540 – 1600 kHz |
| Playback formats | Audio CD, CD-R, CD-RW, MP3 |
| USB port | Play MP3 files from USB flash drive |
| Output power | 2 built-in speakers |
| CD functions | Play, pause, stop, skip forward/backward, search, repeat (1, all, folder), random play, intro, program |
| Radio functions | FM stereo/mono, AM, manual tuning, telescopic antenna |
| Display | LCD screen with track/time/station info |
| Cleaning | Soft slightly damp cloth, no chemicals |
| Safety | Class 1 laser, circuit breaker, safety instructions for children and batteries |
| Included accessories | Power cable, instruction manual |
| Repairability | Repairs by a specialist; do not open the motor unit |
Frequently Asked Questions - SR 4339 AEG
User questions about SR 4339 AEG
0 question about this device. Answer the ones you know or ask your own.
Ask a new question about this device
Download the instructions for your Cd player/recorder in PDF format for free! Find your manual SR 4339 - AEG and take your electronic device back in hand. On this page are published all the documents necessary for the use of your device. SR 4339 by AEG.
USER MANUAL SR 4339 AEG
GB Stereo radio with CD/MP3 player
Overview of the Components.. 3
Instruction Manual.. Page 35
Technical Data.. Page 39
Disposal . Page 39
Język polski
Spis tresci
If ID-3 Tag information has been stored this appears in the display in the form of an LED ticker display. Press the button once more in order to switch the function off again.
ALBUM (12)
Thank you for choosing our product. We hope you enjoy using the device.
General Safety Instructions
Read the operating instructions carefully before putting the appliance into operation and keep the instructions including the warranty, the receipt and, if possible, the box with the internal packing. If you give this device to other people, please also pass on the operating instructions.
- To avoid the risk of fire or an electric shock, you should not expose the device to rain or moisture. Consequently, do not use the device in the immediate vicinity of water - for example near a bath tub, a swimming pool or in a damp cellar.
- The appliance is designed exclusively for private use and for the envisaged purpose. This appliance is not fit for commercial use.
- Only connect the device at a properly installed plug socket. Pay attention that the specified voltage corresponds to the voltage of the plug socket.
- When using external mains supply, pay attention to the correct polarity and voltage. Always place the batteries in the correct direction.
- Assemble the device in such a way that the available ventilation openings are not covered.
- Never open the housing of the device. Incorrect repairs can constitute a considerable risk for the user. Should the device become damaged, in particular the mains supply cable, do not operate the device any longer, but rather have it repaired by an expert. Check the mains supply cable regularly for damage.
- For safety reasons a broken or damaged mains lead may only be replaced by an equivalent lead from the manufacturer, our customer service department or a similary qualified person.
- If the device is not used for a longer period, remove the plug connector from the plug socket or take out the batteries.
These symbols may be found on the machine and are intended to indicate the following:
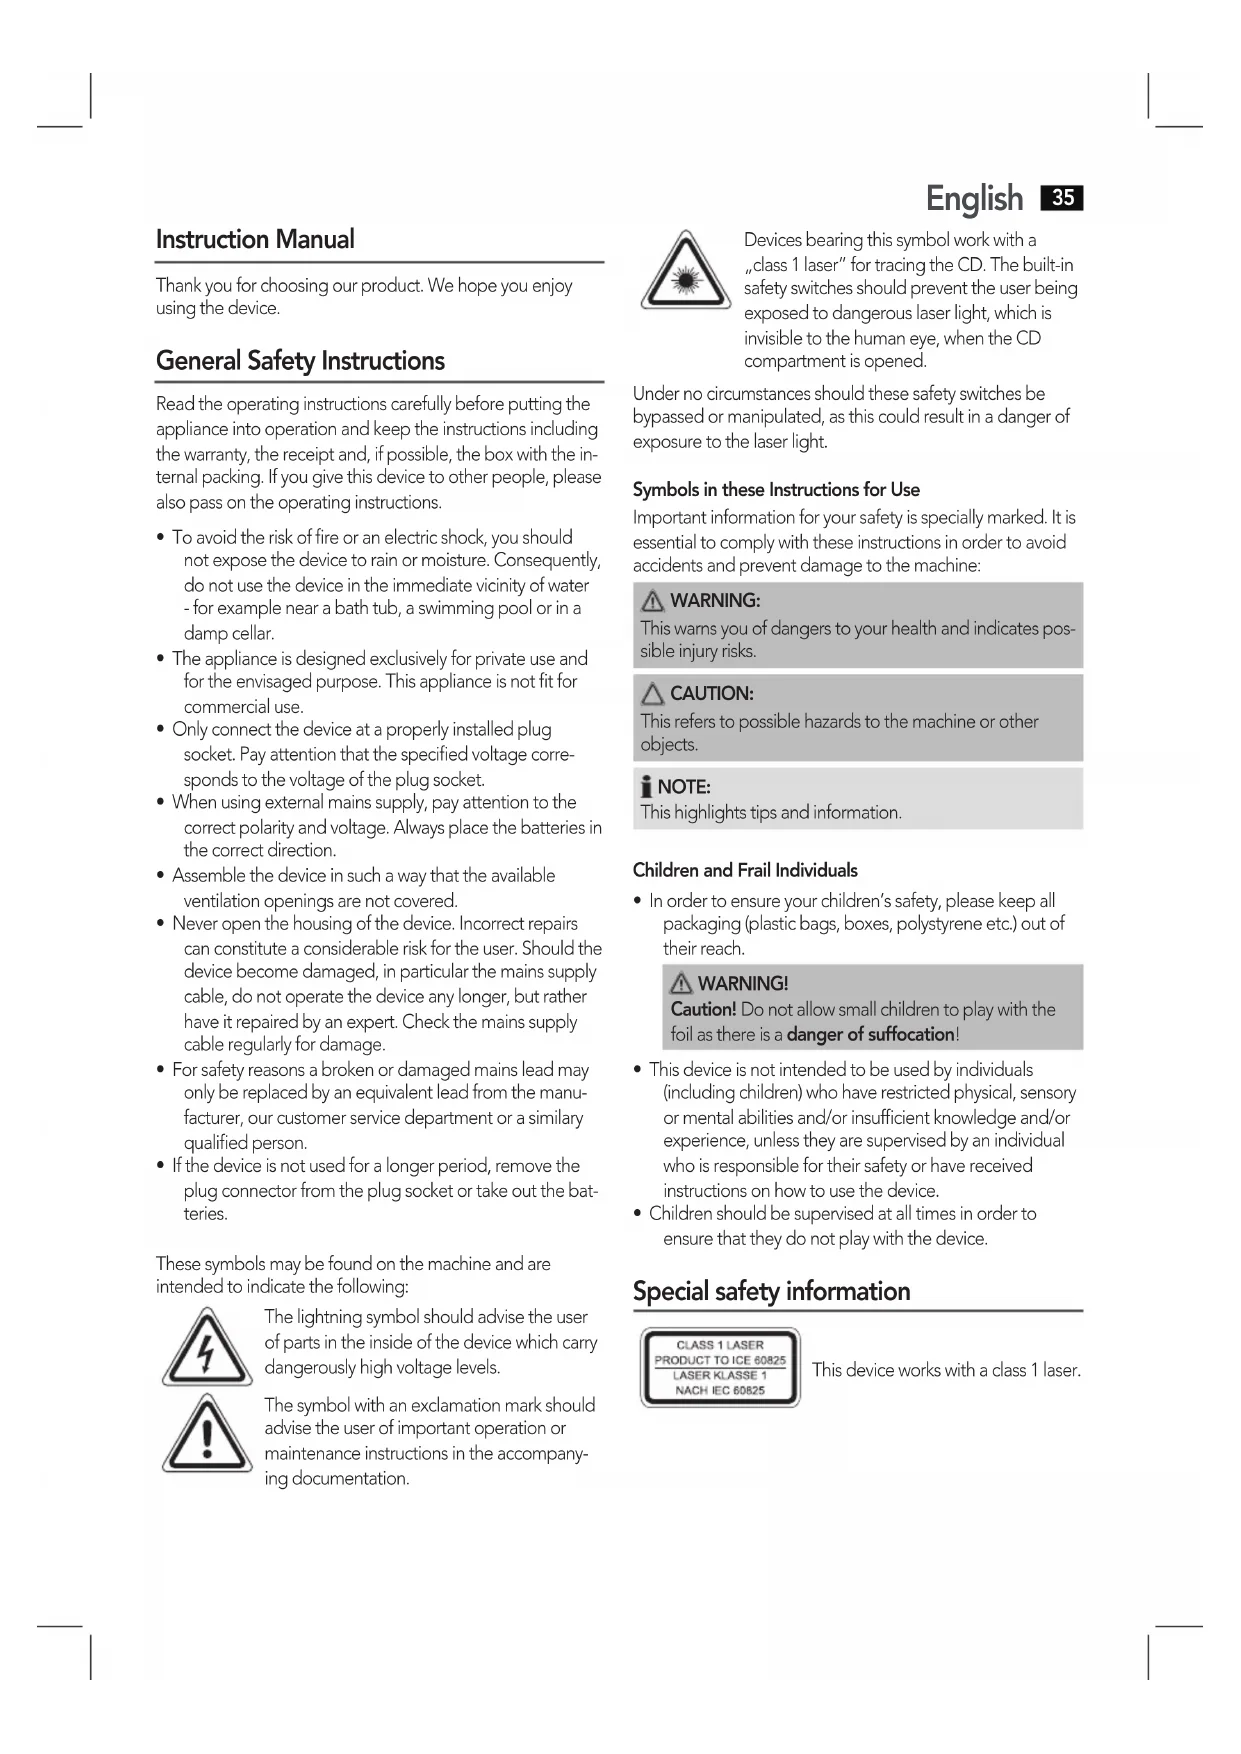
The lightning symbol should advise the user of parts in the inside of the device which carry dangerously high voltage levels.

The symbol with an exclamation mark should advise the user of important operation or maintenance instructions in the accompanying documentation.
English
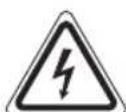
Devices bearing this symbol work with a "class 1 laser" for tracing the CD. The built-in safety switches should prevent the user being exposed to dangerous laser light, which is invisible to the human eye, when the CD compartment is opened.
Under no circumstances should these safety switches be bypassed or manipulated, as this could result in a danger of exposure to the laser light.
Symbols in these Instructions for Use
Important information for your safety is specially marked. It is essential to comply with these instructions in order to avoid accidents and prevent damage to the machine:

WARNING:
This warns you of dangers to your health and indicates possible injury risks.

CAUTION:
This refers to possible hazards to the machine or other objects.

OTE:
This highlights tips and information.
Children and Frail Individuals
In order to ensure your children's safety, please keep all packaging (plastic bags, boxes, polystyrene etc.) out of their reach.

WARNING!
Caution! Do not allow small children to play with the foil as there is a danger of suffocation!
- This device is not intended to be used by individuals (including children) who have restricted physical, sensory or mental abilities and/or insufficient knowledge and/or experience, unless they are supervised by an individual who is responsible for their safety or have received instructions on how to use the device.
Children should be supervised at all times in order to ensure that they do not play with the device.
Special safety information
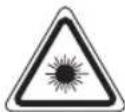
This device works with a class 1 laser.
36 English
Overview of the Components
1 Telescopic antenna
2 Handle
3 CD compartment
4 TUNING control
5 Radio scale
6 Band selection switch (FM.ST / FM / AM)
7 Loudspeaker
8 OPEN/CLOSE (open/close) CD compartment
9 FM ST. control lamp
10 SKIP+ button (forward search)
11 STOP button
12 ALBUM button (album upwards)
13 USB port
14 PLAY/PAUSE/USB button (Play/Pause)
15 INFO button
16 MODE button (Repeat/random playback/memory)
17 SKIP- button (reverse search)
18 POWER control lamp
19 LCD display
20 Function selector switch (OFF / RADIO / CD/MP3/USB)
21 VOLUME MAX/MIN (volume control)
22 AC Mains connection
23 Battery compartment
Intended Use
This device is used for:
The reception of radio programmes
- Playing back audio/MP3 CDs/files.
It is intended exclusively for this purpose and may only be used as such.
It may only be used in the manner described in these instructions for use. The device must not be used for commercial purposes.
Any other use of this device is considered to be contrary to the intended use and may result in damage to materials or even personal injury.
The firm ETV-Elektro-Technische Vertriebsgesellschaft mbH does not accept any liability for damage caused as a result of the use of this device contrary to its intended use.
Start-up of the device/introduction
- Please read the operating instructions carefully before using the device for the first time!
- Select a suitable location for the device, such as a dry, flat, non-slip surface on which it is easy to operate the machine.
- Ensure that the device is sufficiently ventilated!
- Remove the protective film from the display if it is still present.
Power Supply
- Connect the power cable supplied (see battery compartment if necessary (23)) to a properly installed 230V/50Hz safety power socket and the mains connector AC (22) on the back of the machine.
- Ensure that the voltage is the same as that indicated on the model identification plate.
Inserting the Batteries (not supplied)
- Open the lid of the battery compartment (23) on the bottom.
- Insert 6 batteries of type UM2/R14 1,5 V. Please ensure that the polarity is correct (see the floor of the battery compartment)!
- If the device is not used for a long period of time, remove the batteries to avoid the spilling of battery acid.
- Then close the battery lid.
NOTE:
When a mains cable is connected the batteries are automatically switched off.
CAUTION:
- Different battery types or new and used batteries must not be used together.
- Batteries are not to be disposed of together with domestic wastes. Dispose of the used batteries at the relevant collection bin or at your dealer's.
WARNING:
Do not expose the batteries to high temperatures or direct sunlight. Never throw batteries into the fire. There is a danger of explosion!
Transport Safety Device, CD Compartment
- Use the OPEN/CLOSE button (8) to open the CD compartment (3).
- Before operating the machine for the first time, re-move the transport safety device from the CD player if it is still in place.
Volume
The desired volume can be sent using the VOLUME / regulator (21).
Switch-off
The machine is switched off when the function selector switch (20) is turned to the OFF position. The POWER (18) control lamp goes off. Unplug the device.
USB port (13)
This device has been developed in line with the latest technical advances in the USB field. The wide range of different USB storage devices of all types which are currently on the
market, unfortunately do not allow us to guarantee full compatibility with all USB storage devices. For this reason, in rare cases there may be problems in playing back files from USB storage devices. This is not a malfunction of the device.
- Set the function selector (20) to CD/MP3/USB.
- Connect a USB storage device. USB appears on the display. After a few seconds, the total number of folders and titles appears briefly. Playback then begins. The elapsed playing time is shown on the display and the current track and folder are displayed alternately.
For operation, please refer to the section "Playing CDs/ MP3".
NOTE:
If there is a CD in the CD compartment at the same time, keep the PLAY/PAUSE/USB button (14) pressed to select the USB mode.
CAUTION:
Before removing the USB storage device, switch the function selector (20) to RADIO.
Listening to the Radio
- Turn the function selector switch (20) to the RADIO position.
- Use the band selector switch (6) to select the desired frequency band.
$$ \begin{array}{c} \text {V H F (S t r e s e o) = F M S T , V H F = F M ,} \ \text {M e d i u m w a v e = A M (M o n o)} \end{array} $$
- Tune in the desired station with the station adjust-ment knob TUNING (4).
- The FM ST control lamp (9) only lights up when you have selected FM stereo and the station is being received in stereo quality. If reception is too weak and there is noise on the station being received, this lamp will flicker. Where reception is bad we recommend switching to FM.
- For VHF/FM mode pull out the telescopic antenna (1) and turn it to improve reception.
- An aerial is integrated into the device for the reception of AM stations. The machine can be aligned to the station by turning it. In this frequency band programs are transmitted in "mono" only.
Playing CDs/MP3
This is how you play a CD
- Turn the function selector switch (20) to the "CD/MP3/USB" position.
- Use the OPEN/CLOSE button (8) to open the CD compartment (3).
-
Insert an audio CD with the printed side facing upwards on to the central cone so that the CD clicks into place and then close the lid of the CD compartment.
-
After a few seconds the total number of songs/tracks is shown in the display.
NOTE:
In the case of CDs in MP3 format the number of folders is briefly displayed at first. MP3 also appears on the display.
- The CD will play from the first title. The current track and the playing time that has elapsed are shown in the display.
NOTE:
With CDs in MP3 format the current track and folder are shown alternately in the display.
- In order to remove a CD, please press the STOP key (11), open the CD compartment and lift the CD out carefully.
Always keep the CD deck closed.
NOTE:
- In the case of CDs in MP3 format that contain folders, when the device changes to a different folder 001 appears for the first track of the new folder.
- If a disc is incorrectly inserted - or no disc has been inserted - the symbol "CD READ" and the word "NO DISC" appear in the display.
- Playback of CDs produced by the user cannot be guaranteed due to the large variety of software and CD media available.
Description of the CD buttons
PLAY/PAUSE (14)
Press briefly:
You can briefly interrupt and resume playback using this button. The playing time that has elapsed flashes in the display. Pressing again continues playback.
Keep pressed:
Select the USB port.
SKIP + / SKIP - (10 / 17)
When an audio CD, or a CD in MP3 format or file is playing: With SKIP ^+ you can jump to the next or previous track etc.
- If the button is kept pressed down, the machine starts to search through the tracks.
The SKIP - button can be used as follows:
Press once = This starts the current track again from the beginning.
Press twice = This jumps back to the previous track.
Press three times = This plays the song before etc. If the button is kept pressed down, the machine starts to search through the tracks.
38
English

NOTE:
In the case of CDs in MP3 format that contain folders, when the device changes to a different folder 001 appears for the first track of the new folder.
STOP (11)
The CD stops.
MODE (16)
In stop mode for programming any order of tracks (see the section on "Programmed Play").
When an audio CD, or a CD in MP3 format or file is playing.
Press once = (the emits a fixed light) the current track is repeated continuously.
Press twice = (the ALL emits a fixed light) the whole CD is played continuously.
Press three times = the display contains the word RAND and the track number that is to be played first. All tracks are played back in random order.
Press four times = (INTRO appears in the display) Each track on the CD is played for 10 seconds.
Press five times = all functions are cancelled. The normal play mode is resumed.
Only for CDs in MP3 format or files which are playing:
Press once = the current track is repeated continuously (appears in the display).
Press twice = the selected folder of the MP3 CD is repeated continuously (FOLDER appears in the display). Use the ALBUM button (12) to select individual folders.
Press three times = the whole CD is played continuously ALL appears in the display).
Press four times = the display contains the word RAND, MP3 and the track number that is to be played first. All tracks are played back in random order.
Press five times = (INTRO appears in the display) Each track on the CD is played for 10 seconds.
Press six times = the function is deactivated and the CD is played in the normal mode.
INFO (15)
If ID-3 Tag information has been stored this appears in the display in the form of an LED ticker display. Press the button once more in order to switch the function off again.
ALBUM (12)
Press this button during playback to change to a higher folder. The display, e.g. FOLDER F02, flashes briefly. Then the CD begins to play back automatically. If the button is pressed in stop mode the display also flashes. Then start playback with the PLAY/PAUSE/USB button.
Programmed Play
This can be used to program any desired sequence of tracks.
- Press the STOP key (11).
- Press the MODE key (16). The number "P01" (storage location) and the symbol MEMORY flash in the display. Use the SKIP+/SKIP- buttons (10/17) to select the desired track and then press the MODE button again. The display changes to memory slot P02.
NOTE:
- In the case of CDs in MP3 format, press the ALBUM button (12) in order to change the folder.
-
In the case of CDs in MP3 format that contain folders, when the device changes to a different folder 001 appears for the first track of the new folder.
-
Select the next track with the SKIP + / SKIP - key and press the MODE key again. Repeat the procedure until all the desired tracks are selected.
NOTE:
Once the storage capacity of the tracks to be programmed has been reached, "FULL" flashes in the display.
- Press the PLAY/PAUSE/USB key (14). The playback starts. The first track number selected is shown in the display together with the playing time that has elapsed and the word MEMORY.
- Press once the STOP key to stop the playback while retaining the program.
- To play the programme back again, press the PLAY/ PAUSE/USB button.
- To delete the program, press the STOP key twice. The MEMORY control lamp goes out.
The device stops automatically once the entire sequence of programmed tracks is completed. The abbreviation MEMO-RY goes off and the programmed order of tracks is deleted from the memory.
It is also possible to combine the programmed tracks with the REPEAT function. After you have programmed and started the device, please press the MODE button (16) up to three times and then you can use the functions as described under MODE".
Playing back Music in MP3 Format
With this device it is possible to play back pieces of music in MP3 format. The device also supports all standard CD types: CD, CD-RW, CD-R.
This machine of is able to play MP3 CDs. Up to 200 tracks can be compressed and stored on these CDs. Your machine detects an MP3 CD automatically (the total number of tracks and MP3s appears in the display). If you would like to play one of these CDs, proceed as described under "Playing CDs/MP3". Tracks can be programmed as described under "Playing Back Programmed Tracks".
Please note:
There are a number of different recording and compression methods, as well as quality differences between CDs and self-recorded CDs.
Furthermore, the music industry does not adhere to fixed standards (copy protection).
For these reasons it is possible that in rare cases there are problems with the playback of CDs and MP3 CDs. This is not a malfunction of the device.
Cleaning and Maintenance
Always remove the mains plug before cleaning the machine.
- Any marks on the surface can be wiped off with a slightly damp cloth without any additives.
Troubleshooting
| Symptoms Course | Solution | |
| CD can not be played back. | CD is not inserted or inserted incorrectly. | Ensure that the disc is inserted with the label facing upwards. |
| Batteries too weak. | Insert new batteries or operate the device with the mains lead. | |
| CD jumps during playback. | Check the disc for fingerprints, dirt or scratches. | Check the disc for fingerprints, dirt or scratches. |
| Device cannot be operated. | Device crashes and "hangs". | Disconnect the power supply for 5 sec. Then switch the device on again. |
Technical Data
Model: SR 4339 CD/MP3/USB
Power supply: 220-240 V~, 50 Hz
Battery operation: .6 x 1.5 V, Type UM2/R 14
Power consumption: 12W
Protection class:
Net weight: 1.34 kg
Radio section:
Frequency ranges: VHF/FM 88 ~ 108.0 MHz
MW/AM 540 ~ 1600 KHz
Subject to technical changes without prior notice!
This device has been tested according to all relevant current CE guidelines, such as electromagnetic compatibility and low voltage directives, and has been constructed in accordance with the latest safety regulations.
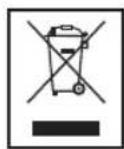
Disposal
Meaning of the "Dustbin" Symbol
Protect our environment: do not dispose of electrical equipment in the domestic waste.
Please return any electrical equipment that you will no longer use to the collection points provided for their disposal.
This helps avoid the potential effects of incorrect disposal on the environment and human health.
This will contribute to the recycling and other forms of reutilisation of electrical and electronic equipment.
Information concerning where the equipment can be disposed of can be obtained from your local authority.
He Do3B0JNAIe MaJIIM DIITM rpaTncb i3 PnIBKOIO. IcHyc 3aRpo3a 3aDyXn!
LeynpaHHe np3HaehnIyBkOpncTAHNJIIObMn (BKIOUOaOHn DItei) 3 OMeXeHmN f3MHMN,yyTcBIMn a6o po3ymOBIMn 3JIOHOCTAMn, HeIOCTaTHIMDOCBIDOM Ta/ab6 3HaHHMn -KpIM BUNaIKIB, KOIN 3aHMMn DOgIJaae BiINOBADJIbHa 3aix63nekyOC6a aboBOHN OTPIMaII BKa3iBKN Udo BkOpncTaHH npnaNy.
IITAM He Do3BOJHe OpaTncb 3 cIM npnnaom. NpTi-6EH dOgJIa 3a HmN.
CneuiJIbHi Bka3iBKn ⅢoDo 6e3neKn
Leynpia npaioe 3 la3epom KlaCy 1.
52 YkpaIHcbka
OrJaIeIeMeHtIb ynpabNiiHHa
1 TeileckoniHa aHTeHa
2 Puyka
3 Bijninok knn KOMnakT -nckB
4 Perynatop nowkyxBnbl TUNING
5 Lkaopaioctaui
6 PeremkaJiaana3ohIB (FM.ST / FM / AM)
7IyHOMOBeUb
8 OPEN/CLOSE (BIDKpTN/3akpnT) BIDINOK INK KOMnAKTINCKIB
9 KohtpOlbHa lamma FM ST.
10 SKIP+ Knaibiu (nowyk Bnepei)
11 STOP KnaBiu
12 ALBUM KJIaBIi (JIb6oM JIcTaTn BBepx)
13 Noprt USB
14 PLAY/PAUSE/USB KnaBiiu (biTbOpOBaHH/nay3a)
15 INFO Knaibii
16 MODE KnaBiu (IobTopeHHy/BiTbOpeHHy y BnnaKOBOMy npAky/3anC y na'M'arb)
17 SKIP-Knabii (nowyHa3a)
18 KOnTpOJIbHaJaMnPAPOWER
19 LCD-ducnnnei
20 Iepemnkau Bn6opy fynkui (OFF/RADIO/CD/MP3/ USB)
21 VOLUME MAX/MIN (perynatop rnuHocti)
22 ACПДКЛIOUeHЯdo eIeKtpuHoiМepexi
23 BiDJIIOK dIa 6aTapei
BnKOpncTaHHa npH3HaueHHaM
Ley npilad Bn3NaHeNo dIa
- npinyompaiaionporpam
BiiTbOpOBaHH ayio - fauiIB Ha KOMNaKT dNcKaX i DnCKax B fopmati MP3/faiJib.
PpIaD pIa3HaHeHO BKNIOH DoIuX IJne i IyOro DO3BOJIaETbCA BnKOpNCTaTNI TIlbKn DnO O3HaYeHO. O3BOJIaETbCA BnKOpNCTaTI npIaD TIIbKn B TaKni CnOciO, Rk Ue ONiCaHO Bui INCTpyKU. 3a6oPaHReTBcBnKOpNCTaTI npIaD dIg KomepuHHuIe.
Hui BnBn BnKOpNCtAHN BBaKaIObCn He HaJIeXHMn 3a npn-3NaueHHm IMoKyTb npn3BeCTn Do NOLKOJKeHHn pnpnaIy I HabiTb Do TpaBMTu3My JIOdei.
Φipma ETV-Elektr-Technische Vertriebsgesellschaft mbH/ 36yt eIeKtpotexHIOI npOykuII TOB / He Hece BiIIOBiaJIbHOCTI 3a IKOdy, UO BHNKNa BHaCNIkOB BIKOpNCTAHn PrINJaNy He 3a HaleXHM PnI3HaHeHHM.
BkIIOUeHnI npIaIy / BVeJeHHN
-
NpeepnBkUHcHHm npuAdy yBaXHO npouHTaTe iHCTpyKlio 3 ekCnIyataui!
-Длу установки ппалду оберіть ппда.Tнглбогmiccle-цмae6bytn cyxa,piBHa,He cln3bka nobepxH,haKIN Bm moKeTe 3pyuH0 KopnCTyBaTncIpnlaDOM. -
PpIMtB Do yBaH, LIO npuIaMae MaTn DOCTaTHO BEHTN-IAUIO!
KaHnHa nncnnei npnaIy 6yna 3axnHa nnibka, II cniBnAJIHTN.
3a6e3neueHH eEKeTprnHm cTpymom
BCTABTE BUNKy Ka6eIIO eNeKTPoXnBHeHHa HaJexNtB Do npuNaHy (INB. BiDInOK dnn 6atapei (23)), y BiDnOBiHO o6naHAny 3axmCHIMM KOHTaKTAMn PO3eTKy 230B /50Tc MepeXi nepemHHoro ctpymy AC (22)Ha 3bOpoti npuNaHy.
3BepHbYbaryHaTe,106 HanpyraBMepexi BiNobida na daHMM Ha Ta6nuci 3TexHiHHMn daHMM Bnpo6Hnka npnaNy.
YctaHOBHeHb6aTapei
(BaTapei He BxOaTb Do o6cIy nocTaBkn)
BiiKpIe BiDinok Ira 6aTapei (23) Ha 3aDiHi cToPOHi npuIaNy.
- NocTaBTe Ha MiccE 6 baTapeNOK TnIy UM 2/R14 1,5 V. 3BepHt b yBarry Ha npabunbHy nolpHicThb 6aTapei (DnBncb HnKnO CTOpOHy BiiinKy dIra 6aTapei)!
A KsO Bn He BkOpncToBye Te npuad TpBaJin Yac, BuJaniTb 6aTaapei3 BiDjInky, uo6 yHnKHyTN "BntiKaHH" KNCLOTN.
3akpiTeBidjInokdIgBaTapei.
IPIIMITKA.
Akuo Bn iDkJIOUHTe Ka6eJIb Do eNEKtpomepexi, To XNBHeHHBd 6aTapeep npINHHTbc aBTOMaTHHO.
VBAFA.
- BaTapei pi3Horo Tnny a60 HObi i Bxke 3actocobahi 6aTapei He MoKHa BnKOpNCToByBaTu pa3OM.
- Batapei He MoXHa BnKDaTn B DomaUHe CmTT. PpOcMBOiDAtn nyCTi Batapei Ha CneuJbHi NyHKTu 360py He6e3NeHnx BiXdoJB abo NOBepHyTN B MaarAnH, De Bu KynIu npuaIad.
NONEPEIXEHNA
3a6bopohaeTc npdaBAtu 6aTaapei BnNBy BnCokoi Tempeatypn abo npamix coHnHex npomih. Ctporo 3a- 6bopohaeTc KndaTn 6aTaapei B noIyM' IChye He6e3neka Bn6yxy!
Pnpctpiin 3axncty nporpaBauy KOMnakT-dnckib CD nptnpahcnopTybaHHi
- Lio6 BiikpnTn Biinok Ia KOMNaKT-DnCKIB (3), KopncTyIeCR KONKOIO OPEN/CLOSE (8).
- PpeT Tm Jk BKJIOHTn npuaI, BuaJIiTb npncTpI nla 3axnty CD-nporpaBau npn TaHcnOpTyBaHHi.
Cun a 3Byky
KhoNkoVOLUME/peryIaTOpOMcIy3ByKy(21)BmMoKeTe o6paTu rHyHicTb,IOBaMnOdoaebTcra.
BukIOueHHA
PpuaBMMKHyTo, kkuo KlaBiu nepeKIOueHHa yHKU (20) haoiNbCB B noLoXeHHi OFF. KoHTpoNbHa lamNoyka POWER (18) norache. Picna cIbero BVITB BnIKy 3 po3- etKN eNEKTPOXINBHeHHA.
Iopr USB (13)
Ppnilad po3po6neho y BiDnoBIOHOCtIO octAHHIM TexHHMM DOcRHeHHM y cfepi BnKOpNCtAHNHA USB-ppniladib. CboorDiHa pINHKy HABHNI npOKNI dianao3OH pi3Hx TnIB USB-pniladIB DnRA 36epirAHNDAHNX, LIO, HaxaJIb, He dae 3MOry rapaHTyBaTN NobHy CymichicTb 3 ycima USB-ppnilaamn 36epirAHNDAHNX. 3 Liei npuHHN Y BnHTKOHX BnAqkax MoKyTB 6Ty NpO6NeMn 3 BiITBopeHHM paJInB 3 USB-pnilady 36epirAHNDAHNX, LIO HE e NOMIKOY y po6oti npilady.
- BctaHOBITb nepemukau yHKui (20) y noIOxehn CD/ MP3/USB.
2.Пд'EDнTe USB-npuaad 36epiraHnHa dAnx.Ha ekpaHi 3'ABnTbca Hanuc "USB".Yepe3 KInbKa cekyHd Ha KOPOtKnI npomixok Yacy 3'ABnTbca 3araJbHa KInbKiCTb nanok i Ha3Bn. Notim noHTbcra BiD TbOpeHHa. Ha ekpaHi BIDobpaXaTmMyTbca Yac BiD TbOpeHHa, I NOMHyB, I No- ceproBO nOTOHn 3aNc i naKa.
BiDomocti npo poobTy habeHeni y po3diJIi "BiTbopeHHa KOMnakT-dncKIB i MP3-paNib".
IPIPIMITKA.
RkIoo y BiDIIJIKy IJIK KOMNakT-DnCKy E DnCK, YrPmMyTe HaTnChyToHO KhoNky PLAY/PAUSE/USB (14), 06Bn6paTn peXIM USB.
YBAGA.
IpeEiBic'EDHaHHM USB-npnilaNy 36epiraHnHaHIN, nepeBeiTb nepemNKay yHKuJ (20) y noLoXKeHHRAIO.
Cnyxanhpaio
- IocTaBTe nepemukau dyHKui (20) B noJIoXeHHRAUDIO.
- 3a donomoro npemekay diaanaohib (6) oepitb noptiBnH Bam diaanaoh padioxbnb.
UKW (Stereo) = FM.ST, UKW = FM, Cepenhi xBni = AM (Mono)
- PerjTOpom TUNING (4) BCTaHObitpaIOCTaHcIIO, IIO Bu xOte cnyxATn.
-
KoHTpoJIbHa JAMnOuKa FM ST (9) CBITITbC TIIbKn B TOMy BInaIky, Akuo Bu o6paIi dIana3oh UKW Stereo i paIOCTaHcI BeJe nepeaHi B cTepeofoHCHOMy pexMI. RaKIo npNOM HeCTaBbHm I 3Byk nepeaHi paIOCTaHcIi Mae nepeWKoDn, JAMnoUka MIRae. Ppi nOraHOi AKocTI npNIMy peKOMeHNyETbcra nepeKlIOHTn PrpNaIb B dia- na3OH FM.
-
При приимoi радionepeдаь в дялалои UKW/FM впгнтб телескогичу aHTeHy (1) i obepHt b II habkoLo OCI.dekiьka pa3iB ДЯ NOKpaUSeHnRA pniomy.
6.ДпгпиOMу paioctaHcB dianaoHi AM B npuaJI iHTerpoBaHa anTeHa.Bn moKeTe o6ePaTu npuaJ haBkpyr Oci i TaKIM YHOM uYkaTn ONTUMaJIbHm npiHOM paioxBnIb. B cIbOMy dianaoHi nepeaHi BeDyTbcN TIlbKn B pexKMI MOHO 3ByKy.
OuHHe iTexHicHe 6cnyroByBaHH
- Ppeed OunueneHnmpnlaNy BntaHITb BNky 3 po3eKne enektpnuhoMepexi.
-Плами на NOВерхиnpипду MOжнвиддИТЗлгКА БОЛORIO TKAHIHO,6e3ДОДТКOBIX MNUOчix 3acO6iB.
YcyHeHHa HeoJIikB
MoeIb: SR 4339 CD/MP3/USB
ПоданьжИВлЕнь: 220-240B\~,50Tc
XINBHeHH BID 6aTaTpeek: .6x1,5B,TnU M2/R 14
Tpyna enektpo6e3neuHocti: 12 Bt
CnoxuBaHHn noTyXHocTi:
Bara HeTTo: 1,34 K
Paiio6nok:
ДиаэоничacToT: YKX/ΦM 88~108,0 MФ.. CX/AM 540~1600 KФ
Yka3bIbaeT Ha BO3MOxHHyO ONaCHOCTb IIN3JeLNA INpyrNX OKpyXaIOUnx PpeMeTOB.

PIMEYAHN:
JaetcoBebiHdopmaluio.
EtN Iuca HxkdauoueeB npncmOTpe
- IV3 coo6paqchen 6e30nacHOCTn dIaTeNe He octabIaIte IeKaTaB yNakOBky (PiactNKOBbIe MeUKN, KapTOH, NeHONpACT nT.D.) 6e3 npUCMOTpa.

IPEYIPPEXDEHNEI
He no3B0JIaTe DeTAM UrpaTb C nOIN3TNJIeHOBOI nJIeHKO. OnachocTB ydyuBa!
3TOT np6bOp He npedHa3HaeH dIa Np63OBAHn IuAM (BKIOUaA DeTei) C ORpaHueHHbIMN cHcOcHbIMN INY mYMCCTBEHHbIMN CNOOC6HOCTMn ININ JIaMn, He IMeIOUIMN ONbITA INJIN HEo6XoIMMbIX 3HaHNI. NCKIOUHeNE COCTABJIOT CUYaH, KOrDa OHN HaxoJATC NOI pncmOTpOM IuCa, OTBETCTBEHHORO 3a INx 6e3OAnachOCTb, INI KOrJa OT 3TOFO IuCa POlyeHbI Yka3AHN No Np63OBAHn Ip6bOpom.
Heo6xoDIMO npncMaTpNbTa 3a DeTbMn, YTO6bi y6e-NTbCBA TOM, YTO OH He IrpaIOT C np6opom.
58 Pycckn
CneuaJIbHaN HΦOpMauIaO 6e3oNaHOCHTN
Данhoe yctpoiCtBO pa6OtaeT c la3epom KIacca 1.
063op detalei npnbopa
1 Teneckonuuecka aHTeHa
2 Pyka
3 Otcek CD
4 TUNING oprah ynpabJeHH
5UkaIpaanopnemHnka
6 IpeeknoateIb Bb6opa dana30Ha (FM.ST/FM/AM)
7ДИНAMVIK
8 OPEN/CLOSE (oTkpblb/3akpbIb) oTceK nncka CD
9 FM ST. KOHTPOJIbHaJ IaMIMOnKa
10 SKIP+ kHonika (nonck Bnepe)
11 STOP KhoNka
12 ALBUM KhoJa (BBepx KaIb6Omy)
13 NopT USB
14 PLAY/PAUSE/USB KhoJa (Bocnpo3BeDeHne/nay3a)
15 INFO Khojoka
16 MODE KhoNka (noBTOp/cnyaHoe Bocnpou3BeJeHne/ nAMTb)
17SKIP-KHONKa(ObpaTHBnNoCK)
18 POWER KOHTpoJIbHaJaMaIIOUka
19KK-dncnnei
20 CeNeKTOp-NepeKIOuHaTeJIb fYHKUIN (OFF/RADIO/CD/MP3/USB)
21 VOLUME MAX/MIN oprah ynpabJIeHn ypoBhem rpmKoCTn
22 PoiKJIouHHe cTeBOrO 3JIeKTpOnIaHnI nepeMeHHoro Toka (AC)
23 Otcek 6aTaapeek
PpeInonaraemoe nCnoJb3ObaHne
PpeDnolaraeMOe nCNoJIb3OBAHne
- Ppiema paannopepea
Bocnpoun3BepeHnaydno/MP3-paJIOB/dmckOB CD.
OHO npEpaHa3HaeHo NCKIQUHTeBHO DnA Yka3aHHo UeIN IdoJIHXIOICNOb3OBaTbC TOJIbKO DnA 3TOFO.
Pa3peIeHOpnpMeHeHMeTolbKO CnOCoBOM,yCTaHOBJIeH HbIM B DaHHbIX INCHpyKUHX NO 3KcNlYaTaUIN. YCTpoIcTBO He npEHa3HaueHo DnA KOMMepeCKOrO npImeHEnH.
IIO6oe npyroe npimHeHne ycTpoiCTBa cHTaETCA npOTnBOpeaUM npeDnonaraEMOMY NCNoJIb3OBAHIO N MOKETBb3BaTb NOBpExKeDeHne MaTePnaJIOB INN daKe TpaBMyNOJIb3OBaTeJIa.
KoMaHnE ETV-Elektro-Technische Vertriebsgesellschaft mbH-he HeceT HnKaKoI OTBeTcTBeHHocTn 3a NOBpeXdHnB, BbI3BaHHbIe PnpMeHeHmE DaHHOrO yCTpOCTBa, npOTNbOppeuMIM PpeDnolaraemomy nCNoIb3ObaHIO.
3anyck yctpoicTba/BBeHne
IoxaIyICTa, BHIMATEJIbHO IPOHTNTE IHCTpyKUIN NO 3KcIIyatauIN NpeED NepBOHaJIbHbIM MCNOJIb3OBAHNEM yCTpoIcTBa!
Bb6epnteIyctpoiCTBaIoxAuaeeMeCTo,HaPnMep cyxoe,pOBHoe,CHECKoJIb3aUeIOBepxHOCTbIO,HaKOTopoJERKOpaOtaTcPi6OpOM.
- Y6eIntecB DIOCTaTOHOBHTUNLAUMyCTPOIcTBa!
CHIMITEc3kpaHa 3aUNTHyIO NHeHKy,ecnOHa IMeET-
Iopaa 3neKtponTuHa
CoeHInHTe KaBEnEM 3NeKTpOnnTaHnI N3 KOMNJIeKtanoCTaBKn (cM. BOTcKe6 BaTapeek, ecn Heo6xOdmo(23) npabInbHo yCTaHOBnEHHyIO b63OpaChyIO po3eTKy3NeKTpOnnTaHnI 230 B/50 Tc coeHNITeMe cTeBOrTo 3NeKTpOnnTaHnI AC (22) Ha 3aJHei CTOpOHe npu6opa.
IpoBepbTe,HTO HAnpRjKeHHe COBnJaTaC yKa3aHHbIM HaJeHTnKALIOHOHTo Ta6nHKe daHHoMoeJI.
BctBaKa 6aTaapeek (He BXOJIT B KOMPJIeKT NocTbAKN)
- OTkpoTe KpbIuKy OToceKa 6aTaapeek (23) B HuxHei Yactn.
BCTaBbTe 6 6Taapeek Tuna UM2/R14 1,5 B. IoxkaIyIcTa, npOBepbTe npabunbHocTb nolpHoCTn (CM. Ha dHe ot-ceka 6aTaapeek)!
Ecln yctpoiCTBO He 6ydtI DIOIro NcNtB30BaTbCn, n3- BNEKITe 6aTaapeKn, YTO6bl IpeDToBpaTb BbITEKaHHe KNCJOTbN3 6aTaapeek.
3aTeM 3akpoIe KpbIuKy 6aTapeek.
I I P I M E U A H N A:
Korda noknioeH uHyp ceTeBOr nTaHn, 6aTapeKn ABTOMATHECKN OTKJIOHaOTCA.
BHIMAHHE:
He nCnoJIb3yIte coBMEcTHo 6aTapeiKn pa3HbIX TnIOB, IIO6 CTapBle HOBblE 6aTapeiKn.
He BbIpaBbIaIe 6aTapeKIN BMeCTe C 6bITOBbIMN OTxOdAMn. IoxaIyIcTa,OTHEcIte NcNoJIb30BaHHbIe 6aTapeKIN B COOTBeTCTByIOUm KOHTeHep C6opa HnN o6paTHo PO3HNHOMY PPODaBly.
IPEUYIPKDEHNE:
He noDBepraTe 6aTapeKu HHTeHCBHOMy HArpeBy nnn BO3dEiCTBnIO npAMoro COJIeHOro CBeta. He 6pocaiTe 6bataeKn B OROh. OnacHOctb B3pbIba!
3aunTHoe TpaHcnpTHoe npncnoc6JeHne, oTceK dKOB CD
- NcnoIb3yIte KhoNky OPEN/CLOSE (8), TTo6bl OTkpbItb oTcek ducka CD (3).
- PpeepnepbohaaHbHm nCnoB3ObaHnem npn6opa ydaIte 3aUHTHO TpaHCnOpTHoe pncnoc6beHne n3 nleepa CD,ecn Taokoe pncnoc6beHne nMeetcra.
PomKoctb
Heo6xOdImbI ypoBeHb rPOMKoCTn MOxHO yCTaHOBnTb peryIaTOpom VOLUME (21).
BbIKIOUeHnE
I P N I M E Y A H N A:
B cnyae nckob CD fopMaT a MP3 chaHa kpaTkOBpeMeHHO OTo6pakaetc h o6ue YnCNo nAnok. TaKxe Ha dncnlee BbBOJNTcMP3.
5.ДИСКCD6yETBOCpOIN3BOINTBcRcNepB0N3aINcN.Ha DnCnIeOTo6paKaTeTcKyuJcA3aINcBnPOnEduIe BpeMBOCpOIN3BeDeHn.
I INPIMEYAHNIA:
OHHOKpaTHoe HaxKtne = HenpepbIBHO BOCpOn3BOIDITcH TekyuJ4 3aIncb (Ha DnCnIeep noka3aHo
Двоиhoe haxaTne = HenpepbIBHO BOCnpon3BOOHTcBbIbpaHna npanKa Ha DnCKeMP3 CD (Ha nCnPee noka3aHo FOLDER).Mcnol3yTeKhoNkY ALBUM (12)ДЯ BbIbopaOTdJIbHbIXnanOK.
HaxaTne Tpu p3a = HnpepbIBHO BOCPON3BOJNTcB BeCb Dnck CD (Ha DnCnIe e noKa3aHoALL).
Haxatne yetbipe pa3a = Ha dncnlee BbIbeJeHO cNoBO RAND, MP3 n Homep 3aIncn, KoTopar Bocnpo3BODITcR nepBOB. BCE 3aIncn Bocnpo3BODITcR BCnyaHOM npAKe.
Haxatne nTb pa3 = Ha dincnnee BbIbeJeHO INTRO. KaJdA 3aIncB c dNcKa CD BocnpoIN3BOJrTa 10 cekyHn.
Haxatne 1eCTb pa3 = fynKUIN DeakTNBUPyETcN INCK CD BocnpoIN3BOIDNTcB O6bHOM peXIMe.
INFO (15)
Ecni coxpaneha nHopmaun o Tere ID-3,To 3TO Otpaxka-etcna Hnncnnee B Bnde MmraHn CBetOnnoHa. Haxmnte KhoNky eue pa3, YTO6bl CHOBa BbIKIOHTb cyHKUIO.
ALBUM (12)
HaxmTe 3Ty KhoNky BO BpeM RAocnpn3BeDeHn, YTO6bI nepeTIN B nanky 6Olee BBicOKoYO yPOBn. Ha dinCnIeK pAtKOBpeMeHHo Mrraet HAnPiScb, HappImep FOLDER F02.
3aTEM ABTOMATNueCKn HauHnaeTCB OBCPOn3BeDeHne DnCKa CD.EcIn KhoIka HaxKaTa B pexKIM OCTaHOBKn,INcPiNei TAKKe Mnraet. 3aTEM HauHnTe BOCPOn3BeDeHne KhoIkoI PLAY/PAUSE/USB.
IporpaMMNPOBaHHoe BocnpOn3VeJeHne
MoXHO npOrpamMnPoBaTb IIO6yIO HxKHyIO NocJeDObaTeNb HOCTb 3aIncen.
- Haxmnte KlaBnuy STOP (11).
- Haxmte KnaBnuy MODE (16).Ha nncnee 6ydt Mngatb Homep "P01" (MeTo xpaHEnia) n CIMBOI MEMORY. IcnoJb3ynte KhoNk SNIP+/SKIP- (10/17) nBb6opa HxKHO 3aInCn, 3aTeM CHOBa Haxmte KhoNky MODE. Ha nncnnee u3MeHnTc MeCTo B namrTa Ha P02.
ITPIMMEYAHNIA:
B clyae dnckOB CD fopMaTa MP3 haxmTe KhoNky ALBUM (12),yO6bI n3MeHnTb naKy.
Bcnyae nucOB CD opMaTa MP3 cnKamn, npn nepexoJe ycTpoiCTBa Kdpyroi panKe dIa nepBOI 3aHNC B HOBOI PANKE OTo6paXaeTc001.
- Bb6epnte cneIyIOuIyO 3aIncb KnaBnuei SKIP+/SKIP-n CHOba haxmnte KnaBnUy MODE.IOBToprTe 3Ty npo- ueIpy Do Bb6opBa BCex Heo6xOIMbIX 3aInciei.
I PIMMEAHNIA:
Iocne 3aONHeHn nporpamMpyEmbIM 3aNcMM MeCTa xpaHHeHn Ha DnCJIeE 6yET MIRaTb HAdnncB "FULL".
- HaxmTe KnaBnUy PLAY/PAUSE/USB (14). HaHHeTcB BocPOn3BeDeHne. Ha DicnIee OTo6paxKaETcHomeR nepBoB BbI6paHHo 3aNcN BMeCTe C pOuEiIMB BpeMeHem BocPOn3BeDeHnI n CNoBOM MEMORY.
- Odn pa3 haxmte knaBnuy STOP, 0to6bIOCTaHOBTb Bocnpoun3BeDeHHe, He nppepbBaI nporpaMMy.
- Дя подожень Воснроньдану Заюгамповаимоюпocледоватьногсту НжмтЕ Кноку PLAY/PAUSE/USB.
7.Ду удалени nporpamMbI DBaЖынхмte KlaBnUy STOP.KoHTpoJIbHaJ lamNoCuKa MEMORY BblKlIOHITCA
YcTPOIcTBO ABtOMaTnueCKN OCTaHOBITC NocJe 3aBePWeHINBAeN PocLeDObaTeJIbHOCTN 3aPpOrpAMMnPoBaHHbIX3aInCe. CNoBO MEMORY npOnaTe, a 3aPpOrpAMMnPoBaHNbI NpOraDOK 3aInCe 6yDet ydaHe H3 nAmrTn.
Takke Moxho nporpaMMPOBaT 3aNcC C NcNoIb3OBAHnEM
fYHKU IN REPEAT. Pocne nporpaMMPOBaHn I 3aNycka
yCTpOInCTBa, NOKAnyInCTa, HAKMITE Tpu pa3a KHOkny MODE
(16), 3aTeM MoxHO NcNOB3OBA Tb fYHKUIN, KaK yKa3aHO B
pa3dene O pexIMax.
Bocnpo3BeJeHne My3bIKN B φopMaTe MP3
JaHHoe yCTpOInCTBO oBecnueHbAe BocnpOn3BeJeHne My3bKnBΦopMaTe MP3.YCTpOInCTBO TaKKe NOpIepXnBaET BceCTaHApTHe TINbI DnCKOB CD:CD-RW,CD-R.
AaHbI np6op MoKET BOCpOuN3BOUntb DnCKn MP3 CD. 200 3aInCeMgYr 6bItcXaTbI H CoXpaHeHb Ha TaKnx dckax CD.YCTpoiCTBO ABTomAtuYeCKn OnpEeNT MP3 CD (Ha nCnIe 6ydt BbIEDeHo oBcJe uCNo 3aInCe I dckOB MP3).O BOCpOuN3BeDEHN OJHOrO IN3 3THx DnCKOB CD cm.B pa3dJe "BocPOn3BeDEHne DnCKOB CD/MP3".3aInCn MoKHO pOrpamMPOBaTb, KaK paccmOTpeHO B rIabe "PiorpamMPOBaHne BOCpOuN3BeDEHna".
PoxkanyIcTa yTuTe:
CyueCTByIOT HeCKoJIbKO pa3HbIX MeTOIOB 3aIINCU IN CxKaTIN, a TaKKe OTJInuB KaueCTBe O6blHbIX DnCKOB CD IN DnCKOB CD, 3aIINCAHHbIX CaOCToRTeJIbHO.
Bonee toro, my3bikalhna Hndyctpna He npnepknaBaetc eHnhbxCTaHdapTOB (3aUHTa OT KOnnpobAHNA).
No 3TMM npuHnAm B KpaHne peKnx CUYaX BO3MOXhBi npo6JIembl pRn BOCpOn3BeDeHN DnCKOB CD n MP3 CD.
3TO HE HBAHETCA pnp3HaKOM HENpabINbHOJ pa6Otby yCTpoi-CTBa.
OuInctka n TexHnueckoe obcIyXnBaHne
- PpeD OCHTko np6opa Bcerda n3BlekaTe BnIKy 3neKTPoNTAHIN.
- JIO6bIe OTMeTkn Ha NOBepxHOCTM MOXHO CTpeTb CnErKa BIAJXHO TKAHbIO 63 KaKIX-NIO6O Do6aBOK.
Диагнoctикa
MoeJIb: SR 4339 CD/MP3/USB
3JIeKToPOnTuHHe: 220-240 B\~,50T
Pabota Ha 6aTaepKax: .6x1,5B,Tun UM2/R 14
IopTe6JIeMaM MoUHocTb: 12BT
Klacc 3aunTbI:
Bec HETTO: 1,34 K
BbIbOp paIIOocTaHUN:
YachToTHbIe dnaHana30hbl: VHF/FM 88~108,0 M
MWW/AM540\~1600K
Mbl octabnem 3a co6o npabo Ha TexHueckne n3meHeHHI
3To n3dJIeHHe npOJIO BCE Heo6xOIMbIe n aKTyAJIbHbIe npOBepKn, npEtnncAHbIe DnpeKTHBOI CE, K npIM. Ha 3JIeKTPO-MaHHTHyIO COBMeCTUMOCbI N COOTBeTCTBME Tpe6oBAHNM K Hn3KOBJTHOH TEXHKe, OHO 6blIO TaXKe CCKOH-CTpyINpOBAHO IN NOCTpoEHO C UyEtOM NocJeHNIX Tpe6oBaHNI NO TEXHKe 6e30NaCHOCTN.