
IMS 4439 PLL - Radio AEG - Free user manual and instructions
Find the device manual for free IMS 4439 PLL AEG in PDF.
| Product type | Clock radio with iPod/iPhone dock |
| Brand | AEG |
| Model | IMS 4439 PLL |
| Dimensions (approx.) | 300 x 150 x 100 mm |
| Weight (approx.) | 1.5 kg |
| Main power supply | External mains adapter 230 V, 50 Hz |
| Backup power supply | 2 AAA batteries (not included) |
| Radio frequency bands | FM, MW (AM) |
| iPod/iPhone compatibility | Yes (docking) |
| Auxiliary input | 3.5 mm AUX jack |
| Main functions | Radio, alarm, snooze, sleep timer, equalizer (EQ), MBASS, MUTE |
| Display | LCD screen with adjustable brightness |
| Remote control | Yes, infrared |
| Maintenance and cleaning | Soft dry cloth, do not use solvents |
| Safety | Keep away from heat sources, do not expose to moisture |
| Spare parts and repairability | Contact AEG customer service |
Frequently Asked Questions - IMS 4439 PLL AEG
User questions about IMS 4439 PLL AEG
0 question about this device. Answer the ones you know or ask your own.
Ask a new question about this device
Download the instructions for your Radio in PDF format for free! Find your manual IMS 4439 PLL - AEG and take your electronic device back in hand. On this page are published all the documents necessary for the use of your device. IMS 4439 PLL by AEG.
USER MANUAL IMS 4439 PLL AEG
Po3TaUyBaHHopraHIB KepyBaHH 3
IocihNK KopncTyBa. ..ctop.60
Texhihi xapaKTepeNCTIKN CTOp. 65
P03TaUyBaHHOprAHIBKepyBaHH

Deutsch
REP/M+ (9) REPEAT (8 and der FB)
STOP (2/13)
MENU (10 ander FB)
ACHTUNG:
ENTER (6 an der FB)

-
" Y" (Radio):
-
" " (iPod/iPhone):
ATENCLON:

Reproduccion musica del iPod/iPhone
REP/M+ (9) REPEAT (8 en el mando)
ATENCLON:
STOP (2/13)
REP/M+ (9) REPEAT (8 no CR)
STOP (2/13)
MENU (10 no CR)
INDICAÇÃO:
Limpeza
PORTUGUES
Symbols in this user manual
WARNING:
CAUTION:
i NOTE:
Location of Controls
2
3

Children and disabled persons
Remote Control
WARNING!
suffocation!
11
ENGLISH
First Use of the Device/Introduction
Inserting the batteries (Backup)
CAUTION:

iNOTE:
Insert/Replace Battery in Remote Control
i NOTE:
CAUTION:
WARNING:
explosion!
Power supply
WARNING:
of explosion!
CAUTION:
Set Current Time (in standby mode)


iPod/iPhone Compatibility
"This accessory was not developed for iPhone use. It is possible that noise occurs and signal strength is reduced."
General Operation
i NOTE:
Switch device on/off (1/21)
Display brightness
Volume
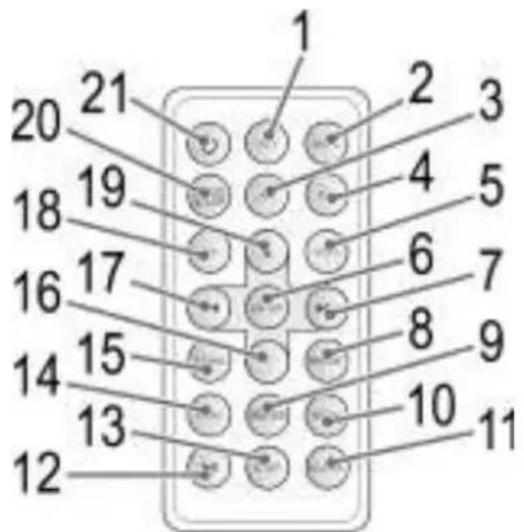
Infrared Remote Control
EQ (4 on RC)
i NOTE:
MBASS (9 on RC)
MUTE (2 on the RC)
NOTE:
Radio Tuning
ENGLISH


iNc
Save Radio Station

Recall Saved Radio Stations
ENGLISH
Alarm Function
Snoopze Function
Deactivate Alarm


Sleep Timer (SLEEP button (7/20))
-“ 念 (Buzzer):
-“Y" (Radio):

-“ (iPod/iPhone):
CAUTION:
MusicPlaybackfromiPod/iPhone
CAUTION:
CAUTION:
iNOTE:
CAUTION:


Turn Off Alarm

CAUTION:
i NOTE:
Description of iPod/iPhone Controls
II (3/12)
(4/17)
(4/7)
REP/M+ (9) REPEAT (8 on RC)
STOP (2/13)
MENU (10 on RC)
ENTER (6 on RC)
iPod/iPhone Charging
iNOTE:
AUX IN Jack (Rear)
i NOTE:
Cleaning
Technical Specifications
External power adaptor

ENGLISH
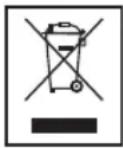
Meaning of the "Wheelie Bin" Symbol
iPod/iPhone compatibilities
BnKOpncTaHnI npNcTpoIO Bneppe/ O3HaNoMJIeHH
piBHe i He KOB3Ke, De IeIeKO MoXHa ynpaBnTn npNCTpoem.
HHOM!
3axnchy CTpiKy.
BCTAHOBnEHH6aTapei (pe3epBa)
(BaTapei He BXOAnrB Do KOMnJIeKTy NocTaBKn)
Ypa3i npnnnneHHH KINBHeHHI pncIpoHO HanaaHTyBaHNb6yde 36epeKeHO, kUO 6aTapeBCTAHOBHeHO.
- BiДКрИTe BiДсIK ДЯБаТAPEй y HnЖнIЧаСТиHIpnICTpoI.
- BCTaBTe Dbi 6atapei R03 TnHy "AAA", notyXhIcTHo 1,5 B. IpeBepiTe npaBnIbHicThb nonIrpHoCTi (noKa3aHa Ha dHi BiDciKy dIra 6atapei)!
- RkIIO npIbT He BnKOpNCOTByBaTHMeTbCn PpOraROM TpHbaIoro yacy, BmIMtB 6aTaapei 3 npICCTPOU, Iooy HnKHyTN BnTIkaHHN KcNcNOTn 3 6aTaapei.

YBAGA.
HOBNM Ta CTapIMM 6aTapeRM ODHouaCHO.
cmITTM. BnKOpNCTaHi 6atapei 3daBaIte y BiINO-BiHm nyHKT npHOMy a6o nobepTaIe ix y nyHKT npND6aHH.

NONEPEDKHEHRA.
He 3aIIuAte n iD npAmm COHnHm npOMHHAM a6o y cepenobuax 3 BnCOKOIO TEMpepaTPOIO. He KnaTe batapei y BOHOb - icHye He6e3neHa Bn6byx!
HKBNEHH
TpikoHTaKTHOI po3eTKn 230 B,50 T. PIIdkHIOuHtB
CTpyMHa npctpoi.
YehnHa Ha Ta6Nui3 TeXHiHmN daHmN.
roHHnKa Ta cTaHcii 6yde Btpaeho y BnnaKy 360iB y noctaahHi KINBHeHHa 6o npN BiKIOeHHI BiMpeXKi KINBHeHH.

YBATA.
noctaayctbca pa3om i3 uim npncptoem. He 3actocobyte do iHux npncptoib.
(−C+),BnKOpHCTaHHiHx aanTepiB MoKe NOuKOJNTn npCTpi.

JPHMITKA.
He KOpNCTyTeCRAHIM DOBnI npomIKOK acy.
BcTaHOBHeHHa/3aMIHeHHa 6aTapei B nyIbTi nucTaHuiHoro KepyBaHHa

PIMITKA.
dna6atapeynybTi ndctaHuiHoro KepyBaHHN NOKPNTa 3axnCHOO CTPIKHO DN TpaHCnOpTyBaHH,
6aatae.IpeepnBnKOpNCTaHHMnyIbTa nctahuiHoro KepyBaHH3HIMtB CTpivky.
Batape B nylti dntaHuiHoro KepyBaHHMiCTNb nitiEBy batapeo TaIeTKOBOro TnIy TpIBaIORo TepMiHy npdaTHOcti. Jkuo NiJ cac BkOpNCTAHHa DaJIbHiCTb iIyIbTa 3MeHunlaCb, DToPmYTecb HaBeDeHX HxKHe Kpokib.
nybTa.
(CR 2025). Npebebipte npaBnblHicb noJrphocti.
KU OyIbT He BIKOPNCOTOBaTHMeTBcR IpOTAROM TpBAnoro Yacy, BIMITb 6aTapeo, UOb yHnKHyTN "BNTiKaHH" KNCLOTn 6aTaapei.

NONEPEDHEHHA.
piipnrmcoHnHm npomHHam. HikoH He KnaTe 6aTaPeY y BOrOHb. IChyE He6e3neKa Bn- 6xy!
Mn (raKamn, LbXamn, rBHTamn Ta iH.). IChye He6e3neKa KOPOTKOro 3AMKaHHa
YKPAIHCbKA

NONEPEDKHeHH.
MOKe CnpuynHHTN NOXeKy.
NEK3aKLeIeTe II KOHTaKTN KNeIKOIO CTpiKoIO.
He notpannla B oci a6o Ha ukipy. RaKIO KncIota nOtnpanna B oci, npomNte ix NcToIO BOIOIO i, RaKIO CmNTOMn He 3HNIKHytb, BiDpa3y 3BepHiTbcra do likapra.

YBAGA.
He ytni3yute 6atapei pa30m i3 no6yTOBnM CmITrM. BiDnecitb 6atapei do aBtOpn3ObaHOI TOKn 360py a6o do dinepa.
HanaTuBaHHraOHHnKa(BpeKmI oukiyBaHHa
- Hatncitb KhoNky CLOCK (11 Ha PIK) i ytpmyTe ii npotrrom npnb3HO 3 cekyHd. Ioka3Hrk rOdn Hnohe 6JImaTn.
BCTaHOBiT ToDNHn.
IiTBePbTe Bn6ip HaTnckaHHm KhoNkCLOCK.
BCTaHOIBiTB XBUNHn.
HanaWtYBaHHa Yacy.
Cymichictb i3 iPod/Phone
denei iPod i iPhone, docTynHnx y mara3nHax, nobHa
iPod/iPhone, nepeBipTe cymichictb Ioro iItepfeCy.
TakoHe MoKe rapaHTyBaTncb NOBHa CymiCHiCTb
fynkui npIbTa dNctaHuiHoro KepyBaHHra.
noTpi6Ho, uO6 iPod/Phone npauoBab HopMaJIbHO,
niKIOHITb Ioro Do DOK-CTAHii.

IPNIMITKA.
B 3aIeKHOCTi BiD Bepci II porpamHoro 3a6e3neueHHRA BcTaHOBHeHOro Ha iPhone, MoKyTb BiOobpaKaatncnHaCTynHi NobIDOMHeHH IPO NOMNIK.
iPhone. BukopncTaanH MoKe npBecn Do nOBuW yMiv i noCna6neHH CnHany."
Bcbomy BinaKy HataChItb KhoNkY "OK".
3araIbHa iHΦopMaizi npo po6Otu npnCTpOHO

NIPMITKA.
IINCTAHUHORO KepyBaHH. IeHTnHi KHONK BIKOHYIOb OHaKOBi FyHKuII.
YBIMKHeHHBMMKHeHHnPnCToIO(1/21)
KuHaTnCHyTH KONKy npncpti nepeide B peKIM OUYBaHHa. KaH aHTnCHyTH KONky 3HOBy, npncptpi yBIMKHeTBcR.
Ackpabictb dncnne
Bn6patn a6o BmKHytn HaJaTuBaHHr RckpaBOcTi ekpaHa MoKHa 3a Donomoro KhoNKn SNOOZE (7).
IyHictb
Notpi6Hy rhyHCTb MoKHa HaJaHTyBaTn 3a DonOMoHO KhoNOK VOL+/VOL- (10/5/18).
IhpaepBOHn nylbT nucTaHnHO KepyBaHH
BnKOpncToBycTaIJa 6e3dpoTobOrO ynpaBnHn npnCTpoem Ha BiDcTahi Do 5 M. RaKo daNbHicTb II nyltBa
TN nybTa notpiHO, uo6 MIXH Nm i npnMaueM Ha npncTpoi He 6yNo nepeuKoJ.
EQ (4 Ha PIK)
(Nonepedhe HanaaHTyBaHHF yHKnui eKbanaa3epa).
Te KhoNky EQ, 6o6 Bn6patn Notpi6He HanaaTyBaHHa.

NIPMITKA.
BaHHa EQ ha iPod/iPhone.
MBASS (9 Na PIK)
BnKOpNCTOByeTbC, 106 niDiChInTH 6acn. AkTbYyTe
MKHyTN II, HATNCHTb KHOHKy EQ (4 Ha PIK).
MUTE (2 Ha PIK)
VOL+/VOL-, uo6 yBIMKHyTn rYHlCtB.

NIPMITKA.
OpaKaTbCa.
HanauTyBaHHpaio
(1/21), 06 yBIMKHyT npn-ctpi.
DOnOKn Ha ekpaHl He BiO6pa3ntb8iHdkaui TUNER.
(4/7/17).
I03haKa peKmMy cTepeo ("ST"Ha ekpaHi) IInue I03Haac, nn npnMaetbcBn6pHa cTaHcIy pexkmi cTepeo. KkuO cnHan dYke cna6kn i HauBHI 3aBADn, cnpo6yute nokpaunTH
npiMaHHcHrHaJy 3MIHNIOJOKeHHaHTeHn Ta/a6o 3roptaHH/03roptaHH.
IINPIMITKA.
HaTnckaTe KhoNky ST/MO, 06 nepemikatncB peKIM MOHO, kUIO 3a6arato WymOBnx 3aBaI.
36epeKeHHpaIioCTaHui
- Hatncihb KhoNkY MEMORY (6 Ha npicntpoi), 0o6 36epeTn paioctaHuiH Do nonepdHix HanaHTy
6JIIMae Ha ekpaHi (Hanp. P01).
- HATINCHITb KHOHKN (4/7/17), 06 Bn6paTno- npeedHe HanaWtBuHHraTcHii BiD P01 do P20.
- Kopotko HaTnChtb Khonky MEMORY, 0o6 36peerTn paioctanuio.
BnJIHK 36epeKeHnx cTaHcij
Kibka pa3iB haTnckaTe KhoNky REP/M+ (9 ha npn-ctpo), 106 BnKInKaTH NOpEepHHi HalaWtYBaHHra 36epeKeHoI CTahui.
Будньнк
Ha npncptoi MOxHa BCTaHOBHTn Dba pi3Hi HanaUyBaHHa Yacy dna 6yDnIbHnka.
(1/21), 0o6 BmKHyTn npNCTpii.
cekyndn KhoNky AL1 (10/1) a6o AL2 (10/3).Ha nncnnei 6yde BidoopaKaTcB NOTOuHn BCTaHOBHeHn Yac 6yDnJIbHnka. BydyTB 6JIMMaTHI rOHN.
1 1 a6o
AL2. Nouhytb 6JIIMaTH XBUNHH. BCTaHOBITb XBUNHH.
AL2.
Bn6epitbpexHM cnpaobByBaHHbHa. PiTBePbTe Bn6ip 3a DonomoroKhONOK AL1 a6o AL2.
-“(3ByKOBn CnHnA1)
Y BCTaHOBJIeHn Yac npo3ByuHTb 3ByKOBn CnHaJ6yDnJIbHnKa. IyHnicb CnHaJy 6yDe nOTpOxy 3POCTaTn.
-Paio
Y BCTAHOBHeHn Yac yBIMKHeTbCpaio. Bye BiTbBOPiBaTncb OCTaHHi HanaTObaHn KaHaI. THyHICTb 6yde Notpoxy 3pOcTaTn.
-“ (iPod/iPhone):
YBAGA.
io6 pao He nepe6ybao B peKmi iPod.
YKPAIHCbKA
KOMNNEKT NOCTABKN) DO DOKy iPod (11). iPod MOXHA BCTAHOBHTH HAIJEKHMM YHOM y
aadanTep.
yB4A.
Ipebeipre, oio iPod/iPhone byo BcTaHOB
Ta He Haxilrte iPod/Phone, Donokn Bih
ДИТи дok a6o/ta iPod/iPhone.
Toro JK peKIMy, AKN 6yNIO BCTaHOBJIeHO dIpeKIMy 6yDINbHnka. IyHnicb 6yDe 3pocTaNTnoTPOxy.
IINPMITKA.
y noci6nky KopncTyBaay iPod/iPhone.
6yDnHbNk npncptpo yBIMKHeTbcBpeKMI BUZZER.
no3haKa a6o ByeaKtNbBOHaNo nepn H a6o npytn cnHnBn 6ydnblnka.
BmKHeHH6yDnIbHnKa
HaTnCHiB KhoNkU ΦIoo BmKHyTu 6yDnJIbHnK Do Ha-CTynHO DnR.
Pekn m NOTopeHHa HrHaIy
HaTnCHiB KHOJky SNOOZE (7/20), 106 BmKHyTH 6yDnJIbHnK np6JIn3Ho Ha 9 XBNINH.
BmKHeHH6yDnIbHnka
HaTNCiB KHOJky AL1 (10/1), DOKn He 3HnKHe 3 ekpaHa N03NaUka
HaTNCiB KHOJky AL2 (10/3), DOKn He 3HnKHe 3 ekpaHa N03NaUka
Taimep chy (KHonka SLEEP (7/20))
Y peKmI ON BCTaHOBITb Yac, KOJI npCtpiMae aBTOMaTHNOpeeTNBpeKIM OIKyBaHH. Bn6epiTb
KaIte LIO KHONKy, DOnOKN He BiO6pa3ntbca Notpi6hni
iHnkaia SLEEP. KOn MHe BCTaHOBHeHn Yac, npntcpii BmKHeTbCABOTMaTHNO.
HaTNCHTb KONky (1/21), 0o6 BmKHyTN uO fYHKuIIO. PnpCTpi nepeJeB peKIM ouikyBaHHa.
YKPAIHcbla
BiTbOpENHMy3NKn 3 iPod/iPhone
(iPod/iPhone He BxOaNTb B KOMnJIeKT NocTaBKn)
YBAGA.
paio He nepe6ybaIO B peKmI iPod/iPhone.
CTaBKn)doDoky iPod (11).iPod MoXkHa BCTaHOBHTN
yBATA.
Ipebeipte, 06 iPod/iPhone 6yno BcTaHOBNeHo
xinrte iPod/iPhone, donokn Bin ndknoeHn do
iPhone.
- Hatncitb KhoNky (1/21), 106 yBIMKHytn npnctpii. Kibka pa3iB HATNCaIte KhoNky FUNCTION (5/14), IOKH He BIDo6pa3ntbcra CnoBO "iPHONE".
6NoKyBaHHa KHOIOK i PO3noHITb BiDTBopeHHa My3nKn, Raio NoTpi6Ho, HATNCyBUn KHONky II (3/12).
- По ВИКОПСТАнHA eLEMeHIT ynpaBlinHa YIHTAITE y nociHnky KOpNCTyBaay iPod/iPhone.
yBABA.
pekimpaio.
I P H M I T K A.
peHHMy3NKNoCTynaeBXiDnI3BIOHK,BiTbOpeH H3yNnHaETbcA,IyHae BKNIK.
Onnc eIementB ynpablinHa iPod/Phone
II (3/12)
HaTnCHiB 1e pa3, 106 npoIOBxHIn BIDTBOpEHn.
(4/17)
1HaTNCHeHH=po3noHnHae BiTBopeHHnichI 3 noaTky.
2HaTnCHeHH= npOnyckaHHo nonepedHboi nichi.
3HaTnCHeHH= npOnyckaHHdo nichi neped nonepedhboIO nicheo i T.D. HATnCHiB i ytpmyte niq vac BiITbOpEHHdI NaNoUky Ha3aD.
(4/7)
HaTnCHiB, 106 nponyctHn Do HacTynHOi nichi Ta Ha- cTynHnx 3a Heo niceHB. HaTnCHiB Ta ytpmYte niD Yac BiTbOpEHn DnI NouKy BnepeD.
REP/M+ (9) REPEAT (8 Ha ΠΚ)
TBOpeHHA.
STOP (2/13)
BiTbOpenH3yNHHtbcra.
MENU (10 Na PIK)
HaTnCHiB tio KhoNky, 106 BiKpHTm MeHIO iPod/ iPhone a6o nobepHyTncb do nonpeDhboro MeHIO.
ENTER (6 Ha PIK)
CTyIhHe MeHIO.
N(19/16 Ha FB)
Bn3 y MeHIO iPod/iPhone.
3apnKaHH iPod/iPhone
Batapera iPod/iPhone nouhe 3aprakatncnicra
IPIIMITKA.
CTaBKN, 3a63e3neuTn npaBnIbHe BnKOpNC-TaHH npictpoi iPod.
KIM3apdKaHHA.
BnKOpNCTOByEcTbCn iPod/iPhone, i yMoB Ioro BnKOpNCTaHH.
po6to paoio.
Po3'EM AUX IN (33aNy)
H.Пдкюаite taki npictpoB BiTbOpeHH,AK MP3- nIeep, CD-nIeep, toio, uOb npocnyxOByBaTu My3NkU yepe3 ryHOMOBui.
KhoNkFNCTION (5/14).
- IoanaIiHCTpykuII MOxHa 3HaTn B Noc6Hky KopncTyBaay dKepeena 30BHIuHbO rHany.
4.ПорocnyoxOByTe My3nKу 3i 30BHIuHix npncTpoB BiIDTBOpEHHaYepe3 ryuHOMoBu. HatNcKaIe KhoNkVOL+/VOL-(10/5/18), u6 hanaTuBaTu piBeHbryHocTi.
IPIIMITKA.
BctaHObITb rHyHcTb 30BHIuHbO rnpCTpOHa pO3ymnPiBeHb.
UH
BID Mepeksi KINBneHHa.
3acobibIaYHnHn.
TexhiHi xapaKTepeNCTNKH
CnoKnBaHHeJekTpoeHepri 25BT
3oBHIHi aadTep KMBneHHA

Papio
TexhiH3miHMOKe 6yTN BHeceHO 6e3 nonepdkeHNr!
PaBn EbpOnn, 30KpeMa 1oO enEeKtpomarHitHOi cymicHOCTi I nPeKTHBi 1oO Hn3bKOi Hanpyr, Ta BInpO6JIeHn BiINOBiIDHO DO OCTaHHix BmOR 6e3NeKn.
I03NaUKn "Made for iPod" i "Made for iPhone" 03HaUoTb, 10 eNeKtpOnHe 6nlaHnHa8 6yNo BnroTOBLeHo dIe NkIoueHHcme Do iPod a6o iPhone iix CepTNΦIKOBaHO Bnpo6HnKOM 10oO BiNobIDHocTi cTaHdaptam po6OtN KOMnAHI Apple. Apple He HeceBiNObiDaIbHocTi 3a po6Otu npICTpOu 4n Ioro BiNObiDHiCTb CTaNdaptAm I HopMaM 6e3neKn.
GARANTIE-KARTE
TapaHTnHnaKapToUka
IMS 4439
063aTeJIbCTBA-CMOTpykoBOcTBO NOIb3OBeTEnA


- Deutsch
- Reproduccion musica del iPod/iPhone
- PORTUGUES
- Location of Controls
- ENGLISH
- General Operation
- i NOTE:
- NOTE:
- Radio Tuning
- iNc
- Alarm Function
- BnKOpncTaHnI npNcTpoIO Bneppe/ O3HaNoMJIeHH
- BCTAHOBnEHH6aTapei (pe3epBa)
- YBAGA.
- NONEPEDKHEHRA.
- HKBNEHH
- YBATA.
- JPHMITKA.
- BcTaHOBHeHHa/3aMIHeHHa 6aTapei B nyIbTi nucTaHuiHoro KepyBaHHa
- PIMITKA.
- NONEPEDHEHHA.
- YKPAIHCbKA
- NONEPEDKHeHH.
- HanaTuBaHHraOHHnKa(BpeKmI oukiyBaHHa
- Cymichictb i3 iPod/Phone
- IPNIMITKA.
- 3araIbHa iHΦopMaizi npo po6Otu npnCTpOHO
- NIPMITKA.
- YBIMKHeHHBMMKHeHHnPnCToIO(1/21)
- Ackpabictb dncnne
- IyHictb
- IhpaepBOHn nylbT nucTaHnHO KepyBaHH
- EQ (4 Ha PIK)
- MBASS (9 Na PIK)
- MUTE (2 Ha PIK)
- HanauTyBaHHpaio
- IINPIMITKA.
- 36epeKeHHpaIioCTaHui
- BnJIHK 36epeKeHnx cTaHcij
- Будньнк
- yB4A.
- IINPMITKA.
- BmKHeHH6yDnIbHnKa
- Pekn m NOTopeHHa HrHaIy
- Taimep chy (KHonka SLEEP (7/20))
- YKPAIHcbla
- BiTbOpENHMy3NKn 3 iPod/iPhone
- Onnc eIementB ynpablinHa iPod/Phone
- II (3/12)
- (4/17)
- (4/7)
- REP/M+ (9) REPEAT (8 Ha ΠΚ)
- STOP (2/13)
- MENU (10 Na PIK)
- ENTER (6 Ha PIK)
- N(19/16 Ha FB)
- 3apnKaHH iPod/iPhone
- IPIIMITKA.
- Po3'EM AUX IN (33aNy)
- UH
- TexhiHi xapaKTepeNCTNKH
Brand : AEG
Model : IMS 4439 PLL
Category : Radio