ExactFit BP4600 - Blood pressure monitor BRAUN - Free user manual and instructions
Find the device manual for free ExactFit BP4600 BRAUN in PDF.
User questions about ExactFit BP4600 BRAUN
0 question about this device. Answer the ones you know or ask your own.
Ask a new question about this device
Download the instructions for your Blood pressure monitor in PDF format for free! Find your manual ExactFit BP4600 - BRAUN and take your electronic device back in hand. On this page are published all the documents necessary for the use of your device. ExactFit BP4600 by BRAUN.
USER MANUAL ExactFit BP4600 BRAUN
This product is manufactured by Kaz Europe SA under a license to the Braun' trademark. Braun' is a registered trademark of Braun GmbH, Kronberg, Germany.
Manufacturer:
Kaz Europe SA
Place Chauderon 18
CH-1003 Lausanne
Switzerland


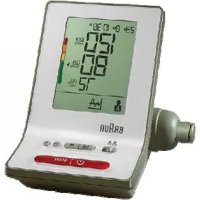
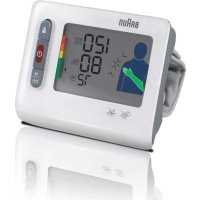
Product description
Fig.1
2
English
Braun upper arm blood pressure monitor has been developed for accurate and comfortable blood pressure measurements. The measuring accuracy of Braun's upper arm blood pressure monitor was tested at the time of manufacture and was proven by clinical research in accordance with AAMI/ANSI-SP10.
What you should know about blood pressure
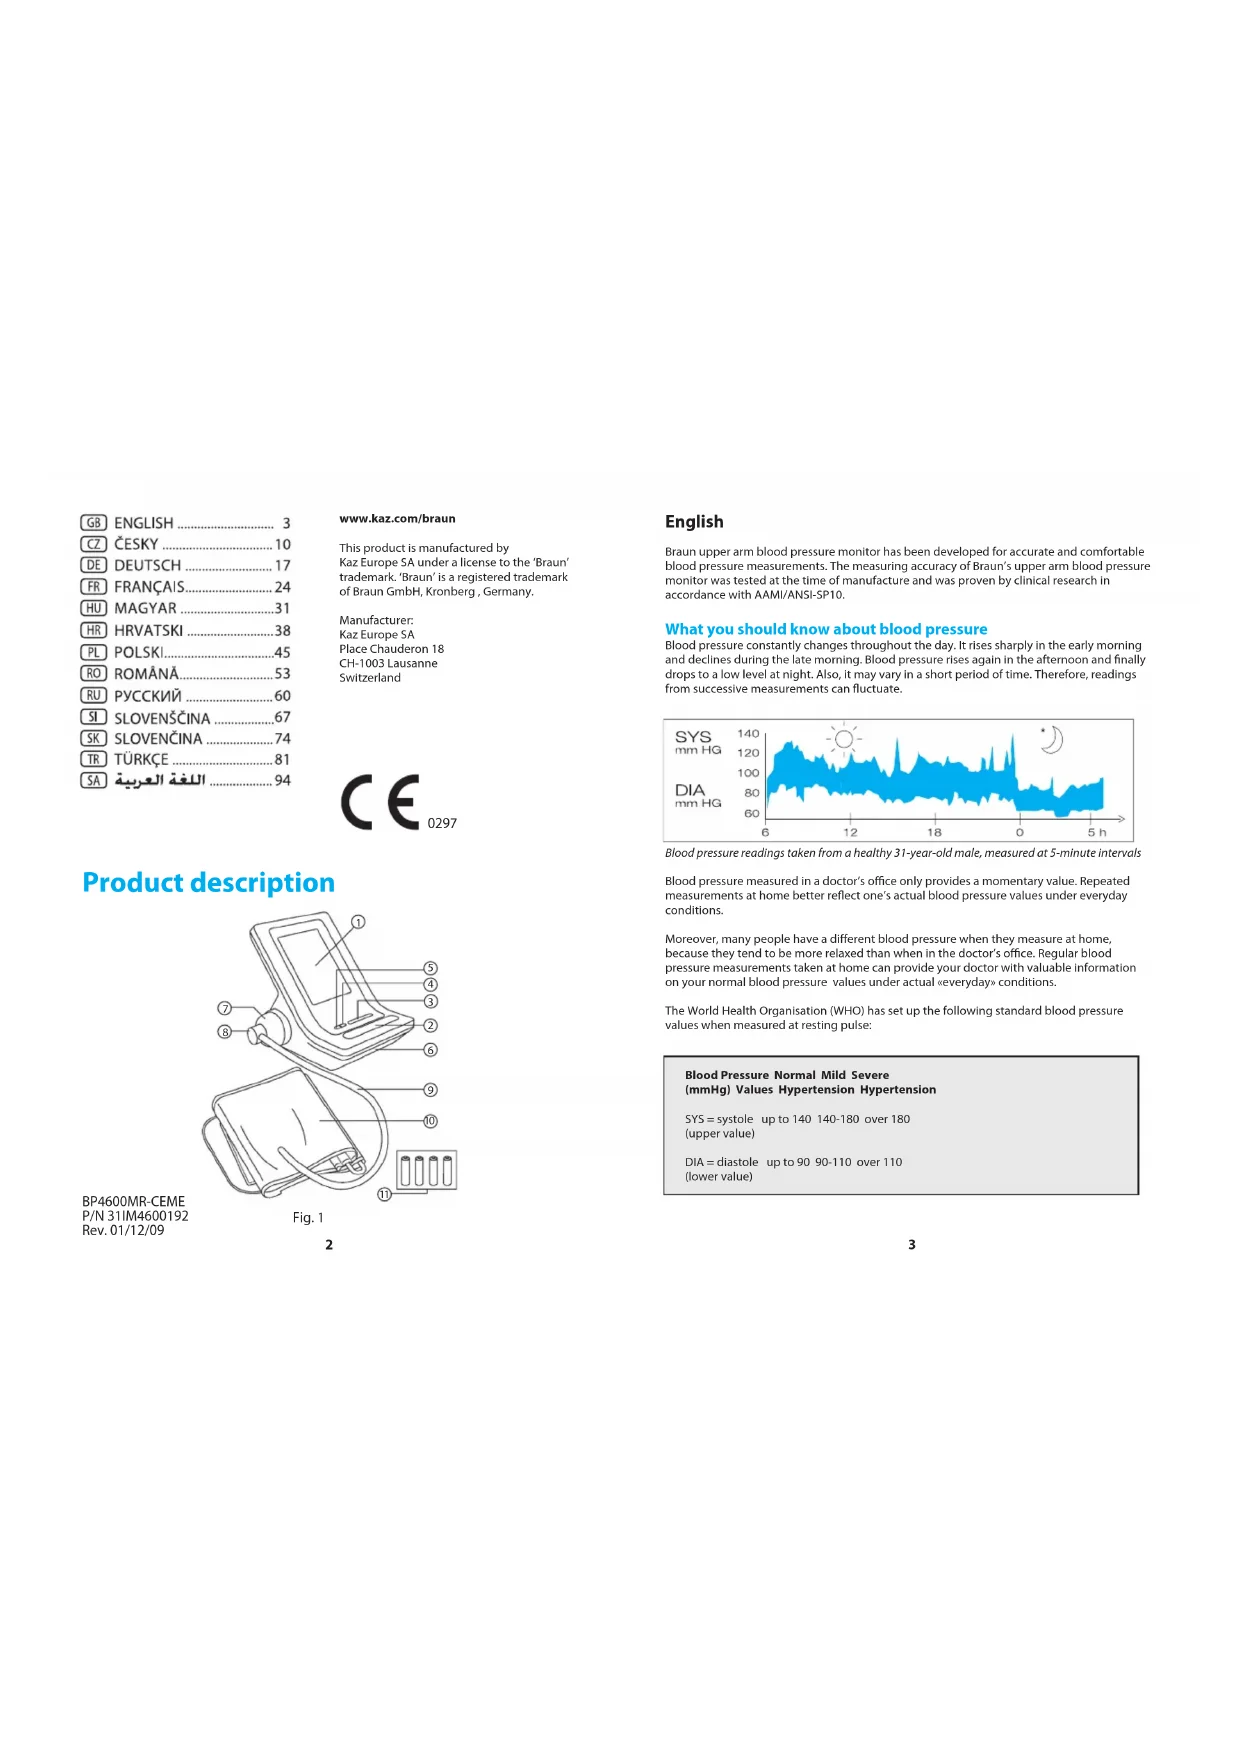
Blood pressure constantly changes throughout the day. It rises sharply in the early morning and declines during the late morning. Blood pressure rises again in the afternoon and finally drops to a low level at night. Also, it may vary in a short period of time. Therefore, readings from successive measurements can fluctuate.

Blood pressure readings taken from a healthy 31-year-old male, measured at 5-minute intervals
Blood pressure measured in a doctor's office only provides a momentary value. Repeated measurements at home better reflect one's actual blood pressure values under everyday conditions.
Moreover, many people have a different blood pressure when they measure at home, because they tend to be more relaxed than when in the doctor's office. Regular blood pressure measurements taken at home can provide your doctor with valuable information on your normal blood pressure values under actual «everyday» conditions.
The World Health Organisation (WHO) has set up the following standard blood pressure values when measured at resting pulse:
Blood Pressure Normal Mild Severe (mmHg) Values Hypertension Hypertension
SYS = systole up to 140 140-180 over 180 (upper value)
DIA = diastole up to 90 90-110 over 110 (lower value)

To ensure accurate measuring results, carefully read the complete use instructions.
- This product is intended for household use only. Keep product and batteries away from children.
- People suffering from cardiac arrhythmia, vascular constriction, arteriosclerosis in extremities, diabetes or users of cardiac pacemakers should consult their doctor before measuring their blood pressure themselves, since deviations in blood pressure values may occur in such cases.
- if you are under medical treatment or taking any medication, please consult your doctor first.
- The use of this blood pressure monitor is not intended as a substitute for consultation with your doctor.
Product Description
- LCD Display
2.Start/Stop Button - Memory Button M
- Set Button
5.ModeButton - Battery compartment cover
7.Hose Port - Connector
9.Hose - Arm Cuff
11.4x AA Alkaline Batteries (1.5V)
Inserting Batteries
- Remove the battery compartment cover at the bottom of the unit and insert 4 AA LR6 ALKALINE batteries with correct polarity (see symbol in the battery compartment).
Note: Always re-set Date and Time after replacing new batteries to make sure the measurement results are stored with correct date and time.
Only discard empty batteries. They should not be disposed of in the household waste, but at appropriate collection sites or at your retailer.

Fig.2

Fig. 3
Key Rules for Accurate Blood Pressure Measurement
- Always take readings at the same time of day, ideally in the morning and evening, under the same conditions.
- Do not measure within 30 minutes after smoking, drinking coffee or eating.
Take off wrist watch and jewelry before fitting the cuff on the measuring arm.
While taking a measurement sit down, relax, keep still, and do not move or speak. - Wrap the cuff snugly around your arm. The cuff must be at heart level.
- Do not vibrate the unit during measurement, or the proper measurement will not be achieved.
- Perform measurement quietly in a relaxed position.
- Sit in a chair with your feet flat on the floor.
- Do not wrap the cuff over jacket or sweater sleeve or measurement cannot be done.
- Remove tight-fitting clothing from your left arm.
-
Do not in any way twist the arm cuff.
-
Do not inflate the monitor's cuff when it is not wrapped around the arm.
- Do not attempt to disassemble or change any parts of the monitor including the cuff.
- Do not drop the product or put it through strong impact.
The device is not supposed to be used if your arm has any wound or injury.
Choosing the Right Cuff
For accurate measurement, it is important to choose the correct size cuff which best fits your upper arm. Choose the cuff size according to your arm circumference and make sure the bottom of the cuff is 2 3 cm above your elbow.
- Small/Medium Cuff = 23~33 cm arm circumference
Large/XLarge Cuff = 33 43 cm arm circumference
Applying the Arm Cuff
- Slide the end of arm cuff furthest from the tube through the metal ring to a loop. The smooth cloth should be on the inside of the cuff.

Fig.4

Fig.5

Fig.6
- If the cuff is located correctly, the Velcro will be on the outside of the cuff and the metal ring will not touch the skin. (Fig. 4)
- Put your left arm through the cuff loop. The bottom of the cuff should be approximately (2-3 cm) above elbow. The tube should lie over the brachial artery on the inside of the arm. (Fig. 5)

Fig. 7

Fig. 8
- Pull the cuff so that the top and bottom edges are tightened around your arm. (Fig. 6)
- When the cuff is positioned properly, press the Velcro firmly against the pile side of the cuff.
- This cuff is suitable for use if the <<INDEX>> mark falls within the <<OK RANGE>> marked by two arrows when the cuff is tightened around your arm. (Fig. 7)
- Sit on a chair and place your arm on the table so that the cuff is at the same level as your heart. (Fig. 8)

Setting Month, Date and Time
a. Press (P5) button ("month" starts flashing)
Press (2) button to set the correct month (1,2,3,...,12)
b. Press(95) button again ("date" starts flashing)
Press button to set the correct date (1,2,3,...,31)
c. Press (95) button again ("hour" starts flashing)
Press button to set the correct hour (1,2,3,...,12)
d. Press (5) button again ("minute" starts flashing)
Press 2 button to set the correct minute (0,1,2,3,...59)
e. Press (b) button again to lock in time settings. Digits will stop flashing.
Taking a Measurement
- Wrap the cuff around the arm (see "Applying the Arm Cuff" section above).
- Sit upright on the chair to have a correct posture.
- Press the button. All elements of the display indicate '888' during the first 3 seconds. (Fig. 9) The measuring blood pressure symbol will then flash on the display and the air pressure will automatically pump up to certain pressure level and start measurement. Do not move or talk in the midst of taking blood pressure measurement.
- After the air pressure has increased, it will slowly decrease. When the pulse is detected, the HEART RATE symbol will start flashing. After taking blood pressure measurement, the product will turn off automatically after 1 minute.


Memory Function
Your blood pressure monitor can store the latest readings of 32 measurements
Storing Measurement Data
After each blood pressure measurement, the Systolic pressure, Diastolic pressure, Pulse rate and the time & date of specific day will be automatically stored. Memory #01 is always the most recent one. Once the memory is full, the oldest values will be overwritten.
Recalling Stored Readings
-
Press "Memory" (3) button, M:00 will appear on the display if there is no data stored in the memory. If there is data stored in the memory, the latest recorded set of measurement which is the Systolic pressure, Diastolic pressure, Pulse rate, and the recording time and date and M:01 will appear on the display for 1 minute.
-
Press the "Memory" (3) button again to read the next line of stored data. The data called up on the display with 2-digit Memory number (ex. M:02).
-
Press the "Start/Stop" (2) button to exit the memory mode.
Erasing data
- Press the "Memory" (3) button into Memory mode.
- Press and hold the "Mode" (5) button and then press the "Set" (4) button, all the stored data will be erased and CLR will show on screen.
- To check if the data was erased, press the "Memory" (3) button, No data should show up on screen, but date, time and M:00.


Low Battery Indicator
When the low battery indicator shows on the display, it means the battery is low and the four batteries need to be replaced with Alkaline LR6 (AA) batteries.
Storage and Cleaning
Always keep the unit in the carrying case after its use.
- Do not put the item directly under the sunlight, in high temperature or humid and dusty places.
- Do not store in extremely low (less than -20^ ) or high (more than 60^ ) temperature.
- Use a piece of cloth with water or mild cleansing agent to clean the case and then use a piece of dry cloth to wipe it dry. Use a piece of dry cloth to wipe the cuff when it is dirty.
- Do not use any strong cleansers to clean it.
- When the unit is not to be used for a long time, remove the batteries. (Batteries may leak or cause harm).
What to do if ....
| Problem Reason | Solution | |
| Heart Rate Symbol | Appears in the measurement condition and flashes when pulse is detected. | • Measurement in progress, remain quiet. |
| Low Battery Indicator | Appears when the battery voltage is excessively low or the positions of the batteries are incorrect. | • Replace all four batteries with new ones. Insert the batteries in the correct positions. Be aware of +/- positions. |
| Measuring Error | Appears when the accurate blood pressure and pulse could not be obtained. | • Press "Start/Stop" button again and remeasure. • Check if cuff is wrapped according to instructions. • Check that there are no kinks in tube. • Check palm if exerting effort. • Check if talking or moving during measurement. • Check if posture is correct. |
Specifications
| Method of measurement Oscillometric | |
| Model number BP4600 | |
| Range of measurement | Pressure 0-300 mmHg Pulse 40~199 beats/minute |
| Accuracy Pressure +/- 3 mmHg Pulse +/- 5% Max. | |
| Inflation Deluxe Automatic | |
| Exhaust Automatic exhaust valve | |
| Display Liquid Crystal Display - Systolic, Diastolic, Pulse rate | |
| Sets of memory 32 sets | |
| Cuff size | • Small/Medium Cuff = 23~33 cm arm circumference • Large/XLarge Cuff = 33~43 cm arm circumference |
| Operating temperature | +10° ~ +40°, less than 85% R.H. |
| Storage temperature | -20° ~ +70°, less than 85% R.H. |
| Unit weight | 290g (without batteries) |
| Power supply | Alkaline Battery: 4 x AA (LR6) |
| Battery life | 300 times measurement (twice a day measurement) |
| Auto power off | Whenever not used for 1 minute |
| Accessories | 4 batteries, arm cuff with tube, instruction manual, pouch, carton box |
IMPORTANT
Read the operating instructions.
Classification:
-
Atternally powered equipment
-
Type BF equipment
-IPX0
- Not suitable for use in the presence of flammable anaesthetic mixture with air, oxygen or nitrous oxide
Continuous operation with short-time loading
This product conforms to the provisions of the EC directive 93/42/EEC (Medical Device Directive). This device conforms to the following standards:
- EN 60601-1: 1990 + A1: 1993 + A2: 1995 + A13: 1996 General requirements for safety.
EN 60601-1-2: 2001 - Electromagnetic compatibility requirements and tests.
EN1060-1:1995 + A1:2002 Non-invasive sphygmomanometers -General requirements. - EN1060-3: 1997 + A1: 2005 - Non-invasive sphygmomanometers- supplementary requirements for electromechanical blood pressure measuring systems.
- EN1060-4: 2004 - Non-Invasive sphygmomanometers- Test procedures to determine the overall system accuracy of automated non-invasive sphygmomanometers.
Portable and mobile RF communications equipment can affect MEDICAL ELECTRICAL EQUIPMENT.

e do not dispose of the product in the household waste at the end of its useful life. Disposal can take place at your local retailer or at appropriate collection points provided in your country.
Guarantee
Kaz grants 2 years guarantee on the product commencing on the date of purchase. Within the guarantee period we will eliminate, free of charge, any defects in the appliance resulting from faults in materials or workmanship, either by repairing or replacing the complete appliance as we may choose.
This guarantee extends to every country where this appliance is supplied by Kaz or its appointed distributor.
This guarantee does not cover: damage due to improper use, normal wear or use as well as defects that have a negligible effect on the value or operation of the appliance. The guarantee becomes void if repairs are undertaken by unauthorised persons and if original Braun parts are not used.
To obtain service within the guarantee period, hand in or send the complete appliance with your sales receipt to an authorised Kaz Customer Service Centre (See package insert for a local Service Center)
UK only:
This guarantee in no way affects your rights under statutory law.
Cesky
EN 60601-1:1990 + A1:1993 + A2:1995 + A13:1996 Vseobecne pozadayky na
bezpecnost
EN 60601-1-2: 2001 - Požadavky na elektromagnetickou kompabilitu a testy.
EN1060-1: 1995 + A1: 2002 - Non-Invasive sphygmomanometers- General requirements.
EN1060-3:1997 + A1:2005 - Non-invasive sphygmomanometers- supplementary
requirements for electromechanical blood pressure measuring systems.
- EN1060-4: 2004 - Non-invasive sphygmomanometers- Test procedures to determine the overall system accuracy of automated non-invasive sphygmomanometers.
Pfnenosna a mobilni radiovakomunikačni zaizeni mohuj ovlvnit lekafska elektronicka zaizeni.

oncenizivotnesti neodhazujte prosim tento vyrobek do bezneho domovnilo odpadu. Muzete jej odevzdat mstnimu prodejci neba no prislunern sbermem miszte ziizhenem dl mistroh pdefisui.
Záruka
DIA = Diastole (unterer Wert)
bis zu 90
90-110
über 110

He 60paHbTe MaHKeTy NOeApx pyKaA KpyTkn Nn CnBtepa, NmpeHMe He MoKet 6bItb bIto/HeIO Hepe3 pyKaB.
-CHIMTE pIOTHO npIneraIOUyO odexdy c neboI pykn.
-He donyckaiTe nepekyuHaHMaHKeTbI.
He HakaunBaTe MaHKeTy TOHometpa, KOrda OHa He oBepHyTa BOKpyr pyKn.
-He nIbTaTecb pa3o6paTb HnH 3aMeHHTb KaKne-NIO Bo TcAII ToHOMeTp a, BKnIOHa MaHKeTy.
He poHnIte np6Op H He donyckaiTe cnIbHbIX yapOB NO Hemy.
- Pnp6op He cneyet nCnOlb3ObaTb npHannuPpaHbI nn TpaBmbl Ha pyke.
Bb6op npabunbHou MaHKeTbI
IaIyNOnyEHTuTOHbIXuM3eMHepENB aXbHO npAunbHb Bb6paTb pa3MeP MaHKeTb, KOTOpBIO COOTBeTCTByET pa3MePy BaueY pky.
Bb6epdte p3aMep MAHKeTBe B COOTBTCTBN COKPYKHOCTBO C0EBO PKNYUyEbnTeCb,TO HNKKHAACTb MAHKeTBe HAXOINTCR Ha 2-3 CM bIeIOJNKt.
- Manenbka/crepnra (Small/Medium) manxeta = okpyknoctb pykn 23 - 33 cm
- 50nbwa/ouehb 60nbwa (Large/XLarge) MaHkeTa = OKpyxHocTb pyKn 33 -43 cm
HaheBaHne MaXkeTbI
- PpOeHbTe KOHe, MAHxETbI, HaxoDIIuINc DaJIbUe OT Ty6Kb, Upe3 MetaIInueckoe KOnIbQ, To6bI co3aTbNETIO. IaKaI TaKbI DOnKHa HaxoDITbCAH BHTpyEHnCTOPOHe MAHIXKTbI.


Pnc.5

- ECNI MAHKeJa pACIOLOKHeJA IpAIBIbHO,TO 3actEka TUNI AINYUcKa 6bEyTe HAOXuTbCa HAI BHEHJIe CTOPOe MAHKeTaN, aMetAMNueKoe KOJIbHo He bEyTe KAcTaBc KoKn (Prc.4)
3.BCTaBte nebyo pyky B tneIO MAHKeTb.HNKHHa TcB MaHXTe bOJINKa HAXOHTbCH npIMepHO Ha 2-3 cm BwIe NOKr. Ty6ka DOJIKH a PNOXoITb HAD pIeEBoi AtrpeHnHa BYHTpeHN CTOPOye PCK.(Pc.)

m = 311 ;

Pc.8
- NotarHMe MaJxKety, yTo6bI BepxHm HuxHm Kpa3aTaynncb Ha pyke.(Pnc.6)
- NpabunbH o pacnooKMB MAHXeTy, nloTHO npXMMTe 3actexkky Tuna «Nunyuka
- Manjexta ABnTcnpiroDHOJ DnCnOblbOaHn,ecn np3 3atrrBaan HA pyke OTmTeK
nonaAet BmAnao3oH < >,OTmeHnhBn Deyma ctpenkAM.PuC.7
7.CaBTe H a CTyI N IOIOKHTe pyKHa CTOJI, YTO6b MaHKeTHe HAOODINAc h Yayp08He BauetOr cepIIa. (PMC.8)
Dmcnnnei

HIMIKATOP HN3K0TO 3APRADA BATAPEI
YctahOBka Mecya, DaTbIM Bpen
a. HaxmTe KhoNky (5) (3haeHne MeCua HaHET MuraTb)
Haxmte KONky 4TO6bIyCTaHOBtB npaBnHbMecra
(1,2,3,...12)
b.HaMMTE KONKY(5)ue pa3 (aHaYeHMe DaTb HaHT MURTaB)
HaKMnTe KONky 4yTO6bI yCTaHOBnTB npABnBHyO daty (1,2,3,...31)
c. HaxmTe KhoNky(5) eue pa3 (3haueHne yacOB HaHET Mrratb)
HaxMMTe KONky UTO6bLYVCTaHOBUTb PdABMbHOE 3HaueHHe HAcOB
(1,2,3,...,12)
d. HaxMNTE KONKy(5) eue pa3 (3HaueHHe MHyT HAHT HauHET MURAtb
HaxMMTe KONkY 17yTO6bl yCTaHOBnTB npaBnBHOe 3HaHeHne MNHYT
(0,1,2,3,...,59)
E. HAKMITE KHOKNK) EUE pa3,TO6b3a#HKIOBAtbYCTAOHNK BYPemeH. 1npeTAYMTMRt.
BbInonHeHne n3MepeHH
- 06epNHTE MAHETy BOKpy PykCm.BiIe Bpa3en HAdBeMaHE MAnKetbIy.
2.CBJeTpe pNMA HO CTYE,TOb6I ZaHTbR pAbNHyBO No3Y.
3.HaKMITE (KHOH)B). Bce nEMeHTN DnCINNE B TcEHNE 3cEHyD 6yDyT NOKaBHbTa 3hAHENe888P. (PWC.9)ATem Ha CInnne 3Amraet CNMBON HMEpHHN KPOBHOO DaBHeNHO, BO3DxH NaHET ANOTMATECHNK HAKAHBATCB DO ONpeGENHORO DaBHeNHO NaHCTCN MHEpHHe. He DeuaImeCb u He ZoOpume Bo APMe 3MSEHPeu KPOBHOO daBHeNHO - Nocle NBIOBENH DAJIEBNHO B03DyXO OH NO HAHET MEIHNHO CHIKATcB.PINOp6bApYKENH NpIbBa HauHTe MIRNAH CBMIONA JACTOTA CEPDEHbIX
COKPALIIEHNI POJIe NIMpeHReN KPOBIRHO DAJIENHPO npIbOp ABOMaTHueCKN BBAJIIOHNCTU Hepe3 1 MHTUY.


Функцу пamrtu
Bai ToHOMeTp MoKeT COxpaHaTB3HaueHn NOcneHmX 32 n3MepeHn
CoXpaHHeNHe DaHHbIX IN3MepeHn
NocnA M3MNEHABNAHOBANOMTHUeCKO CXPAHIOCTA HcHENHCACTOINHEKORO DABIEHNH,DACTONHOCHKO TABIEHNE,ACTOTBITNbCa, aTAKKE BPEMAI DAATA COOTBETCTBYIOJERO DHA.BAHKeHNaAMATN N01 BCTeA OXaPbHcHTCNOCNHEE HmEPHEOE.Nocn 3aONIOHEHNNAMNT HAmBOeE CTAPRE M3MNEHAR HAHNOAT PEPEZAAHCBVtBaC.
PpocMoTp coXpaHeHHbIX 3HaueHn
HaxmmtKe KHONK NAMr (MMemory)3.CEnBnAMrHET DAHNHIX, HAn Dnncnne NOBHTCA HNMe M00.EcnBnAMrTO COxPAHEHDAHNHTo HAn DCNTNE B TceHMe 1 MMHyTB6ydt NOKa3AHbH3NAeHHeN CCTOnuHcKOra DAHNHIn, DnACTONUcKcRO DAHNHIn, YACTOTb PyNbCa, aTAKKE BPEMR data 3aIINcNIOO63AHcHMe M:01.
Hakmte KHonky namn (Memory)3e pa3,TO6bI npcMOTpeB cnedyouho tpoky coxaPehhix daHHxHa dnCnlee noBArTcraaHHHe C dy3hauhyHM omep nueHHNnamn (hanPmep,M:02).
- Hachmiete Kionnycky cTAPr/CTON (Start/Stop) (2), 706b bBHTn M3 peKIMNA PAMNT.
ydaeneHne daHHbIX
-Hakmnte KhoNkny NaMaTn (Memorys) (3), YTO6bBoIIN BpeKHM NaMaTn.
-Hakmnte NdyepKaBae TKeONky PekMma (Mode) (5), 3aTEM HxAKmTe KhoNkny HAcToPkn (SeSb) (4), npn 3OM BCE aanHHe 6yDyt ydaHHe Hn Ha 3KpAne NoBNTcO6oHaehme CLR.
- Φιθόβι προερεύβγ, δυλήν Μις Κετρβήν ἀπηνήμε, λακχΜΙΝΕ ΚΚΟΥΚΑ πάρτης («Memory») (3).
HaKpaHe He donxHo 6bItb noka3aHO Hkaknx DaHHbx, KpOme DaTbI, BpeMeHm M:00.
HnKaTOp Hn3KOrO 3apJa 6aTapen
NoBHeHHe Ha 3KpaHe MrraIoJero HmDkaTopa Hm3KOrO 3apra6 6atapen +03Haayet, TTO 6atapen pa3pIeKbIy NcTbIpe 6atapen Heo6xOIMO 3aMeHn8bJeONHbIMM 6atapemN R5 (AA).
XpaHHe n YnCTKa
Bcerda nocne uonb0aHn y6paTne np6op B cyTnp.
- He cIeHyET xpaHHTbPnIOBpB MeCTax, OTKpbTbXfN pIraPmBXcOJIHeuHbXbLnyue, pINB BICOKo TEMPIEATyI IINIAKHOCTx, aTAKKE bYbnIbHbMeCTax.
- He cnedyet xpaHbTn pnp npn OHn HnKHX (Meeh - 20°C) INN OHnB BcCOKX (60ene 60°C) Tmepnepatypax.
Дагачкд� КОПКСИСНСЮВАТУЕТСКИВЕМБОДМИМARKIЧИЗДМСТСБОВ,3ATEM BUTPINE OEO CYCOK TKAHIO.П配电RAPRIHENHIMAKHTIPIPOTPINE eey COXK TKAHIO.
He nCnOlb3yIe dna eonctKcnBHOeCTByoune uCCTBA.
- Ecni pnp60 he 6bytend nno3b0a5b8 Tce hne HnntbnHoro epemenei, ydaannte i3 hero Bataen. (Bataen mory1 npoteyu in npwnnHtB vpei np60by).


Yto denatb,ecnn ...
jglg jglg jglg jglg jglg jglg jglg jglg jglg jglg jglg jglg jglg jglg jglg jglg jglg jglg jglg jglg jglg jglg jglg jglg jglg jglg jglg jglg jglg jglg jglg jglg jglg jglg j
gill aegd gai ay jilll daill gail gail no walsll pae
aannnnn nnnn nnne nnnn nee
1

(1)
1
actllal 1g 100
Lg 1
Kaz 5, abawg, gjk11n jp aJ Sj
jki 1
j 1
a 1
j 1
(1nssjScladai jy) KAZ
Jaeaa 3a
| Jahr | wandel | dalschall |
| lüber das je jährlich • | wandel aller ge jeyhag paai lassie jayy jauil al dhali | chall jauin alldl ♥ |
| duay ydy aay iayi cayllall jayy niad davonall iayi siad yuyi cayllall jayl -/+ yuyi siad jayi k# | aayalge ydy lousie jayy giu la rainia ayiull ayiull glangi cayls li doyanay k# | yuyall jaye ayllall ginsa + |
| yuyi aay iay iay "layi/ay" iyy ale kayal cayellall layi ayi gyalni ad iis 15 li le k#k aygill all ayi ge cayi yogp ney iayi ayyak k## iay iis li le aylll wannl yuyall aay iay iay iay ias iay iis li le k#k ayyak aay iay iis li le k#k | yuyi lousie jayy paai kawle ge jaydi yuyamall wannl | yuyll Las Error |
1
| alukunolulukulukulukulukulukulukulukulukulukulukulukulukulukulukulukulukulukulukulukulukulukulukulukulukulukulukulukulukulukulukulukulukulukulukulukulukulukulukulukulukulukulukulukulukulukulukulukulukulukulukuluck | |
| BP4600 | jrlall |
| a#z#i/#a#i 199-40 #a#i## 300 - j#a#i #a#i# | #u#dall |
| #u#l all 5% +/- j#a#i mmHg 3-/+ j#a#i# | #dall |
| #u#l ## #u#l# | #dall |
| #u#l#u#l# u#l#l# p#o# | #u#l#l# |
| #u#l all o#u#i J#e## J#u#l# W#u#l# J#u#l# J#u#l# J#u#l# J#u#l# J#u#l# J#u#l# J#u#l# J#u#l# J#u#l# J#u#l# J#u#l# J#u#l# J#u#l# J#u#l# J#u#l# J#u#l# J#u# l# | #u#l#l# |
| #u#s#n 32 | #u#l#l# #u#s#n |
| #u# 23-33 #u# #u# #u# #u# #u# #u# #u# #u# #u# #u# #u# #u# #u# #u# #u# #u# #u# #u# #u# #u# #u# #u# #u# #u# #u# #u# #u# #u# #u# #u# #u# #u# #u# #u# ## | #u#l#l# u#u#u# |
| #u#u#u#u#u#u#u#u#u#u#u#u#u#u#u#u#u#u#u#u#u#u#u#u#u#u#u#u#u#u#u#u#u#u#u#u#u#u#u#u#u#u#u#u#u#u#u#u#u#u# u#u#u#u#u#u#u#u#u#u#u#u#u#u#u#u#u#u#u#u#u#u#u#u#u#u#u#u#u#u#u#u#u#u#u#u#u#u#u#u#u#u#u#u#u#u#u#u#u#u#uu#u#u#u#u#u#u#u#u#u#u#u#u#u#u#u#u#u#u#u#u#u#u#u#u#u#u#u#u#u#u#u#u#u#u#u#u#u#u#u#u#u#u#u#u#u#u#u#u#u#U#u#u#u#u#u#u#u#u#u#u#u#u#u#u#u#u#u#u#u#u#u#u#u#u#u#u#u#u#u#u#u#u#u#u#u#u#u#u#u#u#u#u#u#u#u#u#u#u#u#t#u#u#u#u#u#u#u#u#u#u#u#u#u#u#u#u#u#u#u#u#u#u#u#u#u#u#u#u#u#u#u#u#u#u#u#u#u#u#u#u#u#u#u#u#u#u#u#u#u#v#u#u#u#u#u#u#u#u#u#u#u#u#u#u#u#u#u#u#u#u#u#u#u#u#u#u#u#u#u#u#u#u#u#u#u#u#u#u#u#u#u#u#u#u#u#u#u#u#u#ua#u#u#u#u#u#u#u#u#u#u#u#u#u#u#u#u#u#u#u#u#u#u#u#u#u#u#u#u#u#u#u#u#u#u#u#u#u#u#u#u#u#u#u#u#u#u#u#u#u### | #u#l#l# |
| #u#s#n 85% u#j.#40°-10° | #u#l#l# #u#s#n |
| #u#s#n 85% u#j.#70°-20° | #u#l#l# #u#s#n |
| (u##l## ## ##) ## 290 | ### |
| x AA (LR6) 4: ## ## ## ## ## | ### |
(a##l ## ## ## ## ## ## ## ## ## ## ## ## ## ## ## ## ## ## ## ## ## ## ## ## ## ## ## ## ## ## ## ## ## ## ## ## ## ## ## ## ## ## ## ## ## ## ## ## ## ## ## ## ## ## ## ## ## ## ## ## ## ## ## ## ## ## ## ## ## ## ## ## ## ## ## ## ## ## ## ## ## ## ## ## ## ## ## ## ## ## ## ## ## ## ## ## ## ## ## ## # ## ## ## ## ## ## ## ## ## ## ## ## ## ## ## ## ## ## ## ## ## ## ## ## ## ## ## ## ## ## ## ## ## ## ## ## ## ## ## ## ## ## ## ## ## ## ## ## ## ## ## ## ## ## ## ## ## ## ## ## ## ## ## ## ## ## ## ## ## ## ## ## ## ## ## ## ## ## ## ## ## ## ## ## ## ## ## ## ## ## ## ## ## ## ## ## ## ## ## #
### ### ### ### ### ### ### ### ### ### ### ### ### ### ### ### ### ### ### ### ### ### ### ### ### ### ### ### ### ### ### ### ### ### ### ### ### ### ### ### ### ### ### ### ### ### ### ### ### ### ##### ### ### ### ### ### ### ### ### ### ### ### ### ### ### ### ### ### ### ### ### ### ### ### ### ### ### ### ### ### ### ### ### ### ### ### ### ### ### ### ### ### ### ### ### ### ### ### ### ### #### ### ### ### ### ### ### ### ### ### ### ### ### ### ### ### ### ### ### ### ### ### ### ### ### ### ### ### ### ### ### ### ### ### ### ### ### ### ### ### ### ### ### ### ### ### ### ### ##### ##### ##### ##### ##### ##### ##### ##### ##### ##### ##### ##### ##### ##### ##### ##### ##### ##### ##### ##### ##### ##### ##### ##### ##### ##### ##### ##### ##### ##### ##### ##### ##### ##### ##### ##### ##### ##### ##### ##### ##### ##### ##### ##### ##### ##### ##### ##### ##### ##### ### ##### ##### ##### ##### ##### ##### ##### ##### ##### ##### ##### ##### ##### ##### ##### ##### ##### ##### ##### ##### ##### ##### ##### ##### ##### ##### ##### ##### ##### ##### ##### ##### ##### ##### ##### ##### ##### ##### ##### ##### ##### ##### ##### ##### ##### ##### ##### ##### ### ### ### ### ### ### ### ### ### ### ### ### ### ### ### ### ### ### ### ### ### ### ### ### ### ### ### ### ### ### ### ### ### ### ### ### ### ### ### ### ### ### ### ### ### ### ### ### ##### #### ### ### ### ### ### ### ### ### ### ### ### ### ### ### ### ### ### ### ### ### ### ### ### ### ### ### ### ### ### ### ### ### ### ### ### ### ### ### ### ### ### ### ### ### ### ### ### # ## ## ## ## ## ## ## ## ## ## ## ## ## ## ## ## ## ## ## ## ## ## ## ## ## ## ## ## ## ## ## ## ## ## ## ## ## ## ## ## ## ## ## ## ## ## ## ## ## ## ## ## ## ## ## ## ## ## ## ## ## ## ## ## ## ## ## ## ## ## ## ## ## ## ## ## ## ## ## ## ## ## ## ## ## ## ## ## ## ## ## ## ## ## ## ## ## ## #### #### ### #### ### #### ### #### ### #### ### #### ### #### ### #### ### #### ### #### ### #### ### #### ### #### ### #### ### #### ### #### ### #### ### #### ### #### ### #### ### #### ### #### ### #### ### #### ### #### ### #### ### #### ### #### ### #### ### #### ### #### ### #### ### #### ### #### ### #### ### #### ### #### ### #### ### #### ### #### ### #### ### #### ### #### ### #### ### #### ### #### ### #### ### #### ### #### ### #### ### ##### #### ### #### ### #### ### #### ### #### ### #### ### #### ### #### ### #### ### #### ### #### ### #### ### #### ### #### ### #### ### #### ### #### ### #### ### #### ### #### ### #### ### #### ### #### ### #### ### #### ### #### ### #### ### #### ### #### ### #### ### #### ### #### ### #### ### #### ### #### ### #### ### #### ### #### ### #### ### #### ### #### ### #### ### #### ### #### ### #### ### #### ### #### ### #### ### #### ### ####### ####### ####### ####### ####### ####### ####### ####### ####### ####### ####### ####### ####### ####### ####### ####### ####### ####### ####### ####### ####### ####### ####### ####### ####### ####### ####### ####### ####### ####### ####### ####### ####### ####### ####### ####### ####### ####### ####### ####### ####### ####### ####### ####### ####### ####### ####### ####### ####### ####### ######### ## ## ## ## ## ## ## ## ## ## ## ## ## ## ## ## ## ## ## ## ## ## ## ## ## ## ## ## ## ## ## ## ## ## ## ## ## ## ## ## ## ## ## ## ## ## ## ## ## ## ## ## ## ## ## ## ## ## ## ## ## ## ## ## ## ## ## ## ## ## ## ## ## ## ## ## ## ## ## ## ## ## ## ## ## ## ## ## ## ## ## ## ## ## ## ## ## ## ####### ####### ####### ####### ####### ####### ####### ####### ####### ####### ####### ####### ####### ####### ####### ####### ####### ####### ####### ####### ####### ####### ####### ####### ####### ####### ####### ####### ####### ####### ####### ####### ####### ####### ####### ####### ####### ####### ####### ####### ####### ####### ####### ####### ####### ####### ####### ####### ####### ####### ## ## ## ## ## ## ## ## ## ## ## ## ## ## ## ## ## ## ## ## ## ## ## ## ## ## ## ## ## ## ## ## ## ## ## ## ## ## ## ## ## ## ## ## ## ## ## ## ## ## ## ## ## ## ## ## ## ## ## ## ## ## ## ## ## ## ## ## ## ## ## ## ## ## ## ## ## ## ## ## ## ## ## ## ## ## ## ## ## ## ## ## ## ## ## ## ## ########### ######## ######## ######## ######## ######## ######## ######## ######## ######## ######## ######## ######## ######## ######## ######## ######## ######## ######## ######## ######## ######## ######## ######## ######## ######## ######## ######## ######## ######## ######## ######## ######## ######## ######## ######## ######## ######## ######## ######## ######## ######## ######## ######## ######## ######## ######## ######## ######## ######## ######## ######## |


0.S_1 · 2^1 · 2^2 · 2^3 + S_2 · 2^2 · 2^3 · 2^4
32 1
wlll
a a a a a a a a a a a a a a a a a a a a a a a a a a a a a a a a a a a a a a a a a a a
21
M00 134 3 (3) "Memory" 24
5 5 5
5 5 5
5 5 5
5 5 5
5 5 5
5 5 5
5 5 5
5 5 5
5 5 5
y ylll blln lal y (Memory) 3) Si11 jie kai kai kai kai kai kai kai kai kai kai kai kai kai kai kai kai kai kai kai kai kai kai kai kai kai kai kai kai kai kai kai kai kai kai kai kai kai kai kai kai kai
15.11 (Start/Stop) 1 jkdl
山
(Memory) siiu (Memory) siiui jie baii
paoaag (4 a) "bua" 5 aaij) Mode" ciuy baiai. CLR ay (Memory) ay (Memory) ay (Memory) ay (Memory) ay (Memory) ay (Memory) ay (Memory) ay (Memory) ay (Memory) ay
iJbllgssnnn jolaiil jia
JzAaia 1 J 11111111111111111111111111
1111
galeaai aae jajd aie gaae baaag haoi 1 0000000000000000000000000000000000000000000000000000000000000000
Aegdaiagdiagldaoglaipaoxu Aegdaiagdiagdiagldplaoiao aie ()


12 + 19 = 24
(12.3.2.1)c#a#ll p#dall p#dall 5 a#j#j#j#j#j#j#j#j#j#j#j#j#j#j#j#j#j#j#j#j#j#j#j#j#j#j#j#j#j#j#j#j#j#j#j#j#j#j#j#j#j#j#j#j#j#j#j#j#j#j#
()g 5 10 10 10 10 10 10 10 10 10 10 10 10 10 10 10 10 10 10 10 10 10 10 10 10 10 10 10 10 10 10 10 10 10 10

puii i
(ale"gplnss) ppsj 1
Lagal yol gals 2
(888) aall alldalil jyale 15 jaye 2, jal 3
jal 9 jai 11
aall jayl lao 9 jai
Jai Jai
4
pall kai plal
paie Laiy jay sll 4
yai (HEART RATE) wll alan Jaa jay
15 15
EiJ1IgUgaleoS yLoaic gagHjgljgblx
jlll jie 10 aio gjg jg
a#
1
1
gall yal a l gall yal a l gall a l gall a l gall a l gall a l gall a l gall a l gall a l gall a l gall a l gall a l gall a l gall a l gall a l gall a l gall a l gall a l gall a l gall a l gall a l gall a l gall a l gall a l gall a l gall a l gall a l gell
23-33 11111111
33-43 20gS111111111111
Ej11g0p
yjg 12
J 1

6

5

4
g 4.5111 12345678901123456789011234567890112345678901123456789011234567890112345678901123456789011234567890112345678901


7
1111111111111111111111111111111
Velcro, 1
(6) 1,2,3 , 3,4,5 , 4,5,6
JL#e s#ggg >
(8JSSW)JIJIgIgIgIgIgIgIgIgIgIgIgIgIgIgIgIgIgIgIgIgIgIgIgIgIgIgIgIgIgIgIgIgIg
AeLalS1 pIaIaIgIol aIagI, gai
Jlaljgljg jie 1y, gill, bia jil
aai jaiy jaiy jaiy jaiy jaiy jaiy jaiy jaiy jaiy
1
gaiy iuii jia 100000000000000000000000000000000000000000000
0100 1
ygl 1
y

2.
ciill
1111 1
Ua/21j-2
M 3
12x-4
(1) 2 - 2x + 12 = 5
a|laa|lae 6
0g631 220-7
Jwgo -8
a4 = b1 + 3
aal 15 15 aal 15 aal 15 aal 15 aal 15 aal 15 aal 15 aal 15 aal 15 aal 15 aal 15 aal 15 aal 15 aal 15 aal 15 aal 15 aal 15 aal 15 aal 15 aal 15 aal 15 aAL

g2o 100000000000000000000000000000000000000000000
y j 1
y jll y lally ngg aie 1000 pao hao gao yolaiy 1000 1000 1000 1000 1000 1000 1000 1000 1000 1000 1000 1000 1000 1000 1000 1000 1000 1000 1000 1000 100
aIy jaiIgawlaipallnac aillal yaleell pall bao aell aanll aobio cui