BOR7586BB - Electric oven BRANDT - Free user manual and instructions
Find the device manual for free BOR7586BB BRANDT in PDF.
| Brand | BRANDT |
| Model | BOR7586BB |
| Product type | Built-in electric oven |
| Usable capacity | 73 L |
| Net weight | 43.1 kg |
| Power supply | 220-240 V ~, 16 A, 3-conductor cable 1.5 mm² |
| Number of cavities | 1 |
| Heat source | Electricity |
| Cooking modes | Expert (Convection, Traditional, Eco, Ventilated Grill, Ventilated Sole, Variable Grill, Keep Warm, Defrost, Bread, Drying, Shabbat), Steam Expert (100% Steam, Traditional Ventilated Steam, Ventilated Grill Steam, Convection Steam, Bread Regeneration), Culinary Guide, Steam Guide |
| Special functions | Steam cooking (100% and combined), Drying, Shabbat, Keep Warm, Defrost, Bread, Favorites (3 memories), Smart Assist |
| Cleaning system | Pyrolysis (3 cycles: Express 59 min, Auto 1h30-2h15, Turbo 2h), Drain, Descaling |
| Supplied accessories | Anti-tilt grid, Multi-purpose tray 45 mm, Baking tray 20 mm, 100% steam support tray (perforated stainless steel + silicone lip), Sliding rails (2) |
| Lighting | 25 W lamp, 220-240 V, energy efficiency class G |
| Display | Screen with symbols, rotary knob with push |
| Safety | Automatic door lock (pyrolysis), Control lock (child safety), Automatic stop (Auto Stop) |
| Dimensions (W x H x D) | Approximately 595 x 595 x 550 mm (standard built-in) |
| Origin | Made in France (Origine France Garantie label, factories in Orléans and Vendôme) |
| After-sales service | Consumer relations: www.brandt.com, email: relations.consommateurs@groupebrandt.com |
| Warranty | According to legal conditions |
Frequently Asked Questions - BOR7586BB BRANDT
User questions about BOR7586BB BRANDT
0 question about this device. Answer the ones you know or ask your own.
Ask a new question about this device
Download the instructions for your Electric oven in PDF format for free! Find your manual BOR7586BB - BRANDT and take your electronic device back in hand. On this page are published all the documents necessary for the use of your device. BOR7586BB by BRANDT.
USER MANUAL BOR7586BB BRANDT
REPLACEMENT DE LA LAMPE

MISE EN GARDE
RELATIONS CONSOMMATEURS

(Expert a Parni expert)
OKAMZITÉ PECENI

(Expert a Parni expert)
PECENI S ODLOZENYM STARTEM
| A | B | C |
| SERVICE: C | TYPE: D | I C E |
| E | F | |
| Nr H | Made in France |
TILBEREDNING MED UDSKUDT START
TILBEREDNING MED UDSKUDT START
You have just purchased a BRANDT product and we would like to thank you for the trust you have placed in us.
We have designed and manufactured this product with you, your lifestyle and your needs in mind, so that it meets your expectations as closely as possible. We've put our expertise, our spirit of innovation and all the passion that has driven us for over 60 years into this product.
As part of our ongoing efforts to meet your requirements, our customer service team is at your disposal to answer any questions or suggestions you may have.
You can also log on to our website www.brandt.com where you will find our latest innovations, as well as useful additional information.
BRANDT is happy to support you every day and hopes you enjoy your purchase.

BvCrt.601 1825
The «Origine France Garantie» label provides consumers with a clear and objective indication of a product's origin. The BRANDT brand is proud to display this label on products from our French factories based in Orléans and Vendôme.


Important information
Before switching on your appliance, please read this guide carefully so that you can familiarise yourself with its operation more quickly.
Safety and important precautions 4
Installation 6
Environment 7
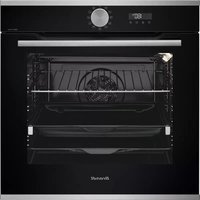
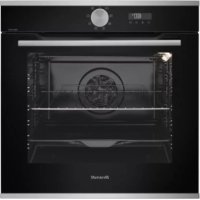
Description of the oven 8
Controls and display 9
Accessories 10
Special 100% steam food support dish 11
The filling drawer 13
First settings - getting started 14
Cooking modes 15
Expert mode 15
Expert steam mode 15
° Special 100% steam support plate 16
^ Steam percentage 17
° Favourites (memorised cooking) 18
^ Expert cooking functions 19
^ Drying 21
Cooking guide mode 22
Steam guide mode 23
^ List of dishes without steam 23
^ List of dishes with steam 24
List of 100% steam dishes 25
Settings 26
Control lock 27
Timer 27
Maintenance-Cleaning 28
Exterior surface 28
Removing the tiers 28
Cleaning the inside windows 28
Removing and refitting the door 28
Replacing the lamp 30
Cleaning function 31
^ Pyrolysis 31
Draining the water tank 32
Decalcifying the boiler 33
Faults and solutions 34
After-sales service 35
Cooking aids 36
Cooking charts 36
Function suitability tests 37
Yeast recipes 37
INSTRUCTIONS DE SECURITÉ IMPORTANTES - LIRE AVEC ATTENTION ET GARDER POUR DE FUTURES UTILISATIONS.
When you receive the appliance, unpack it or have it unpacked immediately. Check its general appearance. Make a note of any reservations on the delivery slip and keep a copy.

Important:
This appliance may be used
by children aged 8 years and older, and by persons with impaired physical sensorial or mental capacities, or without experience or knowledge, if they are supervised or have received prior instructions on how to use the appliance safely and have understood the risks involved. Children must not be allowed to play with the appliance. Cleaning and maintenance operations must not be carried out by children without supervision.
- Children must be supervised to prevent them from playing with the appliance.
WARNING:
The appliance and its accessible parts become hot during use. Be careful not to touch the heating
elements inside the oven. Children under 8 years old must not be allowed near it unless they are supervised at all times.
- This appliance is designed to cook with the door closed.
Before pyrolytic cleaning of your oven, remove all accessories and any thick deposits.
During cleaning, the surfaces may become warmer than under normal conditions of use. It is advisable to keep children away from the appliance.
— Do not use a steam cleaner.
- Do not use abrasive cleaning products or hard metal scrapers for cleaning the oven's glass door, as they could scratch the surface and cause the glass to shatter.
WARNING :
Make sure the appliance is disconnected from the power before replacing the lamp in order to avoid the risk of electric shock. Change
the lamp only when the appliance has cooled down. To unscrew the view port and the light, use a rubber glove, which will make disassembly easier.

The electrical plug must remain accessible after instal
lation.
- It must be possible to disconnect the appliance from the power supply, either using a plug or by fitting a switch on the fixed wiring system in accordance with installation rules.
If the power cable is damaged, it should be replaced by the manufacturer, its after-sales service department or by a similarly qualified person in order to avoid danger.
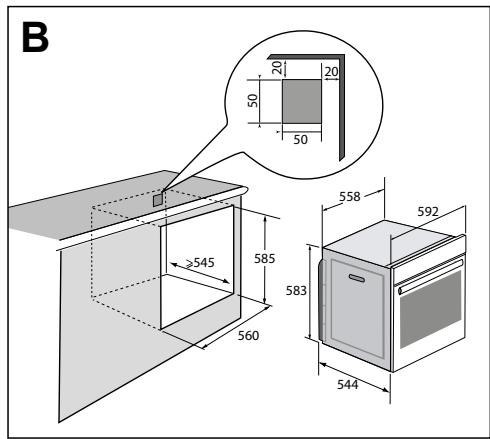
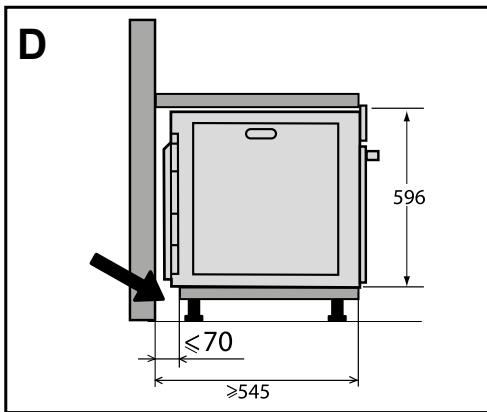
- This appliance may be installed either under a worktop or in a cabinet column, as indicated on the installation diagram.
Centre the oven in the unit so as to ensure a minimum distance of 10mm between the appliance and the surrounding unit. The material of the unit supporting the appliance must be heat-resistant (or
covered with a heat-resistant material). For greater stability, attach the oven to the unit with 2 screws through the holes provided on the side panels.
In order to avoid overheating, the appliance must not be installed behind a decorative door.
- This appliance is designed to be used for domestic and similar applications such as :
Kitchen areas for the staff of shops, offices and other professional premises.
Farms. Use by clients of hotels, motels and other residential type establishments; guest house type environments.
- The oven must be turned off when cleaning inside the oven.
Do not modify the characteristics of this appliance; doing so could be dangerous.
Do not use your oven as a larder or to store any items after use.
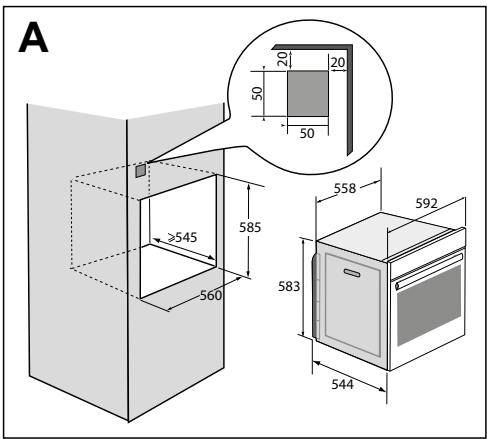
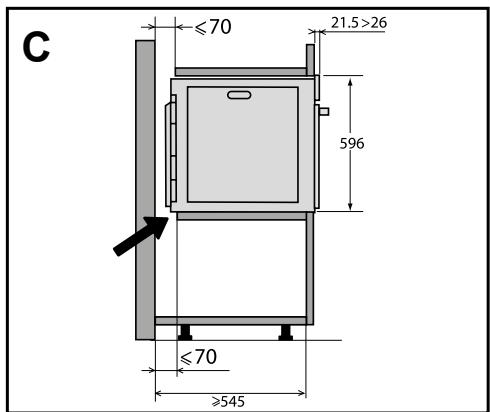
CHOICE OF LOCATION AND FITTING
The diagrams show the dimensions of a cabinet that will be able to hold your oven.
This appliance may be installed either under a column (A) or in a worktop (B). If the cabinet is open, its opening at the back must be 70 mm maximum (C,D).
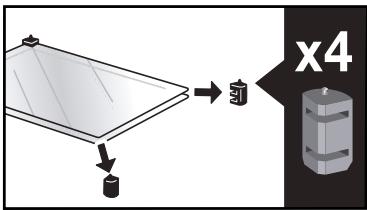
Install the oven in the furniture. To do this, remove the rubber stops and pre-drill a 2-mm diameter hole in the wall of the furniture to avoid splitting the wood. Attach the oven with the two screws. Re-position the rubber stops.
When the cabinet is closed at the back, make an opening of 50 × 50 ~mm for the electrical cable.
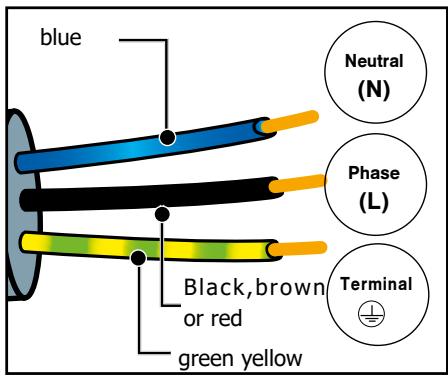
ELECTRICAL CONNECTION
Your oven must be connected with a (standard) power cable with 3 conductors of 1.5mm2 (1 live + 1 neutral + earth) which must be connected to a 220 - 240V single-phase grid by means of a 1 live + 1 neutral + earth CEI 60083 standard power socket or via an all-poles cut-off device in compliance with the installation rules.
We cannot be held responsible for any accident resulting from inexistent, defective or incorrect earthing.

Warning
The safety wire (green-yellow) is connected to the appliance's terminal and must be connected to the earth terminal of the electrical set-up.
The fuse in your set-up must be 16 amperes.

ENVIRONMENT
CARE FOR THE ENVIRONMENT
The packaging of this appliance can be recycled. Help to recycle them and protect the environment by placing them in the municipal containers provided for this purpose.

Your appliance also contains many recyclable materials. It therefore is marked with this symbol to indicate that appliances to be disposed of should not be mixed with other waste.
This way, the appliance recycling organised by your manufacturer will be done with maximum
efficiency, in compliance with European Directive on Waste Electrical and Electronic Equipment.
Contact your local authority or retailer for information on used appliance collection points close to your home.
Thank you for co-operation in protecting the environment.
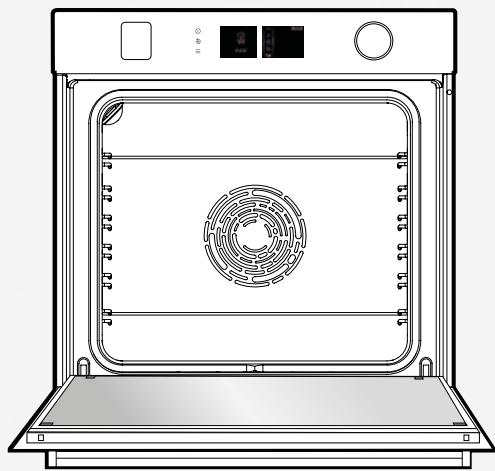
DESCRIPTION OF THE OVEN
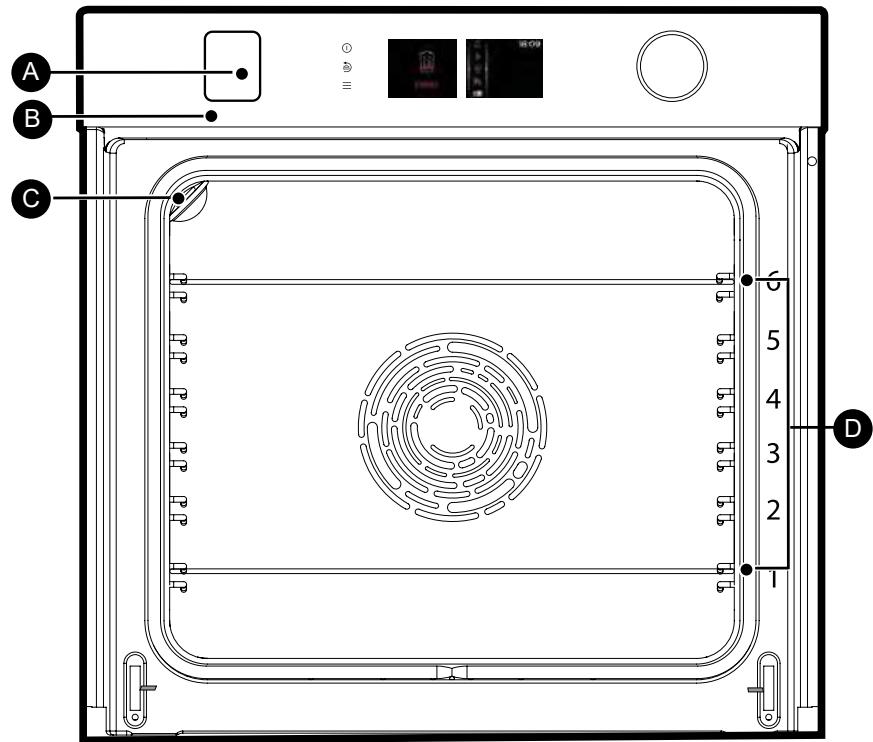
A Control panel
B Water tank refill tray
Lamp
D Shelf runners (6 heights available)
THE CONTROLS AND DISPLAY


Oven off touch control
(press and hold)

Go back touch control
(press and release) and / or Tray open key (press and hold)

MENU access touch control
(cooking, settings, minute minder, cleaning)

Displays

Rotating knob with central button (cannot be removed):
-
Choose programmes, increase or reduce values by turning it.
-
Validate each action by pressing the centre.
DISPLAY SYMBOLS

Start a cooking programme

Stop a cooking programme

Temperature degrees

Cooking time

Cooking end time (delayed start function)

Steam

Saved cooking programmes

Keypad locked indicator

Door locked indicator during pyrolysis

Recommended shelf height indicator for placing dishes.
ACCESSORIES
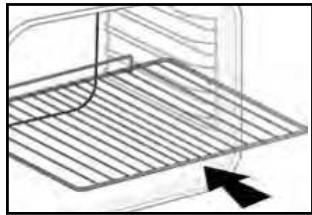
ANTI-TIP SAFETY RACK
The rack can be used to support all dishes and moulds containing food for cooking or browning. It can be used for grilling (placed directly on top). Position the anti-tip stop towards the back of the oven.
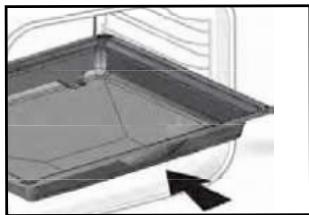
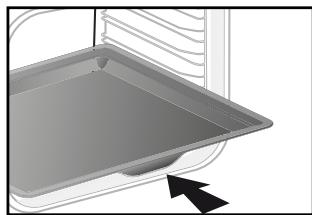
MULTI-PURPOSE TRAY, DRIP TRAY45 MM
When inserted in the shelf runners under the grill with the handle towards the oven door, it collects juice and fat from grilling, and can be used half-filled with water as a double-boiler.
20 MM PASTRY DISH
Insert in the shelf runners with the handle towards the oven door. Ideal for baking cookies, shortbread and cupcakes. The tilted surface makes it easier for you to put your preparations in a dish. Can also be inserted into the shelf runners under the grill to collect juice and fat from grilling.
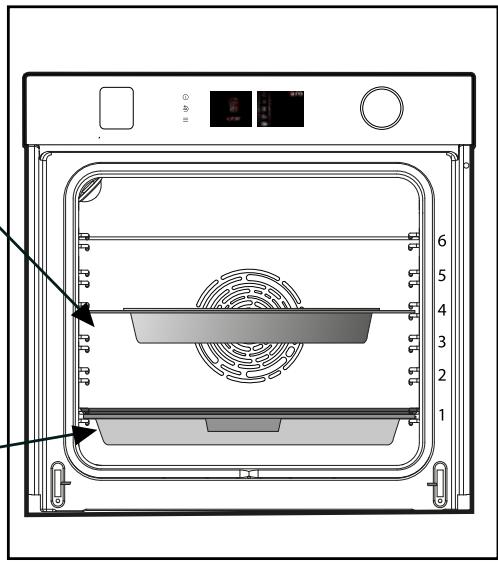
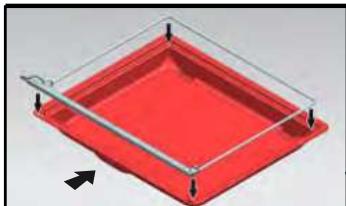
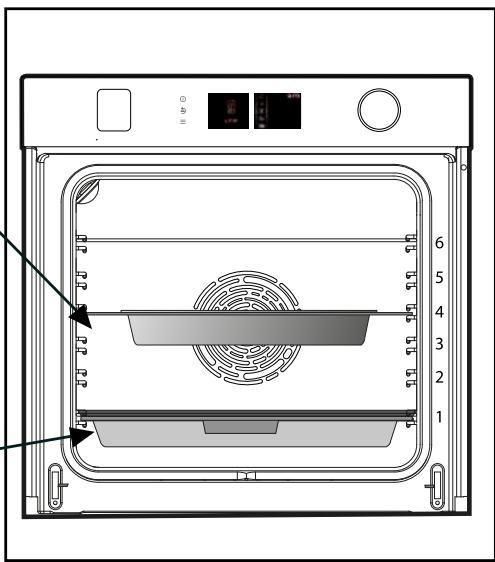
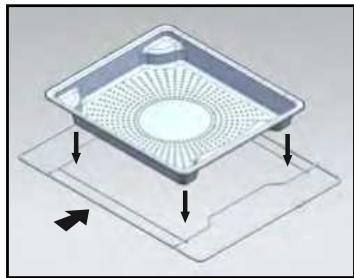
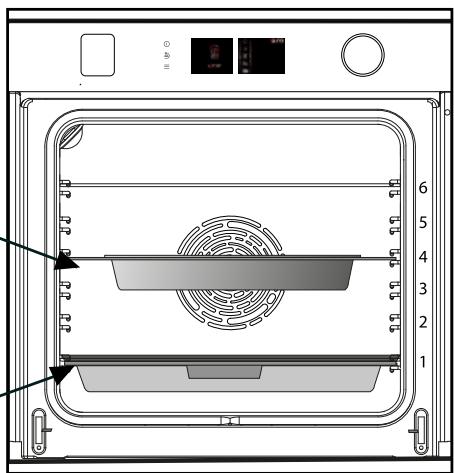
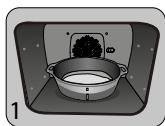
1 - Perforated stainless steel cooking dish to allow the condensation to drain from the food, to insert at shelf level 4.
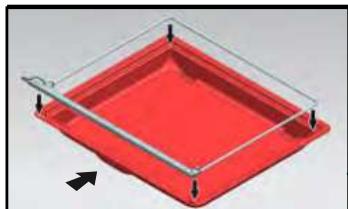
- Silicone bib with its support frame. Place the frame on the 45 mm multi-purpose drip tray to collect the condensation water from the food. Insert the assembly in the bottom level 1. The silicone seal ensures that the door is watertight.

Make sure that the silicone flap is intact with the door glass.

Caution
Use only for the 100 % steam cooking function. Do not use in the other cooking modes. Remove the dishes from the oven before cleaning by pyrolysis.

Caution
After each steaming process, make sure to blot out any water that may be along the goulote at the bottom of the door.
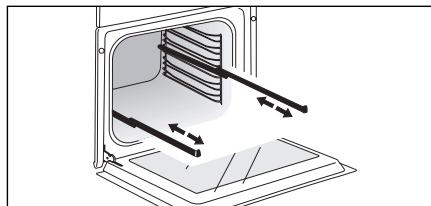
SLIDING RAIL SYSTEM
The new sliding rail system makes food more practical and easier to handle as the trays can be effortlessly pulled for simpler handling. The trays can be completely removed, providing full access. Their stability ensures that food can be handled safely, reducing the risk of burns. This means that you can take food out of the oven far more easily.
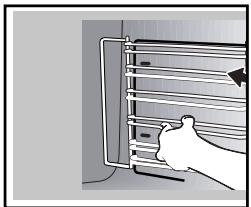
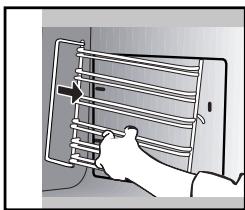
INSTALLING AND REMOVING THE SLIDING RAILS
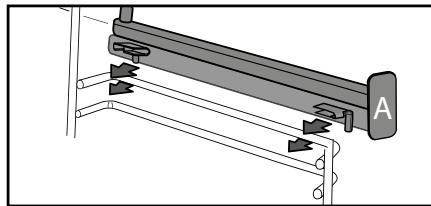
After removing the 2 shelf runners, choose the height (2 to 5) at which you want to fit your rails. Snap the left rail against the left shelf runner by applying enough pressure to the front and back of the rail so that the 2 tabs on the side of the rail slot into the shelf runner. Do the same for the right-hand rail.
NOTE: the telescopic sliding part of the rail must unfold towards the front of the oven, with the bufferA opposite you.
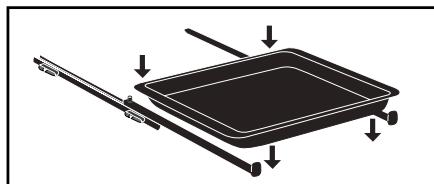
Insert your 2 shelf runners and then put your tray on the 2 rails. The system is now ready to use.
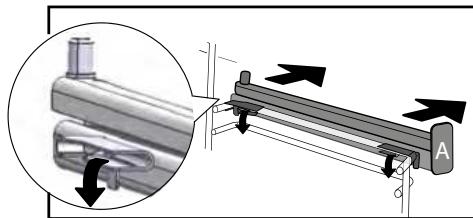
To remove the rails, remove the shelf runners again.
Slightly pris apart the bottom of the tabs fixed on each rail to release the shelf runner. Pull the rail towards you.
Tip
To avoid fumes when cooking fatty meats, we recommend you add a small amount of water or oil to the bottom of the drip pan.
The accessories may warp with the effect of heat, but this will not alter their function. They will return to their original shape once cooled
The refill tray
- Refilling the water tank
Before steam cooking at any time, empty the tank.
The tank volume is 1 litre.
At the start of combined steam cookii tray opens automatically.
Fill the tank.
Ensure that the tank is filled to its max. To do this, use the maximum level m on one of the sides of the tray.
After doing this, manually push the tr Your oven is now ready for combir cooking.


When filling the tank, it takes a few seconds for the water level to settle.
Readjust the level if necessary.

Do not use softened or demineralised water.


Empty the tank every time before cooking. The automatic emptying cycle lasts approximately 3 min. Refer to the «Care - Emptying function» chapter.
INITIAL SETTINGS - USING THE OVEN FOR THE FIRST TIME
- Select the language
The first time you use your oven or after a power cut, turn the knob to select your language and press to confirm your choice.
- Set the time
The displays flashes 12:00.
Adjust the hours and minutes by turning the knob, then press to confirm.
Your oven displays the time.
Note: To modify the time again, refer to the «Settings» chapter.

Before using your oven for the first time, heat it at maximum temperature
while empty for approximately 30 minutes.
Make sure that the room is sufficiently ventilated.
- STARTING - GENERAL MENU
Press the MENU key to access the general menu when the oven only displays the time.
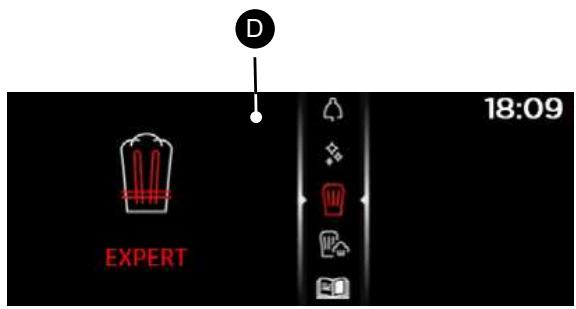
You will access the first cooking mode: Expert mode.
Turn the knob to scroll through the different programmes:
SETTINGS

MINUTE MINDER

CLEANING

EXPERT

EXPERT STEAM

COOKING GUIDE

STEAM GUIDE

THE COOKING MODES
Select one of the following modes according to your experience in cooking your recipe:

Select "EXPERT" mode for a recipe for which you will select the type of cooking, the temperature and the cooking time yourself.

Select the "EXPERT STEAM" mode for a recipe for which you will select the type of cooking, the temperature, the percentage of steam and the
cooking time.

Select the COOKING GUIDE>mode for a recipe for which you need assistance from the oven. Simply select the type of food proposed and its weight
and the oven will select the most suitable parameters.

Select the «COMBINED STEAM» mode for a traditional recipe associated with steam for which you need assistance from the oven.
Simply select the type of food proposed and its weight and the oven will select the most suitable parameters.
To enter the selected mode, validate by pressing the knob.
To go back (except during cooking), press the back key and to stop the oven, press the stop key ① for a few seconds.

«EXPERT» MODE
This mode lets you set the cooking parameters yourself: temperature, cooking type, cooking time.
When the oven is only displaying the time, press the MENU key = o access the general menu then confirm «Expert» mode.
- Turn the control knob until you get to the cooking function of your choose, then confirm:

Fan cooking

Traditional

Eco cooking

Grill ventilated

Bottom heat ventilated

Variable grill

Keep warm

Defrost

Bread

Drying

Shabbat

Favourites (enables 3
cooking programmes to be saved)

«EXPERT STEAM» MODE
This cooking mode enables you to combine normal cooking with steam in order to obtain more tender and gentler cooking that preserves the flavours. It prevents food from drying up and preserves crispiness.
Just like the Expert mode, this function lets you set all the cooking parameters including the percentage of steam.
- Select the «EXPERT STEAM» mode in the general menu and confirm.
Select one of the cooking functions offered among the list below and confirm:
- For steaming only

Steam100%
*****************************************************************************************
- To combine classic cooking with steam (combined mode):

Traditional ventilated + steam

Grill ventilated + steam

Circulating heat + steam

Regenerate the bread from the day before (Recommended duration 8mn)
- Baguette
-Bread - Bread ball
- Croissants
Caution During c
During cooking the appliance becomes hot. Hot steam escapes when you open the door. Keep children away. Make sure that they do not remain in the steam flow.
1 - Perforated stainless steel cooking dish to allow the condensation to drain from the food, to insert at shelf level 4.
- Silicone bib with its support frame. Place the frame on the 45 mm multi-purpose drip tray to collect the condensation water from the food. Insert the assembly in the bottom level 1. The silicone seal ensures that the door is watertight.
Make sure that the silicone flap is in contact with the door glass.
Caution Use only for the 100% steam cooking function. Do not use in the other cooking modes. Remove the dishes from the oven before cleaning by pyrolysis.

Caution After each steaming process, make sure to blot out any water that may be along the goulote at the bottom of the door.

(EXPERT AND EXPERT STEAM)
IMMEDIATE COOKING
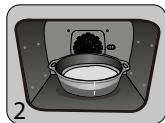
Once you have selected and validated your cooking function, the oven will recommend one or two shelf heights.
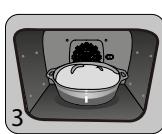
- Place your dish in the oven at the recommended level.
- Press the control knob again to start cooking. The temperature starts to increase at once.
Note: Certain parameters may be modified (depending on the mode selected) before cooking starts (temperature, cooking time, percentage of steam and delayed start); see the following chapters.
CHANGING THE TEMPERATURE
Based on the type of cooking you already selected, the oven will recommend the ideal cooking temperature.
This can be adjusted as follows:
- Select the temperature symbol u then confirm.
- Turn the control knob to change the temperature then confirm your choice.
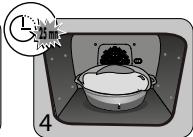
COOKING TIME
You can enter the cooking time for your dish by selecting the cooking time symbol and confirming.
Enter the cooking time by turning the control knob then confirm.
Your oven has the "SMART ASSIST" function which, when programming a cooking time, will suggest a cooking time which can be modified depending on the selected cooking mode.
The time starts to count down as soon as the cooking temperature is reached.

STEAM PERCENTAGE
(EXPERT STEAM ONLY)
For combined cooking, the oven suggests an ideal steam percentage.
To modify this, select the steam symbol and confirm.
Enter the new steam percentage (between 20 and 80% ) by turning the knob and confirm your selection.
For 100% steam cooking
the oven recommends 100% steam.
To change the percentage, select the steam symbol and confirm.
Enter the new steam percentage (between 50 and 100% * by turning the knob, then confirm your choice.
- Except regeneration of the previous day's bread.

(EXPERT AND EXPERT STEAM)
DELAYED START
When you set the cooking time, the end of cooking time automatically adjusts. You can change the end of cooking time if you want to delay the programme start.
-Select the cooking end symbol and confirm. Once you have set the cooking end time, confirm twice.
Note: You may start cooking without selecting a duration or end time. In this case, when you feel that you have cooked your dish for long enough, stop cooking (see the «Stopping cooking in progress» chapter).
STOPPING COOKING IN PROGRE
To stop a cooking programme in progress, press the control knob.
The oven displays a message:
Confirm by selecting «I agree» then validate or select «I refuse» and validate to continue cooking.

FAVOURITES
(EXPERT MODE ONLY)
- MEMORISE A COOKING
The «Favourites» function lets you save 3 recipes in «Expert» mode that you make frequently.
In Expert mode, first of all select a cooking, its temperature and its time.
Then select the symbol by turning the control knob to memorise this cooking, then confirm.
The screen then suggests saving these parameters in a memory or Choose one then confirm. Your cooking is then memorised.
Confirm again to start cooking
NB: If the 3 memories are already used, any new memorisation will replace the previous one.
A delayed start cannot be programmed for memorisations.
- Use a memory that is already saved in the "Favourites" function
Go to the "Expert" menu and confirm.
Scroll through the functions to the «Favourites

function by turning the control knob. Confirm.
-Select one of the memories already saved

and press to confirm.
The oven starts.

EXPERT COOKING FUNCTIONS (DEPENDING ON MODEL)

Pre-heat your oven empty before cooking.
| Position | T°C recommended mini - maxi | Use |
| FAN COOKING* | 180°C 35°C - 250°C | Recommended for meat, fish, vegetables, prefe- rably in an earthenware dish. |
| TRADITIONAL | 200°C 35°C - 275°C | Recommended for meat, fish, vegetables, prefe- rably in an earthenware dish. |
| ECO* | 200°C 35°C - 275°C | This setting saves energy while maintaining the quality of the cooking. In this setting, pre-heating is not required. |
| GRILL VENTILATED | 200°C 100°C - 250°C | Roasts and poultry are juicy and crisp all over. Slide the drip tray on to the bottom shelf support. Recommended for all spit-roasted poultry or meat, for sealing and thoroughly cooking a leg or a rib of beef. To retain the moist texture of fish steaks. |
| BOTTOM HEAT VENTILATED | 180°C 75°C - 250°C | Recommended for meat, fish, vegetables, prefe- rably in an earthenware dish. |
*Cooking mode as per standard EN 60350-1: 2016 to demonstrate compliance with requirements of the energy label of European regulation UE/65/2014.

Never place tin foil directly in contact with the oven floor as the build up of heat may damage the enamel.
| Position | T°C recommended mini - maxi | Use |
| GRIL VARIABLE | 4 | Recommended for grilling cutlets, sausages, toasting bread and prawns placed on the grill. Cooking is done by the upper element. The grill covers the entire shelf surface. |
| 1 - 4 | ||
| KEEP WARM | 60°C | Recommended for letting dough rise for bread, brioche, kügelhopf. |
| 35°C - 100°C | Put the mould on the bottom, not exceeding 40°C (plate-warming, defrosting). | |
| DEFROST | 35°C | Ideal for delicate dishes (fruit tarts, custard pies, etc.). Meat, rolls, etc. are defrosted at 50°C (meat should be placed under the grill with a dish underneath to catch the drips). |
| 30°C - 50°C | ||
| BREAD | 205°C | Recommended cooking sequence for bread ma- king. Pre-heat, then place the ball of dough on a baking sheet - 2nd shelf. Do not forget to place a dish of water in the bottom to obtain a crisp, golden crust. |
| 35°C - 220°C | ||
| DRYING | 80°C | Sequence to dehydrate certain food such as fruits, vegetables, seeds, roots, seasoning plants and herbs. Refer to the specific drying table below. |
| 35°C - 80°C | ||
| SHABBAT | 90°C | Special sequence: The oven runs for 25 or 75 hours without interruption at 90°C only. |

Advice on how to save energy
Avoid opening the door during cooking to avoid heat escaping from the oven.

DRYING FUNCTION (EXPERT MODE ONLY)
Drying is one of the oldest methods of preserving food. The aim is to remove all or some of the water in the food to preserve foodstuffs and prevent the development of microbes. Drying preserves the nutritional qualities of food (minerals, proteins and other vitamins). It allows food to be stored in optimal conditions thanks to their reduced size and makes food easy to use once re-hydrated.
Only use fresh food.
Wash the food carefully, drain and wipe.
Cover the grill in parchment paper and distribute the cut food evenly on top.
Use shelf level 1 (if you have several grill pans, put them on levels 1 and 3).
Turn the food over several times during drying. The
values provided in the table may vary depending on the type of food to dehydrate, its maturity, its thickness and its humidity rate.
GUIDE TABLE TO DEHYDRATE YOUR FOOD
| Fruits, vegetables and herbs | Temperature | Time in hours | Accessories |
| Fruits with seeds (in 3 mm slices, 200 g per grill pan) | 80°C | 5-9 | 1 or 2 grill pans |
| Fruits with stones (plums) | 80°C | 8-10 | 1 or 2 grill pans |
| Edible roots (carrots, parsnips), grated and blanched | 80°C | 5-8 | 1 or 2 grill pans |
| Sliced mushrooms | 60°C | 8 | 1 or 2 grill pans |
| Tomato, mango, orange, banana | 60°C | 8 | 1 or 2 grill pans |
| Sliced red beetroot | 60°C | 6 | 1 or 2 grill pans |

"COOKING GUIDE» MODE

"COOKING GUIDE + STEAM» MODE

COMBINED STEAM

STEAM 100% GUIDE
These two modes select for you the appropriate cooking parameters based on the food to be prepared. These are recipes with or without any steam associated or with 100% steam.
IMMEDIATE COOKING
- Select the "COOKING GUIDE" or "COMBINED STEAM" modes when you are in the general menu then confirm.
The oven suggests several categories which contain a wide range of dishes (see detailed list below):
- Select the category, example "The poulterer", then confirm.
- Choose the specific dish to be prepared, for example "chicken", and confirm.
The weight (or size) must be entered for certain food.
- A weight is then suggested. Enter the weight and confirm; the oven will automatically calculate and display the cooking time and the shelf height.
- Place your dish in the oven and confirm.

For certain recipes the oven must be warmed up before you place your disk
in it.
You may open your oven to baste your dish at any time during cooking.
- The oven beeps and turns off when the cooking time is finished; your screen then
indicates that the dish is ready.
DELAYED START COOKING
If you wish, you can change the cooking end time by selecting the cooking end symbol and confirming.
Once you have set the cooking end time, confirm twice.

For recipes which require pre-heating, it is not possible to use the delayed
start function.

LIST OF DISHES WITHOUT STEAM

THE POULTERER
Chicken
Duck
Duck breast *
Turkey

THE BUTCHER
Rare shoulder of lamb
Rare beef
Beef medium done
Well-cooked beef
Roast pork
Roast veal
Veal rib *

THE FISHMONGER
Salmon*
Trout
Fish terrine

THE CATERER
Lasagne
Pizza*
Quiche

THE GREENGROCER
Potato gratin
Stuffed tomatoes
Jacket potatoes

THE BAKER
Puff pastry
Shortcrust pastry
Leavened dough
Bread
Baguettes
Brioche

THE PASTRY COOK
T Fruit pie
Fruit crumble
Sponge cake
Cupcakes*
Creme caramel
Chocolate cake
Short bread / Cookies *
Cake
Yoghurt cake
- For these dishes, the oven must be preheated before you place your dish in it.

The screen tells you not to insert your dish until the oven has reached its temperature.
A beep sounds to let you know that warm-up is complete; the time starts counting down from this point.
Place your dish in the oven at the shelf level indicated.

LIST OF DISHES WITH STEAM ASSOCIATED

THE POULTERER
Chicken
Duck breast *
Duck

THE BUTCHER
Lamb*
Roast pork
Roast veal
Veal fillet
Pork fillet

THE FISHMONGER
Cooked fish
Fish terrine
Whole fish*
Salmon casserole

THE GREENGROCER
Potatoes au gratin
Stuffed vegetables
Jacket potatoes*

THE PASTRY COOK
Sponge cake*
Flans / creams
Cake
Cupcakes
Pound cake
Apple cake
Nut cake
Coco flan

THE BAKER
Bread*
Baguettes*
Pre-cooked bread*
Frozen dough*

THE CATERER
Lasagne
Clafoutis
Vegetable confit
Potatoes
Risotto*
Fresh meals*
Frozen meals*

DEFROSTING
Meat
Fish
Bread-Cakes*
- For these dishes, the oven must be preheated before you place your dish in it.

The screen tells you not to insert your dish until the oven has reached its temperature.
A beep sounds to let you know that warm-up is complete; the time starts counting down from this point.
Place your dish in the oven at the shelf level indicated.
Caution
Use only for the 100 % steam cooking function. Do not use in the other cooking modes. Remove the dishes from the oven before cleaning by pyrolysis.

LIST OF DISHES 100% STEAM

Potatoes cut in pieces
Peas
Leeks cut in pieces
Courgettes
Pumpkin cut in cubes
Artichokes
Asparagus
Celery branch cut in pieces
Squashes cut into tracks
Chard
Spinach
Brussels sprouts


SETTINGS FUNCTIONS
In the general menu, select the «SET-TINGS» function by turning the control
knob and confirm.
Different settings are proposed:
- time, language, sound, demo mode and lamp management.
Select the function you want by turning the control knob and then confirm.
Then set your parameters and confirm them.

TIME
Modify the time; validate then modify the minutes and validate again.

LANGUAGE
Choose your language and confirm.

SOUND
Your oven emits sounds when you use the keys. To keep these sounds, select ON, otherwise select OFF to deactivate them and confirm.

DEMO MODE
By default, the oven is configured in normal heating mode.
If it is activated in DEMO mode (ON position), the mode for presenting products in stores, your oven will not warm up.
To return it to normal mode, set it to OFF and confirm.

LAMP MANAGEMENT
Two setting options are proposed:
Position ON, the light stays on throughout cooking (except in ECO mode).
Position AUTO, the oven light turns off after 90 seconds when cooking.
Choose your position and confirm.

After 90 seconds without any action by the user, the display brightness decreases to limit energy consumption and then light goes off (when it is in «AUTO» mode).
Press the back or menu keys once to restore the display's brightness and activate the light during cooking if necessary.

LOCKING THE CONTROLS
Child safety lock
Press the back 念 and menu 念 keys at the same time until the padlock symbol displays on the screen.
Control locking is accessible during cooking or when the oven has stopped.
NOTE: only the stop key ① remains active.
To unlock the keypad, press the back and menu keys at the same time until the padlock symbol disappears from the screen.

MINUTE MINDER FUNCTION
This function can only be used when the oven is off.
In the general menu, select the «MINUTE MIN- DER» function by turning the control knob and confirm.
00:00 is displayed on the screen.
Set the minute minder by turning the knob and then press to confirm. The timer starts.
Once the time has lapsed, there is a sound signal. To stop it, press any key.
Note: You can modify or cancel the minute minder at any time.
To cancel, return to the minute minder menu and set to 00:00.
If you press the control knob during the countdown you will stop the minute minder.
CLEANING AND MAINTENANCE:
EXTERNAL SURFACE
Use a window washing product applied to a soft cloth. Do not use abrasive creams or scouring sponges.
REMOVING THE SHELF RUNNERS
Side liners with shelf runners:
Lift the front part of the shelf runner upwards. Press the entire shelf runner and release the front hook from its housing. Then, gently pull the whole of the shelf runner towards you to release the rear hooks from their housing. Pull out the two shelf supports.
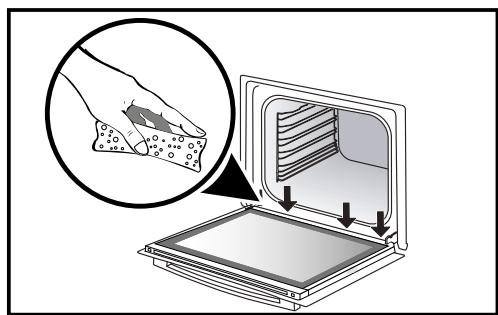
CLEANING THE INNER GLASS
To clean the inner glass, remove the door. Before doing this, remove any excess grease with a soft cloth and washing up liquid.

Warning
Do not use scouring products, abrasive sponges or metal scrapers to clean the glass oven door as this could scratch the surface and cause the glass to shatter.
REMOVING AND PUTTING BACK THE DOOR
Open the door fully and block it with one of the plastic wedges provided in your appliance's plastic pouch.

Remove the first clipped glass panel:
Using the other wedge (or a screwdriver), press the slots A to unclip the glass.
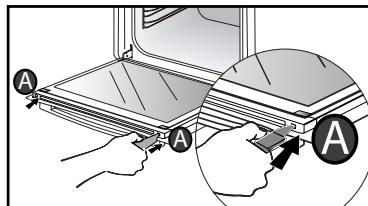
Remove the glass panel.
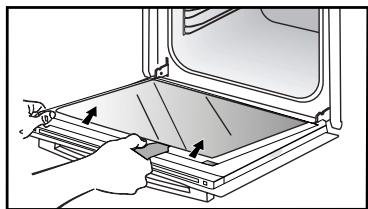
CLEANING AND MAINTENANCE:
The door has two extra panes of glass with a black rubber spacer in each corner.
If necessary, remove them to clean them.
Do not soak the glass panels in water. Rinse with clean water and dry off with a lint-free cloth.
After cleaning, reposition the four rubber stops with the arrow upwards and reposition all of the glass panels.
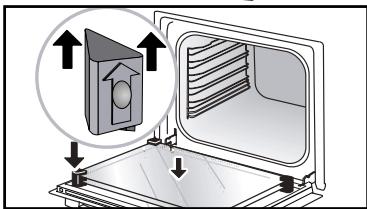
Insert the last glass panel into the metal stops, then clip it in with the side with «PY-ROLYTIC» facing you and legible.

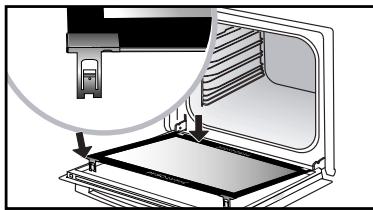
Remove the plastic wedge.
Your appliance is now ready for use again.

REPLACING THE LIGHT BULB

WARNING
Make sure the appliance is disconnected from the power before replacing the bulb in order to avoid the risk of electric shock. Carry out the operation when the appliance has cooled.
Bulb specification:
25 W, 220-240 V\~, 300^ G9.

You can replace the bulb yourself. Unscrew the view port and remove the bulb (use a rubber glove, which will make it easier to remove). Insert the new bulb and replace the view port.
This product contains a light source of energy efficiency class G.

"CLEANING" FUNCTION
(the cavity)

- Remove the accessories and supports from the oven before beginning pyrolysis clean. Before starting a pyrolysis cleaning cycle, we sure that any accessories that are not pyrosis safe have been removed from the oven using rails, baking trays, chrome-plated grills, (so on) as well as any cookware.
PYROLYTIC SELF-CLEANING
This oven is equipped with a pyrolytic self-cleaning function:
Pyrolysis is a cycle during which the oven cavity is heated to a very high temperature in order to eliminate soiling from splattering and spills.
Before starting pyrolysis cleaning, remove any large overspills, if any. Remove the excess grease on the door using a damp sponge.
As a safety measure, cleaning only occurs after the door locks automatically; it is impossible to unlock the door.
PERFORM A SELF-CLEANING CYCLE
Three pyrolysis cycles are proposed. The durations are pre-selected and cannot be modified:

Express Pyro: in 59 minutes
This specific function uses the heat built up during a previous cooking cycle to quickly and automatically clean the inside of the oven: it cleans a mildly dirty oven interior in less than an hour.
The electronic oven temperature monitor determines whether the residual heat remaining in the oven interior is sufficient to provide a good cleaning result. If this is not the case, a 90-minute pyrolysis cycle will automatically begin.

Auto Pyro: between 1:30 and
2:15 for cleaning to save energy.

Turbo Pyro: in 2:00
for more in-depth cleaning of the inside of the oven.
IMMEDIATE SELF CLEANING
-
Select the «CLEANING» function when you are in the general menu then confirm.
-
Select the most suitable self cleaning cycle, for example Turbo Pyro, and confirm.
The pyrolysis cycle begins. The time starts to count down immediately it is set.
During pyrolysis, the symbol displays in the programmer to indicate that the door is locked.
At the end of the pyrolysis cycle, 0:00 flashes.
There is a 30 minute cooling phase after each pyrolysis and your oven remains unavailable during this time.

When the oven is cool, use a damp cloth to remove the white ashes. The oven
is clean again and ready for further cooking operations.
SELF CLEANING WITH DELAYED START
Follow the instructions described in the previous section.
-
Select the end time symbol (delayed start) and confirm.
-
Set the pyrolysis end time you want with the control knob and confirm twice.
After these steps, the oven switches to standby and the start of pyrolysis is delayed so that it finishes at the programmed time.
When the pyrolysis is complete, switch your oven off by pressing the ① key.

EMPTYING FUNCTION (WATER TANK)

Empty the tank every time before cooking.
Emptying may also be carried out when not cooking.
- To do so,select the «CLEANING» function when you are in the general menu then confirm.
- Select the «Emptying» cycle and confirm. The tray opens.
- Select one of the 2 emptying modes, SPEED or AUTO (see detail below) and proceed in the same way as an automatic emptying cycle once finished cooking.
Automatic emptying after cooking:
Every time you finish cooking with your combination steam oven, you will be asked if you wish to empty the tank.
You may choose not to empty the tank by selected «I refuse», otherwise select «I accept» and confirm.
Select a SPEED or AUTO emptying cycle and confirm.
The tray will open automatically to be emptied.

SPEED emptying:
Only if the user wants to use the combination steam oven again immediately.
Emptying time: approximately 20 seconds.

AUTO emptying:
This fully empties the boiler and the tank to avoid stagnant water.
Emptying time: approximately 2 to 3 minutes.
Place a sufficiently large container (minimum 1 litre) under the tray in order to receive the water.
Confirm by pressing the knob to start emptying.
The emptying time displays on the screen.
Once the emptying finished, the screen will indicate 0 m 0 s. Close the tray manually.

DESCALING FUNCTION (STEAM BOILER)
Descaling is a cleaning cycle which eliminates limescale from the boiler.
You must regularly descale the boiler.
When the oven suggests «descaling recommended» you may decide not to do it by selecting «I refuse» and confirm.
You will be able to cook 5 more times before the «combination steam» functions are no longer effective. However, if the message «descaling compulsory» appears, you must descale the boiler and select «I accept» and confirm.

Caution:
When the display indicates «Dscaling
compulsory>, you must imperatively descale the boiler.
To do so,select the «CLEANING» function when you are in the general menu then confirm.
- Select the «Descale» cycle and confirm.
The tray opens automatically.
Proceed step by step.
PHASE 1: EMPTYING
Place a sufficiently large container (minimum 1 litre) under the tray in order to receive the water and confirm.
- The «Emptying» cycle starts and lasts for 3 min 30 s.
PHASE 2: CLEANING
- Pour 110ml of pure white vinegar in the tank.
- Close the tray manually. The «Cleaning» cycle starts and lasts for 30 min. at the end of the cycle the tray opens automatically.
PHASE 3: RINSING
Fill the tank with water to the MAX level.
- Place a container underneath the tray and confirm.
- The «Rinsing» cycle starts and lasts for 3 min 30 s.
PHASE 4: EMPTYING
A second rinsing cycle is required; refill the water tank up to the MAX level.
- Place a container underneath the tray and confirm.
- The «Emptying» cycle starts and lasts for 3 min 30 s.
At the end of the cycle, the descending is complete. A beep sounds. Close the tray manually. Your oven is now ready for use again.
- «AS» is displayed (Auto Stop system).
This function stops heating the oven if you forget to switch it off. Turn your oven to STOP.
- Default code starting with «F». Your oven has detected a problem.
Stop the oven for 30 minutes. If the fault is still there, cut off the power supply for at least one minute.
If the fault persists, contact the Customer Service Department.
- The oven is not heating.
Check that the oven is correctly connected and that your installation's fuse is not out of service. Check that the oven is not set to «DEMO» mode (see settings menu).
- The oven light is not working.
Replace the bulb or the fuse.
Check that the oven is correctly connected.
- The cooling fan continues to operate after the oven stops.
This is normal. It can work for up to one hour after cooking to cool down the oven. If it continues beyond this, contact the Customer Service Department.
- The pyrolysis cleaning cycle does not begin.
Verify that the door is locked. Call the Customer Services Department if the problem persists.
- The «door locking» symbol flashes in the display.
Door locking fault. Contact the Customer Services Department.
- There is water on the floor of the oven.
- The boiler is scaled. Follow the DESCALING procedure. If the fault persists, contact the After-Sales Service.
INTERVENTIONS
Any repairs to your appliance must be made by a qualified professional accredited to work on the brand. When calling, please provide the full references of your appliance (commercial reference, service reference, serial number), so that we can handle your call better. This information appears on the manufacturer's nameplate on the equipment.
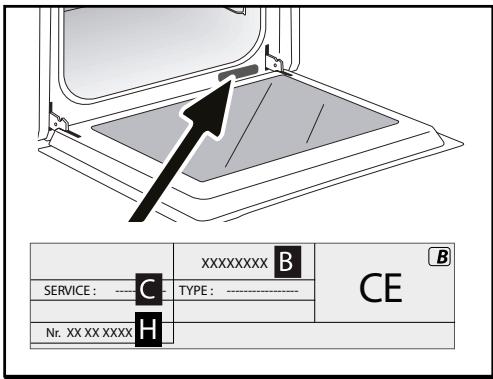
B: Commercial reference
C: Service reference
H: Serial number
ORIGINAL PARTS
When servicing your equipment, ask for only certified original spare parts to be used.

| DISHES | * | * | * | * | * | * | Cooking time | |||||||
| °C | LENT | °C | LENT | °C | LENT | °C | LENT | °C | LENT | °C | LENT | |||
| MEAT | Roast pork (1kg) | 200 | 2 | 190 | 2 | 60 | ||||||||
| Roast veal (1kg) | 200 | 2 | 190 | 2 | 60-70 | |||||||||
| Roast beef | 240 | 2 | 200 | 2 | 30-40 | |||||||||
| Lamb (leg, shoulder, 2.5kg) | 220 | 2 | 220 | 2 | 200 | 2 | 210 | 2 | 60 | |||||
| Poultry (1kg) | 200 | 3 | 220 | 3 | 210 | 3 | 185 | 3 | 60 | |||||
| Chicken thighs | 220 | 3 | 210 | 3 | 20-30 | |||||||||
| Pork/veal chops | 210 | 3 | 20-30 | |||||||||||
| Beef ribs (1kg) | 210 | 3 | 210 | 3 | 20-30 | |||||||||
| Lamb chops | 210 | 3 | 20-30 | |||||||||||
| FISH | Grilled fish | 275 | 4 | 15-20 | ||||||||||
| Cooked fish (bream) | 200 | 3 | 190 | 3 | 30-35 | |||||||||
| Fish in papillotte | 220 | 3 | 200 | 3 | 15-20 | |||||||||
| VEGETABLES | Gratins (cooked foods) | 275 | 2 | 30 | ||||||||||
| Potato gratin | 200 | 3 | 180 | 3 | 45 | |||||||||
| Lasagne | 200 | 3 | 180 | 3 | 45 | |||||||||
| Stuffed tomatoes | 170 | 3 | 170 | 3 | 30 | |||||||||
| PASTRICKS | Sponge cake | 180 | 3 | 180 | 4 | 35 | ||||||||
| Swiss roll | 220 | 3 | 180 | 2 | 190 | 3 | 5-10 | |||||||
| Buns | 180 | 3 | 200 | 3 | 180 | 3 | 180 | 3 | 35-45 | |||||
| Brownies | 180 | 2 | 180 | 2 | 20-25 | |||||||||
| Cake - Pound cake | 180 | 3 | 180 | 3 | 180 | 3 | 45-50 | |||||||
| Clafoutis | 200 | 3 | 190 | 3 | 30-35 | |||||||||
| Cookies - Shortbread | 175 | 3 | 170 | 3 | 15-20 | |||||||||
| Kugelhopf | 180 | 2 | 40-45 | |||||||||||
| Meringues | 100 | 4 | 100 | 4 | 100 | 4 | 60-70 | |||||||
| Madeleineves | 220 | 3 | 210 | 3 | 5-10 | |||||||||
| Choux pastry | 200 | 3 | 180 | 3 | 200 | 3 | 30-40 | |||||||
| Flaky pastry hors d'oeuvres | 220 | 3 | 200 | 3 | 5-10 | |||||||||
| Savarin cake | 180 | 3 | 175 | 3 | 180 | 3 | 30-35 | |||||||
| Shortcrust tart | 200 | 1 | 200 | 1 | 30-40 | |||||||||
| Thin flaky crust tart | 215 | 1 | 200 | 1 | 20-25 | |||||||||
| OTHER | Terrine pâté | 200 | 2 | 190 | 2 | 80-100 | ||||||||
| Pizza | 240 | 1 | 15-18 | |||||||||||
| Quiches | 190 | 1 | 180 | 1 | 190 | 1 | 35-40 | |||||||
| Soufflé | 180 | 2 | 50 | |||||||||||
| Pies | 200 | 2 | 190 | 2 | 40-45 | |||||||||
| Bread | 220 | 2 | 220 | 2 | 30-40 | |||||||||
| Toast bread | 275 | 4-5 | 2-3 | |||||||||||
N.B : Allow all joints to sit at room temperature for at least 1 hour before roasting.
* depending on model

All the temperatures and cooking times are given for pre-heated ovens.
| RELATIONSHIP OF SETTINGS TO TEMPERATURE ℃ / ℉ | |||||||||
| Setting | 1 | 2 | 3 | 4 | 5 | 6 | 7 | 8 | 9 max. |
| °Celsius | 30 | 60 | 90 | 120 | 150 | 180 | 210 | 240 | 275 |
| °Fahrenheit | 85 | 140 | 195 | 250 | 300 | 355 | 410 | 465 | 525 |
PERFORMANCE TESTING ACCORDING TO STANDARD IEC 60350
| FOOD | * COOKING MODES | SHELF | ACCESSORIES | °C | TIME min. | PREHEAT |
| Shortbread (8.4.1) | 5 | Deep Tray 45mn | 150 | 30-40 | yes | |
| Shortbread (8.4.1) | 5 | Deep Tray 45mn | 150 | 25-35 | yes | |
| Shortbread (8.4.1) | 2 + 5 | Deep Tray 45mn + grill | 150 | 25-45 | yes | |
| Shortbread (8.4.1) | 3 | Deep Tray 45mn | 175 | 25-35 | yes | |
| Shortbread (8.4.1) | s | Deep Tray 45mn + grill | 160 | 30-40 | yes | |
| Small cakes (8.4.2) | 5 | Deep Tray 45mn | 170 | 25-35 | yes | |
| Small cakes (8.4.2) | 5 | Deep Tray 45mn | 170 | 25-35 | ||
| Small cakes (8.4.2) | 2 + 5 | Deep Tray 45mn + grill | 170 | 20-40 | yes | |
| Small cakes (8.4.2) | 3 | Deep Tray 45mn | 170 | 25-35 | yes | |
| Small cakes (8.4.2) | 2 + 5 | Deep Tray 45mn + grill | 170 | 25-35 | yes | |
| Fatless sponge cake (8.5.1) | 4 | Grill | 150 | 30-40 | yes | |
| Fatless sponge cake (8.5.1) | 4 | Grill | 150 | 30-40 | yes | |
| Fatless sponge cake (8.5.1) | 2 + 5 | Deep Tray 45mn + grill | 150 | 30-40 | yes | |
| Fatless sponge cake (8.5.1) | 3 | Grill | 150 | 30-40 | yes | |
| Fatless sponge cake (8.5.1) | 2 + 5 | Deep Tray 45mn + grill | 150 | 30-40 | yes | |
| Apple pie (8.5.2) | 1 | Grill | 170 | 90-120 | yes | |
| Apple pie (8.5.2) | 1 | Grill | 170 | 90-120 | yes | |
| Apple pie (8.5.2) | 3 | Grill | 180 | 90-120 | yes | |
| Surface browning (9.2.2) | 5 | Grill | 275 | 3-6 | yes |
*Depending on model
N.B.: To cook on 2 levels, dishes can be taken out at different times.
Recipe with yeast dough (depending on model)
Ingredients:
- Flour 2 kg - Water 1240 ml - Salt 40 g - 4 packets of dehydrated baker's yeast Mix the dough in a mixer and allow to rise in the oven.
Method: For yeast-based pastry recipes. Pour the dough into a heat-resistant dish. Remove the wire shelf supports and put the dish on the bottom.
Pre-heat the oven to 40 - 50^ with the circulating heat function for five minutes. Stop the oven and allow the dough to rise for 25-30 minutes thanks to the residual heat.
Brandt

KAYTTAJAN OHJEET FI
UUNI

Hyvä asiakas,
VIAT JA RATKAISUT 34
HUOLTOPALVELU 35
KYPSENNYKSEN KESTOAIAKA
"VALMISTUSOPAS + HÖYRY"-TILA

YHDISTETTY HÖYRYTYS

100% HÖYRYOPAS
LA MODALITA "GUIDA CULINARIA"

LA MODALITA "GUIDA CULINARIA + VAPORE

VAPORE COMBINATO

GUIDA 100% VAPORE
Sullo schermo compare 0m00s.
Pyro Express: in 59 minuti
De reservoirinhoud is 1 liter
"STOOM EXPERT" MODUS
De oven schakelt in.

MODUS "KOOKGIDS + STOOM"

GECOMBINEERD STOOM

GIDS STOOM 100%
VEDLIKEHOLD - RENGJØRING 28
Vifteassistert dampgrill

Varlufsdamp

Regenerer garsda (Anbefalt varighet 8mn)
STEKING MED UTSATT START
Ràd for energisparing.
Unngá à apné dōren under tilberedningen for a unngá varmetap.

TØRKEFUNKSJON (kun Programvalg)
STEKING MED UTSATT START
Pyro Express: 59 minute
SELVRENGJØRING MED UTSATT START
INSTALACJA I DEMONTAZ SZYN UCHYLNYCH
SPRZEDAWCA WARZYW IOWOCOW
SPRZEDAWCA WARZYW IOWOCOW
Gratin Dauphinois
Warzywa fasperowane
Cale ziemniaki

CUKIERNIK
Tort biszkoptowy
Flan / krem
Keks
Babeczki
SPRZEDAWCA WARZYW OWOCOW
Kalafior
Brokuhy
Fasola szparagowa
Marchew w plasterkach
ZiemniakiPokroić na kawalki
Groch
PoryPokroić na kawalki
CukiniaPokroić w Kosten
Częsci
DyniaPokrojana w Kosten
Karczochy
Szparag
VAL AV PLACERING OCH INBYGGNAD
I ritningarna anges matten for den mobel som sca hysa ugnen.
SJALVRENGORING MED PYROLYS
Pyro Express: 59 minute
OMEDELBAR SJÄLVRENGÖRING
SJÄLVRENGÖRING MED FÖRDROJD START
| A | B | C |
| SERVICE: C | TYPE: D | I C E |
| E | F | |
| Nr H | Made in France |