
SHY S BL/A/60 - Slanted hood ELICA - Free user manual and instructions
Find the device manual for free SHY S BL/A/60 ELICA in PDF.




| Product Type | Slanted Hood |
| Brand | ELICA |
| Model | SHY S BL/A/60 |
| Use | Domestic |
| Installation Version | Extractor (external evacuation) or filter (internal recycling) |
| Number of Speeds | 3 speeds + Booster |
| Booster Function | Yes, activation from 3rd speed, automatic stop after 5 minutes |
| Timer | Yes, adjustable duration depending on speed (20 min at speed 1, 15 min at speed 2, 10 min at speed 3) |
| Lighting | LED lamp (or halogen depending on version) |
| Grease Filter | Metallic, dishwasher-safe or hand-washable every month |
| Charcoal Filter | Active, optional for recycling version, replacement every 4 months (or washable depending on type) |
| Minimum Installation Distance | 45 cm for electric hobs, 65 cm for gas or mixed |
| Power Supply | See rating plate (typical 220-240 V) |
| Grease Filter Maintenance | Clean once a month |
| Charcoal Filter Replacement | Every 4 months maximum (or washable every 2 months) |
| Bulb Type | LED (replacement by technical service) or halogen 12V 20W max G4 |
| Automatic Stop | Booster stops after 5 minutes |
Frequently Asked Questions - SHY S BL/A/60 ELICA
User questions about SHY S BL/A/60 ELICA
0 question about this device. Answer the ones you know or ask your own.
Ask a new question about this device
Download the instructions for your Slanted hood in PDF format for free! Find your manual SHY S BL/A/60 - ELICA and take your electronic device back in hand. On this page are published all the documents necessary for the use of your device. SHY S BL/A/60 by ELICA.
USER MANUAL SHY S BL/A/60 ELICA
EN Instruction on mounting and use
RU Instruction on mounting and use
UK Instruction on mounting and use
KK Instruction on mounting and use
EN - Instruction on mounting and use
Closely follow the instructions set out in this manual. All responsibility, for any eventual inconveniences, damages or fires caused by not complying with the instructions in this manual, is declined. This appliance is intended to be used in household and similar application such as: - staff kitchen areas in shop, offices and other working environments; - farm houses; - by clients in hotels, motels and other residential type environments; - bed and breakfast type environments.
The hood can look different to that illustrated in the drawings in this booklet. The instructions for use, maintenance and installation, however, remain the same.
It is important to conserve this booklet for consultation at any moment. In the case of sale, cession or move, make sure it is together with the product. - Read the instructions carefully: there is important information about installation, use and safety. - Do not carry out electrical or mechanical variations on the product or on the discharge conduits. Before proceeding with the installation of the appliance verify that there are no damaged all components. Otherwise contact your dealer and do not proceed with the installation.
Note: The parts marked with the symbol "(^)" are optional accessories supplied only with some models or otherwise not supplied, but available for purchase.

Caution
- Before any cleaning or maintenance operation, disconnect hood from the mains by removing the plug or disconnecting the mains electrical supply. Always wear work gloves for all installation and maintenance operations.
- This appliance can be used by children aged from 8 years and above and persons with reduced physical, sensory or mental capabilities or lack of experience and knowledge if they have been given supervision or instruction concerning use of the appliance in a safe way and understand the hazards involved. Children shall not be allowed to tamper with the controls or play with the appliance.
- Cleaning and user maintenance shall not be made by children without supervision.
- The premises where the appliance is installed must be sufficiently ventilated, when the kitchen hood is used together with other gas combustion devices or other
fuels.
- The hood must be regularly cleaned on both the inside and outside (AT LEAST ONCE A MONTH).
- This must be completed in accordance with the maintenance instructions provided. Failure to follow the instructions provided regarding the cleaning of the hood and filters will lead to the risk of fires.
- Do not flambe under the range hood.
- Do not remove filters during cooking.
- For lamp replacement use only lamp type indicated in the Maintenance/Replacing lamps section of this manual.
The use of exposed flames is detrimental to the filters and may cause a fire risk, and must therefore be avoided in all circumstances.
Any frying must be done with care in order to make sure that the oil does not overheat and ignite.
CAUTION: Accessible parts of the hood may become hot when used with cooking appliances. - Do not connect the appliance to the mains until the installation is fully complete. - With regards to the technical and safety measures to be adopted for fume discharging it is important to closely follow the regulations provided by the local authorities. - The air must not be discharged into a flue that is used for exhausting fumes from appliance burning gas or other fuels. - Do not use or leave the hood without the lamp correctly mounted due to the possible risk of electric shocks. - Never use the hood without effectively mounted grids. - The hood must NEVER be used as a support surface unless specifically indicated. - Use only the fixing screws supplied with the product for installation or, if not supplied, purchase the correct screws type. - Use the correct length for the screws which are identified in the Installation Guide. - In case of doubt, consult an authorized service assistance center or similar qualified person.
WARNING!
- Failure to install the screws or fixing device in accordance with these instructions may result in electrical hazards.
- Do not use with a programmer, timer, separate remote control system or any other device that switches on automatically.
- This appliance is marked according to the European directive 2012/19/EC on Waste Electrical and Electronic Equipment (WEEE).
- By ensuring this product is disposed of correctly, you will help prevent potential negative consequences for the environment and human health, which could otherwise be caused by inappropriate waste handling of this product.

- The symbol on the product, or on the documents accompanying the product, indicates that this appliance may not be treated as household waste. Instead it should be taken to the appropriate collection point for the recycling of electrical and electronic equipment. Disposal must be carried out in accordance with local environmental regulations for waste disposal.
- For further detailed information regarding the process, collection and recycling of this product, please contact the appropriate department of your local authorities or the local department for household waste or the shop where you purchased this product.
Appliance designed, tested and manufactured according to:
- Safety: EN/IEC 60335-1; EN/IEC 60335-2-31, EN/IEC 62233. Performance: EN/IEC 61591; ISO 5167-1; ISO 5167-3; ISO 5168; EN/IEC 60704-1; EN/IEC 60704-2-13; EN/IEC 60704-3; ISO 3741; EN 50564; IEC 62301.
- EMC: EN 55014-1; CISPR 14-1; EN 55014-2; CISPR 14-2; EN/IEC 61000-3-2; EN/IEC 61000-3-3. Suggestions for a correct use in order to reduce the environmental impact: Switch ON the hood at minimum speed when you start cooking and kept it running for few minutes after cooking is finished. Increase the speed only in case of large amount of smoke and vapor and use boost speed(s) only in extreme situations. Replace the charcoal filter(s) when necessary to maintain a good odor reduction efficiency. Clean the grease filter(s) when necessary to maintain a good grease filter efficiency. Use the maximum diameter of the ducting system indicated in this manual to optimize efficiency and minimize noise.
Use
The hood is conceived for the suction of cooking fumes and steam and is destined only for domestic use.
The hood is designed to be used either for exhausting or filter version.

Extraction version
In this case the fumes are conveyed outside of the building by means of a special pipe connected with the connection ring located on top of the hood.
CAUTION!
The exhausting pipe is not supplied and must be purchased apart.
Diameter of the exhausting pipe must be equal to that of the connection ring.
CAUTION!
If the hood is supplied with active charcoal filter, then it must be removed.
Connect the hood and discharge holes on the walls with a diameter equivalent to the air outlet (connection flange).
Using tubes and discharge holes on walls with smaller dimensions will cause a diminution of the suction performance and a drastic increase in noise.
Any responsibility in the matter is therefore declined.
Use a duct of the minimum indispensable length. ! Use a duct with as few elbows as possible (maximum elbow angle: 90° ). ! Avoid drastic changes in the duct cross-section.

Filtration version
The aspirated air will be degreased and deodorised before being fed back into the room.
In order to use the hood in this version, you have to install a system of additional filtering based on activated charcoal.
Installation
The minimum distance between the supporting surface for the cooking equipment on the hob and the lowest part of the range hood must be not less than 45cm from electric cookers and 65cm from gas or mixed cookers.
If the instructions for installation for the gas hob specify a greater distance, this must be adhered to.
As described in the installation drawings perform 6 holes (8 mm diameter, 40 mm deep), in the positions shown in the drilling template, to fix the hood support bracket and the exhaust flue. After installation, check that the hood and exhaust flue are perfectly aligned.
The range hood is intended to be installed over a hob having 6 heating elements.
! Electrical connection
The mains power supply must correspond to the rating indicated on the plate situated inside the hood. If provided with a plug connect the hood to a socket in compliance with current regulations and positioned in an accessible area, after installation. If it not fitted with a plug (direct mains connection) or if the plug is not located in an accessible area, after installation, apply a double pole switch in accordance with standards which assures the complete disconnection of the mains under conditions relating to over-current category III, in accordance with installation instructions.
WARNING!
Before re-connecting the hood circuit to the mains supply and checking the efficient function, always check that the mains cable is correctly assembled.
Warning! If the supply cord is damaged, it must be replaced by the manufacturer, its service agent or similarly qualified persons in order to avoid hazard.
Mounting
Before beginning installation:
- Check that the product purchased is of a suitable size for the chosen installation area.
- Remove the charcoal (*) filter/s if supplied (see also relative paragraph). This/these is/are to be mounted only if you want to use the hood in the filtering version.
- Check (for transport reasons) that there is no other supplied material inside the hood (e.g. packets with screws (*), guarantees (*), etc.), eventually removing them and keeping them.
Expansion wall plugs are provided to secure the hood to most types of walls/ceilings. However, a qualified technician must verify suitability of the materials in accordance with the type of wall/ceiling. The wall/ceiling must be strong enough to take the weight of the hood.
Do not tile, grout or silicone this appliance to the wall. Surface mounting only.
Operation
| I | II | III> | L | |
| T1 | T2 | T3 | T4 | T5 |
First speed (T1)
Press T1 to activate the first speed. When the function is activated, the LED turns on with a fixed light. Press T1 again to turn the hood off.
Second speed (T2)
Press T2 to activate the second speed. When the function is activated, the LED turns on with a fixed light. Press T2 again to turn the hood off.
Third speed and BOOSTER (T3)
When the hood is off or with the first or second speed active, the third speed can be activated by pressing the button T3 and the LED will turn on with a fixed light.
If T3 is pressed again, the booster turns on. The booster can only be activated if the third speed is already active. When the booster is on, the LED T3 starts to flash. While the booster is working, it is possible to switch to the first or second speed by pressing the desired speed button T1 or T2, the booster will turn off and the selected speed will be activated.
When the booster is on, press T3 again to turn the hood off. After 5' the booster automatically turns off and the third speed is automatically activated.
Timer (T4)
The timer can be activated when the first, second or third speed is active. When the function is activated, both the LED of the Timer (T4) and that of the previously selected speed (T1/T2/T3) turn on with a fixed light.
The duration of the timer depends on the selected speed:
First speed T1 = duration 20'
Second speed T2 = duration 15'.
Third speed T3 = duration 10'.
The timer cannot be activated when the booster is active. When the time expires, the hood turns off. When a speed is timed, it is possible to switch to other speeds by pressing the desired speed button, this operation will turn the timer off. When a speed is timed, the timer can be deactivated by pressing T4, or one of the other two inactive speeds. To turn the hood off, press the speed again to which the timer had previously been linked.
Light (T5)
The light can be activated at any time by pressing key T5. When the function is activated, the LED turns on with a fixed light.
Filter setting
Activation or deactivation of the filter indicators is only possible with the hood off.
To access the configuration menu, hold pressed T2+T3, once inside the menu T1 will start to flash.
The default setting is:
- grease filter indicator (T2) on, therefore active;
- odour filter indicator (T3) off, therefore not activated. T2 activates/deactivates the grease filter indicator. T3 activates/deactivates the odour filter indicator. To exit the menu, hold pressed T1 or wait 10 seconds.
Filter reset
The hood signals the need for filter maintenance at regular intervals:
- grease filter every 40 hours;
- odour filter every 160 hours.
In this case, with the hood off, when the user touches any button the interface signals two types of needs for a period of 10 seconds:
- if T1+T2 flash: grease filter maintenance;
- if T1+T3 flash: odour filter maintenance.
During the 10 seconds it is possible to reset the grease filter by pressing T1+T2 and to reset the odour filter by pressing
T1+T3. After the reset, the button combinations will flash rapidly twice. The interface will now work as normal.
Please note:
During the 10 seconds, the hood will work normally but without any visual feedback regarding the speed buttons. If during the 10 seconds no operations are carried out, the LEDs will stop flashing and the visual feedback will return to normal.
Maintenance
Cleaning
Clean using ONLY a cloth dampened with neutral liquid detergent. DO NOT CLEAN WITH TOOLS OR
INSTRUMENTS. Do not use abrasive products. DO NOT USE ALCOHOL!
Grease filter
Fig. 11
Traps cooking grease particles.
The grease filter must be cleaned once a month using non aggressive detergents, either by hand or in the dishwasher, which must be set to a low temperature and a short cycle. When washed in a dishwasher, the grease filter may discolor slightly, but this does not affect its filtering capacity.
To remove the grease filter, pull the spring release handle.
Charcoal filter (filter version only)
It absorbs unpleasant odors caused by cooking.
Circular charcoal filter
Apply one on each side as cover to both the shield grids of the motor impeller, then turn clockwise.
For the disassembly, turn counter-clockwise.
The saturation of the charcoal filter occurs after more or less prolonged use, depending on the type of cooking and the
regularity of cleaning of the grease filter.
In any case, the cartridge must be replaced at least every four months.
The charcoal filter may NOT be washed or regenerated.
Fig. 12a
Washable activated charcoal filter
The charcoal filter can be washed once every two months (or when the filter saturation indication system - if present on the model in use - indicates this necessity) using hot water and a suitable detergent, or in a dishwasher at 65°C (if the dishwasher is used, select the full cycle function and leave dishes out).
Eliminate excess water without damaging the filter, then put it in the oven for 10 minutes at 100°C to dry completely. Replace the filter every 3 years and when the cloth is damaged.
Fig. 12b
Replacing lamps
Fig. 10
Disconnect the appliance from the electricity.
Warning! Prior to touching the light bulbs, ensure they are cooled down.
Replace the old light bulb with one of the same type as specified in the feature label or near the light lamp on the hood.
- Using a flat head screwdriver or equivalent tool, carefully pry loose the light cover.
- Replace the damaged LED or halogen lamp with one having the same characteristics, as specified in the label features or near the lamp:
LED lamp: For replacement, contact the technical service.
Halogen lamp: 12V - 20W max - G4 (take care not to touch them with your hands)
- Reinstall the light cover. (it will snap shut).
If the lights do not work, make sure that the lamps are fitted properly into their housings before you call for technical assistance.
The timer can be activated when the booster is on. After the time, the switch turns off.
When the speed is timed, you can pass to other speeds by pressing the speed button. This function deactivates the timer.
When the speed is timed, you can deactivate the timer by pressing T4, or by selecting a different speed. To turn off the switch, press the speed to which you have previously applied timing.
Lighting (T5)
The lighting can be activated by pressing the T5 button. When the function is activated, the LED lights up emitting a steady light.
Filter setting
The activation or deactivation of the filter indicators can be done with the switch off.
To select the menu, press the T2+T3 buttons, and once in the menu, the T1 will start to flash.
The preset program is:
- The doctor according to the patient's (T2) indication, is activated, working.
- The doctor according to the patient's (T3) indication, is deactivated, not working.
T2 activates/deactivates the patient's indicator. T3 activates/deactivates the patient's indicator. To exit this menu, press T1 or wait 10
Reset
The reset function indicates the intervals for the maintenance of the filters:
- Doctor's filter every 40 hours.
- Doctor's filter every 160 hours.
- Grease filter every 40 hours. Charcoal filter every 160 hours.
Before starting installation:
First speed T1 = extraction capacity 20'
Second speed T2 = extraction capacity 15'
Third speed T3 = extraction capacity 10'
The timer cannot be activated while the booster is active. After the time has elapsed, the aspirator turns off. When a speed is selected with the timer, you can switch to another speed by pressing the speed button; this operation does not turn off the timer. When a speed is selected with the timer, the timer can be deactivated by pressing T4 or another speed, if it is not active. To turn off
the aspirator, press the speed button, if before that the timer was applied.
Light (T5)
The function is activated at the moment when the button is pressed. When the function is activated, the LED indicator lights up with a fixed light.
Filter setting
Activate or deactivate the indicator on the filter. It can be activated automatically when the aspirator is switched on.
To access the menu for configuration, press and hold T2+T3. If the menu does not appear, repeat the procedure.
The setting options are:
- Filter for grease indicator (T2) is on, therefore it is activated; - Filter for odor indicator (T3) is on, therefore it is not activated.
T2 activates/deactivates the indicator for the grease filter. T3 activates/deactivates the indicator for the odor filter. To exit the menu, press and hold T1 or wait 10 seconds.
Filter reset
The aspirator is equipped with a signaling system that indicates when the filters need to be replaced:
- Grease filter: every 40 hours - Odor filter: every 160 hours.
In this case, when the aspirator is switched off, when the user presses a button, the signaling system is activated for 10 seconds for two types of needs:
- If T1+T2 flash: replace the grease filter;
- If T1+T3 flash: replace the odor filter.
During the 10 seconds, it is possible to reset the grease filter by pressing T1+T2, and to reset the odor filter by pressing T1+T3. After the reset, the button combinations will flash rapidly twice. The signaling system will always work as usual. ATTENTION:
During the 10 seconds, the aspirator functions normally, but it must provide visual feedback for the buttons for speed. If during the 10 seconds no button is pressed, the LED indicators will turn off and the visual feedback will return to normal.
Cleaning
For cleaning use ONLY a cloth dampened with neutral liquid detergent. DO NOT use instruments or tools for cleaning!
Avoid contact with the fan while it is in operation. DO NOT USE SPRAY!
Grease filter
Fig. 11
The appliance has been designed, tested and manufactured in accordance with:
- Safety: EN/IEC 60335-1; EN/IEC 60335-2-31, EN/IEC 62233.
- Performance characteristics: EN/IEC 61591; ISO 5167-1; ISO 5167-3; ISO 5168; EN/IEC 60704-1; EN/IEC 60704-2-13; EN/IEC 60704-3; ISO 3741; EN 50564; IEC 62301. EMC: EN 55014-1; CISPR 14-1; EN 55014-2; CISPR 14-2; EN/IEC 61000-3-2; EN/IEC 61000-3-3. To reduce the impact on the environment, switch the extractor hood to minimum speed when you start cooking and leave it running for a few minutes after you finish cooking. Increase the speed only in case of a large amount of fumes and steam, and resort to using higher speeds only in extreme situations. Replace the charcoal filter(s) when necessary to ensure good efficiency and reduction of odors. Clean the grease filter(s) when necessary to ensure good efficiency of the grease filter. Use the maximum diameter of the ducting system indicated in the user manual to optimize efficiency and minimize noise levels.
Use
The hood serves to extract fumes and steam during cooking and is intended for domestic use only.
The hood is designed to operate in extraction mode (air exhausted outside) or in recirculation mode (air recirculated).

Using the recirculation mode
In this mode, the air is purified and returned to the room through the ducting connected to the collar.

ATTENTION!
The exhaust pipe is not included in the kit and must be purchased separately.
The diameter of the exhaust pipe must match the diameter of the connecting collar.

WARNING!
If the hood is equipped with a charcoal filter, remove it.
Connect the hood to the exhaust pipe with a diameter corresponding to the air outlet opening (connecting flange).
Installing pipes with a smaller diameter will reduce the suction power of the hood and sharply increase the noise level.
The manufacturer declines all responsibility regarding the above.
Use a pipe with the minimum necessary length. Use a pipe with the minimum number of bends (maximum bend angle: 90°). Avoid sharp changes in the pipe diameter.

Use of the hood
Air
The speed button to which the timer mode was applied.
Lighting (T5)
The lighting can be turned on at any time by pressing the T5 button. When this function is activated, the corresponding LED lights up with a steady light.
Filter settings
Turning the filter indicators on and off can only be done with the hood off. To access the configuration menu, press and hold the T2+T3 buttons. After entering the menu, T1 flashes.
The factory setting is as follows:
- The pre-filter indicator (T2) is lit, i.e., on; the deodorizing filter indicator (T3) is not lit, i.e., off.
T2 turns the pre-filter indicator on/off. T3 turns the deodorizing filter indicator on/off. To exit the menu, press and hold T1 for 10 seconds.
Resetting the filters
At regular intervals, the hood will signal the need for filter maintenance:
Pre-filter: every 40 hours; deodorizing filter: every 160 hours.
In such cases, with the hood off, when the user touches any button, the interface will signal for 10 seconds the two required operations:
- If T1+T2 flash: maintenance of the pre-filter;
- If T1+T3 flash: maintenance of the deodorizing filter.
Within 10 seconds, you can reset the pre-filter indicator by pressing T1+T2, and the deodorizing filter indicator by pressing T1+T3. After performing the reset combination, press these buttons quickly three times. Then the interface will function as usual.
ATTENTION:
During these 10 seconds, the hood will operate normally, but there will be no visual feedback on the buttons for the selected speeds. If no action is taken during these 10 seconds, the lights will stop flashing and visual feedback will return to normal mode.
Maintenance
Cleaning
For cleaning, use only a special cloth moistened with neutral liquid detergent. Do not use any tools for cleaning. Do not use products containing abrasive materials. Do not use alcohol!
Pnc.11
The filter element is a replaceable part, coming from the plate.
The filter should be cleaned with non-aggressive agents, manually or in a dishwasher at low temperature and with economical detergent.
Washing in a dishwasher may cause some discoloration of the filter element, but its filtering characteristics remain absolutely unchanged.
To remove the filter element, pull the attached handle towards you to detach the filter.
Carbon filter (only in recommended models)
Removes unpleasant odors.
Round carbon filter
Cover both sides of the protective grilles of the motor with the filters, then insert them into the motor housing.
Attention! Before touching the lamps, make sure they have cooled down.
Replace the damaged lamp with a new one of the same type as indicated on the label, or contact the lamp manufacturer.
- Using a flat screwdriver or suitable tool, carefully remove the protective element.
- Replace the damaged lamp with a halogen lamp or LED lamp with the same characteristics as specified on the label or near the lamp:
LED lamp: For replacement of light bulbs, contact the technical service.
Lamp type: 12V - 20W max - G4 (try not to touch the lamp).
- Close the cover (fastening with a latch).
If the lighting system works, check the correct installation of the lamps in the sockets before contacting the technical support center.
Carefully follow the instructions given in this manual. The manufacturer is not responsible for damage, breakdowns, or malfunctions that may occur as a result of using the device contrary to the instructions given in this manual. The lamp covers are designed for use in the home and for work, which is recommended for the intended use...
The kitchen hood may have a design, 100% consistent with the images shown in the instructions. In any case, the instructions for installation, technical maintenance, and operation remain without changes.
It is important to keep the instructions for future reference, so that you can refer to them at any time. In case of sale, before handing over the device, make sure that the instructions are included with the product. - Carefully read the instructions: they contain important information about installation, use, and safety. It is forbidden to make any electrical or mechanical modifications to the device in any way. Before starting the installation of the device, check all components for defects and that they are not damaged. In the opposite case, contact the point of sale and stop the installation of the device.
Note: Parts marked with the symbol ( ) are optional accessories supplied with some models, or parts that are not included in the kit and need to be purchased.

Warnings
Safety
Before starting any operation on the device for installation or maintenance, disconnect the device from the electrical network by unplugging it from the socket or by switching off the general switch.
- For all installation and maintenance operations, use protective gloves. - The device can be used by children aged 8 years and above and by persons with reduced physical, sensory, or mental capabilities, or with insufficient experience and knowledge, if they are under supervision or have been instructed on the safe use of the device and understand the dangers involved.
way and understand the dangers associated with it.
Do not operate the hood without supervision and do not leave it running unattended. Cleaning and maintenance operations must not be performed without a lamp. The hood must have sufficient ventilation when the exhaust is used simultaneously with other appliances operating on gas or other fuels. The exhaust must be cleaned frequently, both inside and outside (at least once a month), keeping it in any case in the condition indicated in the maintenance instructions. Failure to observe the cleaning rules for the hood and the replacement and cleaning of the filters increases the risk of fire. It is strictly forbidden to prepare flambé dishes under the hood. For replacing the lamps, use only the lamps specified in the maintenance/replacement section of the appliance's user manual. Using open flames is dangerous for the filters and can lead to fire, so it must be avoided in any case. Installation must be carried out by qualified personnel. ATTENTION: When the cooking surface is in use, accessible parts may become hot. Do not connect the appliance to the electrical supply until the installation is completely finished. - This concerns technical measures and safety measures regarding the use of the hood in relation to the connection of vapors, strictly
comply with the standards of local competent authorities.
The hood must not be used to exhaust fumes from appliances that are not connected to the hood, such as those operating on gas or other fuels. - Do not use or leave the hood without properly installed lamps, with the risk of receiving an electric shock. Never use the hood without the properly installed grille! - The hood must never be used as a horizontal surface, unless specified. Use the screws and fixing accessories provided with the product installation kit; if they are not included in the kit, purchase screws of the correct type. Use the correct length of screws as specified in the installation manual. - In case of doubt, consult an authorized service center with qualified personnel.

ATTENTION!
Failure to install the screws and fixing devices in accordance with these instructions can lead to risks of electric shock. Do not use with a programmer, timer, separate remote control, or any other device that switches on automatically.
This product is marked in accordance with European Directive 2012/19/EC on waste electrical and electronic equipment (WEEE). By ensuring that this product is disposed of correctly, you will help prevent potential negative consequences for the environment and human health, which could otherwise be caused by inappropriate waste handling.

This appliance can be disposed of separately or with the accompanying documentation. It is indicated that when disposing of it, you should not treat it as unsorted municipal waste. It must be handed over to a specialized collection point for electrical and electronic equipment recycling. Disposal must be carried out in accordance with local regulations on waste disposal. For more detailed information on the rules for handling such products, their recycling, and reprocessing, contact your local authorities, the waste disposal service, or the store where you purchased this product.
This appliance has been designed, tested, and manufactured in accordance with:
- Safety: EN/IEC 60335-1; EN/IEC 60335-2-31, EN/IEC 62233.
- Performance: EN/IEC 61591; ISO 5167-1; ISO 5167-3; ISO 5168; EN/IEC 60704-1; EN/IEC 60704-2-13; EN/IEC 60704-3; ISO 3741; EN 50564; IEC 62301.
- EMC: EN 55014-1; CISPR 14-1; EN 55014-2; CISPR 14-2;
The exhaust pipe is not supplied and therefore must be purchased separately.
The diameter of the exhaust pipe must match the diameter of the connecting ring.

WARNING!
If the exhaust hood has carbon filters, they must be removed.
Connect the exhaust pipe and the exhaust outlet with the same diameter as the hood's inlet (connecting flange).
Using exhaust pipes and outlets with a smaller diameter will lead to reduced suction efficiency and a significant increase in noise.
Therefore, we disclaim any liability for the aforementioned.
Use the shortest possible exhaust duct. Use exhaust ducts with the fewest number of bends (maximum bend angle: 90°). Avoid sharp changes in the cross-section of the exhaust duct.

Recirculation version
The extracted air is purified and deodorized and then returned to the room. For this purpose, you must install a preliminary filter system with activated carbon.
The distance from the hood to the cooking surface must be at least 45 cm for electric hobs and 65 cm for gas and combined hobs.
It is necessary to take into account the distances specified in the installation instructions for the gas hob.
Before installation, drill 6 holes (8 mm diameter, 40 mm deep) at the locations indicated on the template to secure the hood and the anti-return valve. After installation, check that the hood and valve are securely fastened.
The hood is intended for installation above a surface that has no more than 6 heated elements.

Electrical connection
The voltage in the electrical network must correspond to the characteristics indicated on the rating plate located inside the hood. If the hood is supplied with a plug for the electrical network, connect the hood to a socket that corresponds to the current standards and is located in an accessible place so that installation can be carried out. If the hood is not supplied with a plug (without plug for the electrical network) or the socket is not in an accessible place, even after installation, then it is necessary to install a reliable two-pole switch that ensures complete disconnection from the network under conditions of overvoltage category III, in full compliance with the installation rules.

WARNING!
Before connecting the hood to the electrical network again, check the correctness of the work, making sure that the network control device has been installed correctly.
Warning! Electrical replacement must be carried out by authorized service technicians.
Installation
Before installation:
- Check the dimensions of the purchased hood according to the chosen installation location. Remove the filter/grease filter if present (it is also a suitable filter). The filter will be reinstalled after you finish using the hood.
- Check that the inside of the hood is not clogged with objects, packaging materials, or documents (labels, packages with screws, warranty cards, etc.). If there are any, remove them and keep them.
The hood kit includes screws for fixing, designed for most types of walls/ceilings. However, it is necessary to contact a qualified technician to check the suitability of the materials depending on the type of wall or ceiling. The wall/ceiling must be strong enough to support the weight of the hood.
Functioning
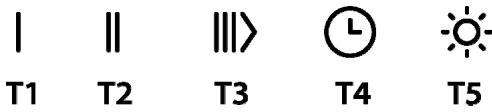
First speed (T1)
Press T1 to turn on the first speed. The corresponding function indicator lights up with a steady light. Press T1 again to turn off the hood.
Second speed (T2)
Press T2 to turn on the second speed. The corresponding function indicator lights up with a steady light. Press T2 again to turn off the hood.
Third speed and BOOSTER (T3)
With the hood turned on, and with the first or second speed activated, you can turn on the third speed by pressing the T3 button, and the corresponding indicator will light up with a steady light.
Pressing the T3 button again activates the booster. The booster can be turned on only after the third speed has been turned on. When the booster is on, the T3 button indicator flashes. During booster operation, you can switch to the first or second speed by pressing the corresponding speed button T1 or T2; the booster is deactivated, and the selected speed turns on. To turn off the hood while the booster is on, press the T3 button again.
After 5 minutes of booster operation, it turns off automatically, and the hood returns to the third speed.
Timer (T4)
The timer can be turned on when the first, second, or third speed is on. When this function is activated, the Timer (T4) indicator and the indicator of the selected speed (T1/T2/T3) will light up with a steady light.
The timer duration depends on the selected speed: First speed T1 = duration 20 minutes; Second speed T2 = duration 15 minutes.
Third speed: T3 = duration 10 minutes. It is impossible to turn on the timer while the booster is working. After the timer ends, the hood turns off. When one of the speeds is working with the timer, you can switch to another speed by pressing the button of the desired speed. This operation deactivates the timer.
When one of the speeds is working with the timer, you can turn off the timer by pressing the T4 button, or by pressing the button of any other speed that is not turned on. To turn off the hood, press again the button of the speed to which the timer was applied.
Lighting (T5)
The device can be switched on at any time by pressing the T5 button. To disable this function, press and hold the button for 5 seconds.
Button functions
Turning the filter indicators on and off can also be done with the cap closed. To do this, press and hold the T1 button for 3 seconds. The procedure is as follows:
- The pre-filter indicator (T2) lights up, i.e., it is on; -The deodorizing filter indicator (T3) does not light up, i.e., it is off.
T2 turns the pre-filter indicator on/off. T3 turns the deodorizing filter indicator on/off. To exit this mode, press and hold the T1 button or wait 10 seconds.
Resetting the filter status
After a certain interval, the cap will signal the need for filter maintenance:
-Pre-filter: every 40 hours -Deodorizing filter: every 160 hours.
In such cases, with the cap closed, when the user presses any button, the device will signal for 10 seconds about the two necessary operations:
- T1+T2 pulse: maintenance of the pre-filter;
- T1+T3 pulse: maintenance of the deodorizing filter.
Within 10 seconds, you can reset the pre-filter indicator by pressing T1+T2 and the deodorizing filter indicator by pressing T1+T3. After performing this reset, the combination of these buttons will be disabled. The device will return to normal operation.
Note: During these 10 seconds, the cap will operate normally, but there will be no visual feedback on the buttons for switching on the device. If no button is pressed during these 10 seconds, the device will stop pulsing and return to normal visual feedback mode.
Cleaning
Cleaning
Do not use special detergent, apply with a neutral detergent. Do not use agents or instruments for cleaning!
Do not use abrasive materials. Do not use alcohol!
The timer (T4) is used to set the delay time for the burner to turn off after the main burner is turned off.
Timer (T4)
The first, second and third burners, as well as the timer, can be turned on. 1. The function of the timer (T4) and the main burner (T1/T2/T3) can be turned on simultaneously.
The timer setting can be adjusted as follows:
First burner T1 = set to 20'.
Second burner T2 = set to 15'.
Third burner T3 = set to 10'.
The timer can be turned on after the burner is turned on.
After the set time has elapsed, the burner will turn off. When the timer mode is set, the burner will turn off automatically after the set time, and the timer will turn off.
When the timer mode is set, the timer T4 or another burner can be turned on. The burner will turn off automatically after the set time.
Clock (T5)
The T5 clock can be set to turn on the burner at a set time. The function can be turned on after the burner is turned on.
Setting the clock
The water indicator light (T2) should be on, and the water heater should be off. The control measurement for the T2+T3 mode is carried out first, then the measurement for T1 is carried out. The following parameters:
- The water indicator light (T2) is on, and the heater is off;
- The water indicator light (T3) is off, and the heater is off.
T2 mode: water indicator light on/off. T3 mode: water indicator light off/on. For measurement, first press T1 or the mode button for 10 minutes. Wait
Water supply reset
To perform technical maintenance on the water heater within the specified intervals, the signal indicator is used:
- Water heater: every 40 days
- Water heater: every 160 days.
In this case, the water heater is turned off, and the mode button is pressed. The interval is 10 minutes. The signal indicator will be:
- If T1+T2 is pressed: technical maintenance on the water heater is required;
- If T1+T3 is pressed: technical maintenance on the water heater is required.
Within 10 minutes, the water heater can be reset by pressing T1+T2, and the water heater can be reset by pressing T1+T3. After reset, the mode combinations are pressed twice. The interval is set by the system.
Calculate:
The water heater's 10-minute interval is set by the system, but the actual time may be longer. If the 10-minute interval is not observed, the reset will be performed at the next interval.
Technical maintenance required
Taaanay yuH IN TEK 6eITapan JyFbIi 3aTne H cyNaHf anpnaHbI Wy6epeKTI naDanaHbIbI. KYPbIINbIbHbI HEMECA T3AJAY KYPALBIIH PAIDANAHAeBAHbI3!
A6pa3nIbIK Kocnacbl 6ap 3aTbI naJaIaNbHaIbI3.
CINPTTI PAIDAJIAHEAHbI3!
MaCy3rici
11-cyper
Ac daibHdaydafbi MaJ 6eIweKeTpIn yctan kanaDbI.
Финьтдя ai caibH arpeccnbTi eMec xyfbl 3aTapMeH, KONMeH HEmece bIbICXyfblMaunHaDa, TEmeH Temnepatypada, yHemdi Ta3anlay Tapti6iHne Jyy KepeK.
bldbicxyfbl mawinada jybyfah Mm yctaTbH pfnbTp Tycci3deHyi MyMKiH, bipak OdaohbIH cy3riu kacneti MyIpe e3repicc3 kaanda.
MaCyricin anbIn Tactay ywiH cepinneni 6ocaty TyTkacbH TaTbIHbl3
Kemip cy3i1w (TEK cy3ri-copfb1w TypiHde)
Ac nicipren Ke3eJxapamcbI3 niCTi yctan kaanaJI. DeHreNEK Kemip cyarici
Ko3fantkbIbTHiKaIaNbI DeHreIerHHTopaNbHa 6ipeyIH opatbIbI3, cTeTIN oJapDbI caFtTinEM 6paHbI3.
Any yuii onapdbicafat tinihe kepi bia.
Kemipni pntbtpdn Kahtybl y3ak naaandahy mep3imHi, kblcKa Hemece y3ak eTyIe baihaibctbl 60ana,b, on ac ydiH typ MeH MaNbIy cTaNtBih pNtbpIy cTaNfah MEP3imDnIK Ta3anayMe n anbIH ana anbIKtaanabI. KaHda Jaaadn 60na Da, KaptndXki KEM derenhe 4 aHa dbip tet ayblCTbIpbHbI3.
Kemipni fuiNbTpdi Jyyf a 60ImaIdbI JxHe de perepehueHaJapamCbI3.
12a-cyper
XybuIaTbIH KEmipJIΦnIbTp.
Kemip fniltbpih eki aai caih (Hemece pfnlbtpdi Ka hbiKbipy typanbxa6abpay kyneci -erep ci3iH moedini3de opnatbifan 60nca -ocihdai kackeTTinikTI xa6apnaca) bCTbIK cyda xHe TnicT jyky kpaIaDapbIMeh, Hemece 65°C TEMpepatypada bIDIC KYfblMaunHaJa Kyyfa 60ana (bepinre Hxafdai TaToJIb, bIdbcB3kyy LcKiIN opbIHay kaket).
Ohu valjatombega version
Birinci hiz T1 = sure 20'
Ikinci hiz T2 = sure 15'.
Ucuncu hiz: T3 = sure 10'.
ailllll llll lllllllllll
4
10 10 10 10 10 10 10 10 10 10 10 10 10 10 10 10 10 10 10 10 10 10 10
aegssjglgeyess
1 Ⅱ Ⅲ> L
T1 T2 T3 T4 T5
(T1) aJy 4e J aualal oia jsi Ioc .jly ic Jull Jaiil T1 6 laiial le jua Jaiin. Jiy Sollya Jiyu Jiuill Led ay Jiais blalil alby T jll
(T3)-BOOSTER
LED

- 1.
ylo 1000
(1) | x - 2| = 1 or | x - 4| = 1
aillj 2
- 1.
The minimum value of a i aai is k.
pili
Jaaill gill aolllg ailll aall
blueill abilgol Sojol jol
Electrical and Electronic Equipment (WEEE)
paaii iinll 1s
aall aill gle alalall aull glll no aol




- EN - INSTRUCTION ON MOUNTING AND USE
- CAUTION
- WARNING
- USE
- EXTRACTION VERSION
- FILTRATION VERSION
- INSTALLATION
- ELECTRICAL CONNECTION
- MOUNTING
- BEFORE BEGINNING INSTALLATION
- OPERATION
- FIRST SPEED (T1)
- SECOND SPEED (T2)
- THIRD SPEED AND BOOSTER (T3)
- TIMER (T4)
- LIGHT (T5)
- FILTER SETTING
- FILTER RESET
- MAINTENANCE
- CLEANING
- GREASE FILTER
- CHARCOAL FILTER (FILTER VERSION ONLY)
- FIG. 12A
- WASHABLE ACTIVATED CHARCOAL FILTER
- FIG. 12B
- REPLACING LAMPS
- LIGHTING (T5)
- RESET
- BEFORE STARTING INSTALLATION
- USING THE RECIRCULATION MODE
- ATTENTION
- USE OF THE HOOD
- AIR
- FILTER SETTINGS
- RESETTING THE FILTERS
- CARBON FILTER (ONLY IN RECOMMENDED MODELS)
- WARNINGS
- SAFETY
- RECIRCULATION VERSION
- BEFORE INSTALLATION
- FUNCTIONING
- BUTTON FUNCTIONS
- RESETTING THE FILTER STATUS
- CLOCK (T5)
- SETTING THE CLOCK
- WATER SUPPLY RESET
- TECHNICAL MAINTENANCE REQUIRED
- MACY3RICI
- CYPER
- KEMIP CY3I1W (TEK CY3RI-COPFB1W TYPIHDE)
- XYBUIATBIH KEMIPJIΦNIBTP
- OHU VALJATOMBEGA VERSION
Brand : ELICA
Model : SHY S BL/A/60
Category : Slanted hood