USER MANUAL DS930 SCHEPPACH
Explanation of symbols used on the device
| Read the operating instructions to reduce the risk of inquiry |
| Wear safety goggles! |
| Wear ear-muffs! |
| Wear a breathing mask! |
| Protection class II |
Table of contents:
Page:
- Introduction 18
- Intended use 18
- Technical Data 19
- General safety notes for power tools 19
- Tool description 22
- Before start-up 22
- Operation 23
- Maintenance 23
- Disposal and recycling 24
1. Introduction
Manufacturer:
scheppach
We hope your new tool brings you much enjoyment and success.
Note:
According to the applicable product liability laws, the manufacturer of the device does not assume liability for damages to the product or damages caused by the product that occurs due to:
- Improper handling,
- Non-compliance of the operating instructions,
- Repairs by third parties, not by authorized service technicians,
- Installation and replacement of non-original spare parts,
- Application other than specified,
- A breakdown of the electrical system that occurs due to the non-compliance of the electric regulations and VDE regulations 0100, DIN 57113 / VDE0113.
We recommend:
Read through the complete text in the operating instructions before installing and commissioning the device.
The operating instructions are intended to help the user to become familiar with the machine and take advantage of its application possibilities in accordance with the recommendations.
The operating instructions contain important information on how to operate the machine safely, professionally and economically, how to avoid danger, costly repairs, reduce downtimes and how to increase reliability and service life of the machine.
In addition to the safety regulations in the operating instructions, you have to meet the applicable regulations that apply for the operation of the machine in your country.
Keep the operating instructions package with the machine at all times and store it in a plastic cover to protect it from dirt and moisture. Read the instruction manual each time before operating the machine and carefully follow its information. The machine can only be operated by persons who were instructed concerning the operation of the machine and who are informed about the associated dangers. The minimum age requirement must be complied with.
In addition to the safety requirements in these operating instructions and your country's applicable regulations, you should observe the generally recognized technical rules concerning the operation of woodworking machines.
Unpacking
- Open the packaging and remove the device carefully.
- Remove the packaging material as well as the packaging and transport bracing (if available).
- Check that the delivery is complete.
- Check the device and accessory parts for transport damage.
- If possible, store the packaging until the warranty period has expired.
ATTENTION
The device and packaging materials are not toys! Children must not be allowed to play with plastic bags, film and small parts! There is a risk of swallowing and suffocation!
2. Intended use
The intended use of this power tool is the sanding of large areas of drywalls as a preparation before painting or wallpapering using suitable abrasive sheets.
This power tool is neither suited for the preparation of small areas, corners and edges, nor for the removal of wallpaper and the grinding of ceilings and wet grinding.
Do not use the power tool for cutting or roughing or polishing. Do not use it together with wire brushes. Do not treat asbestos containing materials with this power tool.
Please note that our equipment has not been designed for use in commercial, trade or industrial applications. Our warranty will be voided if the machine is used in commercial, trade or industrial businesses or for equivalent purposes.
3. Technical Data
| Nominal voltage: | 230 V |
| Nominal frequency: | 50 Hz |
| Power consumption: | 710 W |
| Nominal speed | 1200 - 2500 min-1 |
| Oscillation rate: | 3500 - 7500 min-1 |
| Grinding disc •: | Ø 210 mm |
| Grinding disc ▲: | 280 x 280 x 280 mm |
| Abrasive paper •: | Ø 215 mm |
| Abrasive paper ▲: | 282 x 282 x 282 mm |
| Protection class: | II |
| Weight.: | 4,5 kg |
Danger!
Sound and vibration
Sound and vibration values were measured in accordance with EN 60745.
| LpA sound pressure level | 91.2 dB(A) |
| Kuncertainty | 3 dB(A) |
| LwA sound power level | 102l2 dB(A) |
| Kuncertainty | 3 dB(A) |
Wear ear-muffs.
The impact of noise can cause damage to hearing.
Total vibration values (vector sum of three directions) determined in accordance with EN 60745.
Main handle
$$
a _ {h} = 2. 0 0 \mathrm {m} / \mathrm {s} ^ {2}, K = 1. 5 \mathrm {m} / \mathrm {s} ^ {2}
$$
Additional handle
$$
a _ {h} = 1. 8 6 \mathrm {m} / \mathrm {s} ^ {2}, K = 1. 5 \mathrm {m} / \mathrm {s} ^ {2}
$$
The specified vibration value was established in accordance with a standardized testing method. It may change according to how the electric equipment is used and may exceed the specified value in exceptional circumstances.
The specified vibration value can be used to compare the equipment with other electric power tools.
The specified vibration value can be used for initial assessment of a harmful effect.
Keep the noise emissions and vibrations to a minimum.
Warning! Read all safety notes and instructions! Non-compliance with safety notes and instructions may result in electric shock, fire and/or severe injury! Store all safety notes and instructions for the future.
The term „power tool“ used in the safety notes refers to power tools connected to the mains (with a power cable) or operated with a battery (without a power cable).
Workplace safety
a.) Keep your workplace clean and wellluminated. Disorderliness and poorlyluminated workplaces may lead to accidents.
b.) Do not operate the power tool in explosive atmospheres with inflammable liquids, gases or dust. Power tools generate sparks which may ignite dust or vapours.
c.) Keep children and other persons away from the power tool during operation. You may lose control of the tool if you are distracted.
Electric safety
d.) The plug of the power tool must fit into the socket. Do not modify the plug in any way. Do not use adapter plugs together with grounded power tools. Unmodified plugs and matching sockets reduce the risk of electric shock.
e.) Avoid body contact with grounded surfaces such as pipes, radiators, ovens and refrigerators. There is an increased risk of electric shock if your body is grounded.
f.) Keep power tools away from rain or humidity. Water permeation into the power tool will increase the risk of electric shock.
g.) Use the cable solely for its intended purpose. Do not use the cable to carry or hang up the power tool or to pull out the plug from the socket. Keep the cable away from heat, oil, sharp edges or moving machine parts. Damaged or twisted cables increase the risk of electric shock.
h.) When working outdoors with power tools, only use extension cords which are suited for outdoor areas. Using extension cords suited for outdoor applications reduces the risk of electric shock.
i.) If the operation of power tools in a humid environment cannot be avoided, you must use a residual current circuit breaker. The use of a residual current circuit breaker will reduce the risk of electric shock.
Personal safety
a.) Pay attention to what you are doing and use power tools sensibly. Do not use power tools when you are tired or under the influence of drugs, alcohol or medication. A single moment of inattention while using power tools may cause severe injury.
b.) Wear personal protective equipment and safety goggles. Wearing personal protective equipment such as a dust mask, non-skid safety boots, a protective helmet or hearing protection according to the type and application of the power tool reduces the risk of injury.
c.) Avoid starting the power tool unintentionally. Make sure that the power tool is switched off before you connect it to the mains and/or insert a battery, pick it up or carry it. If you have your finger on the switch when you carry the power tool, or if the machine is switched on when you connect it to the mains, this may result in accidents.
d.) Remove adjustment tools or wrenches before switching on the power tool. Tools or wrenches in rotating machine parts may cause injury.
e.) Avoid abnormal body positions. Stand securely and keep your balance at all times. By doing so, you can control the power tool more easily in unexpected Situations.
f.) Wear suitable clothing. Do not wear loose clothing or jewellery. Keep your hair, clothing and gloves away from moving parts. Loose clothing, jewellery or long hair may be trapped in moving parts.
g.) If dust extraction tools or collection bins can optionally be attached, you must make sure that they are connected and correctly used. Using dust extraction tools may reduce risks caused by dust.
a.) Do not overload the tool. Use the appropriate power tool for your type of work. With appropriate power tools, you can work better and more safely within the given power range.
b.) Do not use power tools with defective switches. Power tools which cannot be switched on or off are dangerous and must be repaired.
c.) Pull out the plug from the socket and/or remove the battery before you make settings to the tool, replace accessory parts or put aside the power tool. These precautionary measures will prevent the power tool from starting unintentionally.
d.) Keep power tools which are not in use away from children. Only persons who are familiar with the power tool and who have read the operating instructions may use the power tool. Power tools are dangerous if used by inexperienced persons.
e.) Maintain power tools with care. Check moving parts for proper function and smooth running, and check whether there are parts which are broken or damaged to the extent that the functionality of the power tool is impaired. Have damaged parts repaired before using the power tool. Many accidents are caused by poorly-maintained power tools.
f.) Keep cutting tools sharp and clean. Carefully maintained cutting tools with sharp edges are less likely to jam and can be guided more easily.
g.) Use power tools, accessory parts, insertion tools, etc. in compliance with these instructions. Take into account the working conditions and the activity which is to be carried out. Using power tools for applications other than those intended may cause dangerous Situations.
Warning! This electric tool generates an electromagnetic field during operation. This field can impair active or passive medical implants under certain conditions. In order to prevent the risk of serious or deadly injuries, we recommend that persons with medical implants consult with their physician and the manufacturer of the medical implant prior to operating the electric tool.
Service
a.) Have your power tool repaired by qualified specialists only, and always use original spare parts for repair. This is to maintain the safety of the power tool.
a.) This machine is designed for sanding. Please read all of the safety information, instructions, illustrations and descriptions delivered with the machine. If the following instructions are not observed, this can result in an electric shock, fire and/or serious injury.
b.) Do not use this machine to perform work such as roughing, brushing, polishing or disc sanding. Performing tasks for which the machine is not designed can create hazards and lead to injury.
c.) Never use accessories that were not specially developed and intended for this machine. Just because an accessory part can be fitted on your machine does not guarantee danger-free operation.
d.) The permissible rotational speed of the accessory must be at least as high as the maximum speed specified on the machine. Accessories that rotate faster than the permissible level can rupture.
e.) The outside diameter and the thickness of accessories must be within the specified size range of the machine. Accessories with incorrect dimensions cannot be sufficiently protected or controlled.
f.) Threaded mounting of accessories must match the grinder spindle thread. For accessories mounted by flanges, the arbour hole of the accessory must fit the locating diameter of the flange. Accessories that do not match the mounting hardware of the power tool will run out of balance, vibrate excessively and may cause loss of control.
g.) Do not use damaged accessories. Before use, always check accessories such as sanding pads for nicks or cracks and check support plates for cracks and excessive wear. Every time the machine is dropped, check the machine and accessories for damage, or install undamaged accessories. Following the check and assembly of accessories, ensure that all persons are beyond the rotating range of the tool and run the machine for one minute at maximum speed. Damage accessories usually break completely during this test time.
h.) Wear personal protective equipment. Depending on the application, use a shield or protective goggles. If practical, wear a breathing mask, ear protectors, safety gloves and a work apron suitable to protect against impact or small sanding or workpiece parts. The protective goggles must be capable of blocking flying debris caused by the various work operations. The breathing mask or device must be capable of fiitering particles generated during work. Continuous exposure to loud noise can cause loss of hearing.
i.) Ensure that persons standing near the machine are at a safe distance from the work area. All persons in the work area must wear personal protective equipment. Parts of the workpiece or broken accessories can fly off and cause injury outside the immediate work area.
j.) Always hold the machine by the insulated handles if you intend to perform work that may pose a risk of cutting into hidden power cables or your own machine cable. Contact with live cables transfers an electric current to metallic machine components and causes electric shocks.
k.) Keep the power cable away from rotating parts. If you lose control, the power cable could be cut or become stuck and your hand or arm could be drawn into the rotating parts.
I.) Never set the machine down until the tool has stopped completely. Turning tools can catch on the storage surface, causing you to lose control of the machine.
m.) Never allow the machine to operate while carrying it at your side. The rotating tool can catch on your clothing by accident and cause serious cutting injuries.
n.) Clean the air vent slits on your machine on a regular basis. The cooling air fan sucks the dust into the machine and excessive deposits of metal dust can result in electrical hazards.
o.) Never operate the machine near combustible materials. Sparks can ignite these materials.
p.) Never use tools that have to be liquid-cooled. Water and other liquid coolants can cause potentially fatal electric shocks.
Cause and prevention of kickbacks
A kickback is a sudden reaction to jamming or catching of a rotating disc, a support plate, a brush or other accessory. Jamming or catching results in a rapid standstill of the rotating accessory, whereby, as a counter-reaction, an out-of-control machine is accelerated around the jamming point in a direction of rotation opposed to the accessory. If, for example, a sanding disc is jammed or caught by the workpiece, the disc circumference can dig into the workpiece surface at the jamming point, causing the disc to be expelled. The disc can either fly towards or away from the user, depending on the direction of rotation of the disc at the jamming point. This can also cause sanding discs to break. A kickback is the result of misuse of the machine and/or incorrect method of work or operation and can be avoided by closely observing the following precautionary measures.
a.) Always hold the machine firmly and position your body and arms such that you can control any kickback force. Always use the auxiliary handle, if included in the delivery, to ensure optimum control over kickbacks or reaction torques during start-up. The user can control reaction torques or kickbacks if suitable precautionary measures are taken.
b.) Never place your hands near rotating tools. Tools can kick back over your hand.
c.) Never position your body in the area in which the machine moves in the event of a kickback. A kickback accelerates the machine in the direction of rotation opposed to the disc at the jamming point.
d.) Take extra care when working in corners, on sharp edges, etc. Avoid kickbacks and prevent the tool from seizing. Corners, sharp edges or a jump back tend to cause the rotating tool to catch, thus leading to a loss of control or a kickback.
Special safety instructions for fine sanding
a.) Do not use excessively large sanding discs when fine sanding. Observe the specifications of the manufacturer when selecting abrasive discs. A sanding disc that is too large and protrudes over the sanding pad represents a cutting injury hazard and can cause catching, disc tears or kickbacks.
Additional warning notes
a.) Hold the machine firmly with both hands and assume a stable stance when performing work. Hold the machine with both hands to guide more securely.
b.) If potentially explosive or self-igniting dust is produced during sanding, the processing instructions of the material manufacturer must be observed under all circumstances.
c.) Harmful/toxic dusts can be produced during your work (e.g. lead-containing paint, some types of wood and metal). Contact with these dusts, especially inhaling them, can represent a hazard for operating personnel or persons in the vicinity. Comply with the safety regulations that apply in your country. Connect the electric power tool to a suitable extraction system. To protect your health, wear a P2 protective mask.
d.) Never use machines with a damaged cable. Do not touch damaged cables and pull the plug from the mains power supply if the cable becomes damaged during work. Damaged cables increase the risk of electric shock.
Residual risks
Even if you use this power tool in compliance with the regulations, there are still remaining risks. The following risks may occur due to the type and design of the power tool:
- Lung damage if no suitable protective dust mask is used.
- Damage to hearing if no suitable ear protection is used.
- Health damage caused by hand-arm vibrations if the equipment is used over a prolonged period or is not properly guided and maintained.
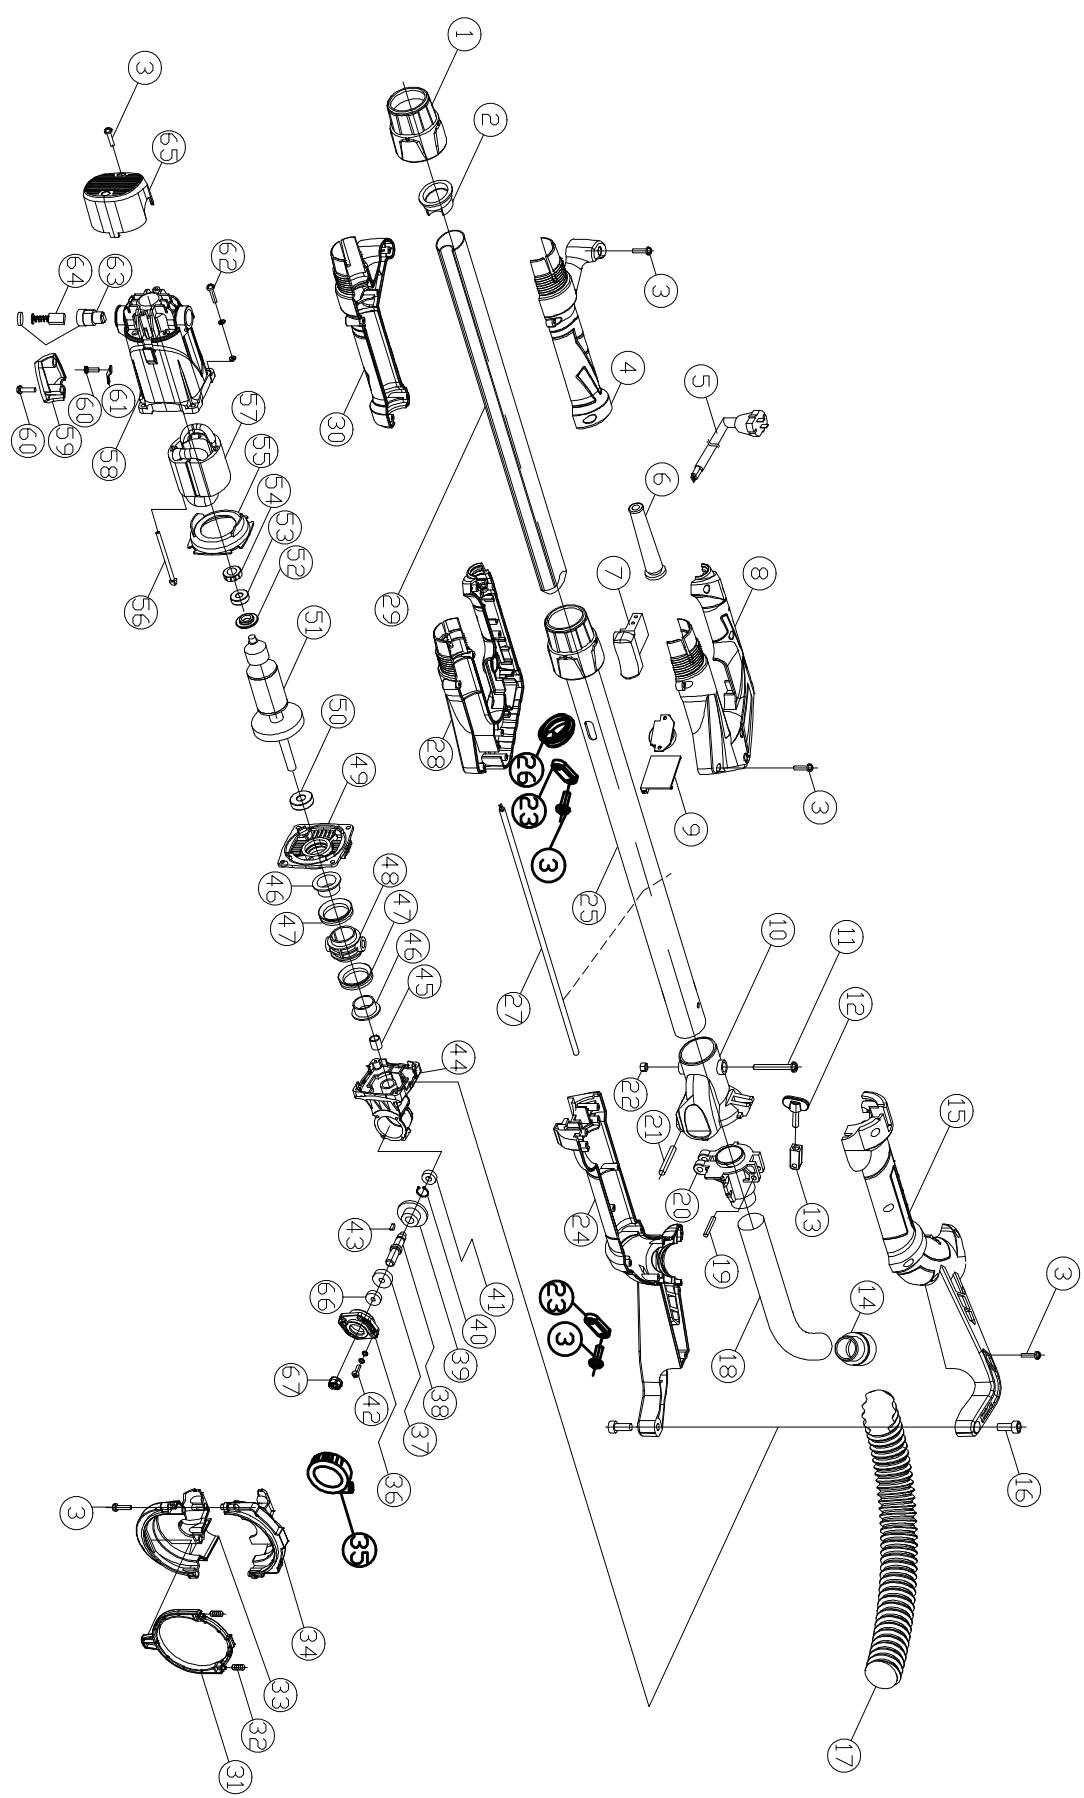
- Handle surface
- LED-Light
- Adjustment wheel for speed pre-selection
- On/off switch
- Main handle
- Adapter with connecting nut
- Hose adapter
-
Extraction hose
-
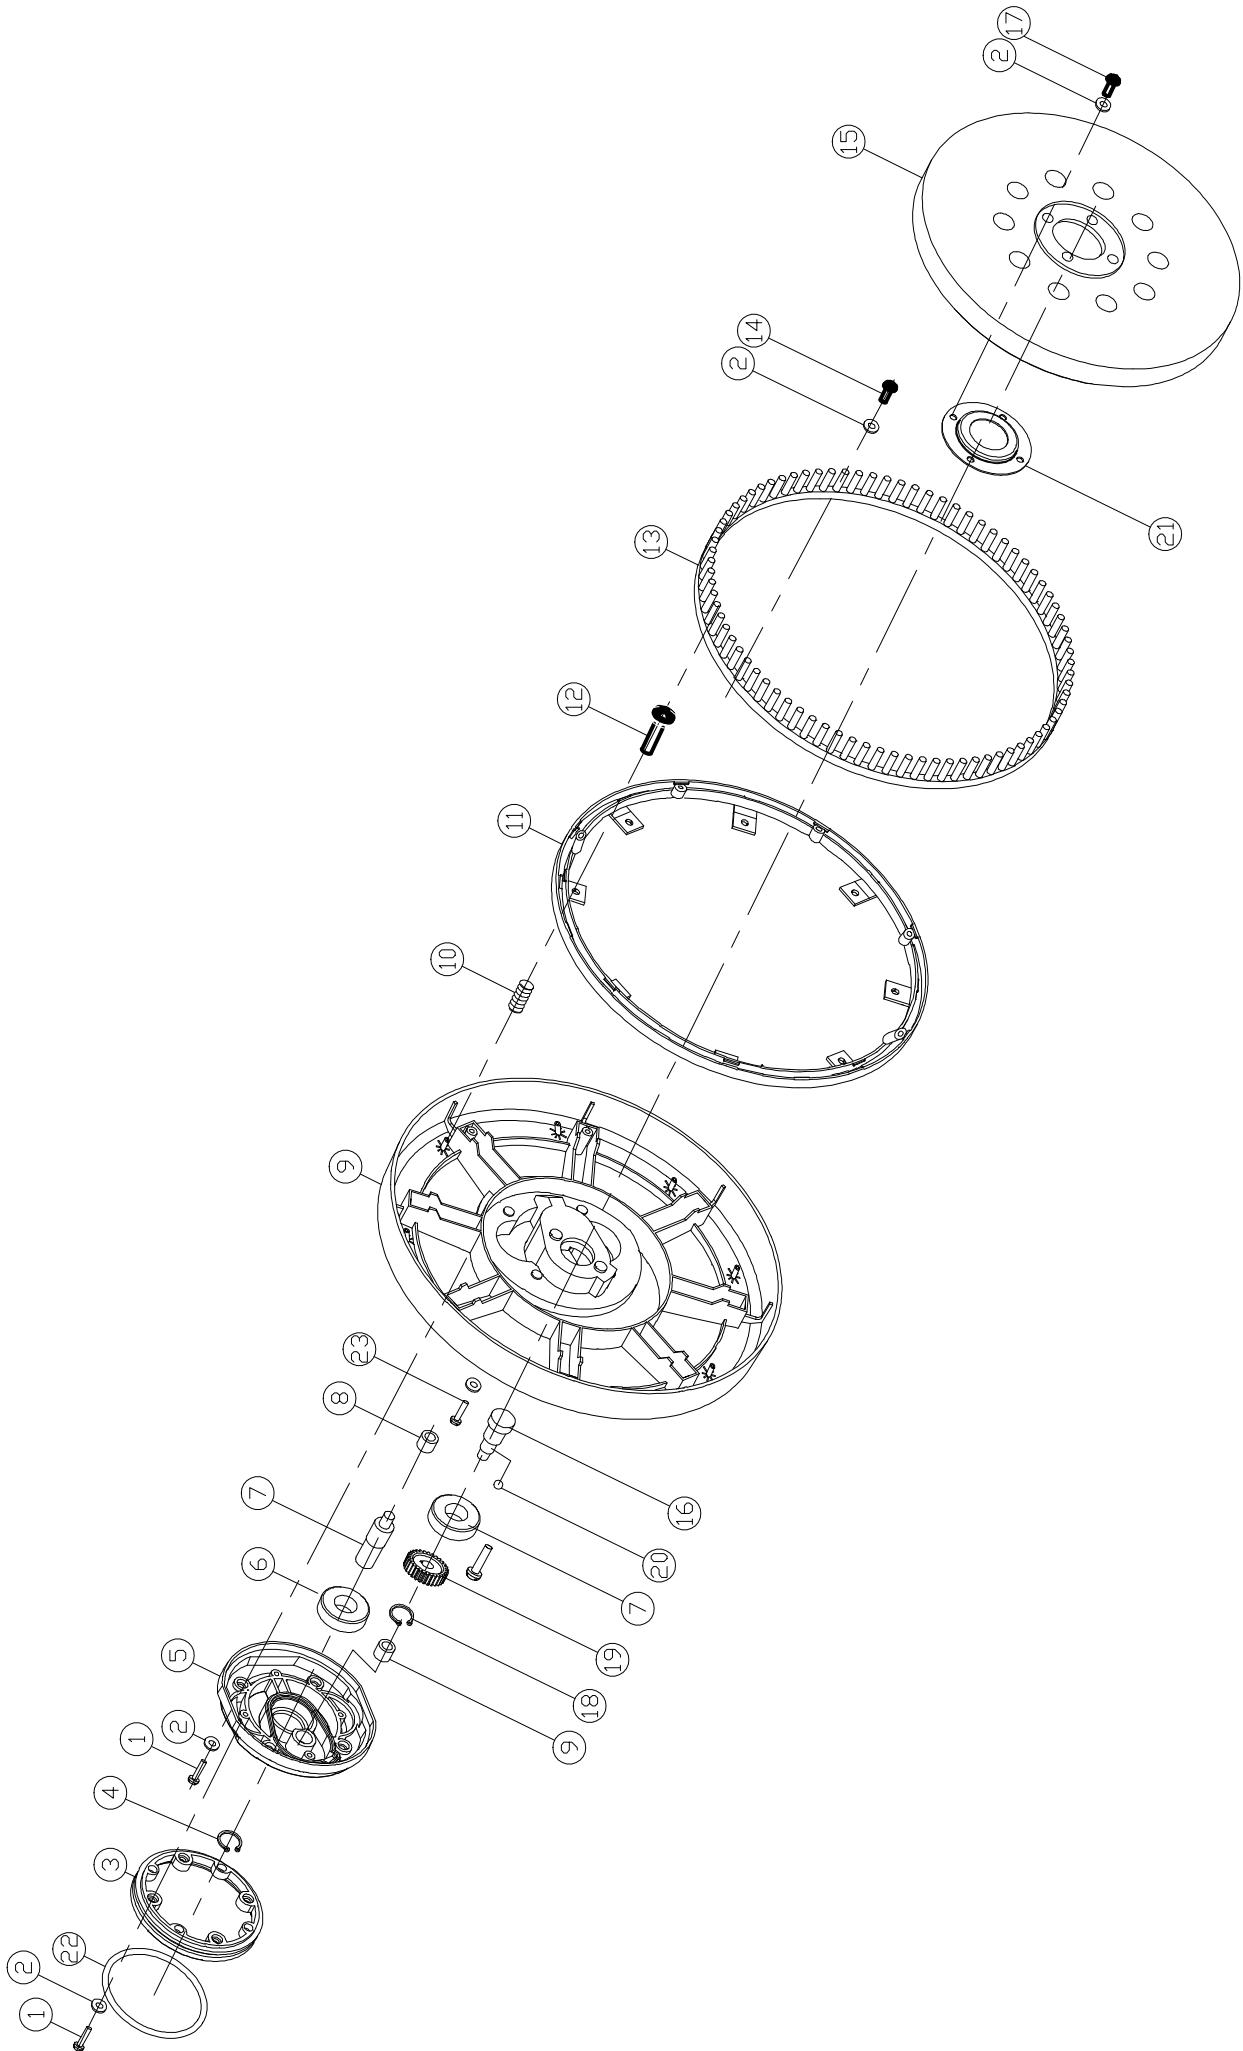
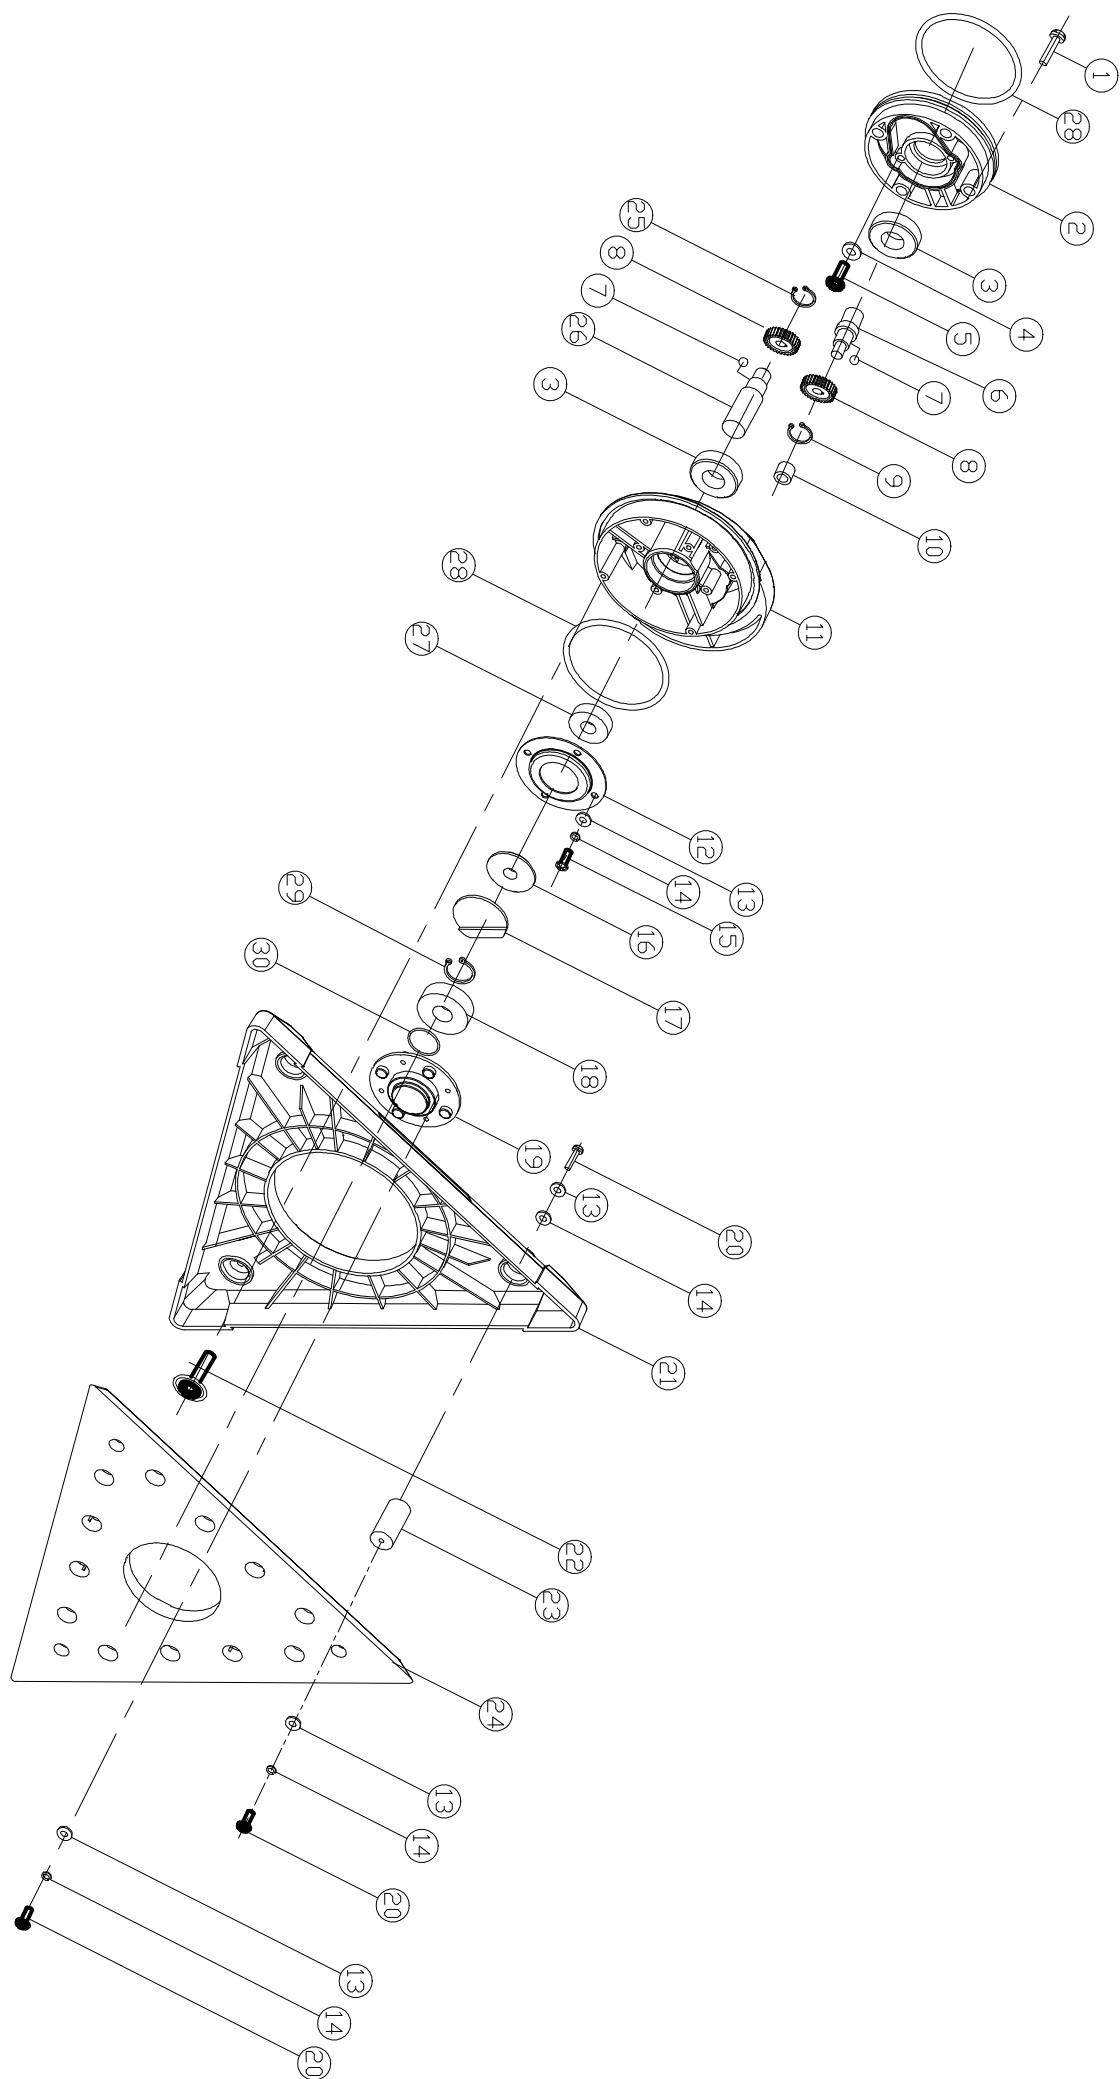
Triangular velcro sanding plate with extraction holes
- Round velcro sanding plate with extraction holes
- Triangular sanding head
- Round sanding head
6. Before start-up
Installation
- Fold the front and back part together (Fig. 2). And then tighten the screw nut. (Fig. 3).
- The longest length installation Insert the additional handle to the end of the machine. And then turn the screw nut on the end of the machine for tightening. (Fig. 4)
Sandpaper
Selection
- The grain size of the sandpaper is specified on its rear side. The smaller the specified number, the coarser the graining.
- Use sandpaper with coarse grain for rough grinding, and sandpaper with fine grain for finishing. We recommend sandpapers with aluminium oxide, silicon carbide or other synthetic abrasives.
- If you can chose between sandpapers with different graining, you should start with coarsegraining sandpaper and complete the grinding process with the finest possible graining. Thus you will get good and smooth grinding results.
How to apply and replace sandpaper
Apply the sandpaper to the grinding plate using the Velcro strip mechanism.
- Align the sandpaper with the grinding plate and press it on evenly.
- Pull the sandpaper off the grinding plate and replace it with a new one I another one (Fig. 5).
3.
WARNING! Harmfull noxious gases may be generated when e.g. lead-containing paint is processed. These gases entail a risk for the operator and the persons in the vicinity!
Therefore only use the power tool in combination with a dust extraction unit, and protect yourself and other persons in the working area with additional suitable personal protective equipment!
When working with this power tool, a lot of dust is generated. The dust extraction unit is very useful if you want to keep your workplace clean. It is possible to combine the extraction system or a vacuum cleaner with the extraction hose (8) which is connected to the adapter for dust extraction.
- Connect the dust extraction adapter with a suitable dust extraction unit such as a vacuum cleaner (Fig. 6-8).
Note: Make sure that the vacuum cleaner is suitable for being used together with a power tool.
Connection to the power supply
- Make sure that the power tool is switched off. Always switch the on/off switch (4) to off position before connecting the power tool to the power supply.
- Plug the power plug into a correctly installed socket which camplies with the requirements specified in the technical data.
- Your power tool is now ready for operation.
7. Operation
Oscillation rate
Before you start working with the swing speed to match the appliance. Use a low swing speed for coarse grinding, increase the oscillation rate for fine work.
- Rotate the adjustment wheel (6) to adjust the oscillation rate. Turn the wheel clockwise to reduce the oscillation rate (Fig. 9).
- Turn the wheel counter-clockwise to increase the oscillation rate (Fig. 10).
Switching on/off
To switch on:
Push the on/off switch (4)
Continuous operation: (Fig. 11)
Secure the on/off switch (4) with the leeking button (A)
To switch off:
Press the on/off switch (4) briefly.
Note: The insertion tool moves for a short while after having it switched off. Do not put aside the power tool until the insertion tool has come to a complete halt.
Grinding
- Attach an appropriate abrasive sheet and select the corresponding speed.
- Hold the power tool securely at the handle surfaces (1, 5) and switch it on as described.
- Wait until the insertion tool has reached its full operating speed.
- Apply some pressure to the grinding head (11/12) such that the insertion tool touches the surface to be processed.
- Constantly move the power tool over the surface.
Note: If you want to avoid irregular grinding results, do not keep the power tool at one spot for too long.
-
Lift the grinding plate from the surface to be processed before switching off the power tool.
-
Do not put aside the power tool until the insertion tool has come to a complete halt.
Attaching/changing the sanding head (Fig. 12/13)
Before performing any work on the electric power tool, pull out the main plug.
To attach:
- Press the lock button on the side of the tool;
- Put the tool on the sanding head and rotate to get the correct position
- Release the lock button to engage.
To change: Press the lock button on the tool change head and remove sanding head. The triangular sanding head is attached/changed in the same way. When attaching the tool change head, ensure that the locks engage correctly.
8. Maintenance
Warning! Prior to any adjustment, maintenance or service work disconnect the mains power plug!
General maintenance measures
- Keep all safety devices, air vents and the motor housing free of dirt and dust as far as possible. Wipe the equipment with a clean cloth or blow it down with compressed air at low pressure.
- We recommend that you clean the equipment immediately after you use it.
- Clean the equipment regularly with a damp cloth and some soft soap. Do not use cleaning agents or solvents; these may be aggressive to the plastic parts in the equipment. Ensure that no water can get into the interior of the equipment.
Brush inspection
In case of excessive sparking, have the carbon brushes checked only by a qualified electrician. Important. The carbon brushes should not be replaced by anyone but a qualified electrician.
Please note that the following parts of this product are subject to normal or natural wear and that the following parts are therefore also required for use as consumables.
Wear parts*: Carbon brushes, sanding pad, brush head, sandpaper
- Not necessarily included in the scope of delivery!
Storage
Store the device and its accessories in a dark, dry and frost-proof place that is inaccessible to children.
The optimum storage temperature is between 5 and 30^ .
Store the electrical tool in its original packaging.
Cover the electrical tool in order to protect it from dust and moisture.
Store the operating manual with the electrical tool.
9. Disposal and recycling
The equipment is supplied in packaging to prevent it from being damaged in transit. The raw materials in this packaging can be reused or recycled. The equipment and its accessories are made of various types of material, such as metal and plastic. Defective components must be disposed of as special waste. Ask your dealer or your local council.
Old devices must not be disposed of with household waste!

This symbol indicates that this product must not be disposed of together with domestic waste in compliance with the Directive (2012/19/EU) pertaining to waste electrical
and electronic equipment (WEEE). This product must be disposed of at a designated collection point. This can occur, for example, by handing it in at an authorised collecting point for the recycling of waste electrical and electronic equipment. Improper handling of waste equipment may have negative consequences for the environment and human health due to potentially hazardous substances that are often contained in electrical and electronic equipment. By properly disposing of this product, you are also contributing to the effective use of natural resources. You can obtain information on collection points for waste equipment from your municipal administration, public waste disposal authority, an authorised body for the disposal of waste electrical and electronic equipment or your waste disposal company.
Dal'si varovnePokyny
| 2000/14/EC_2005/88/EC |
| Annex V |
| Annex VI
Noise: measured LWA = xx dB(A); guaranteed LWA = xx dB(A)
P = xx KW; L/Ø = cm
Notified Body:
Notified Body No.: |
| 2010/26/EC |
| Emission. No: |
X 2006/42/EC
Annex IV
Notified Body:
Notified Body No.:
Certificate No.:
Standard references:
EN 60745-1; EN 60745-2-3; EN 60745-2-4; EN 55014-1; EN 55014-2; EN 61000-3-2; EN 61000-3-3
This declaration of conformity is issued under the sole responsibility of the manufacturer.
The object of the declaration described above fulfils the regulations of the directive 2011/65/EU of the European Parliament and Council from 8th June 2011, on the restriction of the use of certain hazardous substances in electrical and electronic equipment.
Subject to change without notice
Documents registrar: Georg Kohler
Günzburger Str. 69, D-89335 Ichenhausen
Garantie DE
Apparent defects must be notified within 8 days from the receipt of the goods. Otherwise, the buyer's rights of claim due to such defects are invalidated. We guarantee for our machines in case of proper treatment for the time of the statutory warranty period from delivery in such a way that we replace any machine part free of charge which provably becomes unusable due to faulty material or defects of fabrication within such period of time.
With respect to parts not manufactured by us we only warrant insofar as we are entitled to warranty claims against the upstream suppliers. The costs for the installation of the new parts shall be borne by the buyer. The cancellation of sale or the reduction of purchase price as well as any other claims for damages shall be excluded.
Garantie FR