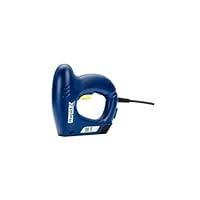
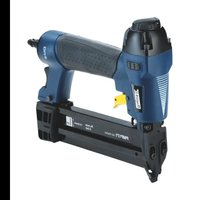
E-Tac/ES140 - Stapler RAPID - Free user manual and instructions
Find the device manual for free E-Tac/ES140 RAPID in PDF.



| Product type | Corded electric stapler |
| Brand | RAPID |
| Model | E-Tac/ES140 |
| Rated voltage | 220–240 V~, 50 Hz |
| Rated current | 1.8 A |
| Staple type | Rapid 140, lengths 6, 8, 10, 12, 14 mm |
| Nail type | Rapid T8/300, length 15 mm |
| Magazine capacity | 50 staples |
| Stapling speed | 20 strokes/min |
| Weight | 0.66 kg |
| Sound pressure level | LpA = 87.6 dB(A), LwA = 98.6 dB(A), uncertainty K = 3 dB(A) |
| Vibration level | 2.8 m/s², uncertainty K = 1.5 m/s² |
| Recommended hearing protection | Yes, wear hearing protection |
| Intended use | Wood or similar materials indoors |
| Power supply | Mains with cord |
| Maximum extension cord length | 25 m with 2.5 mm² cross section |
| Safety | On/off switch, safety fork, magazine lock |
| Maintenance | Clean with dry or damp cloth, do not oil/grease |
| Staple jam removal | Unplug, open magazine, remove staple with a needle |
| Disposal | Do not dispose with household waste, recycle at a collection center |
Frequently Asked Questions - E-Tac/ES140 RAPID
User questions about E-Tac/ES140 RAPID
0 question about this device. Answer the ones you know or ask your own.
Ask a new question about this device
Download the instructions for your Stapler in PDF format for free! Find your manual E-Tac/ES140 - RAPID and take your electronic device back in hand. On this page are published all the documents necessary for the use of your device. E-Tac/ES140 by RAPID.
USER MANUAL E-Tac/ES140 RAPID
WARNING! Read all safety warnings and all instructions. Failure to follow all instructions listed below may result in electric shock, fire and/or serious personal injury.
Save all warnings and instructions for future reference.
The term "power tool" in the warnings refers to your mains-operated (corded) power tool or battery-operated (cordless) power tool.
1) WORK AREA SAFETY
a) Keep your work area clean and well lit. Cluttered benches and dark areas invite accidents.
b) Do not operate power tools in explosive atmospheres, such as in the presence of flammable liquids, gases, or dust. Power tools create sparks which may ignite the dust or fumes.
c) Keep bystanders, children, and visitors away while operating a power tool. Distractions can cause you to lose control.
2) ELECTRICAL SAFETY
a) Power tool plugs must match the outlet. Never modify the plug in any way. Do not use any adapter plugs with earthed (grounded) power tools. Unmodified plugs and matching outlets will reduce risk of electric shock.
b) Avoid body contact with grounded surfaces such as pipes, radiators, ranges and refrigerators. There is an increased risk of electric shock if your body is grounded.
c) Do not expose power tools to rain or wet conditions. Water entering a power tool will increase the risk of electric shock.
d) Do not abuse the cord. Never use the cord for carrying, pulling or unplugging the power tool. Keep cord away from heat, oil, sharp edges or moving parts. Damaged or entangled cords increase the risk of electric shock.
e) When operating a power tool outdoors, use an extension cord suitable for outdoor use. Use of a cord suitable for outdoor use reduces the risk of electric shock.
f) If operating a power tool in a damp location is unavoidable, use a
ground fault circuit interrupter protected supply. Use of a ground fault circuit interrupter reduces the risk of electric shock.
3) PERSONAL SAFETY
a) Stay alert, watch what you are doing and use common sense when operating a power tool. Do not use a power tool while you are tired or under the influence of drugs, alcohol or medication. A moment of inattention while operating power tools may result in serious personal injury.
b) Use personal protective equipment. Always wear eye protection. Protective equipment such as dust mask, non-skid safety shoes, hard hat, or hearing protection used for appropriate conditions will reduce personal injuries.
c) Prevent unintentional starting. Ensure the switch is in the off-position before connecting to power source and/or battery pack, picking up or carrying the tool. Carrying power tools with your finger on the switch or energizing power tools that have the switch on invites accidents.
d) Remove any adjusting key or wrench before turning the power tool on. A wrench or a key left attached to a rotating part of the power tool may result in personal injury.
e) Do not overreach. Keep proper footing and balance at all times. This enables better control of the power tool in unexpected situations.
f) Dress properly. Do not wear loose clothing or jewellery. Keep your hair, clothing and gloves away from moving parts. Loose clothes, jewellery or long hair can be caught in moving parts.
g) If devices are provided for the connection of dust extraction and collection facilities, ensure these are connected and properly used. Use of dust collection can reduce dust-related hazards.
4) POWER TOOL USE AND CARE
a) Do not force the power tool. Use the correct power tool for your application. The correct power tool will do the job better and safer at the rate for which it was designed.
b) Do not use the power tool if the switch does not turn it on and off. Any power tool that cannot be controlled with the switch is dangerous and must be repaired.
c) Disconnect the plug from the power source and/or the battery pack from the power tool before making any adjustments, changing accessories, or storing power tools. Such preventive safety measures reduce the risk of starting the power tool accidentally.
d) Store idle power tools out of the reach of children and do not allow persons unfamiliar with the power tool or these instructions to operate
the power tool. Power tools are dangerous in the hands of untrained users.
e) Maintain power tools. Check for misalignment or binding of moving parts, breakage of parts and any other condition that may affect the power tool's operation. If damaged, have the power tool repaired before use. Many accidents are caused by poorly maintained power tools.
f) Keep cutting tools sharp and clean. Properly maintained cutting tools with sharp cutting edges are less likely to bind and are easier to control.
g) Use the power tool, accessories and tool bits etc. in accordance with these instructions, taking into account the working conditions and the work to be performed. Use of the power tool for operations different from those intended could result in a hazardous situation.
5) SERVICE
a) Have your power tool serviced by a qualified repair person using only identical replacement parts. This will ensure that the safety of the power tool is maintained.
TACKER SAFETY WARNINGS
Always assume that the tool contains fasteners. Careless handling of the tacker can result in unexpected firing of fasteners and personal injury.
Do not point the tool towards yourself or anyone nearby. Unexpected triggering will discharge the fastener causing an injury.
Do not actuate the tool unless the tool is placed firmly against the work piece. If the tool is not in contact with the work piece, the fastener may be deflected away from your target.
Disconnect the tool from the power source when the fastener jams in the tool. While removing a jammed fastener, the tracker may be accidentally activated if it is plugged in.
Use caution while removing a jammed fastener. The mechanism may be under compression and the fastener may be forcefully discharged while attempting to free a jammed condition.
Do not use this tacker for fastening electrical cables. It is not designed for electric cable installation and may damage the insulation of electric cables thereby causing electric shock or fire hazards.
TECHNICAL SPECIFICATION
| Model Number | E-tac |
| Voltage | 220–240 V~, 50Hz |
| Current | 1.8A |
| Brad Type, length | Rapid T8/300, 15 mm |
| Staple Type, length | Rapid 140 Staple 6, 8, 10, 12, 14 mm |
| Magazine Capacity | 50 pcs (65 mm) |
| Speed | 20 shots/min |
| Tool Weight | 0.66 kg |
NOISE EMISSION
A-weighted sound pressure level LpA=87.6 dB(A), uncertainty K=3 dB(A)
A-weighted sound power level LwA=98.6 dB(A), uncertainty K=3 dB(A)
Wear hearing protection.
VIBRATION
Vibration total value = 2.8m / s^2 uncertainty K = 1.5m / s^2
The declared vibration total value has been measured in accordance with a standard test method and may be used for comparing one tool with another
The declared vibration total value may also be used in a preliminary assessment of exposure
The vibration emission during actual use of the power tool can differ from the declared total value depending on the ways in which the tool is used.
ASSEMBLY
DEFINITIONS (FIGURE 1)
A Trigger Switch
B Power Cord
Magazine Latch
Staple output
On/Off Power Switch
F Safety Yoke
LOAD STAPLES/BRADS INTO THE MAGAZINE
- Turn off the power switch and unplug the tacker
- Hold tool upside down, squeeze latch and slide magazine open.
- Put staples or brads in magazine, legs facing upward and close magazine (Figure 2 or 3) Ensure brad strip stays upright in magazine. Use only recommended staples or brads
- Close magazine and make sure it is securely locked.
REMOVE STAPLES/BRADS FROM THE MAGAZINE
- Turn off the power switch and unplug the tacker
- Hold tool upside down, squeeze latch and pull out magazine.
- Remove the staples / brads from the magazine
- Close magazine.
OPERATION
STAPLING
- Plug stapler into a 220-240V\~, 50Hz power outlet.
- Turn on the power switch (Figure 4)
- Make sure the tool is in good working condition.
- Hold the tacker firmly with the staple output flat against the work piece to activate the safety yoke F.
- Squeeze trigger A to fire the tacker.
- To fire the tacker again release safety yoke and trigger then repeat step 4 and 5.
- Unplug tacker, turn off power switch after use.
NOTE: For better performance press the tool against the work piece (Figure 5)
NOTE: In case of jammed staple or brad, read the maintenance section.
DO NOT re-fire the tool in order to clear the jam as this may damage the tool.
NOTE: During operation, the tool may feel warm. This is normal but if the tool starts to feel hot use shall be discontinued until it cools down.
NOTE: The tacker should be used only for the intended purposes. It is designed for use on wood or similar materials in indoor environment
GUIDELINES FOR USING EXTENSION CORDS
Recommended Minimum Wire Area (mm^2) for Extension Cords
Up to 10m: 1,5 mm²
Up to-25m: 2,5mm²
Over 25m: not suitable
MAINTENANCE
STANDARD MAINTENANCE
- Unplug tacker before any maintenance
- Inspect all screws and tighten if necessary.
- Keep all vents free from dust and dirt
- Clean tool by a dry or damp cloth. NEVER use any solvent.
- Keep the magazine channel clean.
- DO NOT oil or grease any parts.
- Be sure the tacker is not damaged. Replace or repair prior to use.
CLEARING A JAMMED STAPLE / BRAD
- Turn off the power switch and unplug the tacker
- Hold tool upside down, squeeze latch and pull out magazine.
- Take out the loose staples / brads from the magazine
- Use a pin with sharp end to remove the jammed staples (Figure 6)
WARNING!!
DO NOT alter or parts on this tacker or attach special fixtures. This can lead to personal injury.
If the replacement of the supply cord is necessary this has to be done by a qualified service center in order to avoid a safety hazard.
ENVIRONMENT

Separate Collection. Do not dispose power tools into household wastel According to the European Directive 2012/19/EC on waste of electrical and electronic equipment
When the tool needs to be replaced, or if it is of no further use it should be brought to a separate collection centre for recycling
VEILIGHEIDSWAARSCHUWINGEN VOOR TACKERS
INDFOR HAEFTEKLAMMER/DYKKEREIMAGASINET
FJERN HAEFTEKLAMMER/DYKKERE FRA MAGASINET
FYLLE MAGASINET MED STIFTER/DYKKERTER
-
Slå av av/på-knappen og trekk ut ledningen på stiftemaskinen ut fra veggkontakten
-
Hold maskinen opp-ned, trykk pa lasen og skyv ut magasinet.
- Legg stifter erller dykkerter i magasinet med bena pekende opp, og lukt magasinet (Figur 2 erller 3). Pass pa at dykkertremsen star loddrett i magasinet. Bruk kun anbefalte stifter erller dykkernet.
- Lukk magasinet og kontroller at det er forsvarlig lately.
FJERNE STIFTER/DYKKERTER FRA MAGASINET
STANDARD VEDLIKEHOLD
FJERNE EN STIFT / DYKKERT SOM HAR KILT SEG FAST
3NEKHTPOINHCTPymEHT BA03paTaeT BEPOARTHOCTb NOPaHEHNA 3NEKTPNHECNIM TOKOM.
r)NcnoB3yIteUHypnHTAHINCTporoNoHa3HaueHHIO. 3AnpeuetaTcTHyb3aUHypnOTHNIUOeHHINnIINPeHOCHe 3EhTPOHNCTpymHtA.OBepearTeUHypOTBo3dEChTBnBbCOHx TEMNEPATyp,MaclaOCTpbIXKpOMOKnIHDbHNyUHxCqAteT.Ipn IcNOB3OBaHHIN NOBPEJDeHHORO INI INpeEPuyEHHO HUPyaNTAHIN B03paCTaET BepoARHOCTb NOPaHEHHN3NEHTPnueCHM TOKOM.
II) PnI NOIb3OBAHH 3NeKTPoHNCTpyMeHTOM Ha yIINe HCIONb3yIte YIINHITBnI Ia NcNPlyatauHN BHe nOMEueHn. IVcNOIb3OBAHHe YdINHHTe Ia I3NcIyAtauHN BHe NOMEeHn CHNIkaET BepoTHOCTb NOPaHEHn 3JIeKTHpUeCHN ToHOM.
e) EcNBe BCE JTepeyTcHcNoJIb3ObaHHe 3NeKTHPOHNCTpyMeHTa B cIbPOM MeCTe, NOHIOUHTeB K cIeN IITNaHc Y cTOPOCTBM AaHTHO TROHOKIOHJe NcNOJIb3ObaHBe Y cTOPOCTB 3aIHTHO T OTHIOUCHEN CHINKAET BepoTHOCT IbpaKeHn 3NeKTHpueHECM TOHOM.
3AπPABKA CHOБOK/ΓBO3ДΕN B MΑΓΑ3Η
- UctahOBInTe BbIHIOHateJIb B NOIOJHeHne BblKII. IN OTCoeINHIne ⅢHyp NITaHnIOT CETN.
2.ПовернITE Исторем ent HmKHeN CTOpOHOB BBepx,OTKpoTe 3aUeIHy n CdbINbTe KpbIshky MaRa3InHa. - 3anpaBbTe MaRa3Hn FBO3dHMn HIN NCHO6hAMn HOHKAMn BVEpN 3aKnpoiteMaRa3Hn (PcCyH0N 2 INN 3).JeHTa C FBO3dMn DOnJIHn PaCnOlaRaTbCnB.MaRa3Hn pIrMO.
IcnoIb3yIteToIbKOpeHOMeHDoBaHNbIe ChO6Hn IΓB03N.
- 3aKpoIte MaRa3Hn H y6eIHTecB Cpa6aTbIBaHHN 3aIeHN.
I3BLeueHHe NCHObOK/ΓBO3ДeI I3 MFA3HHA
- UctahOBiTe BbHIOUoATENB bIIOJIOKeHHe BblKII, nOTcoEINHHTe 5Hyp pITaHnA OT cETH.
2.ПовернITE Иструм ent HmKHeI CTopoHOI BBePx,OTKpoTe 3aUeNHy n CdbHbTe KpbIshy Maag3Ha. - N3BnEHNTE ChO6Kn/ΓB03n IN 3 MaRa3Ha
- 3aKpoIeMaIa3IN
3KCNJLYATALIN
CUNBAHNE
1.ПоДнHочHTe CTeNJIeK CteTeBoi po3eTHe 220-240 B\~,50 T.
2. BHHIOHTe BbHIOHTeBJIeKTPoNTaHnA (pnc.4).
3.Y6eNTecbBHCnpabHOMpa0oem COCTOHHINHCTpyMeHTa.
4.ПлOTHOPINHMMTEBbIXOdHoeOTBepCTVECKo603a6NBHOROIINCTOJIetaK pa6OHeJTeTANDnAaNTBaUmPpeOxoPAHITeBHOBUNH F.
5. HaKMnte cIyCHOByIO KHOHNY A dIa BBInycha CHO6HI.
6. PtObI CHOBa ANTHBnPOBAtb CNO603aBnBHOn NINCTOJET, OTNCTHEnpeDOxpanHTeBHyIO BnHy NcYCHOByIO HONHy, NOCE Yero NOBTOPIte 4 n5
7. BbHIOUHTe BbHIOUaTeB 3JIeKTPoNTaHnI N OTCOeDINHte CkO6O3aBnHOI nCTOJET OT cETN 3JIeKTPoNTaHnI.
KLAMBRIPUSTOLI OHUTUSJUHISED
TEXHnueECKN CNEUΦNKALIN
| Homer Ha modal | E-tac |
| Haprejenne | 220-240 V~, 50Hz |
| Mошноct | 1,8 A |
| Тип и дыленина Ha Дьрюделский пiroн | Rapid T8/300, 15mm |
| Тию и дылжина на снобице | Сноби Rapid 140, дылжина 6, 8, 10, 12, 14 mm |
| КаначитET на магазина | 50 6p (65mm) |
| Снорost | 20 Иструел/MINH |
| Тerglio на Истру金融市场 | 0,66 kg |
EMHCN HA SHYM
HnBOHaA-npeterneho3BykoBoHaJIraHe LpA=87,6dB(A),npomEnIbocT K=3 dB(A)
HnBOHaA-npeterIeHO3BykoBoHaIraHeLwA=98,6dB(A), npomEnIOBocK=3 dB(A)
Da ce Hocat 7yM03aIpyuHITeIN (aHTnfoHN).
BIBPAIIN
067a cTOnHocT Ha Bn6paun =2,8 m/s², npomehnIOBcT K=1,5 m/s²
IIOOcHetaA O6la CToiHOCHT Ha Bn6bpAluE H3MepeHaB CbOTBTCTBHe CbC CTaHdapTnHa MeTOA 13NITBAHe H MOKe Da CE I3PON3Ba 3a CpaBHraHa He AOtDEHNHCHPTyMehNTI
IocuHeTAto67a CToHcT HbB6paNMa MoHe Da Ce N3No13Ba CbIoo 3a npedBaPnteHa OueHkHa eKcno3nIurTa
EMNcHraHa Nb6pauin B XoJa Ha faHnTuYeChata HecnIooatauHa naEeKtponHCTpymEnTa MoNe Da cePaJIaBaT aTo nocOeHata Ocbla CtoHocB 3aBvNCMOCT O NaHcHnHTe Ha eKcPiOnaTauHa NHeHCTpyMeHa.
CTJIOBAHAE
ONPENEJENHNAIHTYPA1

CnycbK

3axpaHbau Ka6eI

3aKoHuaHa Ha MaRa3Ha

M3xOJaIu OTBop 3a Ch6n

IyckOB npEkbvau On/Off (Bn./H3kn.)

PpeDnAa3nten
3APEDETE CCHOB/ДьPBOДЕЛСКПИРОНВ MмАЗИHA
1.ИЗнluоуепpeкьсваHaТаkepaиИЗвадeTe UeNceJaOT3axpaHbAHeTo
2. 06bphete HNCTpyMeHTa cdoJIHaTa qact Harope, HATNCHETe 3aHOnyauHata n C npINIIb3BaHe OTBOpTe MaRa3Ha.
3. ПоставETe Вмагаина сбоби ИлдьрвODEнспірони Ккрачета на hope
I 3aTbOpete Maar3Ha (Φmγpa 2 nnn 3) YBepe Ce, ye KOMnJIeKTBt NipOHH e NOCTaBeH B Maar3Ha B IN3npaBeHO NIOJKeHne.
N3no3BaIte cAmo npenopbuaHnTe Chobn HInPiOnH
- 3aTbOpTe MaIa3Ha IcseYBpeTe, Ye cTa6nHIO 3aHIOueH.
OTCTPAHETE CKOBHTE/DbPBODEJICKNEIINPOHNOT MArA3nHA
1.ИЗкlioуeteпръсваHaТанега ИЗвадеTe УнselfeЯОТзхариBaHTo
2.ObpHete HNCTpyMeHTa C DoJIHATA cAHT HarOpe, HATINCHETe 3aKOHJAHKA tI INBAdTe MArag3HaHa.
3. OTeTaPaHeTe ChO6Nte/DbpBoDcENckHte NIpOHOI OT MaRa3Ha
4. 3aTbOpeteMaRa3nHa.
EKCPIIOATALIIN
ПОДшИВАЕ CBС CHOБИ
- BnHouTe TeIb6OaB HOnTaKT C HanpeJHeHne 220-240V\~,50Hz.
- Bhniouhe Te ypea ot Hnioha Ha 3axpaHbAHeTo (fngya 4).
- YBepeTe Ce, Ye INHCTpyMeHTbE B Do6po EKcNlOaTaUOnHO CbCToRHe.
4.Дрьichte Tahepa 3dpaBO Taka,Чe ИЗвObT 3a Ch6bO D da e ПЛТНО рпленen KbMa pa60THI DeTaiN,3a Da ce aKTHINpa npEdnA3nTeJrT F. - HatncheTe cnycbHa A, 3a da ctpenrte c tahepa.
- 3a Da n3ctpeIATE HOBA cHOba C Tahepa,OCB6oDeTe PpeDn3InTeIy N HATmCHETe CnycbHa, CneI KOEt NOBTOpe CTbN4 I5.
7.ИЗнIOуЕ ypeDA OT KIOUHa 3axpaHbAHeto ИИЗBaTe UeIeCEla My OT KOHTaTcA cIeD yNtOpe6a.
3A6ELEKHA: 3a no-do6pn pe3yntaTH npHTNCHEte HNCTpyMeHaT KaM o6pa6oTBaHn MaTepHaI (fHrypa 5)
3A6EJIEXHKA:BcnyaHa 3acyaIe Ha cO6b HnPiPoHN IpOyTepea3dena OTHOCHO npDpBxHk.
HE CE DOYCHA NOBTOpeH I3CTpeC INHCTpyMeHTa 3a I3NUCTBAHe Ha 3aceDnHInTE KOHCyMaTHBn, TbI HATO NTo3n HAuHIN HNCTpyMeHTbT MOKe Da CE nobpeDn.
3A6EJIEXKHA: IIO BpeMe Ha pa60Ta HnHCTpymeHTbT MoKe da 3arpee.
ToBa e HOpMaIHO, Ho aHO INCTpymeHTb CTaHe ropeu, paBcTaT a Tp8oBa Da ce npeyctaHOBn Do OXlaJdAHeTO My.
3A6EJIENHKA: TahepT rPbBA da ce 3nON3Ba eMHCTBEHO npnpda3aHHeNo. Toe n pOeKtIpaH 3a pa60a c bpbO i CXoHN MaTePnAln B 3aKpITN NOMUeHNEH
HACOKN 3A N3PONJ3BAHE HA YDbJIJKHTENHI KABEJIIN

- Save all warnings and instructions for future reference.
- 1) WORK AREA SAFETY
- 2) ELECTRICAL SAFETY
- 3) PERSONAL SAFETY
- 4) POWER TOOL USE AND CARE
- 5) SERVICE
- TACKER SAFETY WARNINGS
- TECHNICAL SPECIFICATION
- NOISE EMISSION
- VIBRATION
- ASSEMBLY
- DEFINITIONS (FIGURE 1)
- LOAD STAPLES/BRADS INTO THE MAGAZINE
- REMOVE STAPLES/BRADS FROM THE MAGAZINE
- OPERATION
- STAPLING
- NOTE: For better performance press the tool against the work piece (Figure 5)
- GUIDELINES FOR USING EXTENSION CORDS
- MAINTENANCE
- STANDARD MAINTENANCE
- CLEARING A JAMMED STAPLE / BRAD
- WARNING!!
- ENVIRONMENT
- VEILIGHEIDSWAARSCHUWINGEN VOOR TACKERS
- INDFOR HAEFTEKLAMMER/DYKKEREIMAGASINET
- FJERN HAEFTEKLAMMER/DYKKERE FRA MAGASINET
- FYLLE MAGASINET MED STIFTER/DYKKERTER
- FJERNE STIFTER/DYKKERTER FRA MAGASINET
- STANDARD VEDLIKEHOLD
- FJERNE EN STIFT / DYKKERT SOM HAR KILT SEG FAST
- 3AπPABKA CHOБOK/ΓBO3ДΕN B MΑΓΑ3Η
- I3BLeueHHe NCHObOK/ΓBO3ДeI I3 MFA3HHA
- 3KCNJLYATALIN
- CUNBAHNE
- KLAMBRIPUSTOLI OHUTUSJUHISED
- EMHCN HA SHYM
- BIBPAIIN
- CTJIOBAHAE
- ONPENEJENHNAIHTYPA1
- 3APEDETE CCHOB/ДьPBOДЕЛСКПИРОНВ MмАЗИHA
- OTCTPAHETE CKOBHTE/DbPBODEJICKNEIINPOHNOT MArA3nHA
- EKCPIIOATALIIN
- ПОДшИВАЕ CBС CHOБИ
- 3A6ELEKHA: 3a no-do6pn pe3yntaTH npHTNCHEte HNCTpyMeHaT KaM o6pa6oTBaHn MaTepHaI (fHrypa 5)
- 3A6EJIEXHKA:BcnyaHa 3acyaIe Ha cO6b HnPiPoHN IpOyTepea3dena OTHOCHO npDpBxHk.
- 3A6EJIEXKHA: IIO BpeMe Ha pa60Ta HnHCTpymeHTbT MoKe da 3arpee.
- 3A6EJIENHKA: TahepT rPbBA da ce 3nON3Ba eMHCTBEHO npnpda3aHHeNo. Toe n pOeKtIpaH 3a pa60a c bpbO i CXoHN MaTePnAln B 3aKpITN NOMUeHNEH
- HACOKN 3A N3PONJ3BAHE HA YDbJIJKHTENHI KABEJIIN
Brand : RAPID
Model : E-Tac/ES140
Category : Stapler