
GC-PC2040I - Chain saw EINHELL - Free user manual and instructions
Find the device manual for free GC-PC2040I EINHELL in PDF.
User questions about GC-PC2040I EINHELL
0 question about this device. Answer the ones you know or ask your own.
Ask a new question about this device
Download the instructions for your Chain saw in PDF format for free! Find your manual GC-PC2040I - EINHELL and take your electronic device back in hand. On this page are published all the documents necessary for the use of your device. GC-PC2040I by EINHELL.
USER MANUAL GC-PC2040I EINHELL
Vibration ahv (hinterer Handgriff)
(ISO 22867) max. 6,53m / s^2
- Safety regulations
- Layout and items supplied
- Proper use
- Technical data
- Before starting the equipment
- Operation
- Cleaning, maintenance, storage and ordering of spare parts
- Disposal and recycling
- Troubleshooting guide
GB
Danger!
When using the equipment, a few safety precautions must be observed to avoid injuries and damage. Please read the complete operating instructions and safety regulations with due care. Keep this manual in a safe place, so that the information is available at all times. If you give the equipment to any other person, hand over these operating instructions and safety regulations as well. We cannot accept any liability for damage or accidents which arise due to a failure to follow these instructions and the safety instructions.
1. Safety regulations
The corresponding safety information can be found in the enclosed booklet.
Danger!
Read all safety regulations and instructions.
Any errors made in following the safety regulations and instructions may result in an electric shock, fire and/or serious injury.
Keep all safety regulations and instructions in a safe place for future use.
2. Layout and items supplied
2.1 Layout (Fig. 1-21)
-
Front hand guard (chain brake lever)
-
Motor unit
- Chain bar
- Saw chain
- Chain guard
- Spark plug wrench
- Front handle
- Rear handle
- Starter handle
- On/Off switch
- Throttle lever
- Throttle lever safety lock
- Choke lever
- Air filter cover
- Air filter
- Spark plug
- Stop claw
- Chain catch
- Chain bar fastening nut
- Chain tensioning screw
- Fuel tank cap
- Oil tank cap
- Mixing container
- Screwdriver
25. Fuel pump (primer)
Safety features (fig.1a/1b)
3 LOW KICKBACK SAW CHAIN helps significantly reduce kickback, or the intensity of kickback, due to specially designed depth gauges and guard links.
6 CHAIN BRAKE LEVER / HAND GUARD protects the operator's left hand in the event it slips off the front handle while saw is running. CHAIN BRAKE is a safety feature designed to reduce the possibility of injury due to kickback by stopping a moving saw chain in milliseconds. It is activated by the CHAIN BRAKE lever.
10 STOP SWITCH immediately stops the engine when tripped. Stop switch must be pushed to ON position to start or restart engine.
12 SAFETY TRIGGER prevents accidental acceleration of the engine. Throttle trigger cannot be squeezed unless the safety latch is depressed.
18 CHAIN CATCHER reduces the danger of injury in the event saw chain breaks or derails during operation. The chain catcher is designed to intercept a whipping chain.
Note: Study your saw and be familiar with its parts.
2.2 Items supplied
Please check that the article is complete as specified in the scope of delivery. If parts are missing, please contact our service center or the sales outlet where you made your purchase at the latest within 5 working days after purchasing the product and upon presentation of a valid bill of purchase. Also, refer to the warranty table in the service information at the end of the operating instructions.
- Open the packaging and take out the equipment with care.
- Remove the packaging material and any packaging and/or transportation braces (if available).
- Check to see if all items are supplied.
- Inspect the equipment and accessories for transport damage.
If possible, please keep the packaging until the end of the guarantee period.
GB
Danger!
The equipment and packaging material are not toys. Do not let children play with plastic bags, foils or small parts. There is a danger of swallowing or suffocating!
Original operating instructions
- Safety instructions
3. Proper use
The chain is designed exclusively for sawing wood. You may only fell trees if you have received the appropriate training. The manufacturer cannot be held liable for damage caused by improper or incorrect usage.
The equipment is to be used only for its prescribed purpose. Any other use is deemed to be a case of misuse. The user / operator and not the manufacturer will be liable for any damage or injuries of any kind caused as a result of this.
Please note that our equipment has not been designed for use in commercial, trade or industrial applications. Our warranty will be voided if the machine is used in commercial, trade or industrial businesses or for equivalent purposes.
Caution! Residual risks
Even if you use the equipment in accordance with the instructions, certain residual risks cannot be eliminated. The following hazards may arise in connection with the equipment's construction and layout:
- Injuries through cutting in case of contact with the unguarded or rotating saw chain.
- Injuries through cutting in case of kickback or other accidental movements of the guide rail.
- Injuries due to parts of the saw chain being catapulted away.
- Injuries due to parts of the cut material being catapulted away.
- Damage to hearing if the compulsory hearing protection is not used.
- Breathing problems due to the inhaling of harmful fumes and skin injuries due to contact with pertol.
4. Technical data
Engine displacement 50.4 cm³
Maximum engine capacity 2 kW
Cutting length 39 cm
Chain bar length 16" (40 cm)
Chain pitch (3/8" 9.525 mm
Chain thickness (0.05) 1.27 mm
ldling speed 3.000 ± 300 min
Maximum speed with cutting equipment 11,500 min-1
Max. chain speed 21 m/s
Tank capacity. 540 cm³
Oil tank capacity 240 cm³
Anti-vibration function Yes
Sprocket teeth 7 teeth x 9.525 mm
Net weight without chain and chain bar ....5.75 kg L_P sound pressure level (ISO 22868)
at the operator's position 101.8 dB(A)
Keep the noise emissions and vibrations to a minimum.
- Only use appliances which are in perfect working order.
Service and clean the appliance regularly. - Adapt your working style to suit the appliance.
- Do not overload the appliance.
- Have the appliance serviced whenever necessary.
- Switch the appliance off when it is not in use.
- Wear protective gloves.
GB
5. Before starting the equipment
Danger: Do not start the engine until the saw is fully assembled.
Caution: Wear protective gloves at all times when handling the chain.
5.1 Installing the guide rail and saw chain (Fig. 2A-2G)
- Disengage the chain brake by pushing the front hand guard (6) towards the front handle (7). (Fig. 2A)
- Remove the guide rail cover (A) by loosening the two nuts (19) (Fig. 2B).
- Place the guide rail (2) into the mounting on the chainsaw (Fig. 2C).
- Place the chain (3) around the drive wheel (C) (Fig. 2E). Check that the direction of rotation of the chain (3) is correct. The cutter links (B) must be aligned as shown in Fig. 2D.
- Place the chain around the chain bar. (Fig. 2E)
- The chain drive links (3) must slide fully into the groove which runs around the cutter bar (D) and also between the teeth on the drive wheel (C). (Fig. 2E)
- Turn the chain tensioning screw (20) counterclockwise until the bolt (E) is at the end of its travel. (Fig. 1B/2F)
- Install the bar cover (A).
Important! The bolt (E) on the chain tensioning mechanism must snap into place in the hole (G) in the guide rail. (Fig. 2G)
To ensure that happens, slide the guide rail (2) forwards and backwards slightly when you mount the bar cover (A). Hand tighten the nut (19).
5.2 Adjusting the chain tension (3A/3B)
Before adjusting the chain tension, make sure that the engine is switched off.
- Push the tip of the guide rail (2) upwards slightly and adjust the chain tension using the chain tensioning screw (20). (Fig. 3A) The chain is set to the optimal tension when the chain (3) on the underside at the middle of the guide rail (2) is as shown in Fig. 3B (B).
- Tighten the nut (19) while applying slight pressure to the tip of the bar.
- Carry out a functional check. Pull the chain (3) by hand once all the way around the guide rail (2). If the chain (3) is hard to pull around the guide rail (2) or if it jams, the tension is too tight.
If that is the case, make the following slight adjustment:
- Loosen the nut (19) and hand tighten it again.
- Reduce the chain tension by turning the chain tensioning screw (20) counterclockwise. Only make small adjustments at a time and always pull the chain (3) backwards and forwards on the guide rail (2) to see if the chain (3) moves smoothly but still fits tightly.
Note: If the chain (3) is too loose, turn the chain tensioning screw (20) clockwise.
- If the chain tension is adjusted to the optimal setting, tighten the nut (19) while applying slight pressure to the tip of the bar.
A new saw chain will stretch, so it is important to readjust the chain at short intervals (around 5 cuts) when you first start using it. The intervals get longer as operating time increases.
Note: If the saw chain (3) is TOO LOOSE or TOO TAUT, the drive wheel, chain bar, chain and crank shaft bearing will suffer premature wear. Fig. 3B shows the correct tension A (when cold) and tension B (when warm). Fig. C shows a chain that is too loose.
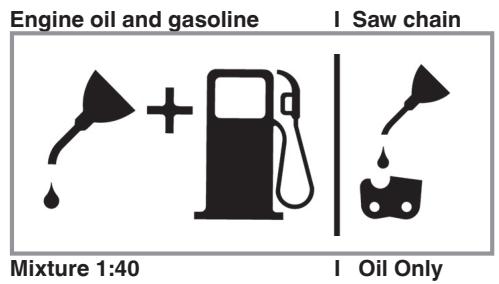
5.3 Fuel and lubrication
Fuel
Use regular grade unleaded gasoline mixed with 1:40 custom 2-cycle engine oil for best results.
Mixing fuel
Mix fuel with 2 cycle oil in an approved container. Shake container to ensure thorough mix.
Note: Never use straight gasoline in your unit. This will cause permanent engine damage and void the manufacturer's warranty for that product. Never use a fuel mixture that has been stored for over 90 days.
Note: If 2-cycle lubricant is to be used, it must be a premium grade oil for 2-cycle air cooled engines mixed at a 1:40 ratio. Do not use any 2-cycle oil product with a recommended mixing ratio of 1:100. If insufficient lubrication is the cause of engine damage, it voids the manufacturer's engine warranty for that occurrence.
GB
Recommended fuels
Some conventional gasolines are being blended with oxygenates such as alcohol or an ether compound to meet clean air standards. Your engine is designed to operate satisfactorily on any gasoline intended for automotive use including oxygenated gasolines. It is recommended to use unleaded petrol as fuel.
Lubrication of chain and chain bar
Whenever you refill the fuel tank with petrol you must also top up the level of chain oil in the chain oil tank. It is recommended to use standard chain oil.
Engine pre-start checks
Danger: Never start or operate the saw unless the bar and chain are properly installed.
- Fill the fuel tank (21) with correct fuel mixture (Fig. 4).
- Fill the oil tank (22) with chain oil (Fig. 4).
Once you have filled the chain and oil tank, tighten the tank cover securely by hand. Do not use any tools to do so.
6. Operation
Before you use the saw, check it for damage. If you discover any damage, do not use it. The chainsaw may be started only when the chain brake is engaged. The chain brake is engaged when the brake lever (6) is pushed forward.
Explanation of how it works: refer to Checking the chain brake - Static check.
6.1 Chain brake
The chainsaw is fitted with a chain brake which reduces the risk of injury caused by the danger of kickback. The brake is engaged when pressure is applied to the hand guard (6), e.g. when the hand of the person operating the chainsaw strikes the hand guard (6) if kickback occurs. When the brake is engaged, the chain (3) stops abruptly.
Warning: The chain brake is intended to reduce the risk of injury due to kickback; however, it is unable to provide adequate protection if the saw is used carelessly. You must check the operation of the chain brake on a regular basis. Test the chain brake before the first cut, after several cuts, after maintenance is done on the chainsaw and if the chainsaw has been subjected to strong impact or if it has been dropped.
6.1.1 Checking the chain brake (Fig. 5A/5B/6)
Static check (engine switched off)
Chain brake disengaged (chain (3) is free to move)
- Pull the front hand guard (6) towards the front handle (7). The front hand guard (6) must make an audible click when it snaps into place. (Fig. 5A)
- It must be possible to move the chain (3) on the guide rail (2).
Chain brake engaged (chain (3) is blocked)
- Push the front hand guard (6) towards the guide rail (2). The front hand guard (6) must make an audible click when it snaps into place. (Fig. 5B)
- It must not be possible to move the chain (3) on the guide rail (2).
Note: The front hand guard (6) must snap into place in both positions. If you feel strong resistance or if the front hand guard (6) does not snap into place, do not use the chainsaw. Take your chainsaw to an authorized service center for repair.
Dynamic check (engine is started)
- Place the saw on a firm and level surface.
- Hold the front handle (7) with your left hand.
- Start the chain saw by following the starting instructions. (refer to 6.2 and 6.3)
- Disengage the chain brake (pull the front hand guard (6) towards the front handle (7)). (Fig. 5A)
- Grasp the rear handle (8) with your right hand.
GB
- After a brief warmup period, run the engine at full speed. With the back of your left hand, push the front hand guard (6) towards the guide rail (2). This will engage the chain brake. (Fig. 6)
Danger: Engage the chain brake slowly and carefully. Hold the saw firmly with both hands, and make sure you have a good grip. The saw must not touch any objects.
- The chain (3) must stop abruptly. Immediately release the throttle lever (11) when the chain (3) has come to a stop.
Danger: If the chain (3) does not stop, shut off the engine and take the saw to an authorized service center for repair.
6.1.2 Checking the clutch
Carry out a functional check on the clutch on a regular basis. Test the clutch before the first cut, after several cuts, after maintenance is done on the chainsaw and if the chainsaw has been subjected to strong impact or if it has been dropped.
- Start the chain saw by following the starting instructions. (refer to 6.2 and 6.3)
- Briefly actuate the throttle lever (11) and release it to ensure that the throttle valve has been released and the engine is idling.
- The chain (3) must stop when the engine is idling.
The clutch has been designed so that when the idling speed is increased by a factor of 1.25 no chain movement can be detected.
Danger: If the chain (3) does not stop, shut off the engine and take the saw to an authorized service center for repair.
Danger: Always engage the chain brake (6) before you start the engine.
6.2 Starting a cold engine (Fig. 7A-7D)
Fill the tank with an adequate amount of gasoline/ oil mix. (refer to Paragraph 5.3)
- Set the equipment down on a hard, level surface.
- Move the On/Off switch (10) to the l^u position. (Fig. 7A)
- Press the fuel pump (primer) (Fig. 6/Item 25) ten times.
- Pull out the choke lever (13) (Fig. 7B)
Note: Pulling out the choke lever (13) opens the throttle valve slightly and locks it in that position. This increases the idle speed, and the saw starts faster.
- Hold the saw firmly and pull out the starter handle (9) until you feel it start to resist. Then sharply pull the starter handle (9) 3 times. (Fig. 7C/7D)
- Push in the choke lever (13).
- Hold the saw firmly and pull out the starter handle (9) until you feel it start to resist. Then quickly pull the starter handle (9) several times until the engine starts. (Fig. 7D)
Note: Do not allow the starter handle (9) to snap back. This may result in damage. Once the engine has started, allow the saw to warm up for 10 seconds.
Warning: Since the throttle lever is slightly open, the cutter starts to operate when the engine is started. Briefly actuate the throttle lever (11). This releases the throttle valve and the engine returns to idle mode. (Fig. 7C)
8. If the engine does not start up after the starter handle is pulled 8 times, repeat steps 1-7.
Please note: If the engine does not start up even after several attempts, read the Engine troubleshooting section.
Please note: Always pull the starter handle out straight. If it is pulled out at an angle, friction will occur on the eyelet. As a result of this friction, the cable will become frayed and will wear faster. Always hold onto the starter handle when the cable retracts. Never allow the starter handle to snap back when it has been pulled out.
6.3 Starting a warm engine (Fig. 7A-7D)
(The chainsaw has been idle for less than 15-20 min.)
- Set the equipment down on a hard, level surface.
- Move the On/Off switch (10) to the l^ position. (Fig. 7A)
- Hold the saw firmly and pull out the starter handle (9) until you feel it start to resist. Then quickly pull the starter handle (9) several times until the engine starts. The equipment should start after 1-2 tugs. If the saw does not start after 6 pulls, repeat steps 1 - 7 of Paragraph 6.2. (Fig. 7D)
GB
6.4 To stop engine
- Release trigger and allow engine to return to idle speed.
- Move STOP switch down to stop engine.
Note: To stop the engine in an emergency, activate the chain brake and switch the ON/OFF switch to "Stop (0)".
6.5 General cutting instructions
Danger: Felling trees is prohibited without the necessary training!
Felling
- Felling is the term for cutting down a tree. Small trees up to 6-7 inches (15-18cm) in diameter are usually cut in a single cut. Larger trees require notch cuts. Notch cuts determine the direction the tree will fall.
- A retreat path (A) should be planned and cleared as necessary before cuts are started. The retreat path should extend back and diagonally to the rear of the expected line of fall, as illustrated in Fig. 8.
- If felling a tree on sloping ground, the chain saw operator should keep on the uphill side of the terrain, as the tree is likely to roll or slide downhill after it is felled.
- Direction of fall (B) is controlled by the notching cut. Before any cuts are made, consider the location of larger branches and natural lean of the tree to determine the way the tree will fall (Fig. 8).
- Do not cut down a tree during high or changing winds or if there is a danger to property. Consult a tree professional. Do not cut down a tree if there is a danger of striking utility wires; notify the utility company before making any cuts.
General guidelines for felling trees (Fig. 9)
Normally felling consists of 2 main cutting operations, notching (C) and making the felling cut (D).
- Start making the upper notch cut (C) on the side of the tree facing the felling direction (E). Be sure you don't make the lower cut too deep into the trunk. The notch (C) should be deep enough to create a hinge (F) of sufficient width and strength. The notch should be wide enough to direct the fall of the tree for as long as possible.
- Never walk in front of a tree that has been notched. Make the felling cut (D) from the other side of the tree and 1.5 - 2.0 inches
(3-5 cm) above the edge of the notch (C). Never saw completely through the trunk. Always leave a hinge. The hinge guides (F) the tree. If the trunk is completely cut through, control over the felling direction is lost. Insert a wedge or felling lever in the cut well before the tree becomes unstable and starts to move. This will prevent the guidebar from binding in the felling cut if you have misjudged the falling direction. Make sure no bystanders have entered the range of the falling tree before you push it over.
Before making the final cut, always recheck the area for bystanders, animals or obstacles.
Felling cut
- Use wooden or plastic wedges (A) to prevent binding the bar or chain (B) in the cut. Wedges also control felling (Fig. 10).
- When diameter of wood being cut is greater than the bar length, make 2 cuts as shown (Fig. 11).
- As the felling cut gets close to the hinge, the tree should begin to fall. When tree begins to fall, remove saw from cut, stop engine, put chain saw down, and leave area along retreat path (Fig. 8).
Limbing
- Limbing a tree is the process of removing the branches from a fallen tree. Do not remove supporting limbs (A) until after the log is bucked (cut) into lengths (Fig. 12). Branches under tension should be cut from the bottom up to avoid binding the chain saw.
- Never cut tree limbs while standing on tree trunk.
Bucking
- Bucking is cutting a fallen log into lengths. Make sure you have a good footing and stand uphill of the log when cutting on sloping ground. If possible, the log should be supported so that the end to be cut off is not resting on the ground. If the log is supported at both ends and you must cut in the middle, make a downward cut halfway through the log and then make the undercut. This will prevent the log from pinching the bar and chain. Be careful that the chain does not cut into the ground when bucking as this causes rapid dulling of the chain. When bucking on a slope, always stand on the uphill side.
GB
- Log supported along entire length: Cut from top (overbuck), being careful to avoid cutting into the ground (Fig. 13A).
- Log supported on 1 end: First, cut from bottom (underbuck) 1/3 diameter of log to avoid splintering. Second, cut from above (overbuck) to meet first cut and avoid pinching (Fig. 13B).
-
Log supported on both ends: First, overbuck 1/3 diameter of log to avoid splintering. Second, underbuck to meet first cut and avoid pinching (Fig. 13C).
-
The best way to hold a log while bucking is to use a sawhorse. When this is not possible, the log should be raised and supported by the limb stumps or by using supporting logs. Be sure the log being cut is securely supported.
Bucking using a sawhorse (Fig. 14)
For personal safety and ease of cutting, the correct position for vertical bucking is essential.
A. Hold the saw firmly with both hands and keep the saw to the right of your body while cutting.
B. Keep the left arm as straight as possible.
C. Keep weight on both feet.
Caution: When working with the saw, always make sure that the saw chain and chain bar are sufficiently lubricated.
7. Cleaning, maintenance, storage and ordering of spare parts
Disconnect the spark plug boot before doing any cleaning and maintenance work!
7.1 Cleaning
- Keep all safety devices, air vents and the motor housing free of dirt and dust as far as possible. Wipe the equipment with a clean cloth or blow it with compressed air at low pressure.
We recommend that you clean the device immediately each time you have finished using it. - Clean the equipment regularly with a moist cloth and some soft soap. Do not use cleaning agents or solvents; these could attack the plastic parts of the equipment. Ensure that no water can seep into the device.
7.2 Maintenance
Warning: All maintenance work on the chainsaw apart from the work described in this manual may only be carried out by authorized after-sales service personnel.
7.2.1 Air filter
Note: Never operate saw without the air filter. Dust and dirt will be drawn into engine and damage it. Keep the air filter clean! The air filter must be cleaned or replaced after every 20 hours of service.
Cleaning the air filter (Fig. 15A/15B)
- Remove the top cover (14) by undoing the cover fastening screw (A) on the cover. You can then remove the cover (Fig. 15A).
- Lift out the air filter (15) (Fig. 15B).
- Clean air filter. Wash filter in clean, warm, soapy water. Rinse in clear, cool water. Air dry completely.
Note: It is advisable to have a supply of spare filters.
4. Insert the air filter. Install the air filter cover (14). Make sure that the cover fits perfectly when you do so. Tighten the cover fastening screw.
7.2.2 Fuel filter
Note: Never use the saw without a fuel filter. After 100 hours in operation the fuel filter should be cleaned or, in case of damage, replaced. Be sure to empty the fuel tank before changing the filter.
- Remove the fuel tank cap.
- Bend a piece of soft wire.
- Reach into fuel tank opening and hook fuel line. Carefully pull the fuel line toward the opening until you can reach it with your fingers.
Note: Do not pull hose completely out of tank.
- Lift filter out of tank
- Pull off the filter with a twist and clean it; if the filter is damaged, dispose of it.
- Insert a new filter. Place one end of the filter into the tank opening. Make sure that the filter is seated in the lower corner of the tank. If necessary, use a long screwdriver to move the filter to its correct position, taking care not to damage in the process.
- Fill tank with fresh fuel / oil mixture. See Section Fuel and Lubrication. Install fuel cap.
GB
7.2.3 Spark plug (Fig. 15A-15C)
Note: To ensure that the saw's engine retains its power, the spark plug must be clean and have the correct electrode gap (0.6 mm). The spark plug must be cleaned or replaced after every 20 hours of service.
- Set the On/Off switch to Stop (0)".
- Remove the top cover (14) by undoing the cover fastening screw (A) on the cover. You can then remove the cover (Fig. 15A).
- Lift out the air filter (15) (Fig. 15B).
- Disconnect the ignition cable (C) from the spark plug by pulling and twisting it simultaneously (Fig. 15C).
- Remove the spark plug using a spark plug wrench.
- Clean the spark plug with a copper wire brush or fit a new one.
7.2.4 Carburetor setting
The carburetor has been set to its perfect adjustment at the factory. If it requires adjusting, take the saw to your nearest authorized after-sales service outlet.
7.2.5 Chain bar
Grease the guide rail starwheel after every 10 hours of operation. This is necessary to get the best performance from your chainsaw. (Fig. 16) Clean the lube hole, then place the lube gun (not included) at the hole and pump grease into the bearing until grease is forced out.
Clean the groove which the chain runs in as well as the oil entry hole on a regular basis using a commercially available cleaning tool. (Fig. 17A) This is important to ensure optimal lubrication of the guide rail and chain during operation.
- Remove burrs and sharp edges on the guide rail (2) by carefully filing them down with a flat file. (Fig. 17B)
- Turn the guide rail (2) around after every 8 hours of operation so that it wears evenly on the top and bottom.
Oil passages
Oil passages on the bar should be cleaned to ensure proper lubrication of the bar and chain during operation.
Note: The condition of the oil passages can be easily checked. If the passages are clear, the chain will automatically give off a spray of oil within seconds of starting the saw. Your saw is equipped with an automatic oiler system.
Automatic chain lubrication.
The chain saw is equipped with an automatic oil lubrication system with a toothed wheel drive. It automatically supplies the bar and the chain with the right quantity of oil. The moment the engine is accelerated, the oil also starts to flow through the bar plate more quickly as well.
The chain lubrication system has been set to its perfect adjustment at the factory. If it requires adjusting, take the saw to your nearest authorized after-sales service outlet.
On the underside of the chainsaw you will find the setting screw (A) for the chain lubrication system (Fig. 21). Turning the screw counter-clockwise increases the chain lubrication, turning it clockwise decreases the chain lubrication.
To check the chain lubrication, hold the chain saw, with the chain, over a piece of paper and run it at full speed for a few seconds. You will be able to judge the set amount of oil from the paper.
On a regular basis, check that the chain lubrication is working correctly. Test chain lubrication before the first cut, after several cuts and always after any maintenance.
Chain lubrication
Always make sure the automatic oiler system is working properly. Keep the oil tank filled with Chain, Bar and Sprocket Oil.
Adequate lubrication of the bar and chain during cutting operations is essential to minimize friction with the guide bar.
Never starve the bar and chain of lubricating oil. Running the saw dry or with too little oil will decrease cutting efficiency, shorten saw chain life, cause rapid dulling of chain, and lead to excessive wear of bar from overheating. Too little oil is evidenced by smoke or bar discoloration.
GB
7.2.6 Chain maintenance
Chain sharpening
Note: A sharp chain produces well-defined chips. When your chain starts to produce sawdust, it is time to sharpen.
Chain sharpening requires special tools to ensure that cutters are sharpened at the correct angle and depth. For the inexperienced chain saw user, we recommend that the saw chain be professionally sharpened by the nearest professional Service Center. If you feel comfortable sharpening your own saw chain, special tools are available from the professional Service Center.
Chain sharpening (Fig. 18)
Sharpen the chain using protective gloves and a round file of.
Always sharpen the cutters only with outward strokes (Fig. 19) observing the values given in Fig. 18.
After sharpening, the cutting links must all have the same width and length.
After the blades have been sharpened 3-4 times, check the height of the depth limiter and if necessary lower it with a flat file and then round off the front corner (Fig. 20).
Round off the front edges with a file.
7.3 Storage and transportation
Install the chain guard (4) before transporting or storing the chainsaw.
Note: Never put a chain saw into storage for longer than 30 days without carrying out the following steps.
Storing a chain saw
Storing a chain saw for longer than 30 days requires storage maintenance. Unless the storage instructions are followed, fuel remaining in the carburetor will evaporate, leaving gum-like deposits. This could lead to difficult starting and result in costly repairs.
- Remove the fuel tank cap slowly to release any pressure in tank. Carefully drain the fuel tank.
- Start the engine and let it run until the unit stops to remove fuel from carburetor.
- Allow the engine to cool (approx. 5 minutes).
- Thoroughly clean the saw.
Note: Store the unit in a dry place and away from possible sources of ignition such as a furnace, gas hot water heater, gas dryer, etc.
After the saw has been in storage, perform the steps listed in Paragraph 5 before starting the chainsaw.
Transportation
- Engage the chain brake.
Make sure the chainsaw cannot shift position in order to prevent fuel loss, damage or injury.
7.4 Ordering replacement parts:
Please quote the following data when ordering replacement parts:
Type of machine
- Article number of the machine
- Identification number of the machine
- Replacement part number of the part required
For our latest prices and information please go to www.isc-gmbh.info
8. Disposal and recycling
The equipment is supplied in packaging to prevent it from being damaged in transit. The raw materials in this packaging can be reused or recycled. The equipment and its accessories are made of various types of material, such as metal and plastic. Never place defective equipment in your household refuse. The equipment should be taken to a suitable collection center for proper disposal. If you do not know the whereabouts of such a collection point, you should ask in your local council offices.
9. Troubleshooting guide
| Problem | Probable cause | Corrective Action |
| Unit won't start or starts but will not run. | - Incorrect starting procedures. - Too much fuel in the combustion chamber following failed attempts to start the saw. - Incorrect carburetor mixture adjustment setting. - Fouled spark plug. - Fuel filter plugged. | - Follow instructions in the User Manual. - Wait about 30 minutes until the fuel in the combustion chamber has evaporated before trying again to start the chainsaw. - Have carburetor adjusted by an Authorized Service Center. - Clean / gap or replace plug. - Replace fuel filter. |
| Unit starts, but engine has low power. | - Incorrect lever position on choke. - Dirty air filter. - Incorrect carburetor mixture adjustment setting. | - Move the lever to the correct position. - Remove, clean and reinstall filter. - Have carburetor adjusted by an Authorized Service Center. |
| Engine hesitates. | - Incorrect carburetor mixture adjustment setting. | - Have carburetor adjusted by an Authorized Service Center. |
| No power under load. | - Incorrectly gapped spark plug. | - Clean / gap or replace plug. |
| Runs erratically. | - Incorrect carburetor mixture adjustment setting. | - Have carburetor adjusted by an Authorized Service Center. |
| Smokes excessively. | - Incorrect fuel mixture. | - Use properly mixed fuel (40:1 mixture). |
| Poor performance when operated | - Blunt chain - Loose chain | - Sharpen or replace the chain - Tension the chain |
| Engine dies | - Empty petrol tank - Fuel filter in the wrong position in the tank | - Fill up the petrol tank - Completely fill the petrol tank or or re-position the fuel filter in the petrol tank |
| Insufficient chain lubrication (the cutter rail and chain get hot) | - Empty oil tank for the chain - Oil lubrication openings moved | - Top up the oil tank for the chain - Clean the oil entry hole/groove on the guide rail. |
The reprinting or reproduction by any other means, in whole or in part, of documentation and papers accompanying products is permitted only with the express consent of the iSC GmbH.
Subject to technical changes
GB
Service information
We have competent service partners in all countries named on the guarantee certificate whose contact details can also be found on the guarantee certificate. These partners will help you with all service requests such as repairs, spare and wearing part orders or the purchase of consumables.
Please note that the following parts of this product are subject to normal or natural wear and that the following parts are therefore also required for use as consumables.
| Category | Example |
| Wear parts* | Cutter bar, spark plug, air filter, petrol filter |
| Consumables* | Saw chain |
| Missing parts |
- Not necessarily included in the scope of delivery!
In the effect of defects or faults, please register the problem on the internet at www.isc-gmbh.info. Please ensure that you provide a precise description of the problem and answer the following questions in all cases:
Did the equipment work at all or was it defective from the beginning?
Did you notice anything (symptom or defect) prior to the failure?
- What malfunction does the equipment have in your opinion (main symptom)?
Describe this malfunction.
GB
Warranty certificate
Dear Customer,
All of our products undergo strict quality checks to ensure that they reach you in perfect condition. In the unlikely event that your device develops a fault, please contact our service department at the address shown on this guarantee card. You can also contact us by telephone using the service number shown. Please note the following terms under which guarantee claims can be made:
- These guarantee terms apply to consumers only, i.e. natural persons intending to use this product neither for their commercial activities nor for any other self-employed activities. These warranty terms regulate additional warranty services, which the manufacturer mentioned below promises to buyers of its new products in addition to their statutory rights of guarantee. Your statutory guarantee claims are not affected by this guarantee. Our guarantee is free of charge to you.
- The warranty services cover only defects due to material or manufacturing faults on a product which you have bought from the manufacturer mentioned below and are limited to either the rectification of said defects on the product or the replacement of the product, whichever we prefer. Please note that our devices are not designed for use in commercial, trade or professional applications. A guarantee contract will not be created if the device has been used by commercial, trade or industrial business or has been exposed to similar stresses during the guarantee period.
-
The following are not covered by our guarantee:
-
Damage to the device caused by a failure to follow the assembly instructions or due to incorrect installation, a failure to follow the operating instructions (for example connecting it to an incorrect mains voltage or current type) or a failure to follow the maintenance and safety instructions or by exposing the device to abnormal environmental conditions or by lack of care and maintenance.
- Damage to the device caused by abuse or incorrect use (for example overloading the device or the use or unapproved tools or accessories), ingress of foreign bodies into the device (such as sand, stones or dust, transport damage), the use of force or damage caused by external forces (for example by dropping it).
-
Damage to the device or parts of the device caused by normal or natural wear or tear or by normal use of the device.
-
The guarantee is valid for a period of 24 months starting from the purchase date of the device. Guarantee claims should be submitted before the end of the guarantee period within two weeks of the defect being noticed. No guarantee claims will be accepted after the end of the guarantee period. The original guarantee period remains applicable to the device even if repairs are carried out or parts are replaced. In such cases, the work performed or parts fitted will not result in an extension of the guarantee period, and no new guarantee will become active for the work performed or parts fitted. This also applies if an on-site service is used.
- To make a claim under the guarantee, please register the defective device at: www.isc-gmbh.info. Please keep your bill of purchase or other proof of purchase for the new device. Devices that are returned without proof of purchase or without a rating plate shall not be covered by the guarantee, because appropriate identification will not be possible. If the defect is covered by our guarantee, then the item in question will either be repaired immediately and returned to you or we will send you a new replacement.
Of course, we are also happy offer a chargeable repair service for any defects which are not covered by the scope of this guarantee or for units which are no longer covered. To take advantage of this service, please send the device to our service address.
Also refer to the restrictions of this warranty concerning wear parts, consumables and missing parts as set out in the service information in these operating instructions.
F
Sommaire
Carburants recommandes
Chere cliente, cher client,
(ISO 2000/14/CE) 115 dB (A)
6.3 Varmstart (7A-7D)
(Maskinen stod stilla i mer an 15-20 minuter)
Kettingdeling (3/8), 9,525 mm
Kettingdikte (0,05), 1,27 mm
Stationair toerental 3000± 300min^-1
Paso de laceda (3/8),9,525 mm
Grosor decedena (0,05")1,27 mm
UcTpoIcTbA 3aunTbI (pnc.1a/1b)
3 ПИЛьнHA YENb C MAJOI OTDAUH NOMOJET Bam cnpaBntbC rOTDAuH IN c ee CINIOI prn NMOUcNEuaJIbHO pa3pa6oTaHHbIX 3auHTbIX yCTPOICTB.
6 PbIuHr TOPMO3A LEPIN (NEPEIDHRA 3AUHTA PYK) 3aunuaeTLeByo pyky onepatopa B clyueae ee COsKaJIb3bIbAHnIc C nepeJneykoRTN BO BpeMra60tBI Nlbl. TOPMO3 LEPIN ABJRETCyUCTpoCTBOM 3aunbl, CnHJaOUsIM PNCK npnHHeHH TpaBM BCJIeDCTBNe OTdauH NocpeCDTBOM OCTaHOKN pa6ToaUeeynnIbHoN CEEN 3a MmJIInceKHyDJI. AKTNIBpyeTcprn NOMOUI PsIgA TOPMO3A LEPIN.
10 NEPEKJIIOUATEJIb «BHKIOUOHEO- BbIKIIOUOHEO» cpa3y ocTaHaBaIBaet DBINrATeJIb,ecIN OH BbIKIIOUaTec.ДЯ 3aNycka nII NOBtOPHOro 3aNycka DBNrAteJIa BbIKIIOUaTeJIb DOJKeH HaxOdITbc R INoJKeHn «BHJI.»
12 BLOKINPOBKA DPOCCEJIbHOrO PblU4A InpenTCTByeT BHe3anHomy yChOpEHNIO DBnIraTeJIA DroceJIbHbI pyIhar HeBO3MOJHO HaKaTb, He HJaKabHa 6LoKINPOBky DPOCCEJIbHOrO pbIura.
18 LcENEUYOBINTeJIb cHnHaet pNcK npuHHeHn TpaBM B Clyueae O6pbIbA nI cxOda cennc C shHbI BO BpeM pa6oTbI. LcEnyNoBNTeJI npedHa3NaueH dIJI nepexBaTnpOBncaUoSe cenII.
Yha3aHHe! O3HaKoMbTeCb C yCTpoiCTBOM NJIblI n ee DeTaJIaMn.
RUS
2.2 CoCTaB HOMJIeHTa yCTpoiCTBa
ПоберытКOMПLEKTHOCTьИЗДELЯн ОСНOBAHIN OпИСАнHOrO OБьЕМ NOCTaВи. ПриОБнаружEHи ИЮСТаTKA KOMПОHETOB ОБразИТСБВHAш СЕВИСЧБИ ΚЕТР ИЛIMМагAZIH,ВКOTOPOM BBy PrNObpeJIN УСТрОИСТВО, He NO3ДHeE YeM B TeYeHne 5-TN Равочи Дnev ПОСLE РПОБРЕТHERИЗДЕЛЯ, ПревяВИВ DeIYCTBNTeJIbHyU KBITaHcIIO O ОнКунke.ОБразИТЕ ВИМANHe Na TБИЦу C УкAZaHnEM rapaHTHmHbIX CpOKOB BДOKYMEnte C ИнформuaциЕ O СЕВИСHOM OБслУЖИВAHIN.
- OTKpoIte ynaKOBky N BbIHbTe ocTopoHNO n3 ynaKOBn yCTpOiCTBO.
- YdaJInte ynaKOBOCHbI MaTePnA,I a TaKHe npncnoc6beHn 3aunTbI yctpoiCTBa npu ynaKOBbIBaHHn n TpaHCnOpTnpOBKe (pni HaJIInH).
- PpOBeBpTe KOMnJIeKTHOcTb yCtpoiCTBa.
- Поберыт eустюг STOи npinHaДLEЖOCTH
н ha NaHInuHe BO3NkUxN ри
ТраHCnOpTnPoBHe NOBpeJdEHN.
CoxpaHnTe ynaKOBky nO BO3MOxHOCTn Do nCTeueHnC poka rapaHTnHbIX 68a3aTeIbCTB.
Onachoctb!
YcTpoIcTB O UynaHObHa He YABJIOTcR
TeCTCNHM NrgpyuHAmn! 3anpeSeHo DetrM
HRpaTb C NlaCTNHOBbIMn NaHETAMn,
PLeHNKAMn MEmKHM DeTaIaHMn! OnaCHOctb
3aKJIIOUaETcR B TOM, YTO OHN MOryT
IporILOTHTb HIN NOrn6HyTb OT ydysb!
OpnHnHaJIbHoe pyKOBOdCTBO no 3KcIpyatauIN
- Yka3aHnI NO TEXHnke 6e3ONaCHOCTN
3.ИспобьзованеВСоТВЕТСВИСпpeДиЗИЧЕНЕ
UcTpoIcTBo npedHa3NaueHo NCKLIOuHTeJIbHO
Dnpe3Kn DepeBa. BAlKy DepeBBeB
MOJH0 OcyueeCTBnTb TOJbKO npHnHaUNH
COOTBeTCTByUoTeO o6yehN. IpOn3BOdnteJIb
He HeCET OTBeTCTBeHHocTH 3a yUeep6,
BO3NHkWn B pe3yNbTaTe NCNoJIb3OBaHnI He
no Ha3NaueHIO nIi HnepaBnIbHO pa6Otbl C
ycTpoIcTBOM.
Pa3peshaetcnaNoIb3ObaTb yCTpoIcTBo TOnbIOB COOTBeTCTBnC ero npedHa3NaueHHeM.JIIO6oe dpyrOe,OTInuauoUeeec O TTOrnoNcNoIb3ObaHne
CHTaETcH He COOTBETCTBYUOIM
npedHa3naueHHo. 3a BCE Bo3NHKUnne B
pe3yIbTaTe TaHOro HCNoJIb3OBaHHu yUeep6 HIN
TpaBMbl IIO60r BOda HeCet OTBETCTBeHHOCt b
IOJIb3OBaTeJIb N pa6OtaUoHc C yCTpOJCTBOM, a
He erO h3ROTOBHTeJIb.
UyTnTe, YTO KOHCTpyKuŋ Haawnx yCTpoiCTB He npedHa3NaueHa dJa IcNoIb3OBAHnI IN B pOmblIeHNHO, peMeCJIeHNHO nIN HndycTpnaIbHOo6bIaCTn. MbI He hecem HNKaHOI OTBETCTBENHOCTn IO rapaHTnHBIM 6OB3aTeJIbCTBaM npI NCIOb3OBAHIn yCTpoiCTBa B IpomblIeHNHO, peMeCJIeHNHO nIN HndycTpnaIbHOo6bIaCTn, a TaKHe B NODo6HOJ DeAteJIbHOCTn.
OctopoxHo! OctatoUhble pncn
Дангпннадлесьемобрашени C 3ТИУСТВOM BCERda COXPAHЯOTCA OCTaTOHbIe pUCN.СLEdYUOJIne OANACHOCTM MOrYT BO3HNIKHyTB CBRA3N C OOCBENHOCTAM NOKHTPYKUN IN NCONINHEHNA 3TORO yCTPOIcTBa:
- nope3bl npn cOpnpKOCHOBeHN C He3aunueHHoH NIN Bpaauouecra ceIbIO NNlbl;
- nope3bI BCLeJeCTBHe OTeaHn IIn DpyrHx CnyaHbIX DbHXeHn HappaJIIOUeI 1INHbl;
- TpaMbI, npuHHeHHbIe pa3JIeTaIOUIMMnCBACTOPHObl YaCTaMNIeNIIINbI;
- TpaMbI, npuHHeHbIe pa3JIteTaIOUIMnCBACTOPOHbI YaCTaMNI NlOMaTePHaIa;
- NOBpeKdEHeNcLyuXa,ecnHne HcNoJIb3yETcnpednncAHHa 3aunTa oprAhOB cLyxa;
- HapuHnIy DbIXaHnB CBeJeCTBVe BDbIXaHnBpeHbXra3OB IN NOBpeJxDeHnKoJn pni nonaHaHH Ha Hee 6eH3nHa.
RUS
4. TexHHueChne daHHbIe
PaboumyobemDBIgateTJI 50,4cm3
MaKcHmAbHaMoOuHocTbDbIrTaTeJI 2 KBT
Динанпilneн.. 39cm
Динан ha npablaiouei shnbl 16" (40 cm)
EMKOCtB TOJINHBHOrO 6aKa .540 cm3
EMKoCTbMacJHoro6aHa 240 cm3
CnCTema rawenry Bn6paunn
3y6byaenHoro 3y6aToro
KoIeca 73y6beB no 9,525 MM
Bec HeTTO 6e3 e9n I
HanpaBIAIOUeIuINbI 5,75Kr
YpOBeHbIaBHeHnIyUmaLpa (ISO 22868)
Ha pa6o7eM MeTe onepaTopa 101,8 d5(A)
TOrpeuHocTb KpA 2,5D(A)
I3MepeHHbI ypOBeHb MoUHOCTH
LwA (ISO 22868) 111,5 dB(A)
TOrpeuHocTh KwA 2,5 dE(A)
TapaHTnpoBaHHbI ypOBeHb MoUHOCTH
Uyma L_WA (ISO 2000/14/EC) 115 dB(A)
5.1 MoNTaH HaprablaIooe IINbI N ceni IIJIbI (pnc.2A-2G)
- Pa36bIoknpoBaT Topm03 ueH,ДЯЗTOHaKaTb Ha nepedHIO 3aunTy pyK (6)B HappaBJIeHn NpeDneH pyKoATrKn (7). (Pnc.2A)
- OTKpyTb DBe raHn (19) n cHrTb KpbIshny HappaJIouSei uHHb(A)(pnc.2B).
- BCTaBnTb HnPaBlaJIoUyU 5uHy (2) B KpeIeHne Ha zenoUHOI pHe (pnc. 2C).
- YIOnHITb cIeNb (3) BOKpyr BeDyUSei IeCTepHn (C) (pnc.2E).IpoKoHTpOIpuPyTe HappaBLeHne BpaSeHnraCeN (3).PeJxUne Uactn (B)doJIHHbIb6bTbBbIPOBHebl,KaK poka3aHOHa pnc.2D.
- YIOnKHTb cIeNb BOKpyr HappaBJIaIOUeJ 1INHbI. (Pnc.2E)
- BeDyIe 3BHeJzIeN (3) DoJIHHbI pIoHocTbO BXoIIT B paCNoIooHeHHbI no nepiMeTpY na3 (D), a TaKHe B npOMeHcyTHm MeJdy 3y6bMy BeDyuIe IweCTepHn (C). (Pnc.2E)
- Повернту haTRAЖHOB BnHT ZeHn (20) npOTnB yacoboi CTpeIKN, TaK YTObI 6OIT (E) haxoJncIa Na KOHc CBOe JInHn nepemeueHn. (Pnc.1B/2F)
- YctaHOBInTb KpbIshKy HappaBIAIOUeI ShnHbI (A).
Yha3aHne! BoNT (E) ycTpoNCTBa dIy HATJxHeHn ceiIN doJIxHeH fIKCnPOBaTbC B OTBepCTn (G) HaprablaIOe shHbl. (Pnc.2G)
ДлэТOrO Heo6xOДmO HEmHOrO nOdBnrgaTb HanpaBIAJIOUyU OINHy (2)ВпeрдиHa3aД B npOcECE yCTaHOBKn KpbIuKn OINHbI (A).
3aTaNHybraHKn (19) yCnIeM pyKn.
RUS
5.2 PerynipobbHa HataJHHeNn cenn (3A/3B) PerynipobHy HataJHHeNn cenPi pa3peWaeTc8 BbINOHNrTb TOnbKO pRi BbIKIQUeHHOM DBrGATEJIe.
-
Czlerka haKaatb Ha ocTprne HappaBlaHooJei shnbl (2) no HappaBleHIO BVerpN oTpeyIInpoBaTb HataJHeHne cenC n POMOsbH HataJHHoro BnHTa cen (20). (Pnc. 3A) HataJHeHne cenC cnHaTaeTcR ONTMaJIbHbIM, eCIN zEnb (3) npineraet K HnXHei CTOpOHe NocepeDInHe HappaBlaHooJei shnbl (2), kAn Noka3aHO Ha pnc. 3B (B).
-
Czernka HaKaTb Ha ocTpne uHbI n 3aTHyt b o6e raikn (19).
-
BbIOnHnTb npOBepHy fYHKUHOHINPOBaHnB. BpyHyIO npOTaHyt b cIb (3) Odn pa3 BOKpyr hAnpaBIAIOSe IInHb (2).EcI IN cIb (3) C TpyDom BpAaETcB BOKpyr HApPABIAIOSe IInHb (2) IIN 6JIOnHpyETcR, 3HaHT, HATJKeHHe CNIshKOM CInhHoE.
B TaHOM cIyuae cIeJyET BbIOnIHnTb He3HaHTeIbHyU peYInpOBky:
- OTHpyTb o6e raHKn (19) n cHOba 3aTMyTb Hx yCnJIem pyKn.
- YmehbHNTb HATJxHeHne cENn, NOBepHyB HATJXHO BINTcENn (20) npOTNB yacOBoC CTpeIKN. IocLe BbINOpHEHn He6OJIbXu XaROB peYInpOBKn CledyET ChOBA npOTAHyTB cENb (3) Ha nApBaJIIOUeM IINHe (2), YTO6bl Y6eDHTCBaTOM, YTO cENb (3) DBNKETc 6e3 NOMEX, HO, TeM He MeHee, PLOTHo pInleraet K HanpaBIAJOUeM IINHe. Yka3aHHe: Ecln HATJxHeHne cENn (3) CNIshKOM Cna6oe, Heo6xOdIMNo NOBepHytB HATJXHO BINTcENn (20) no YacOBoN CTpeJIKe.
- EcInn HataKeHne ceni Otperyu npoBaHo ONTImaJIbHO, Heo6xOdmo CJeRHa HaKaTb Ha ocTpne HappaBIAIOUeI uINHbI N 3aTAYb o6e raIKn (19).
HOBAR NINbHaN cenb pactaRnBaetc,
No3TOMy pRn BBOde B 3HCnIyaTaauHIO BAHNo
DOnOJIHNTeJIbHO peryIInpOBAtB ee uepe3
KOpOTHe IpomEnHyTHn BPeMeHn (PnpMepHO
yepe3 5 pe3OB).3TN BpeMeHHbIe INHTepBaIbl
IpOdJIeBAIoTcno Mepe yBelenueHn Cpoka
3HCnIyaTaauH nIIbl.
Yka3aHHe:CJIINHKOMCJLABOE nI IN CJIINHKOM CNJIbHOE naTaeHne nIIbHOI uei (3) yckopraet n3Hoc Beyuie Wectepn, HaprablaIOe WInhbl, cenu n oDunnHa
KoIeHcyToRBaJa.Ha pnc.3B n3O6paKeHo npabInbHoe hataJKeHne A (xOIoHoe coCToHne) HataJKeHne B (harpTeOE coCToHne).Ha pnc.Cn3O6paKeHa cInuKOM Cna6o HataHyTa uenb.
5.3 TOnJIbO n MacNo
TOnnBO
HcnoIb3yIteIJI ONTINMaIbHbIXpe3yIbTaTOB HOpMaIbHyIO He3TNIpOBAHHyO CMECb TOnJIbBa CO CneuaIbHbIM DByXTaKTHbIM MacIOM.
TOnnBnaCmecb
CmeaTb TOINBO C DByXTaHTbIM MacIOM B IIOxOJaUe EMMoCTn. B36oJTaB eMKoCTb, YTO6bl BCE TtuaTeJIbHO CmeaTaB.
Yha3aHHe: 3anpeSeHo nCnOJIb3oBaT bIy IToI nnbl yIcTbI b6eH3IN. 3To MoJET npNBecTN K IOBpeKJdeHIO dBIgATEIe N K nOTEpe npBaHa rapaHTnHoe o6cIyKINBaHne DaHHoro n3dEJIra. 3anpeSeHO nCnOJIb3oBaT bTOnJIbNHyIO cMeCb, KOtOpaa XpaHnlaIb B TeueHene 6oJe 90 dHei.
Yka3aHne: Heo6xOdImo NcNoJIb3OBaTb CpeuJaIbHOe DByXTaKTHOE MacNo DJIa DByXTaKTHORO DnBiratTeN C Bo3DyUHbIM OXlaJXDeHMeB KOLINueCTBeHHOM COOTHOseHn 40:1. He nCnoJIb3yIte DByXTaKTHOE MacNo C peKomeHIOBaHHbIM COOTHOseHm Cmecn 1:100. HeNocToAtOChOE MacNo pInBoDnT K noBpeJxHeHIO DByrAteJN I K Notepe npaba Ha erO rapaHTnHOe O6cLynXuBaHne.
PekomeHdyeMOe TOJIHBO
HeKOTOpBie HaH6OJIe pacnpoCTpaHEnHbIe TINbI 6eH3Ina CODepKAT TaKHe npIMecN, KaK CnIPrTOBbIe IIN 3ΦnRbIe COeHNHeHINy, YTObI cOoTBeCTBOBaTb CTAndApTAM YNCTOTb BIXLONHbIX rA3OB. DnBnateJIb pa6OtaET yDObIeTBOPNTbHO CO BCEMN CopTAMi 6eH3Ina dIЯ ПИВОДA, B TOM YNcIe C 6eH3INHom, O6OraSeHbIM KNCLOpOdom. PpeNoHTeTIbHO NcNOJIb3ObTaB He3TNlIpOBaHHbI CTAndApTbI b 6eH3INH.
Cma3bIbaHneMacloncenn HnnpaBlaIOeShnbl
KaHdbi pa3 npn 3anpaBKe ToIINBHO6aKa 6eHNHom Heo6xOIMO TaKHe 3anoJIHrTb 6aK MaCla ZeN.PekomeHdyetc HcNoJIb3OBaTb DnT 3TOrO cTaHdaptHOe MacNo dIra ZeN.
RUS
Motophoe Maclo 6eH3nH Tnilbnae

Прорория 1:40 Tolyko Maclo
KoHTpoJIb nepeI nychom dBnratela
Onachoctn: 3anpeucho 3anyckaTb n IcnoIb3ObaTb Pny,ecIn HaprablaIOuaa ShHa nCeIb HnpabINbHO yCTaHOBLeHbl.
- 3aŋoJIHnITb TOnJIbHbIi δaK (21)
HaJIeJxAaIeT OToJIbHObcMecBIO (pIc.4). - 3aONHITb MacJIaHbI 6aK (22) MacIOM dJIa ZeHN (pnc.4).
IocJe 3aPabKn 6aka cenn n MacJHoro 6aka HJxHO 3aKpbItb KpbluKN 6aKOB n 3aBHTnTb nx pyKo. He nCnoJIb3yIte dJa 3TOrO HnKaKoH INCTpyMeHt.
6. Pa60Ta c yctpoiCTBOM
Ipeed hauaIom 3KcIyatauHn HeoXoIMNO npOBepntb yCTpoiCTBO Ha HAIuHne BO3MOxHbIX NOBpeJdeHn, pNn HAIuHn NOBpeJdeHne IcNoIb3OBAHne yCTpoiCTBa 3anpeJeHO.
YcTpoIcTbO pa3pe7aepTa 3aynckaTb T0JIbKo C BkIIOUeHHbIM TopMO3OM cENI. TopMO3 cENI BKNIOUeH, eCIN pbIaR TopMO3a cENI (6) HAnkat NO HAnpaBLeHnIO BnpeEd.
Onncnne npnncnna deiCtBn,cm.B pa3delaX «PpOBepHa TOpMo3a ceH» - «Ctatuuechoe HcNbItaHne
6.1.Topm03 zenn
LcnoHna nla cha6KeHa TOpMO3OM ceHn, KOTOBpi CHNkaet ONaCHOCTb pnuHHeHn TpaBM No pnuHHe OTdaHn. TopMo3 BkIouaETc HauKaTHm Ha 3aunTu pyk (6). HanpImep, ecIn npri otDaue pyka onepaTopaUpyadaparetc o 3aunTu pyk (6). Ppi aKTHBaunn TOpMo3a ceB (3) pe3KO OCTaHaBnBaetc.
PpeynpeJeHne: XOTa TOPMO3 ueHnnpedHa3NaueH IJIy UMeHbSeHnry PnCKaIOnyHeHH TpaMbI NO pInuHHe OTdaH, OH
He o6eueHbAet COOTBETCTBYUoey 3aunTbI B clyae He6peKHOro 06paueHnC nIoOn. PeryIarpo npOBepRte HndLeKauyo pa6Oty TopMo3a cen. Heo6xOdmo npOBepRtB TopMo3 cennped BblOInHeHem nepBOrO pe3a, nocle MHOKpTHORO pINLEHn, nocle TexHnueckoro 06cLyHNBaHn, a TaKHe B Tom clyae, ecIn cNoOpHnA PIIa NODBepralacb DeiCTBIO CnIbHbIX TOJYKO B IIN PaJaIa.
6.1.1 Поберна Торmoэцени (рис. 5A, 5B, 6)
Ctathuechoe HcBbTaHne (pnp octahOBLeHHOM dBVaTeNe)
Topmo3 ueHn OTHIouen (eHb (3) MoHcT CBO6oHNo nepemeeaTbcA
- Пotingупегадиюзашу рук (6)В наразалени пedingней руков (7).Пepingая заша рук (6)doJnxha 3aФИСИРОВАТССХараКТерньIMцELN (Pnc.5A)
- Κεπβ (3) Σόλκην περεΜειατβς ἀν ἡπαραβλίουσει υπινε (2).
TopMo3 Zeenn BkIIOueH (zIeNb (3) 3a6JIOKINPOBaHa)
- HαkaTb Ha nepeDnIO 3aunTy pyK (6) B HappaBLeHn HappaBlaHOe 5HHbI (2). Pepednra 3aunTa pyK (6) DoJHKha 3aΦHKcnpoBaTbC aXapaKTepHBIM UeJIyHOM. (Pnc.5B)
- LcIb (3) He doJIxHa nepeMeuTaBcra Ha HaprablaHoueJ uHe (2).
Yha3aHHe:Ipeednra 3aunTa pyk (6)doJHKha
fHKcnpoBaTbCByB DByx nolKeHHax. He
pa6oTaTe Cnilo,ecIn oUyuaetc CnilbHoe
cOpOTNbJIeHne nnpeednra 3aunTa pyk
(6) He qHKcnpyETcB Ondom n3 noLOKeHn. B taKOM cLyuae He3aMeJnteIbHo OTnpaBbTe Nny B aBTOpN3OBaHHoe 6kpO o6cLyJHbAHnHa pemOH.
ДиhamMuYeChoe HcIbITaHHe (C BHKJIOUeHHbIM DBnRaTeJIem)
- YctaHOBNTb NIIy Ha npOHyIO pOBHyIO NOBepXHOCTb.
- Левский яковский yedepnivbaite nepednioyakuTky (7).
- 3aynctnte ceNoCHyIO nIy, cIeDyI INcTpyKuIN IO nCcy. (Cm.6.2 nIi 6.3)
- OTHIHOHTe TOPMO3 ueHIN (NOTAHHTe nepedHIO 3aunTy pyK (6) B HappaBHeHH
RUS
peednepykOaTHN7).Pnc.5A)
- Bo3bMntecb 3a 3aDnIO pyKoTHy (8) npaBoi pyKoI.
- Послк короткоу порравьВыHMNTe ra3 noHocTbIO.HaKMnTe TblbHOn CTOPHOH KInCTN leBOI pyKn Ha nepeDHHO 3aunTy pyK (6)В CTOPHy HaprabJIoUSei ShInbI (2).BHLIOHTcT TopMo3 ZeII.(pnc.6)
Onacho: Topmo30m cenn CJIeJyET NJIb3ObaTcB MeDJIeHNO n O6dymaHNO. Heo6xoJIMO npOHO yIepHNBaT bNlNy dByMa pyKaMn, o6ecneuBaJxOpoWNI 3axBaT. NIIa HE DOLKHa cOpNKacatbcraC dpyrMMn ppeDMtAmN.
- LcIb (3)doJIHNa octaHaBnBaTbcr HemeJenHo.B clyuae octaHOBNu ceni (3) Heo6xoJIMO cpa3y OTNyCTHTb DpocceJbHbI pyUar (11).
Onacho: EcInu cenb (3) He octaHaBnBaTeTc, Heo6xOJIMMO BvIKIQUHTb DnIRaTeJIb N CdaTb INLy dIpy pEmOHTa B aBTOpN3OBaHHoe 6HOp0 O6ClyKINBaHn.
Yha3aHne: He BbITraBaIte 7JIaHr n3 6aKa HapyJy nonHOCTbIO.
4.ИЗВЕКИТЕФИЛБТРИЗ6аka.
5. BbITAHHTe FInIbTp BpaaateHbHbIM DnHexHeHem N OuchTe erO.EcIn FInIbTp NOBpeJDeH, yTHIN3NpyTe erO.
6. YctaHOBInTe HObIy IIN OUYIeHHbI ΦHbTp. BCTaBtte KOHeC ΦHbTpBa B OTBePCTne 6aKa. Y6eINTecb, YTO ΦHbTp HAXOHTcB B HIXHEM yIyIy 6aKa. YcTaHOBInTe ΦHbTp B HYNHoe MeCTo pRn NOMoUdIINHHO OTBePTKn.
7. 3aONHnTe 6ak CBeKeH ToPJIINBHOcMecbIO. CMOTpHte pa3dEe «TOPIIINBO I MACJIO». YctaHOBHTe KpbIshky 6ka.
7.2.3 Cbeca 3aHHraHHa (pnc.15A-15C)
Yka3aHne:ДЯ COxpaHeHn MOUHOCTN DBiRaTeJI NIIbI CBeua 3aXnHaHn DOJHXa 6bITb YNCTOи IMeTb npAunBHope pacCToHne MeJdy 3JIeKTPoDamn (0,6 MM). CBeuy 3aXnHaHn HUHXO OUYaTbYeep3 KaJDbIe 20 YaCoB pa6Otbl NIN MeHrTB B Clyae Heo6xOIMocTn.
- YctaHOBInTe NpeKInHouaTeJIb «BkHIOHeHO- BbIKIIOHeHO» B NOLOKeHne «Stop (0)».
RUS
- CHNIMITE KpbIshky BO3dyuHoro FOJIbTpa (14), ydaJIINB dIa 3TOrO KpeIeHHbI BnHT KpbIshKn (A). Iocne 3TOrO MOxHO ChrTb KpbIshKy (pnc. 15A).
- ИзВлесни Своздушни Фильст (15) (рис. 15B).
- ИЗБЛЕКИТЕ npOBOD 3aЖИГАнIGA (C), NOTAHYB N OДНовременно Враця С党支部 3aЖИГАнIGA (pnc.15C).
- CHIMITE CBEUY 3aJINrAHHc c NOMOJIbO CBEHORO KJIIOHa.
- OuHCTnTe CBeyu 3aXnHaHnI ΜeTHoN CO ΜεTnHO N3 MeHNO pPOBOLOH NlN UyCTaHOBnTE HOByIO CBeyu.
7.2.4 PerynipobbKa hap6IopaTopa
Оптимальна мошноctь karбюратoga
Быla установleteна Ha 3abode-иЗROTOВТЕ.
При Нeo6хODIMOCTN peRyINPOBKN CNTeMbI
Смазьваня сeпн Heo6xODIMO BbINOJIHЯТь eB
aBTOPn3OBaHHOM bOpO o6cIyKINBaHЯ.
Yka3aHHe: Hb Kcem Cnyae He BbIIOJIHnTepeRyIINPOBHy Kap6Iopatopa camOCToTeJIbHO!
7.2.5 Hapabla loa shHa
Cma3bIbAIte 3Be3doUky HnpaBIAIOuSei IINHbI Uepe3 KaXdIbe 1O cacOB pa6Otbl. 3To Heo6xOIMO dIra O6ecneueHInr ONTMaJIbHOI MOUIOCHTeIOnOHOI PIIbI. (Pnc.16) OUnCTHHe MacJHoe OTBepCTHe, YcTaHOBInTe WIPnIz DIA KOHCNCTeHTHOI CMA3Kn (HE BXODIT B KOMJIeKT NOCTABKN) IN 3aKaauHTe CMA3KBy NPOUHNHINK, POKA OHa HE 6yDeT BvICTyNaTb HA HApYKHO CTOpOHe.
PeylraHOp OunuAte na3, B KOTOpom DnKHeTcIeNb, I OTBepCTne IJIPOaHm Macla pRIN NOMOUs INCHTpymEnTa IJr OoNCTKn, KOTOpbM MoKNHO pIno6peCTn B MaRa3InHe. (Pnc. 17A) 3To BaKHo IJr ObecneueHn ONTMalbHoi CMa3Kn HappaBIAHOSeI WInHbI NcENI BO Bpemr pa60TbI.
- AkkypaTHO ydaJInte 3ayceHnIbI ocTpblc KpOMKn HappaBlaJIoUeI shINbI (2) npi nOMoUg pIOCKOrO HAnINlbHnka. (Pnc.17B)
- Пелеворачивайт eнларьюцу lo nHy (2) uepe3 kaxdble 8 yacob pa60tbl, YTObI OHa paBHOMeHPO n3HaWuBaJalacb Ha BepxHei NnKHei CTOpOHe.
PponyckaTeJn Macla
PpOynckaTeI MaCla Ha HappaJIooJeI ShHe HeoXoDmIO OOnuTaTb, YTo6bl ObecneHTb HaJdLeKaUee CMa3bIBaHne HAppaJIHOUe I ShHbI NcENI BO BpeM pa60TbI.
Yha3aHHe:CocToHHe npOnyckaTeJIeM Macna MoJHO IeRKO npOBepntb. EcI npOnyckaTeJIu ChTbe,TO cIeN b AToMaTnueChn paCnblraT MacIOU chepe3 HeCKoJIbKO ceKHyD nOcJIe NpCKa IIJIb.IIIa OCHaSeHa ABToMaTnueChkO CNTEmO CMa3Kn MaCLOM.
AbTomatuechacm3ha ceH
CteNochna nla cHa6KeHa aBtOMaTnuecko
CNCTeMoN CMa3Kn MaCLom C 3y6uAtbIM
npNbOdom.ABTOMaTnuecka CNCTema
Cma3bIBaHnna MAcIOM cHa6KaeT HApRaBJIIOUyUo
uHNHy NcEb ABTOMaTnueckn HaJdLeKauIm
KOInueCTbOM MacJa. PnY yCKOpEnHn DVBraTeJIa
MaCNo Teet 6bICTpee NO HApRaBJIIOUe JINHe.
CnCTema Cma3bIBaHnna CcENi ONTmAbHo
OTpeRyIInpOBaHn Ha 3aBODe-N3rTOBHTeJe.
PnI Heo6XoDMocTN peRyIInpOBxN CnCTembl
Cma3bIBaHnna CcENi, Heo6XoDMn BO bIpOIJIHTb ee B
ABTOPIN3OBaHnOM 6IPO O6CJynbAHnA.
Ha HnJHNe CTOpOE cTeNoCHNO nIbI hAxODITcra
peRyIInpOBoOHb BVNT (A) dJa CMa3Kn cEpi
(pnc.21).PiobopoTOM BJIeBO Cma3Ka cEpi
ycnlnBaEtCRA, NobopoTOM BnPaBO Cma3Ka cEpi
ymEnbShaAetCRA.
3aToUHa pInIbI (pnc.18)
3atauBaTe ceNB, nCnoJIb3yra 3aunTHbIe nepaTKn I KpyIbI HAnIIbHNIK.
3atauBaTe oCTpna TOLbKO HappaBLeHHbIMn HApJyDvNKeHnMn (Pnc.19), yUHTbIBaY daHbIe, yKa3aHbIe Ha pnc.18.
Piocne 3aToCHN Bce peKyuIe qactn DoJIHHbl IMeTb ODiHaKOBUIO UINPHNy I dInHy.
Iocle 3-4 npoceydp 3aTockn peHyuXx uacteHne6xoDIMO npOBepntb BbICOTy OrpaHnHTeIaIy6nbI n pnp Hne6xoDMOCtN yCTaHOBNTb erO rny6ke npn NOMOUs PLOCKOro HAnNbHnka, a3aTeM 3aKpyTInTB nepeDnYyrol (pnc.20).
3aKpyIInTe nepeDHeN KpOMKn HAnJIbHNKOM.
7.3 XpaenHeNn n TpaHcnpToPobBa
ДоHaЧалТранспорТировиХхpaан�уctaновITEorpaЖденицп(4).
Yka3aHne:He octabIyTe 9eOnuHyIO nIy6e3 pa6OtblDolbIe,ChmHa30dHe,HeBbINOJIHNB CJeMyUOJNe DeiCTBnI.
XpaenHe zenoHoi nJIbI
EcInIeNoUHAn PIIa He IcNoIb3yETc8 60JIe 30 dHe, Heo6xOdIMo NIOJrTOBnTb ee K 3ToMv. B npOTnBHom Cnyae HaxOJaUeecB Kap6Hpatope OCTaTOuHoe TOnLIbNO IcnapReTcA, OCTaBnI NOxOHn Ha pe3INHy OcaJOK. 3To MOKeT 3aTpynHb CTAPN, KaK CJIeDCTBne, BbI3BaTb Heo6xOdIMocTb IpOBeDEHHa peMOHTbIX pa6OT.
- MeIeHNo OTKpoIte KpbIuKy TOnJIbHOrO 6aKa dIy TORO, YTO6bl yMeHbUInTb IMeIOUeecr daBLeHne B 6aKe.OctopoJHo ONOpOxHnTe 6aK.
- 3aynctnte DnBraTeIb I octabte erop a6oTaTb Do Tex nop, noka nila He octaHOBNTc, YTO6bl ydaJIHTb TOnJIINBO N3 KAP6IopaTopa.
- Побождente, пoka DBnraTeIb octbIHET (OK.5 MInH).
- TüsseleBHO Ounchte yctpoNCTBO.
YhaaHHe: XpaHHTe NnIy B cyXOM MeCTe, BdaJIb OT BO3MOKHbIX hCTOuHNHOB BOCIIaMeHENH, HaprImep, neu, 6oJIepeA dIy HarpeBa BOdbl, pa6OtaIOUeRo Ha ra3y, raoBOB cyuINKn I T. D.
IocIe xpaHEnn BbIIOJNHTe BBoD B 3KcNpyatauio CoIaCHO yKa3aHNm n3 a63aCa «5.PpeD BBODOMB 3KcNpyatauio
TpaHcnpOpBbA
- PnPbVeIeT B DeIcTBn TOPMo3 cenN.
3aФИСИРУTe ΣeNoUHуI O NIIy O T COKЛьЖЕнЯ,ЧTOБи HeДОПУСТВу YTeUKN TOJIINBA, NOВржdeHи ИИ TpaBM.
RUS
7.4 3aHa3 3aNaChbIX YacTei
- He obra3aTeJIbHO BxOJrT B oBem NoCTabKn!
Пио баружени.Deфektob Илн HeNCpabHocTeМbl npocim Bac 3aBnTb O taKOM clyuaeВ ceTN INHTepHerHa caite www.isc-gmbh.info.ОбатITE BHMaHne Ha ToHoe OINcaHne HeNCpabHocTHN B IIObOM clyuae OTBeTbTe Ha cIeDyUOuNE BONPOCSbl:
- UcTpoIcTBo yHe pa6oTaIOn nI I OHO 6bIIO HeNCpPaBbIM C cAmOro HaUaIa?
Bam 6pocnilocb yto-lno B rla3a nepei BO3HKnHOBeHHeM HeNCnpaBHocTn (npn3hak nepei HeNCnpaBHocTbI)? - KaHyo HeNCnpaBHOCTb HMeet YcTPOJcTBO, NO BaSeMy MHeHIO (OCHOBHO npu3HaK)? OInuHTe 3Ty HeNCnpaBHOCTb.
RUS
TapaHTnHoe CBnTeJIbCTBO
YbaKaemam nokynteBnua, yBaKaemb nokynteB,
Hauin npOdyKtI npOxOaT TsaTeBHeuN KOnTpOJI kauEcTBA. EcIn 3To yCTpoiCTBO BCE He 6ydet
fHyhUHOHPoBaT 6e3ynpueHo, Mbl npocm Bac oBaHTbcra B hau CepBnchbl otDeI no aDpecy,
yka3AHOMy B 30m rapaHTnHOM TaIOHe. Mbl taKHe oxOTHO OTBeTM Ha BaHn BONpOcbl NO TelefoHy,
Homep KToToporo npBedeH HnKe. Pn npEdbAeHn rapaHTnHbIX Tpe6oBaHn DeIcTBuyI CTJeDyoUne
ycNoBria.
- HactoIe npabIna rapaHTnI DeIcTByOT NcJIIOHTeBHO B OTHOWeHIN NOJb3OBAteJe, T.e. fNuecknX nU, KOTOpIe He HamepeBaIOTcN cNOJb3OBAt b HactoIe eN3dJIeB E pAMKx CBOe npoeCCNoHaBn IIN dpyroCamaCTOBHe JDeTbeNbocT.N.HactoIe npaBnla rapaHTn peYnIpyOt DOnOIHNBeIhBly YcOIBN Oka3AnHra paHTnHbX yCUY, KOTOpIe HnKeynOMHyTbI npOIN3BOITeB oecEnuBaET NOKyNA TcEM CBOIX HObIX yCTPOJCTB D ONOIHeHne K YcLOBnM rapaHTn B COOTBeTCTBnC 3aKOHm. 3TN rapaHTnHbIe O63aTeNbCTBa He 3aTpaRNaBOT BaShn 3aKOHnIe rapaHTnHbIe Tpe6oBAnH. HaunrpaANTnHbIe ycLyg nDf Bac 6ecPnAthbl.
- RapaHTnHbIe yClyrpaCnpocTpaHraOTcraToBkoHaDeΦeKbHOBOrOyCTPOrCTBaHNHeeyPOMaHyTOr npoIN3BOIDTeJIa, KOTOpoe BbI pIno6peJIi, CBr3aHHbIe C HeIOCTaHOM MaTePnaJIa NII npoIN3BOCDTEHNbIM 6paKOM, INOrpaHmHuBaIOcTcNO HAWeMBy BbIOpy UcTaPHeHNEM TaHX DeΦeKTOB yCTPOJCTBA HIN 3aMeHOn yCTPOrCTBa.YUHTe, YTO HaINu YcTOpCICTBa HE pIepHa3NaueHbI DJI NcNoJIb3OBAHnB rPOMbiUJIeHHbIX cJIeJIax, B pEmecJIeHNOM pON3BOCTBe H Na IpoΦeCCHOHaJIbHO OH OCHOB.IoAToMy rapaNTnHbI IODorOB cHTaTcN HeJeCTBnTeJIbHbIM, eCLN yCTPOJCTBO NcNoJIb3OBAIOCb B TeueHne rapaHTnHORO cPoKa H KUcTAPHbIX, pOMbiUJIeHHbIX pPeDpPrnTnIX NII B pEmecJIeHNOM pON3BOIDCTBe, a TaIKHe NODBeprAIOcB CONOCaBIIMo Harpy3Ke.
-
Ha7a rapaHTnIy he paCnpocTpaHAreTcHa: -NoBpeJdeHnY yCTPOICTBa, BO3NtHnIe B pe3yJIbTaTe HecO6JIoDEHnpyKOBODCTBa NO MOHTaKny HnEHPaBnIbHOro MOHTaHa, HecO6JIoDEHnpyKOBODCTBa No 3KcNlPyTAuMn (HanPIMep, npi NpOHJIIOUeHn K CETn C HnPaBnIbHbIM HAnpRAKeHnEM Nn pOdom TOKa), HecO6JIIODeHnry Tpe6OBaHn KacaTeJIbHO TEXNHueCHO O6cLyJHHBaHnry N Tpe6OBaHn TEXNHKn 6e3OnaChOCtN, BO3dEICTBnHa YcTOIeBOAoHOMaJIbHbX UcLObN OkpyKaIoSe I cpebl Nn HeDcOtaTOcHOrO yXoJa n TEXNHueCHO 06cLyJHHBaHnra;
-
NOBpeKdENHry uCTpoiCTBA, BO3HNKUHe B pe3yIbTaTe HnPaBnIbHOro IIN HeHaJIeKaIeRO
ICNoIb3OBAHnRA (HnprIMep, NpePpRy3ka yCTpoiCTBa IIN npIMeHHeNe He DoNpyUeHHbIX K
NCNoIb3OBAHnIO HacaDOK IIN npINaJDeNkHOCTe), NPOJaAHnRA B yCTpoiCTBO NOCTOPoHHNX
IPeMDetOB (HnprIMep, NeCKA, KaMHe IIN PbIIn, NOBpeKdENHe npr TpaHCnpTIpOBKe),
IPmPeHEnHra Cnbl IIN BHeuHx B03deCTBn (HnprIMep, NpOBpeKdENHe npr NaDeHH); - NOBpeKdENHry uCTpoiCTBA INu YactE yCTpoiCTBA, CBraAHhBe C n3HOCOM B CCB3N C
3KcPiYatauee, O6bIHyBM IIN dpyrIM eCTeTBHeBIM n3HOCOM.
4.「rapaHTnHbIcpoKcoTbJIeT24MeCA,OTcHTHaHnHaTcCOJHIOKynHycTPOCTBa.「rapaHTnHbIepaba Heo6xOIMOpEJbAJIbTbDOHCteUeHHaCpoka rapaHTnB TeueHHmDByXHeJeBNoCtneTOKak6yTeB O6HpayKeHa HEnCnpabHOCTb.3aBJeHHa rapaHTnHOE0cLynBaHHe NocLeNCTeEHnOcPoka rapaHTnHe npInHMaTc.EmOHNTINZamaHaYCTPOINCTBA HeBeETKnpoJdEHHo rapaHTnHoroCpoka,TaKHe pNpOKaAHn TaKOH yCLyTNOTcHTHOBOrOrapaHTnHORo cPoKa Ha YcTPOCTBO INI BO3MOJHO UcTAHOHe NaHuaHaeTc3aHOBO.3To yCNOBHe DeNCTByET TaKHe pN o6paueHHn B MeCTHbI cepBnCHbI OTDeJ.
5. Дльnpedьгеленя rapaHTINHbIX Tpe6OBaHm COo6uHte O HeNCnPabHocTH yCTpoiCTBa Ha caite www.isc-gmbh.info. ПпгOTobTe KBtAnuHO O noHynIke IInI dpyIe DOka3aTeJIbCTBa npno6peTehnB Bamn HOBOY yCTpoiCTBA. OKa3aHHe rapaHTINHbIX ycIy npIMeHNTEJBHO K yCTpoiCTBaM, HappaJIeHHbIM aPaccMOrTpEne 63 CoOTBeTCTByUOxN DoKa3aTeJIbCTB IInI ΦIpMeHNoI TaJInuH, NcKJIIOuaETcB BvIDy HeIOCTaHa DAHbIX IJN DEHTNfKnAuzn TANX YCTpoiCTB. Ecln NaHaTa rapaHTINa PacpNOcTpaHNeTcH a HeNCnPabHocTB yCTpoiCTBa, Bbl HeMeJeHNo NOJyHte OTpeMOHTnpOBaHHoe IIn HOBoe yCTpoiCTBO.
Camo co6oB pa3yMeTcra, Mbl MoJHem TaKHe yCTpaHnTb npn OJIaTe 3aTpa HEnCpapBHOCTN yCTpoIcTBa, KOtOpble He BxOJaT B O6bem rapaHTnHbIX ycLyr nII npn IcTeueHm Cpoka rapaHTn.ДЯ 3TOrO Bam Heo6XoDMo BbICIaTb yCTPOIcTBO Ha aDpe Naeien CnyKbI cepBICA.
Yto kacaetc 6bictpon3haunbaouxxc, paocxodhix deTaleH n Heioctaouxix KOMIOHETOB, Mbl o6paaaem BnHMaHne Ha orpahnueHn 3ToI rapaHTn COrnaCHO INΦOpMauN O cepBnCHOM 06cnyHNBaHn HactoJUeRo pyKOBODCTBaNo 3KcPnlyaTaun.
PL
Spis tresci
Tmuatiooac aluoiδac (3/8"), 9,525 mm
Iaoc aluoiδac (0,05")1,27 mm
ApiOoC oTpofoV paAevTi ....3000 ± 300 min
Méyiotoc aipθuoc stpoow
Evnpomega yia to oepic
Noise: measured L_WA = 111.5 dB (A); guaranteed L_WA = 115 dB (A)
P=2.0 KW; L/Ø = cm
Notified Body:
区2004/26/EC
Emission No.: e1197/68SA2012/46327100
Standard references: EN ISO 11681-1; EN ISO 14982
Subject to change without notice


EH 08/2016 (01)
