
YK-81CEU - Pulse oximeter BRAUN - Free user manual and instructions
Find the device manual for free YK-81CEU BRAUN in PDF.

| Product Type | Pulse Oximeter |
| Brand | Braun |
| Model | YK-81CEU |
| Display Type | OLED Screen |
| SpO2 Measurement Range | 70% – 100% |
| SpO2 Accuracy | 80% – 100%: ±2%; 70% – 79%: ±3% |
| SpO2 Resolution | 1% |
| Pulse Rate Measurement Range | 30 BPM – 254 BPM |
| Pulse Rate Accuracy | ≤ 100 BPM: ±1 BPM; > 100 BPM: ±2 BPM |
| Pulse Rate Resolution | 1 BPM |
| Power Supply | 2 AAA 1.5V batteries |
| Dimensions (approx) | 58 mm × 35 mm × 30 mm |
| Weight (approx) | ≈ 50 g (batteries included) |
| Operating Temperature | 5°C to 40°C |
| Operating Humidity | 15% to 80% RH |
| Auto Shutdown | After 8 seconds without signal |
| Protection Rating | IP22 |
| Standards | IEC 60601-1, IEC 60601-1-2, IEC 60601-1-11, ISO 80601-2-61, ISO 10993-1/5/10, ISO 15223-1, ISO 14971, IEC 62366 |
| Maintenance and Cleaning | Clean with a cloth moistened with 70% alcohol before and after each use |
| Warranty | 2-year limited (material or workmanship defects) |
| Package Contents | Oximeter, strap, instruction manual, 2 AAA 1.5V alkaline batteries |
| Main Functions | SpO2 measurement, pulse rate, bar graph display, 6 screen orientations, configuration menu |
| Intended Use | Home use (at home or in business), for women, spot checks or intermittent monitoring |
Frequently Asked Questions - YK-81CEU BRAUN
User questions about YK-81CEU BRAUN
0 question about this device. Answer the ones you know or ask your own.
Ask a new question about this device
Download the instructions for your Pulse oximeter in PDF format for free! Find your manual YK-81CEU - BRAUN and take your electronic device back in hand. On this page are published all the documents necessary for the use of your device. YK-81CEU by BRAUN.
USER MANUAL YK-81CEU BRAUN
Not made with natural rubber latex
Enthält keinen
Naturkautschuk
Ikke fremstilte at
naturgimmulfatd.
Thank you for purchasing the Braun Pulse oximeter, YK-81C. This pulse oximeter is a high-quality product tested in accordance with international ISO safety and performance standards. This device uses red and infrared light at set wavelengths along with a photodetector to measure oxygen saturation in blood and the associated pulse rate.
The Braun Pulse oximeter is intended to be used by consumers in a home-use setting (such as home setting or places of business).
Please read these instructions carefully before using this product and keep the instructions and the pulse oximeter in a safe place.
Indications for use
The Braun Pulse oximeter (YK-81C) is a non-sterile, reusable device intended for spot checking or intermittent determination of functional oxygen saturation in arterial blood, as well as the associated pulse rate by using the tip of the finger as the measurement site. The device is only intended for adults, in a home-use environment (such as a home setting or places of business).
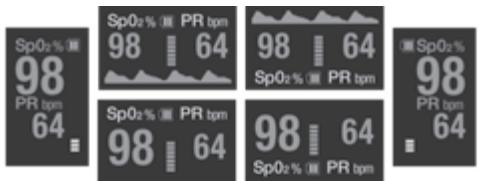
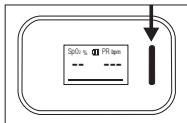
The Pulse oximeter displays the % SpO2 , pulse rate, as well as the pulse amplitude using a vertical bar graph.
This device is factory calibrated and no further calibration is required by the user.

WARNING AND PRECAUTIONS
Please read the manual carefully before use.
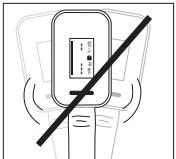
Device isn't suitable for continuous monitoring.
Pulse oximeters are sensitive to motion. Keep hands still while taking a reading.
Pulse oximeters require sufficient blood flow to obtain proper readings. Poor blood circulation can result in inaccurate readings. If your hands are cold or if you have poor circulation, warm your hands by rubbing them together or use another warming method before attempting to obtain a reading. A tourniquet, blood pressure cuff, other devices or clothing that cause blood flow restrictions may also result in inaccurate readings.
Fingernail polish or acrylic nails obstruct the light transmission through the fingertip and may also result in inaccurate readings.
Your finger must be clean for a proper reading.
The Pulse oximeter should be clean in order to get a proper reading. Please ensure the finger clip area is cleaned, following the cleaning instruction in the manual.
If a reading is difficult to obtain, switch to another finger or to the other hand. The index or middle finger is recommended for taking measurements.
There are a number of other conditions which may lead to an inaccurate reading; including but not limited to, recent medical tests that included an injection of dyes, use of arterial catheters, a weak pulse, low levels of hemoglobin in the blood, low perfusion (the quality of your pulse), elevated levels of dysfunctional hemoglobin, the strength and type of light that you are in while using the pulse oximeter, and the existence of cell phones, radios, and fixed transmitters within certain ranges of the pulse oximeter during use.
This device does not provide a low SpO2 alarm.
DO NOT use on the same finger continuously for over 2 hours.
The device is not appropriate for the constant monitoring of the user. Prolonged and continuous monitoring may increase the potential of unexpected changes of dermal conditions such as putrescence, etc. A feeling of discomfort or pain may occur if using the device continuously, especially for those users who experience poor perfusion or immature dermographia by light collimation.
In addition to the items described in the Warnings and precautions section, inaccurate measurements may be caused by factors including but not limited to:
- Immersing the device in liquid.
Significant levels of dysfunctional hemoglobin (such as carboxyhemoglobin or methemoglobin). - Intravascular dyes such as indocyanine green or methylene blue.
- Measurements may be adversely affected in the presence of high ambient light such as direct sunlight. In bright light conditions, cover the sensor area if necessary.
- Excessive user movement.
High-frequency electrosurgical interference and defibrillators.
Venous pulsations. - Hypotension, severe vasoconstriction, severe anemia, or hypothermia.
DO NOT modify this equipment without the authorization of the manufacturer.
Fingertip pulse oximetry
General description
Oxygen mixes with blood in the lungs and is transported in blood mainly by hemoglobin. Chemically the oxygen molecule combines loosely and reversibly with the heme portion of the hemoglobin. The amount of oxygen that combines with the hemoglobin is determined by the partial pressure of oxygen. The amount of oxygen in blood, expressed as a percentage of hemoglobin saturation is a measure of oxygen (SaO2) in the artery and is estimated by a pulse oximeter as an SpO2 reading.
The amount of oxygen in blood (as measured by the pulse oximeter SpO2 reading) is a very important physiological parameter in respiratory and circulatory systems. Many respiratory diseases reduce the oxygen-hemoglobin saturation in human blood. Moreover, factors such as Automatic Organic Regulation Malfunction caused by anesthesia, trauma resulting from major surgery or medical examination, or other diseases due to virus or bacteria can also cause a reduction in oxygen hemoglobin saturation in arterial blood which can be detected by the pulse oximeter through a low SpO2 reading. This can result in symptoms such as depression, vomiting, and asthenia in patients.
The fingertip pulse oximeter is a compact, low-power consumption, portable device. When the index finger is inserted into the fingertip photoelectric sensor, the display screen of the Braun Pulse oximeter will show the measured value of % SpO2 and pulse rate as well as a vertical bar graph showing the pulse amplitude.
Measurement principle
Pulse oximetry is based on the difference in the selective absorption of red light by oxygenated blood or oxyhemoglobin (HbO2, which is bright red) as compared to deoxyhemoglobin (Hb, which is dull red) or de-oxygenated blood. This selective absorption is based on the Beer Lambert Law. A red (660nm) and infrared LED (940nm) on the top portion of the prospective clamp finger-type sensor emits light at these two frequencies. The red light transmitted through the finger is selectively absorbed by the oxygenated arterial blood and the remaining light is detected by a photodetector on the lower portion of the clamp finger. The infrared light then passes through the finger without any selective absorption and is detected by the photodetector on the lower side of the clamp. The transmitted light captured by the photodetector is converted into a voltage or current signal and then passed through signal conditioning and filtering circuits using a microprocessor. % SpO2 is then derived by analyzing the changes in the amplitude of these pulsatile signals derived from the photodetector and calibrating them using pulse scanning and recording technology. The pulse rate is then derived from these associated waveforms.
Product description
- OLED display
-
Power/Menu button
-
Finger clip
- Lanyard
How to use your Braun Pulse oximeter
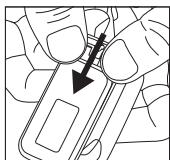
Installing and replacing batteries (initial set up)
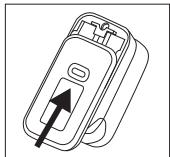
Push on the edge of the battery cover behind the arrows to slide it from the device.
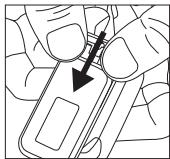
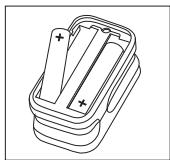
Install 2 AAA batteries.
Replace battery cover.
Taking a measurement
Press on top and bottom housing to open rubber finger clip.
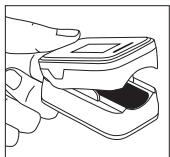
Insert finger with nail facing up into rubber finger clip.
It is recommended that you use the oximeter on your index finger.
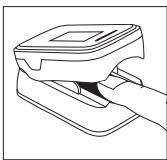
Make sure you finger is fully inserted into the device and not pressed hard into a surface.
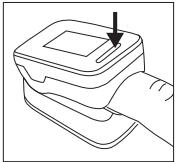
Press Power/Menu button on the top of the device.
Keep finger steady while taking a measurement.
Rotating the display
If you want to change the display direction, press and release (approx. 1 second) the Power/Menu button on the front panel. The display can be viewed in 6 different orientations.
Care and cleaning
Use 70% alcohol to clean the pulse oximeter finger insert area and your finger, before and after each test.

Parameter set up
Press the Power/Menu button to turn on the device. With the device turned on, press and hold the Power/Menu button to change the display mode.
Press and hold the Power/Menu button (approx. > 3seconds) until you
enter the parameter setup menu 1 and hold down again (approx. 3 seconds) to enter screen 2.
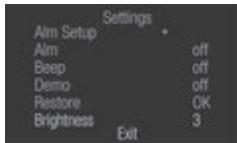
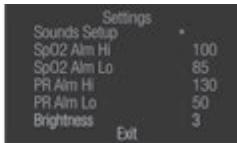
- In menu 1 or 2 press the Power/Menu button to cycle through the various parameters. You will see the * move to each parameter as you cycle through. When you are at the parameter you wish to change, press the Power/Menu button for 3 seconds to change the parameter setting.
- If you wish to restore to factory settings, move the * to the restore selection on menu 1 and hold the Power/Menu button down for approximately 3 seconds.
- To exit the menus and return to the measurement screen, move the *to the exit selection on menu 1 or 2 and hold the Power/Menu button for 3 seconds, or simply wait 10-12 seconds without interacting with device and it will return to the measurement screen.
The measure Attention
If using device outdoors or under strong light, please increase the screen brightness to improve legibility.
Choose a lower screen brightness to conserve battery power.
Limited 2 year warranty
A. This 2 year limited warranty applies to repair or replacement of product found to be defective in material or workmanship. This warranty does not apply to damage resulting from commercial, abusive, unreasonable use or supplemental damage. Defects that are the result of normal wear and tear will not be considered manufacturing defects under this warranty. KAZ IS NOT LIABLE FOR INCIDENTAL OR CONSEQUENTIAL DAMAGES OF ANY NATURE, ANY IMPLIED WARRANTY OF MERCHANT ABILITIES OR FITNESS FOR A PARTICULAR PURPOSE ON THIS PRODUCT IS LIMITED IN DURATION TO THE DURATION OF THIS WARRANTY. Some jurisdictions do not allow the exclusion or limitation of incidental or consequential damages or limitations on how long an implied warranty lasts, so the above limitations or exclusions may not apply to you. This warranty gives you specific legal rights and you may also have other rights which vary from jurisdiction to jurisdiction. This warranty applies only to the original purchaser of this product from the original date of purchase. B. At its option, Kaz will repair or replace this product if it is found to be defective in material or workmanship. C. This warranty does not cover damage resulting from any unauthorized attempts to repair or from any use not in accordance with the instruction manual. Refer to page 158 for list of European Contact numbers. Please be sure to specify a model number.
NOTE: IF YOU EXPERIENCE A PROBLEM, PLEASE CONTACT CONSUMER RELATIONS FIRST OR SEE YOUR WARRANTY. DO NOT RETURN THE PRODUCT TO THE ORIGINAL PLACE OF PURCHASE. DO NOT ATTEMPT TO OPEN THE DEVICE HOUSING YOURSELF, DOING SO MAY VOID YOUR WARRANTY AND CAUSE DAMAGE TO THE PRODUCT OR PERSONAL INJURY.
Errors and troubleshooting
| Error message | Situation | Solution |
| SpO2 or PR can not be shown normally | Finger is not fully inserted into device | Retry by correctly inserting the finger |
| User's oxyhemoglobin value is too low to be measured | Try a few more timesIf you can make sure that there is no problem in the product, please go to the hospital in a timely manner for exact diagnosis |
| SpO2 or PR reading is unsteady | Finger is not fully inserted into device User is moving or finger is shaking | Retry by correctly inserting the finger Remain as still as possible |
| The oximeter can not be turned on | Inadequate power or power off Batteries are installed incorrectly The oximeter might be damaged | Replace the batteries Please reinstall the batteries Please contact the customer service center |
| Unit turned off | The product automatically shuts off when no signal can be detected within 8 seconds Inadequate power | Normal Replace the batteries |
| Low battery displayed | Batteries need to be replaced | Replace the batteries |
Product specifications
Type: Braun Pulse oximeter, YK-81C
Display Type: OLED display
SpO2 Measurement range: 70% - 100%
Accuracy: 80% - 100% ± 2%
70% - 79% ± 3%
Resolution: 1%
Pulse Rate
Measurement range: 30BPM\~254 BPM
Accuracy: ≤ 100± 1 BPM
> 100 ± 2BPM
Resolution: 1 BPM
Power Supply: two AAA 1.5V alkaline batteries
Power Consumption: below 30mAh
Automatically Power-off: The product automatically shuts off when no signal can be detected within 8 seconds
Dimension: Approx. 58mm× 35mm× 30mm
Operation Temperature: 5^ 40^ (41^ 104^)
Storage Temperature: -10°C~40°C (14°F ~ 104°F)
Operation Humidity: 15%~80%
Storage Humidity: 10%~95%
Air Pressure: 70kPa~106kPa
This device conforms to the following standards: IEC 60601-1: Medical electrical equipment - Part 1: General requirements for basic safety, and essential performance. IEC 60601-1-2: Medical electrical equipment - Part 1-2: General requirements for basic safety and essential performance - Collateral standard: Electromagnetic disturbances - Requirements and tests.
IEC 60601-1-11: Medical electrical equipment - Part 1-11: General requirements for basic safety and essential performance - Collateral standard: Requirements for medical electrical equipment and medical electrical systems used in the home healthcare environment.
ISO 80601-2-61: Medical electrical equipment - Part 2-61: Particular requirements for basic safety and essential performance of pulse oximeter equipment.
ISO 10993-1 Biological evaluation of medical devices- Part 1:
Evaluation and testing within a risk management process.
ISO 10993-5: Biological evaluation of medical devices - Part 5: Tests for In Vitro cytotoxicity.
ISO 10993-10: Biological evaluation of medical devices - Part 10: Tests for irritation and skin sensitization.
ISO 15223-1: Medical devices - Symbols to be used with medical device labels, labeling and information to be supplied - Part 1: General requirements.
ISO 14971 - Medical Devices - Application Of Risk Management To Medical Devices
IEC 62366 - Medical devices - Part 1: Application of usability engineering to medical devices
Maintenance and storage
- Replace the batteries when low voltage symbol is lit.
- Clean the surface of the oximeter before it is used to take a measurement.
- Remove the batteries if you will not use the oximeter for an extended amount of time.
- For product preservation store the device in -10 40^ (14-104°F) and 10% -95% humidity.
- It is recommended that the product should be kept dry at all times. Excessive humidity might affect its lifetime and even damage the product.
- This device is factory calibrated and no further calibration is required by the user.

To protect the environment, dispose of empty batteries at appropriate collection sites according to national or local regulations.
Box content
One lanyard
One user manual
2 AAA 1.5V alkaline batteries
Symbols and definitions

Type BF Applied Part

Operating Humidity

Operating Temperature

Consult Instructions for Use

Batch Code

Serial Number

Medica Device

Catalogue Number

Manufacturer

Voltage

Storage Humidity

Storage temperature

Authorized representative in the European Community
IP22
IP22: Protected against solid foreign objects greater than 12.5mm in diameter and dripping water when tilted at 15^
DE Deutschland
Rotation of displayet
IEC 60601-1-2: Medical electrical equipment - Part 1-2: General requirements for basic safety and essential performance - Collateral standard: Electromagnetic disturbances - Requirements and tests. (Sahköset laäketieteelliset laitteet - Osa 1-2: Yleiset
ISO 10993-10: Biological evaluation of medical devices - Part 10: Tests for irritation and skin sensitization (ISO 10993-10:
WAARSCHUWINGEN EN VOORZORGSGMAATREGELEN
aill is yolssil jus sll uaiu wabi.2
jaiy jaii jaii jaii jaii jaii jaii jaii jaii jaii jaii jaii jaii jaii jaii jaii jaii jaii jaii jaii jaii jaii jaii jaii jaii jaii jaii jaii jaii jaii jaii jaii jaii jaii jaii
.
104-14) 40\~10- jj jjj jjj jjj jjj.4
4.8% 95 -%.10%(
a a a a a a a a a a a a a a a a a a a a a a a a a a a a a a
ailll 1i iii i jll lglc ilil
j 10000000000000000000000000000000000000000000000
aaiiaaiiie 1
aoll
S APQ = S AQP + S_ PQQ
AAA1.5
jzglg jzgl

EF 5

jill 1

jssssssssssssssssssssss

a#do

Jlalll


COS < AN = 12

aasss

m = 311

jzjjzaiy

j 1

(1) a + b = 1 (2) a + b = 3 (3) a + b = 4
IP22
iip22
ailll 1e all 12.5 le la 12
YK-81C, 000000000000000000000000000000000000000
OLED
:
auii 5
SpO2": 70% - 100%"
2± 100 - 80
7.3±79-7.70
%1
:
a254\~a30
jaiill Joo joi jbi
a 100
+ = 2
a2+100<
a 1
:
AA 1.5
a + b = 1
yj jie jie jixi loic jilali jlll lai
:Jtai Jtaiill
8J
30×35×58
2k + 1 = 3
\~41) 40-5
| x - 2| = 1| x| · | r1^2 + r2^2| = 1| x| · | r1| · | r2| < 35r1r2
104
\~(14)a240~a240-10
:j
104
7.80 7.15 : 社会经济
95\~10:
JSSU 106\~JSU 70:glb
aaiiiee aiee iieae
aLd aal dall:1eJ-aaJySlaIaIaIaIaIaIaIaIaIaIaIaIaIaIaIaIaIaIaIaIaIaIaIaIaIaIaIaIaIaIaIaIaIaIaIaIaIaIaIaIaIaIaIaIaIaIaIaIaIaIaI
a2111c1211a2111
aallll:2-1e jj-aaee 60601-60601-1
- aayablaaegsll yjaiy1: jayssll jayall - pjjll 1
adalll:11-1jgj-aaallll:EN60601-1-11
aulll lalal jaiy cllb: gail jall - pJdI y aalw alal
aJglll aaglll 5e jall - aalb s jauu uuuuauuuuuuuuuuuuuuuuuuuuuuuuuuuuuuuuuuuuuuuuuuuuuuuuuuuuuuuuuuuuuuuuuuuuuuuuuuuuuuuuuuuuuuuuuuuuuuuuuuuuuuuuuuuuuuuuuuuuuuuuuuuuuuuuuuuuuuuuuuuuuuuuuuuuuuuuuuuuuuuuuuuuuuuuuuuuuuuuuuuuuuuUU
.
- jj- 4a 1000000000000000000000000000000000000000000000000000000000
jzlllclalao golodilai gill jzll - aialll jzll:ISO 15223-1
alalll1jll - 1a jgi gill clogale, ciaalall, iiall
aalb jyj1 100 - aalb jyj1 - ISO 14971
aulls jyj yle pduuul yauuua uus - aulls jyj - IEC 62366
ailll lalall jll aiall /aiall jge biaol 21 aiall .1
iic jsiLioic. iDx Jiaill eii jiae Jg Jg sJg sJg
j3aalallalall jle baiiai iyy
Aaleal 120jy
aaii i 1
j1j3aiaiallaii 2j1iaial
aaii 10-12 aaii jaiii
.
gbsjy j g j y aeg eel i ci j jllal gall gall plaiaal all g
a
AaBaaBaaBaaBaaBaaBaaBaaBaaBaaBaaBaaBaaBaaBaaBaaBaaBaaBaaBaaBaaBaaBaaBaaBaaBaaBaaBaaBaaBaaBaaBaaBaaBaaBaaBaaBaaBaaBaaBaaBaaBaaBaaBaaBaaBaaBaaBaaBaaBaaBaaBaaa
juiuui jiuai jiuai jiuai
gill glll lglal g 100e aae e ae aee aae aae aae aae aae aae aae aae aae aae aae aae aae aae aae aae aae aae aae aae aae aae aae aae aae aae aae aae aae aae aae aae aae aae aae aae aae aae aae aae aae aae aae aae aae aae aae aae aae aae aee
aalalalalalalalalalalalalalalalalalal
a a a a a a a a a a a a a a a a a a a
dIgai jiaiiaizao 2020 Uaiaaa jia gao aaiyai yjia jiai iiaii gaiiu
aalalal alalal y aalalal y aalalal
aannnnnne aennnnnne nnnnnnne annnnnne
jlll jlll jlll jlll jlll jlll jlll jlll
jaii jaiy gaiy i jaiy i jaiy i jaiy i jaiy i jaiy i jaiy i jaiy i jaiy i jaiy i jaiy i jaiy i jaiy i jaiy i jaiy i jaiy i jaiy i jaiy i jaiy i jaiy i jaiy i jaiy i jaiy i jaiy i jaiy i jaiy i
al jall aall yaiy iiaa aiaaa aaii aaii aaii jay jaij
jia cial llaa gaiy gaiy gaiy gaiy gaiy gaiy gaiy gaiy gaiy gaiy gaiy gaiy gaiy gaiy gaiy gaiy gaiy gaiy gaiy gaiy gaiy gaiy gaiy gaiy gaiy gaiy gaiy gaiy gaiy gaiy gaiy gaiy gaiy gaiy
Cullill 125 125 125 125 125 125 125 125 125 125 125 125 125 125 125 125 125 125 125 125 125 125 125 125 125 12
Jilu w jilun
Jy 1000000000000000000000000000000000000000000
Juslllall 3j j j j j j j j j j j j j j j j j j j j j j j j j j j j j j
jlll jil 1200000000000000000000000000000000000000000
Abjellipssusill 5s
.
j j 1111111111111111111111
Aaiinll 5d jn nn nnnn nn nnnn nn nnnn nn nnnn nn nnnn nn nnnn nn nnnn nn nnnn nn nnnn nn nnnn nn nnnn nn nnnn nn nnnn nn nnnn nn nnnn nn nnnn nn nnnn nn nnnn nn nnnn nn nnnn nn nnnn nn nnnn nn nnnn nn nnnn nn nnnn nn nannn nn nnnn nn nnnn nn nnnn nn nnnn nn nnnn nn nnnn nn nnnn nn nnnn nn nnnn nn nnnn nn nnnn nn nnnn nn
e 1
#
a a a a a a a a a a a a a a a a a a a a a a a a a a a a a a a a a a a a a a a
.5j 1111111111111111111111111111
e 154 154 154 154 154 154 154 154 154 154 154 154 154 154 154 154 154 154
SE
Svenska
Support contact numbers
| Austria | Ireland (The Republic Of) | Slovakia |
| π +43 (0)1 360 277 1225 | π +353 (0)1 525 1809 | π +421 2 5011 2115 |
| Bahrain | Italy | Slovenia |
| π +973 17582250 | π +39 02 3859 1183 | π +386 (01) 888 86 74 |
| Belgium/Luxemburg | Jordan | South Africa |
| π +32 (0)2 620 01 01 | π +962 6 582 0112-3-4-5 | π +27 (0) 11 844 6190 |
| Bosnia | Kuwait | Spain |
| π +387 (33) 902 911 | π +965 24833274 | π +34 913 754 176 |
| Bulgaria | Lebanon | Sweden |
| π +35 929 358 684 | π +961 (01) 512002 | π +46 (0)8 5199 3097 |
| Croatia | Netherlands | Switzerland |
| π +385 (01) 3444 856 | π +31 (0) 78 201 8001 | π +41 (0) 22 567 5200 |
| Cyprus | Norway | Tunisia |
| π +357 22575016 | π +47 23 5001 20 | π +216 71716880 |
| Cyprus Northern region | Poland | Turkey |
| π +0392 22 72 367 | π +48 22 512 39 02 | π +90 216 337 22 55 |
| Czech Republic | Portugal | UAE |
| π +420 (0) 2 25 43 97 69 | π +351 21 060 8045 | π +971 4 353 4506 |
| Denmark | Qatar | United Kingdom/ Northern Ireland |
| π +45 35 15 80 40 | π +974 4 4075048 | |
| π +974 4 4075000 | π +974 4 4075000 | π +44 (0) 207 949 0115 |
| Finland | ||
| π +358 (0)9 81 71 00 14 | Romania | |
| France | π +40 214 255 566 | |
| π +33 (0)1 85 14 80 95 | Saudi-Arabia | |
| Germany | π +966 3 8692244 | |
| π +49 (0)21 173 749 003 | Western Region - Jeddah | |
| Greece | π +966 (0) 22565555 | |
| π +30 211 180 94 56 | Central Region - Riyadh | |
| Hungary | π +966 (0) 12886808 | |
| π +36 (06)1 429 2216 | Eastern Region - Al-Khobar | |
| Iceland | π +966 (0) 38940555 | |
| π +354 555 3100 | South Region - Abha | |
| Israel | π +966 (0) 72376062 | |
| π +1 800250221 |

Xuzhou Yongkang Electronic Science Technology CO., Ltd
4F C8 Building, No. 40 Jingshan Road Economic Development District, Xuzhou, Jiangsu, China


Prolix GmbH
Brehmstr.56,40239
Duesseldorf-Germany

© 2021 All Rights Reserved.
Imported and distributed by:
Kaz Europe Sarl
A Helen of Troy Company
Place Chaudron 18
CH-1003 Lausanne - Switzerland
www.helenofroy.com/emea-en/

Printed in China
© 2021 All rights reserved.
REF YK-81C
P/N:A005511R1
04FEB21
| Helen of Troy Creative Department Artwork Specifications | |||||
| Brand: Braun Category: Oximeter Model: YK-81CEU | |||||
| Artwork Part #: A005511R1 | |||||
| Die Line Part #: NA | |||||
| Subject: Owners Manual Region: EMEA | |||||
| Flat Size: MM: W160 x H154 | |||||
| Folded Size: MM: W80 x H154 | |||||
| Scale: 1/1 Material: 50# matte text | |||||
| Page count: 164 Revision: 3 Date: 04FEB21 | |||||
| Release Date: 15DEC20 Rerelease Date: 05FEB21 | |||||
| Colors: Dielines (Do not print) Spot Colors Cyan 0% Magenta 0% Yellow 0% Black 100% GFE-63-1-4U PMS PMS XXXX | |||||
| Special Instructions: | |||||
| Quality Requirement of Artwork and Quality Clarification Process of Artwork Printing: Meet Eng-QS-06&02 | |||||
| Helen of Troy Creative Services Marlborough, MA 01752 USA +1508 490 7000 |