USER MANUAL KARAVISION IBIZA
WITH 14.1" TFT SCREEN & 2 VHF MICS
Ref.: KARAVISION
Code: 10-9011
MANUAL
EN- Instruction Manual - p. 2
WITH 14.1" TFT SCREEN & 2 VHF MICS
Please read the manual carefully and keep it for future reference.
Explanation of signs
CE Accordance with the requirements of CE standard
The product is for indoor use only
To avoid hearing loss, do not expose yourself to high volume levels for long periods of time.
Restrictions of Use
As the product contains a transmission/reception system of VHF signals, it is exclusively meant for professional use and allowed for use only in some countries of the European Community (FR - BE - PT - D - NL - LU - GR - SP - RO - GB - IT - PL).
CAUTION:
- The unit shall be connected to a power supply only of the type described.
- To reduce the risk of fire or electrical shock, do not expose this unit to rain or moisture.
- Adequate care shall be taken so that foreign objects do not fall, or liquids are not spilled into the enclosure through openings.
- Do not remove the cover or back, as there are no user-serviceable parts inside.
- For indoor use only
- Do not place on the apparatus a naked flame source, such as lighted candles.
- The unit should only be used in moderate climates
- A minimum distance of 0.5m around the unit must be kept to ensure sufficient ventilation and avoid overheating.
- The appliance may not be exposed to extreme temperatures (< +5^ / > +35^) in operation.
- The appliance may not be subject to strong vibrations or heavy mechanical strain.
- Due to strong magnetic fields, do not put credit cards and other magnetic items close to the speaker.
IMPORTANT NOTE on LITHIUM-ION Batteries
- PRIOR to using the unit for the first time, please charge fully the battery
- Charge the battery regularly after each use. Don't wait until it is discharged!
- DON'T allow the battery to discharge completely, otherwise it will lose 20% of its capacity or even be totally damaged! If the voltage becomes too low, the internal circuits are not powered anymore and it will become impossible to recharge the battery!
- If you don't use the unit for a longer period of time, it is recommended to charge it at 40% of its capacity and check/charge it once per month.
** BATTERIES ARE NOT COVERED BY THE WARRANTY **
We cannot be held responsible for damaged batteries further to the non-observance of these basic rules.
RECOMMENDATIONS FOR BATTERIES

This symbol indicates that used batteries should not be disposed of with household waste but deposited in separate collection points for recycling.
WARNING
Danger of explosion if battery is incorrectly placed. Only replace by the same or equivalent type. Do not swallow the battery. Danger of chemical burns.
Keep new and old batteries out of the reach of children.
If the battery compartment doesn't close properly, stop using the remote control and keep it out of the reach of children. If you are in doubt whether the batteries have been swallowed or introduced into any other part of the body, contact immediately a doctor.
Charging the battery
Prior to using the unit for the first time, fully charge the built-in battery. Plug de DC connector of the supplied mains adaptor into the 12V=2A input socket (12) on the side panel of the unit and the other end into an appropriate mains outlet.
The charging LED (11) lights up in red during charge and goes off when the battery is fully charged.
The charging level of the battery appears on the 3-segment indicator in the upper right corner of the screen.
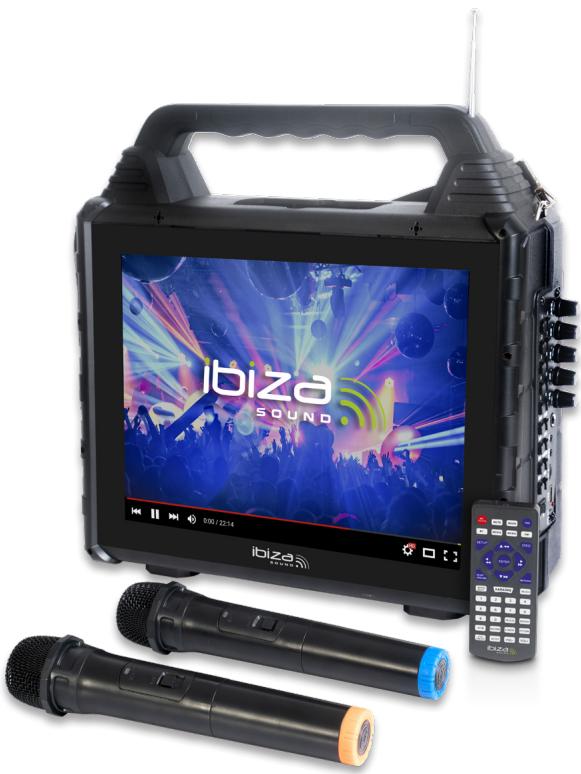
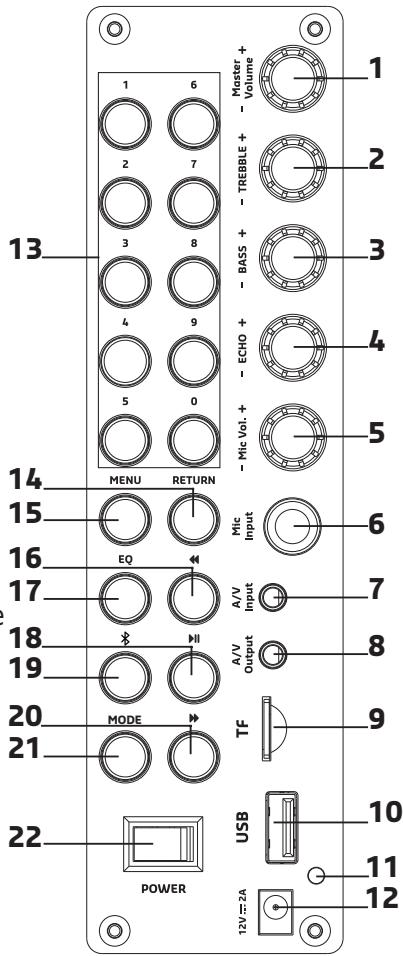
Description of the side panel
- MASTER VOLUME Rotate to adjust the overall volume.
- TREBLE +/-: Rotate to adjust the high frequencies
- BASS+/-: Rotate to adjust the low frequencies
- ECHO +/-: Rotate to adjust the echo effect of the microphones
- MIC VOL +/-: Rotate to adjust the mic volume
- MIC INPUT: Connect a wired mic
- A/V input: Connect an external audio and/or video device to this 3.5mm jack socket
- A/V output: Connect this 3.5mm jack socket to an external audio and/or video device
- TF /microSD card input (supports 32Gb)
- USB input: supports USB devices up to 32Gb
- Charging LED: lights up in red during charge and goes off when the battery is fully charged.
- 12 ~V = 2 ~A input to power the unit and charge the built-in battery. Connect the supplied mains adaptor to this socket
- Number buttons: press the number if you want to select directly a track
- RETURN: Go back to the previous menu or the main interface
- MENU: Press this button to enter into a submenu. Press the up and down buttons to select a menu item. Press the play/pause button to confirm
- PREVIOUS SONG: Press this button to move to the previous track.
- EQ: Press to cycle through various equalization settings: Rock, pop, jazz, classic, flat
- PLAY/PAUSE MUSIC Press this button to pause or play. Confirm the setting in the menu
- BT: Press to select Bluetooth mode. You can now pair the speaker with your mobile phone, tablet or any other Bluetooth-enabled equipment to play music.
- NEXT SONG: Press this button to move to the next track.
- MODE: Press this button to select an input source.
- ON/OFF switch
Remote Control
MIC PRIORITY: Press to reduce the volume of all other input sources when you talk into the microphone
MUTE: Press to mute the sound output. Press again to switch sound on again
MODE: : Press to select movie / music / radio / Bluetooth / etc mode, USB or TF card
TRK: Display the karaoke tracks
BT: Press to switch directly into Bluetooth mode
MOVIE: Press to switch directly into video mode
MUSIC: Press to switch directly into music mode
FM: Press to switch directly into FM mode
SET UP: Press to enter into the settings menu to set language, product information, restore factory settings, set volume, brightness, VCM and other settings
OSD: Press to display the menu on the screen
▲: Upwards. Keep pressed to select the previous song
: Left. Keep pressed to rewind
ENTER: Confirm the selection
Right. Keep pressed to fast forward
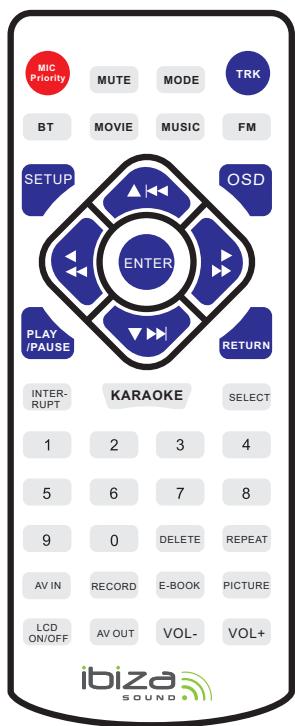
: Downwards . Keep pressed to select the next song
PLAY/PAUSE: Play or pause the currently played track
RETURN: Return to previous menu or main interface
INTERRUPT: Switch to the next song
KARAOKE: Play karaoke tracks
SELECT: Select the displayed karaoke track
Number buttons: Select directly a track by keying the number in
DELETE: In Karaoke mode, delete the selected track
REPEAT: Repeat one or all tracks
AV IN: Select the A/V input
RECORD: Press to enter into recording function
E-BOOK: Press to select E-book mode
PICTURE: Press to select picture mode and display pictures
LED ON/OFF: Switches the screen on and off
AV OUT: Select A/V output mode
VOL-: Press to reduce volume
VOL+: Press to increase volume
Use of the Remote Control
Please operate the remote control within a distance of 2m and 30^ between the remote and the appliance. Aim the remote at the sensor. Remove all obstacles between the remote and the sensor.
The remote control might not work properly if the sensor is exposed to strong sunshine.
If the remote control doesn't work properly, please check the batteries.
Functions
- Music: Supports MP3, WMA, OGG, AAC, FLAC, AC3 and other formats.
- Movie: Supports PMVB, AVI, MP4, MPG, VOB, MKV, FLV720 P, WMV high-definition video playback formats, a variety of display modes, letters and other functions.
- Photo: Supports JPG, BMP, GIF, PNG and other image formats, photo album playback, rotation, zoom and background shadows.
- E-book: Supports TXT, LRG, POB and other formats, accepts background music.
Radio: FM tuner
- Record function: MP3 file format, long time recording. Insert USB stick or TF card for recording.
- File management functions: File management on USB stick and TF card.
- Bluetooth: Connect this unit to your tablet PC or mobile device via Bluetooth to enjoy the sound of your music.
- Audio / video input: Used in conjunction with an external set-top box or other equipment, the unit will become a mobile TV.
- General Settings: Language, product information, restore factory settings, display background illumination, volume, brightness, VCM and other settings.
Music Mode
Plug in the USB or TF card. The unit will automatically switch into music mode.
- Press the MUSIC button to start auto play.
- Press the PLAY / PAUSE button to play music, press again to pause.
- Press "Up" or "Down" button to select Previous / Next song. Keep the UP/DOWN button pressed for 3 seconds for fast rewind/fast forward.
- If the music files contains lyrics, the lyrics will be displayed simultaneously.
- Press the MENU button and select a song via the UP / DOWN buttons. Press PLAY / PAUSE to set the sound mode (normal, classic, jazz, rock, pop); play mode (play the previous song, repeat all, Single cycle play, random play, sequential mode)
- Press the number keys to select the song you want to play.
- Press the RETURN key twice to return to the main interface.
Video Mode
- Plug in the USB or TF card. Press the "MOVIE" button to play the video automatically.
- Press the play / pause button to play the video file.
- Press the button again to pause
- Press "UP" or "DOWN" to select the previous song / next song
- Press and hold the UP / DOWN button for 3 seconds for rewind and fast forward function.
- In MOVIE mode, press the MENU key to display video file information. You can set the play mode (all loops, single cycle, sequential play, single play, shuffle play); you can choose "left channel" or "right channel" playback, the default is stereo; the default track is track 1.
- In MOVIE mode, press the number keys to select the movie you want to play.
- In MOVIE mode, press the RETURN key once, enter the video file list, press the RETURN key twice to return to the main interface.
Photo Mode
Insert the USB flash drive or TF card. Press the PICTURE button on the remote control to enter into photo playback mode.
- Press the UP and DOWN keys to select the previous or next picture
- Press the MENU button to pop up the setting menu. Now you can set the background Music, rotation, zoom, brightness, special effects and so on.
FM mode
Press FM button on the remote control to enter into FM radio mode.
- Press the MENU button or keep the Play/pause button pressed to start automatic search for radio stations. All found stations are automatically saved.
- Press the UP / DOWN buttons to browse upwards or downwards through the saved stations. Or press the number keys to select directly a saved station.
E-book
Plug in the USB or TF card that contains the e-book files.
- Press the E-BOOK button on the remote control to enter into E-BOOK mode
- Press the Previous or Next key to turn the page
- Press the MENU button and set background music, auto play mode, font color, page jumps.
Bluetooth
Press the BLUETOOTH button on the remote control or the BT button on the side control panel.
Active the search function on your tablet PC or mobile phone and select KARAVISION in the list of found devices. Set the volume with the volume control of your tablet or phone and keep the unit within the receiving range of 10 meters.
Record
Insert the USB flash drive or TF card, press the record button to enter the record mode. Press the play / pause button to start recording. Press the REC button to stop recording. Press the play / pause button to save the recorded file. In REC mode you can play or delete recorded files. You can also set the recording quality and recording file format.
Universal settings
On the main screen, press the UP and DOWN keys to move to the common setting icon. Press the play / pause button to enter the setting mode, or press the SET UP button on the remote control to enter directly into the setting mode. This gives you access to languages, product information, restore factory settings, date, time, volume, brightness and other important settings.
File management
Plug in the USB stick or microSD card, move to the file management icon on the main screen and press the play / pause button to enter the file management interface. The file names on the USB or microSD media will automatically be identified and displayed in form of a list. Press the up and down buttons to select a file and press the play / pause button to play the selected file.
Common problems
- The remote control doesn't work: Align the end of the lamp with the remote control receiver or replace the battery in the remote control.
- No sound: Check if the volume is turned up.
- No sound, no picture: Check if the display has been switched off. Check if Audio/Video have been set to output status
- Buttons don't react: Shut down the system, wait a moment and switch it on again
- Broadcast display format error: USB stick or TF card are not compatible. Please use a USB stick or TF card of 32Gb capacity. Or format the USB stick/TF card first on a computer and then copy the audio and video files to the USB or TF card
- Wireless microphone doesn't work: Please turn on the wireless microphone or replace the battery.
- Song name display garbled: The song name is in traditional Chinese or another national language. The appliance only supports Simplified Chinese and English song name display.
- Doesn't play automatically the next track: Play mode is set to "play a song". During playback, press the menu button, bring up the playback menu, the playback mode is set to loop play all songs or to play in sequence.
- No sound in Bluetooth mode: Please turn on the Bluetooth function of the device such as a mobile phone or tablet PC and connect it with the local device. Turn on the Bluetooth volume of your mobile phone or tablet.
- Bluetooth can not call: This unit does not support Bluetooth calling
- Only the sound of the karaoke microphone is heard, not the original song nor the accompaniment: Turn off the microphone priority function.
Specifications
Power supply. 100-240V~50/60Hz via supplied mains adaptor
Input voltage. 12V=2A
Battery. Lithium 7.4V= 4400mAh
Average operating time on battery 2-4 hours
Screen 14.1
Resolution 1024 x 768
Woofer 5"13cm
RMS power 30W
Max. power 150W
Freq. range. 20Hz - 20kHz
THD. <1%
VHF mic frequencies 201.2 & 206.2MHz
Max. RF value of the mics 5.66dBm
BT freq. band 2402-2480MHz
Max. RF emission power 1.16dBm
FM band 87.5 - 108MHz
Dimensions 36 x 14 x 38cm
Weight. 4.3kg
This marking indicates that this product should not be disposed with other household wastes throughout the EU. To prevent possible harm to the environment or human health from uncontrolled waste disposal, recycle it responsibly to promote the sustainable reuse of material resources. To return your used device, please use the return and collection systems or contact the retailer where the product was purchased. They can take this product for environmental safe
recycling.
ENCEINTE PORTABLE POUR KARAOKE AVEC ECRAN ET 2 MICROS VHF
RECOMMANDATIONS POUR LES PILES

BT freq. band 2402-2480MHz
Max. RF emissie vermogen 1.16dBm
FM band 87.5 - 108MHz
Afmetingen 36 x 14 x 38cm
Gewicht. 4.3kg
ALTAVOZ PORTATIL PARA KARAOKE
CON PANTALLA Y 2 MICROS VHF
- Pressione o botão BLUETOOTH no controlo remoto ou o botão BT no paine de controlo lateral.
- Active the search function on our tablet or mobile phone and select KARAVISION in the list of found devices. Set the volume with the volume control of your tablet or phone and keep the unit within the receiving range of 10 meters.
Gravacao
- Active a funcao de pesquisa no seu tablet ou telemóvel e selecione KARAVISION na lista de dispositivos发展机遇ados. Ajuste o volume com o controle de volume de seu tablet ou téléphone e mantenha o aparecido no都认为 do alcance de recepçao de 10 metros.
Average operating efficiency / Efficacité active moyenne: 83.53%
Efficiency at load (10%)/Rendement à faible charge: 77.27%
No-load consumption / Consommation electrique à vide: 0.071 W
CE
Hereby we,
LOTRONIC SA
Rue F. Englert 17 Bte2
1480 TUBIZE
Belgique
+32.2.390.91.91
Certify and declare under our sole responsibility that the following product:
Trade name:

SOUND

Product name:
KARAOKE SPEAKER
Type or model:
KARAVISION
Conforms with the essential requirements of RED directive 2014/53/EU, ErP directive 2009/125/EC, Commission Regulation (EU) 2019/1782, 2011/65/EU RoHS directive and the Commission Delegated Directive (EU) 2015/863
Based on the following specifications applied:
ENIEC62368-1:2020+A11:2020
EN 62479 : 2010
ETSI EN 301 489-1 V2.2.3 : 2019-11
Place and date of issue: Tubize (Belgium), on 02/10/2024
Manuel De Sousa
Quality manager
CE
EN IEC 62368-1:2020+A11:2020
EN 62479 : 2010
ETSI EN 301 489-1 V2.2.3 : 2019-11

Any questions or problems? Contact us
IBIZALIGHTSOUND Follow us on Instagram

Join us on facebook


Assembled in PRC · Designed by LOTRONIC S.A. · Rue F. Englert 17 · Bt 2 · 1480 Tubize · Belgium info@lotronic.net
https://ibizashop.eu/
Copyright LOTRONIC 2024