PORT-TFT12 - Powered speaker IBIZA - Free user manual and instructions
Find the device manual for free PORT-TFT12 IBIZA in PDF.
| Product type | Portable amplified speaker |
| Brand | IBIZA |
| Model | PORT-TFT12 |
| Dimensions (W x H x D) | 410 x 650 x 370 mm |
| Weight | 12 kg |
| Mains power supply | 15 V DC, 2 A |
| Built-in battery | 12 V, 5 Ah, lead-acid |
| Battery life | Approximately 4 hours |
| Rated / maximum power | 400 W RMS / 800 W max |
| Speaker | Woofer 12" (30 cm) |
| Screen | TFT color 15" (38 cm) |
| Media player | USB, TF card (max 32 GB), formats MP3, MP4, MP5, WAV, WMA |
| Bluetooth | Yes, standard version, band 2402-2480 MHz |
| UHF wireless microphones | 2 mics, frequencies 863.2 & 864.8 MHz, range 50-60 m (outdoor) |
| Audio inputs | AUX (3.5 mm mini-jack), wired microphone (6.35 mm), USB, TF |
| Outputs | Line audio, RCA video |
| Special features | Karaoke, recording on USB/TF, voice announcement, equalizer |
| Remote control | Yes, with AAA batteries (not included) |
| Safety | Short-circuit protection, do not expose to water or excessive heat |
| Maintenance and cleaning | Unplug before cleaning; use a soft, dry cloth |
| Spare parts and repairability | Contact after-sales service or your dealer for parts |
Frequently Asked Questions - PORT-TFT12 IBIZA
User questions about PORT-TFT12 IBIZA
0 question about this device. Answer the ones you know or ask your own.
Ask a new question about this device
Download the instructions for your Powered speaker in PDF format for free! Find your manual PORT-TFT12 - IBIZA and take your electronic device back in hand. On this page are published all the documents necessary for the use of your device. PORT-TFT12 by IBIZA.
USER MANUAL PORT-TFT12 IBIZA
with 15"color TFT screen, Bluetooth, Remote Control & 2 x UHF Mics
ENCEINTE PORTABLE AUTONOME 12"/30CM 800W
Ref. BOOST-PORT-TFT12
CODE: 17-2510BO
ENGLISH
USER MANUAL
Please read the manual carefully and keep it for future reference.
The lightning flash with arrowhead symbol, within an equilateral Triangle, is intended to alert the user to the presence of not insulated dangerous voltages within the product's enclosure that may be of sufficient magnitude to constitute a risk of electric shock to persons.
The exclamation point within an equilateral triangle is intended to alert the user to the presence of important operating and maintenance (servicing) instructions in the literature accompanying the appliance.

CAUTION DO NOT OPEN THE HOUSING SHOCK HAZARD
CAUTION:
- Do not place any recipients filled with liquids, such as glasses or vases, on top of or directly next to the appliance. They could fall over, causing water to enter the appliance. Never pour out liquids over the appliance. Do not place small objects, such as coins or paper clips, on the appliance since they could fall inside the appliance and cause fire or a shock hazard! If any liquid or objects enter the appliance, pull immediately the mains plug out of the socket and contact a specialist.
- Only pull the mains plug out of the socket by the intended gripping surface. Do not pull it by the cable.
- Never plug the mains plug in or out with damp or wet hands
- Electrical appliances must be kept out of the reach of children. Be particularly careful if children are present. Children are not aware of the hazards involved in handing electrical appliances improperly. Children could attempt to poke objects into the appliance. There is a life-threatening danger of electrocution.
- Never place the appliance on an unstable or mobile surface. Persons could be injured or the appliance damaged by it falling down.
- All persons involved in operating, installing and servicing the appliance and putting it into service must be trained and qualified accordingly and observe these operating instructions.
- Defective mains cables may only be replaced by specialists. Danger of shock hazard!
- If you are not sure about the correct connection or if questions arise which are not answered by the operating instructions, please do not hesitate to contact support or a specialist of your choice. Consult a specialist if you are in doubt about the operating principle or the safety of the product.
IMPORTANT NOTE ON LEAD-ACID BATTERIES
- PRIOR TO USING THE UNIT FOR THE FIRST TIME, PLEASE CHARGE FULLY THE BATTERY WITHOUT ANY INTERRUPTION.
- CHARGE THE BATTERY REGULARLY AFTER EACH USE. DON'T WAIT UNTIL IT IS DISCHARGED!
- DON'T ALLOW THE BATTERY TO DISCHARGE COMPLETELY! ONCE THE BATTERY IS FULLY DISCHARGED, THE CURRENT DRAIN FOR RECHARGING WILL BE SO HIGH THAT IT WILL DAMAGE THE CHARGER AND/OR THE POWER SUPPLY OF THE UNIT.
- IF YOU DON'T USE THE UNIT FOR A LONGER PERIOD OF TIME, PLEASE CHARGE THE BATTERY COMPLETELY AT 100% AND CHECK/CHARGE IT ONCE PER MONTH OTHERWISE THE BATTERY WILL BE OUT OF USE.
THE LIFE TIME OF THE BATTERY DEPENDS ON THE OBSERVANCE OF THESE RECOMMENDATIONS.
** BATTERIES ARE NOT COVERED BY THE WARRANTY **
WE CANNOT BE HELD RESPONSIBLE FOR DAMAGED BATTERIES FURTHER TO THE NON-OBSERVAN-CE OF THESE BASIC RULES.
CHARGING THE UNIT
This speaker has a high capacity battery. Please use only the supplied adaptor for charging. Plug one end into the 15Vdc input socket (18) and the other end into a suitable mains outlet.
The power adapter has an indicator light that will illuminate when the speaker is on charge. It takes around 12 hours to fully charge the speakers. Disconnect the power adaptor as soon as the battery is fully charged.
Note: When the battery of the speaker is low, please charge it within 48 hours.
BATTERY OPERATION
The average running time on a fully charged battery is about 4 hours.
The user has the possibility to connect an external 12V battery to the EXT DC 12V IN terminals (19) on the rear panel of the unit. Connect the positive pole (+) to the red terminal and the negative (-) to the black terminal.
RECOMMENDATIONS FOR BATTERIES IN THE REMOTE CONTROL & MICROPHONES

This symbol indicates that used batteries should not be disposed of with household waste but deposed correctly in accordance with your local regulations..
Batteries shall not be exposed to excessive heat such as sunshine, fire or the like. When the internal bathe are not to be used, remove them to avoid damage caused by battery leakage or corrosion.
ATTENTION
Danger of explosion if battery is incorrectly placed.Only replace by the same or equivalent type.
WARNING
Do not swallow the battery. Danger of chemical burns. Keep new and old batteries out of the reach of children. If the battery compartment doesn't close properly, stop using the product and keep it out of the reach of children.
If you are in doubt whether the batteries have been swallowed or introduced into any other part of the body, contact immediately a doctor.
VOICE PROMPT
When you switch the unit on, you will hear a vocal message. To mute this message, keep the input selector button (9) on the rear panel pressed. "OFF" will be displayed. To activate the voice prompt, keep the button 9 pressed until ON is displayed.
You can choose the language of the voice prompt between English or Chinese. Keep the PLAY button (13) pressed. Either L-CH or L-EN will be displayed. Press until the desired language is displayed.
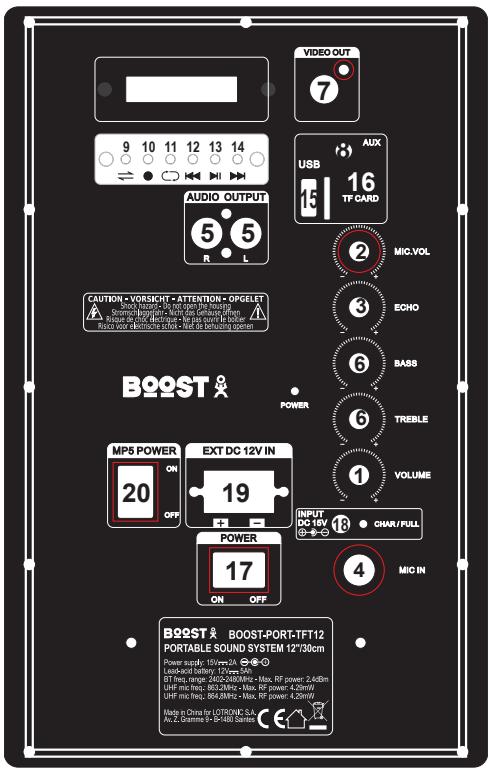
DESCRIPTION OF THE FRONT PANEL

- POWER Led: lights up when the MP5 player is switched on via the MP5 POWER switch (20) on the rear panel
- MODE: Switches through the different file formats on the inserted USB/TF
- BACK: Return to the previous menu item
- SOUND TRACK: No function
- PREV: Go to the previous track
- NEXT: Go to the next track
- PLAY/PAUSE: Press to start playing a track; Press again to pause playback; Press again to resume playback
- MENU: While playing a music file, press this button to display various controls instead of the default equalizer screen. Cycle through the menu items via the and buttons on the remote control or on the front panel.
Select an item via the PLAY/PAUSE button. When the EQ item is activated, press PLAY/PAUSE and cycle through the various music styles by pressing the PLAY/PAUSE button. You have the choice between Normal - Rock Classic - Jazz - Pop
In MOVIE mode, this button will give you access to several audio and video settings.
- IR: Infrared sensor. Direct the remote control towards this sensor
- TF card input
- USB stick input
DESCRIPTION OF THE REAR PANEL
- Master volume control
- Microphone volume control
- Echo control for the microphone
- Wired Microphone input
-
Audio output: Connect to another active box or amplifier
-
Bass & Treble controls
- Video output via RCA: Connect to a suitable monitor
- AUX input via 3.5mm mini stereo jack
- Input selector: Press this button to switch between the various inputs (AUX, USB, TF, Bluetooth)
- REC button: Press this button to record the sound of the wired or wireless mic on the USB or TF.
- REPEAT: Press to toggle between repeating the current track or repeating all tracks. Keep pressed during 5 seconds to activate/deactivate the talkover function (mic priority)
- Press to go back to the previous track.
- Play/pause
- Press to go to the next track
- USB stick input (MP3)
- TF card input (MP3)
- ON/OFF switch of the system
- Mains adaptor input
- External battery input
- MP5 power switch: Switch on the Karaoke display and module on the front panel
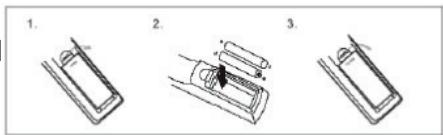
INSTALLING THE BATTERIES
Remove the battery cover from the back of the remote control as shown and insert 2x AAA size batteries ensuring correct polarity
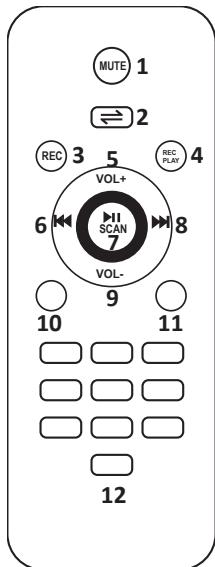
DESCRIPTION OF THE REMOTE CONTROL
- MUTE: Mutes the sound output
- Switches through the different file formats on the USB/TF
- REC: Press to record your voice
- REC PLAY: Press to play your record
- Increase the volume
- Select previous file
- Play/Pause/Select
- Select next file
- Reduce the volume
- Repeat tracks / random play. Keep pressed for 5 seconds to deactivate the mic talkover function if you want to use the karaoke function
- Equalizer: Cycles through the various music styles: Normal - Rock - Classic - Jazz - Pop
- Number buttons for direct input of a file number. Press the number of the file to access it directly. For files numbers above 9, press 1+ the unit. Ex. For file number 15, press 1 + 5 . For file number 38, press 3 + 8
CONNECTION OF A WIRED MICROPHONE (NOT INCLUDED)
Connect the microphone to the MIC IN socket and switch it on. Note: If you are playing music from any other input, connecting the microphone will not mute the sound output. Adjust the volume, echo, bass and treble with the controls 2 (volume), 3 (echo) and 6 (bass & treble)
- Open the battery compartment and insert two AA batteries with the correct polarity.
- Turn the switch on the mic to ON. If the power indicator lamp doesn't flash or doesn't light up, check if the batteries have been properly inserted.
- Start singing into the microphone and adjust the volume to the desired level via the mic volume control (2) on the rear panel.
- Adjust the echo (3), bass (6) and treble (6) via the controls on the rear panel
- When the indicator lamp on the mic lights up, you have to replace the battery.
- Don't use the microphones close to the speaker in order to avoid feedback.
KARAOKE FUNCTION
This feature is available with any input. Play a track through AUX/USB/TF/ Bluetooth, connect a microphone or switch on the UHF mic(s) and sing along. Keep the REPEAT button on the remote control pressed for 5 seconds to deactivate the talkover function of the microphone otherwise the sound will be muted when you start singing.
BUILT-IN REC FUNCTION
- Plug a microphone into the MIC IN input or switch on the UHF mic(s).
- Insert a USB/TF card into the corresponding port. Press the Input selector button (9) on the rear panel and select USB/TF mode.
- If the USB/TF card is plugged into the speaker for the first time, the system will automatically create a folder named 'record' to save the recorded files.
- When you are ready to record, press REC button (10) on the unit or on the remote control (3) to record the sound of the wireless or wired microphone(s).
USB/TF OPERATION
Keep the speaker away from high temperatures, strong magnetic fields and any equipment that could generate interference. If the speaker stops working, switch it off and on again, or unplug the USB/TF card and re-plug it. The speaker should be back to normal status.
The maximum size of USB/TF device that can be connected is 32 GB.
Supported music formats: MP3, MP4, MP5, WAV, WMA
PLAYING MP5 FILES
Please note: ONLY THE USB AND TF INPUTS ON THE FRONT PANEL can read MP5 (video) files. If a USB stick or TF card is connected on the rear panel, unplug them first, otherwise they will have priority over the USB/TF inputs on the front panel. As soon as the USB/TF media is connected, the playlist is displayed on the TFT screen.
The supplied remote control works only with the MP5 module. It will not control the microphones, USB, TF or AUX inputs on the rear panel.
Switch on the unit via the POWER switch (17) on the rear panel.
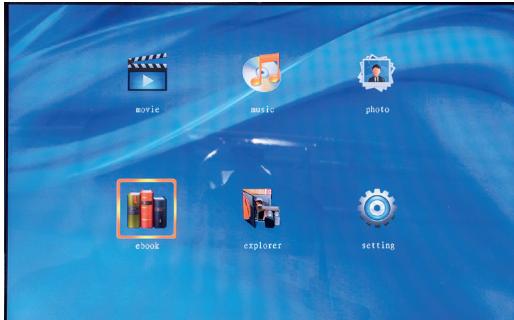
Switch on the MP5 module via the MP5 POWER switch (20) on the rear panel. The TFT screen shows following
items:
MOVIE
MUSIC
- PHOTO
Ebook
- Explorer
- Setting
- Select MOVIE via the buttons and on the remote control if you insert a USB/TF card with video files. Press PLAY/PAUSE button (7) on the front panel or the remote control to display the contents. Select a file via the and on the remote control or on the front panel (5 & 6) and press PLAY/PAUSE on the remote control or the front panel.
- Select MUSIC via the buttons and on the remote control if you insert a USB/TF card with MP3 music files. Press PLAY/PAUSE button (7) on the front panel or the remote control to display the contents. Select a file via the and on the remote control or on the front panel (5 & 6) and press PLAY/PAUSE on the remote control or the front panel.
- Select PHOTO via the buttons and on the remote control if you insert a USB/TF card with picture files (JPEG). Press PLAY/PAUSE button (7) on the front panel or the remote control to display the contents. Select a file via the and on the remote control or on the front panel (5 & 6) and press PLAY/PAUSE on the remote control or the front panel.
- Select EBOOK via the buttons and on the remote control if you insert a USB/TF card with text files
- Select the SETTINGS icon and press PLAY/PAUSE button.
Language: The default language is English. You can choose between Chinese and English.
PLAYING MP3 FILES
- Connect a USB stick or TF card to the inputs 15 or 16 on the rear panel. Set the volume with the volume control (1). Adjust the bass and treble with the controls (6) on the rear panel. Control the files via the buttons 9 to 14 on the rear panel.
LINE INPUT (8)
Connect an AUX source to the AUX input (8) on the rear panel and press the input selector button (9) on the rear panel until LINE is displayed.
VIDEO OUT (7)
Connect an RCA video lead to this socket and to the RCA input socket of your TV set, video projector, etc.
BLUETOOTH OPERATION
- Turn on the unit and press the input selector button on the unit to select the Bluetooth function.
- Activate the Bluetooth feature on the external device to be paired.
- Initiate a search for devices. The device shows up as "BOOST-PORT-TFT12".
- Press the button to start playing and the buttons and for the selection of songs.
SPECIFICATIONS
RMS/max power. 400W/800W
Woofer 12"/30cm
Battery. 12V 5Ah lead-acid
Operating time 4 hours
TFT screen 15"
UHF mic frequency. 863.2 & 864.8MHz
Max. RF transmission power 4.29mW
Transmission distance of UHF mics 50-60m in open environment, 25-30m indoors
BT frequency band 2402-2480MHz
Max RF transmission power 2.4 dBm
Power supply. 15V=2A
Dimensions 410 x 370 x 650mm
Weight. 12kg
TROUBLE SHOOTING
If a problem occurs, follow the steps in the table below. If problem still can't be solved, please contact your retailer.
| PROBLEM | POSSIBLE CAUSE | SOLUTION |
| No sound when power on | 1. No input source | 1. Connect an AUX signal, USB, TF or Bluetooth source |
| 2. Volume down | 2. Adjust volume | |
| No sound from the microphone | 1. Bad mic connection | 1. Plug in the mic properly |
| 2. Mic not switched on | 2. Switch mic on | |
| 3. Mic volume down | 3. Increase mic volume | |
| No sound after inserting USB/TF card | 1. Incorrect file format | 1. File format should be MP3 |
| 2. Bad connection of USB/TF card | 2. Plug in USB/TF card properly | |
| 3. The USB/TF is plugged into the front-mounted inputs | 3. Switch on the MP5 POWER switch on the rear panel | |
| If Speaker makes loud noises | 1. Microphone switched on but may be too close to the speaker | 1. Keep the microphone 2 meters away from the speaker |
| 2. Microphone switched on but is not being used. | 2. Turn off microphone if not in use. | |
| 3. Microphone volume may be too loud | 3. Adjust microphone volume to lower mode | |
| 4. Mobile phone is being used too close to the speaker | 4. Keep mobile away from the speaker whilst attending a call. | |
| 5. Other wireless equipment may be placed very close to the speaker. | 5. Keep the speaker away from other wireless equipment |

This marking indicates that this product should not be disposed with other household wastes throughout the EU. To prevent possible harm to the environment or human health from uncontrolled waste disposal, recycle it responsibly to promote the sustainable reuse of material resources.
FRANCAIS
MANUEL D'UTILISATION
Puissance de transmission RF max. 4.29mW
EU Declaration of Conformity
Hereby we,
LOTRONIC SA
Avenue Zénobe Gramme, 9
1480 SAINTES
Belgique
+32.2.390.91.91
Certify and declare under our sole responsibility that the following product:
BQOST
Trade name:
Product name:
Portable speaker with TFT display and UHF microphones
Type or model:
BOOST-PORT-TFT12
Conforms to the essential requirements of the:
RED directive 2014/53/EU, 2005/32/EC ErP directive and 2011/65/EU RoHS directive
EN60065:2014
EN62479:2010
EN 62311:2008
ETSI EN301 489-1 V2.2.0 : 2017-03
Place and date of issue:
Saintes (Belgium), on 07/01/2019
Manuel De Sousa
Quality Manager
CE

View the product on our website
Imported from China by LOTRONIC S.A.
Avenue Zénobe Gramme 9
B-1480 Saintes