
DBK6980HG - Range hood AEG - Free user manual and instructions
Find the device manual for free DBK6980HG AEG in PDF.
 FR
FR
 AR
AR
 BG
BG
 CS
CS
 DA
DA
 DE
DE
 EL
EL
 EN
EN
 ES
ES
 ET
ET
 FI
FI
 HU
HU
 IT
IT
 KK
KK
 LT
LT
 LV
LV
 MK
MK
 NL
NL
 NO
NO
 PL
PL
 PT
PT
 RO
RO
 RU
RU
 SK
SK
 SL
SL
 SQ
SQ
 SR
SR
 SV
SV
 TR
TR
| Product type | Extractor hood |
| Brand | AEG |
| Model | DBK6980HG |
| Control type | Touch |
| Number of speeds | 4 speeds + Boost (5 min) + Breeze (60 min) |
| Hob²Hood function | Yes (infrared communication with the hob) |
| Lighting | LED, adjustable brightness |
| Grease filter | Washable, dishwasher safe |
| Grease filter cleaning frequency | Every month |
| Charcoal filter | Not washable, replace every 4 to 6 months |
| Filter notification | Yes (steady light = grease, flashing = charcoal) |
| Filter notification reset | Press filter symbol for 3 seconds |
| Surface care | Soft cloth, warm water, mild detergent |
| Bulb replacement | By a qualified technician only |
| Replacement parts | Use only original parts |
| Safety | Refer to the installation manual for safety instructions |
| Function activation | Press symbols for 1 second |
| Boost function | Maximum speed for 5 minutes, then returns to previous setting |
| Breeze function | Operates at minimum speed for 60 minutes, then automatic shut-off |
| Light intensity adjustment | Press and hold the lighting symbol |
Frequently Asked Questions - DBK6980HG AEG
User questions about DBK6980HG AEG
0 question about this device. Answer the ones you know or ask your own.
Ask a new question about this device
Download the instructions for your Range hood in PDF format for free! Find your manual DBK6980HG - AEG and take your electronic device back in hand. On this page are published all the documents necessary for the use of your device. DBK6980HG by AEG.
USER MANUAL DBK6980HG AEG
Always use original spare parts.
When connecting to our after-sales service, you must have the following information: model, PNC, serial number.
The information should also be available on the data plate.
For repairs / service - Safety information
① All information regarding the operating environment
We reserve the right to make changes.
1. SAFETY AND INSTALLATION INFORMATION

WARNING!
Read the brochure
Instructions for
Installation and
Safety
and installation.
Read carefully.
Table 3 for safety
Before each use
The device is ready.
2. DESCRIPTION OF THE DEVICE
2.1 Before first use

Connect the device with the plug on the socket for heating or cooking, place it on a weak fire.
| γ3 | При варе и пьржени на големи колочевха xpa-на бeз калak,rotbete Вьрху Няковко зони за rotbeh-e He по КOTПОни. |
| ηηηηη | При варе и пьржени на големи колочевха xpa-набeз калak,виска Влажноct. |
| ηηηηη | Освекава вьдуна в кухн我不是 рпс Mного Н stock НИВО на чуМ. Може да се akтувира и Deakтувира уретд дOKOCBAне на символа. Таши Фуншся се ИЗКЛЮЧВа abTomatчно сед 60 мину-Ти. Изпалзайтсамо сед rotbehе. |
It is recommended to let the absorber work for approximately 15 minutes after heating. The control panel is a sensor field. Touch the symbols for 1 second to activate the functions.
To work with the absorber:
- Turn on the device by pressing symbol ①.
You can also activate the functions.
- To activate the function, touch the symbol.
- If necessary, press the lamp symbol to illuminate the cooking surface. To change the light intensity, touch and hold the symbol again.
To turn off the device, press symbol ① again.
3.2 New function 三
This is an automatic function related to the hob and the absorber. Like the hob, the absorber also has a communication with an infrared sensor. The fan speed is determined automatically, based on the setting of the mode and the temperature of the cooking vessels on the hob. You can also control it manually.
The filter indicator lights up when the filter needs cleaning or replacement.
For more information on how to use the filter functions, refer to the user manual for the filter.
3.3 Activating Maximum Motor Speed
When you press the button, the maximum motor speed is activated for 8 minutes. After this period, the device returns to the previous speed settings.
When the function is activated, the filter cleaning reminder is disabled.
3.4 Filter Indicator
The filter indicator reminds you to clean or replace the active carbon filter, as well as to clean the grease filter. The filter indicator turns on for 30 seconds if the grease filter needs cleaning. The filter indicator remains on for 30 seconds if the active carbon filter needs to be replaced or cleaned.

Refer to the section "Cleaning and Maintenance" for instructions on cleaning the grease filter.

Refer to the section "Cleaning and Maintenance" for instructions on cleaning and replacing the active carbon filter.
To activate the function, press the button for 3 seconds.
To activate or deactivate the function:
- Turn on the control panel.
- Make sure the lights are off. To activate the function, press for 3 seconds.
If the function is activated, the filter indicator light will blink.
- To deactivate the function, press for 3 seconds. If the function is deactivated, the filter indicator light will turn off.
4. Cleaning and maintenance
4.1 General information about maintenance
The appliance must be set to the desired temperature and short cycles. The filter for the milk frother may light up, but this does not affect the operation of the device.
- To reinstall the filter, insert the two tabs into the corresponding openings.
4.3 Replacing the activated carbon filter

WARNING!
The activated carbon filter must not be washed!
To replace the filter:
1. Remove the milk frother filter.
See "Cleaning the milk frother filter" in this chapter.
2. Pull out the separating part of the filter.
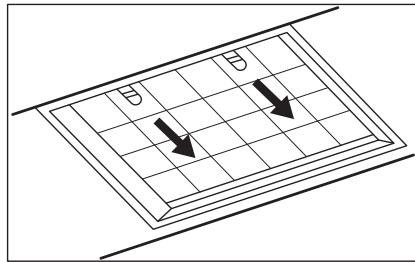
- Then tilt the front part of the filter forward and pull it out.
- To install a new filter, insert the tabs into the corresponding openings. In any case, it is necessary to replace the filter at least every four months.
4.4 Replacing the lamp
This device is equipped with an LED lamp. This part must be replaced only by a technician. In case of malfunction, see "Service" in the chapter "Safety Instructions".
5. ENVIRONMENTAL PROTECTION
Recycle materials with the symbol . Put the packaging in the relevant containers for recycling. Help protect the environment and human health, as well as to recycle waste from
electrical and electronic appliances. Do not dispose of appliances marked with the symbol with the household waste. Return the product to your local recycling facility or contact your municipal office.
CONTENTS
- SAFETY INSTRUCTIONS AND INSTALLATION 13
- PRODUCT DESCRIPTION 14
- DAILY USE 14
- CLEANING AND MAINTENANCE 16
- ENVIRONMENTAL CONCERNS 17
FOR PERFECT RESULTS
Thank you for choosing this AEG product. We have designed it to work flawlessly for many years, using innovative technologies that make life easier – features you may not find on ordinary appliances. Take a few minutes to read this manual to get the best from it.
Visit our website:

Get usage advice, troubleshooting, brochures, and service and repair information:
www.aeg.com/support
Register your product for better service:
www.registeraeg.com


Buy additional equipment, consumables and original spare parts for your appliance:
www.aeg.com/shop
CUSTOMER CARE AND SERVICE
3. DAILY USE
3.1 Using the hood
Check the recommended speed according to the table below.
| ♀1 | Prilikom zagrijavanja hrane, kuhanja sPokrivenim pos-sudama. |
| ♀2 | Prilikom kuhanja sPokrivenim posudama na više zo-na kuhanja ili plamenika, lagano prženje. |
| ♀3 | Prilikom ključanje i prženja velikh količina hrane bezPoklopca, kuhanja na više zona kuhanja ili plameni-ka. |
| i i | Prilikom ključanja i prženja velikih količine hrane bezPoklopca, visoka vlžnost. |
| ... | Osvježava zrak u kuhinji nakon kuhanja na vrlo niskojrazini buke. Može se aktivirati i deaktivirati dodiomsimbola. Funkcija se automatski isključuje nakon 60minuta. Koristi se samo nakon kuhanja. |
It is recommended to leave the hood running for about 15 minutes after cooking. The control panel is a sensor field. Touch the symbols for 1 second to activate the function.
To operate the hood:
Thank you for choosing this AEG product. We have created it to give you impeccable performance for many years, with innovative technologies that help make life simpler – features you might not find on ordinary appliances. Please spend a few minutes reading to get the very best from it.
Visit our website to:

Get usage advice, brochures, trouble shooter, service and repair information:
www.aeg.com/support

Register your product for better service:
www.registeraeg.com

Buy Accessories, Consumables and Original spare parts for your appliance:
www.aeg.com/shop
CUSTOMER CARE AND SERVICE
Always use original spare parts.
When contacting our Authorised Service Centre, ensure that you have the following data available: Model, PNC, Serial Number.
The information can be found on the rating plate.
Warning / Caution-Safety information ① General information and tips Environmental information
Subject to change without notice.
1. SAFETY INFORMATION AND INSTALLATION

WARNING!
Refer to the separate
Installation Instructions
booklet for Safety
Information and Installation.
Read carefully the Safety
chapters before any use or
maintenance of the
appliance.
2. PRODUCT DESCRIPTION
2.1 Control panel overview

| Function | Description | |
| 1 | On / Off | Turns the hood on and off. |
| 2 | First speed | The motor switches to first speed level. |
| 3 | Second speed | The motor switches to second speed level. |
| 4 | Third speed | The motor switches to third speed level. |
| 5 | Maximum speed | The motor switches to maximum speed level. |
| 6 | Speed boost | The motor switches to maximum speed level. After 5 minutes the appliance returns to previous setting. |
| 7 | Breeze | The hood operates on the lowest speed. After 60 minutes the appliance turns off. |
| 8 | Filter notification | Reminds to change or clean the charcoal filter and clean the grease filter. |
| 9 | Hob²Hood | Indicator of the function to control hood from hob. |
| 10 | Lamp | Turns the lights on and off. |
3. DAILY USE
3.1 Using the hood
Check the recommended speed according to the table below.
| ♀1 | While heating up food, cooking with covered pots. |
| ♀2 | While cooking with covered pots on multiple cooking zones or burners, gentle frying. |
| ♀3 | While boiling and frying big quantities of food without a lid, cooking on multiple cooking zones or burners. |
| ♂and | While boiling and frying big quantities of food without a lid, big humidity. |

Refreshes the air in kitchen after cooking at a very low noise level. It can be activated and de-activated by touching the symbol. The function turns off automatically after 60 minutes. Use after cooking only.
It is recommended to leave the hood operating for approximately 15 minutes after cooking. The control panel is a sensor field. Touch the symbols for 1 second to activate the functions.
To operate the hood:
- Turn on the appliance by pressing the ① symbol.
You can now activate the functions.
- To activate the function touch the symbol.
- If needed, touch the light symbol to illuminate the cooking surface. To change the light intensity touch and hold the symbol again.
To turn off the appliance, press the ① symbol again.
3.2 Hob²Hood function
It is an automatic function which connects the hob with a hood. Both the hob and the hood have an infrared signal communicator. Speed of the fan is defined automatically on basis of mode setting and temperature of the hottest cookware on the hob. You can also operate the fan using the hob manually. The function can be activated from panel of the hob.

For more information how to use the function refer to the hob user manual.
3.3 Activating Maximum Motor Speed
When you touch , the MaximumMotor Speed starts to operate for 8
minutes. After that time, the appliance returns to its previous speed settings.

When the function is turned on, additional touch on does not have any effects.
3.4 Filter notification
Filter alarm reminds to change or clean the charcoal filter and clean the grease filter. The filter indicator is turned on for 30 seconds if the grease filter must be cleaned. The filter indicator flashes for 30 seconds if the charcoal filter must be replaced or cleaned.

Refer to cleaning the grease filter in care and cleaning chapter.

Refer to cleaning the charcoal filter or replacing the charcoal filter in care and cleaning chapter.
To reset the function touch for 3 seconds.
To activate or deactivate function:
- Switch on the control panel.
- Make sure that the icons are turned white.
- To activate the function, touch for 3 seconds.
If the function is activated, the filter icon flashes five times.
- To deactivate the function, touch for 3 seconds.
If the function is deactivated, the filter icon flashes three times.
4. CARE AND CLEANING
4.1 Notes on cleaning
| Cleaning Agents | Do not use abrasive detergents and brushes. Clean the surface of the appliance with a soft cloth with warm water and a mild detergent. |
| After cooking some parts of appliance can get hot. To avoid stains appliance must be cooled down and dried with clean cloth or paper towels. | |
| Clean stains with a mild detergent. | |
| Keep the hood clean | Clean the appliance and grease filters each month. Clean the interior and grease filters carefully from fat. Fat accumulation or other residue may cause fire. Follow the instructions for cleaning the accessories when filter notification is on. Refer to Filter notification in daily use chapter. |
| Grease filters can be washed in a dishwasher. The dishwasher must be set to a low temperature and a short cycle. The grease filter may discolour, it has no influence on the performance of the appliance. | |
| Charcoal filter | The time of saturation of the charcoal filter varies depending on the type of cooking and the regularity of cleaning the grease filter. The activated charcoal filter is not washable, cannot be regenerated and must be replaced approximately every 4/6 months of operation, or more frequently for particularly heavy usage. |
4.2 Cleaning the grease filter
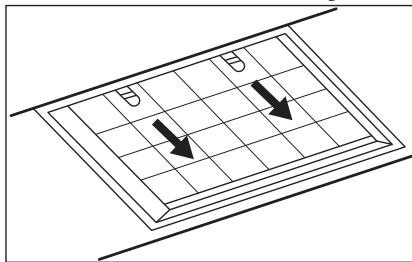
Filters are mounted with the use of clips and pins on the opposite side.
To clean the filter:
- Hold the panel on the sides and push it back (1).
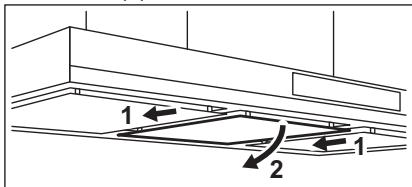
- Slightly tilt the front of the filter downwards (2), then pull.

Be careful! The filter is protected by a chain against accidental collapse. Dismount the chains before cleaning the filters.
- Disassemble the filter by removing the screws on top of the filter.
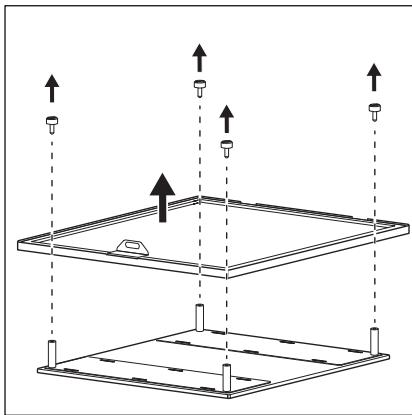
- Clean the filters using a sponge with non-abrasive detergents or in a dishwasher.

The dishwasher must be set to a low temperature and a short cycle. The grease filter may discolour, it has no influence on the performance of the appliance.
- To mount the filters back follow the first two steps in reverse order. Repeat the steps for all filters if applicable.
4.3 Replacing the charcoal filter

WARNING!
The charcoal filter is non-washable!
5. ENVIRONMENTAL CONCERNS
Recycle materials with the symbol. Put the packaging in relevant containers to recycle it. Help protect the environment and human health by recycling waste of electrical and electronic appliances. Do not dispose of
To replace the filter:
- Remove the grease filters from the appliance. Refer to "Cleaning the grease filter" in this chapter.
- Pull the tabs towards the bottom part of the filter.
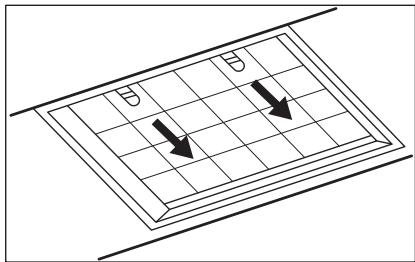
- Slightly tilt the front of the filter downwards, then pull.
- To install a new filter, perform the same steps in reverse order. In any case, it is necessary to replace the filters at least every four months.
4.4 Replacing the lamp
This appliance is supplied with a LED lamp. This part can be replaced by a technician only. In case of any malfunction refer to "Service" in the "Safety Instructions" chapter.
appliances marked with the symbol with the household waste. Return the product to your local recycling facility or contact your municipal office.
TABLE OF CONTENTS
- SAFETY INFORMATION AND INSTALLATION 39 2. PRODUCT DESCRIPTION. 40
- DAILY USE 40 4. CLEANING AND MAINTENANCE. 42 5. WASTE DISPOSAL. 43
FOR BEST RESULTS
4.3 Replacing the charcoal filter

WARNING!
The charcoal filter is not washable!
5. WASTE DISPOSAL
2. CONTROL PANEL
2.1 Control panel buttons

| Функция | Синоattamacь | |
| 1 | Косулы/Өшірүл | Aya tarikkышы кocаны жэнөшірedi. |
| 2 | Бірінші кылдам'dык | Motop bірінші кылдам'dык Deнг'reиhe ayызды. |
| 3 | Екінші кылдам'dык | Motop ekінші кылдам'dык Deнг'reиhe ayызды. |
| 4 | Ушінші кылдам'dык | Motop ушінші кылдам'dык Deнг'reиhe ayызды. |
| 5 | Мakсимал'dы Жылдам'dык | Motop мakсимал'dы кылдам'dык Deнг'reиhe ayызды. |
| 6 | Жылдам'dык'tы кушey | Motop мakсимал'dы кылдам'dык Deнг'reиhe ayызды. 5 minuTTaH keiH KypbIrfbI aJdbIHfbl napameTpre kaɪta opana'dы. |
| 7 | Демалу | Aya tarikkыш Курал сн Төмehri кылдам'dыктɑжүмьic ICTeɪdi. 60 minuTTaH keiH KypbIrfbI ceHeDi. |
| 8 | Суэрı typалы хабарлан'dыр | Kəmip cyɜricih ayüctbpy He ta3anay kəнe Maɪ cγзricɪn ta3anay kɑжет ekeɪn ecke cana'dы. |
| 9 | Отikký2Аya tarikkыш Курал | Aya tarikkыш Курал'dы otчытан Бackapу Функцяскынbɪн Иndикаторы. |
| 10 | Шam | Шam'dar'dы кocа'dы кэнөшірedi. |
3. OPERATING INSTRUCTIONS
3.1 Starting the device
Check the device's operation according to the table below.
| Y1 | Тамakты кылтыkanда, кашик кашилfasн bдыICTы Колданыniciprene_. |
| Y2 | Бірпше nicipy aiMaКтарында hemece OTыктарda Кашилары кашиль bдыICTа Тамak Niciprene_, bannen Куырfaнда. |
| Y3 | Көн мөлшердөгтafamdapдү Кашиксыз Кайнатkaнда көн He Kyырfaнда, bірпше nicipy aɪmaftында hemece OTыктарда niciprene_. |
| ЖэHe | Улken Мөлшердөгтafamdapдү Кашиксыз Кайнатkaнда көн He Kyырfaнда, bɪlfaɪdəblɪbɪk Kən. |
| ↑↑ | Писрэннен Keiin acyüderi ayanbI eTe Təmen shu Дeнгийнда кианртады.Оны танбаны Tурту apкылы begencdipyre көн eшipurre boli. Фунksяя 60 minhTTan Keiin ABItomatMbI Tpyde сeнedi.Tek nicipуden Keiin падаланын_. |

If the device does not start, contact the service center within 15 minutes.

Control panel — touch buttons. Press and hold the buttons for 1 second to activate the functions.
To start the device:
- Press and hold the power button to turn on the device. The indicators will light up. 2. Press and hold the power button to activate the function.
- If necessary, press and hold the power button to turn off the device. To change the settings, press and hold the power button again and hold it.
To turn off the device, press the power button once.
3.4 Water filter notification
The water filter replacement signal indicates that the filter needs to be replaced or cleaned. If the filter needs to be cleaned, the filter indicator will flash for 30 seconds. If the filter needs to be replaced, the filter indicator will flash for 30 seconds.

Refer to the "Filter replacement and cleaning" section in the "Maintenance and cleaning" chapter.

In the maintenance and cleaning section, see the instructions for replacing or cleaning the filter.
The function is activated by pressing and holding the button for 3 seconds.
Functions for enabling/disabling:
- Press the button.
- The indicator light will turn on. 3. To enable the function, press and hold the button for 3 seconds. The function is enabled, and the filter indicator will blink with colors. 4. To disable the function, press and hold the button for 3 seconds. The function is disabled, and the filter indicator will blink with colors three times.
4. CLEANING AND MAINTENANCE
4.1 Cleaning precautions
| Жуrbіш 3aTTAP | Жemіріш жуrbіш 3aTTAPДы жэне щeТкeнерпі naДаланБанБіЗ. |
| КурьЛФынБін �аддынБін �жafын �жумсak �жубіш 3aT �КOCылfaH �жын �у �уfa �батырьлФан �жумсak �шубeркnen �тazаланБіЗ. | |
| ТаframniciprenHHen KeiH �курьЛФынБін �кeьір �бeЛіКтepi �bICbіn �КeТуі Mумін. �ДаКтБ �бОДырмас �Ушін �КурьЛФынБі �суВытіn, �тAZa �шубeркnen �нemecce �КаFA3 �сУПIMeH �КурfaTу �КepeK. | |
| ДаКтары �жумсak �жубіш 3aTпeн �тazаланБіЗ. | |
| Aya tarTkbls KypaIbI Ta3a yCTaHbI3 | КурылгынblжэHe май сузгілөрін ai саын ta3alaынbl. Курылгынbli iшin кэн He май сузгілөрін майдан ta3apтынbl3. Май күнанлfaнда нemecе baskа калдык киналпса, орт kayин Тудьруbl MymkiiH. Сузгінih xabapлама сигналbl kocsyнbl Keздe kepek-жарakтарbl ta3anay hyckaynapbɪn opbɪdəнbl3. Сузгі typалbl xabapламы КУнdenіkti пайдану tapayынн Ka paнbl3. |
| Майысузгілөрін blыdic жуfuьlli машинада жууfasболаы. blыdic жуfuьlli машинafа төmen Temпература кыска уллр opнату kepek. Май сузricihiŋ Tyci e3repyi MymkiiH, Бул курылгынbliЖуMbIC ICTeyihe acep etne'di. |
| Кемір сузricihi | Кемір сузricihi Толу уасыты таfram Nicipудин Тури мін мін сузricihi Каншалыкты кіи таэлан falhaына 6алалыICTы 6олады. |
| Белсандірілген Кемір сузricihi жууfas 6олмайы, калlbіна кentіруг 6олмайы кәне колданыүына 6алалыICTы ор 4/6 ai caын | |
| Немец колданыүхийгіні 6алалыICTы ayыстіру керек. |
4.2 Cleaning the filter
The filters are installed with clips and latches in the opposite direction for removal.
To clean the filter:
- Remove the filter by pulling the tabs on the filter's upper edge.
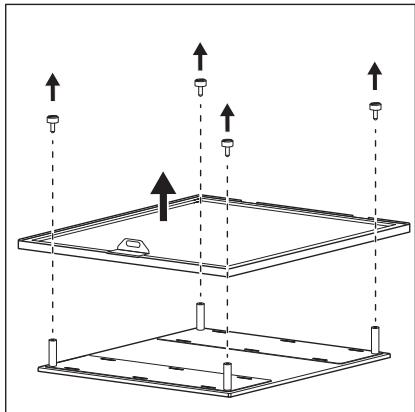
- Clean the filters with a soft brush or in a dishwasher.

In the dishwasher, set the temperature to a low and short cycle. The filter color may change, but this does not affect the appliance's performance.
- To reinstall the filter, place it in its original position and press until it clicks.
If necessary, replace the filters with new ones.
4.3 Replacing the filter

For cleaning:
- We have selected our words. In this section, see "Word cleaning".
- Check the buttons according to the meaning of the word.
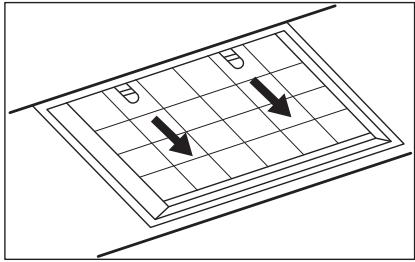
- If the word is taken in a different meaning, then drag it.
- Use these cards to place the word. In some cases, words must be dragged by anyone.
4.4 Cleaning
The LED lamp is connected. This is a technical device. In case of malfunction, see "Safety instructions" section "Service".
5. DISPOSAL OF WASTE EQUIPMENT
Hand over the materials marked with the sign for recycling. Place these materials in special containers for recycling. Electrical and electronic devices and batteries must not be disposed of with household waste, as they can harm human health and the environment.
Do not allow children to play with the packaging. Do not dispose of the marked devices together with household waste. Take them to a local collection point or contact your local authorities.
- IZMANTOSANA IKDIENA 87
- KOPŠANA UN TIRISANA. 89
- APSVERUMI PAR VIDES AIZSARDZIBU 90
NEVAINOJAMIEM REZULTATIEM
Instructions for use
Brochure for users
Installation. Carefully
read the safety instructions before
use
the device.
2. DESCRIPTION OF THE DEVICE
2.1 Overview of the control panel
3.3 Activating the maximum speed of the motor.

When you press the button, the motor will run at maximum speed for a period of 8 minutes. After this period, the device returns to its previously set speed.
The device is designed for maximum motor speed operation for a period of 8 minutes. After this period, the device returns to its normal operating conditions.
C TnabAMN, OTHOCRUMMCRA
Technical safety.
2. DESCRIPTION OF THE DEVICE
2.1 General view of the control panel

3.1 Using the extractor hood
The recommended speed values are given in the table below.
Turning on the extractor hood;
- Turn on the device by pressing the symbol ①.
Now you can turn on the functions.
2. To activate the functions, press the symbols.
3. If necessary, press the backlight symbol ; to illuminate the cooking area. To change the light level, press and hold the symbol. To turn off the device, press the symbol ① again.
3.2 New function =
This function uses automation that links the cooking surface to the extractor hood. Both the cooking surface and the extractor hood maintain the connection via the wireless network. The fan speed is set automatically based on the selection
of the mode and temperature of the hottest cookware on the cooking surface. There is also the possibility of manual adjustment of the fan using the cooking surface. The function is activated on the cooking surface control panel.

For more detailed information on using this function, see the instructions for operating the cooking surface.
3.3 Enabling the maximum speed mode
When the engine is touched for 8 minutes, it switches to maximum speed mode. After this period of time, the device returns to the previous speed setting.

If this function is enabled, further touches do not lead to any result.
3.4 Filter warning
The filter indicator reminds of the need to replace or wash the charcoal filter or to clean the clogged filter. In case of need to clean
the clogged filter, press and hold the filter indicator for 30 seconds. If it is necessary to replace the charcoal filter, after 30 seconds the filter indicator starts blinking.

See the section "Cleaning the clogged filter" in the chapter "Care and cleaning".

See the description of the procedure for washing or replacing the charcoal filter in the chapter "Care and cleaning".
The clogged filters can be washed in the dishwasher.
The dishwasher must be set to a low-temperature program and a short cycle. The clogged filter may change color; this does not affect the performance of the device.
Charcoal filter
The service life of the charcoal filter depends on the type of cooking and the regularity of cleaning the clogged filter. The filter made of activated carbon is not washable, is not subject to regeneration and must be replaced approximately every 4/6 months of operation or earlier in case of particularly intensive use.
4.2 Cleaning the clogged filter
Useful tips for service
Keep the original packaging and spare parts.
Contact the Service Center for information about the device: model, production number, serial number.
The manufacturer is not responsible for damage caused by incorrect use.
Warnings/Precautions - safety information and advice for the environment
All rights reserved.
1. SAFETY INFORMATION FOR INSTALLATION

WARNING!
Read the safety instructions.
Repair information:
www.aeg.com/support
Register your product for better service:
www.registeraeg.com


Therefore, the area of triangle OBC is 1/2 * OB * BC = 1/2 * 2t * 5.

www.aeg.com/support
www.registeraeg.com
www.aeg.com/shop



- SAFETY AND INSTALLATION INFORMATION
- WARNING
- DESCRIPTION OF THE DEVICE
- BEFORE FIRST USE
- TO WORK WITH THE ABSORBER
- NEW FUNCTION 三
- ACTIVATING MAXIMUM MOTOR SPEED
- FILTER INDICATOR
- CLEANING AND MAINTENANCE
- GENERAL INFORMATION ABOUT MAINTENANCE
- REPLACING THE ACTIVATED CARBON FILTER
- REPLACING THE LAMP
- ENVIRONMENTAL PROTECTION
- CONTENTS
- FOR PERFECT RESULTS
- CUSTOMER CARE AND SERVICE
- DAILY USE
- USING THE HOOD
- TO OPERATE THE HOOD
- SAFETY INFORMATION AND INSTALLATION
- PRODUCT DESCRIPTION
- CONTROL PANEL OVERVIEW
- HOB²HOOD FUNCTION
- FILTER NOTIFICATION
- TO ACTIVATE OR DEACTIVATE FUNCTION
- CARE AND CLEANING
- NOTES ON CLEANING
- CLEANING THE GREASE FILTER
- TO CLEAN THE FILTER
- REPLACING THE CHARCOAL FILTER
- ENVIRONMENTAL CONCERNS
- TABLE OF CONTENTS
- FOR BEST RESULTS
- WASTE DISPOSAL
- CONTROL PANEL
- CONTROL PANEL BUTTONS
- OPERATING INSTRUCTIONS
- STARTING THE DEVICE
- TO START THE DEVICE
- WATER FILTER NOTIFICATION
- FUNCTIONS FOR ENABLING/DISABLING
- CLEANING PRECAUTIONS
- CLEANING THE FILTER
- REPLACING THE FILTER
- CLEANING
- DISPOSAL OF WASTE EQUIPMENT
- NEVAINOJAMIEM REZULTATIEM
- OVERVIEW OF THE CONTROL PANEL
- ACTIVATING THE MAXIMUM SPEED OF THE MOTOR
- WHEN YOU PRESS THE BUTTON, THE MOTOR WILL RUN AT MAXIMUM SPEED FOR A PERIOD OF 8 MINUTES. AFTER THIS PERIOD, THE DEVICE RETURNS TO ITS PREVIOUSLY SET SPEED
- GENERAL VIEW OF THE CONTROL PANEL
- USING THE EXTRACTOR HOOD
- TURNING ON THE EXTRACTOR HOOD
- NEW FUNCTION
- ENABLING THE MAXIMUM SPEED MODE
- FILTER WARNING
- CLEANING THE CLOGGED FILTER
- USEFUL TIPS FOR SERVICE
- SAFETY INFORMATION FOR INSTALLATION
Brand : AEG
Model : DBK6980HG
Category : Range hood