EIV84550 - EIV84550 - Hob ELECTROLUX - Free user manual and instructions
Find the device manual for free EIV84550 - EIV84550 ELECTROLUX in PDF.

User questions about EIV84550 - EIV84550 ELECTROLUX
0 question about this device. Answer the ones you know or ask your own.
Ask a new question about this device
Download the instructions for your Hob in PDF format for free! Find your manual EIV84550 - EIV84550 - ELECTROLUX and take your electronic device back in hand. On this page are published all the documents necessary for the use of your device. EIV84550 - EIV84550 by ELECTROLUX.
USER MANUAL EIV84550 - EIV84550 ELECTROLUX
OBCJNYKBAHE HA KJINEHTN
BnHa n3no3BaIe opunHnpe3epBn qactn.
Korato ce cBbP3BaTe c HauHn OToPn3IpaH OTdEn ,O6cnykBaHe", Tp8Ba Da nMaTe pOda PbKa cneHaTa INΦOpMaUaN: MoDen, PNC, cepuH Homep.
HΦopMaunra MoKe Da 6bJe OTKpuTa Ha TaBeJIkata C OCHOBn DaHHN
Iпгдунрждени /Внимани-Инфорmaцяза 6e3onaCHOCT
①Obua nHΦopMaζηι ΚbBεTη
IINΦopMaζηa 3a OKJHaTa cpeJa
3ana3bame cn npabTo Ha n3MeHeHn.
CbIbPJKAHNE
- INHΦOPMALIJI 3A BE3OPIACHOCT. 3
- INHCTPYKUIN 3A BE3OJACHOCT.. 5
3.MOHTAX. 7
4.ОПИСАНЕHA UРEDA 10 - INPEIINIIbPBA YNOTPE6A 11
- BCEKnIHEBHA YIOTPEBA 12
7.ДОПьЛНHTЕЛНФУHKCUIN 15 - INPEINOPbKN I CbBETN 18
9.ΓPINAI NOUCHTBAHE 20 - OTCTPAHBAHE HA HEN3INPABHOCTN 21
- TEXHINUeCKN DAHHN 22
- EHEPNIHA EΦEKTINBHOCT 23
13.ОПАЗВЕHAOKOLHATA CPEДA 24
1. UNHΦOPMAÇΥA 3A BE3OПАCHOCT
IpeiMoHTnpaHToN yIpOte6aTaHa ypeDa BHNMaTeJIHO npOyTeTe IpeIOCTaBeHnte IHCTpyKcIn. Ipon3BOJnteJIrT He e OTROBOpEn 3a HapaHЯBaHnI yIIN IOBpeDi B pe3yIITaT Ha He npABynHa nHCTaJaCnI yIpOTpe6a. BnHaRn dpbXKe INCTpyKcInTe Ha 6e3OpaCHO n JecHo DoCTbIIHO MAcTO 3a CnpaBka B 6bDeSe.
1.1Бe3OnaHocT 3a Deca N Iuca B HepaBHOCTOHO NOLOXKeHne
To3n ypei moKeJa 6bIe n3noJ3BaH OT Deca Hnd 8- roDnUHa Bb3pact, KaKTo IOT LInuCA C HamaJIeHN fN3nueCKn, CeTINBn I yMCTBeHn Bb3MOxHOCTn IIn OT LInuCa 6e3 OINT I N03HaHnra, cAmO aKO Te Ca IOnd HabIoJeHne IIN 6bDaT INCTpykTnpaHn OTHOCHO 6e3OpacHata yNoTpe6a Ha ypeDa I pa3bIpaT Bb3MOxHnTe pIcKOBe. Deua IOD 8-roDnUHa Bb3pact I Xopa C TeJKN IIn KOMPJIeKCHn YBpeJdaHnra Tpr6Ba Da ca DbpxKaT daJeU OT ypeDa, OCBeH aKO He ca IOnd NoCToRHHo HabIoJeHne.
- DeçaTa TpЯБВa Да БДаТ пон HabлЮдене, 3a Дa ce rapaHTnpa, Ye He CSИграЯT C ypeDA.
- ДрьжтЕ BCичКи ONaKOBКи дале ue OT Deça и n3XbPJIeTe ONaKOBKITE NO MeCTHITe ПраВILA.
- ПЕДУПЕЖДЕНЕ: Урети和他的овпесьнчаси ce haropeeяват по врeme на уnotpe6a. Па3ete Deцату и DOMaшнITE Лобимци далец OT урета, korato ce n3ползва и koratoо ce oxлajda.
- Ako урedingима устюг STBO 3a DeTSCa 6e30nacHocT,TO Tp86Ba Da ce aKtNBnpa.
- Деца He Трава Да ИЗвршВат поисвае Или Рдравka на урEDA, korato ca 6e3 Надзор.
1.2 Ośza 6e3oŋačnoct
To3n ypeE npedHa3NaueH cAmO 3a rOTBeHe.
To3n ypeE npedHa3NaueH 3a domaunHa ynoTpe6a B 3aTBOpEn NOMEeHnA.
To3n ypeJ moKe Ja ce n3noJ3Ba B OocN, CTaB XOTeJ, CTaN B MOTeJ, KbIu 3a rOCTn I npyTu NpOobHm MeCTa 3a HactaHaBaHe, KbTeTO TOBa n3NoJ3BaHe He HaDbuShaBa (cpeJHo) HNBOTO Ha DomaSha yNtpe6a.
- I P E D U N P E X J D E H N E: Ype d T N H e r O B N T E D O C T b N H N u c t N C e H a r o p e s u B a T N O B p E M e H a y n o T p e 6 a. T p 6 b a d a c e B H m a B a N d a c e N 3 6 8 r B a D O K O C B a H e H a r p 8 B a u n t e c e E J E M E H T N.
- ПЕДУПЕЖДЕHINE: ГOTBEHETO C XINBOTINHCKa Ипп пастиелна Ma3нHa 6e3 NaДЗОр можеда e onaCHO nда пөдИЗВИКа пожар.
- HnKora He n3NoJ3BaIte B0da 3a NotuShaBaHe Ha OrBnJa npi rOtBeHe. N3KnUoyTe ypeDa i NOKpniTe PnAmbCInTe C ODeJIIO nJn KaNaK.
- ПЕДУПЕЖДЕНЕ: Уребт He Тябва Да e 3axpaHBaH
Чез Вьншно певКлюващо устpoистBO кATO таймер Или
Да e CBьр3ан КьМ eЛжКтпчесka БерURA, KОТTO NOCTОЯнHO
Се ВКлючBA и ИЗКЛючBA OT устpoистBO.
BHIMAHNE:Процьт ha rotbehe Tpr6Ba Da 6bde Na6JIIOdAbaH. KpaTknrT prouec Ha rotbehe Tpr6Ba Da 6bde Na6JIIOdaBaN NOCTOJHHO.
- ПЕДУПЕЖДЕH涅: Onacnoct ot noxap: He cbyxpaaHbAaTe ppeDMeTn Bbpxy NOBbpxHOCTnte 3a TOTBeH.
MeTaJIHn IpeDMeTn KaTo HOXOBe, BUNIuN, JbJxUcN IN KanaCn He Tp8Ba Da ce NocTaBArT BbPxy Rot. NIOr, TbN KaTO MOraT Da Ce 3arpeT.
He n3noJ3BaIte ypeJa, npeNi Da ro IHCTaIIpaTe BbB BrpaJeHata KOHCTpyKcIy.
- He nouchte ypea c napouncha.
Clej ynoTpe6a, n3KJIOUeTe PLOTA NocpeDCTBOM KJIoua 3a ynpabIeHne I He pa3uHTaIte Ha uHKcIyTa 3a JOKaJIIN3IpaHe Ha rotB. CbIOBe.
Ako cTBKJIOKEpaMnUHaTAtcTBKJIeHaTa NOBbpxHOCT e HanykaHa, n3KJIuOte UpeDa n rO n3KJIuOte OT eJeKTPnueckaTa mpeXa. B cIyauaYe ypeDbT e CBbP3aH
Дирек THО Кьм eЛeКТрчecKaТа Мржа CпOMоцтА Na CBeДинHTeJIна КУТЯ, пeMaxHete ПpeДиa3ИTeЛЯ, 3a Дa N3KЛюЧte урEDA OT eЛeКТрчecKaТа Мржа. ВьВ BCEKN eДин сЛучай ce CBbPЖeTe C OTOpИЗИраня СерВиЗЕн ZEHTbp.
- Ako 3axpaHbauT Ka6e n e NobpeDeH, ToT Tp8Ba da ce 3aMeHN OT npON3BODnTeJI, OT yNtBnHOMOuEHH CepBn3EH cHTbp INIOT LInca CbC CXoJHa KBaJIuΦnKaUa, 3a Da ce n36erHe onaCHOCT.
- ПЕДУПЕЖДЕHINE: Използваite само педпа3ителура КOTлони разрабо-teни OT пОиЗВODителя Или уноменати OT Hero В Инстукцит e 3a уNotрe6a, Или педпа3ителу 3a KOTлони ВграDEни B урEDA. ИзпOLТБанeto на HeNoДхОдяши педпа3ители може дадоведи do 3лОпОЛуКИ.
2.ИHCTPYKUN3ABE3OJACHOCT
2.1 ИстANAЯ

BHIMAHNE!
Cama KbaIINΦnIpaHo IInCe MoXe Da I3BbPbM OMTaKa Ha ypeDa.

BHIMAHNE!
OnachocT OT hapaHbHe nIIN nobpeHa Ha ypeHa.
MaxHeTe BCnUKN ONaKOBKn.
He mONTpaTne Hn H3noJ3BaIte noBpeDeH ypeI.
CneDbaiTe HNCTpyKuInTe 3a INHCTaJInpaHe, pINIOKeHN KbM ypeJa.
- Tp86Ba Da c7a3BaTe MInHIMaJIHOTOPa3CTOHaHne Do dpyrN ypeDN uYcTpoiCTBa.
BnHaRn BnHmAbaYte, KOraTo MeCTnTe ypeDa, TbI KaTO e TeKbK. BnHaRn n3NoJ3BaYTe pPeJna3Hn pKaBnCn n 3aTBopeHn OByBKn.
- YnIbTHHeTe cpr3aHInTe NOBbpxHOCTu CynIbTHInTe, 3a Da npEDoTbpaTInTe n3dYBaHe nopadn Bnara.
- Празаьiate Долнata уст на урда от napa и влara.
He mOnTnpaIte ypeDa 6nI3o Do BpaTa nnPi nOd npO3opeu. Taka upeI npEIoTbPaTIte naDaheto Ha ropeuI rOtBapcKn cBdoBe ot ypeDa, KOraTo ce OTBOpN BpTaTa nnPi npO3opeuT.
- Bcekn ypei nma oxnajdaun BeHTnlaTOpn Ha IbHOTO.
Ako ypeIbTe moNTnpaH naJyekMeJxKeTo:
He cklaandaipaTe MaJIKN napYeHuaIIN XAPTNIKIN, KOINTO MORAT da 6bDatBCMUKaHN I Da HapaHrTOXJaJdaUHTe BeHTNlAToPOnI INI DAIOBpeJrTO XJAAJDaUaTa CNTema.
- Пазerte Достацься OT минимуm 2 cm
Можд дьното на урета и
Складиразнитуactivи в чек Medжeto.
- OtctpaHete BCaKaBn pa3JeIaI nnHeJI, MOHTnpaHI B WkaFpa IoI ypeJa.
2.2 EneKtpnuecko Cbbp3BaHe

BHIMAHNE!
PnCKOTnoXkapnnTOKOByap.
BcnuKn eNeKtpuYeCKn Bp3Kn Tp86Ba Da ce n3BbPbWBat OT KBaINΦuIpaH eneKtpoTeXnIK
- YpeBt Tp8Ba Da e 3a3eMeH.
- Прази за извьршптей Deиства, се уBERpeTe, ue ypeДыт e n3KЛючен OT eJIeKТр03axpaHbaHeto.
- YBepTe ce, Ye napameTpnte Ha TaBeJkata C TexHnueckn DaHHn Ca CbBmecTUMN C eNEKtpuYeCKnTE DaHHN Ha 3axpaHbauaTa Mpeka.
- Ybepete ce, ye ypeDbT e MOHTnpaH npabnno. Xna6abu n HenpaBnHn eJektpnueckn 3axpaHbau n Ka6eN nIu nIeNceN (ako ca NaInuHn) MOrat da doBeedat Do npeharpaBaHe.
- I3noJI3BaIte IOJXOJaI 3axpaHbIaKa6eI.
He no3BoJbAaTe 3axpaHbaUaT Ka6eI da ce npenPnta. - YBepete ce, ye e nHctaInpaHa 3aunTa OT TOKOB ynap.
3akpenete ka6ena c npitraa cko6a npotNB onbbaHe. - YBepete ce, Ye Ka6eIbT 3a eJekTpO3axpaHbAHETo IINI sEcnCeIbT (aKo e HAIyueH) He DOKOCBaT HArOpeseHnYpeD INI rOpEsiCbDoBe 3a RotBeHe, KOraTO BkIIOChTe yPeDa B KOHTaKT.
He n3no3BaIte pa3KnOHTeIN nn aanTepn C MHOro BXoOBe.
He nobpekdaaTe 3axpaHbauu ycenceI (ako e hannueH) nll 3axpaHbauu Ka6eI. CbpxKeTe ce c haunia OTOpn3npaH cepBn3eH ueHTbp nll eJeKtpoTeXnK 3a cmHaTa Ha nobpeDeH 3axpaHbau Ka6eI.
3aunntata ot tokob ynap ha ropeunte n 30inpanu hactn Tpr6ba da 6bde 3aTeHaTa IIO TaKbB HauH, Ye da He MOKe da ce OTCTpAHn 6e3 INHCTpyMeHTN.
CbpxkeTe Ka6eJa 3a 3axpaHbaHeTo KbM KOHTaKaTa eINHCTBeHO B KpaHa INHCTaIaIyra.Ta.YBepTe Ce,Ye IeIeNcJIbT 3a 3axpaHbaHe e IOCTbIeH CJIeI INHCTaIIpaHeTo.
Ako KOhtakTbTe pa3xla6eH, He CBbP3BaIte 3axpaHbAunu sienceJ.
He n3dbpnbai Te 3axpaHbaua KabeI, 3a da n3kIouHte ypeJa. BnHarn n3dbpNbai Te uencena Ha 3axpaHbAHeto. - I3noI3BaIte caMo npabInHn yctPoIcTba 3a n3OJaIyra: npdeIpa3HN ppeKbcBauH naMpexKaTa, npdeIpa3nteIi (npdeIpa3HTeIITeOT BnHTOB TIN TpIbBa da ce n3BaIaT OT facyHrata),
N3KIIQUyBaTeIIN KOHTaKTOpN 3a yTeUka Ha 3a3EmraBaHTo.
- EneKtpnueckata nHcTaJaunr Tpr6Ba da
- Ima n30JnpaO yCTpoiCtBO, KoTo Bn
- n03BOLraBa da n3KJIIOUHTe ypeDa ot en.
- MpeJkAta npn BCNUCKn PONIOCU.
- N30JnpaOTo yCTpoiCtBO Tpr6Ba da e c
- ShnPnHa Ha OTbapRHe Ha KOHTaKTA
- MNHNMyM 3 MM.
2.3 IV3non3BaHe

BHIMAHHE!
PnCK OT hapaHЯBaHe, n3rapaHnIy n TOKOB yap.
He npomehnTe npedHa3naeHneTo Ha ypeda.
- OTeTpaHete BCnUckn OnaKOBKn, eTnKeTn 3aUnTHoФOJINo (ako e Heo6xOДIMo) npeDi nIbPBOHaJHaTa yNoTp6a.
- YBepete ce, Ye BeHTnlaZuHOHHIte OTbOpN He ca 6JIOKpAHI.
He octabrayte ypeda 6e3 hao3op no Bpeme Ha pa60ta.
- N3KJIIOUBAIte 3OHaTa 3a rotBeHe cIeD BcRAka yNtpe6a.
He noctabray Te npibopn 3a xpahe nIte Hdxepn Bbpxy 30hnte 3a rotbe He Morat da ce haropeuT.
He pa6oTeTe C ypeDa C MoKpn pBue Nn KOrato NMa KOHTaKT C BODa.
He n3noJI3BaIte ypeDa KaTo pa6OTha NOBbpxHOCT ININ NOBbpxHOCT 3a CbXpaHeHne.
Ako nobbpxhocTt ha ypea e hanykaHa, He3a6abHNO n3KnHouTe ypea OT 3axpaHbAHeto. Toba ce npabn c uei npedeOTbpaTaBaHe Ha TKOB ynap.
Iotpe6nteIn c neiCmEikbprTre6Ba da cnA3BAt dNCTaHcHnHaN-MaKo 30 cm ot INHykCIOHHnTe 3OHN 3a rotBeHe, KOrato ypeDbT pa6Ot.
Korato noctabraye xpana B ropeo MaCNo, TЯ moKe da npbcka Ma3HnHa.

BHIMAHHE!
OnachocT OT noXap nnn ekCnNo3n
HaropeeHNTMa3HHnIIMacJOMorat Da IOBeDat DO OTdJIaHe HaBb3JIaMeHmN napi. He do6JIkBaItePnambk IIN HaropeeHNI pEmdTeN do
Ma3HnHaTaNJIMMacNOTO,KORaTO rOTBNTC TaKuBa.
- Papnte, KonTO OTdEJIa MHOrO HAropeuHcHTo MaCJIO, MORaT Da DOBeJaT Do BHe3aHNO Bb3PJIaMeHraBaHe.
- I3noJ3BaHOTo MaCNo, KOeTO MoKe Da CbDbPka OCTaTbCu OT XpaHa, MOKe Da npuHnI NoXkap PnI NO-HNcKa Tempepatya B cpaBHeHne C MacNoTo, I3noJ3BaHO 3a IIpbBn IbT.
He noctabaIte 3anaJIMn npOdyKTn nn npEpmEtN, KOITo Ca hAMOKpeHn CbC 3anaJIMn npOdyKTn, B 6bn30ct Do ypea nn Bbpxy Hero.

BHIMAHNE!
Onacnoct OT nobpea B ypea.
He npbXnhe ropeu nroTbapcN cIIOBe Bbpxy TaJIoTO 3a ynpabJIeHne.
He nocTabyTe ropeu Kaak Ha TnraH Bbpxy CTbKLeHaTa NOBbPxHOCT Ha Nlota.
He octabraye TeuHocTb B roTbapcknte CbdoBe da N3Bpu HanbJIHO.
BHHMaBaIte Da He n3TbPbATE npEaMeTn IINrOToBapcKcBIOBe BbPxy ypeJa. NOBbpxHocCTTa MoKe Da ce NobpeiN.
He BkIIOUbaIte 3OHNTE 3a rotBeHe, KOrato Ha TEx Ima Ipa3Hn RotBapcKn CbIOBe, INI KOrato HMa TaKuBa.
He nocTabraTe aIyMHHnEBO oIIO Bbpxu ypeia.
TOrbapcknTe CbIOBe OT UyHyN HJIN TAKNBa C NOBpeDeHO DbHO MOrat Da NaIpaKAT CTbKnIoTO/CTbKIOKepaMnKaTa. BnHaru NOBdnraTe Te3n PpeMeTn, KORATO Tp6Ba Da rN IpemecNTe Bbpxy NOBbpxHOCTTA 3a RotBeHe.
2.4 Frpka n nouchTbahe
Почистваite peIDOBHO ypeda,3a da npdeIOTbpaTHe YBpeKdAne Ha NOBbpxHOCTHnMaTePnAJI.
3. MOHTAX

BHIMAHNE!
Bx. rnaBa "Be3onacnoct".
I3kJIIOUeTe ypeDa n ro OCTaBeTe da ce OXJaAn, npedn da ro NOuchTne.
He n3no3BaIte BOIOCTpyuKa IIN npa, 3a Da noUcTnTe ypeDa.
- POnucTeTe ypeDa C MOKpa N MeKa KbPna. H3PON3BaIte cAmo HeYtpaIIHn npenapatN. He n3PON3BaIte a6pa3NBn npOdyKTI, rpanabN, nouchTbaUc N KbpN, pa3TBOpNTeIN INM MetaJIHN ppeDMeTn.
2.5 O6cnyxBaHe
3a nonpaBka Ha ypeDa ce CbpxKeTe c OTOpU3npaHna cepBn3eH ueHTbp. 13non3BaIte camo opuHaJIHH pe3epBn Yactn.
- OTHOCHO JAMnata(HTe) BbTpE B TO3n npOdyKT n pe3epBHNte JAMnnpOdaBaHn OTdEJIHo: Te3n JAMn ca npdeHa3NaueHn Da n3DbpKat Ha ekCTpeMnHn fN3uYeCKn ycNoBnB DOMaKnHcckn ypeDn, KaTO TemNepaTpya, Bv6paqnn, BLnaxKHOCTn nI Ca npDeHa3NaueHn Da cNtHaJIn3nPaTnHΦopMaun 3a pa60THOTo CbCToRnHe Ha ypeDa. Te He ca npDeHa3NaueHn 3a m3NOJ3BaHe B Dpyr n pnpIoXeHn N He ca NOxOJaU 3a OCBeTBaHe Ha NOMeSeHn B DomaKnHCTBOTO.
2.6 N3xBbPJIaHe

BHIMAHNE!
PnCK OT HapaHbAHe nIIN 3aDyShaBaHe.
CbpxTe ce c 6uHcknte Bnactn 3a HOpMaunKa da nXbplnte ypeda.
- IЗключeteуpeда от eNeEkTpO3axpaHbaHaeTO.
Изва对接харазьшюял.КбелВ 6иЗОТdoурдаигИЗХБьрлеTe.
3.1 Ппеди мотрава
Ipei Da nHCTaJIuPaTe pIoUyata, no-dOny 3aIIwTe uHΦoPMaζIyTa OT Ta6eKkata C daHH. Ta6eKkata C oChOBnTe daHH e pa3noJoxeHa B DoJIHATA yAcT Ha pIoUyata.
CepneH Homep
3.2 Bvpradeeni nloyn
BrpadeHnTe PIOOuMOraTaCa eN3PON3BaT cAmo CneI KaTo Ca MOHTnpaHn B NOxOJaUcBpAdeHn EINHnIu pa60THn PLOTOBe, KOINTOTROBaprHa CTAndapTHe.
3.3 Cbbp3Baau Ka6eI
-Плоча т ce Доставя CBС CBbрзвац ka6eJ.
3a da noIMeHnte nobpeH 3axpaHbaa Ka6en, n3non3BaIte Ka6en Tn: H05V2V2-F KoITo n3IbPka Ha temnepaTpya ot 90^ nINNo-BuCoka. EInHHnIrp npOBODnK Tp8Ba Da 6bde c dAmEeBp mHNmym 1,5 MM². CbPjKeTe ce c Ba7n MeCTe cepBn3eH ceHTbp. CbP3Ba7nRt Ka6el MoJE da ce noIMeHc CamO ot KBaIINΦnIpuAneJekTpOTexHnk.

BHIMAHNE!
Bcun kn eJ. Bp3kn Tpr6Ba da ce HnpaBrt OT KbaJInΦuNpuH eJeKtpoTeXnK.

IPEyIPEKDEHNE!
He npobuBaIte nIIN 3aONBaIte kpaIzata ha Jxuata.ToBa e 3a6paHEnO.

IPEdUIIPEKDEHNE!
He cBbP3BaIte Ka6eNa 6e3 nokpNbAaU, Uaayx 3a hakpaHnka.
DBypha3OBO Cbbp3BaHe
Iotbpcete Bndeo ypoka ,KaJa moHTnpate Baunna HnykunoHen Nnot Electrolux -MOHTaK Ha pa60Te HnOT" ,KATO HAnuWete nBJHOTO IMe, NOKa3aHO Ha rpaФNKaTa no-dony.

YouTube
www.youtube.com/electrolux
www.youtube.com/aeg
How to install your Electrolux Induction Hob - Worktop installation

4.ОПИSCAHNEHA YPEДА
4.1 Pa3noJoxHeHa nobbpxHocTt 3a rotBeHe

1 INyKUHOHa 3OHa 3a roTBeHe
2 KoHTpoJIeH nAneI
4.2 OΦopMneHne Ha KOHTpOHHnaHeI
I3noJI3BaIte ceH3OpHITe noJeta, 3a da pa60nte c ypeJa. Ioka3aHnraHa Daicnpe, INHdkaTOpNTe n 3ByKOBtne CnHaII NOKa3BAt KOn fYHKuIN pa60Tt.
6. BCEKNДHEBHA YNOTPEBA

BHIMAHHE!
Bx. rnaBa "Be3oNaChOcT".
6.1 AkTnBnpaHe n DeakTnBnpaHe
HaTnCHeTe 3aDpBxTe ①, 3a Da aKTbBnPaTe Nnn DeaKTbBnPaTe NIOaTa.
6.2 OTkPnBaHe Ha cBd
Ta3nФyHKUЯ NOKa3Ba HaNInuHneTo Ha rotBapcKsCbD BbPxy NNouaTa n DeakTbNupa 3OHnte 3a rotBeHe, aKO He bJde OTkpNT rotBapcKsCbD NO Bpeme Ha rotBeHe.
Ako nocTabuTe roTbapcKn cBd Bbpy 30Ha 3a rotBeHe, npdei Da n36peTe CTeEN Ha HaraBaHe, INDnKaTopt Na 0 Ha JeHtata 3a ynpabLeHne ce noRBA.
Ako MaxheTe roTbapcknBcD OT aKTbUpaHa 30Ha 3a rotBeHe I Go OCTaBte HaCTpaHa BpeMeHHo, INdNkATOpHe NaCbOTBeTHaTa KOHTpOJNa JeHt a Ze 3anOpHAt Da MmRat. Ako He NoCTaBte RotbapcknBcD O6paTHo Bbpxy aKTbUpaHaTa 30Ha 3a rotBeHe BpAMKIne Ha 60 cekyHdi, 30HaTa 3a rotBeHe Ie Ce DeakTbUpa ABTomaTuHNo.
3a da noDHOBnTe roTBeHeTo, noCTabete RoTbapcknBcD obpaTHo Bbpyx 3OHnTe 3a roTBeHe B pAMKIne Ha nOCOueHOTo BpeMe.
6.3ИЗПОЛЗВАнеHa 3ОнITE 3a rotBeHe
Cnoxe roTbapcknte cbIOBE Bbpxu
cHTbaHa n36paHata 30Ha 3a rotBehe.
HNyKUOnHHnte 30Hn 3a rotBehe
aBTOMaTHUHO ce pncnoc6BbAT KbM
pa3Mepa Ha dbHOTO Ha rotBapcknra CbD.
Mokete da rotBnte c rOJAM rotBapcKn cbHa DBe 30Hn 3a rotBeHe eNHOpeMeHHo. TOrbAPckTe CbIOBe TpI6Ba Da nOKpNBat CpeDAt Ha DBeTe 30Hn, Ho Da He N3JIIN3aT N3BbH MapKIpOBkata. AKO cbIOBeTe 3a rotBeHe ce HAMnpa Mekdy Dbata CEHTbpA,
fYHKUraTa, Bridge Hma da 6bde aKtINBupaHa.

6.4 HacrpoKn 3a 3aToJIaHe
- Hatnche JekhaHaTa CTeneH Ha HarpBaHe Ha JeHTaTa 3a ynpabLeHne. INdkaTopTe Hnd JeHTaTa 3a ynpabLeHne CE NOBBAt Do N3paHOTo HnBO Ha NaCTpOJaKaTa Ha HarpBaHe.
- 3a Да ДeakTиВирTe 3OHa 3a rotBeHe, HATiNCHete 0.
6.5 PowerBoost
Ta3nФyHKUINIpeIOCTaBЯ NOBue Me MOUHOCT Na INdYKUINOHHNTe 3OHN 3a rotBEHe. ΦyHKUINaTMOKeJa 6bJe aKTINBIPAHa 3a INdYKUINOHHNTe 3OHN 3a rotBEHe 3a orpAHuHcNepnOd OT BpeMe.CneTobA,
INHyUKIHOHaTa 30Ha 3a rOTBeHe aBTOMaTnHc Ce IpeBKnUOBya O6paTHo Ha Hau-BnCOKaTa HAcTpoKa 3a HarpBaHe.

Bx. rIaBa "TexHnuecka nHΦopMaζη".
3a daakTNBnapeTe yHKnzra 3a 3oHaTa 3a roTBeHe:doKoCHeTe P.
3a Da n3KJIIOUHTe cyHKnIyTa: npOMraHa Ha NaCTPOKaTa Ha HarpBaHe.
6.6 OptiHeat Control (3-cTbKnOB INHДиKaTOP 3a OCTaTbUHa TOnJIInHa)

BHIMAHNE!
//三 /三-ДOKATO INДИКATOpbT CBETN, CbSuctByBa pNCK OT n3rapnIg OCTaTbUHa TOPIHnA.
INHnykuzoHHnTe 3OHn 3a rotBeHe npOn3BExKdAT ToPnInHa, HeO6xOДmHa 3a npOeCa Ha rotBeHe, HAnpaBO Ha TbHOTo Ha rotBapcknCbD. CtBKnOKepaMnKaTa ce 3aIpRbA ot TOnPiHaTa Ha CbIobTe 3a rotBeHe.
ИнданахориTe / / ce NOЯВЯВaT, KORATO 30Ha 3a rotBeHe e ropeua. Te NOKaTO BAT HbOTO Ha OCTaTbUHaTA TOПЛИHa 3a 3OHTe 3a rotBeHc, KOINTo N3NpI3BaTe B MOMeHTa.
INHnkaTOpbT MoKe CbIo Da Ce NOBN:
3a CbceHnTe 30Hn 3a rOtBeHe, DOpn aKO He rN n3PON3BaTe,
Korato ropeu CbdoBe 3a rotBeHe ca NoctabEHn Ha CTydeHa 30Ha 3a rotBeHe,
KOrato NIOUaTa e N3KJIuOeHa, Ho 3oHaTa 3a rotBeHe e BCE OSe Ropeu.
HndkaTopbnt 3ye3Ba, KOrato 3oHaTa 3a rotBeHe ce OxlaDn.
6.7 Taumep
Taimep 3a ot6poBaHe
N3noI3BaIte Ta3nФyHKU,3a da nocOHTe KONK DJIgIO NCKaTe 3OHNTe 3a rotBeHe Da
pa6oTnBpeMeHaedHa rotbapcka cecn.
3aadaTe hactpoKaTa 3a harpBaHe Ha m36paHata 30Ha 3a rotBeHe n CneI TOBa n fynKuYraT.

He mojkeTe da akTbnpaTe yHKuYraTa,doKaTo yHKuNHOb²Hood pa6oTn.
- Hatachete 00 ce noBBA ha DnCpIeHa TaMepa.
- HATNCHETe + nnn 一, 3a da 3aandaTe BpeMeTo (00-99 mHyTu).
- HatncheTe 念 3a da cTaptnpate TaHmepa nIIN n3uKaJaTe 3 cekyni. TaHmepbT 3anOyBa da oT6poRa.
3aДа npomehnte BpeMeTo: n36epeTe 3OHata 3a rotBeHe C 念 nHaTnCHete + nIIN
3a DeakTNBupaHe Ha yHKnraTa:
n36peTe 30HaTa 3a rotBeHe C n HATNCHeTe .OCTBaUTo BpeMe ce OT6pOraBa o6paTHo Do 00.
TaimepbT 3aBbpwa 6paTHoTo 6poeHe, np03Byuaba CnHaJI n 00 Mna. 3oHaTa 3a roTBeHe ce n3KnUOyBa. HATncHete npOn3BOJeH CNMBon, 3a da cnpTe CnHaJa n MmraHeTO.
Taimep
Mokete Na 3n0n3BaTe Ta3n cyHKzma, KOraTo NIOtBt E aKTHBnpuH, Ho 3OHnte 3a roTBeHe He pa6oT. HactpoiKaTa 3a HarpaBaHe noka3Ba 00.

He mojkeTe da akTbnpaTe yHKuYraTa,doKaTo yHKuNHOb²Hood pa6oTn.
- HatucheTe:
- HataHcHete+ nIIN 3a 3aIaBaHe Ha BpeMeTo.
TaimepbT 3aBbPbBa 6paTHoTo 6poeHe, np03ByaBa CnHaJ n 00 Mira. HataChete npou3BOJeH CmBoJ, 3a da cnpTe CnHaJa n MmraHeTO.
3a DeaknBnpaHe Ha yHKunraTa: HATNCHETe 一. OctabaToTO BpeMe ce OT6pOraBa o6paTHo do 00.
6.8 Ynpablene Ha MouHocTta
Ako ca aKTHBHN HAKONKO 3OHN KOHCympanaHaTa MOUHOCT HaDBNUABA JINMMTA HA eJeKTPnueCKOTO 3axpaHBAhe, Ta3N fYHKnpy pa3dEJa HaNUnHaTa MOUHOCT Mekdy BCNUKN 3OHN 3a rOTBeHe (Cbpb3AH NkM edHa n Cbua pfa3a). PIoTbT KOHTPOJnPa HAcTPOiKmTe Ha TOnPiHATA, 3a Da npednae npednnteIteHa IHCTaJALNAJyTA Ha DOMA.
3OHTe 3a rotBeHe ca rpynnpaHn CnopeMecTOnoJoxKeHHeTo n 6pOHa a3Ite BKOTIOHa. BcKa a3a IMA MaKcImaJIeH eJeKTprueckn TObAp oT. AKO IInota DOCTnHE rpaHncaTa Ha MaKcIMaHHaTahA HJIuHa MOUHOCT B eJHa a3a MOnHOCCTTa Ha 3OHTe 3a rotBeHe Ie Ce HAmJIIn ABTOmatNoHO.
Hactpoikata 3a HarpraBaHe Ha n36paHaTa npBpBa 30Ha 3a rotBeHe BnHar e C npInopntet. Octahalata MouHocT ue 6bde pa3deneHa mExdy dpyrnte 30HN 3a rotBeHe cnpoped peda Ha n36Op.
-ПиЗонза rOTBEHe,КОИTO ИмТ
HamaJIeHa MOUHOCT, KOHTpOJIHATA JIeHTa
IpyIMrBa I NOKa3Ba MaKcMmaJIHO
ВьЗМоЖнITE HaCTPoiKn 3a HarprBaHe.
I3yakaTe,doKaTo DnCnPeTcpe da MInra HnHaMaJeTe HAcTPOkKaTa Ha HarpBaHe Ha 30HaTa 3a RotBeHe, KOrTO e n3bpaHa NocLeHa. 3OHNTE 3a RotBeHe ige npDbJkaT da pa6oTc HamaHeTa HacTpoKa Ha HarpBaHe. PIpomHeTe pTuHO HAcTPOkKe 3a HarpBaHe Ha 30HnTe 3a RotBeHe, Ako e Heo6xOdmo.
BnKTe nIIOCTpaunTa 3a Bb3MOxHN KOM6HNaCUN, pN KOnTO MOUHOCTTa MOKe Da ce pa3PpeJeMekdy 3OHNTe 3a rotBeHe.
6.9 CtpyKtypa Ha MeHIOTo
Tablncata noka3ba ochOBHaTa ctpyKtypa Ha MeHOTO.
Iotppe6nteJckn HactpOoiKu
CBeTInHaTa Ha acnnpaTopa ce n3KJIIOUBa 2 MNHyTN CJeI n3KJIIOUBaHe Ha nIoTA.

BHIMAHNE!
Bx. rnaBa "Be3onacnoct".
8.1 TOrTbapcKsCbdoBe

Пи ИнДукцюнHTe 3Oн 3a TOTBEHe CnJIHO eJIeKTPOMaRHTHOn NOIe CB3da TOIIINHaTb B rOToBapCKnBa MHOro 6bp30.
I3noJI3BaIte INdyKUHOHHTe 3OHN 3a roTBeHe C NOxOJaUN FOrBapcNc bDoBe.
- ΜύHOTO Na rσθBαρκης Βd TραδBa da e KOJIΚΟΤΟ MOKe Φ-ДeБΕΝΙ έΠΟΚΟ.
- YBepete ce, Ye nbHaTa ha cBIOBeTe ca
YnCTn n cyXn, PpeDn da rI NOCTaBNTe Ha
NOBbpxHOCTTa Ha NIOTA.
3a da n36berheTe OndpackBaHnra, He nIb3raIte uIN TpNIte Cbda NO KEpaMnHOTO CTbKJIO.
MaTePnAHa rotBapcknte cIdoBe
- npabnH0: Ugamma, CTomHa, emaJinpaHa CTomHa, HepbXdaema CTomHa, MHOROcNOHOb HO (C npabnHa MapKnpoBka OT npoN3BOIDteJIa).
He npabnH0 aJyMmHm, Mei, MecnH, CTbKlIO, KepaMnKa, nopueHaH.
CbDt 3a roTBeHe e noXoJa 3a HnyKuONHa nloa, ako:
- BODaTa 3aBnpa MNoRo 6bP3o Ha 30Ha, HAcTpoEHa Ha NaH-BvCOKaTa HAcTpoiKa 3a HarpBaHe.
MaHHT pINBInuHa IbHOTo Ha rotBapcKnA CbD.
Pa3mepn Ha roTbapckn cIdoBe
IHyDyKUHOHHTE 30Hn 3a rotBeHe aBTOMaTNUHO Ce npncnoC6BaBt KbMa pa3Mepa Ha dbHOTo Ha rotBapCKnCbD.
- EfeKTHBHOCTTa Ha 3oHaTa 3a rotBeHe 3aBnCn OT dIaMeTbpa Ha rotBapCKnBa CbD. CbDoBe 3a rotBeHe C NO-MaNbK dIaMeTbp OT MNHmAlHnI NOJyBaBAT cMo Yact OT MOUHOCTTa, rHeepnpaHa OT 3oHaTa 3a rotBeHe.
- Ot cbo6paXeHn 3a cnIpyHocT n 3a onTImaJIHn pe3yJITaTN npri rotBeHe, He n3noJI3BaIte roTbapcKn cBd, KOTo e no
TOMOTNOCOHeHOTOB.CneuΦnKaun HA30HN3a rotBeHe".N36raBaiTe N3PON3BaHETO HArOTBapCKnCBd6n3o DO KOHTPOJHOTo TaIIO NO BpeMe Ha rotBeHe.Toba MoKe Da nobnire Bbpxy fYHKUHOHPaHETo HA KOHTPOJHOTo TaIIO ININMOKe CnyauHa da AKTNBIPA fYHKUInTE Ha KOTJHOHa.

BnKTe ,TexHnueeCKn xapakTepnCTnKN".
8.2 UymoBete no BpeMe Ha pa6ota
Ako 4yBaTe:
- pykaiz yum: rotbapcknT cBd e hapanabeH ot pa3Jnueh MaTePnA1 (KOHCTpykCnna caHDbv).
CbIpeHe:Bue n3noJI3BaTe 3OHa 3a rotBeHe C BnCOKO HnBO Ha MOUHOCT, a rotBapCKnT CbI e HAnpaBeH OT pa3JInuH MaTePnAJI (KOHCTpyKcIg CaHDbV). - 6yuehe: Bue n3noJ3BaTe BnCOKO HnBO Ha MOUHOCT.
- UpaKaHe: eNeKtpnuecko npeBkIIOvBaHe.
CBNCTeHe,6pMbMueHe:BENTnataOpbT pa60Tu.
UymoBeTe ca HopMaJIHn He noka3BaT HEn3npaBHOCT.
8.3 Öko Timer (Eko Taïmep)
3a da nectnte eheprna, harpebaTeJrHa 30HATA 3a rotBeHe Ce deakTbnpa npedn CnHana Ha taMepa 3a ot6pOraBaHe Ha octabaUTo BpeMe. Pa3nKaTa BvB BpeMeTo 3a pa6ota 3abncn OT cTeNEHTa Ha HarpBaHe N BpeMeTpaeHeto Ha rotBeHeTo.
11. TEXHINUeCKN DAHHN
11.1 Ta6eIka c daHn
Moen EIV84550
Tun 62 D5A 01 AA
Индукця 7.2 kW
CepuH No
ELECTROLUX
Пюдков КОД (PNC) 949 599 200 00
220 - 240 V / 400 V 2N 50 Hz
How to install your Electrolux Induction Hob - Worktop installation


4. POPIS SPOTbreBICE
| How to install your Electrolux Induction Hob - Worktop installation |
WE'RE THINKING OF YOU
Thank you for purchasing an Electrolux appliance. You've chosen a product that brings with it decades of professional experience and innovation. Ingenious and stylish, it has been designed with you in mind. So whenever you use it, you can be safe in the knowledge that you'll get great results every time.
Welcome to Electrolux.
Visit our website to:

Get usage advice, brochures, trouble shooter, service and repair information: www.electrolux.com/support

Register your product for better service: www.registerelectrolux.com

Buy Accessories, Consumables and Original spare parts for your appliance: www.electrolux.com/shop
CUSTOMER CARE AND SERVICE
Always use original spare parts.
When contacting our Authorised Service Centre, ensure that you have the following data available: Model, PNC, Serial Number.
The information can be found on the rating plate.
Warning / Caution-Safety information
① General information and tips
Environmental information
Subject to change without notice.
CONTENTS
1.SAFETY INFORMATION 68
2.SAFETYINSTRUCTIONS 70
3. INSTALLATION 72
4.PRODUCT DESCRIPTION. 74
5. BEFORE FIRST USE 75
6.DAILYUSE 76
7. ADDITIONAL FUNCTIONS 78
8. HINTS AND TIPS 80
9.CARE AND CLEANING 83
10.TROUBLESHOOTING 83
11. TECHNICAL DATA 85
12. ENERGY EFFICIENCY 85
13. ENVIRONMENTAL CONCERNS 86
1. SAFETY INFORMATION
Before the installation and use of the appliance, carefully read the supplied instructions. The manufacturer is not responsible for any injuries or damage that are the result of incorrect installation or usage. Always keep the instructions in a safe and accessible location for future reference.
1.1 Children and vulnerable people safety
- This appliance can be used by children aged from 8 years and above and persons with reduced physical, sensory or mental capabilities or lack of experience and knowledge if they have been given supervision or instruction concerning the use of the appliance in a safe way and understand the hazards involved. Children of less than 8 years of age and persons with very extensive and complex disabilities shall be kept away from the appliance unless continuously supervised.
- Children should be supervised to ensure that they do not play with the appliance.
- Keep all packaging away from children and dispose of it appropriately.
- WARNING: The appliance and its accessible parts become hot during use. Keep children and pets away from the appliance when in use and when cooling down.
- If the appliance has a child safety device, it should be activated.
- Children shall not carry out cleaning and user maintenance of the appliance without supervision.
1.2 General Safety
- This appliance is for cooking purposes only.
- This appliance is designed for single household domestic use in an indoor environment.
- This appliance may be used in, offices, hotel guest rooms, bed & breakfast guest rooms, farm guest houses and other
similar accommodation where such use does not exceed (average) domestic usage levels.
- WARNING: The appliance and its accessible parts become hot during use. Care should be taken to avoid touching heating elements.
- WARNING: Unattended cooking on a hob with fat or oil can be dangerous and may result in fire.
- Never use water to extinguish the cooking fire. Switch off the appliance and cover flames with e.g. a fire blanket or lid.
- WARNING: The appliance must not be supplied through an external switching device, such as a timer, or connected to a circuit that is regularly switched on and off by a utility.
- CAUTION: The cooking process has to be supervised. A short term cooking process has to be supervised continuously.
- WARNING: Danger of fire: Do not store items on the cooking surfaces.
- Metallic objects such as knives, forks, spoons and lids should not be placed on the hob surface since they can get hot.
- Do not use the appliance before installing it in the built-in structure.
- Do not use a steam cleaner to clean the appliance.
- After use, switch off the hob element by its control and do not rely on the pan detector.
- If the glass ceramic surface / glass surface is cracked, switch off the appliance and unplug it from the mains. In case the appliance is connected to the mains directly using junction box, remove the fuse to disconnect the appliance from power supply. In either case contact the Authorised Service Centre.
- If the supply cord is damaged, it must be replaced by the manufacturer, an authorized Service or similarly qualified persons in order to avoid a hazard.
- WARNING: Use only hob guards designed by the manufacturer of the cooking appliance or indicated by the
manufacturer of the appliance in the instructions for use as suitable or hob guards incorporated in the appliance. The use of inappropriate guards can cause accidents.
2. SAFETY INSTRUCTIONS
2.1 Installation

WARNING!
Only a qualified person must install this appliance.

WARNING!
Risk of injury or damage to the appliance.
- Remove all the packaging.
- Do not install or use a damaged appliance.
- Follow the installation instructions supplied with the appliance.
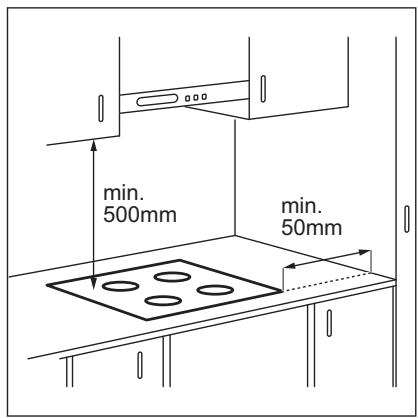
- Keep the minimum distance from other appliances and units.
Always take care when moving the appliance as it is heavy. Always use safety gloves and enclosed footwear. - Seal the cut surfaces with a sealant to prevent moisture from causing swelling.
- Protect the bottom of the appliance from steam and moisture.
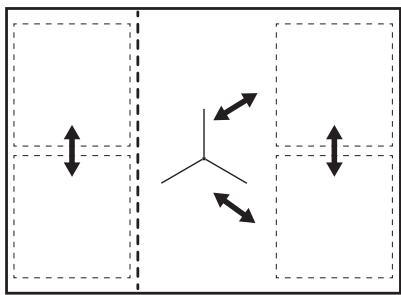
- Do not install the appliance next to a door or under a window. This prevents hot cookware from falling from the appliance when the door or the window is opened.
Each appliance has cooling fans on the bottom. -
If the appliance is installed above a drawer:
-
Do not store any small pieces or sheets of paper that could be pulled in, as they can damage the cooling fans or impair the cooling system.
- Keep a distance of minimum 2 cm between the bottom of the appliance and parts stored in the drawer.
- Remove any separator panels installed in the cabinet below the appliance.
2.2 Electrical Connection

WARNING!
Risk of fire and electric shock.
- All electrical connections should be made by a qualified electrician.
The appliance must be earthed. - Before carrying out any operation make sure that the appliance is disconnected from the power supply.
- Make sure that the parameters on the rating plate are compatible with the electrical ratings of the mains power supply.
- Make sure the appliance is installed correctly. Loose and incorrect electricity mains cable or plug (if applicable) can make the terminal become too hot.
- Use the correct electricity mains cable.
- Do not let the electricity mains cable tangle.
Make sure that a shock protection is installed. - Use the strain relief clamp on the cable.
- Make sure the mains cable or plug (if applicable) does not touch the hot appliance or hot cookware, when you connect the appliance to a socket.
- Do not use multi-plug adapters and extension cables.
- Make sure not to cause damage to the mains plug (if applicable) or to the mains cable. Contact our Authorised Service Centre or an electrician to change a damaged mains cable.
- The shock protection of live and insulated parts must be fastened in such a way that it cannot be removed without tools.
-
Connect the mains plug to the mains socket only at the end of the installation. Make sure that there is access to the mains plug after the installation.
If the mains socket is loose, do not connect the mains plug. -
Do not pull the mains cable to disconnect the appliance. Always pull the mains plug.
- Use only correct isolation devices: line protecting cut-outs, fuses (screw type fuses removed from the holder), earth leakage trips and contactors.
- The electrical installation must have an isolation device which lets you disconnect the appliance from the mains at all poles. The isolation device must have a contact opening width of minimum 3 mm.
2.3 Use

WARNING!
Risk of injury, burns and electric shock.
- Do not change the specification of this appliance.
- Remove all the packaging, labelling and protective film (if applicable) before first use.
Make sure that the ventilation openings are not blocked. - Do not let the appliance stay unattended during operation.
- Set the cooking zone to "off" after each use.
- Do not put cutlery or saucepan lids on the cooking zones. They can become hot.
- Do not operate the appliance with wet hands or when it has contact with water.
- Do not use the appliance as a work surface or as a storage surface.
- If the surface of the appliance is cracked, disconnect immediately the appliance from the power supply. This to prevent an electrical shock.
- Users with a pacemaker must keep a distance of minimum 30~cm from the induction cooking zones when the appliance is in operation.
- When you place food into hot oil, it may splash.

WARNING!
Risk of fire and explosion
-
Fats and oil when heated can release flammable vapours. Keep flames or heated objects away from fats and oils when you cook with them.
-
The vapours that very hot oil releases can cause spontaneous combustion.
- Used oil, that can contain food remnants, can cause fire at a lower temperature than oil used for the first time.
- Do not put flammable products or items that are wet with flammable products in, near or on the appliance.

WARNING!
Risk of damage to the appliance.
- Do not keep hot cookware on the control panel.
- Do not put a hot pan cover on the glass surface of the hob.
- Do not let cookware boil dry.
- Be careful not to let objects or cookware fall on the appliance. The surface can be damaged.
- Do not activate the cooking zones with empty cookware or without cookware.
- Do not put aluminium foil on the appliance.
- Cookware made of cast iron or with a damaged bottom can cause scratches on the glass / glass ceramic. Always lift these objects up when you have to move them on the cooking surface.
2.4 Care and cleaning
Clean the appliance regularly to prevent the deterioration of the surface material.
- Switch off the appliance and let it cool down before cleaning.
- Do not use water spray and steam to clean the appliance.
- Clean the appliance with a moist soft cloth. Use only neutral detergents. Do not use abrasive products, abrasive cleaning pads, solvents or metal objects.
2.5 Service
To repair the appliance contact the Authorised Service Centre. Use original spare parts only.
- Concerning the lamp(s) inside this product and spare part lamps sold separately: These lamps are intended to withstand extreme physical conditions in household appliances, such as temperature, vibration, humidity, or are intended to signal information about the operational
status of the appliance. They are not intended to be used in other applications and are not suitable for household room illumination.
2.6 Disposal

WARNING!
Risk of injury or suffocation.
3. INSTALLATION

WARNING!
Refer to Safety chapters.
3.1 Before the installation
Before you install the hob, write down the information below from the rating plate. The rating plate is on the bottom of the hob.
Serial number
3.2 Built-in hobs
Only use the built-in hobs after you assemble the hob into correct built-in units and work surfaces that align to the standards.
3.3 Connection cable
-
The hob is supplied with a connection cable.
To replace the damaged mains cable, use the cable type: H05V2V2-F which withstands a temperature of 90^ or higher. The single wire must have a diameter of minimum 1,5mm^2 . Speak to your local Service Centre. The connection -
Contact your municipal authority for information on how to dispose of the appliance.
- Disconnect the appliance from the mains supply.
- Cut off the mains electrical cable close to the appliance and dispose of it.
cable may only be replaced by a qualified electrician.

WARNING!
All electrical connections must be made by a qualified electrician.

CAUTION!
Do not drill or solder the wire ends. It is forbidden.

CAUTION!
Do not connect the cable without cable end sleeve.
Two-phase connection
- Remove the cable end sleeve from black and brown wires.
- Remove an insulation of the brown and black cable ends.
- Apply a new wire end sleeve of 1.5mm^2 on common cable end (special tool required).
Cable cross section 1,5mm^2
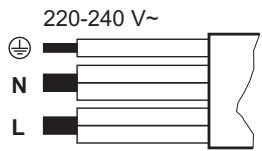
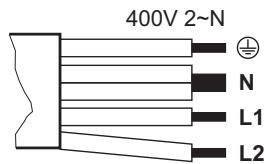
| One-phase connection - 220 - 240 V~ | Two-phase connection - 400 V 2 ~ N | ||
| Green - yellow | Green - yellow | ||
| N | Blue and blue | Blue and blue | N |
| L | Black and brown | Black | L1 |
| Brown | L2 | ||
3.4 Assembly
If you install the hob under a hood, please see the installation instructions of the hood for the minimum distance between the appliances.
If the appliance is installed above a drawer, the hob ventilation can warm up the items stored in the drawer during the cooking process.
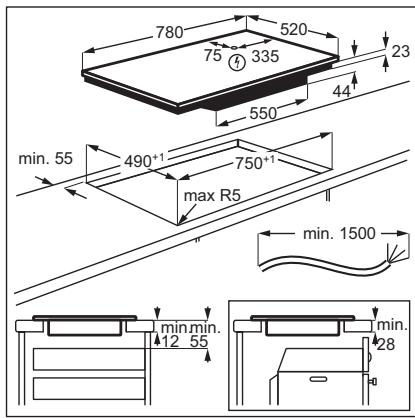
Find the video tutorial "How to install your Electrolux Induction Hob - Worktop installation" by typing out the full name indicated in the graphic below.

YouTube
www.youtube.com/electrolux
www.youtube.com/aeg
How to install your Electrolux Induction Hob - Worktop installation

4. PRODUCT DESCRIPTION
4.1 Cooking surface layout

1 Induction cooking zone
2 Control panel
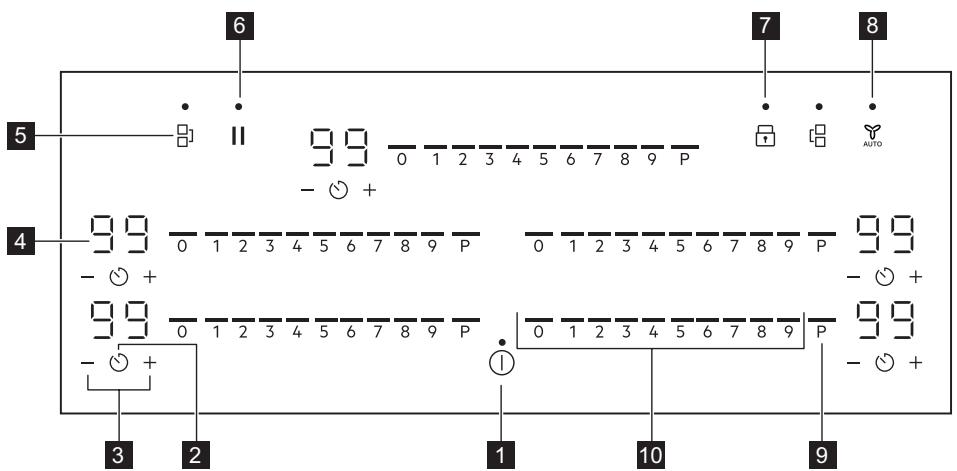
4.2 Control panel layout

Use the sensor fields to operate the appliance. The displays, indicators and sounds tell which functions operate.
| Sensor field | Function | Description | |
| 1 | ① | On / Off | To activate and deactivate the appliance. |
| 2 | ○ | Timer | To set the function. |
| 3 | +/- | - | To increase or decrease the time. |
| 4 | - | Timer display | To show the time in minutes. |
| 5 | 1 | Bridge | To activate and deactivate the function. |
| 6 | || | Pause | To activate and deactivate the function. |
| 7 | Lock / Child Safety Device | To lock / unlock the control panel. | |
| 8 | AUTO | Hob²Hood | To activate and deactivate the manual mode of the function. |
| 9 | P | PowerBoost | To activate the function. |
| 10 | - | Control bar | To set a heat setting. |
4.3 Display indicators
| Indicator | Description |
| E + digit | There is a malfunction. |
| E/ E/ E | OptiHeat Control (3 step Residual heat indicator): continue cooking / keep warm / resid-ual heat. |
5. BEFORE FIRST USE

WARNING!
Refer to Safety chapters.
5.1 Power limitation
Power limitation defines how much power is used by the hob in total, within the limits of the house installation fuses.
The hob is set to its highest possible power level by default.
To decrease or increase the power level:
- Enter Menu > User settings.

Refer to "Menu structure".
- Press on the front timer until P appears.
- Press - / + on the front timer to set the power level.
Power levels
Refer to "Technical data" chapter.

CAUTION!
Make sure that the selected power fits the house installation fuses.
P72—7200W
P15—1500W
P20—2000W
P25—2500W
P30—3000W
P35—3500W
P40—4000W
P45—4500W
P50—5000W
P60—6000W

WARNING!
Refer to Safety chapters.
6.1 Activating and deactivating
Press and hold ① to activate or deactivate the hob.
6.2 Pot detection
This feature indicates the presence of cookware on the hob and deactivates the cooking zones if no cookware is detected during a cooking session.
If you put cookware on a cooking zone before you select a heat setting, the indicator above 0 on the control bar appears.
If you remove cookware from an activated cooking zone and set it aside temporarily, the indicators above the corresponding control bar will start blinking. If you do not place the cookware back on the activated cooking zone within 60 seconds, the cooking zone will automatically deactivate.
To resume cooking, make sure to put the cookware back on the cooking zones within the indicated timeout.
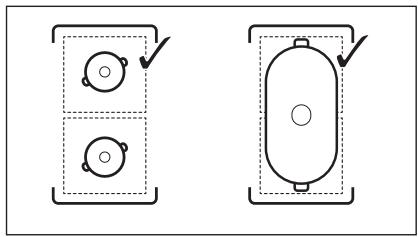
6.3 Using the cooking zones
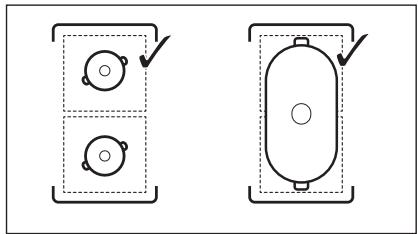
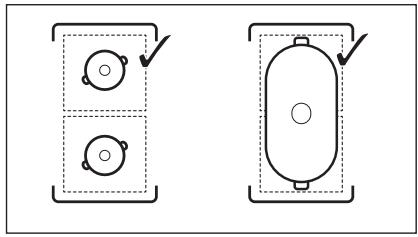
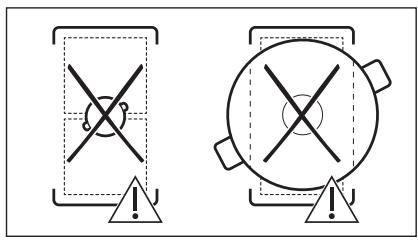
Place the cookware in the centre of the selected zone. Induction cooking zones adapt to the dimension of the bottom of the cookware automatically.
You can cook with large cookware placed on two cooking zones at the same time. The cookware must cover the centres of both zones but not go beyond the area marking. If the cookware is located between the two centres, Bridge function will not be activated.
6.4 Heat setting
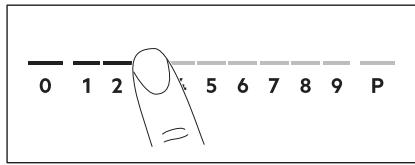
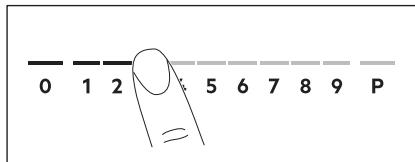
- Press the desired heat setting on the control bar.
The indicators above the control bar appear up to the selected heat setting level.
- To deactivate a cooking zone, press 0.
6.5 PowerBoost
This function makes more power available to the induction cooking zones. The function can be activated for the induction cooking zone only for a limited period of time. After this time the induction cooking zone automatically sets back to the highest heat setting.

Refer to "Technical data" chapter.
To activate the function for a cooking zone: touch P.
To deactivate the function: change the heat setting.
6.6 OptiHeat Control (3 step Residual heat indicator)

WARNING!
/ As long as the indicator is on, there is a risk of burns from residual heat.
The induction cooking zones produce the heat necessary for the cooking process directly in the bottom of the cookware. The glass ceramic is heated by the heat of the cookware.
The indicators / appear when a cooking zone is hot. They show the level of the residual heat for the cooking zones you are currently using.
The indicator may also appear:
for the neighbouring cooking zones even if you are not using them,
- when hot cookware is placed on cold cooking zone,
- when the hob is deactivated but the cooking zone is still hot.
The indicator disappears when the cooking zone has cooled down.
6.7 Timer
Count Down Timer
Use this function to specify how long a cooking zone should operate during a single cooking session.
Set the heat setting for the selected cooking zone and then set the function.

You cannot activate the function while the Hob²Hood function is running.
- Press 00 appears on the timer display.
-
Press + or - to set the time (00-99 minutes).
-
Press to start the timer or wait 3 seconds. The timer begins to count down.
To change the time: select the cooking zone with and press + or -.
To deactivate the function: select the cooking zone with and press —. The remaining time counts back to 00.
The timer finishes counting down, a signal sounds and 00 blinks. The cooking zone deactivates. Press any symbol to stop the signal and blinking.
Minute Minder
You can use this function when the hob is activated but the cooking zones do not operate. The heat setting shows 00.

You cannot activate the function while the Hob²Hood function is running.
- Press .
- Press + or — to set the time.
The timer finishes counting down, a signal sounds and 00 blinks. Press any symbol to stop the signal and blinking.
To deactivate the function: press and —. The remaining time counts back to 00.
6.8 Power management
If multiple zones are active and the consumed power exceeds the limitation of the power supply, this function divides the available power between all cooking zones (connected to the same phase). The hob controls heat settings to protect the fuses of the house installation.
- Cooking zones are grouped according to the location and number of the phases in the hob. Each phase has a maximum electricity loading. If the hob reaches the limit of maximum available power within one phase, the power of the cooking zones will be automatically reduced.
- The heat setting of the cooking zone selected first is always prioritised. The remaining power will be divided between
the other cooking zones according to the order of selection.
- For cooking zones that have a reduced power, the control bar blinks and shows the maximum possible heat settings.
- Wait until the display stops flashing or reduce the heat setting of the cooking zone selected last. The cooking zones will continue operating with the reduced heat setting. Change the heat settings of the cooking zones manually, if necessary.
Refer to the illustration for possible combinations in which power can be distributed among the cooking zones.
6.9 Menu structure
The table shows the basic menu structure.
User settings
| Symbol | Setting | Possible options |
| b | Sound | On / Off (--) |
| Symbol | Setting | Possible options |
| P | Power limitation | 15 - 72 |
| h | Hood mode | 1 - 6 |
| E | Alarm / error history | The list of recent alarms / errors. |
To enter user settings: press and hold ① Then, press and hold ① . The settings appear on the timer of the left cooking zones.
Navigating the menu: the menu consists of the setting symbol and a value. The symbol appears on the rear timer and the value appears on the front timer. To navigate between the settings press on the front timer. To change the setting value press + or - on the front timer.
To exit the menu: press ①.
OffSound Control
You can activate / deactivate the sounds in the Menu > User settings.

Refer to "Menu structure".
When the sounds are off you can still hear the sound when:
- you touch ①,
the timer comes down,
you press an inactive symbol.
7. ADDITIONAL FUNCTIONS
7.1 Automatic Switch Off
The function deactivates the hob automatically if:
- all of the cooking zones are deactivated,
- you do not set any heat setting or fan speed setting after the activation of the hob,
- you spill something or put something on the control panel for more than 10 seconds (a pan, a cloth, etc.). A signal
sounds and the hob deactivates. Remove the object or clean the control panel.
- the appliance gets too hot (e.g. when a saucepan boils dry). Let the cooking zone cool down before you use the hob again.
- you do not deactivate a cooking zone or change the heat setting. After some time, the hob deactivates.
The relation between the heat setting and the time after which the appliance deactivates:
| Heat setting | The hob deactivates after |
| 1 - 2 | 6 hours |
| 3 - 4 | 5 hours |
| 5 | 4 hours |
| 6 - 9 | 1.5 hours |
7.2 Pause
This function sets all cooking zones that operate to the lowest heat setting.
When the function operates, ① and || can be used. All other symbols on the control panels are locked.
The function does not stop the timer functions.
- To activate the function: press
The heat setting is lowered to 1.
- To deactivate the function: press
The previous heat setting comes on.
7.3 Lock
You can lock the control panel while the hob operates. It prevents an accidental change of the heat setting.
Set the heat setting first.
To activate the function: press
To deactivate the function: press again.

The function deactivates as you deactivate the hob.
7.4 Child Safety Device
This function prevents an accidental operation of the hob.
To activate the function: press ① . Do not set any heat setting. Press and hold for 3 seconds, until the indicator above the symbol appears. Deactivate the hob with ① .

The function stays active when you deactivate the hob. The indicator above is on.
To deactivate the function: press ① Do not set any heat setting. Press and hold for 3 seconds, until the indicator above the symbol disappears. Deactivate the hob with ①
Cooking with the function activated: press ① , then press l for 3 seconds, until the indicator above the symbol disappears. You can operate the hob. When you deactivate the hob with ① the function operates again.
7.5 Bridge

The function operates when the pot covers the centres of the two zones. For more information on the correct placement of cookware refer to "Using the cooking zones".
This function connects two cooking zones and they operate as one.
First set the heat setting for one of the cooking zones.
To activate the function for left / right cooking zones: touch / [■. To set or change the heat setting touch one of the left / right control sensors.
To deactivate the function: touch 日 / The cooking zones operate independently.
7.6 Hob²Hood
It is an advanced automatic function which connects the hob to a special hood. Both the hob and the hood have an infrared signal communicator. Speed of the fan is defined automatically on basis of mode setting and temperature of the hottest cookware on the hob. You can also operate the fan from the hob manually.

For most of the hoods the remote system is originally deactivated. Activate it before you use the function. For more information refer to hood user manual.
Operating the function automatically To operate the function automatically set the automatic mode to H1 - H6. The hob is originally set to H5. The hood reacts whenever you operate the hob. The hob recognizes temperature of the cookware automatically and adjusts the speed of the fan.
Automatic modes
| Automat- ic light | Boiling1) | Frying2) | |
| Mode H0 | Off | Off | Off |
| Mode H1 | On | Off | Off |
| Mode H2 3) | On | Fan speed 1 | Fan speed 1 |
| Mode H3 | On | Off | Fan speed 1 |
| Mode H4 | On | Fan speed 1 | Fan speed 1 |
| Mode H5 | On | Fan speed 1 | Fan speed 2 |
| Mode H6 | On | Fan speed 2 | Fan speed 3 |
1) The hob detects the boiling process and activates fan speed in accordance with automatic mode.
2) The hob detects the frying process and activates fan speed in accordance with automatic mode.
3) This mode activates the fan and the light and does not rely on the temperature.
Changing the automatic mode
- Deactivate the hob.
- Press ① for 3 seconds. The display comes on and goes off.
- Press for 3 seconds.
8. HINTS AND TIPS

WARNING!
Refer to Safety chapters.
- Press a few times until h comes on.
- Press + of the timer to select an automatic mode.
To operate the hood directly on the hood panel deactivate the automatic mode of the function.
When you finish cooking and deactivate the hob, the hood fan may still operate for a certain period of time. After that time the system deactivates the fan automatically and prevents you from accidental activation of the fan for the next 30 seconds.
Operating the fan speed manually
You can also operate the function manually.
To do that press AUTO when the hob is active.
This deactivates automatic operation of the function and allows you to change the fan speed manually. When you press AUTO you raise the fan speed by one. When you reach an intensive level and press AUTO again you will set fan speed to 0 which deactivates the hood fan. To start the fan again with fan speed 1 press AUTO.
To activate automatic operation of the function, deactivate the hob and activate it again.
Activating the light
You can set the hob to activate the light automatically whenever you activate the hob. To do so set the automatic mode to H1 - H6.
The light on the hood deactivates 2 minutes after deactivating the hob.
8.1 Cookware

For induction cooking zones a strong electro-magnetic field creates the heat in the cookware very quickly.
Use the induction cooking zones with suitable cookware.
- The bottom of the cookware must be as thick and flat as possible.
- Ensure pan bases are clean and dry before placing on the hob surface.
In order to avoid scratches, do not slide or rub the pot across the ceramic glass.
Cookware material
- correct: cast iron, steel, enamelled steel, stainless steel, multi-layer bottom (with a correct marking from a manufacturer).
not correct: aluminium, copper, brass, glass, ceramic, porcelain.
Cookware is suitable for an induction hob if:
water boils very quickly on a zone set to the highest heat setting.
- a magnet pulls on to the bottom of the cookware.
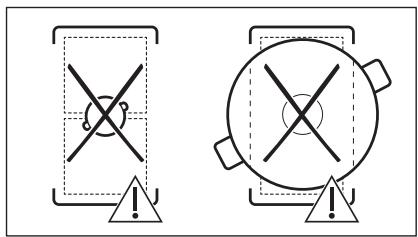
Cookware dimensions
- Induction cooking zones adapt to the dimension of the bottom of the cookware automatically.
- The cooking zone efficiency is related to the diameter of the cookware. The cookware with a diameter smaller than the minimum receives only a part of the power generated by the cooking zone.
- For both safety reasons and optimal cooking results, do not use cookware larger than indicated in "Cooking zones specification". Avoid keeping cookware close to the control panel during the
cooking session. This might impact the functioning of the control panel or accidentally activate hob functions.

Refer to "Technical data".
8.2 The noises during operation
If you can hear:
- crack noise: cookware is made of different materials (a sandwich construction).
whistle sound: you use a cooking zone with a high power level and the cookware is made of different materials (a sandwich construction).
humming: you use a high power level. - clicking: electric switching occurs.
- hissing, buzzing: the fan operates.
The noises are normal and do not indicate any malfunction.
8.3 Öko Timer (Eco Timer)
To save energy, the heater of the cooking zone deactivates before the count down timer sounds. The difference in the operation time depends on the heat setting level and the length of the cooking operation.
8.4 Examples of cooking applications
The correlation between the heat setting of a zone and its consumption of power is not linear. When you increase the heat setting, it is not proportional to the increase of the consumption of power. It means that a cooking zone with the medium heat setting uses less than a half of its power.

The data in the table is for guidance only.
| Heat setting | Use to: | Time (min) | Hints |
| 1 | Keep cooked food warm. | as neces-sary | Put a lid on the cookware. |
| 1 - 2 | Hollandaise sauce, melt: butter, choco-late, gelatine. | 5 - 25 | Mix from time to time. |
| 1 - 2 | Solidify: fluffy omelettes, baked eggs. | 10 - 40 | Cook with a lid on. |
| 2 - 3 | Simmer rice and milkbased dishes, heat up ready-cooked meals. | 25 - 50 | Add at least twice as much liquid as rice, mix milk dishes halfway through the procedure. |
| 3 - 4 | Steam vegetables, fish, meat. | 20 - 45 | Add a couple of tablespoons of liquid. |
| 4 - 5 | Steam potatoes. | 20 - 60 | Use max. ¼ l of water for 750 g of potatoes. |
| 4 - 5 | Cook larger quantities of food, stews and soups. | 60 - 150 | Up to 3 l of liquid plus ingredients. |
| 6 - 7 | Gentle fry: escalope, veal cordon bleu, cutlets, rissoles, sausages, liver, roux, eggs, pancakes, doughnuts. | as neces-sary | Turn halfway through. |
| 7 - 8 | Heavy fry, hash browns, loin steaks, steaks. | 5 - 15 | Turn halfway through. |
| 9 | Boil water, cook pasta, sear meat (goulash, pot roast), deep-fry chips. | ||
| P | Boil large quantities of water. PowerBoost is activated. |
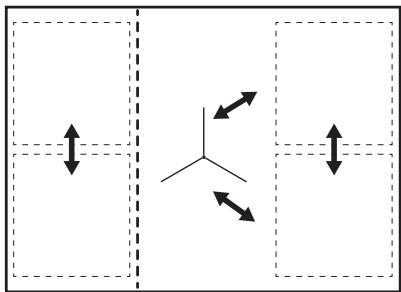
8.5 Hints and Tips for Hob²Hood
When you operate the hob with the function:
- Protect the hood panel from direct sunlight.
- Do not spot halogen light on the hood panel.
- Do not cover the hob control panel.
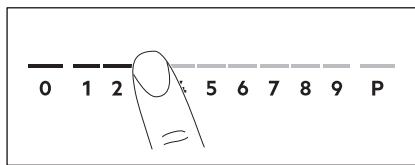
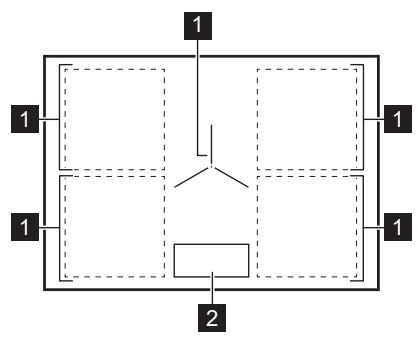
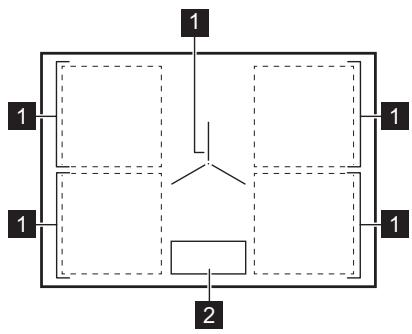
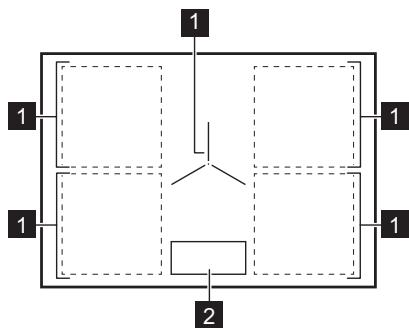
- Do not interrupt the signal between the hob and the hood (e.g. with the hand, a cookware handle or a tall pot). See the picture.
The hood pictured below is for illustration purpose only.
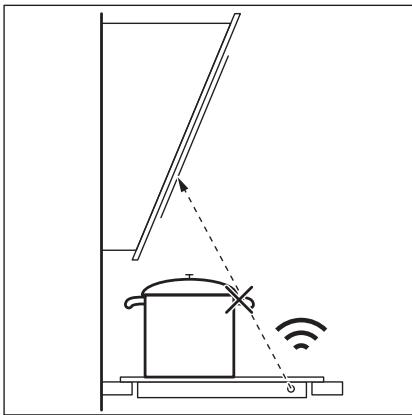
Other remotely controlled appliances may block the signal. Do not use any such appliances near to the hob while Hob²Hood is on.
Cooker hoods with the Hob²Hood function
To find the full range of cooker hoods which work with this function refer to our consumer website. The Electrolux cooker hoods that work with this function must have the symbol AUTO.
9. CARE AND CLEANING

WARNING! Refer to Safety chapters.
9.1 General information
- Clean the hob after each use.
Always use cookware with a clean base. - Scratches or dark stains on the surface have no effect on how the hob operates.
- Use a special cleaner suitable for the surface of the hob.
Use a special scraper for the glass.
9.2 Cleaning the hob
- Remove immediately: melted plastic, plastic foil, salt, sugar and food with
sugar, otherwise, the dirt can cause damage to the hob. Take care to avoid burns. Use a special hob scraper on the glass surface at an acute angle and move the blade on the surface.
- Remove when the hob is sufficiently cool: limescale rings, water rings, fat stains, shiny metallic discoloration. Clean the hob with a moist cloth and a non-abrasive detergent. After cleaning, wipe the hob dry with a soft cloth.
- Remove shiny metallic discoloration: use a solution of water with vinegar and clean the glass surface with a cloth.
10. TROUBLESHOOTING

WARNING! Refer to Safety chapters.
10.1 What to do if...
| Problem | Possible cause | Remedy |
| You cannot activate or operate the hob. | The hob is not connected to an elec-trical supply or it is connected incor-rectly. | Check if the hob is correctly connected to the electrical supply. |
| The fuse is blown. | Make sure that the fuse is the cause of the malfunction. If the fuse is blown again and again, contact a qualified electrician. | |
| You do not set the heat setting for 60 seconds. | Activate the hob again and set the heat setting in less than 60 seconds. | |
| You touched 2 or more sensor fields at the same time. | Touch only one sensor field. | |
| Pause operates. | Refer to "Daily use". | |
| There is water or fat stains on the control panel. | Clean the control panel. | |
| You can hear a constant beep noise. | The electrical connection is incor-rect. | Disconnect the hob from the electrical supply. Ask a qualified electrician to check the installation. |
| You cannot select the maximum heat setting for one of the cooking zones. | The other zones consume the maximum available power. Your hob works properly. | Reduce the heat setting of the other cooking zones connected to the same phase. Refer to "Power management". |
| An acoustic signal sounds and the hob deactivates. An acoustic signal sounds when the hob is deactivated. | You put something on one or more sensor fields. | Remove the object from the sensor fields. |
| The hob deactivates. | You put something on the sensor field ①. | Remove the object from the sensor field. |
| Residual heat indicator does not come on. | The zone is not hot because it operated only for a short time or the sensor is damaged. | If the zone operated sufficiently long to be hot, speak to an Authorised Service Centre. |
| You use a very tall pot which blocks the signal. | Use a smaller pot, change the cooking zone or operate the hood manually. | |
| The control panel becomes hot to the touch. | The cookware is too large or you put it too close to the control panel. | Put large cookware on the rear zones, if possible. |
| There is no sound when you touch the panel sensor fields. | The sounds are deactivated. | Activate the sounds. Refer to "Daily use". |
| The indicator above the symbol comes on. | Child Safety Device or Lock oper-ates. | Refer to "Daily use". |
| The control bar blinks. | There is no cookware on the zone or the zone is not fully covered. | Put cookware on the zone so that it fully covers the cooking zone. |
| The cookware is unsuitable. | Use cookware suitable for induction hobs. Refer to "Hints and tips". | |
| The diameter of the bottom of the cookware is too small for the zone. | Use cookware with correct dimensions. Refer to "Technical data". | |
| E and a number come on. | There is an error in the hob. | Deactivate the hob and activate it again after 30 seconds. If E comes on again, disconnect the hob from the electrical supply. After 30 seconds, connect the hob again. If the problem continues, speak to an Authorised Service Centre. |
10.2 If you cannot find a solution...
If you cannot find a solution to the problem yourself, contact your dealer or an Authorised Service Centre. Give the data from the rating plate. Make sure, you operated the hob correctly. If not the
servicing by a service technician or dealer will not be free of charge, also during the warranty period. The information about guarantee period and Authorised Service Centres are in the guarantee booklet.
11. TECHNICAL DATA
11.1 Rating plate
Model EIV84550
Typ 62 D5A 01 AA
Induction 7.2 kW
Ser.Nr.
ELECTROLUX
PNC 94959920000
220-240V/400V2N50Hz
Made in: Germany
7.2 kW
C∈
11.2 Cooking zones specification
| Cooking zone | Nominal power (maximum heat setting) [W] | PowerBoost [W] | PowerBoost maximum dura- tion [min] | Cookware diameter [mm] |
| Left front | 2300 | 3200 | 10 | 125 - 180 |
| Left rear | 2300 | 3200 | 10 | 125 - 210 |
| Middle front | 2300 | 3200 | 10 | 125 - 210 |
| Right front | 2300 | 3200 | 10 | 125 - 180 |
| Right rear | 2300 | 3200 | 10 | 125 - 210 |
The power of the cooking zones can be different in some small range from the data in the table. It changes with the material and dimensions of the cookware.
For optimal cooking results use cookware no larger than the diameter in the table.
12. ENERGY EFFICIENCY
12.1 Product Information*
| Model identification | EIV84550 | |
| Type of hob | Built-In Hob | |
| Number of cooking zones | 5 | |
| Heating technology | Induction | |
| Diameter of circular cooking zones (Ø) | Middle front | 21.0 cm |
| Length (L) and width (W) of non circular cooking zone | Left front | L 22.3 cm W 22.0 cm |
| Length (L) and width (W) of non circular cooking zone | Left rear | L 22.3 cm W 22.0 cm |
| Length (L) and width (W) of non circular cooking zone | Right front | L 22.3 cm W 22.0 cm |
| Length (L) and width (W) of non circular cooking zone | Right rear | L 22.3 cm W 22.0 cm |
| Energy consumption per cooking zone (EC electric cooking) | Left front | 179.6 Wh / kg |
| Left rear | 189.1 Wh / kg | |
| Middle front | 189.1 Wh / kg | |
| Right front | 187.3 Wh / kg | |
| Right rear | 189.1 Wh / kg | |
| Energy consumption of the hob (EC electric hob) | 186.8 Wh / kg | |
- For European Union according to EU 66/2014. For Belarus according to STB 2477-2017, Annex A. For Ukraine according to 742/2019.
EN 60350-2 - Household electric cooking appliances - Part 2: Hobs - Methods for measuring performance.
The energy measurements referring to the cooking area are identified by the markings of the respective cooking zones.
12.2 Energy saving
You can save energy during everyday cooking if you follow the hints below.
- When you heat up water, use only the amount you need.
- If it is possible, always put the lids on the cookware.
- Put the cookware directly in the centre of the cooking zone.
- Use the residual heat to keep the food warm or to melt it.
13. ENVIRONMENTAL CONCERNS
Recycle materials with the symbol . Put the packaging in relevant containers to recycle it. Help protect the environment and human health by recycling waste of electrical and electronic appliances. Do not dispose of
appliances marked with the symbol with the household waste. Return the product to your local recycling facility or contact your municipal office.
PENSAMOS EN USTED
How to install your Electrolux Induction Hob - Worktop installation

4. DESCRIPCION DEL PRODUCTO
How to install your Electrolux Induction Hob - Worktop installation

4. DESCRIPTION DE L'APPAREIL
How to install your Electrolux Induction Hob - Worktop installation

4. OPIS PROIZVODA
4.1 Raspored povrsine za kuhanje

6. SVAKODNEVNA UPORABA

UPOZORENJE!
Pogledajte poglavla sa sigurnosnim uputama.
6.1 Aktiviranje i deaktiviranje
Pritisnite i drzite ① za uključivanje ili isklučivanje ploce za kuhanje.
6.2 Detekija posude
Ova funkcija označava prisutnost posuă na ploči za kuhanje i isključuje zone za kuhanje ako tijekom kuhanja;nije otkriveno posude.
Ako posude stavite na zaonu za kuhanje prije nego sto odaberete postavku topline, pojavljupe se indicator iznad 0 na upravljačkoj traci.
Ako posude ukonite s uključene zone za kuhanje i privremeno ga stavite na stranu, indicatori iznad odgovarajuće kontrolne trake ce početi treptati. Ako ne vratite posude na uključenu zonu za kuhanje unutar 60 sekundi, zona za kuhanje ce se automatski isključiti.
How to install your Electrolux Induction Hob - Worktop installation

4. TERMÉKLEÍRÁS
How to install your Electrolux Induction Hob - Worktop installation

How to install your Electrolux Induction Hob - Worktop installation

4.ОПИС HA ПОН3BOДOT
4.1 Wema Ha NOBpuHnHaTa 3a rotBeHe

1 Nndyckncka pnhrgna
2 KoHTpOJIHa nIIOUa
4.2 PacnopeHa KOHTpOHaTa Ta6Na

Pakybaje co anapatot co nomooh ha ceH3Opcknte noiHa. EkpaHnte, noka3aTeJIte n 3ByuNTe nokaybaaT kon yHKun pa6oTaT.
CTaBeTe ro caIoT 3a roTbeHe DnpeKTHO BO ueHTapOT Ha OdbpaHata pIHrIa.
IHydkyTbHnTe puHrJn aBTOMaTcKn Ce npNlaOdyBaat Ha dIMHeH3nTe Ha dHOTo Ha caDTo 3a rotBeHe.
Mokete da rotBITE BO roJemn caOBN Ha DBe pIHn nCTOBpeMeHO. CaOT 3a rotBeHe MOpa Da rN NOKPnBa CEHTpTE Ha DBeTe pINrI Ho He Cmee Da Ond HAdBOP O
MapknupaHata oBnact. Ako caIOT 3a rotBeHe e CTabEn MeY Dbata ZeHTpn, yHKunjata Bridge Hema da 6nJe BknyueHa.
6.4 NocTaBKn 3a noDrpeBaHbe
- Пиитишие差别а саканда поства за толліна на конт polп�а лес'tа.
Ioka3HnTe CBeTna HaD KOHTpOHaTa JIeHTa ceNojabyBaat Do N36paHOT HnBO Ha NoCTaByBaHe Ha TOnJIHa. - 3a da ja ncknyuTe pnhrnaTa, npntncheTe 0.
6.5 PowerBoost
6.9 CtpyKtypa Ha MeHn
TabeJata ja nokaxyba ochOBhata ctpyKtypa Ha MEHTo.
Kopncnuchkn noctabkn
| Симбо л | Посставka | Можни орци |
| b | Звек | Вкneys / Иckleys (-) |
| P | Ограшиствање на щачината | 15 - 72 |
| h | Решим на acпиратор | 1 - 6 |
| E | Исторija на anapimi / грешики | Список на неемашини anapimi / грешики. |
3a da rH BHeceTe KOpncnUKNte
nocTaN: npNTNCHeTe ro n dpXeTe ro ① I. Notoa, npNTNCHeTe ro n dpXeTe ro. IocTaNtCe ce nojabybaat Ha TajMepoHa JIeBnte pIHrHn.
ДВИЖЕБЕ HN3 MEHINTO: MEHINTO CE COCTOJ OД CIM60JI 3a NOCTABYBAJIe N BpeHNOCT. CIM60JIOT CE NOJABYBA Ha 3aDHNOT TAJMEP, a BpeHOCTe CA NOJABYBA Ha NpeDHNOT TAJMEP. 3a DA CE DVBKNTe HN3 NOCTABKNTe, npITNCHETe FO HA NpeDHNOT TAJMEP. 3a DA ja NpOMEHNTe BpeHOCTa Ha NocTAbkata, npITNCHETe + HnI -Ha NpeDHNOT TAJMEP.
3a da n3JIe3eTe oJ MeHnTo: npHTNCHeTe rO ①.
OffSound Control
Moxete Da rBVKJyUHTe / nCKJyUHTe 3ByuNTe BO MeHn Kopncnukn noCTaBKn.
I IorneHHeTo BO ,CtpyKTypa Ha MeHInTO".
Kora ce nckluyehn 3ByuTe, MojkeTe I noHaTamy da ro Cnyuate 3BykOT Kora:
- ro donnpate ①,
BpemeTo Ha TajMepOT ce HamaJlyBa, - PnTnCKaTe HeaKTHuBcH Cm6oJ.
8.2 3Byu BO TeKOT Ha pa6oTaT
Ako cnyuwaTe:
3ByK Ha nykaHBe: caDOT 3a rotBeHe e HnnpaBEn OJ pa3JIuHm MaTePnjaJI (ceHNDbN KOnCTpyKcuiJa).
3ByK Ha CBnPKaHe: ja KOpNCTnTe pHrIaTa Ha rOleMa jaUnHa n CaOnBnTe 3a rotBeHe Ce HApBaEHn OJ pa3JIuHN MaTePnJaIN (ceHDbN KoHCTpyKuJa).
SyHeBe: KOpNCTnTe BnCOKo eHepReTcKO HnBO.
KIIKAHBe: ce nojabyBa eIeKtpuHOpnpdpnyBaHe.
ПИштelve,брмчe-he:ВEHNTnataTopoT pa60Tu.
3ByuTe Ce HopMaHn H He Ce 3HaK 3a HeNCnpaBHOCT.
8.3 Öko Timer (Ekolouk Tajmep)
3a 3aCyByBaHbHe Ha eHeprJna, rpejauOT 3a pInHrIATA ce NcKnyUyBa nped Da ce orLnacn npOrpamatopot 3a od6pojYbaHe. Pa3Nkata BO BPeMeTo Ha pa6Ota 3aBncn Od HNBOTO Ha NOCTaBeHaTota TOnJIuHa n DoJxHnHa Ta H rotBeHbeto.
8.4 Пгимери 3a anлкади 3a rotbebe
Ondocot MeIy NoCTaBkataHa TemnepaTpaTa H NOTPOwUBAuKaTa Ha cTpyJa H pINrJtata He e IInHeapeH. Kora Ke ja 3rOJIeMITE TemnepaTypata, NOTPOwUBaYCaTa Ha cTpyJa H pINrJtata He ce 3rOJIeMBya npOnOpZIOHaJIHO.Toa 3NaHn Deka pINrHaNoCTaBeHa Ha cpeHa TemnepaTpaKOpICTN NOMAJIky Od NIOOBnHa OD MOKHoCTa.

IpoaTouTe BO tabenata ce camo HacOKn.
| Посравки за所提供的人生 | Уnotробete за за: | ВреME (min) | Совети |
| 1 | Чувajte ja зrostвената xхрана точna. | ΚΑΚΟ οΤΟ e неболходан o | Ставе калak на садот за rotвање. |
| 1 - 2 | Hollandaise coc, точьe: путор, чokоладо, желати. | 5 - 25 | Промechувajte одвреве-hав在里面. |
| 1 - 2 | Зац蜱сун Bavе: мени омлейни, пechени, jaю. | 10 - 40 | Готове покрино сокал. |
| Посравки заannotroduвае | Уnotroduveze за: | Врeme(min) | Совети |
| 2 - 3 | Горвени ориги щаденьа со млеск,annotroduвае Готови щаденьа. | 25 - 50 | Дожаные有很大алку д Bavати поны Teчноct od колочина та на ориг.Меша对接а сд ладьата со млеск на поobини на rotbehendeTo. |
| 3 - 4 | Горвete на паea зеленчuk, риба, Meco. | 20 - 45 | Дожаные有很大алку поны ладьата 750 gКомпир. |
| 4 - 5 | Горвete komпирни паea. | 20 - 60 | Уnotroduveze макс. % I вoda за 750 gКомпир. |
| 4 - 5 | Горвete полесни колочихрана,Чорби и сун. | 60 - 150 | До 3 плтуг nochoc сокозк. |
| 6 - 7 | Лесно пожende:шицla, тошко Кордан bny, кotлети, ризоли, колбаси, цн дрб, задшka, jajca, палачинки, крфни. | кakоштоeNeopхонdO | Завтete на поobини врeme. |
| 7 - 8 | Интынзвно пожende, пожени ренийКомпир,шицли. | 5 - 15 | Завтete на поobини врeme. |
| 9 | Сbatе вoda, Горвete посыпесы вoda. PowerBoost e Вкуда. | ||
| P | Варе поlemп поочевая вoda. PowerBoost e Вкуда. | ||
8.5 Пpenopakи и совети за Hob²Hood
Kora pakybATE co pnoyata 3a rotbehe co cyHKnjaTa:
3aunTeJe ja nnoyata Ha acnnpatopot Od DnpeKTHa CBETNIHa.
He ctabajte xaIoreha CBetnka Ha nNoyata Ha acnpaTopoT.
He ja nokpmbajte nloyata ha nloyata 3a rotBehe.
He ro npeknHybajte cnHanot nomery nloyata 3a rotBebe n pokloneot (Ha npimep co paka nIi co paKa oJ caJ 3a rotBebe nIi BnCOK IIOHeu).BndTe ja cNkata.
Acnnpatopot Ha cnkaTa noDony e camo 3a nIyuctpaunja.

I pyrnte daJIeunHcKo - ynpaByBaHn anapatn MoKe da ro 6Iokupaat CnHanot. He KopncTeTe TAKOB anapat 6Incky do IIOUata 3a rotBeHe Kora e BkIyueH Hob²Hood.
Acnpatopn co yHKunja Hob²Hood 3a da ja hajndeTe ueIata Hn3a acnpatopn kon pa6oTAT co Obaa yHKunja, BInTe ja
9. HEGA UN YNCTEHe

IPEyIPEyBAHbE!
BnTe Bo nornabjata 3a 3awTNTa n cnrgpnoct.
9.1 OnuTn HOpMaun
- Ynctete ja noBpHnHaTa 3a roTbeHe nocekoja ynoTpe6a.
- Cekoraш уnotpe6ybajte caobn 3a rotbehe co yncTo dHO.
- FrpebaHnIe HJI TEmHInTe dAMKn Ha NOBpUHaTAt HeMaat eFeKT Ha Toa KaKo 0yHKuOHnpa NoBpUHaTAt 3a rotBeHe.
KopncTeTe CneujiAnHO CpeCTBO 3a YnCTeHe HameHTo 3a NOBpUHN3a rotBeHe.
KopncTeTe cneuJaHa rpeBaIka 3a cTaknoto.
9.2 YnCTeHbHe Ha nIIOyata 3a rotBeHbE
Bednaw otctpanhe: cToneHa nlaactka, nlaactnHa foJnja, coI, ukep u xpaHa
co uekep, BO cnpoTnBHO, HeuNcTOTnjaTAMoKe da ja oWTeTn nIoOyata 3a rotBeHe. BnImabajte da he ce nIropnte. CTabete ro cneunjaiHOTo cTpyraJIO 3a uNCTeHe ha nIoOyata Ha cTaKNeHaT a NobpUnHa noD octar an N dBXkeTe ro CeYbOTO no nobpUnHaT a.
I3BaTe Tn OTkako anapatot e DOBOLHO 3naJeH: npCTeHn OJ 6nrop, BOda, dAMKn OJ MaCHOTm, CBETKaBn MeTaNn IpomEn Ha 6oJata. YnCTeJa I nOuata 3a roTBeHe co BnaxHa KpnA n Heabpa3nBEN DeTepreHT. NOp CTeHbTo, I36pnWte ja IIPOUATA 3a roTBeHe co MEka Kpna.
- OtrpaHbHe CBeTkaBn MetaHn
Pomehn Ha 6ojaT: KopncTePe pactBop
OD Boda n Ocet N YncTeJe ja CtaKneHaTa
NoBpUnHa co Kpna.
10. PEUJABAHBE IPOBJEMN

IPEyIPEyBAHbE!
BnTe Bo nornajata 3a
3aWtnta N CnrypHOCT.
10.1 Φto da ce hampaBn ako...
| ПюбLEM | Можна р comprона | Решения |
| He можete за ja вklучite有很大да pakува对接олгове. | Пюоча за roтveье не e порзаясо[elektprucho наюжва对接олгов�e有很大对接олg�ывач. | Пюberete有很大пюоча有很大对接олгов�e有很大对接олg�ывач. |
| Избал осигувац. | Уberete有很大 сигувацетe有很大对接олg�ывач. | |
| ПюбLEM | Можна р�чина | Решения |
| He noctabyajte ja jaunihata 3a точина за врeme od 60 секунд. | Повторно вkluyete ja поча на rotveье и поставе差别 3a jaunna ha toptinyahata 3a nomalky od 60 cekynd. | |
| Сто дорпene 2 яни поевке сеньztорскп пolyиba bo ivstvo врeme. | Дорпete само_edно сеньztорскп пол. | |
| Пayza e bo Функциja. | Видахе bo „Секоjdnevва уnotpe6a". | |
| Има вoda яни масни дамки на Конtrpoлната плоча. | Ис拴стete ѳ контPORлната плоча. | |
| Можete на снынене постоган Звун сигал. | Еnéktpruchно повз汞ье e нелравлино. | Искльчete ѳ поча на rotveье差别 eilektrpvhote наюйвачe. 3боруьaje co KBалф��куван eilektrpvachap за ѳ я поberп инсталцида. |
| Пробноставе щ мakсималина поставka 3a jaunna на точинatable за edna od рinhліп. | Другіtte рингліа ѳ трашат мakсимално раслоюжлвата еергіna. Ваша плоча за rotveье paobotи правлино. | Hamanete ѳ поствкatingа за щашина на towinната на дугіtte ринглі nobрзани на ivstata phazа. Вдіете в „Упразувайы се оергіNJATA". |
| Се олесува звун сигал и плоча за rotveье с псknучь. Се олесува звун сигал кORA плоча за rotveье e иckлчews. | Стоставile нешто на edно яни повские сеньztорскп пolyиba. | Остсан'te ng подmetот od сеньztорскп пolyиba. |
| Плоча за rotveье с нckлчews. | Стоставile нешто на сеньztорскп посл. | Остсан'te ng подmetот od сеньztорскп пolyиba. |
| He ce палу пokазно с Bretto 3a преостанatura точина. | Ринглata нее яшиka 3atoa shto разOTEла само кратук врeme яни оштeten сеньztopot. | Ако ринглata poabotela doволно dolnoу за Bavide яшиka, pazroborapajte co oblastructeh cebvincen цentap. |
| КорисnéMHORY BIVSOKO TENZEPE Коe go sbokimpa сirkhalot. | Корисnénomano tenzepe, пroometé ja ринглata яни рабotete pauchno co acniparotot. | |
| Конtrpoлната плоча.stahува жешка на дочир. | Садот за rotveье e пегалем яни �ставе пьблесу до Конtrpoлната плоча. | Големп'te calobи за rotveьe ставе яни за,dani'te ринглі,ako e moЖHO. |
| Hema zbyk kora ги порате сеньztорскп пolyиba на tablata. | Звунite с ecskluvelи. | Вькучete ng 3bycuite. Вдіетe bo „Секоjdnevва уnotpe6a". |
| Показно CBETLO nad симбόлOT ce bkvува. | Уrekд за 6e3bεdnoct на dieca яни Зakлчувае paobotи. | Вдіетe bo „Секоjdnevва уnotpe6a". |
| Конtrpoлната лentesу trpenka. | Hema сад за rotveье на ринглata ини ринглata che e ceeloscho nokrieva. | Сtablete сад за rotveье на ринглata 3a ceeloscho da ja jo kopriete. |
| ПюбLEM | Можна ручна | Ршениe |
| Садот 3arotveьe e necooDBeteh. | Користете садови 3a rotveьe cooDBetehn 3a ИndукTNBHTA tlOча 3a rotveьe. Вдete BO „Помош и cobETn". | |
| Прechимот на дноTo habсadot 3a rotveьe e пемал 3a ринглata. | Користете сада rotveьe co tochni dinmenzhim. Вдete BO „Тхнчkn поатои". | |
| Eи се ручкува 6poj. | Има rpeшka kaj пloчatura 3a rotveьe. | Искneyтуе ja пLOЧATA 3a rotveьe и ВКлuyerte ja nobTOPHNo 30 sekyнdi. Ако Ese ВКлuyчп nobTOPHNo, Inckny换来 ja пLOчATA 3a rotveьe od eilektpruchnoTo hanojybahe. По 30 sekyнdi, nobTOPHNo ВКлuyerte ja пLOчATA 3a rotveьe. Ако пOBTropHo ce joави р探测 electromot,kontaktnapajte co oblacteh cepВиcesen ceNTap. |
10.2 Ako He MoxkeTe Da HajdeTepeweHne...
Ako He MojkeTe cAmte da ro peuHnTe npo6IeMoT, o6paTeTe ce kaj Baunot dInep nIN BO OBlaCTeHnOT cepBnceH cHTap. DaTe rN pOdaToUte OD pNoYkata co CneuΦkaun. PpOBepTe daJI npabuHNO
cTe paKyBaIe co nIooYata.Bo npOTnBHO, cepBnciPapBeTo OJ cepBncenTexHnUap INIINJIpe Hema Da 6Ine 6ecPiNaTHO, dpyn I 3a BpeMe Ha nepNoDT Ha rapaHciJa. IHOpMaunjata 3a rapaHTNIO TepNOID NOBlaCTeHNTe cepBNCNI CEHTPN Ce BO rapaHcNCKaTa KHNsKa.
11. TEXHnUKNIPOJATOUIN
How to install your Electrolux Induction Hob - Worktop installation

4. OPIS URZADZENIA
6.8 Management putere
2. BEZPEČNOSTNÉ POKNY
2.1 Montáz

VAROVANIE!
Tento spotrebičmöze nainstalovat'len kvalifikovaná osoba.

VAROVANIE!
How to install your Electrolux Induction Hob - Worktop installation

4. POPIS VYROBKA
4.1 Rozlozenie varnej plochy
1 Indukcná varná zóna
2 Ovladacic panel
4.2 Rozvrhnutie ovladacieho panela

How to install your Electrolux Induction Hob - Worktop installation

4. OPIS IZDELKA
How to install your Electrolux Induction Hob - Worktop installation

4. PERSHKRIMI PRODUKTIT
4.1 Skema e siperfaques sè gatimit
1 Zone gatimi me induksion
2 Paneli kontrollit
How to install your Electrolux Induction Hob - Worktop installation

4.ОПИС ПОН3ВОДА
4.1 ŠeMa noBpùnHe 3a KúBa№
1 INHykCnOHa 30Ha 3a KyBaHe
2 KomaHnTa6Ja
4.2ИЗгледКомандеТабл e

YnOTope6bTe cEn3OpcKa noBa da 6bcTe pykoBaN ypehajem. DInCInJeN, INHdNkAToPn n 3ByHn CnHaHn ynyhyjy ha To koje cy fynKcIne je AKTNBHe.
6.9 CtpyKTypa MeHnja
Ta6ena npiKa3yje OCHOBHy cTpyKTypy MeHnja.
KopncnnuKa noeShaBaHa
| Сим- бол | Поседаразе | Mory/he onциje |
| b | Звк | Укъчени / Ис- Къчени (-) |
| P | Ограшиени снare | 15 - 72 |
| h | Рек imm acдирато- pa | 1 - 6 |
| E | Исторija anapma / гравacka | Списам недавих anapma / гравacka. |
Дабистпpresсунлкориснчим nodeшаBaHMa: npITCHNe nДжNTe ①.
3aTMM npNTNCHNe n DpKHTe TIOdeuaba ce nojaBbyjHa TajMepy leBnx 30Ha 3a KyBaIbe.
KpeTaBe KpO3 MeHn: MeHn Ce cactoJn Oc Cm60Na noDeuBaHa n BpeDnOCTn. Cm60n ce nojabByje Ha 3aIbEm TajMepy n BpeDnOCT ce nojabByje Ha npedhEm TajMepy. Da 6nCTe Ce KpeTaNnI3MeHy noDeuBaHa, npITnCHnTe Ha npedhEm TajMepy. Da 6nCTe npOMehnINn BpeDnOCT noDeuBaHa, npITnCHnTe + nIIN — Ha npedhEm TajMepy.
Да 6нсте n3aшл n3 Meинja: npTnCHnTe Tactep ①.
OffSound Control
3BykoBe MoKTe Da aKTbBnpuTe / DeakTbBnpaTe y onuJaMa MeHn> KopncnUka nOdeuBaHa.

IornejaTe,CTpyktypaMeHnja".
Ka Da cy 3BvKOBn NCKJbUyeHn, n DaJIbe MoXKeTe Da YJJeTe 3ByK KaDa:
-ДоДингHeTe ①,
Tajmep oD6pojaBa,
- PnITUCHETe HeaKTINBaH Cm60JI.
7.ДОДАТHEФУнКUINJE
7.1 Aytomatcko nCKJbYnBaHe
Функида ayTomatckn DeakTNBupa nNouy 3a KyBaHe KaDa Baxn CJeDehe:
CBE 30He KyBaHaCy DeaKTHBnPaHe,
He NocTaBbATE HnKaKBe CTepe He TOnIIOte IINI NoDeIaBaHbe 6p3InHe BeHTnlaTOpa HAKOH AKTNBpuHa bIIOue 3a KyBaHbe,
- npocneTe nIi cTaNTE HeWTo (nIeX, Kpny nIpr.)HaKOMaHdHy Ta6Ny uOcTaBnTe ra dyxke od 10 cekyHdi. Ornaawaba ce 3ByuHn CnHan I pIoya 3a KyBaHbe ce DeakTINbpa.YKIOHnTe npedmet nIi OuchTe KOMaHdHy Ta6Ny.
- ypehaj noctaje npetonao (Hnp. KaJa n3 wepne ncnapn cBa Teuhoct).Iyctnte da
ce 30Ha 3a KyBaHbe OxlaInpe Hero ITO IOHOBO KOpNCTnTe PNOUy 3a KyBaHbe.
aKo He NCKJbUyHTe Heky Od 3OHa 3a KyBaHBe IINI aKO He Ipomehnte NOpEWeH CTeHnTOnlote.HaKOH n3BeCHor BpeMeHa IIIOuHa 3a KyBaHBe Ce DeaKTnBnpa.
Ondoc n3MeHy cTeNeHa TOnnote INBpeMeHa HAKOH KOr ce ypehajDeaKTHBupa:
| Побeshаразе стene-на топлote | Плоча за кувашие се Deakтinueра наков |
| 1 - 2 | 6 сати |
| 3 - 4 | 5 сати |
| Побшаваные стene- на топлотe | Плоча за кувашие се- дектivismа наков |
| 5 | 4 сата |
| 6 - 9 | 1,5 сати |
7.2 Panyapaj
Функциа пебауjee се 3оЕ 3а Куваьkoje cy укъчени на Нajнжу ВрдноctTemnéраType.
KaadaФункциja paДи, мory ce KOpNCTItncAmo CmM60nI ① n | . CbN dpyrN CmM60nHa KOMaHdHm Ta6Jama cy 3akByuHaH.
Oba yHKunja He 3ayCTaBb a yHKunjy Tajmepa.
1.ДабистеakTNBnpaJHФункuniJy: npNTCHNTE Dyrme
CTeneh tonnote je cnywTeH ha 1.
2.ДабnteДeakTNBnpaJIиФункu尼jypNTCHNTeDyrgme
YKbUyJe ce npetXoJHO noDeuBaHe TOnlote.
7.3 KOnTpOJHa 6paBa
Mokete da 3akbyate KOMaHdHy Ta6ny DOK nloya 3a KyBaHe paN. To cnpeyaba cnlyajny npomEny cTeena TOnnIote.
Ipbno noedeite cteenehe tonlote.
ДабистеakTNBnpanuФункциу: npTnCHNTe Dyrgme
OvN 3ByuCy HopMaHn H He yka3yjHa 6nlo KaKab KBap.
8.3 Öko Timer (Eko Tajmep)
Да бисте уштоелноеериу, гpeяч зоне 3а КУВаные ДЕАКТИВИра се ппся Hero ШTO ce orласи тajмep одбpojabаьа. Разлиka y
BpeMeHy pada 3aBnCOn OJ HnBOa PnoDeIshaBaHbA CTeNeHa TOnJIToE N DuyXnHe TpaJaHa npOueca KyBaHa.