
FRESHLIGHT 2200 - Motorhome and caravan lighting DOMETIC - Free user manual and instructions
Find the device manual for free FRESHLIGHT 2200 DOMETIC in PDF.

| Product type | Roof air conditioner with integrated LED lighting |
| Brand | Dometic |
| Model | FreshLight 2200 |
| Product number | 9102900165 |
| Cooling power (ISO 5151) | 2050 W |
| Maximum heating power | 2700 W |
| Supply voltage | 230 V~ / 50 Hz |
| Current consumption in cooling mode | 4.1 A |
| Current consumption in heating mode | 5.2 A |
| Refrigerant | R-407c |
| Protection type | IP X4 |
| Dimensions (W x D x H) | 1105 x 758 x 210 mm (height above roof) |
| Weight | approx. 42 kg |
| Maximum interior volume (insulated vehicle) | 25 m³ |
| Fan speeds | 4 levels + automatic mode |
| Air conditioning modes | Automatic, Cooling, Heating, Air circulation, Ventilation, Dehumidification |
| LED lighting | Yes, dimmable |
| Blinds | Blackout blind and solar protection blind (manual) |
| Remote control | Yes, with digital display and programmable functions |
| Additional functions | Timer, Sleep, I Feel, clock, lighting adjustment |
| Filters | 2 washable filters + activated carbon filter (replace annually) |
| Maintenance and cleaning | Regular filter cleaning, check condensation drains |
| Warranty | Applicable legal warranty |
Frequently Asked Questions - FRESHLIGHT 2200 DOMETIC
User questions about FRESHLIGHT 2200 DOMETIC
0 question about this device. Answer the ones you know or ask your own.
Ask a new question about this device
Download the instructions for your Motorhome and caravan lighting in PDF format for free! Find your manual FRESHLIGHT 2200 - DOMETIC and take your electronic device back in hand. On this page are published all the documents necessary for the use of your device. FRESHLIGHT 2200 by DOMETIC.
USER MANUAL FRESHLIGHT 2200 DOMETIC
Please read this instruction manual carefully before installing and starting up the product, and store it in a safe place. If the product is passed on to another person, this manual must also be handed over with it.
Table of contents
1 Explanation of symbols. 39
2 Safety instructions. 40
2.1 General safety 40
2.2 Operating the device safely 41
3 Target group for this manual 42
4 Scope of delivery 42
5 Optional extras 42
6 Intended use. 43
7 Technical description 43
7.1 Components 44
7.2 Control panel 45
7.3 Remote control 46
7.4 Air conditioning modes 48
7.5 Additional functions 49
8 Before initial use 50
9 Operating the roof air conditioner 51
9.1 Basic notes on operation 51
9.2 Using the remote control 51
9.3 Hint for improved use. 52
9.4 Switching the roof air conditioner on and off 53
9.5 Selecting the air conditioning mode. 54
9.6 Selecting the blower setting manually 55
9.7 Setting the temperature 55
9.8 Adjusting the air nozzles 56
9.9 Setting the timer. 56
9.10 Activating the sleep function 58
9.11 Activating the "I feel" function 58
9.12 Operating the lights 59
9.13 Replacing the remote control batteries 59
9.14 Setting the time 60
9.15 Using the blinds 60
10 Cleaning the roof air conditioner 61
11 Maintenance of the roof air conditioner 62
12 Troubleshooting. 63
13 Warranty 64
14 Disposal 64
15 Technical data 66
1 Explanation of symbols
WARNING!
Safety instruction: Failure to observe this instruction can cause fatal or serious injury.

CAUTION!
Safety instruction: Failure to observe this instruction can lead to injury.

NOTICE!
Failure to observe this instruction can cause material damage and impair the function of the product.

NOTE
Supplementary information for operating the product.
Action: This symbol indicates that action is required on your part. The required action is described step-by-step.
This symbol describes the result of an action.
fig. 1 5, page 3: This refers to an element in an illustration. In this case, item 5 in figure 1 on page 3.
2 Safety instructions
The manufacturer accepts no liability for damage in the following cases:
- Damage to the product resulting from mechanical influences and excess voltage
- Alterations to the product without express permission from the manufacturer
- Use for purposes other than those described in the operating manual
In particular, the manufacturer will not be liable for any consequential damage, especially consequential damage caused by failure of the roof air conditioner.
Note the following basic safety information when using electrical devices to protect against:
Electric shock
Fire hazards
- Injury
2.1 General safety
WARNING!
- Electrical devices are not toys.
Keep electrical appliances out of reach of children or infirm persons. Do not let them use the appliances without supervision. - Persons (including children) whose physical, sensory or mental capabilities or whose lack of experience and knowledge prevent them from using the device safely should not use it without supervision or instruction by a responsible person.
- Only use the device as intended.
- Do not make any alterations or conversions to the device.
-
Installation, maintenance and repairs of the roof air conditioner may only be carried out by qualified personnel who are familiar with the risks involved and the relevant regulations. Inadequate repairs may cause serious hazards. For repair service, please contact the service centre in your country (addresses on the back page).
-
Do not use the roof air conditioner near flammable fluids or in closed rooms.
- Make sure no combustible objects are stored or installed near the air outlet. A distance of at least 50~cm must be kept.
- Do not reach into air outlets or insert any foreign objects in the roof air conditioner.
- Do not undo the upper cover of the roof air conditioner in the event of a fire. Use approved extinguishing agents instead. Do not use water to extinguish fires.

NOTICE!
- Never drive through automatic car washes when the roof air conditioner is mounted.
- Please ask your vehicle manufacturer if a technical inspection is required after fitting an air conditioner and whether the height entered in your vehicle documents needs to be altered (increased height 210~mm ).
- If faults occur in the roof air conditioner's refrigerant circuit, the roof air conditioner must be checked by a specialist company and properly repaired. The refrigerant must never be released into the air.
2.2 Operating the device safely

WARNING!
Always disconnect the power supply when working on the device.

NOTICE!
- Do not operate the roof air conditioner if the ambient temperature is below 0^ . There is a risk of damage from freezing condensation.
- The roof air conditioner is not suitable for use in agricultural or construction vehicles.
- Operate the device only if you are certain that the housing and the cables are undamaged.
3 Target group for this manual
This operating manual is for the user of the roof air conditioner.
4 Scope of delivery
FreshLight 1600
| Designation | Item number |
| Dometic FreshLight 1600 roof air conditioner | 9102900207 |
| Installation manual | |
| Operating manual |
FreshLight 2200
| Designation | Item number |
| Dometic FreshLight 2200 roof air conditioner | 9102900165 |
| Installation manual | |
| Operating manual |
5 Optional extras
Available as an option (not included in scope of delivery):
| Designation | Item number |
| WAECO DC extension kit DC-Kit-2 | 9100300001 |
| WAECO DC extension kit DC-Kit-3 | 9100300002 |

NOTE
The WAECO DC extension kit (accessory) allows the Dometic FreshLight roof air conditioner to be used while in motion.
6 Intended use
The Dometic FreshLight roof air conditioner with integrated roof window can condition the interior of campers and caravans with cool or warm air.
The roof air conditioner is not suitable for installation in construction machines, agricultural machines or similar equipment. It will not work properly if exposed to strong vibrations.
The operating mode of the roof air conditioner is guaranteed for temperature up to 52^ .
Do not operate the roof air conditioner in the "Heating" air conditioning mode if the room temperature is above 30^ .
Heating operation is recommended at ambient temperatures of +2^ and above.
7 Technical description
The roof air conditioner with integrated window supplies the interior with cool or warm dehumidified air without dust and dirt. Used air can be extracted from the interior with a blower.
Two dimmable LED lamps integrated in the air outlet unit provide pleasant lighting.
The roof window has two blinds: the blackout roller blind lets no light through, while the sun protection blind protects from direct sunlight.
The roof air conditioner is operated with the remote control.

NOTE
The roof air conditioner can lower or raise the temperature within the vehicle to a certain level. The temperature depends on the type of vehicle, the ambient temperature and the cooling capacity of your roof air conditioner. Below an outer temperature of 16^ the roof air conditioner does not cool anymore. In this case only use the air conditioning mode "Circulating air".
When the outside temperature drops, the heating capacity of the roof air conditioner sinks. Heating operation is recommended only at temperatures of +2^ and above.
7.1 Components
The refrigerant circuit of the roof air conditioner consists of five main components (fig. 1, page 2):
- Compressor (1)
The compressor draws in the R407c refrigerant used and compresses it.
This raises the pressure and therefore the temperature of the refrigerant.
- Condenser (2)
The built-in liquefier works like a cooler or heat exchanger. The air flowing past absorbs the heat and the hot refrigerant gas cools down and becomes liquid.
Evaporator (3)
The evaporators cool down and dehumidify the air flowing past them. The refrigerant absorbs the heat and vaporises.
Blower (4)
A blower distributes the cooled air within the vehicle through an air outlet unit.
- Solenoid valve (5)
The solenoid valve allows the cooling cycle to be reversed and the air feeding in to be heated.
Overview of all parts: fig. 12, page 7.
7.2 Control panel
The control panel (fig. 2, page 2) is at the air outlet unit of the roof air conditioner.
It contains the following control and display elements:
No. Explanation
1 Status LED
| No light: | The roof air conditioner is switched off. |
| Orange light: | The roof air conditioner is in stand-by mode. |
| Green light: | The roof air conditioning is switched on. |
| Flashing green light: | The roof air conditioner is switching to the “Heating” conditioning mode (♀) or is being defrosted. |
| Red light: | Only if the system is connected to 12 V-: the supply voltage of 230 V~ is not available. |
| Slowly flashing red light: | Malfunction in interior temperature sensor E1 |
| Flashing red light: | Malfunction in exterior temperature sensor E2 |
| Quickly flashing red light: | Malfunction in exterior temperature sensor E3 |
| Button ① | Switches the roof air conditioner on, off or to stand-by mode Pressing the button longer engages the automatic mode. |
| Button - | Switches the light on or off or dims it. Only active when the roof air conditioner is switched on or on stand-by. |
| fired receiver for the remote control | |
7.3 Remote control
All settings of the device (e. g. temperature settings, timer programming) are transmitted to the roof air conditioner by remote control.
The following control and display elements are available on the remote control (fig. 3, page 3):
No. Explanation
| 1 Digital display: displays the following: - Time - Selected room temperature (target value) in °C or °F - Actual room temperature - Air conditioning mode - Blower level - Symbols for active additional functions - Battery status |
| 2 | Button ↓: |
| Switches the roof air conditioner and remote control on or to stand-by mode |
| 3 | Button ⌒: Selects the blower setting |
| 4 | MODE button: |
| Selects the air conditioning mode |
| 5 | CLOCK button: Sets the time |
| 6 | TIMER button: |
| Sets the timer |
| 7 | SLEEP button: Activates the sleep function. The sleep function automatically reduces the target value to provide a pleasant sleeping temperature. |
| 8 | SET button: |
| Transmits current data to the roof air conditioner. |
| 9 | I FEEL button: Activates the “I feel” function. Every 10 minutes, the “I feel” function adjusts the target temperature to the temperature measured by the remote control. The remote control must be pointed at the IR receiver (fig. 2 4, page 2) on the control panel. |
| 10 | Reset button |
| Reset all values to standard values |
No. Explanation
| 11 ROOM button: Press once: Displays the current interior temperature (symbol is displayed). Press again: Displays the set temperature. |
| 12 | LIGHT button:Switches the light of the roof air conditioner on or off.The LIGHT button remains functional even when the remote control is switched off. |
| 13 | F°/C° button:Switches between temperature units Celsius (°C) and Fahrenheit (°F) |
| 14 | - button: Reduces the value |
| 15 | + button: |
| Increases the value |
| 16 | Symbol ☑ (batteries empty) |
| Is displayed when the batteries in the remote control are empty. If this happens, replace the batteries, see “Replacing the remote control batteries” on page 59. |
| 17 | Symbol ▲ (transmitting values) |
| Is displayed briefly when the remote control is transmitting values to the roof air conditioner. |
7.4 Air conditioning modes
The roof air conditioner has the following air conditioning modes:
| Air conditioning mode | Display message | Explanation |
| Automatic | △ | You specify the temperature, and the roof air conditioner brings the interior to this temperature by heating or cooling and by controlling the necessary blower output. The button is deactivated in this mode. |
| Cooling | ※ | You specify the temperature and blower settings, and the roof air conditioner cools the interior to this temperature. |
| Heating | ◎ | You specify the temperature and blower settings, and the roof air conditioner heats the interior to this temperature. |
| Circulating air | ※ | You specify the blower level, and the roof air conditioner blows air into the interior. |
| Ventilation | △ | The roof air conditioner ventilates the interior by sucking the used air from the interior with the blower. The ventilation flap is opened for this purpose. The button is deactivated in this mode. |
| ◎ | ||
| Dehumidification | ▲ | You specify the temperature, and the roof air conditioner brings the interior to this temperature by heating or cooling the air, by controlling the necessary blower output and by dehumidifying the interior (Circulating air mode). The button is deactivated in this mode. |
7.5 Additional functions
The roof air conditioner has the following additional functions:
| Additional function | Display message | Explanation |
| Timer | 08:00 ON ① | The roof air conditioner is switched on at the specified time. |
| 20:00 OFF | The roof air conditioner is switched off at the specified time. | |
| 08:00 ON ① OFF | The roof air conditioner is switched on and off at the specified times. | |
| Sleep | The set temperature is reduced by 1 °C after one hour and by 2 °C after two hours to generate a pleasant temperature for sleeping. | |
| I feel | IFeel | The remote control measures the room temperature and transmits this measurement to the roof air conditioner every 10 minutes. The roof air conditioner adapts the target value to this measurement. The remote control must be pointed at the IR receiver (fig. 2 4, page 2) on the control panel. |
8 Before initial use
Inspection before starting up
Before you switch on the roof air conditioner, observe the following:
Check whether the supply voltage and frequency correspond to the values specified in the technical data, see page 66.
Ensure both the air intake opening and the air nozzles are free. All ventilation grilles must always be kept free to ensure that the roof air conditioner is able to operate at maximum capacity.

CAUTION! Beware of injury
Do not insert your fingers or objects into the air nozzles or the intake grille.
Check remote control and insert batteries
Insert the provided batteries in the remote control battery compartment, see "Replacing the remote control batteries" on page 59.
Check that the four Dip switches (fig. 4, page 3) are in the correct position.
If you changed the position of the Dip switches: Acknowledge the new setting using the Reset button (fig. 3 10, page 3).
Setting the time
Set the current time: see "Setting the time" on page 60.
9 Operating the roof air conditioner
9.1 Basic notes on operation
The roof air conditioner has three operating modes:
| Operating mode | Features |
| Off | The roof air conditioner is switched off. The remote control is inactive. |
| Stand-by | The roof air conditioning is ready for operation and can be switched on with the remote control. |
| On | The roof air conditioner is conditioning the air in the interior. |
You can use the control panel to
- switch the roof air conditioner on, off or to stand-by mode
- switch the light on and off or dim it
You can use the remote control to
- switch the roof air conditioner to and from stand-by mode.
- switch the light on and off
make the settings - select additional functions
9.2 Using the remote control
There are two ways to control the roof air conditioner with the remote control:
- You can transmit the values directly to the roof air conditioner when you set them
- You can first specify all values on the remote control and then transmit them collectively to the roof air conditioner
Transmitting values directly when they are set
The remote control must be pointed at the IR receiver (fig. 2 4, page 2) on the control panel during operation.
When a button is pressed, the value is transmitted directly to the roof air conditioner. The roof air conditioner confirms the receipt of data with a high note.
**Specifying values and transmitting them collectively to the roof air conditioner**
The remote control may not be pointed at the IR receiver (fig. 2 4, page 2) on the control panel during operation.
Specify the required values on the remote control. Once you have made all your settings, point the remote control to the IR receiver on the control panel and press the SET button. This transmits the data to the roof air conditioner. The roof air conditioner confirms the receipt of data with a high note.
Switching only the remote control to or from stand-by
In stand-by mode, the remote control display shows only the time.
If the remote control is not pointing to the IR receiver (fig. 2 4, page 2) on the control panel, you can activate the remote control or switch it to stand-by independently from the roof air conditioner:
Press the button.
9.3 Hint for improved use
The following hints will optimise the performance of your roof air conditioner:
- Improve the heat insulation of your vehicle by sealing gaps and hanging reflective blinds or curtains on your windows.
- If the vehicle has been subjected to direct sunlight for a long time: Operate the roof air conditioner in the "Circulated air" (♂) or "Ventilation" (♀) mode with the windows open for a while before switching on the "Cooling" (♂) air conditioning mode.
- Avoid opening doors and windows as far as possible in the "Cooling" (※) and "Heating" (※) modes.
- Select an appropriate temperature and blower speed.
- Align the air nozzles sensibly.
- Make sure the air nozzles and intake grille are not covered by cloths, paper or other objects.
9.4 Switching the roof air conditioner on and off

NOTE
When it is switched on, it begins to condition the air to the values that were set most recently.
With the control panel
The figure shows how to use the control panel to switch the roof air conditioner on, off or to stand-by. Press the ① button as shown in the illustration:
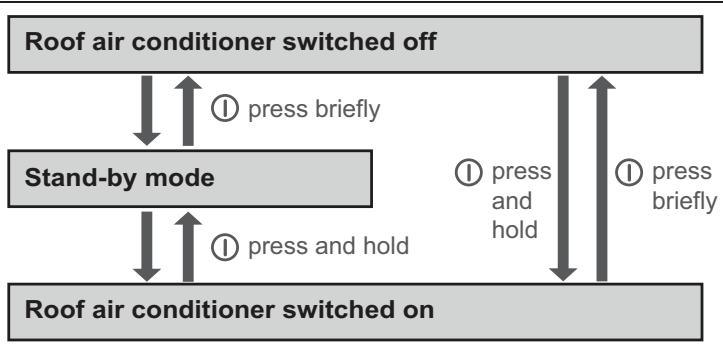
Example: The roof air conditioner is in stand-by mode. You want to switch it off.
Briefly press the ① button.
The roof air conditioner is switched off.
With the remote control

NOTE
- The roof air conditioner can only be operated by the remote control when it is switched on or in stand-by mode.
- You can use the remote control to switch the roof air conditioner to and from stand-by mode. Press the button.
9.5 Selecting the air conditioning mode

NOTE
- Before selecting the "Ventilation" () air conditioning mode, you have to open both blinds completely.
- In the "Ventilation" (5) mode, the blower only starts once the ventilation flap (fig. 1, page 4) is open. This can take a few minutes.
- When the roof air conditioner is switched to the "Heating" (mode, it takes approx. 30 seconds before heating begins. During this time, the status LED on the control panel flashes and the cooling cycle is reversed.
Select the air conditioning mode of your choice using the MODE key, see "Air conditioning modes" on page 48.
The roof air conditioner confirms the receipt of the values with a high note.
✓ The roof air conditioner is switched to the selected air conditioning mode.
9.6 Selecting the blower setting manually
The blower controls the strength of the air supply.
In the "Cooling" (), "Heating" () and "Circulated air" ( modes, the blower levels can be selected manually. In the other air conditioning modes, the roof air conditioner controls the blower level automatically.
| Display message | Explanation |
| S | Low blower level |
| S S | Medium blower level |
| S S S | High blower level |
| S S S | Highest blower level |
| AUTO S S S | Automatic mode, only available in the “Cooling” (※) and “Heating” (※) air conditioning modes. |
Use the button to select the desired blower level.
✓ The roof air conditioner confirms the receipt of the values with a high note.
The new blower level has been set.
9.7 Setting the temperature
In the "Automatic" () , "Cooling" (※) , "Heating" (※) and "Dehumidifying" (♣) modes, you can specify a temperature between 16^ and 31^ via the remote control.
Use the ^+ or - button to select the desired temperature.
✓ The roof air conditioner confirms the receipt of the values with a high note.
✓ The temperature is set on the roof air conditioner.
9.8 Adjusting the air nozzles
The air supply within the vehicle can be regulated by setting the air nozzles.
The air nozzles can be regulated with a slide button (fig. 6 2, page 4) so that air is directed to the front, the back or in both directions:
Turn the knob on the slider anti-clockwise.
Move the slider so that the air is directed in the required direction.
Tighten the knob again in clockwise direction.
The slats (fig. 6 1, page 4) in the front air nozzle can be moved. This directs the air in the required direction.
9.9 Setting the timer
The timer function allows you to set a specific time period for air conditioning. You can specify the switch-on time, the switch-off time or both values. The time can be set in 10 minute increments.

NOTE
The remote control returns to its initial mode if no button is pressed on the remote control for 15 seconds while programming the timer.
Before programming the timer, select the air conditioning mode and all required values (e.g. temperature).
Setting the switch-on time
Press the TIMER button once.
The ON symbol (08:00) flashes on the display of the remote control.
Use the + or - button to set the time when the roof air conditioner is to switch on.
Press the SET button to transmit the value to the roof air conditioner.
The switch-on time is set on the roof air conditioner.
The roof air conditioner is switched on with the selected air conditioning mode at the specified time.
Switch the roof air conditioner to stand-by.
Setting the switch-off time
Press the TIMER button twice.
The OFF symbol (20.00) flashes on the display of the remote control.
Use the + or - button to set the time when the roof air conditioner is to switch off.
Press the SET button to transmit the value to the roof air conditioner.
The switch-off time is set on the roof air conditioner.
The roof air conditioner runs in the selected air conditioning mode until the specified time.
Setting the switch-on and switch-off times
Press the TIMER button three times.
The ON symbol (08:00) flashes on the display of the remote control. The OFF symbol (20:00) is displayed.
Use the + or - button to set the time when the roof air conditioner is to switch on.
Press the TIMER button again.
The OFF symbol (20.00) flashes on the display of the remote control.
Use the + or - button to set the time when the roof air conditioner is to switch off.
Press the SET button to transmit the value to the roof air conditioner.
- The switch-on and switch-off times are set on the roof air conditioner. The roof air conditioner starts in the selected air conditioning mode at the specified time and runs until the second specified time.
Switch the roof air conditioner to stand-by.
Cancelling timer settings
If you have set the timer, you can cancel these settings as follows:
Press the TIMER button five times.
- The timer symbol disappears. The setting has been cancelled.
9.10 Activating the sleep function
When the sleep function is active, the set temperature is reduced by 1^ after one hour and by 2^ after two hours to generate a pleasant temperature for sleeping.
Set the required temperature (see "Setting the temperature" on page 55).
Press the SLEEP button.
The symbol appears in the display.
The sleep function is activated.
9.11 Activating the "I feel" function
When this function is active, the remote control measures the room temperature and transmits this measurement to the roof air conditioner every 10 minutes. The roof air conditioner adapts the target value to this measurement.
Press the I FEEL button.
Position the remote control so that it points at the IR receiver (fig. 2 4, page 2) on the control panel. Otherwise, the values cannot be transmitted to the roof air conditioner.

NOTE
The remote control should not be kept in a part of the room that is considerably warmer or colder than the average room temperature. It may not, for example, be left in the sun or in front of the roof air conditioner.
9.12 Operating the lights
The lights on the roof air conditioner can be dimmed. When switched on, they revert to the most recently specified brightness.
Switching the light on/off with the control panel
Briefly press the button to switch the lamps on or off.
Dimming the light with the control panel
Press and hold the button until the lights have been dimmed to the required brightness.
In order to dim the lights in the other direction: Briefly release the button and then press and hold it again.
Switching the light on/off with the remote control
Press the LIGHT button to switch the lamps on or off.
9.13 Replacing the remote control batteries
Replace the batteries if you see the symbol on the display.
The battery compartment is on the back of the remote control.
Gently push down the lid of the battery compartment and slide it open in the direction of the arrow.
Insert the new batteries (2 x type AAA) in the remote control as indicated in the battery compartment.
Close the cover of the battery compartment.

Protect the environment!
Do not dispose of batteries with general household waste. Return any used batteries to your retailer or take them to a collection point.
9.14 Setting the time
The remote control needs the current time in order to program the timer. The time is indicated on the display of the remote control.
Perform the following steps to set the time:

Note
The remote control returns to its initial mode if no key is pressed on the remote control for ten seconds while setting the time.
Press and hold the CLOCK button to go to the mode used to set the time.
The time flashes on the display of the remote control.
Use the ^+ or - button to set the current time.
Press the SET button to confirm the time.
9.15 Using the blinds

NOTICE! Beware of damage
The blackout blind may not be closed completely if the vehicle is standing in the blazing sun. There is a danger of heat accumulation. In order to prevent damage, the blackout bind must remain open by at least one third.
The two blinds can be used to control the sun and light penetrating the vehicle.
Move the blinds manually (fig. 7, page 5).
10 Cleaning the roof air conditioner

NOTICE! Beware of damage
- Do not clean the roof air conditioner with a high-pressure cleaner. Exposure to water can damage the air conditioner.
- Do not use sharp or hard objects or cleaning agents for cleaning as these may damage the roof air conditioner and the window.
- To clean the roof air conditioner, use water with a gentle cleaning agent. Never use petrol, diesel or solvents.
-
When cleaning the roof window, use only cleaning agents that are approved by the manufacturer.
-
Acrylic glass polish (item no. 9104100242),
- Special polishing cloth (item no. 9104100243) and
- Acrylic glass cleaning agent (item no. 9104100244)

NOTE
The roof window may cloud over in bright sunshine. It will become clear again as soon as it cools down.
Clean the housing of the roof air conditioner and the air outlet unit occasionally with a damp cloth.
Regularly remove leaves and other dirt from the ventilation grilles (fig. 8 1, page 5) of the roof air conditioner. Make sure you do not damage the grilles in the process.
Clean the remote control with a slightly damp cloth from time to time. We recommend using a cleaning cloth for glasses to clean the display.
Clean the roller blind with mild soap and plenty of water.
11 Maintenance of the roof air conditioner

WARNING!
Any other maintenance work to that which is described here may only be carried out by qualified personnel who are familiar with the risks involved when handling refrigerant and air conditioning systems as well as the relevant regulations.
| Interval | Inspection/maintenance |
| Regularly | Check the condensation water drainage: ► Check whether the condensation water drainage channels (fig. 9 1, page 5) at the sides of the roof air conditioner are clear and the condensation water is able to escape. |
| Regularly | Clean the filters on both sides of the air discharge unit (fig. 10, page 6): ► Manually take off the filter cover (1). ► Remove the filter (2). ► Clean the filter (2) with a detergent solution and let it dry. ► Put the dry filter (2) back in. ► Put the cover (1) back on. |
| Once per year | Check the profile seals: ► Check the seal between the roof air conditioner and the roof of the vehicle for cracks and other damage. |
| Once per year | Have the heat exchanger serviced: ► Have the heat exchanger of the roof air conditioner serviced by specialist workshop. |
| Once per year | Replace the carbon filter (fig. 11, page 6): ► Manually take off the filter cover (1). ► Remove the filter (2). ► Remove the carbon filter (3). ► Clean the filter (2) with a detergent solution and let it dry. ► Put a new carbon filter in. ► Put the dry filter (2) back in. ► Put the cover (1) back on. |
12 Troubleshooting
| Problem | Cause | Remedy |
| Roof air conditioner constantly switches itself off. | Icing sensor has tripped. | Outer temperature is too low or all air nozzles are closed. |
| No cooling capacity | The roof air conditioner is not set to cooling. | ➢ Set the roof air conditioner to cooling. |
| The ambient temperature is above 52 °C. | The roof air conditioner is only designed for ambient temperatures of up to 52 °C. | |
| The temperature set is higher than the room temperature. | ➢ Select a lower temperature. | |
| The ambient temperature is below 16 °C. | The roof air conditioner is only designed for ambient temperatures above 16 °C. | |
| One of the temperature sensors is defective. | ➢ Contact an authorised workshop. | |
| The vaporiser fan is damaged. | ||
| The condenser fan is damaged. | ||
| No heating capacity | The ambient temperature is above 30 °C. | ➢ Only use the heating function of the roof air conditioner at temperatures below 30 °C. |
| The ambient temperature is below 2 °C. | The heating function of the roof air conditioner is only designed for ambient temperatures of up to 2 °C. | |
| The temperature set is above 30 °C. | ➢ Select a lower temperature. | |
| The roof air conditioner is not set to heating. | ➢ Set the roof air conditioning to heating. | |
| One of the temperature sensors is defective. | ➢ Contact an authorised workshop. | |
| Low air output | The air intake section is clogged up. | ➢ Remove any leaves and other dirt from the ventilation grilles of the roof air conditioner. |
| The blower is defective. | ➢ Contact an authorised workshop. | |
| Water enters the vehicle | The condensation water drainage openings are clogged up. | ➢ Clean the drainage openings for condensation water. |
| The seals are damaged. | ➢ Contact an authorised workshop. | |
| Roof air conditioner does not switch on. | No supply voltage (230 V~) connected. | Check the power supply. |
| The voltage is too low (under 200 V). The voltage converter is defective. | Contact an authorised workshop. | |
| One of the temperature sensors is defective. | ||
| The electrical fuse of the power supply is too low. | Check the electrical fuse of the power supply. | |
| Roof air conditioner does not switch off. | One of the temperature sensors is defective. | Contact an authorised workshop. |
| The electrical fuse of the power supply is too low. | Check the electrical fuse of the power supply. |
13 Warranty
The statutory warranty period applies. If the product is defective, please contact the service partner in your country (addresses on the back on the instruction manual).
Our experts will be happy to help you and will discuss the warranty process with you in more detail.
14 Disposal
Regulations for environmental safety and correct disposal
All organisations must apply a set of procedures to identify, evaluate and control the influence that their activities (manufacturing, products, services, etc.) have on the environment.
The procedures to be followed to identify significant environmental impact must take the following factors into account:
- use of raw materials and natural resources
- atmospheric emissions
- discharge of liquids
- waste management and recycling
contamination of the soil
In order to minimise environmental impact, the manufacturer provides a series of indications here below that should be taken into account by all those who, for whatever reason, interact with the appliance during its working life.
- All packing components must be disposed of (preferably recycled) in compliance with statutory legislation in the country in which disposal takes place.
- All product components must be disposed of (preferably recycled) in compliance with statutory legislation in the country in which disposal takes place.
- For correct disposal, the appliance must be consigned to an authorised waste disposal company to ensure that all recyclable components are reused and the remaining materials are processed properly.
- During installation ensure the room has adequate ventilation to prevent the build-up of stale air that might be harmful to the health of the operators.
- During operation and maintenance ensure that any waste pollutant products (oil, grease, etc.) are disposed of correctly.
- Keep noise levels down to reduce noise pollution.
For more information on correct dismantling of our products please refer to the recycling handbooks at www.dometic.com.
Place the packaging material in the appropriate recycling waste bins wherever possible.
When in operation or undergoing repairs and maintenance work, make sure that the refrigerant circuit is not damaged and refrigerant cannot escape. It acts as a greenhouse gas and should not be allowed into the environment.
If you wish to finally dispose of the product, ask your local recycling centre or specialist dealer for details about how to do this in accordance with the applicable disposal regulations.
Dispose of the product at an official waste disposal facility in accordance with the applicable recycling or disposal guidelines.

Protect the environment!
Do not dispose of any batteries with general household waste. Return defective or used batteries to your retailer or dispose of them at collection points.
15 Technical data
| Dometic FreshLight | ||
| 1600 | 2200 | |
| Item no.: | 9102900207 | 9102900165 |
| Cooling capacity based on ISO 5151: | 1500 W | 2050 W |
| Heating capacity: | max. 2050 W | max. 2700 W |
| Rated input voltage: | 230 V~/50 Hz | |
| Power consumption in cooling mode: | 2.7 A | 4.1 A |
| Power consumption in heating mode: | 3.5 A | 5.2 A |
| Operating temperature range: | 0 °C to +52 °C | |
| Refrigerant: | R407c | |
| Blower: | 4 blower levels 1 automatic mode | |
| Protection class: | IP X4 | |
| Max. volume of space in the vehicle (with insulated walls): | 20 m³ | 25 m³ |
| Dimensions L x W x H (mm): | 1105 x 758 x 210 着他igh above vehicle roof) | |
| 1105 174 931 @Domestic 25-60 53 196 684 880 | 758 550 | |
| Weight: | approx. ca. 40 kg | approx. ca. 42 kg |
| Inspection/certification: | CE E24 10R-030642 | |
7 Description technique
Programming at timeren
7 Tast SLEEP:
16 Symbol (battery afladede)
17 Symbol (send vaedier)
9.7 Stalla in temperature
Opphev timerprogramming
Nár du har programmert timeren, kan du oppheve dette på følgende måte:
Trykk fem ganger pa TIMER.
Symbolet for timeren slukker. Programmeringen er opphevet.
I3rOToBnTeJIb He HecET HNKaKoI OTBeTCTBENHOCTN 3a yUepe6 B CJIeDyUOuNX cIyuaX:
7 TexHnueckoe OnPscahne
HaKpbIshbI KOHdIuHOep c INHTerpnpoBaHHbIM KpbIshbIM JIOKOM NODaET BO BHyTpEHHee NOMeUeHne XOJIoHbI INI IN TeJIbI OCyUeHHbI BO3dYx 6e3 Ibln I rpa2oTaHHbI BO3dYx MoXeT 6bITb ydaJIeH n3 BHyTpEHHero NOMeUeHna BeHTnIyTopOM.
O6uBn BnB CEx DeTaJe: pnc. 12, cTp. 7.
7.2 PaheJIb ynpaBneHnIa
HaMoDyIe BbIXOJa BO3dUxa KOHdNcNoHepa HaxoDntc TaHeJIb ynpabLeHnra (pnc. 2, ctp. 2).
Ha nei imeioTc cneDyUoIe opraHbI ynpabLeHnI INHdkaun:
No PnOaChenHe
1 CBeToDIOHbI INdKATOp COCTOHHa
BhaaJe onpeJeHne 3NaeHn, a 3aTeMnx COBMeCTHa nepeDaHa B KOHdNcNoHep
9.5 BbI6oppeKIma KOHdNtNoHnpOBaHnA

YKA3AHNE
9.7 HactpoJa Ka TempepaTypbl
3aIpeIaTcBbIbpaCbBaTb 6aTaapeKn B 6bIToBOMyCOp.
Pa3pJxHbIe 6aTapeIN cIaBaIte B TOpROByIO opraHn3aCNIIO nII IN CpeuHaJIbHbIe c6OpHbIe nyHKtbl.
9.14 Hac tropona BpeMeHn
ДляnporpaMMNPOBAHЯТаMepa NyIbTy DnCTaHcNoHOrO ynpaBJIeHnTpe6yETcToUHoe Bpem. Bpem yka3bIbAetcHa Na DnCJIeE nIbTa.ДлянacTpOknВpemeH NblONHITe CneDyUoUne Onerpaun:

Yka3aHne
Ecn npn HacrpoKe BpeMeH N TeueHn 10 ckyHd He haxMaTb HN OndHy n3 KHOPOK Ha NylbTe DnCTaHcNoHOrO ynpaBJeHn, TO nyIbT aBTOMaTHueCKN BO3BpaUaTcAeTcB INCXoHbI peXIM.
12 YcTpaHHeN HeNCnPaBHOCTeI
Dometic Australia Pty. Ltd.
1 John Duncan Court
Varsity Lakes QLD 4227
+61755076000
+61755076001
Mail: sales@dometic-waeco.com.au
AUSTRIA
Dometic Austria GmbH
Domatic Italy S.r.l.
Via Virgilio, 3
I-47100 Forli
+39 0543 754901
+390543756631
Mail: info@dometic.it
NORWAY
Dometic Norway AS
Skolmar 24
N-3232 Sandefjord
+4733428450
+47 33428459
Mail: firmapost@waeco.no
POLAND
Dometic Poland Sp. z o.o.
Ul. Puławska 435A
02-801 Warszawa
Poland
+48224143200
+48224143201
Mail: info@dometic.pl
RUSSIA
Domatic RUS LLC
Komsomolskaya square 6-1
107140 Moscow
Russia
+74957807939
+74959165653
Mail: info@dometic.ru
SLOVAKIA
Domatic Slovakia s.r.o.
Tehelná 8
SK-98601 Filakovo
+421 47 4319 107
+421474319166
Mail: info@dometic.sk
SPAIN
Dometic Spain S.L.
Avda. Sierra del Guadarrama, 16
E-28691 Villanueva de la Canada
Madrid
+34 902 111 042
+34 900 100 245
Mail: info@dometic.es
SWEDEN
Dometic Scandinavia AB
Gustaf Melins gata 7
Dometic Switzerland AG
Riedackerstrasse 7a
CH-8153 Rümlang (Zürich)
+41 44 8187171
+41448187191
Mail: info@dometic-waeco.ch
TAIWAN
WAECO Impex Ltd.
Taipei Office
2 FL-3 · No. 56 Tunhua South Rd, Sec 2
Taipei 106, Taiwan
+886227014090
+886227060119
Mail: marketing@dometic-waeco.com.tw
UNITED KINGDOM
Dometic UK Ltd.
Dometic House · The Brewery
Blandford St. Mary
Dorset DT11 9LS
+44 844 626 0133
+448446260143
Mail: sales@dometic.co.uk
UNITED ARAB STATES
Dometic AB
Regional Office Middle East
PO Box 74775
Dubai, United Arab Emirates
+97143212160
+97143212170
Mail: info@dometic.ae
UNITED STATES OF AMERICA
Dometic Marine Division
2000 N. Andrews Ave. Extension
Pompano Beach, FL 33069 USA
+19549732477
+19549794414
Mail: marinesales@domaticusa.com