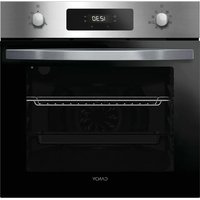
CCG6503PW - Cooker CANDY - Free user manual and instructions
Find the device manual for free CCG6503PW CANDY in PDF.
Questions des utilisateurs sur CCG6503PW CANDY
0 question sur cet appareil. Repondez a celles que vous connaissez ou posez la votre.
Poser une nouvelle question sur cet appareil
Download the instructions for your Cooker in PDF format for free! Find your manual CCG6503PW - CANDY and take your electronic device back in hand. On this page are published all the documents necessary for the use of your device. CCG6503PW by CANDY.
USER MANUAL CCG6503PW CANDY
WARNING: The appliance and its accessible parts become hot during use. Care should be taken to avoid touching heating elements.
- Children under 8 Year of age must be kept away from the appliance unless they are continuously supervised.
- This appliance can be used by children aged from 8 years and above and persons with reduced physical, sensory or mental capabilities or lack of experience and knowledge if they have been given supervision or instruction concerning use of the appliance in a safe way and understand the hazards involved.
Children must not play with the appliance. - Cleaning and user maintenance shall not be made by children without supervision.
WARNING: Unattended cooking on a hob with fat or oil can be dangerous and may result in fire.
NEVER try to extinguish a fire with water, but switch off the appliance and then cover flame e.g. with a lid or a fire blanket.
WARNING: Danger of fire: do not store items on the cooking surfaces.
- During use the appliance becomes hot. Care should be taken to avoid touching heating elements inside the oven.
WARNING: Accessible parts may become hot during use. Young children must be kept away. - Do not use harsh abrasive cleaners or sharp metal scrapers to clean the oven door glass since they can scratch the surface, which may result in shattering of the glass.
- The internal bottom surface of the drawer can get hot.
- The oven must be switched off before removing the guard, after cleaning, the guard must be replaced in accordance with the instructions.
- Only use the temperature probe recommended for this oven.
- Do not use a steam cleaner for cleaning operations
- Any spillage should be removed from the lid before opening.
- The hob surface must be allowed to cool down before closing the lid.
WARNING: Avoid possibility of electric shock - ensure the appliance is switched off before replacing the lamp.
- If the range is placed on a base, measures must to be taken to prevent the appliance slipping off the base.
- A mean for disconnection from the supply mains having a contact separation in all poles that provide full disconnection under overvoltage category III conditions, must be incorporated in the fixing wiring in accordance with the wiring rules.
- The instructions state the type of cord to be used, taking into account the temperature of the rear surface of the appliance.
- If the supply cord is damaged, it must be replaced by a special cord or assembly available from the manufacturer or its service agent.
CAUTION: In order to avoid a hazard due to inadvertent resetting of the thermal cutout, this appliance must not be supplied through an external switching device, such as a timer, or connected to a circuit that is regularly switched on and off by the utility.
- This appliance must be installed in accordance with the regulations in force and only used in a well ventilated space. Read the instructions before installing or using this appliance.
- These instructions are only valid if the country symbol appears on the appliance. If the symbol does not appear on the appliance, it is necessary to refer to the technical instructions which will provide the necessary instructions concerning modification of the appliance to the conditions of use of the country".
- Prior to installation, ensure that the local distribution conditions (nature of the gas and gas pressure) and the adjustment of the appliance are compatible.
- The adjustment conditions for this appliance are stated on the label (or data plate).
- This appliance is not connected to a combustion products evacuation device. It shall be installed and connected in accordance with current installation regulations. Particular attention shall be given to the relevant requirements regarding ventilation.
- The use of a gas cooking appliance results in the production of heat and moisture in the room in which it is installed. Ensure that the kitchen is well ventilated: keep natural ventilation holes open or install a mechanical ventilation device (mechanical extractor hood). Prolonged intensive use of the appliance may call for additional ventilation, for example opening of a window, or more effective ventilation, for example increasing the level of mechanical ventilation where present.
CAUTION: Accessible parts may be hot when the grill is in use. Young children must be kept away.
- WARNING: In order to prevent tipping of the appliance, stabilizing means must be installed. Please refer to the instructions on page 142 of this manual
1. GENERAL WARNINGS
Thank you for choosing one of our products. To get the most out of your cooker we recommend that you:
- Read the notes in this manual carefully: they contain important instructions on how to install, use and service this cooker in safety. Keep this booklet in a safe place for easy, future reference.
- In the case of the sale or transfer of the appliance, this manual should be given together with the appliance in order to guarantee the proper transfer of the information on installation/usage of the appliance and the relative warnings. When the cooker is first switched on it may give off acrid smelling fumes—this smoke is harmless—we suggest to operate the cookers for 2 hours while empty.
1.1. SYMBOLS USED IN THIS USER MANUAL
For easier comprehension, the symbols below are used in this user manual.

Safety Information
Information for Environment Protection
This appliance complies with the EU E.E.C directives.
Caution, possibility of tilting.
Anti-tip restraints.
1.2. DECLARATION OF COMPLIANCE
All parts of this appliance that may come into contact with foodstuffs comply with the provisions of EEC Directive 89/109. The appliance complies with European Directives 73/23/EEC, 89/336/EEC and 90/396/EEC, replaced by 2006/EC, 2004/108/EC and 2003/55/EC, and subsequent amendments. The appliance also complies with 93/68 General Directives and subsequent amendments.
1.3. SAFETY HINTS
- The cooker must be used only for the purpose for which it was designed: it must only be used for cooking food. Any other use, e.g. as a form of heating, is improper use of the cooker and is therefore dangerous.
- The manufacturers cannot be held responsible for any damage caused by improper, incorrect or unreasonable use.
- When using any electrical appliance you must follow a few basic rules. If the appliance breaks down or develops a fault switch it off, disconnect it from mains, do not touch it, call the authorised Service.
- Always use gloves to remove food from the oven.
- Always keep your appliance clean, for safety and health reasons. Fat and food residues may cause fire.
- Any spillage should be removed from the lid before opening.
- The hob surface should be allowed to cool down before closing the lid.
- Do not insert your hand between oven and the upper lid hinges. Keep children away.
- Make sure that all the knobs are in the OFF position when the appliance is not in use.
- The oven drawer is to store empty trays or to keep food warm.
- Do not put flammable, explosive or cleaning materials like nylon bags, paper, cloths, etc, into the drawer.
- Use only heat resistant pots and pans. Do not use flammable materials.
- It is dangerous to modify or to attempt to modify the properties of the appliance.
- Particular attention is necessary when you are frying: do not leave the appliance unattended.
The appliance is heavy. Take care when moving. - The emission of hot air is normal while the appliance is working. Do not close the vents on the oven.
-
Some spillage on the appliance may occur, when placing food on or into the appliance or when removing food with excess fat or water. Clean such residues immediately after cooking, in order to prevent unpleasant smells and possible fires.
-
Either reduce the flame or shut down the burners, before removing pans.
- WARNING! Heat and humidity are produced in the area where appliances which burn gaseous fuels are used. Special attention must be paid for correct aeration of the environment: if natura ventilation is inconsistent or insufficient, an extractor fan must be installed. If in doubt, please apply to a GIAS Service for advice.
- When using any electrical appliance you must follow a few basic rules:
It is not generally a good idea to use adapters, multiple sockets for several plugs and cable extension.
Do not pull the power cable to remove the plug from the socket.
Do not touch the oven with wet or damp hands or feet.
If the main cable is damaged it must be replaced promptly:
When replacing the cable, follow the instructions given below:
Cable replacement must be carried out by qualified technicians. Use only an approved service centre for repairs end ensure that only original parts are used.
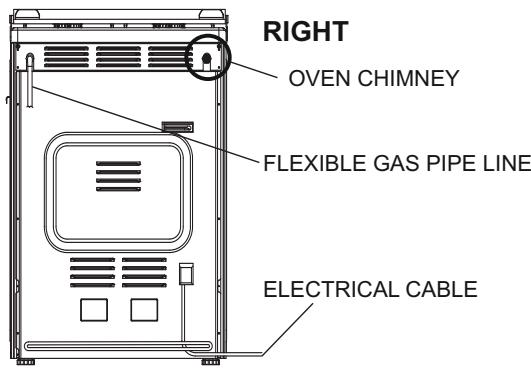
*When necessary, remove the power cable and replace it with one of the H05RR-F, H05VVF, and H05V2V2-F type. The cable have the capacity for the electrical current required by the product. - Check the flexible gas connection pipe periodically.
- The gas inlet hose must be kept away from the hot parts of the oven and must not come into contact with the oven. You can move the gas inlet connector to the left or to the right of the oven. After such a modification, check for possible gas leakage with a soapy solution.
- After attaching the gas pipe to the connector, anchor it firmly with a clamp. Particular attention must be paid for gas leakage: check with a soapy solution.
- Do not leave the appliance unattended before it has cooled down.

If the above instructions are not adhered to, the manufacturer cannot guarantee the safety of the cooker.
1.4. USEFUL TIPS
- All lids, enamelled or glass surfaces can be disassembled for easy cleaning.
If your appliance has a top lid, it is designed for either protecting the cook top against dust when it is not functioning or to prevent against oil spillage during cooking. -
Do not use the lid for other purposes.
-
ATTENTION! (For models with glass lid) The glass lid can break if it is exposed an excessive heat. Always check that the burners are off before closing the lid.
- Do not use deformed or unbalanced pans.
- Clean the grill and the fat collecting tray carefully before initial usage.
- When using cleaning sprays, do not spray on heaters or on the thermostat.
Make sure that oven shelves are correctly placed.
Light the burner before placing the pan on top for quicker ignition. - Check the burner for a normal flame.
- Do not cover oven parts with aluminium foil.
2. INSTALLATION
Installation have to be made by qualified personnel. The manufacturer have no obligation to carry this out. If the assistance of the manufacturer is required to rectify faults arising from incorrect installation, this assistance is not covered by the guarantee.
The installation instructions for professionally qualified personnel must be followed. Incorrect installation may cause harm or injury to people, animals or belongings. The manufacturer cannot be held responsible for such harm or injury.
WARNING! Care must be taken regarding where the appliance is placed! It can only be installed in a continuously ventilated room.
Electrical connections must always be disconnected before any repair, installation or modification.
The use of a gas cooking appliance results in the production of heat and moisture in the room in which it is installed. Ensure that the kitchen is well ventilated: keep natural ventilation holes open or install a mechanical ventilation device (mechanical extractor hood). Prolonged intensive use of the appliance may call for additional ventilation, for example opening of a window, or more effective ventilation, for example increasing the level of mechanical ventilation where present.
- Before positioning your appliance, check the properties of the energy supply (gas type, gas pressure) and make sure that your appliance is regulated accordingly.
- This appliance must not be connected to the exhaust system of any equipment running on other fuel.
- The appliance must not be installed near flammable materials (e.g. furniture, curtains, etc.)
-
If the range is placed on a base, measures have to be taken to prevent the appliance slipping from the base.
-
This grill(s) should be constructed so that it cannot be closed from either side and positioned preferably near the floor. Grill(s) must not be placed across the channels through which combustion gases and exhausted fumes pass.
-
If it is impossible to install grilled air vents in the room where the appliance is installed, the air needed can also be supplied from an adjacent room providing it is not a bedroom or a room where an air current could cause danger.
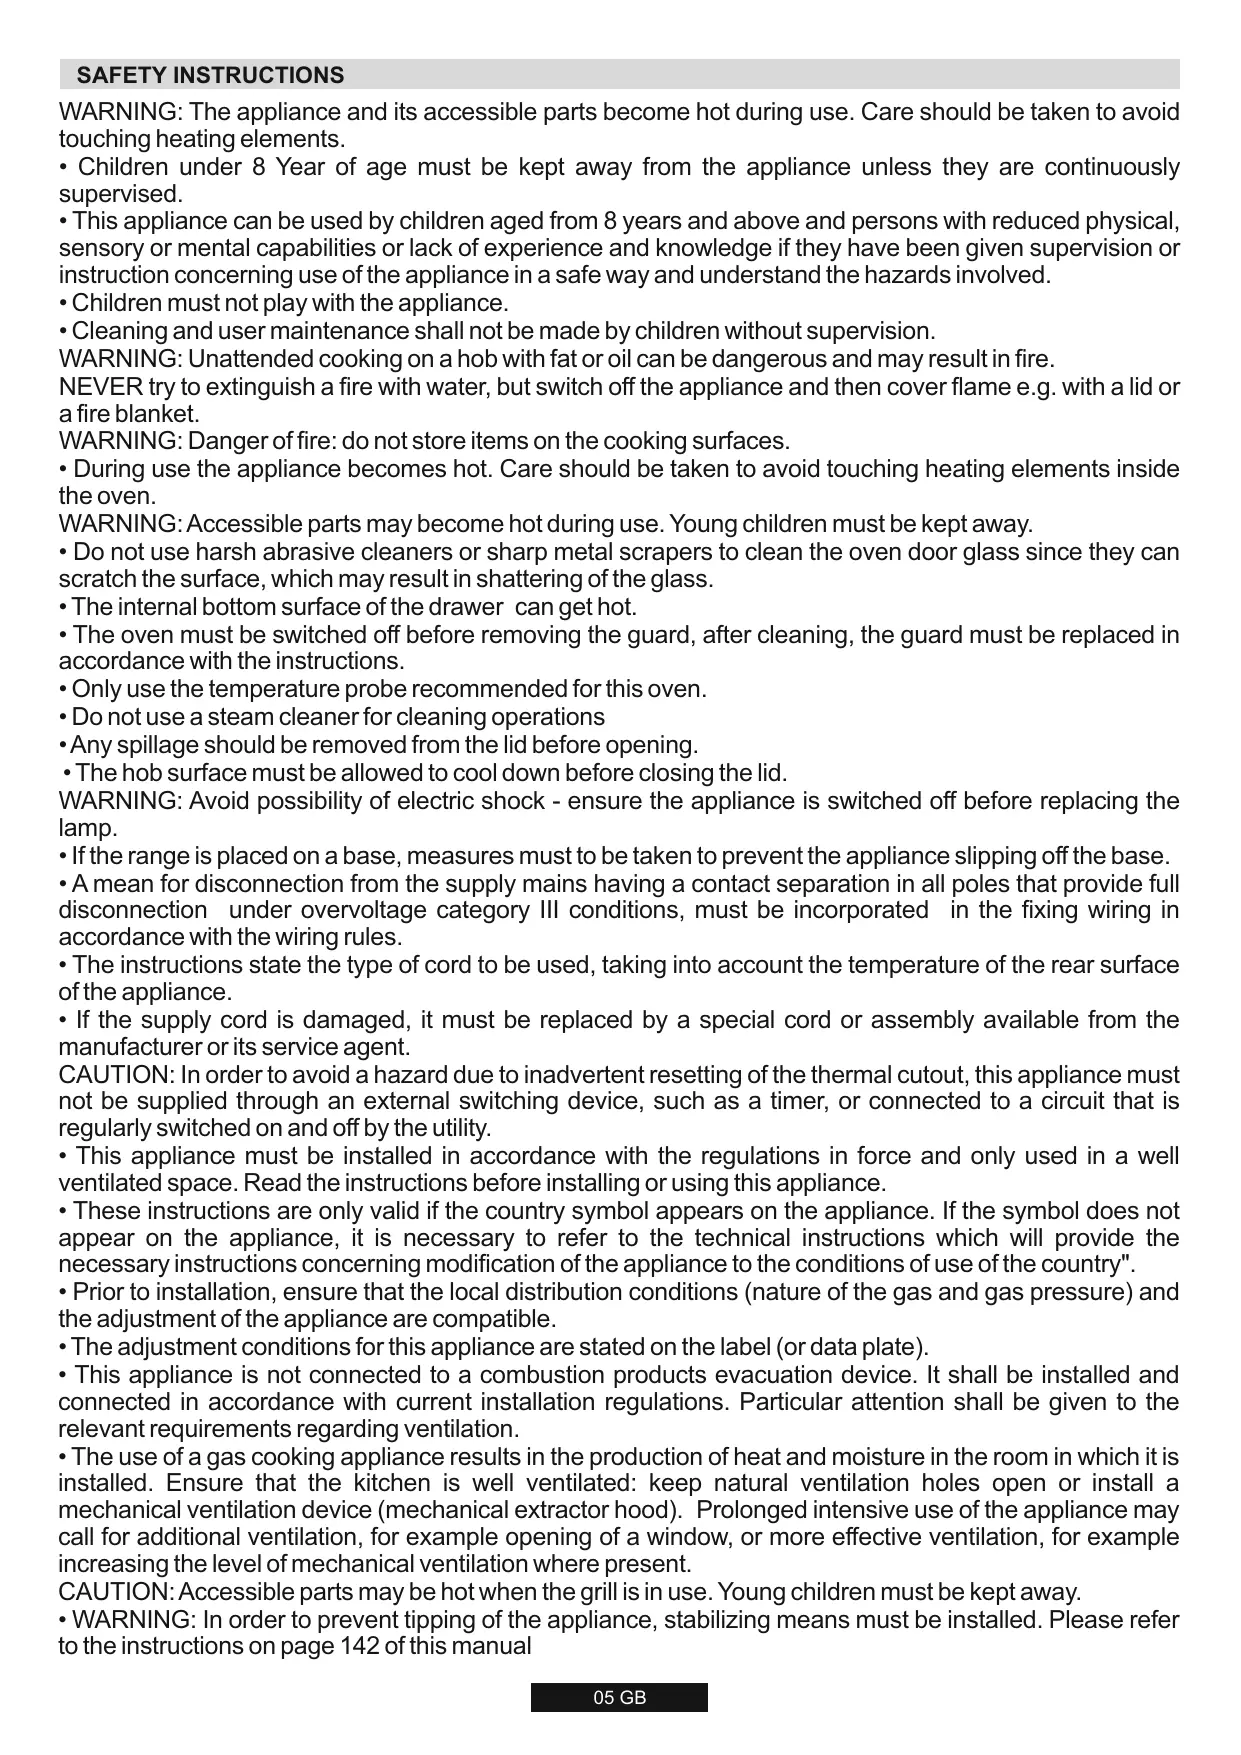
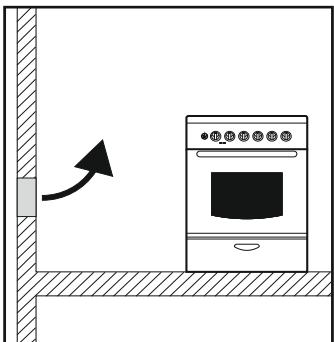
2.2. POSITIONING
The appliance has been designed on the presumption that the adjacent work tops will be no higher than the cook top surface.
2.1. ENVIRONMENT THE APPLIANCE SHOULD BE PLACED
- The appliance must not be placed on a base
- There must be sufficient natural air ventilation in the room for gas combustion for the appliance to function correctly.
- The air flow should enter through grilled air vents in the outer walls.
- Air grills must have a cross section of 100cm^2 for the passage of air and for appliances with a flame safety device. For appliances with no flame safety device, this cross section should be 200cm^2 . (Single or multiple grills can be used)
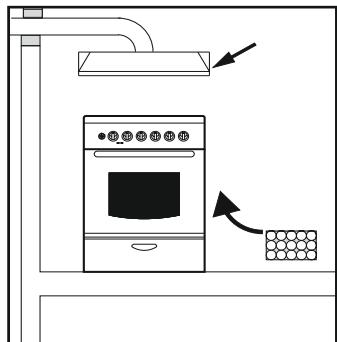
Emission of Combustion Gases
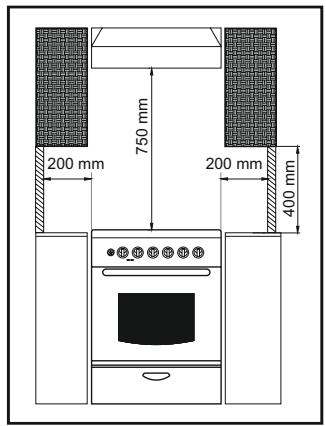
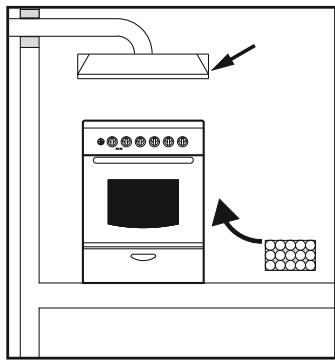
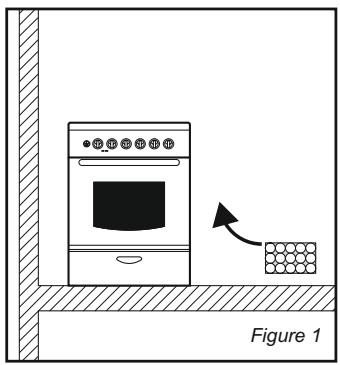
- Combustion gases from cooking appliances must be released directly out of doors or via a hood connected to a chimney or flue (Figure 1)
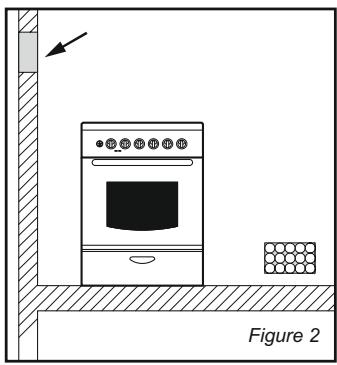
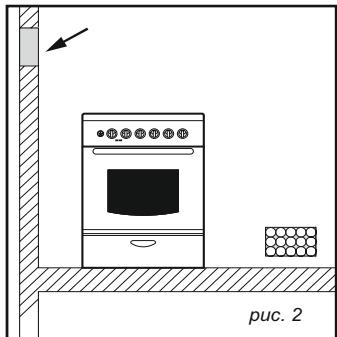
- If it is impossible to install a hood, an electric extraction fan should be fitted in a wall or a window opening out of doors (Figure 2)
- Extractor fans should have a capacity of replacing kitchen air 3-5 times per hour.
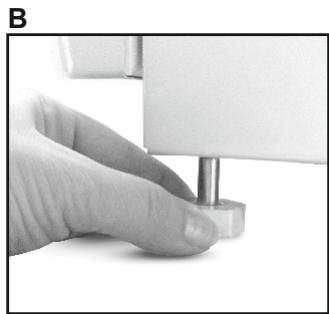
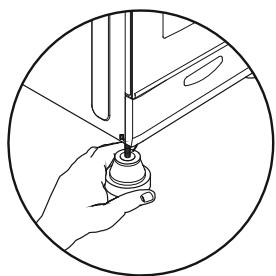
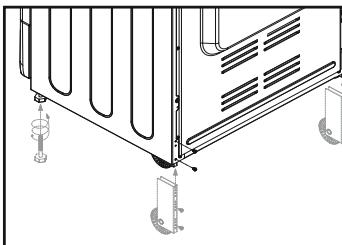
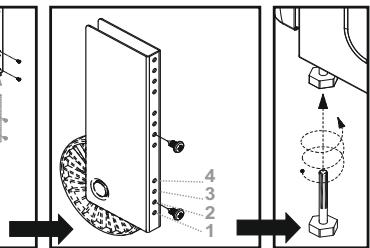
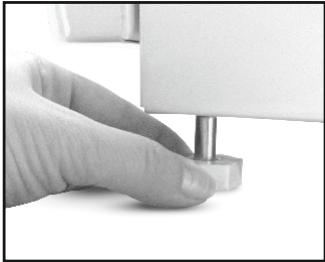
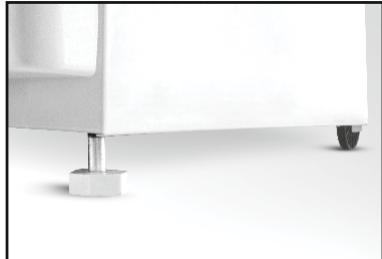
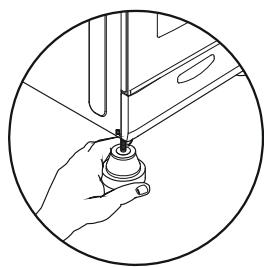
2.3. FEET ADJUSTMENT
Your appliance has adjustable feet at the lower corners of its chassis.
- The feet can be adjusted individually with the aid of a wrench to guarantee that the oven is perfectly balanced and levelled, so that any liquids in the pans is horizontal.
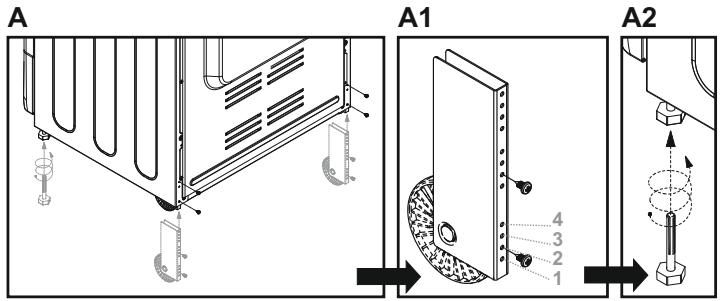
Adjustable feet and wheels.
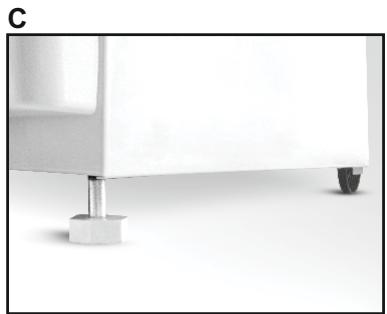
- The maximum height of cooker will be 868mm by fixing the adjustable front feet and rear wheels to the 4th hole.
- Rear wheels should be fixed to the 2nd hole (picture A1), standard height. Thus, standard height will be 850 ~mm .
Adjustable feet.
2.4. ELECTRICAL CONNECTION
Cookers can be presented with or without energy cable. Cable connection should be done by Autorited service according to following instructions.
The electrical connection must be made according to the standards and regulations in force. Before making the electrical connection, check the following:
- Is the capacity of the electrical connections and safety fuses in the building sufficient to cope with the load of the appliance? (Check with the adhesive info label)
- Does the electricity supply line have an earth connection conforming with the standards in force? A proper earth connection must exist in your home. If there is not a proper earth connection at your home, please apply to an authorized technician to deal with this problem.
- Is the socket or the multi-pole switch at a easily reachable point after the installation of the appliance?
- A plug conforming to standards should be connected to the mains cable and the cable should be inserted into a safe socket.
- A multi-pole switch must be used between the appliance and the electricity line if a direct electrical connection to the appliance is required. (It must comply with standards and be appropriate for the load)
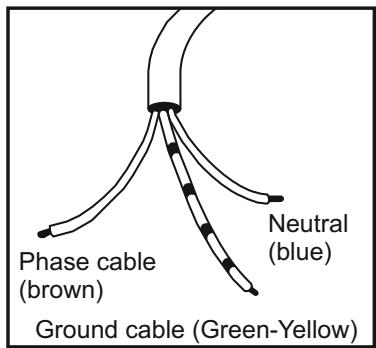
The green-yellow ground cable must not be interrupted by a switch. The brown phase cable (from the "L" coded connector of the oven) must always be connected to the phase line of the mains.
- The power line must be positioned so that it is not exposed to temperatures higher than 50^ .
- When the power cable must be changed, a cable with a cross section appropriate to the indicated power must be used. The green-yellow ground cable should be approximately 2 cm longer than phase and neutral cables.
- Check the heaters by switching them on for 3 minutes, after having completed the connection.
- The manufacturer will not accept responsibility for damages arising due to non-compliance with the safety standards.
- For the direct connection to the fixed wiring, it's necessary to provide means for disconnection from the supply mains having a contact separation in all poles that provide full disconnection under overvoltage category III conditions, in accordance with the wiring rules
2.5. COOKERS WITH ENERGY CABLE
- Connection is exclusively envisaged under tensions of 220-240V Between phases or between phases and neutral.
- The eventual replacement of the supply cord must be carried on by the After Sales Service or by an agreed engineer, with a cord whose characteristics must be similar to the original one
Ratings/Supply Cable Sections:
| Model rated power (kW) | Rated Voltage (V) | Rated Current (A) | Supply Cable |
| 2.3 kW | 220 - 240 V | 9.1 A | 3 x 1.0 mm² |
| 3.5 kW | 220 - 240 V | 15.9 A | 3 x 1.5 mm² |
| 4.0 kW | 220 - 240 V | 18.2 A | 3 x 2.5 mm² |
2.6. GAS CONNECTION
The gas must be connected to the appliance according to standard and the provisions in force.
- When the appliance left the factory, it was regulated for the gas type stated on the adhesive info label near the gas inlet at the back of the appliance.
Make sure that you are using the gas stated on the label. If it is a different type of gas, follow the instructions in the chapter on conversion to different gas types'.
- Make sure that gas supply pressure is that given in the gas type category table (Last 3 pages in this user manual) in order to achieve maximum efficiency and lowest consumption. If the gas pressure is different, a proper gas regulator should be used on the gas inlet. The use of a gas regulator complying with the standards for LPG is allowed.
Connection with a Solid or Flexible Metal Pipe
- The gas supply can be connected by a proper flexible stainless steel pipe according to the safety standards in force. In this case, there will be no further need to move the appliance. The gas inlet connector of the appliance is Gc 1/2 .
Connection with a Flexible Non-metallic Pipe
- If the gas connection is in a position where it can be switched on and off when required, a flexible pipe complying with the standards in force can be used. The flexible pipe must be firmly fixed with a clamp.
The flexible pipe can be connected as follows:
- Since the flexible pipe will be placed behind the oven, it should be exposed to temperatures no higher than 30^ at any point.
The length should be no longer than 150~cm
- It must not be exposed to steam.
- No folding, bending or tension is allowed.
- It should be protected against sharp or piercing objects.
- It must be accessible in order to allow for periodic inspection.
- The flexible pipe must be checked as follows to guard against wear over time:
- Check that there are no cracks, cuts or burned spots on or at the ends of the pipe.
- The material must maintain its flexibility. Excessive rigidity is not allowed.
- There must be no rust on the clamps.
- It should be replaced in any case after no more than 5 years' usage.


Check all connections for leaks with a soapy substance after the installation is completed. Do not use a flame for to check gas leaks.
2.7. CONVERSION FOR DIFFERENT GAS TYPES
For the cookers below written adjustment have to be done by qualified technician.
Follow the steps given below to convert the appliance from the factory set up to that for a different gas type.
Cookers are adjusted NG and connection type is cylindric (1). For hose type NG connection, hose adapter (2) can be fixed to cylindrical adapter with seal.
For LPG connection, LPG hose adapter (3) can be fixed to cylindric adapter with seal.
Adjustments and changing injectors
Changing Injectors
- Remove grates.
- Remove burner caps and burners.
- Remove injectors by using a 7 mm wrench, then screw on the correct injector selected from gas type category table
(last 3 pages in this user manual) according to the gas to be used.
- Follow the above steps in the reverse order after completing the assembly of the new injector.
Stand by Adjustment
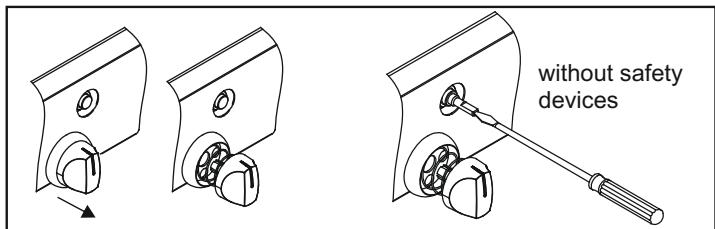
Stand by adjustment for the cookers without safety devices and with safety ingition
- Turn the burner control knob to the small flame position and remove the knob.
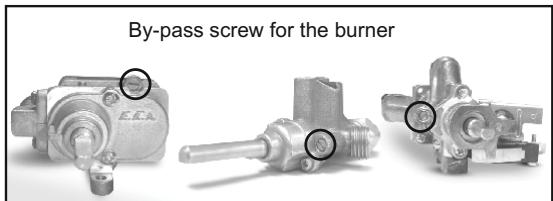
- If conversion from natural gas to LPG is required, turn clockwise the by-pass screw of the gas valves with a screw driver to their final position.
- If conversion from LPG to natural gas is required, turn anti-clockwise the by-pass screw of the gas valves with a screw driver till a smaller flame of 1/4 size is obtained.
After completing the adjustment, insert the knobs again.
- Check the adjustment by turning the burner control knob quickly from maximum to minimum position. If the flame does not go out, it means that the adjustment is correct.
- For safety devices, idle flame setting can be done with screw on valve body. If there is ignition on the knob for idle flame setting cooktop, toplid and panel must be removed.
- For thermostat valve idle frame setting cooktop, top lid and panel must be removed.
Gas Oven
- Remove rear cover (Figure3)
- Remove injector adapter.(Figure 4)
- Remove injectors by using a 7 mm wrench, then screw on the correct injector selected from gas type category table (last 3 pages in this user manual) according to the gas to be used. (Figure 5)
- Follow the above steps in the reverse order after completing the assembly of the new injector.
- Burner Gap is 4.5 0.3 ~mm for NG and LPG (Figure 6)
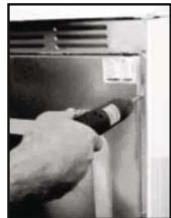
Figure3
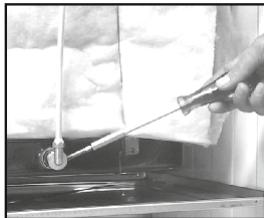
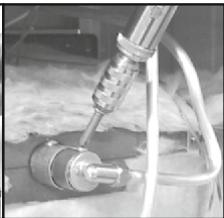
Figure4
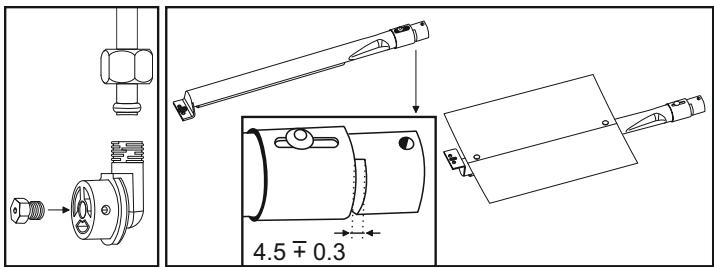
Figure5
Figure6
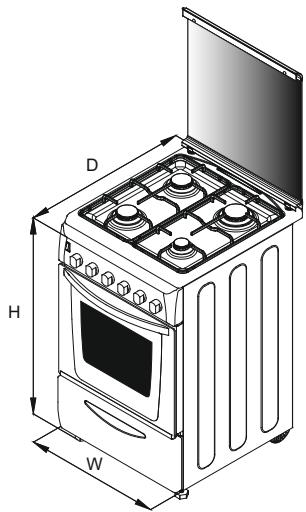
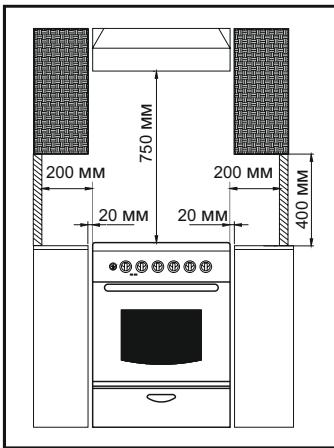
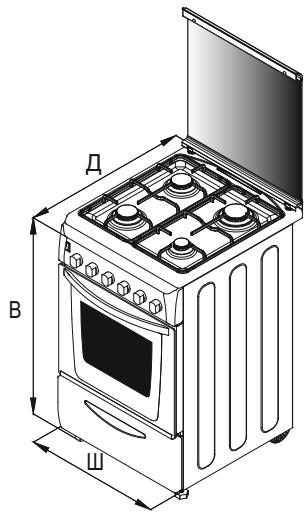
2.8. DIMENSIONS OF THE APPLIANCE
| 50 x 60 | 60 x 60 | |
| Height (mm) | 863 | 850 |
| Width (mm) | 510 | 598-600 |
| Depth (mm) | 600 | 600 |
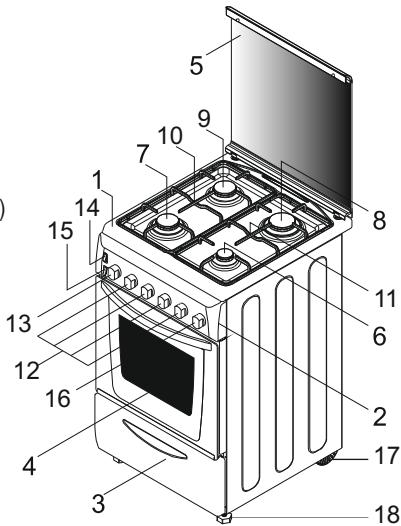
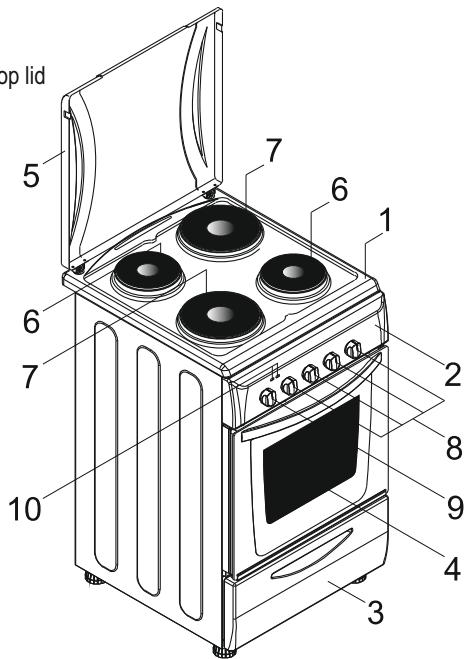
2.9. GENERAL APPEARANCE AND DEFINITION OF THE APPLIANCE
This User Manual has been drawn up as a guide for several models. Some of the properties mentioned in this manual may not exist in your appliance.
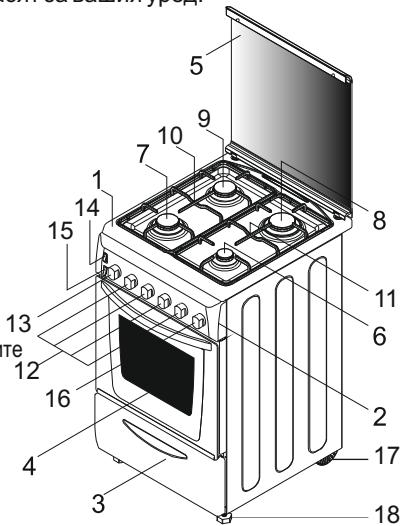
1-Cook top
2- Control panel
3-Drawer
4-Oven door (Front door)
5- Glass top lid or metallic top lid
6-Auxiliary burner
7-Rapid burner (Semi-Rapid burner)
8- Ultra rapid burner (Rapid burner)
9-Semi-Rapid burner
10-Left grate
11-Right grate
12-Burners control knobs
13- Thermostat oven knob
14- Ignition button or fan button
15-Lamp knob
16-Timer knob
17-Moving Foot (Adjustable Feet)
18-Bolt Foo t(Adjustable Feet)
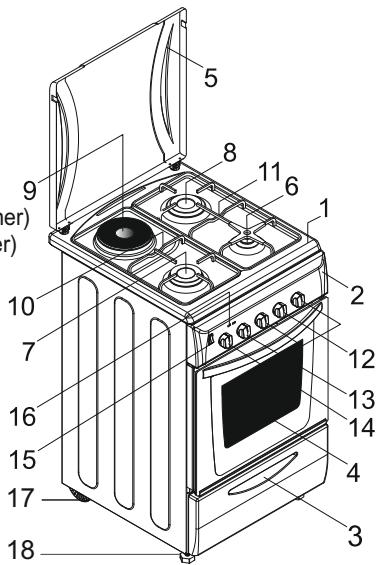
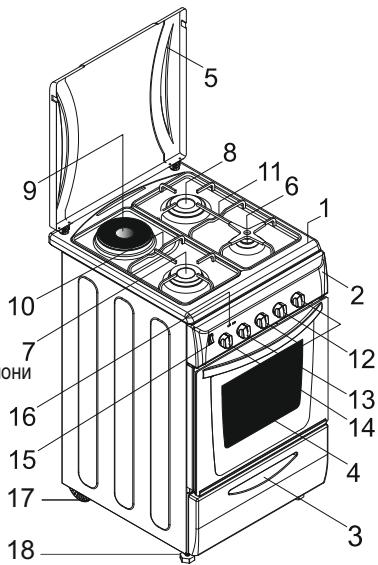
1-Cook top
2- Control panel
3-Drawer
4-Oven door (Front door)
5-Metallic top lid or Glass top lid
6-Auxiliary burner
7-Rapid burner (Semi-Rapid burner
8- Ultra rapid burner (Rapid burner)
9- Hot plate
10-Leftgrade
11-Right grate
12-Burners control knobs
13- Hot plate control knob
14-Thermostat oven knob
15- Ignition button or fan button
16- Signal lamp
17-Moving Foot (Adjustable Feet)
18-Bolt Foot (Adjustable Feet)
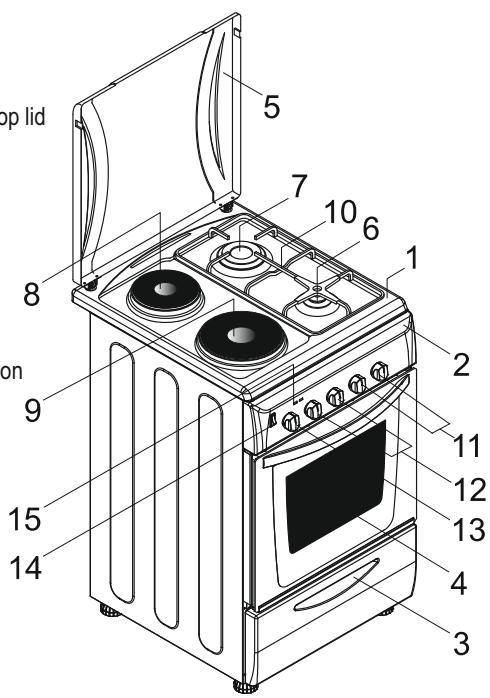
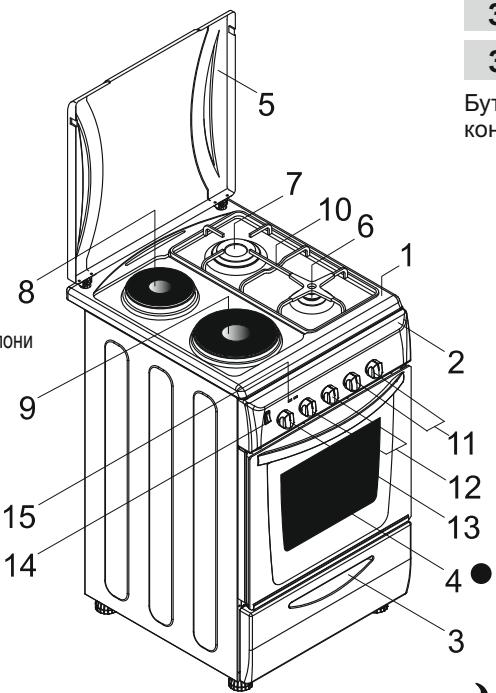
1-Cook top
2- Control panel
3-Drawer
4-Oven door (Front door)
5-Metallic top lid or Glass top lid
6-Auxiliary burner
7-Rapid burner
8-Hot plate
9-Hot plate
10-Right grate
11-Burners control knobs
12-Hot plates control knobs
13- Thermostat oven knob
14-Ignition button or fan button
15- Signal lamp
1-Cook top
2- Control panel
3-Drawer
4-Oven door (Front door)
5-Metallic top lid or Glass top lid
6-Hot plate
7-Hot plate
8- Hot plate control knobs
9-Thermostat oven knob
10- Signal lamp
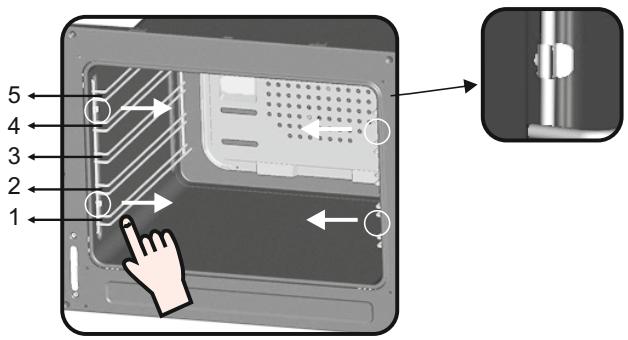
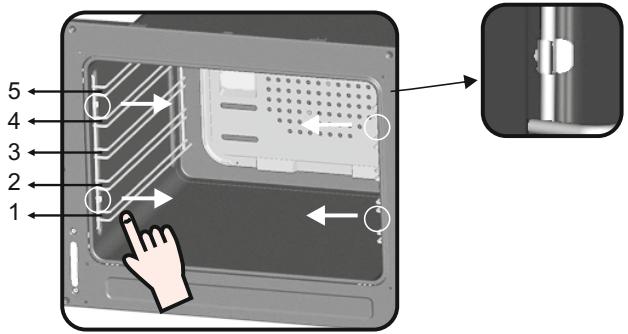
REMOVING AND CLEANING WIRE RACKS
1- Remove the wire racks by pulling them in the direction of the arrows (see below)
2- To clean the wire racks either put them in the dishwasher or use a wet sponge, ensuring that they are dried afterwards.
3-After the cleaning process install the wire racks in reverse order.
3. USE OF COOKTOP BURNERS
The knobs which control the burners are positioned on the control panel.
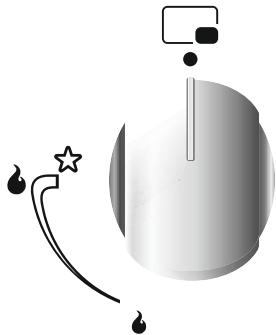
Figure 7
Off Position
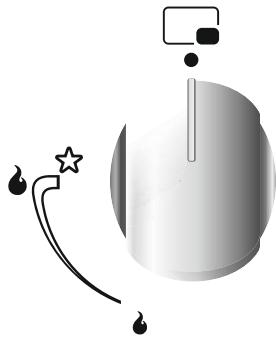
When the knob is turned so that the 'dot' symbol faces towards the panel, it is in the Off position and the gas valve is closed and the flame will go out.
Maximum Gas Flow
Press the burner knob and turn it to the left till the 'dot' symbol faces towards the large flame symbol.
The flame is on full at this position.
In this position, the gas valve is completely open.
Minimum Gas Flow
The flame can be decreased by turning the knob so that the 'dot' symbol faces towards the small flame symbol. The valve will be partially open and the burner will then be on low.
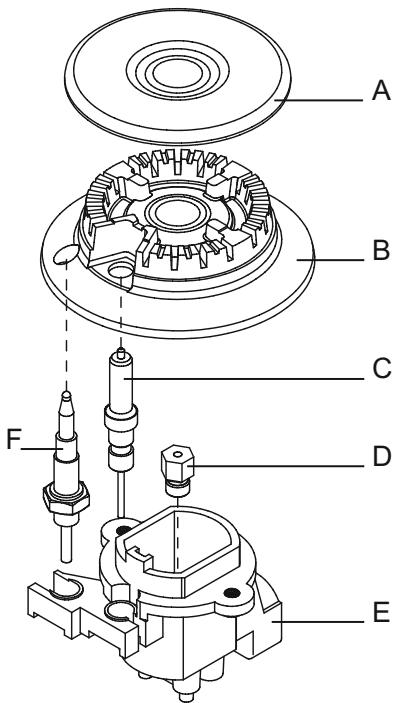
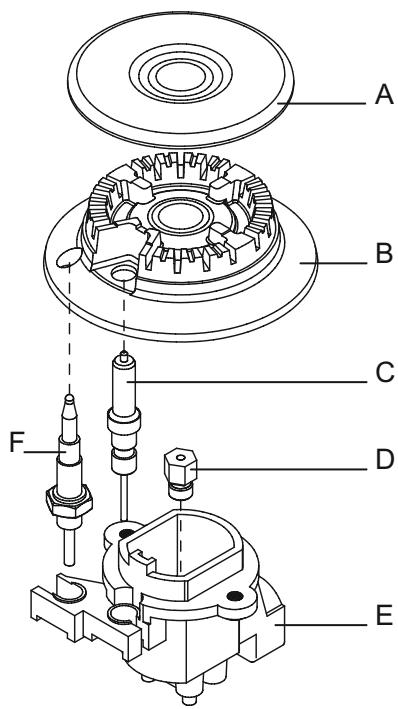
A - Burner Lid
B-Burner
C - Electrode
D - Injector ( Jet )
E - Burner body
F - Safety device
Ignition of the Burners
Cooktop Gas Burners
The burner must be ignited before a pan is placed over it.
For models with automatic ignition, the 'spark' button must be pressed. Press the knob controlling the burner you want to ignite and then turn it left to the big flame symbol. Press the ignition button. On models with ignition-thru knobs, press and turn the knob controlling the burner you want to ignite as far as the star symbol; the electrode will be automatically activated. All the electrodes will be activated automatically and the burner to which gas is supplied (that relative to the knob pressed) will ignite.
Oven Gas Burners
The button must not be kept pressed down for more than 15 sec. If the burner has not ignited after 15 sec. release the button and open the compartment door and/or wait at least 1 min. before attempting again. For other models the gas is ignited by means of the control knobs.

Figure 8
Make sure that the gas is actually burning after this step! If there is no flame, repeat the procedure
After ignition, adjust the flame to the size required.
Manual ignition (if the electricity supply is not available)
Hold a flame (a match or a lit taper or a hand-operated gas lighter), near the burner.
WARNING! to wait 1 minute between two ignition tentative.
Press and turn the knob of the burner you want to ignite as far as the large flame symbol. If the burner does not catch fire at the first attempt, try again pressing the knob a little longer. When the burner is lit, adjust the flame to the required level.
If the burner does not light after several attempts, check the correct position of the burner and its cap.
Turn the knob clockwise to the "O" position in order to close the gas flow. If the burner accidentally stops burning, wait at least one minute before attempting to relight it.
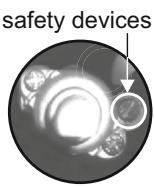
Some cookers have a flame safety device (see the picture above, safety device F). If the flame goes out, the gas supply is automatically cut off.
Minimum and maximum diameters of the cooking pan bases :
| Burner | Min. Diameter [mm] | Max. Diameter [mm] |
| Large Burner | Ø 240 mm | Ø 280 mm |
| Mid - size Burner | Ø 180 mm | Ø 240 mm |
| Small - size Burner | Ø 120 mm | Ø 180 mm |
| Ultra rapid Burner | Ø 240 mm | Ø 280 mm |
- The outer surface of the flame is hotter than the inner part. The tips of the flames must touch the bottom of the pan. Flames extending outside the pan cause unnecessary gas consumption.
- Gas burners, unlike the electrical hot plates, do not need flat bottomed pans. Flames touching the base of the pan conduct the heat completely.
- Although there is no need for special pans for gas burners, pans made of thinner material conduct the heat faster than those in thicker material.
- Some parts of the food may be heated while others remain cold due to the uneven distribution of heat under the pan. Therefore, continuous stirring of the food being cooked is necessary in the case of thin-bottomed pans. Heat is more effectively and evenly distributed with thick-based pans.
- Use of very small pans is not recommended. Wider, low-sided pans are more suitable for more effective and quicker cooking than small, deep pans.
- You cannot shorten cooking time by using a small pan over a large burner. You will only waste gas in this way. However, a pan with a lid will save energy.
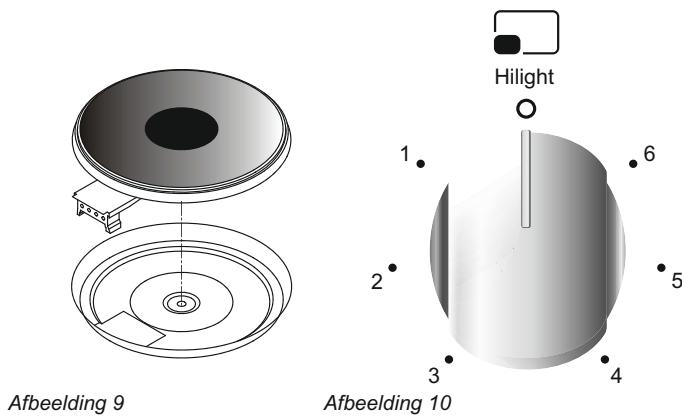
3.2. USE OF COOKTOP ELECTRICAL PLATES
Turn the knob to the position for the required temperature of the hot plate. The indicator light of the hot plate will come on and the hot plate will start to heat.
When cooking is completed, turn the knob to the "O" position. Do not leave the hot plate turned on without a pan on it. The diameter and the base of the pan you use is critical. The minimum diameter of the pan base is 14cm and the base should be flat.
Leave the hot plate to heat up for 5 minutes before placing a pan on it the first time you use it. This will allow the heat resistant coating of the plate to harden due to burning.
Use a wet cloth and detergent for cleaning the hot plates. Do not remove food residues from the hot plates with a knife or any other hard, sharp object.
Turn on the hot plate for a few moments to dry it after cleaning. However, it must never be left on for more than a few moments without a pan on top.
Figure 9
Figure 10
| Position | Power (Watt) | Power (Watt) | Power (Watt) | Explanation | |||
| 0 | 0 | 0 | 0 | Off | |||
| 1 | 100 W | 135 W | 175 W | Heating | |||
| 2 | 180 W | 220 W | 220 W | Cooking at low temperature | |||
| 3 | 250 W | 300 W | 300 W | Cooking at low temperature | |||
| 4 | 500 W | 850 W | 850 W | Cooking, Roasting, Boiling | |||
| 5 | 750 W | 1150 W | 1150 W | Cooking, Roasting, Boiling | |||
| 6 | 1000 W | 1500 W | 2000 W | Cooking, Roasting, Boiling | |||
Suitability of Cooking Pans
Keep in mind that larger pans have larger heating surfaces.
This will help them to cook the food faster than pans with smaller heating surfaces.
Always use pan sizes proportionate to the amount of the food to be cooked. In order to prevent splashing, do not use very small pans, especially for foods with excess liquid. If you use excessively large pans for quick cooked foods, sausages and liquids will stick and residues will remain attached to the pan after being emptied.
Closed pans and baking trays or moulds are suggested for cooking sweets. Splashed sugar and juices from an open pan may stick to the cooker surface and will be difficult to remove.

Figure 11
Figure 12
This is especially important for pans used for roasting or pressurized cooking at high temperature.
Do not leave burners unattended without a pan or with an empty pan on top.
Check the suitability of cooking pans with respect to the following criteria;
They should be heavy.
They should completely cover the burner surface; they may be a little bigger but no smaller.
Base surfaces should be completely flat and fit well on the cooking surface.
- For the best use of the electric hotplates and to minimize energy consumption, only pans with smooth flat bases should be used. The size of the pan should be as close as possible to the diameter of the hotplate, and never smaller. The base of the pan should be dry and spillage should be avoided. Empty pans must not be left on the plates, and the plates should not be left switched on without a pan.
4.1. GRILLING
ELECTRIC GRILL: Use with closed door ONLY
GAS GRILL: It can be used with open door WITH panel protector inserted under control panel, as in picture.
Grilling gives food a rich brown colour quickly. Depending on the quantity of the food, you can switch the grill on to different positions. Almost all food can be cooked under the grill except for very lean game and meat rolls.
- Meat and fish that is going to be grilled should first be lightly doused with oil.
- Place a fat collecting tray beneath during grilling. Put some water into the tray to prevent unpleasant smells and to prevent the fat catching fire.
- Grilling is usually preferred for cooking pieces of meat, for example steaks, which are not too thick, different sized meat parts, cleaved hunted birds, fish, some vegetables (e.g. courgettes, aubergines, tomatoes, etc.) together with meat and fish products on spits.
Oil the fish lightly before putting it directly under the grill.
Add salt on meat after cooking, salt fish into the cleavage before cooking.
- The distance from the grill will depend on the thickness of the meat or fish. If the distance is correctly judged, the outer parts will not be burnt and the inside will not remain raw.
- Prevent unpleasant odours and smoke caused by dripping fats and sauces by pouring 1-2 glass of water into the fat-collecting tray.
- You can also use the grill for toasting, toasted bread or sandwiches, for example, and also to cook certain fruits (bananas, grapefruit or pineapple slices, apples etc.). However, fruit must not come into contact with the heating elements.

Never cover oven inner walls or the bottom with aluminium foil. Accumulated heat can damage the oven enamel and your meal.

While the oven functions are running, top lid of the cooktop must be open position.
4.2. ELECTRIC OVEN
| Position | Oven Function |
| F | Function |
| °C | Temperature |
| ◎ | Cooking time |
| ○ | Not in function |
| ←→ | Turn spit and grill heater |
| ○ | Lamp |
| · | Grill heater |
| ×× | Grill heater and fan |
| ×× | Fan |
| ×× | Upper heating element and fan |
| ×× | Lower heating element and fan |
| ×× | Upper heating element, lower heating element and fan |
| · | Lower and upper heating element |
| · | Upper heating element |
| · | Lower heating element |
| · | Manual |
| PIZZA | Pizza |
4.3. ELECTRIC OVEN SUGGESTIONS FOR COOKING
Traditional Cooking
Heat is generated from the upper and lower heaters. Generally, the middle shelf position is preferable for cooking. However, if the top or bottom surface of the food must be cooked more, place it on the upper or lower shelf.
Convection Cooking (with Fan)
-
The food is cooked by evenly distributed preheated air blown into the oven by the help of the fan located on the inside back wall of the oven. It is possible to cook several dishes simultaneously on different shelves thanks to the evenly distributed heat inside the oven.
-
This type of oven is also very useful for defrosting frozen food. It can also be used for sterilizing canned food, preparing fruit syrups, and dehydrating fruits and mushrooms.
4.4. COOKING PIZZA PIZZA
-
Thermostat setting at maximum
-
Preheating time 15 min (20 min if possible)
- Position of the tray in either one of the two lowest position
- Cooking time 20 min.
4.5. COOKING CAKES
- Unless otherwise suggested, preheat the oven for at least 10 minutes before use. Do not open the oven door when cooking cakes otherwise they will not rise (cakes or dishes with yeast and soufflés). The blast of cold air which will enter the oven will prevent rising. You can check whether cakes are properly cooked by inserting a rod into the dough. If the rod comes out dry when you pull it out, it means that the cake is properly cooked. Do not check in this way until at least three quarters of the cooking time has elapsed.
Please keep in mind the following tips
-
If the surface of the food is cooked well but it is still raw or partly raw inside, it must be cooked longer at a lower temperature.
-
On the other hand, if the surface of the food is too dry, it should be cooked at a higher temperature for a shorter time.
4.6. COOKING MEATS
- The minimum quantity of meat to be cooked in the oven is 1kg . Otherwise, the meat will be too dry.
If you require well done meat, use less fat. If meat has a little fat, there is no need to use oil. If one side of the meat is fatty, place this side up. The melted fat will sufficiently grease the part below. Red meats should be taken out of the fridge at least 1 hour before the cooking.
-
Otherwise the meat may become tough due to the temperature difference. Do not use salt before cooking, especially when grilling meat. Salt will draw the blood and juices out of the meat which will consequently prevent the roasting of the upper surface of the meat.
-
Add salt to roast meat only after half of the cooking time has elapsed.
-
Place the meat to be roasted in a wide, shallow pan.
-
Deep sided containers / pans act as a shield against the heat. Meat can be placed in the oven in a heat resistant pan or directly onto the grill. Insert a fat / gravy collecting tray beneath the grill. Sauces must be added at the beginning if the food is cooked for a short time, while it would be better to add sauces in the last half hour if the food is cooked for a longer time.
4.7. COOKING FISH
Small fish can be cooked at the maximum temperature from start to finish. Medium sized fish must be cooked at the maximum temperature at the beginning and then the temperature must be slowly reduced. Larger fish must be cooked at lower temperatures from start to finish. Check the cut at the bottom of fish to understand whether it is cooked properly. In order to understand whether the fish properly grilled or not, check the cleavage at the bottom of the fish. The colour (for grilled fish) should be an even matt white. This is not the case for salmon and trout.
4.8. COOKING TURN SPIT
- The cooker is equipped with a metal turnspit, two forks and a hook used to support the spit.
-Instruction for use:
-Remove all accessories from the oven;
-put the deep pan on the bottom of the oven or on the lowest bench;
-stick the turnspit through the meat, centered between the two forks
-Fix the turnspit into the drive hole located in the bottom wall, then hang
the support hook in the drive located at the top front of the oven cavity and around the edge of the turnspit
-Preheating is not necessary with the turnspit.
Cooking Time Recommended in turnspit Position
| Cooking time (min) | ||
| Type of food | Gas Oven | Electric oven |
| Beef (1kg) | 25/35 | 20/30 |
| Lamb, sheep (1kg) | 35/45 | 30/40 |
| Veal, Poultry (1kg) | 65/75 | 60/70 |
| Pork (1 kg) | 60/70 | 65/75 |
4.9. USING THE MINUTE TIMER
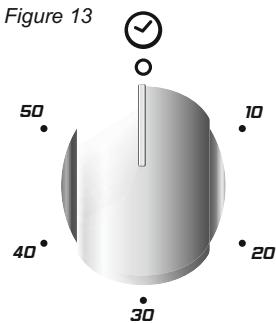
To set the cooking time, turn dial one complete revolution and then position the index to the required time. When the time has lapsed, the signal will ring for a few seconds.
4.10. USING THE END OF COOKING TIMER
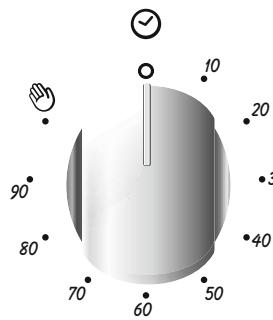
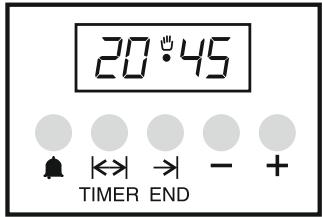
Figure 14
This control enables to set the desired cooking time (max. 90 min.) the oven will automatically switch off at the end of the set time.
The timer will count down from the set time return to the "O" position and switch off automatically.
-30 For normal use of oven set the timer to the position.
40 To set the oven ensure the timer is not on the "O" position.
4.11. GAS OVEN
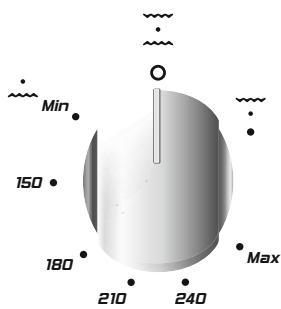
Figure 15
The oven temperature and heater can be selected by turning the oven adjustment knob to the desired temperature level. The oven thermostat range is: 140-270°C. Some cookers have flame safety device on burners. If the flame goes out, the gas supply is automatically cut off.
4.12. USE OF THE ELECTRONIC PROGRAMMER
| FUNCTION | HOW TO ACTIVE | HOW TO SWITCH IT OFF | WHAT IT DOES | WHAT IT IS FOR |
| MINUTE MINDER | •Press and hold the button▲ •Press the buttons ▼or ▲ to set the required time •Release all the buttons | •When the set time as elapsed an audible alarm is activated (this alarm will stop on its own, however it can be stopped immediately by pressing the button) □ | •Sounds an alarm at the end of the set time. •To check how long is left to run press the button▲ | •Allows to use the oven as alarm clock (could be activated either with operating the oven or with out operating the oven) |
| MANUAL FUNCTION | •Press the button □ •Set the cooking function with the oven function selector | •Turn the oven function selector to position“○” | •Enables you to operate the oven. | •For cooking the desired recipes |
| COOKING TIME | •Press and hold the TIMER button •Press the buttons or to set the lenght of cooking required •Release all buttons •Set the cooking function with the oven function selector | •When the time is elapsed the oven will switch off automatically. Should you wish to stop cooking earlier either turn the function selector to 0, or set time to 0:00(TIMER and buttons) | •It allows to preset the cooking time required for the recipe chosen. •To check how long is left to run press the TIMER button. •To alter/change the preset time press TIMER and ▲▼ buttons | •At the end of the cooking set time, the oven will switch off automatically and an audible alarm will ring. |
| END OF COOKING | •Press and hold the END button •Press the buttons ▼▲ to set the time at which you wish the oven to switch off •Release the buttons •Set the cooking function with the oven function selector | •At the time set, the oven will switch off. To switch off manually, turn the oven function selector to position “○”. | •Enables you to set the end of cooking time •To check the preset time press the END button •To modify the preset time press buttons END+ ▲▼ | •This function is typically used with “cooking time” function. For example if the dish has to be cooked for 45 minutes and needs to be ready by 12:30, simply select the required function, set the cooking time to 45 minutes and the end of cooking time to 12:30. •Cooking will start automa-tically at 11:45 (12:30 minus 45 mins) and will continue until the preset end of cooking time, when the oven will switch itself off automatically WARNING! If the END of cooking is Selected without setting the length of cooking time, the oven will start cooking Immediately and it will Stop at the END of cooking time set. |
Setting the correct time:
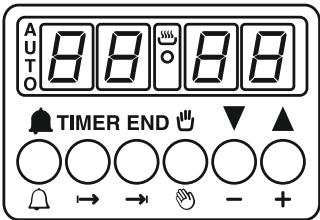
WARNING : the first operation to carry out after the oven has been installed or following the interruption of power supply (this is recognizable the display pulsating and showing ) 📁 📁 🁶 is setting the correct time. This is achieved as follows
-
Press and hold the TIMER and END buttons (▶ and |▲)
-
Set time with buttons
-
Release all buttons
ATTENTION the oven only operates if set on manual function or preset time. N.B.: on some models the symbols are replaced by + and - .
In the programming of a timer with 5 buttons, for manual function, press "TIMER" and "END" buttons simultaneously
4.13. COOKING TABLES
Traditional and Hot Air Circulation Cooking Methods; Weights (Gr) TYPE OF THE FOOD Traditional Cooking Method
| Weight (Gr) | TYPE OF THE FOOD | Traditional Cooking Method | Hot Air Circulation Method | Cooking times (Minutes) | NOTES | ||
| CAKES AND DESSERTS | Shelf Position | Tempera-ture(℃) | Shelf Position | Tempera-ture(℃) | |||
| Dough with stirred egg | 2 | 180 | 2(1and3) | 160 | 45 - 60 | ||
| Dough | 1 | 180 | 2(1and3) | 160 | 20 - 35 | ||
| Small Cakes | 2 | 180 | 2(1and3) | 160 | 20 - 30 | ||
| Cheese Cake | 1 | 175 | 2 | 150 | 60 - 80 | ||
| Apple Pie | 1 | 180 | 2(1and3) | 160 | 40 - 60 | ||
| Strudel | 2 | 175 | 2(1and3) | 150 | 60 - 80 | ||
| Jam tart | 2 | 180 | 2(1and3) | 160 | 45 - 60 | ||
| Small cakes | 2 | 180 | 2(1and3) | 160 | 15 - 25 | ||
| Biscuits | 2 | 180 | 2(1and3) | 160 | 10 - 20 | ||
| Cream cakes | 2 | 100 | 2(1and3) | 100 | 90 - 120 | ||
| BREAD AND PIZZA | |||||||
| 1000 | White Bread | 1 | 200 | 2 | 175 | 45 - 60 | |
| 500 | Rye Bread | 1 | 200 | 2 | 175 | 30 - 45 | |
| 500 | Sandwich | 2 | 200 | 2(1and3) | 175 | 20 - 35 | Inside the closed oven on dishes 8 pieces on a tray Under the grill |
| PASTRY | |||||||
| Macaroni | 2 | 200 | 2(1and3) | 175 | 40 - 50 | ||
| With vegetable | 2 | 200 | 2(1and3) | 175 | 45 - 60 | ||
| Small pastries | 2 | 200 | 2(1and3) | 175 | 35 - 45 | ||
| Lasagne | 2 | 200 | 2 | 175 | 45 - 60 | ||
| MEATS | |||||||
| 1000 | Roast beef | 2 | 200 | 2 | 175 | 50 - 70 | Cook on grill |
| 1200 | Roast pork | 2 | 200 | 2 | 175 | 100 - 130 | Cook on grill |
| 1000 | Roast veal | 2 | 200 | 2 | 175 | 90 - 120 | Cook on grill |
| 1500 | British style roast beef | 2 | 220 | 2 | 200 | 50 - 70 | Cook on grill |
| 1200 | Lamb | 2 | 200 | 2 | 175 | 110 - 130 | Leg |
| 1000 | Chicken | 2 | 200 | 2 | 175 | 60 - 80 | Full size |
| 4000 | Turkey | 2 | 200 | 2 | 175 | 210 - 240 | Full size |
| 1500 | Duck | 2 | 175 | 2 | 160 | 120 - 150 | Full size |
| 3000 | Goose | 2 | 175 | 2 | 160 | 150 - 200 | Full size |
| 1200 | Rabbit | 2 | 200 | 2 | 175 | 60 - 80 | In parts |
| FISH | |||||||
| 1000 | Whole fish | 2 | 200 | 2(1and3) | 175 | 40 - 60 | 2 Fishes |
| 800 | Fillet | 2 | 200 | 2(1and3) | 175 | 30 - 40 | 4 Fillets |
NOTE :
1) Cooking times do not include pre heating. Preheating the oven for about 10 minutes is advisable especially for cakes, pizzas and breads.
2) Indicates tray positions for cooking several dishes simultaneously.
3) All cooking operations must be carried out with oven door closed.
| FOOD TYPES | QUANTITY | COOKING ON GRILL | COOKING TIMES (Minutes) | |||
| N. OF PARTS | WEIGHT | SHELF POSITION | TEMPERATURE (℃) | UPPER SECTION | LOWER SECTION | |
| Beefsteak | 4 | 800 | 4 | max | 10 | 8 |
| Grilled cutlet | 4 | 600 | 4 | max | 12 | 8 |
| Sausage | 8 | 500 | 4 | max | 10 | 6 |
| Chicken parts | 6 | 800 | 3 | max | 30 | 20 |
| Mixed grill | 4 | 700 | 4 | max | 12 | 10 |
| Milky desserts | 4 | 400 | 4 | max | 13 | 10 |
| Tomato slices | 8 | 500 | 4 | max | 12 | -- |
| Fish fillets | 4 | 400 | 4 | max | 8 | 6 |
| Scallops | 6 | --- | 4 | max | 12 | -- |
| Toast | 4 | --- | 4 | max | 8 | -- |
| Bread slices | 4 | — | 4 | max | 2-3 | 1 |
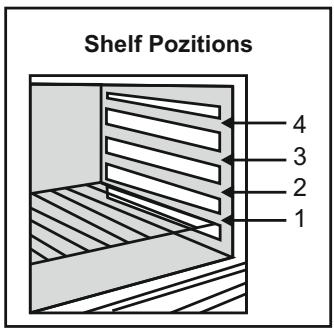
Figure 16
5. CLEANING AND MAINTENANCE
Before all cleaning and maintenance :
-
Cleaning and user maintenance shall not be made by children without supervision
-
Disconnect mains voltage.
-
Shut off the gas valve for your own safety. If the oven is adjusted to natural gas, shut off the natural gas valve.
-
If the oven is hot, wait till it has cooled down.
-
Clean enamelled surfaces with warm, soapy water or with suitable brand products. On no account use abrasive powders that may damage surfaces and ruin the appearance of the cooker.
It is very important to clean the oven each time it is used.
-
Use detergents and abrasive metal pads for the stainless steel grills.
-
The glass surfaces such as the top, the oven door and the warming compartment door must be cleaned when they are cold.
-
Damage caused by failure to respect this rule is not covered by the guarantee.
-
You can clean burners and burner caps with hot water and detergent.
Also the gas channels of the burners can be cleaned by a brush. Make sure that burners are dry before replacing them in their seats. Check correct positioning of the burner.
especially for cakes, pizzas and breads.
Periodically clean the ignition electrodes of automatic ignition ovens.
This will prevent ignition problems. Check frequently that the gas channels of burners are not blocked by food resid
-
Wipe the top lid with a dry cloth in order to prevent harmful effects of water, oil and steam generated by the cooked food.
-
Do not use abrasive products, metal cleaning pads, sharp objects, rough cloths, or chemical products and detergents that can permanently damage the catalytic lining.
-
It is a good idea to use deep roasting trays for fatty foods such as joints of meat etc. and to put a tray underneath the grill to catch surplus fat.
Cleaning of Oven Door
For thorough cleaning of the oven door, it is advisable to remove the same, as shown in below.
Open the door completely, turn the two feet on the hinge arms 180^ .
Close the door partly by a 30^ . Remove the door by slightly lifting the it at this position.
For replacing the door, follow the steps above in the reverse order.

Figure 16
To Replace the inside light
- Switch off the mains power supply and unscrew bulb.
Replace with an identical bulb that can withstand very high temperatures.
Figure 17
5.1. CATALYTIC SELF - CLEANING OVEN
- Special self-cleaning panels covered in a micro-porous coating are available on some of our models. If they are fitted, the oven no longer needs to be cleaned by hand.
- The lining must be porous for self-cleaning to be effective.
- Excessive splattering of fat may block the pores and therefore hinder self-cleaning. This self-cleaning capacity may be restored by switching on the empty oven to maximum for about 10-20 minutes.
- If the walls of the oven are so thickly coated in grease that the catalytic lining is no longer effective, remove surplus grease with a soft cloth or sponge soaked in hot water. All catalytic linings currently on the market have a working life about 300 hours. They should therefore be replaced after about 300 hours.
6. SERVICE CENTRE & TROUBLESHOOTING
-
If the oven is not working, before calling the service centre we recommended that:
-
You should check that the oven is properly plugged into the power supply.
Gas input is abnormal
-
Check the following:
-
Are the holes of the burner clogged?
-
Is the pressure regulator working properly?
-
If you are using a pipe, is there any gas in the pipe? Is the valve open?
-
If you detect something abnormal with the gas valves, contact a
qualified electrician or an authorised service centre for assistance.
There is a smell of gas where the appliance is placed
-
Please check the following:
-
Has a gas valve been left open?
-
Is the gas pipe in the correct position and in good condition?
If you suspect a gas leak, do not use a flame to check
The oven does not heat up
Are the oven control knobs at the correct position?
The cooking time is too long
Has the correct temperature been selected?
Smoke comes from the oven
It is advisable to clean the oven after each use. If fat which splashes during the cooking of meat is not cleaned, it will cause an unpleasant smell and smoke the next time you use the oven. (See the Cleaning and Maintenance chapter)
The oven light does not come on
- The light might be faulty. To change the bulb, please see the relative page.
- If you have checked the above and the oven still does not work properly, contact the nearest authorized service for assistance
- Model and Production Number (PNC or ENR).
7. PROTECTION OF THE ENVIRONMENT
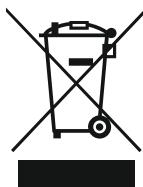
This appliance is marked according to the European directive 2012/19/EU on Waste Electrical and Electronic Equipment (WEEE). WEEE contains both polluting substances (which can cause negative consequences for the environment) and basic components (which can be re-used). It is important to have WEEE subjected to specific treatments, in order to remove and dispose properly all pollutants, and
recover and recycle all materials.
Individuals can play an important role in ensuring that WEEE does not become an environmental issue; it is essential to follow some basic rules:
- WEEE shall not be treated as household waste.
- WEEE shall be handed over to the relevant collection points managed by the municipality or by registered companies. In many countries, for large WEEE, home collection could be present.
- When you buy a new appliance, the old one may be returned to the retailer who has to collect it free of charge on a one-to-one basis, as long as the equipment is of equivalent type and has the same functions as the supplied equipment.
Restrictions anti-basculement.
1.2. DECLARATION DE CONFORMITE
Raccordement part tuyau couple caoutchouc
Caution, possibility of tilting.

Anti-tip restraints.
Recipients adequados
OCTOPOXHO, BO3MOXHOCTb ONPOKnDbIBaHnI.
OrpaHnueHne npnxkMa.
1.2.ДЕКЛAPAUЦA COOTBETCTBИA
Bce DeTann DaHHoro 3NeKtponpnbopa, KOtOpbIe MOrT BxOuNTb B KOHTAKTC PnIeJ, OTBeauOT Tpe6oBaHnM DnpeKTHBbE BpOenckCko 3KOHOMUneCKOrO Coo6bIeCTBa 89/109/EEC. 3ToT 3NeKtponpnbop COOTBeTCTByET Tpe6oBaHnM DnpeKTHB EbpOenckCko 3KOHOMUneCKOrO Coo6bIeCTBa 73/23/EEC, 89/336/EEC n 90/396/EEC, KOTOpbIe 6bln 3aMeHehbl DnpeKTHBaAMN 2006/EC, 2004/108/EC n 2003/55/EC, n NocJeDyUOzIMM NOnpaBkAmN K HmM. 3TOT 3NeKtponpnbop TaXke COOTBeTCTByET Tpe6oBaHnM O6uei DnpeKTHBbI 93/68/EEC n NocJeDyUOzIMM NOnpaBkAmN K Hei.
1.3. MEPbI PPEIOCTOPOXHOCTN
-ПлNTа Должна ИСОЛьзOBaTbСТ ТOLTКо NO ee npramomy H3aHaueHnIO,TO ectb,TOLTKOДЯпriROTOBHeHnI ПИи.JIIObIe DpyRNe PIMMeHnI PIIITbI,HaNPIMeP IcNOЛьзOBaHnE eeДЯ obOrpeBa NOMEuEHHN,3aIPeSaJTOCra,TAK KAK OHI YBnIaTOC RAONACHbIMN.
-ПюиЗБоДиТь He HeceT OTBETCTBeHOCTh 3a KaKne-JIb60 NOBpeXdEHn, Bbl3BaHHbIe HEnpaBnIbHbIM NcPONb3OBaHmE PJIITbI INI He6peXhblm O6paUeHmE CHei.
-При Исповьани Зелковорпборов слдует coьндаь
HeckoIbKO OCHOBHbIX npaBn. B cnyae BblXOda n3 CTpO IIN HApUeHNIA HoMaJIbHbHO pa6Otbl 3NeKTPoPnBOpa, BblKnIOHnTe erO, OTcoEiINHTe Ka6eIb NITaHnO t3NeKTPocETn, He npKacaiTecb K HeNcCpABHOMy 3NeKTPoPnBOpy, n 6paTntEc b YTBepJdeHHb CepBnchbIu eHTp.
-При ИЗВLEЧЕНМ ПИДОИ N3 Dуховки OБЯЗATEЛьноЛьзУТecьперчатами.
-Плдержьаite ПЛNTYВЧICTOM COCTOЯн. 3TO Heo6xOДМО Дпяобсчени 6e3oNacHocTN u CoXpaHENHa 3dOpOBBJ. HAnuNe Ha ПЛNTe JKNpa n OCTaTKOB NIIU MoKET PnBecTn KNoxapy.
- Ecni nPiHTa He nCnOJIb3yETcR, y6eIITecB TOM, YTO BCE pyKu IynpaBIIeHn HaxoJrTcB NonoXeHn BblKl.
- BbI dBIXHOJ RIK NITbI NCNOb3yETc DnXpaHeHn NyCTbIX nPOTNBHe HnDn COxPAHeHn NIsB Ba3OrpTeOM COCTOHN.
-He xpaHnTe B BblBnXHOM RaUKe PJIITbI rOpHoune IN B3pbIBOONaChbIe MaTePnaJIbI, a TaKKe YNCTaUe CpeDCTBa, PJIaCTNKOBbIe NaKeTbI, 6yMaRy, TkaHn, I.T. n.
-Пользуйтесь тольков ларостоимп кастюл'mи в сковорогам. He пolyзуйтесь горочимma teprnaлиm.
-He BHOCHTE B KOHCTpyKcIHO 3NeKtpOnpnbopa HnKaKx N3MeHeHNI. 3TO MOKET npBecTn K ChnKeHIO eO 6e3oNaCHOCTN.
-BoBpeMjaKapKnPiuIHe OToXoJInTe OTPiNtbl.
-Даньий элькторпбор IMeet 6oIbSuI Maccy.СобидайтocToPoxKHOCTbПрe erO nepemeUeHnI.
-Bo Bpemra60tI pIITbI n3 Hee BbIXOINT rOpaH N Bo3dyX. 3To HOpMaJIbHoe RaBHeHne. He 3aRopaxNBAitTe BeHTnlaCIOHHbIe OTBepCTn, paCnOLOKeHHbIe Ha KOpnyce PIIITbI.
-При установке на плпту пиши,codерхашь-boльwoe количесв Клрра плп Воры,И при снгтей Тадкй пиши c плпть может npoicxODnTb pa3ЛВанhoe xIDKOSTn.ВЗТOMСCityae CPAzyже посе пиротoblenя пиши HeobxOДIMO ydaNTb c pIITb OCTaTKN pNiU, YTO6blnpedOTBpaTntb NOBHeHne HEnpnaTHbIX 3aIaxOB N BO3rOpahnI pNiU.
-Пелегд Tem Кад сныс Куноную поу, умehьшптЕ ВсICOTу Пламен Или NGACNTe ropelkn.
-Прии Испльзовани заелковпборов следует соблдаь следушие основные павILA:
He noIb3yIteCb nepexoHnKamn, TpoHnKamn n/nnuDINHITeBHBIMN SHypamn.
Pn n3BneHm BNkK Ka6eJI nHTaHn i3 3NeKtpuecko po3EtKn cJeDyET depKaTbCra 3a BNkY, a He 3a cam Ka6eJIb.
He npikacaiTecb K pIInTe MOKpbIMN IIN BnaXhbIMn pykamn IIN HOrAMN.
B cnyae noBpeJdeHnKa6eI nHTaHn erO Heo6xOIMo 3ameHnTb doJIKNbIM o6pa3OM.
Pn 3ame He Ka6eJnOJIb3yITeCb npNBedeHHbIMn HNKe INHCTpyKUmaMn.
3aMeHa Ka6eJa DOJXHa BbIOnHrTbc KBaJIInΦuNpObaHbIM CnEuaJIInCTOM. JIЯ BbIOnHeHra peMOHTa NOIb3yITecb YcIyramN TOIbKO yTBepKdEHHoro cepBnCHOrO cHTpa, I npocJeDnte 3a TeM, YTO6bl NCIOJIb3OBaJIncb TOJIbKOΦuPMeHbIe 3aIaChbIe YaactN.
B cnyuae Heo6xOIMOCn OTcoeHNHTe Ka6JIb N 3aMeHnTe ero HOBbIM Ka6eIem TnA H05RR-F, H05VVF, nn H05V2V2-F. Ka6eIb DOJIKeH IMeTb DoCTaTOCHHyN Harpy3OHyIO CNOcO6HOCTb, YTO6bl npOnyckaTb TOK, NoTpe6JIeMBy IINNTo.
-Периончески поворейпсостаянке Гбкого ra30богошланга, КOTOBИ NCПОЛьЗЕТСД ПИ NOДСОЕДНЕНЯ RA3a.
- 山naHr noaun ra3a He dOnJxH nPoXoAnTb PraOM c ropyMn DeTajMaN pInTbI H He dOnJxH kAcTaBcA pInTbI. Bbl MoKTe PeOCoEHNHT bRa3OBbI h PaBcN HnHa Na HnBeoC TcOpHe pInTbI. TocNe BbInOJIHeHn EToI OnpaCnPiPoBepbTe repMeTuHOCtB CoeHNHeHn C NMOUbIOMbIJbHO pactBopa.
-Послne рпсоeINHня ra3OBOrO shlaHra K coeINHnTeJIHO 3aKpeINTe ero c nOMOuBIO xOMyTa. ПрOBepbTe C nOMOuBIOMbIbHorO pactbopa, HET JIn yTeKn ra3a.
He octabnIte pIITy 6e3 npICMOtpa, noka oHa He octbIHET.
1.4. NOJE3HbIE COBETbl
Bce KpbIshK, 3MaJIIpOBaHHbIe IJIIN CTekJIaHHbIe NaHeJIIM OmyT CHImaTbcSdIyUdo6HOrO BbIOnHeHnIX YInCTKn.
- EcniBaWa nPiTa nMeet BepxHIOKpbIuKy,TO 3a KpbIuKa DoJXHaNCnOJIb3OBaTbcjIy3aUNTbI BepxHe NOBepxHOCTN PIIbTIOT bJIIN, KOrDa nPiTa He NCnOJIb3yeTcR, INI dIg PpeD0TBpaueHnnpoJIbAHn Jkpa BO BVpem PpiROTOBLeHn Niu.
-He nCnoJIb3yIte KpbIshky dIa dpyrnx ueJe.
BHIMAHHE!(Длma MOneJIe co CTeKJIaHHoN KpbIuKo).PpncJbHOM HarpeBaHmCteKJIaHHoN KpbIuKo OHa MOKeT TpeChyTb.Перд Tem kak3akpbITb KpbIuKy, npOBepbTe, YTO rpeJIKN BblKnUoyehbl.
-He noIb3yIteCb deOpMnPOBaHHo n HeycTouHBOI nocydoi.
-Перед первим Исповьанем ТцаTeьн ВыIMоТe ГИЛь ИлOTOKДЯ сбopa Кupa.
-При Исторьанни чостяши Сред CTВ aэрозлбов уразковские не пазбравайся сред CTBO на HARpeBaTeи и на Термocтат.
-Пюверьт,чTO NOJKN DXYOBKN ppaBnJIbHO yCTaHOBJIeHbl.
-Дяболгсьысторо зжоганя конфоркп сдует зжога ТОТО,ΚАК NOCTABITи HA Hee NOcydY.
-Пюверъ,чTO KOHфоркa ripNT HopmaЛьно.
-He nopkbIaIte DeTaN DyXOBKn aIOMHnEBoN oBtro.
2. YCTAHOBKA
YcTaHOBKa DOJXHa BbIOnNHaTbcK BaIINΦuNpObaHHbIM CneuaJIncTOM. Ipn3BODnteIb He 683aH BbIOnNHaTb YcTaHOBky. EcIn Notpe6Byetc NOMoUb Ipn3BODnteIa DnIy UcTpAnEHn HcNpaBHOCTe, Bi3BaHbIX HepapBnBHOY cTaHOBkO, TO 3a 3Ty pa60ty 6ydt BbICTabNeH Cuet, TAK KAK OHa HE BXoDHT B Ccpepy DeiCTBnaRapaHTn.
CneuiaNCT, BbINOJHryUOy uYCTaHOBky PnITbI, DOnJKeH CO6NIOdaTb HNCTpyKcNIN NO yCTaHOBKe. HenpabUNbHaay UCTaHOBka MOKET HaHECTN Bpe3ZOpOBbI OJIeN I XNBOTbIX, a TAKKe npNBECTN K NOPYe IMyUeCTBa. PpON3BOJNTbI He Hecet OTBeTCEBHeHOCTN 3a TaKne nOTEpi.
"3KcNpyataunra3OBoi pInIbTo cOnpOBoXdaetcB BbldeHnEM Tepa Hbarn BV KOMHaTe, rge yctahOBHeNaPiTa. Y6eintecbTom, CTO KxHr XopoIOo BEHTNUInyPTc: OTBepCTNa ECTeCTBEHHoB BEHTUNAun He DOnKhb6bITb 3aRopoxKeHbI, INn yCTaHOBnte MEXAHnueckoe BEHTNUAnuOHHOy cTPOINCTBO (BbITgKa). PnnpOdoJKNtEnbHom INHTehCNUBHom NCNoJIb3OBAHN Neu MoKet NOTpe6oBaTbcSdONOpHNTeJIbHaN BHTNUAun, HApPIMep OTKpbIBaHne OKHa, INn 60Jee 3ΦΦeKTNBHaN BeHTUNIAun, HApPIMep, YEbnueHne IpnU3BOUInTeJIbHOCTN BbITgKKn (ecn OHa NcNOJIb3yeTc).
PNEyPExDEHNE! Heo6xOJIMO npabunbHO BbIpaTb MeTo Jnla yctaHOBKn Pnntbl! Pnnta MoKET 6bIb TycaHOBNeHa TOnbKO B KOMHate C nocToaHHoB BeHTNJLJIeueN. Pepe BblONHeHem PEmOHTA, yctaHOBKn Nnn MOnuΦKaUIN PnNTbl Heo6xOJIMO OToeDInHtB Ka6eJIb PtTaHnaOT 3neKTPOcTeN.
-ПepeД yctaHOBKо ПIITbI npOBepbTe CBOJCTBa NCTOuHnKa 3HeprN (TIN Ra3a, DAJIeHne Ra3a), n yoEeNTecb B TOM, YTO Ba7a PJIInTa npabuJIbHo OTOpeRyIpOBoHa.
-Длг STOTПNTbI He DoPONHа NCPONb3OBAbTcB BbITRKHa CnCTeMa, KOTOPa npIMeHЯETcДлг obOpduBaHЯ, pa60taUeRo Ha dpyrom TOJIINBE.
-He yctaHabnBaIte pIHTy prdOM C rOpUChmMaTePnaJAmu (Haepimep, MraKaj Me6JIb, UToBpI, nT.I.).
ecnIbTOBm3NEkTPOPNi6Op yCTaHaBnIBaETcRa H OCHOBAHNI, TO Heo6XOJIMO pInHrTb COOTBETCTByIOUe MEpbl IJIr TORO, YTO6bl OH HE MOI COCKOJIb3HYt b C OCHOBHNI.
2.1. NOMEUSEHNE, B KOTOPOM YCTAHABJINBAETCЯ ПЛITA
-ITTOI TOObI IINTa pa6oTaN HOpMaIbHO, B NOMEeHIN, IDe YCTaHaBnBaETCI INTA, DOnJXHa 6bITb ECTcTBeHHa BEHTINrA, IOCTaTOHnA IINPOHOrC XKIRAHnRA3a.
IOTOK BO3dyxa DOJXeH NOCTyNaTb N3 BEHTnJIaCIOHHbIX KAHaNOB C BHTnJIaCIOHHbIMpeWETkAMn,paCNoJIOKeHHbIX H hapYKHOI CTHe 3dAHJa.
-Дягазови пintы, сабжehнои заuntьim устpoctbom, кotopoe OTKlnoayet noaуgamma3a pri noracahmплamehn, BEHTUNLAIOHbI KaHAn DoJIXeH IMTe CBeHcHne 100 cm². Дягазови пintы, He IMeOuSeTakoro 3auNTHOу yCTpoiCTBa, BeHTUNLIOHbI KaHAn DoJIXe HIMTe CBeHcHne 200 cm². (MoxetИсплььэвсьсдОин Иин Heckonlbo BEHTUNLAIOHbIX KaHaNoB).
Bbinyck 2a3006pa3HbIx npodykmo8 c2opauHra
· Ra3o06pa3HbIe npOdyKtblcropaHnI,obpa3yUoUnece BO BpEmpa60bI bIJIHTbI dJONKHbI BbIyNcKaTbCpIIMO UpeE3 DBeBp IINu UpeE3 BbITAAxHOI KOIINaK,NOdCOeDInHeHHbIKBbITAAxHOI TpyBe INu KBO3dyXOBoY (Pnc.1). · ECnn HET Bo3MOxHOCTN yCTaHOBtBbITAAxHOI KOIINaK,TO B CTeHe INn B OOKOHOM pOeMe HxKHO YCTaHOBtB 3NeKTPnueckn BTAAxHOI BEHTNJrTOP (Pnc.2).
- BbTJXHOB BeHTINIaTOp DOJIKeH IMeTb MOUHOCtB, DoCTaTOUYIO DnI TORO, yTO6bI BO3dyx B KuyHe NOJIHOCTbO 3aMeHJNcR 3-5 pa3 B Yac.Z
-3TN BeHTNJLauONHbIe peWETKN DoJXHbI 6bITb COOPyKeHbI TaKIM O6pA3OM, YTO6bl OHN He MOrIN 3aRopaxNBATbcra Hc OdHOH N3 CTOpOH, INpeDIOuNTeNbHO, DoJXHbI 6bITb paCNOJoxHe bIOBn3OCTN OT NOA. BeHTNJLauONHbIe peWETKN He DoJXHbI paCNoIarTaBC PRAOM C BbInyCKOM ra3006pa3hBX INpoDyKTOB CROPAHN N BbIT8KKoN dJIbIMa.
- Ecni HeBO3MOxH OoOpyDnTb BO3DyUHb KAnAaB N OMeUeHIn, rDe yCTaHOBNeH O6OpyDObAHne, TO BO3DyX, HeO6xoDmbl nIy CxMraHnra3a, MOKeT NODaBaTbCn H3 C0CeDHeRo NOMeUeHn, ecNl 3TO NOMEuEHNHe He YBLaTeCn aJaBHoN KOHaToN, IIN NOMeUeHnEm, B KOTopoN NOTOK BO3DyXa MOKeT CO3DaBaTaB OnaCHOctb.
2.2.PA3MELUENHE
Pn KOnCTpyuPoBaHm DaHnOro n3dennI npEtnoIaranocb, yTO cmExhblc HnM pa6Ouyne NOBepxHOCTn 6ydyT He BbIe NOBepxHOCTn BapouHoi naHeni.
2.3. PEGYUNPOBKA BbICOTbl HOXEK
Данная плanta Имeel peуліремье HOЖи, paclnoLOжЕHHые B HIXHnx yIax KOpnyca плntbl.
BbICota HOkeK MOKeT peryInpoBaTbCra INHINBHyaJIbHO C NOMOcIbIO raeyHOrO KJIIOUca IJRA OeCneueHn yCTOnuHBOCTn I ROpN3OHTaJIbHO rOyOBn PJIInTbI dJa TOrO, YTO6bl yPoBeHb HaJIToB B KxOHHyIO Nocdy JIKNDKoCTn 6bl paCNOJIOKeH rOpN3OHTaJIbHO.
PeaylupyembIe HOKU u KOlecuKU
A
B
C
Y BaIero npi6opa ImeIoTc HAcTpauBaembIe HOKn B erO HIXHnx yrrax
-MakcmaJIbHaB Blicota IIITbI COCTaBnEe 868 MM, npu yCTaHOBKe BlicOTbI HOKe IN 3aDnIX KOJIeC.
-HoKmMOrTy 6bItb HactpoeHbI npi NOMOUsn RaeyHoro KJIoua,3TO
I03B0JAEr TapaHTnIpOBAbT, YTO dYXOBKa BblPOBHeHa.
-3aHnne KOJeca DoJIxHb6bTb 3aФнксюВаьHa OTBepCTn2 (pncyHOK1),CTaHdapTHaBbICota.Takm 06pa3OM,CTaHdapTHaBbICota6ydet 850 MM.
PeaynupyembIe HOKku
2.4. NOДКЛЮЧЕНЕ KЭЛЕKTPOCETN
ПлNTы могут поставлиьсak к Кабелм ппаня, tak и 6e3 Hero. Подcoедионе Кабеля ппаняК ппite Должно Выноггьчсс cotpyнkom yTВерждевного сервсного цentpa B COOTBEТCBИСпpeДCTаBLHbIMN HIXE INHCTpyKlIЯМN.
IopKJIIOUeHne K 3JKeTPOCETn DOJXHO BbIIOJNHaTBcB COOTBeTCTBm C DeICTBYIOUHMn 3JKeTPOTEXHnueCKMn npaBnAmn HOpMaMn. Ipeep IOkJIIOUeHem 3JKeTPOpnpn6opa K 3JKeTPOcETn npoBepbTe:
-Obnaaet nI JINHn 3JNEKTPoNTaHnI DOCTaTOOH Harpy3OHOH cnOC6bOCTbIO, IN COOTBeTCTBYOT JN yCTAHOBJIeHHbIe B DOME npEdoxpahnteM MoUHocTn 3JNEKTPoPnp6oba? (MoUHocTb 3JNEKTPoPnp6oba yka3aHa B TaBNIuYKe C TexHnueckmN daHHbIMN, pRnKJIeEHHOH Ha 3aDHeN CTOpOHe PIIITbI).
-Imeet JINIINHNA 3JIeKTPoNITAHNIA PPOBOD 3a3eMJIeHNA, COOTBETCTBYUOUI NDeIcTBYIOUIM 3JIeKTPoTeXHnueCKIM npaBUNAM HOpMaM? JINIHNA 3JIeKTPoNITAHNIA B BaIeM DOME DOJIXHA IMeTb 3eMeJIbHbI IPOBOd. EcIn erO HeT, O6paTntEcB 3a NOMOuBo K KBaJIuΦIuPobAOBaHHOMy 3JIeKTPnky.
-Будет Ли обесеньbatьс удобн布局 дocтуг К злелктуческов розтке Ли К многононюсому Вылночateлю поле установки Злелктурпбора?
-Подсоевине К Кабелю петаши Вилку, удовлесворяшую Tребоганям Дейостыюх ЗлжтpoTeхнчecкxnpabИЛ ИHopm, И BCTавпье ee Bлжелкгпчeckyю po3eТК.
- Ecni Tpe6yeTc nprmoe NODKJIIOHHe 3JNEKTPoPn6Opa K 3JIeKTPocETn, To 3JIeKTPoPn6Op DoJIXeH 6bITb NODKJIIOUeH K 3JIeKTPocETn Chee3 MHORONOLCHB BIKJIIOUaTeIb. (3TO T BkJIIOUaTeIb DOJIXeH COOTBetCTBOBaT Tpe6OBaHnA M DeiCTByIOxN 3JIeKTPoTEXHueCKNX IpabIN I HopM I DOJIXeH COOTBetCTBOBaT NOKDJIIOUaEMo HArpy3Ke).
KEnTo-3eHeBn npoBOd 3a3eMneHn He DoJnxH npepbBaTbCBAkJIIOuATEJIeM. KopuHBeBn npoBOd fao3bl (OT KJIeMMbl "L"HaKJIeMMHOI KOJIOKe PInITbI) DoJnxH 6bl TNOKIIIOueH K npoBOdyfao3bl3NEKTPOcETn.
Линя злесктугияdoлжнабытпраложенTaK,чтоби OHa He NOBepraanb BO3dIeJCTBnIO TempepaTpybl,PpeBbIshaOuSei 50^
- Ecni Tpe6yETc 3aMeHntb Ka6eIb NHTAHN, TO CJIeDyET NCIOJIb3OBAITb Ka6eIb C IOCTaTOHbIM CeEHnEM IPOBOHNKOB. KeJTo-3eJIeHbI NPOBOd 3a3EMLHeHnI DOnJKeH 6blTb np6JIu3NTeHbHO Ha 2 CM DInHHee IPOBOoB Oa3bI NeHTpAnI.
Посл e BblnoHHeHnI PNOKJIUChEHN IJIITbI K 3JIeKTPocetI npOBepbTe pa60Tu HargBaTeJIeN, BKJIIOHNB INx Ha 3 MInHyTbI.
Pon3BODInTeIb He Hecet OTBeTCTBeHHOCTn 3a NOBpeXeHn, BO3HNKUne N3-3a TORO, YTO yCTaHOBka 3NeKTpOpnp6opa He 6bla BblONHeHa B COOTBeTCTBnC npaBnJaM 3NeKTpo6e3OnachOCTn.
Ecnn 3neKtpnpn6op nocTabnaretc6e3Ka6eJnPiTaHnC BnIKoN, nnn 6e3 Dpynx yctpoCTB dIy OTCoeDInHeHnO T 3neKtpocetn C OTcoEduHeHnEM Bcex a3, YTO obecneuBaET NOHoe OTcoEduHeHne 3neKtpnpn6opa OT 3neKtpocetn B cnyae BO3NKHOBeHnpeHaepJxKeHn KaTeOpn III, TO 3neKtpnp60p DOJXeH NODKNIOATbCSYepe3 pa3beDInHJOUe e YcTPOCTBO C XeCTKO 3neKtpnpOBdKO, CMOHtPOBAHHO B COOTBETCTBN C npaBnAMn POKJaADKn 3neKtpnpOBdoKn.
2.5. ПЛNTы, NOCTABЛЯEMьE C KАБЕЛЕМ ПИТAHИА
PpOBepbTe, YTo ra3 Ha camOM DeJe 3arOpEnc! Ecnn PJIaMeHn HEt, NOBTOPiTE ONIcaHHyIO BbIe npOeDpy.
Pocne 3axnraHna PnAmEHn OtperynpyTe HyxHyBbICOTy PnAmEHn.
PyuHoe 3axnraHne pIamEHn (ecnn HET nCTouHnKa 3JeKtpoNtAHn)
IodHeCiteK ropeJIke pIamra (cIuUka, 3aXKeHHa 6yMaRa, IINr3OBAra 3aXnraJIka).
PNEyPExHHe! MeJy DBym nonbTkamn 3aKehy ropeIky DoJxHa 6bTb nay3a dInTeNbHocTbHO He MeHee 1 MInHyTb. HaxMnte pyKU ynpablenHn Ia KOnCOpKn, KOtOpYIO BbIXOTNe 3aKehy, INOBepHnTe ee B NoJIoXeHne "BbICOKoe PJaMa", eCIN PJaMa He 3aRopeNoC b nepBOI noBbTKN, NOBTOPiTE NOnbITKy, HaxIma pyKU ynpablenHn HEMHOrO DoJIbSe. IocJe 3aJinraHn PJaMeHN OTperyInpyuTe HyxHyo BbICOTy PJaMeHN.
Ecnn nocne HeckoJbKnx nonbITOK KOHOpka He 3aXnraetc, npOBepbTe, npABNJbHO JIn yCTaHOHa KOHOpka N ee KpbIiKa.
YTo6bI 3aKpbItb npaay ra3a nobepHnte pyky no YacOBoi cTpeKe B nOJoxeHne "O". Ecnn KOhOpka cnUyauHo rachet, To nepeed ee NOBTOPBnIM 3axnraHnEM cJeJaTe na3y He MeHee 1 MInHyTbI.
B HeKOTopbIX pIITax mMeETcY yCTPOJCTBO 3aIHTbI OT NORACAHN pIaMeHn (CM. npeDCTabJIeHHb BblIe PNCyHOK, yCTPOJCTBO 3aIHTbI OT NORACAHN pIaMeHn F), KOtOpoe oBeCneuBaet aBTOMaTueckoe pIeKpaSeHHe NOdaChra3a B CnUyae NOracAHN pIaMeHn.
MnHmMaIbHbIe IMakcImaIbHbIe dAmEtpbl Da KxOHHOIOcybl
Pnuma He Haapeeaemcra
1. ALGEMENE WAARSCHUWINGEN
2.1. OMGEVING WAAR HET APPARAAT MOET WORDEN GEPLAATST
Turn the knob to the position for the required temperature of the hot plate. The indicator light of the hot plate will come on and the hot plate will start to heat.
When cooking is completed, turn the knob to the "O" position. Do not leave the hot plate turned on without a pan on it. The diameter and the base of the pan you use is critical. The minimum diameter of the pan base is 14 cm and the base should be flat.
Leave the hot plate to heat up for 5 minutes before placing a pan on it the first time you use it. This will allow the heat resistant coating of the plate to harden due to burning.
Use a wet cloth and detergent for cleaning the hot plates. Do not remove food residues from the hot plates with a knife or any other hard, sharp object.
Turn on the hot plate for a few moments to dry it after cleaning. However, it must never be left on for more than a few moments without a panon top.
-BHIMAHHE: Onacnoct OT noxap: He npbXte ppeMeTN Bbypxy roTbapckite NOBbpxHOCTN.
-По Врeme Ha yIOTpe6a ypeIbT ce HaropeuЯBa. TpIbBa Ia ce n36IgBa DOKOCBaHe Do HaprBaUHTe eJIeMeHTN OTbH Na cyphHata.
-BHIMAHHE: DoctbHnTe Yactn MoKe Da ce HaropeuT No BpeMe Ha ynoTpe6a. Maikte Deua Tp6Ba Da ce DbpKxat daJeU.
-He n3noI3BaIte rpy6n a6pa3nBHN NOUHCTBaIuBEIeCTBa IIN MeaJIH N CTbprAJa 3a IOHNCtBAHe Ha CTbKJIOTo Na BpATA, TbN KaTO Te MORaT Da N3DpACKaT NOBbPxHOCTTa, KOET Da IOBeDe Do HanyKBaHe Ha CTbKNOTO.
-BbtpeHnata DoHa NOBpbXHOCT Ha YekMeJKeTo MoKe Da ce HArOpelu.
-ФурнаТа ТрябВа Дa ce ИЗКЛЮЧи Рпеди CBаЯнe Ha пpeДиа3ИTeЯ, СлeД NOчИСТВaHETO My, пpeДиa3ИTeЯТ TрябВа Дa ce MOHTIpa OБраTHO спa3ВaйкУka3aHnIЯТa.
Pon3BODNTeH He Hocn OTROBOPHOCT 3a BpeHn HapnaBeHn OTHecNa3BaHe Ha MepKInTe 3a 6e3OnaCHOCT n NOCOeHNTe NHcTpyKuH.
-ПронзВODиTeЯ He Noema OTROBOPHoc 3a NOBpei n B CJIeIcTBnHa Hecna3BaHe Ha INHCTpyKuInTe 3a 6e3OnaNCHoCT.
-3a DnpekTHa Bp3ka CfNcnpaHo oKa6eJaBaHe Heo6xOd NMOOCnpyraBaHe Ha cpeCTBa3an3KKnUoyBaHeOT3axpaHbAHeTOcpa3deJeHne Mekdy KOHTAKTteHa BCNUCKn POJUCn, KOUTO OCNyprBaT nbJHOn3KKnUoyBaHe npucNoBna Ha npeHapEgeHne, CBOTBetCTBnecnPabuNaTa3aoka6eJaBaHe.
2.5. ПECHСЕLEKTPUQUECKI KABELI
-CBbpr3BaHTo e npeDnIeHo 3a HanpeXeHne ot 220 -240 V MeJdy pa3nte IJIIMeKdIy pa3nte IN HylaTa
Cbbp3BaHTo 10/16 ampe np Ha n3xoJa.

- EbeHTyaIHa 3aMaHa Ha 3axpaHbAunia Ka6e Tpr6Ba da ce OcbIeCTBra BA OT CneInpOdaJxBeHnra cepBn3 nIn OT KnaIINpUpaT texHnK. IOnMeHnIaR Ka6e Tpr6Ba da e Cbc CbIuTe XapakTePrcntkN kato OpunHaNIIHnKa6eI.
Klnacnphiunpahe/U3603axpaHbau Ka6eI
| Мо德尔 Номиналиношност (kW) | Номиналино наразожения (V) | Номинаlemен ток (A) | Зхсаньш кабел |
| 2.3 kW | 220 - 240 V | 9.1 A | 3 x 1.0 mm² |
| 3.5 kW | 220 - 240 V | 15.9 A | 3 x 1.5 mm² |
| 4.0 kW | 220 - 240 V | 18.2 A | 3 x 2.5 mm² |
2.6.CBbP3BAHE C ΓA3
Cbpb3BaHeTo Ha ypeDa c raz Tp86Ba da e cbrJacyBaHo C DeiCTBaUHTe HapeD6n n npaBnla.
-При пюпзворстбото на урета, тол e налaceн да Изплзьа onpeденин тин на ra3 поочен в ETИКЕТ ся КОТо се hamURA B 6ПИЗOSTdo doBOda 3a ra3 на 3aДнATER CTpaHa Ha anapata.
YBepTe ce ye n3noN3BaTe ra3 KOItO e noCooH ha etnKeTa. Ako e npyr TnT ra3, cIeJeTe IHCTpyKUnTE B rIaBa" npomraHa Ha dpyr Tn ra3".
- YBepete ce ye HaIraHTo Ha ra3 e CbIcTO KaKTo e ONOMEHaTo B Ta6eIATA NOIOny 3a da ce NoCTnRHe MAKcImaHa eФИKaCHOCT n Hau MaNKo I3rapaHe.
Ako haIraheTo Ha ra3 e pa3nueHo, cboDBetHnapeynatop 3a doBOID ra3 Tpr6Ba Da ce Harnacn. YnoTpe6ata Ha peryaTopa 3a ra3 B cbflacHOCT cbc StAndapDnte 3a LPG e no3Bolena.
Cebp3eaHecMacueHaunuc2b8aemmpb6a
-Довьт Ha ra3 може Да с CBржс CBc CBoBETHa cTBaema HepbKdaema CTOMaHeHa Tpb6a B CbflacHocT DeiCTBaunTe правILA и CTAndapn. B TaKbB cnUyam, Няму hyЖda 3a премecTube He Ha anapata. KoHEKTopa 3a DoBoD Ha ra3 Ha anapata eGc'/2
Cebp3eahe cbc ca2baema Hememalna mpb6a
-AKO KOHEKUJRA 3a IOBOH Ha ra3 e Ha N03UNA Kb DeTO MOKe Da CE BKJIIOUyBa N3KNIOUyBA KORATO e HUxHO, MOKe Da CE N3NOJ3Ba CfBbAeMa Tpb6a B CbIpaCHOCT C DeINCTBaUNTe PpaBnA n CTaNapdnn.
Ctbaemata Tp6bTa Tp6Ba IITbTHo Da ce 3akpei Cbc cKo6a.
cTbBaemata Tpb6a Tp6Ba da ce 3akpen TaKa ye:
C orneHa ToBa Ye Tppb6ata 1ue 6bde 3aNeukata, He Tp8Ba Da 6bde N3IOXeHa Ha Tempepa Typa no-BncoKa oT 30^
Дьлжина He TprбБада 6bde noBeeу ot 150 cm.
-He Tp86Ba Da ce n3Ia Ha napa.
-He Tp86Ba da ce npertba nHn HamauchkBa.
-ПаЗЕТОСТРИпpeДмETN.
-Тябва за бде дocтбпна за ce obb3MOЖи nepnoДиЧЕнпргл徳.
- cTbBaemata Tp6a Tp6Ba Da ce npOBepBa KaKTo B npOdbJxKeHne 3a Da Ce 3aunITn OT IpOMeHN B TeueHne Ha BpeMeTO:
-П robерете даллima Chупени, Кьсани Лл ИЗюрени частни Трбata плкрацати.
-MatepnaIbT Tp86Ba Da 3ana3nФleKc6nHocTa.
-He Tp86Ba Da nMa pBxJa no CkOBeIe.
- Tp86Ba Da ce 3aMeHn CJIe5 5 roDInH n3IIOJ3BaHe.


Поберете BCNUKIN CBpB3KN OT n3TNUaHe Ha ra3 cneI MOHTaxa. He n3PON3BaIte OrBn 3a npOBepka dani n3TNUa ra3.
2.8.PA3MEPA HA YPEDA
| 50 x 60 | 60 x 60 | |
| Височина(mm) | 863 | 850 |
| ШирINA (mm) | 510 | 598-600 |
| Дълбочина(mm) | 600 | 600 |
2.9.OBU XAPAKTEPNCIKI DEΦHNUHA YPEDA
ToBa yNbTbAHe 3a yNOrpe6a e HnPaBHeO, TaKa Ye da NocJyKn 3a HraKOJIk MoeJa NeuKn. HЯkon OT xapakTePrcntKnTe, cnomeHaTn B yNbTbAHeto MoKe Da He Ce OTHacrT 3a BaUHyapei.
1.ГоренpbбнечkaТа
2.Panen 3a ynpabVeHne
3.Чекmedжke
4.Bpata Ha cyphnata (IpeHa Bpata)
5.CtBKnE Hnn MeTaNekn
6.CnomaratehenKOTJIOH
7.BbpzoharpaauKOTJIOH
8.YItpa6bρ3oHaŋrapBaαuKOTIOH
9.Пolyбрэнограви стлон
10.JIyBa peWetka
11.Дясанpeшетka
12. BytoHn 3a peynpahe Ha KOtNoHnTe
13.Tepmoperynatop
14.Бутон за заразалвае Или Бутон за венилatable
Агамбага.
15.Bytoh 3a ocBteHneHneto
16. TaHmep
17.PeYunpauni ce kpaeta
18.KpaueTa C BnHTOBe
1- Pnot
2-KoHTpOHaTa6JIuCa
3- YekmeDke
4-BpataHaФypnata(претнаВрatura)
5-MetaneHkanakNJINCTbKJIeHkanak
6-「a3OBKOTJIOH
7-CpeHNO 6bpyra3OBKOTJIOH
8-Бьрзига30OBKOTJIOHn
9-KoTIOH(1000W)
10-Яbapeшета
11-Дясанpeшета
12-KoHTpoJIHn KoYeta 3a Γa3ObIte KOTJIOH
13-KoHTpOJIHNO KONUe 3a KOTIOHnTe
14-Konue 3a TepmoCTaTOn Ha cyphatha
15-Konue 3a 3anaIbahe nIIN KOUe 3a BEHTnlaucia
16- lamnukka 3a cnHan
17- Peryunipauni ce kpaueTa
18-KpaueTa C BnHTOBe
1-Плот ha neчkaTa
2-KoHTpOJHa Ta6ena
3-YeKMeDke
4- Bpata Ha Фурнata (предна ВраТа)
5-MetaJenKanakIJI NCTbKJIeN KAnak
6-ra3OB KOJIOH
7-6bp3ra3OBKOTJIOH
8-KOTIOH (1000W)
9-KOTIOH(1500W)
10-Дяна решета
11-KoHTpOHa Ta6eJa 3a Ra3oBInTe KOTJIOH
12-KoHTpONHn 6yToHn 3a KOTNoHnTe
13-Konue 3a Tepmoctatot Ha yphtata
14-KoIyue 3a napeHne nn KOnye 3a BeHTnJIaCnA
15- lamna 3a cnHan
3.ИЗПОЛЗВАЕHAKOTJOH
3.1.N3N0JI3BAHE HA ΓA3OB KOTJIOH
Бутон'te C кonto ce контponupaТКOTJOHnTe ca pa3noJIOxKeHn Ha KOHTponHaTa Ta6ena.
phiaypa 7
POnuua Off
Korato 6ytoHa e 3aBbpten TaKa ye CmB0Ja 'ToCka' e 3aBbpten KbM Tabenata, Toraba e B no3nua Off n BeHTnla 3a ra3 e NCKHoue, a orbna ige N3rache.

MaKcumaJIHo nycKaHe Ha 2a3
HaTnCHete KOnyTeO Ha KOtJIOHa n 0r 3aBpTeTe Ha JIABO, DOKaTo 'TOUka' CmBOLA He NOCOuN CmBOLA rONaM M PnAmbK. B Ta3n P03nZIg PnAmbKa e Ha MaKcIMMaJIHO HnBO. B Ta3n P03nZIg BEHTnla 3a r3e O TBOpeH N3zINo.

MuHumalnHO nyckaHe Ha 2a3
Пламькьт може да биде hamaineн CBbpTeHe Ha konчeto, takaeTOUka' cIMBOJa DA ce CBpJxE cbc cIMBOJa MaIbK ПламьК.ВentINbT ile sbde yactuHOr OTBOpH.
A-KanakHaKOTnOHa
B-KoTIOH
C-EeKtpoA
D-IMHexEeKTop
E-TraNoHaKOTnOHa
F-Ppea3nten
OTCTPAHBAHE IN IOUINCTBAHE HA TEJIENI CTEJIAKIN
1- OtctpaHete TeIeHNTE CTeIaxNITE KATO rN 3IbPnATE B nocOKata, yka3aHa cbc CTpeKN (BIX NO-DOJy)
2-3a da nouchte TeJeHne CTeJaxHe IINI IN NOCTABeT B MnaJHa MaunHa, IINI N3NoJ3BaIte MOKpa Tb6a, KaTO Ce yBepnte,Ye cNeI TOBa Ca N3cbXHaJI.
3- Cnei nOuHCTBaHcTe, MOHTnpaIte TeJIeHITe cTeJaXn B obpaTeH peI.
phiaypa 8
3anaBhaeHaKOTIOHHTe
KomJIOHume Ha 2a3 Ha IIIoma
Kotnoha Tpr6Ba Da ce 3anaHn npedn da ce nocTabrT cbdoBeTe. 3a MoJeN C aBTOMaTHUHO 3anaJIbAHe, NCKpa' KOnYeToTpr6Ba Da 6bJe HATNUCHATO.
HaTnCHete KOnyTeO, KOEt KOHTpOJnpa KOTNoHa n CJIeI TOBa 3aBbptete Ha JIABO CmBOLA 3a TOLJAMbK. HATnCHete KOnyTeo 3a naJIeHe. 3a MoDEJI, KOIT NImat KOnyTeA 3a 3aNAJIbaHe, HATnCHete IN BKNIOUte KOnyTeO, KOETOKOHTPONIPA KOTNoHa Ha 3BeZdNcKa CmBOLA.
EJektpoBt 1e 6bJe aBTOMaTHUHO aKTbIpaH. BcUKN eJIektpoN 1e 6bDaT aBTOMaTHUHO aKTbIpaHn.
KomnoHu Ha 2a3 Ha neyKama
KoIyTe He MoKe Da 6bJe HaTnCHaTo 3a NOBeYe OTe 15 cek. Ako KOTJIOHa He ce 3aapani Cnei 15 cek. Oc B oObe Te KOnye To n OT B op e T e Bpa Ta Ta IIN PoUa Ka iTe MmHmym 1 MIn. Ppei Da C e yB ePnt E NOBTOpHO.
Cne3anaJIbaHETO,HaCTpoTeIJaMbkaHa Heo6xOdIMOTO HNBO.
PbUHO 3anaBHe (aKo HMa eJNeKTpo3axpaHBaHe)
3aDpBxKeTe nnambka(Kn6pnt nJIn 3anaJka), B6Jn3OCT Ha KOTNoHa.
BHIMAHNE!I3uKaBaiTe 1 MInyTa MeJdy Dba ONTa 3a 3anaBaHe. HatucheTe H BkIouTe KOChTe Ha KOTNoHa B NocKa Ha CmBOJa rOjam PnAmbK. Ako KOTNoHa He Do6ne PnAmbK OT PbBna ONIT, ONTaTe NOBTOPOHc, cera No-DbIro 3aApbXKe KOChTe. Korato KOTNoHa e BkIIOHe, HarNaCeTe PnAmbKa.
Ako KOTJIOHa He CBETn, CJIeI HЯKOJIKO OINTa, npOBepTe N03NtYTa Ha KOTJIOHa.
3aBbptete KOnyeto B Nocoka Ha YacobHnKoBaTa CTrpeNka Do "O" N03nui CbOTBeTHO C npITOKa Ha ra3. Ako KotNoHa cIyauHa 3n3rache, NoyakaTe eHa MNHyTa pPeDN Da ce ONiTate OTHOB. HraKo NeuKn Imat PpeDnAaNTeJ (BIX ChmMka F). Ako nIaMbKa n3rache, npITOKa Ha ra3 ABTomAtNuHo Ce cnnpa.
MnHmym makcmym pa3mepn Ha cBdoBeTe:
TpaNIOHEn MeToI 3a roTBeHe, TerIIO (Gr) BnXpaHa TpaNIOHEn MeToI Ha roTBeHe
| Терло (Gr) | ТПЛ XPАHA | Традиционец MeTOД Ha GOTBEHe | MeToД Ha rotBeHe cЦркУlaциЯHa TОпь L b3dUx | Вразе Ha rotBeHe (MinHyt) | БЕЛЕЖКИ | ||
| TOPTN И DECEPTN | ПOTиция Na padтовete | Tempepa typa (℃) | ПOTиция Na padтовete | Tempepa typa (℃) | |||
| TopTaСяиca | 2 | 180 | 2 (1 n 3) | 160 | 45 - 60 | ||
| Малka TopTa | 1 | 180 | 2 (1 n 3) | 160 | 20 - 35 | ||
| TopTa | 2 | 180 | 2 (1 n 3) | 160 | 20 - 30 | ||
| TopTa сирени | 1 | 175 | 2 | 150 | 60 - 80 | ||
| Пида ябык | 1 | 180 | 2 (1 n 3) | 160 | 40 - 60 | ||
| Шрдел | 2 | 175 | 2 (1 n 3) | 150 | 60 - 80 | ||
| TopTa C Мармалад | 2 | 180 | 2 (1 n 3) | 160 | 45 - 60 | ||
| Малka TopTa | 2 | 180 | 2 (1 n 3) | 160 | 15 - 25 | ||
| БиCKВITEна | 2 | 180 | 2 (1 n 3) | 160 | 10 - 20 | ||
| TopTa | 2 | 100 | 2 (1 n 3) | 100 | 90 - 120 | ||
| 1000 | ХлЯБ И ПИZA | ||||||
| Бял xляб | 1 | 200 | 2 | 175 | 45 - 60 | Вътpe в Затворени reprна 8 парчига на тава Ha skapa | |
| 500 | Ръжен xляб | 1 | 200 | 2 | 175 | 30 - 45 | |
| 500 | Сандун | 2 | 200 | 2 (1 n 3) | 175 | 20 - 35 | |
| 250 | Пида | 1 | 220 | 2 (1 n 3) | 200 | 20 - 35 | |
| ПACTA | |||||||
| Мakapони | 2 | 200 | 2 (1 n 3) | 175 | 40 - 50 | ||
| Със зеленчuk | 2 | 200 | 2 (1 n 3) | 175 | 45 - 60 | ||
| Малки Тостешии | 2 | 200 | 2 (1 n 3) | 175 | 35 - 45 | ||
| Лазаня | 2 | 200 | 2 | 175 | 45 - 60 | ||
| 1000 | MECO | ||||||
| Пechени roвекdo | 2 | 200 | 2 | 175 | 50 - 70 | Готвано на ска Гotвано на ска | |
| 1200 | Пechени CBИнско | 2 | 200 | 2 | 175 | 100 - 130 | |
| 1000 | Пechени телесko | 2 | 200 | 2 | 175 | 90 - 120 | Гotвано на ска |
| 1500 | Говекdo по anглийску начин | 2 | 220 | 2 | 200 | 50 - 70 | Гotвано на ска |
| 1200 | Аngешко | 2 | 200 | 2 | 175 | 110 - 130 | Бут |
| 1000 | Пиelleшko | 2 | 200 | 2 | 175 | 60 - 80 | ЧeLo |
| 4000 | Мисирka | 2 | 200 | 2 | 175 | 210 - 240 | ЧeLo |
| 1500 | Патиza | 2 | 175 | 2 | 160 | 120 - 150 | ЧeLo |
| 3000 | Гъска | 2 | 175 | 2 | 160 | 150 - 200 | ЧeLo |
| 1200 | Зашко | 2 | 200 | 2 | 175 | 60 - 80 | На части |
| 1000 | РИБА | ||||||
| Цая риба | 2 | 200 | 2 (1 n 3) | 175 | 40 - 60 | 2 Риби | |
| 800 | Фиile | 2 | 200 | 2 (1 n 3) | 175 | 30 - 40 | 4 Филета |
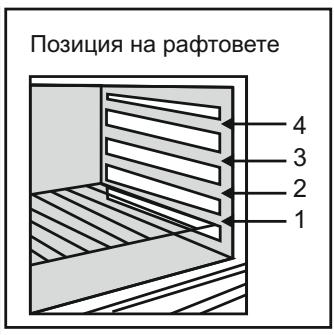
3A6EJIEXKA:
1) BbB BpemTo 3a rotBeHe He e BkIIOeHO 3aRpaBaHTo.3aRpaBaHTo Ha yHaTa OKoJ0 10 MIn. ce npenOpbUba OcObeHO 3a TOpTn, nua n XJ6.
2) NokaBa No3nTtHa TaBNTe KOrato RotBNTe NOBeueЯEDHOBPemEHNO.
3) BcuiKn Oepaun Ha roTbeHe Tp6Ba Da ce npabT cbc 3aTbpeHa cypha
| ВИД ХРАHA | КOLONЧECTBO | СКAPA | ВРЕМЕ HA ГOTBEHE (Минути) | |||
| ПAPЧETA | ТEGЛО | ПОЗИЦЯ HA RAФTOBE | temпература (°C) | Горна чACT | ДOLЛHAчACT | |
| Говекда пьржOLA | 4 | 800 | 4 | Мakсимална | 10 | 8 |
| Котлети на скар | 4 | 600 | 4 | Мakсимална | 12 | 8 |
| Колбасi | 8 | 500 | 4 | Мakсимална | 10 | 6 |
| Пильши частi | 6 | 800 | 3 | Мakсимална | 30 | 20 |
| Смесena скар | 4 | 700 | 4 | Мakсимална | 12 | 10 |
| Млень dicesгп | 4 | 400 | 4 | Мakсимална | 13 | 10 |
| Парчета домат | 8 | 500 | 4 | Мakсимална | 12 | -- |
| Рибно Фпile | 4 | 400 | 4 | Мakсимална | 8 | 6 |
| Миди | 6 | --- | 4 | Мakсимална | 12 | -- |
| Тостови | 4 | --- | 4 | Мakсимална | 8 | -- |
| Прapачета xяяб | 4 | - | 4 | Мakсимална | 2-3 | 1 |
5. NOUHCTBAHE IN IODINPbXKA
Преши BCЯКО NOUCHTBAHe:
ИЗклоче захсанься кабел
Cnpete KpaHcTe 3a ra3 3a BaWa 6e3oNaChoc T.
-Ako nekaTa e TOpJa n3uKaaiTe da ce oxlaani.
-He n3non3BaIte npa nn cnpe noi haIrahe 3a nouictbaHe Ha ypeHa.
-He n3non3BaIte abpa3nBHN cpeICTBa, IINO OCTPNIpeIMTe 3a
YHCTeHE Ha CTbKJIOTo HA BpTaTata.
-EmaiipapaHata NOBbpxHOCT YnCTeTe C TOnJa BOa n canyh nIb cbc sbOdBETHO CpeDCTBO 3a YnCTHe. He n3PON3BaTte a6pa3NB KOnTO MOKe Da HApacka NOBbpxHOCTTa n BVa. BaxHo e da YnCTNTe cyphHATA CneB C8aKO PON3BaHe n3PON3BaTte npenapat n a6pa3NBn CpeDTCBa 3a CTOMaHEHTE KOTIOHN
-CTbKJIeHaTa NOBbpxHocT Tp6Ba Da ce nouchtn Korato e XlaJHa.
BpeDnTe npEiN3BkAHH OT HeCnA3BaHe Ha npaBnAta He Ce BKJIouHeH B rapaHcnaTa.
-MoKe Da noUcHbATE KOJIOnHtE C ropeuca BODa N npenapat. OTBOpHtE 3a ra3 MoKe Da ce noUcHtAT C metaJIHa cheTka. YBepTe CeYe KOTJIOHNITE Ca cyxN I peDn Da rN n3KapaTe OT MЯCTOTO IM
-Периондунно поисваite сеньковпente Ha Neчkaраз. По-очто npовераяйтЕ даллима OCTаьси OT XpaHaВ Каналпente 3a ra3.
-ПочиTeTe Bbpxa C Kbpya 3a Да He ce ПОВpeДИ OT BOДa, OЛЮ,napa
-He n3noI3BaIte abpa3nBn, MeTaNH yeTKN, ocTpN npEIMTeN, rpy6n MaTePnaJIN nn XmMkaJI N npEnapaTN KOHTO MOKe TpaIHo Da NOBpeDn KaTaN3aTopa.
- XeNaTeJIHo eДа ИЗнОЛЗВaTe ДьЛБОka Taba 3a roTBeHe Ha Ma3HO MECO I NOCTaBete CBД ПОД CkapaTa 3a Cb6IpaHc H aMa3HnHaTа.
IoucmeheHaepamamaHa yphama
3a zyloctno yinCTeHe Ha BpaTaHa h cyphHata, ce n penOpbYBa Da ce n3kapa, KaKTo e NOKa3aHO Ha CHIMKaTAt.
OTbopete Bpata Na3zJIO, 3aBbptete DBeTe Kpaeta Ha 180°. 3aTbopete YactnUHO Bpata Ta Ha 30°. IpbHneTe Bpata C BHMaTeJIHO NOBmIraHe OT Ta3N N03nZna 3a BpbuaHe Ha BpataTa\cbuNTe CTbIKn PO o6paTHnpei.
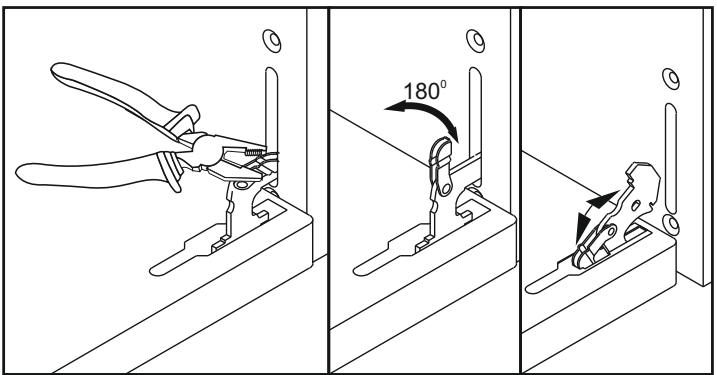
φuεypa 16
3a cmraHa BaBbTpewHaTaJaMaNa
-ИЗклоче Te 3axpaHbauця Ka6eJ N OTBnHTeTe JAmnPata.
IopmeHete CnEHTNuHa TepMoUcTouBa JAmna.
- HnKora He n3noJ3BaIte npa 3a nouchTaHe.
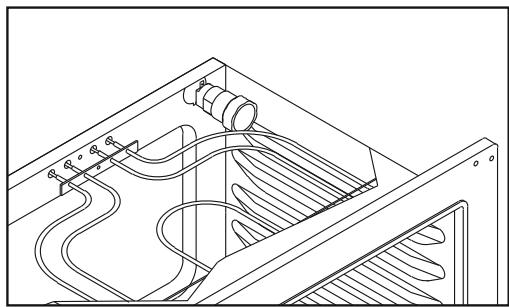
phiyapa 17
5.1. NOUHCTBAHE HA NEPKATA 3A FOTBEHE
-CneuajnncamonocTbaunCe naheNc MKNpOpaHnHa 0bnoKka ca Ha pa3noJIOKeHne npn HkON MoJeN.
-Поголум Колунecтбо Наслова Мазни можende за заши попесу
3а самоночьан.Таи Вьз金融机构 за самоночьане можende за
6ьдe наразевна на праэна пechа мakсимуm 10-20 минуtn.
-Akno nO CTeHnTE Ha cyphhata hma HacnoeHO Ma3HnHa IbpBO rOTCTpaHete C meKa KbPna nnr T6a C tonla BODa. KaTaNtHNOTo NOUCTBaHe hma XNBOT OKONO 300 Yaca, cneD TOBA Tp86Ba da ce NODMeHn.
6. CEPBNU3EH UENTbP IN IPOBJIEMN
Please apply the following procedure while placing your oven.
1- Place your oven to the place of use and make its height and level adjustments.
2-Determine the H and Y measure as indicated in the figure and mark the wall to which the oven will be fixed. (Figure A)
3- Fix the wall mounting fixture (in the service pouch) on the wall using a dowel and screw (not provided). (Figure B)
4- Push the oven backwards and make the fixture settle in the slot on the back side of the oven. (Figure C)
The fixture will function when inserted 20mm deep in its slot.
The manufacturer will not be responsible for any inaccuracy resulting from printing or transcript errors contained in this brochure. We reserve the right to carry out modifications to products as required, including the interests of con sumption, without prejudice to the characteri stics relating to safety or function.