
SEASHELL IX/F/80 - Kitchen hood ELICA - Free user manual and instructions
Find the device manual for free SEASHELL IX/F/80 ELICA in PDF.
User questions about SEASHELL IX/F/80 ELICA
0 question about this device. Answer the ones you know or ask your own.
Ask a new question about this device
Download the instructions for your Kitchen hood in PDF format for free! Find your manual SEASHELL IX/F/80 - ELICA and take your electronic device back in hand. On this page are published all the documents necessary for the use of your device. SEASHELL IX/F/80 by ELICA.
USER MANUAL SEASHELL IX/F/80 ELICA
Closely follow the instructions set out in this manual. All responsibility, for any eventual inconveniences, damages or fires caused by not complying with the instructions in this manual, is declined. The hood is conceived for the suction of cooking fumes and steam and is destined only for domestic use.
The hood can look different to that illustrated in the drawings in this booklet. The instructions for use, maintenance and installation, however, remain the same.
It is important to conserve this booklet for consultation at any moment. In the case of sale, cession or move, make sure it is together with the product.
! Read the instructions carefully: there is important information about installation, use and safety.
! Do not carry out electrical or mechanical variations on the product or on the discharge conduits.
! Before proceeding with the installation of the appliance verify that there are no damaged all components. Otherwise contact your dealer and do not proceed with the installation.

Caution
WARNING! Do not connect the appliance to the mains until the installation is fully complete.
Before any cleaning or maintenance operation, disconnect hood from the mains by removing the plug or disconnecting the mains electrical supply. Always wear work gloves for all installation and maintenance operations. The appliance is not intended for use by children or persons with impaired physical, sensorial or mental faculties, or if lacking in experience or knowledge, unless they are under supervision or have been trained in the use of the appliance by a person responsible for their safety. This appliance is designed to be operated by adults, children should be monitored to ensure that they do not play with the appliance. This appliance is designed to be operated by adults. Children should not be allowed to tamper with the controls or play with the appliance. Never use the hood without effectively mounted grating! The hood must NEVER be used as a support surface unless specifically indicated. The premises where the appliance is installed must be sufficiently ventilated, when the kitchen hood is used together with other gas combustion devices or other fuels. The ducting system for this appliance must not be connected to any existing ventilation system which is being used for any other purpose such as discharging exhaust fumes from appliances burning gas or other fuels. The flaming of foods beneath the hood itself is severely prohibited. The use of exposed flames is detrimental to the filters and may cause a fire risk, and must therefore be avoided in all circumstances. Any frying must be done with care in order to make sure that the oil does not overheat and ignite. Accessible parts of the hood may become hot when used with cooking appliance. With regards to the technical and safety measures to be adopted for fume discharging it is important to closely follow the regulations provided by the local authorities. The hood must be regularly cleaned on both the inside and outside (AT LEAST ONCE A MONTH). This must be completed in accordance with the maintenance instructions provided in this manual). Failure to follow the instructions provided in this user guide regarding the cleaning of the hood and filters will lead to the risk of fires. Do not use or leave the hood without the lamp
correctly mounted due to the possible risk of electric shocks. We will not accept any responsibility for any faults, damage or fires caused to the appliance as a result of the non-observation of the instructions included in this manual. This appliance is marked according to the European directive 2002/96/EC on Waste Electrical and Electronic Equipment (WEEE). By ensuring this product is disposed of correctly, you will help prevent potential negative consequences for the environment and human health, which could otherwise be caused by inappropriate waste handling of this product.

The symbol on the product, or on the documents accompanying the product, indicates that this appliance may not be treated as household waste. Instead it should be taken to the appropriate collection point for the recycling of electrical and electronic equipment. Disposal must be carried out in accordance with local environmental regulations for waste disposal.
For further detailed information regarding the process, collection and recycling of this product, please contact the appropriate department of your local authorities or the local department for household waste or the shop where you purchased this product.
Appliance designed, tested and manufactured according to:
- Safety: EN/IEC 60335-1; EN/IEC 60335-2-31, EN/IEC 62233.
Performance: EN/IEC 61591; ISO 5167-1; ISO 5167-3; ISO 5168; EN/IEC 60704-1; EN/IEC 60704-2-13; ISO 3741; EN 50564; IEC 62301. - EMC: EN 55014-1; CISPR 14-1; EN 55014-2; CISPR 14-2; EN/IEC 61000-3-2; EN/IEC 61000-3-3. Suggestions for a correct use in order to reduce the environmental impact: Switch ON the hood at minimum speed when you start cooking and kept it running for few minutes after cooking is finished. Increase the speed only in case of large amount of smoke and vapour and use boost speed(s) only in extreme situations. Replace the charcoal filter(s) when necessary to maintain a good odour reduction efficiency. Clean the grease filter(s) when necessary to maintain a good grease filter efficiency. Use the maximum diameter of the ducting system indicated in this manual to optimize efficiency and minimize noise.
Additional Installation Specifications:
Use only the fixing screws supplied with the product for installation or, if not supplied, purchase the correct screws type. Use the correct length for the screws which are identified in the Installation Guide. In case of doubt, consult an authorised service assistance centre or similar qualified person.
WARNING! Failure to install the screws or fixing device in accordance with these instructions may result in electrical hazards.
Use
The hood has been made for use in the internal recirculating filtering version.
Cooking fumes and steam are aspirated inside the hood, filtered and cleaned, passing through the fat filter/s and the carbon filter/s that MUST be supplied with the hood.
Installation
Specialised personnel must carry out both the electrical and the mechanical installation.
The minimum distance between the supporting surface for the cooking equipment on the hob and the lowest part of the range hood must be not less than 60cm from electric cookers and 70cm from gas or mixed cookers.
If the instructions for installation for the gas hob specify a greater distance, this must be adhered to.

Electrical connection
The mains tension must correspond to the tension shown on the characteristic label situated inside the hood.
The product is meant for connecting directly to the mains supply, therefore apply a regulation bipolar switch that ensures complete disconnection from the mains in the conditions of category III over-tension, conforming to the installation rules.
Warning! Detail B (fixing bracket to the ceiling - Fig. 1) is equipped with a conductor (yellow-green) that must be connected to the earth of the domestic electrical plant.
Fig. 4
Warining! Changing the interconnection cable must be carried out by the authorised technical assistance service.
Mounting
This type of cooker hood must be fixed to the ceiling.
Very heavy product; hood handling and installation must be carried out by at least two persons.
Expansion wall plugs are provided to secure the hood to most types of walls/ceilings. However, a qualified technician must verify suitability of the materials in accordance with the type of wall/ceiling. The wall/ceiling must be strong enough to take the weight of the hood. Do not tile, grout or silicone this appliance to the wall. Surface mounting only.
Operation
Use the high suction speed in cases of concentrated kitchen vapours. It is recommended that the cooker hood suction is switched on for 5 minutes prior to cooking and to leave in operation during cooking and for another 15 minutes approximately after terminating cooking.
Note: if the hood does not work, make sure that it is ON by using the ON/OFF button.
Remote control
Warning! Some functions of this remote control may only be activated with certain hood models.
Remote control affiliation:
Keep T2 +T5 pressed within the first minute the hood is powered. Once pairing is complete it is displayed on the hood.
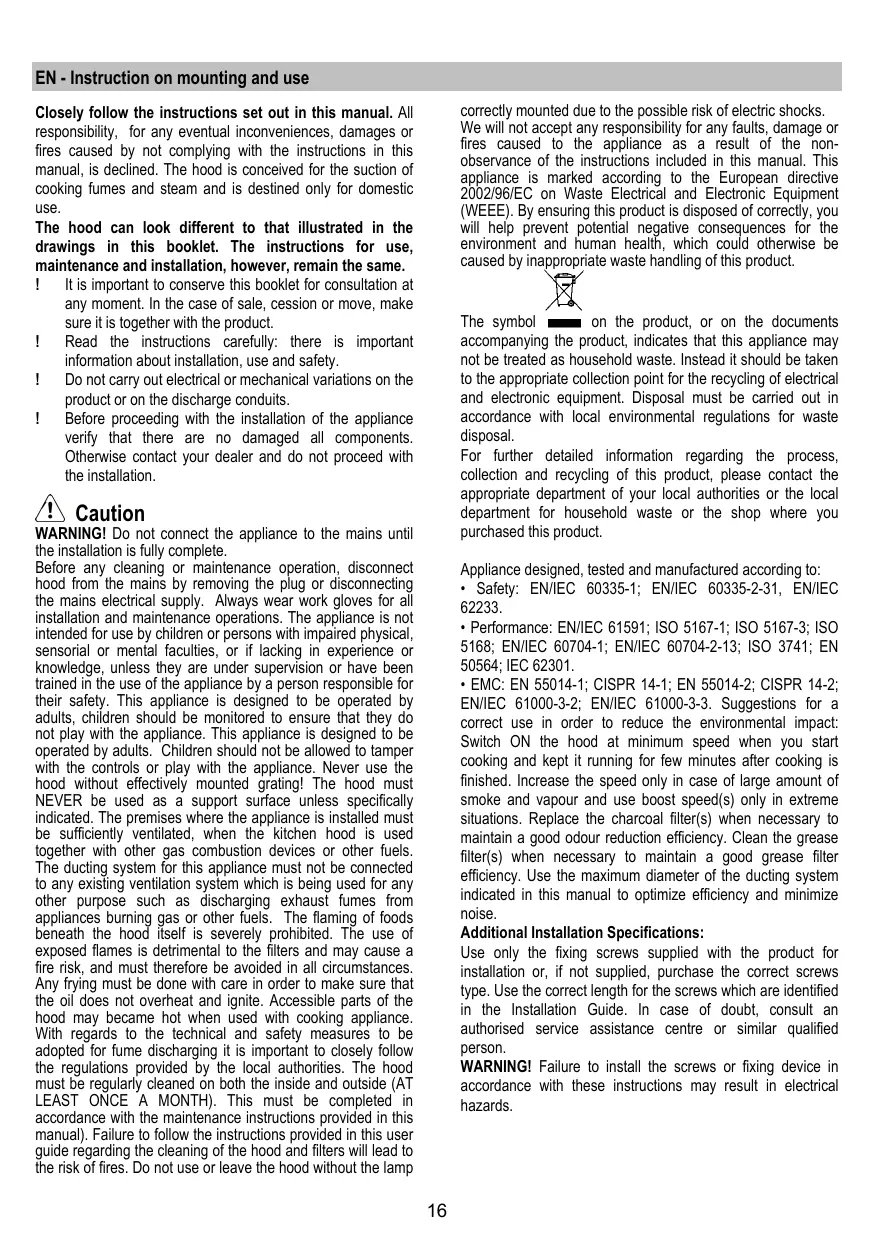
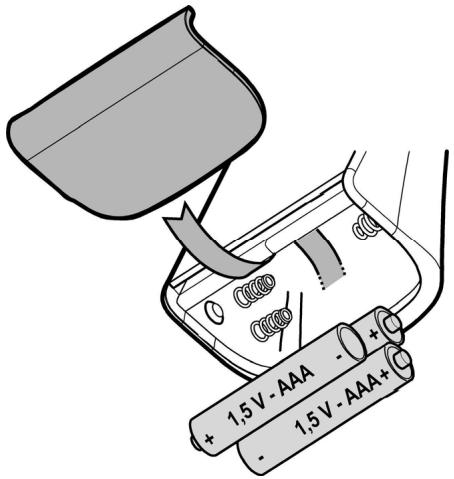
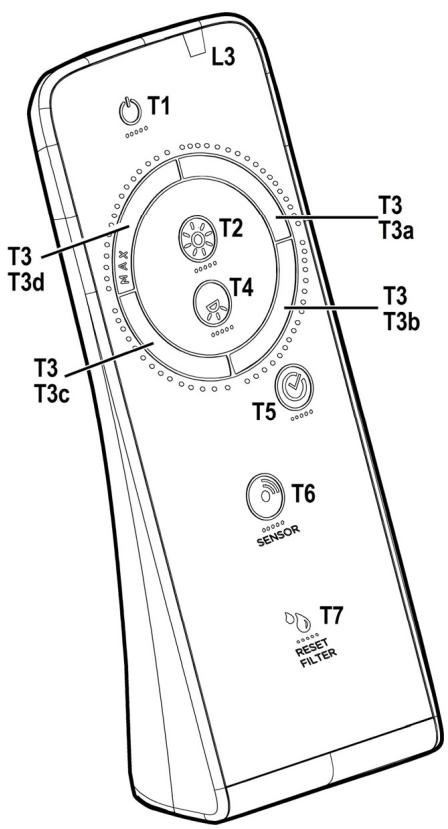
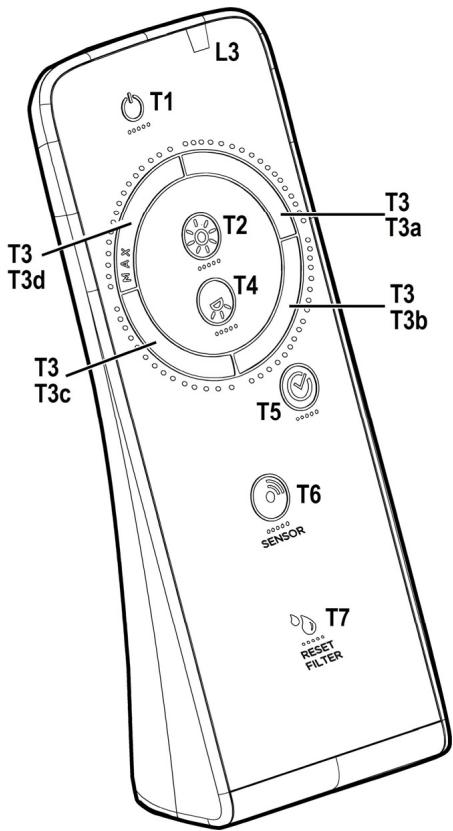
Description of the remote control functions
T1. OFF key
T2. ON/OFF key and dim light intensity adjustment
T3. Suction speed (power) control key:
T4. Hob light ON/OFF key
T5. Delayed hood ON/OFF key
T6. Sensor ON/OFF key.
T7. Filter saturation warning reset key.
L3. Remote control operation LED
Note: touch the keys lightly to select the available functions.
T1. OFF key
Press to switch the hood off
T2. ON/OFF key and dim light intensity adjustment
Press briefly to switch the dim light on or off Press longer to adjust intensity.
Note: The dim light is only available on some models.
T3. Suction speed (power) control key
Touch the key starting from any position, turning it clockwise or anticlockwise to increase or decrease suction speed.
The key is divided into several sectors. You can select the desired speed directly in the corresponding sector as follows:
T3a: Speed 1 (low suction)
T3b: Speed 2 (medium suction)
T3c: Speed 3 (high suction)
T3d: Speed 4 (intensive suction)
Hob light ON/OFF key
Press to switch the hob light on or off.
T5. Delayed hood ON/OFF key.
LED L2 on the hood flashes the same colour as LED L1.
Press to program the delayed switch-off of the hood based on the suction speed (power) active at that moment:
Speed 1 (low suction): 20 minutes
Speed 2 (medium suction): 15 minutes
Speed 3 (high suction): 10 minutes
T6. Sensor ON/OFF key
Keep it pressed to activate/deactivate the mode with sensor which manages fume extraction in automatic mode.
Note: The sensor is only available in some models.
T7. Filter saturation warning reset key.
With the hood off, press T7, the LED L1 quits signalling the saturation warning.
Maintenance of the remote control
Cleaning the remote control:
Clean the remote control with a damp cloth and a neutral solution of detergent without abrasive substances.
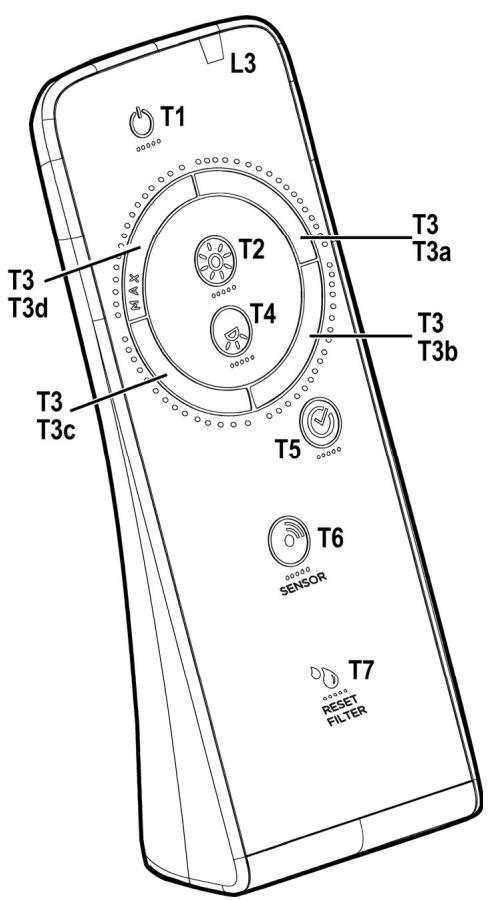
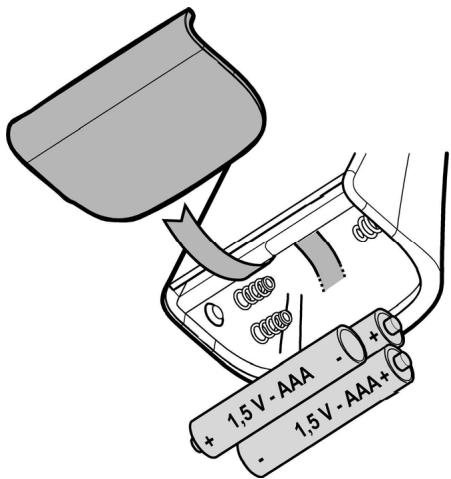
Changing the battery:
- Open the battery casing.
- Replace the flat batteries with 3 new 1.5V type AAA batteries.
Respect the polarity indicated in the battery casing when inserting the new battery!
- Close the battery casing up again.
Disposal of the batteries
Ultimate disposal of the batteries should be handled according to all national laws and regulations. Do not place used batteries in your regular waste.
Ultimate disposal of the batteries must be done safely.
Contact your local waste management officials for other information regarding the environmentally sound collection, recycling, and disposal of the batteries.
Maintenance
ATTENTION! Before performing any maintenance operation, isolate the hood from the electrical supply by switching off at the connector and removing the connector fuse.
Or if the appliance has been connected through a plug and socket, then the plug must be removed from the socket.
Cleaning
The cooker hood should be cleaned regularly (at least with the same frequency with which you carry out maintenance of the fat filters) internally and externally. Clean using the cloth dampened with neutral liquid detergent. Do not use abrasive products. DO NOT USE ALCOHOL!
WARNING: Failure to carry out the basic cleaning recommendations of the cooker hood and replacement of the filters may cause fire risks.
Therefore, we recommend observing these instructions.
The manufacturer declines all responsibility for any damage to the motor or any fire damage linked to inappropriate maintenance or failure to observe the above safety recommendations.
Grease filter
Fig. 13
Traps cooking grease particles.
The grease filter must be cleaned once a month using non aggressive detergents, either by hand or in the dishwasher, which must be set to a low temperature and a short cycle.
When washed in a dishwasher, the grease filter may discolour slightly, but this does not affect its filtering capacity.
Charcoal filter (filter version only)
Fig. 13
It absorbs unpleasant odours caused by cooking.
The charcoal filter can be washed once every two months using hot water and a suitable detergent, or in a dishwasher at 65^ (if the dishwasher is used, select the full cycle function and leave dishes out).
Eliminate excess water without damaging the filter, then put it in the oven for 10 minutes at 100^ to dry completely.
Replace the mattress every 3 years and when the cloth is damaged.
Replacing lamps
For replacement, contact the technical service.
T3d : Vitesse 4 (aspiration intensive)
ANVAND INTE ALKOHOL!
Tryk for at slukke for emhaeten
- Ebponeckata dupekTbBa 2002/96/EC
- Waste Electrical and Electronic Equipment (WEEE).
YBepaiknCe,TeO3n ypeJne 6bJe peuKlnpapn no NooobabaunrTa TOBA HauHn, BBe DonpHaacTe 3a OanBaHeTNOkONHATAcpeN aBauTeO 3dpabe.

CmBbIbT BbPx ypea IINB nPnDpykBaAuaata ro DOKyMeHTaunia NocOuBa,Ye To3n npDyKT He Tpr6Ba da 6bde CHTAH 3a Domauhen OTNaBbK, a Tpr6Ba da 6bde npeaaden B CneuaHNO PnpDAHaehENITE 3a TOBA NYHKTOBE 3a peuKnIpaHe H eNEKTPnueCa H eNEKTPoHnHa TEXHnka. PtnpBpKaJte Ce KbM MeCTHnTe HopMaTnBu 3a npepa60Ta Ka HTaDbLc. 3a No-nOpRoHa INHΦopMaUcaa B BB Bp3Ka c PnpDaBaHETo, Cb6PiKeH O neuKnIpaHETo Ha To3n PnpOyKT Bn CbBETBame Da ce ObpHete KbM KOMnTeEHNTHe MecTHn CnyKbN, CnyKbnte 3a Cb6Piane Ha DomauHH OTNaDbLc INI Ma3AnHbT, B KOITO CTe 3akynnnTo3n en. eyed.
YpeIbTe InpoeKTIpaH, TECTBaH I npOIN3BeHeB CbOTBETCTBNE C:
- Bezonaachoc: EN/IEC 60335-1; EN/IEC 60335-2-31, EN/IEC 62233.
- Pa60THN xapaKTepeNCTnK: EN/IEC 61591; ISO 5167-1; ISO 5167-3; ISO 5168; EN/IEC 60704-1; EN/IEC 60704-2-13; ISO 3741; EN 50564; IEC 62301.
EMC - ENEKTPOAMHHTA cBMBCTNMOCCT: EN 55014-1; CISPR 14-1; EN 55014-2; CISPR 14-2; EN/IEC 61000-3-2; EN/IEC 61000-3-3.
IpeDnoXeHn 3a npBnHa yOnTpe6a, 3a da ce HamaJIb B3dEJCTBMeTO BpXy OKoHATA cpeA: BkNoHTe (ON) acnHpTaOp Ha MNImMaJIHa CkOPOCT, KORATO 3anoHcTe Da rotBNTe I rO octABete Da paOTo NHKoKIO MHyTN cJeI prNkIOuBaHe Na rOtBEHTo YBeUNHabeTte CKOPoCTTa camo B ClyuH a Ho rOJlMO KOINueCTBO DmI n Napn I N3IOITBAWe TbeYNeuHIne CKOPoCTNa Camo B EKCtPemHn CntyaUHM. CmeHnIte FmTTbpa/FmTTPrTE C AKTNBEH BvTJHeN, KORAto E Heo6xOIMO, 3a Da NoDlbPxAte Do6pa eFKeTbHOCHT Ha HAMAJBaBe Ha Mnpu3MaTHe POnCTBaTHe FmTTbpa/FmTTprTE 3a Ma3HNH, KORATO E Heo6xOIMO, 3a Da NoDlbPxAte Do6pa eFKeTbHOCHT Ha FmTTbpa 3a Ma3HNHIne. MOnTbBAite MAKCIMMaHnIy DmAMETp b Ha CnCTeMaT a 3a OTBexKaHe Ha B3dyxa, NocOeH B TOBa pKOBODCTBO 3a ONTMIm3nPaHe Ha eFKeTbHOCCTTa n 3a HAMApBABe Ha WMyA.
BHIMAHHE! Hen3BpUbaHTo Ha MOHTaJa Ha BInTOBeTe HaФnKcnpauTe MEXaHN3Mn B CbOTBETCBNE C HACTOJIte INHCTpykLm, Moke da DoBoBeDe Do PNCKOBe OT eNEKTPnuecko ECTECTBO.
Ynotpe6a
AcnipatopbTe npedHa3nueh 3a ynoTppe6a BvB BapnHT Ha cnTnpuraC Bepcna C Btpeuho peuknpahe.
ДиMbTи napata,KOnTO ce OTdJIaT npn rotBHece 3aCMyKBb BvB BvTpEshOCTTa Ha acnnpatOpa, CneI KOETe CEФИТрпатиnpueYcTBat npe3ФЛТьpa/ФИТрпte 3a Ma3HmHn HФЛТьpa/ФИТрпte CakTNBEH BvIeH,C KOnTO Tp8BaJa e cHa6DeH acnPapatOpa.
MOHTIPAHe
En. Bp3knte n TexHnueckata qact np MoHTnpaHe Ha acnnapota Tpa6Ba da 6bdat N3BbpseHn OKbaJInΦnucpan nepcoHaj.
MHHMaHHTO pa3CToHHe MEXdy NOBbpxHOCTTa, Ha KOrTO ce NoCTaBRT cbDoBete 3a RotBeHe nHa Hn-HNCKata YacT ha kXyHeCNKHa acnPiAtop, Tp6Ba Da bDe He no-MAnKO OT 60cm B cnyaH na EneKTpyeckn neekn Hne no-ManKO OT 70cm, B cnuyaH raZobn IIn KOMOHNHPaHa neekn.
Ako B INCHTpyKUHHe Ha ra3OBuYpeI 3a roTBeHe e nocOeHo NO-TOJIAMo pa3CTOAHne, TO Tp8Ba Da ce Ima npEdn.

En.Bpb3ka
Hnpeheneto, KoTo npotuHa no en. Mpejata Tp8bA da OTOBapra Ha napeheneto NocOeHO BbPxy EtMKeta CbC CbOTBeTHnte XapakTepcntKn OT BbTpewHaTcTaHa Ha acnipatopA.
To3n npOdyKT e npEHa3HaueH 3a DnpeKTHo CbBp3BaHe KbM 3axpaHbAaUata MPexa. 3a ZENTa MOHTnpaIte DbyPONIOceH npEcbcAhy, KOIT OTO OTROBapra Ha HOpMITE 3a 6e30naCHOCHT N KOIT Da rapaHTnpaZIyNocHTO N3KNIIOvBaHe Ha MPexaTa B cnuay Ha CBpbXhAnpExeHne III, CbflNaCHO npabInata 3a NHCTaIInpaHE.
BHUMAHIE! DetaB n (nnaHka 3a fKcnpahe KbM tabaHa -Fnr.1), e Ch6Dc H cnpoBOnHK (XbTno-3eNEH), KOTo Tp8Ba da bDe 3a3EmeH KbM en. INCTanaAunrTa ha Xnnueto. Fnr.4
BhImaHne!IoMnHaTataKa6eJa3aMeKdHnHO CbP3BaHe Tpa6Ba Da 6bDe OcBJeCTBeHa OT yIbIHNOMOeH cepBn3 a TeXnuecko o6CnyXbaHe.
MOHTAX
To3n BnD acnnpatop Ce MOHTnpa KbM TabAH
YpeD C MHO RONAMO TERNO G NpemeCTBaHETO INHCTaInpaHeto Ha acnpaTopa Tp8bda da ce N3BbPbBaOT haMgMaNKo Dbama duyu.
PnB CTOBA, Bn npenopbYBaMe da ce nocbBetBaTe c KBAINΦmuaipan TeHnK, 3a Da CTE CnpyHn, ye DCtABeHNte akcecoapn CaNDXoAun 3a CEJTA. CTeHATA, CbOTBeTHO tabaHbT, Tpa6Ba DA bDaTdoCTaBHyHO CTaBUNH 3a Da N3DbpKAT Ha HATOBaBaHETO.
Haun Ha ynoTpe6a
Ako npn roTBHe ce otDeJIa MHOro napa, npemHHeTe Ha MAKcIManen pexmHa pa6ota. IpenopbChteIHO e da BKNIOHTe acnnpatopa 5 MNHyTn npedn da zanoHHe Ta rotBnE Na ro octabnE da pa60n OOE 15 MNHyTn cneJ kato npNKIOHTe.
3a6eJekka: ako acnnapatopbT He pa60Tu, npOBepTe daJIIN 6yToHbT ON/OFF eB nO3uIa "ON".
Cbpb3BaHe Na dntaHOnHo ynpabNeHne:
HaTNCHe T2 + T5 npe3 mbpbata MNHyTa Ha 3axpaHbAne Ha acnnpaTopo. OcbuectBeHTo cBbP3BaHe ce Bmka Dbpxy acnnpaTopo.
OnncHHe Ha cyHKcImTe Ha dNCTaHcUOHnHO ynpabJeHne
T1. ByToH OFF
T2. BytoH ON/OFF n perynipaHe Ha nHTeH3nBHOCTTa Ha Mekata CBETJIInHa
T3. Bytoh 3a ynpablenHe Na ckopoCTTa (MoUHocT) Ha acnnpupaHe:
T4. BytoH ON/OFF 3a CBetInHa NaI rotBapckn IIOJ
T5. Bytoh ON/OFF 3a otloxKeHnKlUyBaHe Ha acnpaTopa
T6. BytoH ON/OFF ceH3Op.
T7. BytoTH 3a HynipaHe Ha cnHnIm3npaHTo 3a HacnUaHe Ha nItpn.
L3. CBeTJInHeH INDkaTop 3a pa6Ota Na dIcTaHcIOHnHO ynpabJIeHne
3a6eJekka:doKocBaIte 6yToHnTe, KaTO ynpaxKaBaTe IeK HATNC, 3a Da n36epTe hAnuHnTe cyHKU.
T1. ByToH OFF
HaTncHe, 3a da nKIOUHTe acnnpaTopa
T2. Bytoh ON/OFF n perynipane Ha nHTeH3nBHOCTTa Ha MeKaTa CBeTIHa HATiCHETe KpaTko, 3a Da BkIOHte NIN N3KIOHTE MeKaTa CBeTIHa HATiCHETe 3a NO-DbIro, 3a da perynipate INHTeH3NBOCTTa N.
3a6eJIeKka: OcBETIeHHeTo C MeKa CBETIIHa e HAIuHcMo pIn HAKOINMOJI.
T3.БуTON 3a ynpablenHe Na ckopoCTTa (MoUHcT) Ha acnnpipaNe DOKOCHEte BSYOHA, KATO 3anOuHete OT KOYTO N Da e NO3nIyuaNpyaknBaTe BpTeJIbO DBINKeHne No Nocoka Ha dBINKeHne Ha YacobNHOBATA CTpeKna I O6paTHO, 3a Da yBelenHTe Nn HamaJIte CkopoCTTa Ha acnnpauNTa.
BytoBt e pa3deneH ha JkOJIko cekTopa, kaTo JeIaHaTata ckopocT MoKe Da ce n3bepe ype3 dIpeKTHo HATnCKaHe B CbOTBeTHna cekTop, KaKTo cJeDbA:
T3a: Ckopoc1 (cna6a acnpaun)
T3b: Ckopoct 2 (cpeHa acnnpaun)
T3c: Ckopoc3 3 (CnIHa acnnpaun)
T3d:CKoPocT4(HTHeH3nBHaacnipaLna)
T4. ByToH ON/OFF 3a cBETInHa HaI roTbAPCKnI pIOT HAtINcHTe, 3a Da BKNIOUHTe INI N3KNIQUHTe CBETINHaTa 3a OCBETBAHe Ha roTbAPCKnI pIOT.
T5. Bytoh ON/OFF 3a oToIooKeH O3KIOUOVAHe Ha acnnpaTopa. CBeTIHHmT INDnKaTop L2 Bbpxy acnnpaTopa Mmra B CbIuN aBRT KaTO CBETNIHEn INDnKaTop L1.
HaTnCHeTe, 3a Da npOrpaMpaTe OTNoXeHOTo N3rAcBaHe Ha acnPaTopa Bb3 OChOBa HA CKOpocTTa (MOUHOCTTa) Ha acnpaZna, AKTNBA H TO3N MOMENT:
Ckopoct 1 (cna6a acnpaun)20 MNHyTn
CkopocT 2 (cpeHa acnnpauny):15 MmHytn
Ckopoct 3 (cnilha acnpaun): 10 MNHTN
T6. ByToH ON/OFF cEh3Op.
HaTnCHeTe nbIro, 3a da aktINBnPate/DeakTNBnPatepekXmAbc cEh3Op, KOITnpedBnKda aBTOMaTHUHO npapBJeHne Ha acnnapuaTata.
3a6eIeKka: Cen3OpbTe hAnuHcN CaO npn HrkO MoDeJI.
T7. Bytoh 3a hynpahe Ha cnHnIIm3npaHeTo 3a HacnIaHe Ha nIPTne. Pn n3knIOeH acnpaTop HatncHE T7 nCBETnHHnT INnKATop
L1npctaba da cnHaJIIN3Ipa 3a hAcnIaHe.
Poiipbxxka Ha nctaHnOHnHO
TouncBaHe:
IunctaHIOHOHTe Ce NOcHCTBa C HablaXHeHa KbPna I HeTpajHn NoCtBaUpi PpenapATN, KOITo HE CbDbPxKat a6p3aBHN uactu.
Подмая на застура:
- OtbopeTe mactoto 3a 6atepnaTa.
CmeheTe m3ToeHnTe 6aTePm n C 3 HOBn 6aTePm n OT nO 1.5V TnAAA.
BHMaHHe! He nouchTaBaiTe HNKora cbc Cnpt!
BhimaHne! HecnBaHaHo Ha HopMITE 3a noHcTbaHe Ha acnHaTopa Na 3a noMaHa Ha qInTPte BOn Do pNCKOBe OT noXap. CnaBaIte cTporo nocOeHnte IHCTpyKuIN!
He ce noema HnKakBa OTROBOPHc3a eBeHTyaJIHn 8eTn HaHeceHn PO MOTopa IN IOXapu, Bb3HnKHaJN CNECTBne Ha He npabInHa NoDpBjXKa INI IN HeCnA3BaHe Ha NactOyUnte INHCTpyKUIN.
ФиNTbрзаMa3HINH
Φnr.13
ФиNTbpyT 3aIbpxa Ma3HnTe YactnU, OTdJIaHn npn IOTBeHe.
IpoHCTBa Ce BeDnBc MeceHc C HeYtpaHn npepaTn. Mne ce pTuHO INN B CbDOMMaHa MaHInHa Ha Hncka TemnepaTa pa INKpaTbK peXIM Ha N3MmBaHe.
PnMneHaΦnTbpa3aMa3HNHnBcDmNJIHaMaJINHa eBb3MOxHOToIaCeObE3uBETn,HO TOBa HNKaKbB CJIyauHe HamaJIraCnOC6hOCTaMyHaΦnITpnpaHe.
ФиNTbP cakTNBeH BbIeH (cAmO 3a ФиNTpnpaHaBepcn)
Фг.13
3aIbPka HnepnraTHnTe Mnpn3Mn, KOHTO ce OTdEJrT npn IpbxKeHe.
ФинтbpbT c AkTNBEH BByIeN MOKe DA bIe NOcIbTBaH BaBcKn DBa Meceua. Mne ce TOnna BODa N OndOxrau npenaparntu INN B cbDommaHa MaunHa Na 65°C (BTo3n Cnyau Tp8Ba Da n3IbNHTe peXmHa Na m3MBAHe dOkpaN i B cbDommaHaTa MaunHa He Tp8Ba Da mMa dpyrCbDoBe).
Iocyuete Bnmatelno fntbpa, cne Koeto ro noctabe BbB yphata 3a OKo10 MmHytna 100C.
TeKCTINHHTe B3rnaBnHcN HaФntbpa TpI6Ba Da ce noDMeHrHa BCEK TprnoDmHn NnA KO NBpXHOCTTa NM e yBpeDeHa.
POnmHa Ha en. KpyuKn
3a IIOIMHa Ce ObprHe T KbM CepBn3a 3a TEXHnuecko 06cIyXBAhe.
UcTpoCTBO pa3pa6oTaHO,MCbItaHO uN 3roTOBnEHO B COOTBTCTBM C:
-
Be30anachocTB: EN/IEC 60335-1; EN/IEC 60335-2-31, EN/IEC 62233.
-
3KnclnyatauOnHbIe xapaTepeNCTnK: EN/IEC 61591; ISO 5167-1; ISO 5167-3; ISO 5168; EN/IEC 60704-1; EN/IEC 60704-2-13; ISO 3741; EN 50564; IEC 62301.
-
3MC: EN 55014-1; CISPR 14-1; EN 55014-2; CISPR 14-2; EN/IEC 61000-3-2; EN/IEC 61000-3-3. Прдножени дяправильною NGONьзовни вцеля снжени ВОЗдевеля на КOKУЖАUGUуСРуВДБКИНDEТСЕДУ:ВБКИNGHTБВITЯЖОН KOLINAK Ha MINHмально CBOKOCTM, KORDAHaNCHaeteROTOBNTB, NOCTABTe erO paBOtaTB B TeeyHne HeCKOLbKHX MNHYT NOCJI TOTO, KAK 3AKOHNTe TOBOTuBt. YBEJIMnBaTE ChOKOCTb TOnbKO B CNYuae BoNbUoro KONJIeCTBA DbMa nnapa, И prNbeger K NCONsB3OBANHO NOBVIIHeHHbIX CKOPoCTe TOnbKO B 3KCTpeMaJIbNbIbIX CNTyauJnx. 3aMeHNeTRe yOrNoBHy IФInbTp(b), KORDA STO HeOBxODmO, dI NaNDepKAnH XOPOWeI 3ΦΦeKTHNBOCTH yMeHbSeHnzaXanoxo.OvNuaaTe JxpoRbVBe MfNtp(b), KORDA STO HeOBxODmO, dI NaNDepKAnH XOPOWeI 3ΦΦeKTHNBOCTH xNPOBOrO FInlbTa. IVcNpONByte MACKImaJIbHbI dIaNMeTp CNCTeMbI BO3DyXOBOD, YkA3AHHbI B DAHNOM PYKOBOCTB, dI ONTNIMZaUIN 3ΦΦeKTHNBOCTH mMINHMzAUm yPBOH yUMa.
BHUMAHNE! OTCYCTBVE YCTAHOBN BUNTOB N yCTPOBCTB KPNENHBA COOTBTCTBN C 3TMM NHCPTKUAMM MOKET NOBNEb3a CO6OIN PCKN JNEKTPMHECKORO XAPAKTepa.
Ponb3ObaHne
BbTjKaCKOHCTpyuropBaHa DnIpa6oTbI BpeKMe peUpkyIaun BO3dyxa.
KkyoHHbIe DbIMbI n napbl, BbITrMaebMbIe BHytpb npi6opa, noDBepraTcF qnIbTpauu m OChTe Kepe3 qnIbTp/b 3aedpKKn Jnpa n yroJIbHbI/bE FmIbTp/bI, KOtopbIMN DOJTKHA 6bItch ChabKeHa BByTjKa.
YctaHOBka
YctaHObKa kak MexaHuecko, TaK n 3JIeKtpuecko Yactn DOnJXHa BblNOJIHrTbcra CneuaIaN3NpOBAHHbIM nepcoHaON.
PacctoHHe HxKHe IpaHn BbITJxKHaIOnOpHoi pIOCKOByIO IOcOyDi HA KxOHHO PIHTe DIOXHO 6bITb He Mehee 60cm -Ipy 3NeKtpueCeKHXPiNT, Hne Mehee 70cm dIpy Ra3OBbIX INI KOM6HINHPoBAHHbIX PJIINT.
EcnB INHCTpyKUxN NO yCTaHOBe rA3OBoI PIIITbI OROBOpeHO 6oJIbuee paCCTOHNHe,To yHTnte 3TO.

3NeKtpnueckoe coeHHeHne
HapnKHeHne cTe n DoJIxHO COOTBCTCBOBAtb 3HaeHHIO, yka3aHmOy Ha TaBnUKe TEXHuecknx DaHHbIX, pa3MeIeHHo BHyTPO np6Opa.
I3dene cKoHcTpynpoBaHO nI pynMOro nOdoeINHeHnK CETNI PNTAHN, DnI YrO HeoXoDnMO PnIMEHnTB NaIeXaUm DByXnIOuCHbbl BkIIOuHTelb, KOtOpBn Oecneyn 6bl noHoe npepbIbAme NITAHn npn BO3NHKOHEHn ycNoBn pepehApNxHEn 3-ei KaterOpn, BCOOTBCTBN C pAbnAmn NO yCTAHOBke.
BHIMAHNE! DeTalb B (KPOHtEINn DnN KpENJIeHnK notOnkY - Pnc.1) Cha6ZHeNA npOBOHNKOM (KeITo3eNEhBIM), noCDoeINHReEMbIM K KOHTpy 3a3eMHeNBAeDOMaHHe NJEKTPNVECKOn yCTAHOBKn.Pnc.4
BHMHHe! Opeaunno 3aMeNe npObDa BHTpyENHX CoeHNHeNIOJXHa PnOIN3BOuNTbCryyONHMOeHHbIM nepCOHOAD CNYKx6b TYEHNCCKORO OBcYKXBAHIN.
YctaHObKa
3TOT TIN BbITXKIN DOnJIKeH KpeNITbcK NtOJIky.
UcTpoIcTB0 OTJInuAeTc8 60JIbIIM BECOM; IJn erO nepeHocKn u yctaHOBKn Tpe6yEtc H MeHee DByx YenOBek.
BbITRAKc ChabkeHa IIO6eMaM NJI KpeIeHnE ee B 0BbIshnCTBe CTEN/NOTOKOB. Ondako, Heo6xOdHMo 6bpaTbCk K KaIINuChiPouBAHHOMy TexNHy K y6eJntCbR TOM, YTO MaTePnAbl pInroDhl DAnDaHOrO TnA CTeHb/ NOTOKa. CHeHa/NOTOKO JOnKnHb ONaadTaOCHNO npOHTbO C yETOM Maccbl npi6opa.
Функционюразипe
NoIb3yITeCb INTHeCNBbIMpeXIMOMpa60tblbITKkBN Ccnyae OocO bIcKOK KOHueHTpaunu KYXOHbIXNcnapEHNI. Mbl peKomeHdye BKLIOHTbBtIRKky 3a5MHyTdoHaJana npoecca pnproTOBNEHnPiUsnOCTaNTbe EKIIIOUeHHOB TteHeMe 15 MNHTNOOKOHuaHNpOcecca.
PpHmeeaHHe cIIN BbITgKHe pa6OtaET, pOBepnTb YTObbl KONkA ON/OFF HaxoDInacB bNoJoxeHN ON
Adepcaunn dntanuohnoro npabneHna:
Дерхат b haxato T2 + T5 B TeueHn nepBOM MNHybI NITaHn BblTgKKn.
YcneuHoe 3aBepueHHe aDpeauHn 6ydt Noka3Ho Ha BbTjXke.
Oncanhe yHKnI npIbTa dNCTaHIOHORo ynpabJeHna
T1. Khonka BbIKI
T2. KhoNka BKNI/BbIKI IN HAcTPOKA INHTeHCBHOCTN MRAKORO OCEUENIA.
T3. KhoNka KOHTPOJIa CKOpOCTn (MOUHOCTN) BCacbIBAHNA:
T4. KhoNka BKNI/BbIKI OcBeueHnBapOuHn NOBepxHocTN
T5. KhoNka BKN/ByIKBbIKbIKHouEnHa BbITaERKKc C3aApKko
T6. Khonka BKJI/BbIKJI datuika.
T7. KhoNka 6pOca cHrHaJa HacbIeHnA qInbTpOB.
L3.ИнданкаторныйCBETODIOpa6bIДиCTAHUONHOROynpabJIeHnA
PpimmuHne. Cnerka kacatbca KhoNOK dna BbIbopa doctynhbx dyHKn.
T1. Khonka BblkN
HaxaTb, yTO6bI BbIKNIOHTb BbITAKKy
T2. KhoNka BkJI/ByIKIи NaCTPOJka INHTECNBHOCTM MaKTOO OCBSeHEnIaBbCTPO HxKaTb, YTObI BKJIIOHTb NIN BbIKIOHTb MIRKNI CBET DePkaTb HaxaToI dIoJIbIe, YTObl peYIpnoBaTb INTEHCNBHOCTb PnIMeayHe.MrKOE OCBSeEHNHe DOCTUH0 ToIbKO Ha HEKOTbIX MOdEJIaX.
T3. KhoIka KOHTPOJcKOpOCTn (MoUHOCTH) BCaCbBaHn
KochyTcra KhoNikn C IJIObO N03uINM, BbIOnJIaR BpaUaTeJIbHOe DBIXKeHne NO YAcOBo INI INPOTNB YacOB O CTpeIKN, UTObI yBeJIInHTb INI yMeHbUInB CKOpOCTb BCaCbIBAHn.
KhONka pa3deneHa Ha HeckOJIbKO CeKUIM, MoXHO BBy6paTb Tpe6yEmIO CKOpOCTb, HaxIMaH HeNOCpeDCTBeHHO B CeKUIM, CneDuOuIMo6pa3OM:
T3a: Ckopoctb 1 (H3Koe BCacbBaHne)
T3b: CkopoocTb 2 (cpeHHeB BCaCbBaHne)
T3c: CkopoocTh 3 (BbICOKOE BCaCbBaHne)
T3d:CKoPoocTb4(WHTEHCMBHOBcBaCbIbAHne)
T4. Khonka BKJI/BbIKI ocbeueHnBapouHNo nobepxHocTN
HaxaTb TTO6bI BKIOUOHTb IIN BbIKIOUHTb IaMNOChy IJIra OCBaIeHNRABapOHn IOBepxHOCTN.
T5. Khonka BKN/BlIKN BblKIOHEnBbITaepKKoN
Miraet CBETOIOIaL2 Ha BbITJXKe, TaKOrO JKe ZBeta, KaK mCBETOIOI L1.
HaxaTb, yTO6bI 3aNPorpaMMPOBaT bBikIOueHne C 3aIepKkoB, B 3aBNCIMOCTN OT CKOPoCTN (MOUHOCTN) BCaCbIBaHnA, NOkJIIOueHHO B HactoIiM MOMENT:
Ckopoctb 1 (Hn3Koe BCacbIbAHne): 20 MNHyT
Ckopooctb 2 (cpeJeHee BCacbIbAHne):15 MmHyT
Ckopoocb 3 (BbICOKoe BCaCbBaHne):10 MNHyT
T6. Khonka BKJI/BblKJI daTuKa.
DepkaTb DnIro Haxatoy TTO6bI NOKIIIOHTb/OTKIOHTb peJIM C DaTHIKOM, npeYcMaTpBaHOUoHpyuHoe ynpaBHeHne BCaCbIbAHne.
Bupio Mac 3NaHy Bary, Tomy nepecyBaHH Ta BCTAHOBJIeHH BITJXKNI NOBHNO BIKOHByBaTHCJ ΜΟΗΜΕΝΑ ΜΟΥ ΜΟΥ ΜΟΥ ΜΟΥ ΜΟΥ ΜΟΥ ΜΟΥ ΜΟΥ ΜΟΥ ΜΟΥ ΜΟΥ ΜΟΥ ΜΟΥ ΜΟΥ ΜΟΥ ΜΟΥ ΜΟΥ ΜΟΥ ΜΟΥ ΜΟΥ ΜΟΥ ΜΟΥ ΜΟΥ ΜΟΥ ΜΟΥ ΜΟYG ΜΟΥ ΜΟΥ ΜΟΥ ΜΟΥ ΜΟΥ ΜΟΥ ΜΟΥ ΜΟΥ ΜΟΥ ΜΟΥ ΜΟΥ ΜΟΥ ΜΟΥ ΜΟΥ ΜΟΥ ΜΟΥ ΜΟΥ ΜΟΥ ΜΟΥ ΜΟΥ ΜΟΥ ΜΟΥ ΜΟΥ ΜΟΥ ΜΟ⁺ ΜΟ⁺ ΜΟ⁺ ΜΟ⁺ ΜΟ⁺ ΜΟ⁺ ΜΟ⁺ ΜΟ⁺ ΜΟ⁺ ΜΟ⁺ ΜΟ⁺ ΜΟ⁺ ΜΟ⁺ ΜΟ⁺ ΜΟ⁺ ΜΟ⁺ ΜΟ⁺ ΜΟ⁺ ΜΟ⁺ ΜΟ⁺ ΜΟ⁺ ΜΟ⁺ ΜΟ⁺ ΜΟ⁺ ΜΟ⁺ ΜΟ⁻ ΕΦΦΦΦΦΦΦΦΦΦΦΦΦΦΦΦΦΦΦΦΦΦΦΦΦΦΦΦΦΦΦΦΦΦΦΦΦΦΦΦΦΦΦΦΦΦΦΦΦΦΦΦΦΦΦΦΦΦΦΦΦΦΦΦΦΦΦΦΦΦΦΦΦΦΦΦΦΦΦΦΦΦΦΦΦΦΦΦΦΦΦΦΦΦΦΦΦΦΦΦ
B KOMNJIeK T BITXKK N BxOJaTb Upynn DnI KpINIIeHNN, po3paXOBaHI ha 6inbUcIb Ttinib CTIn/CTen. Ipote Heo6XiHo 3BepHyTnCS Do KBanidikOboAHorO Texhika DnI nepeBipKn npndaTHocTi MATEpiAnIB B 3aJexHocTi BiD TnYu CTInu ChTeNi. CtHa/CteNa NobHHb ByTN DoCTaTHbO MiChmM, UoB BHTPIMaTI Bary BITXKKN.
ФункюhybaHHA
BnKOpncTObyIte IHTeHcNBy 乌BnDikctb y BnPaNy oc6bnBO BnCokoi KOHcHtpaui kXohHnHX napiB. PekomeHdyEmo BKIOUHTNI BNTJkky 3a 5 XBNIN Do noTuATky roTyBaHH i Kki i 3aJIuINr NOrO BKIOUChEM Ha npTo3i 15 XBNIN nicna 3aIKHueHHraTGYBaHH iKi.
Pnmtka: kIIO BNTJkKa He Ipiauo, nepeBiptnu o6 KhoNkA ON/OFF 3naOdiNaCBy nolooHHi ON.

CnoJyehnnyIbTy duCTaHIOHO KepyBaHHN
HaTCHiB i yTpmyTe T2 + T5 npotrrom nepoio xBnlinn XnBtneHn BnTAKN. Ycniuhe cnoJyueHHa6ye BiOobpaxeHO Ha BnTAAJI.
Onnc yhnkui npylbty dnctahuiHoro kepybaHHa
T1. Khonka OFF (BIMKH.)
T2. KhoNka ON/OFF (BBIMKH/BIMKH) i peryIIOBaHnIHTeHCINBHOCTi M'AKORO CBITNa
T3. Khonka kepybaHHa WbNdkCTIO (NOTyHKHcTIO) BCMOKTyBaHHA:
T4. Khoika ON/OFF (BBIMKH/BIMKH) cBtNo Bapnilbhoi nobepxhi
T5. KhoNka ON/OFF (BBIMKH/BIMKH) 3aTpMKN BIMKHeHHB BITXKK
T6. KhoNka ON/OFF (BBIMKH/BIMKH) daTnuKa.
T7. Khonka ckndaHHc rHaniaui Hacnuehocti pibtpib.
L3. CbTIOJIOHa lamma po6Otu nIyIbTy
Ppimitka: TopkaiTeca KhoNOK, NERKO HATnCKaOuH, DnB Bn6opy DocTyHnx fynKui.
T1. Khonka OFF (BIMKH.)
HaTnCHiBtIIOB BmKHyTu BNtJkKy
T2. Khoika ON/OFF (BBIMKH/BVIMKH) i perylnHOBaHH iTeHcmbHOCTi M'AKORO CBITJa
Kopotko HATNCHTb 106 BBIMKHYTN a6o BIMKHYTN M'Ke CBITTO
HaTnchItb doBwe 06 bViprepyIIOBAtn iTHeCNBHcTb cBtna.
PnIMITka:PiDCBiyBaHHa M'KIM CBITNOM DOCTynHe IINe B NEBHX MOdEJIaX.
T3. Khonka KepybaHHa WbNdkicTHO (NOTyKhICTHO) BCMOKTyBaHHa
IOTOPKHbCn DO KhONKn, NOOHauOn 3 6yNb-RAKO nOIOKeHHN, i BmKoHaTe OeptaJIbHn pyx 3a a60 npOt uacOBoi CTrpIKn, Uo6 36JIbUnTn a60 3MeHUnTn 5BmDkCTb BCMOkTuBaHH.
KhONka po3JIeHa Ha DeekilbKa cekTopiB, MoXHa o6paTn 6axaHny 1WbNdkiCTb, HATNCkAOnu NpIMy O Y BiIDNoBIDH N CekTOP, HAcTyHmM YHHom:
T3a: ⅢBvDkICtB 1 (CJa6Ke BCMOKtYBaHHa)
T3b: ⅢBnDkictb 2 (cepeHcBCMOKtYBaHHa
T3c: ⅢBnKicb3 (CmBHe BCMOKTyBaHHa)
T3d: 1IHTeHcBHe BCMOKTyBaHHa
T4. Khonka ON/OFF (BBIMKH/BIMKH) cbrtno bapnblho nobepxhi
HaTnCHiTb 06 BBIMKHyTN a6o BIMKHyTN cBtNo niDCBiYBaHHaBapInbHoi NOBepxHi.
T5. KhoNka ON/OFF (BBIMKH/BIMKH) 3aTpMKN BIMKHeHHBNTJAKN.
CbitnoioL2HaBtJxu6bnaeTaKIMXeKoJIbOpOM,0nCBitnoioL L1.
HaTnCiTiB 063aOpPamyBatn 3atpMkY BmKHeHHBaTjXKn Ha OCHOBI WbDkoCTi (NOTyXHocTi) BCMOKTyBaHH, 0o di y ToJ MOMeHT:
Ubukic1b 1 (cna6ke BCMOKTyBaHHa):20 XbuiHn
Ubnikcb2cepeHcBcMOKtBuHaHHa:15XbInnH
Ubnikcb 3 (CJbhe BCMOKtyBaHHa):10 xBnINH
T6. KhoNka ON/OFF (BBIMKH/BIMKH) daTnuKa.
HaTnCHiB i yTpmyTe 06 akTNByBatn/De3akTNByBatn peXIM i3 DaTnKOM, kIy npeE6baue ABtOMaTHne KepyBaHH BCMOKTyBaHH.
Ppimitka: DaTchNK DoCTynHn JIiSe B neBnX MoeJax.
T7. Khonika ckndaHra CnHanaIi HacuHeOci φinbtpib.
Ha BIMKHeHII BHTaJxUi HATnCHITb T7, CbitIOjIoL L1 nepeTaHe CmHani3yBaTu npo HacnueHicTb.
O6cnyrobybAHN dntaHnHoro ynpablinnHa
甲CTka nctaunHoro ynpabnIHn:
IOnCTNtN dNCTaHcJIne HynpaBInHH 3a DOnOMorO BO noroi MRAOi caPfTeKN i MMIOrO pIKrO HeITpAIBHO 3ac06y 6e3 a6pa3nBnHex peOBHN
3aima6aatapei:
BjdknTe Bicik 6aTaepoK.
3amihitb BnchaxeHi 6atapeiKn 3-Ma HOBIMn Ha 1,5 B, Tny AAA.
BCTaBnIouH NOBI 6aTapeKIn, DOTpIMyTeCb nOJIpaHocTi, IIO BkA3HaY bIDcIKy 6aTapeKo!
3aKpntn npoXHHy 6batae.
BukHeHHa cmITBaDnpaCbObaHnx 6aTapei
BKNHHeHHa CMITTA BiDnpaBohAnx 6aTapei NOBHNO BOKHYBaTNC3IgHO BCIX HauIOHaBbNHX HOPMATIBi 3aKOHIB.He BKnMaTaBI BnPaCbObAHi 6aTapei pa30i 3BcHaNHMn BiXoJAMn
BaTaapei MaHToB 6yTu HajiHn 3daiHi y BiXoJn.
Дя 6иьш DetalbHoi Infopmaui zuo do acnektib 3axncty hABKOniunHbOrO cepeoBnua, noBtophoro BnKOpncTaHHia BnKHeHHaatapei 3eptatncb do ynoHBaKeHHx no BnnyeHHNo CneiJIaNbHnx BiXoDIB yCTaHOB.
Доглад
Ybara!pepe 6ydb-koO onepaocu Ynctkn nn
0cbcnyrobyBaHH, BiD'ednaHTe BntjKky BiD
eEektpomepexi, BNTaryuyn BuNky afo BiKlnouaOnu
rONOBHm BIMNKauch KNTna.
YnCTka
Bttjka Mae Chntncb TaOTo I k30BHi Tak IBcepeHnI (no KpaHni Mpi 3 Tako H X nepioDnHiCtIO kI i DOrJIa 3a fInbtpamn dnn 3atPmAHn H XnpiB). Jnna YnCTKn BnKOpNtOByTe CneJiaJbHy CepBetKy, HAMoey HeITpAlbHM pIKM MMIOuHMMa6OBm.
He BnKOpNCTOByIte 3ac06n IIO MaIOb abpa3nBHI MATEPIAII. HE BnKOpNCTOByIte CnIPT!
Ybara: He BnKoHaHn npabIN qunIeHH n 3amHn φinbTpB MoKe npInBeCTn Do pN3NKy BnHKHeHH NOKeXi. Tomy peKomeHnyE moD oTpMByBaTncB npBeDeHnx IHcTpykui.
3HimaTbCBAICBIAIDOBaIbHcIbTB3R3KY3MOKINBIMU ykoDkeHHnMmDbryHa i NOKeJAMn,IO BUNHKnBHaCniOk HeBipHoro pemOnTy a6o He BNUKHOHn BUNeONCaHNx nonepedKeHb.
ФлгтзатрмкхирВ
Man. 13
3atpmyec xnpoBi cnoIyehn, 0o BnHnKaHb nIac nprirotybaHH iKi.
IIOBHeH NCTNTNCb OINH pa3 Ha MICAb He CNILbHOIOHMMM MIOOHMM 3ACo6aMn, BpyHy a60 B NOcyDOMHII MaUNHi npn H3bKi TEMNepaTypi i 3 KOPOTKIM ZIKLJOM.
PnMNTI B NocydomnHm MaunHm MetaJIeBn pIbTp3aTpIMKn KJpy MOKe BtpaTITN KOJIp, aJe IoroXapakTepeNtKn 3 pIbTpYBaHn JxODHm YHOM He3MiHrTbcra.
ByrilbHnI pIbTp (TIJIbKn B peKmIp eeprkynlaii) Man. 13
B6npaε HenpncmHi 3aaxn KuyxHi.
ByrIbHnФIpIbTp MoKHa MmTn pa3 Ha DBa MicaIy T enPiN BoDi BiDIOBIDHMM MNHOHMN 3aco6amn, a50 K B nocydomnHi MaunHi npi 65^ (y BnIaKy MmTTB NocydomnHi MaunHi 3dJChiHTn NobHn cIKn MtTn 6e3 kxyOHOno HauHHa BCEpEHNH).
3nTn haNnKOBy Bvy 6e3 noNkoJxHn Hn pInbtpy, nicn yOro 3HOBy NOCTaBNTu Ioro y DxyOBky Ha 10 xv. npn 100° dny nobHO r OcyUbaHH.
IpyuSyMiHTn pa3 Ha TpRPOK, a6o J KOxHOrO pa3y, KOJI INTKAHINBAIBJRAETbCn ONUKOJDKeHOO.
3amHaJAMn
Iooio ix 3amHn 3BepTaHTecra do cnyk6uTexHnHoro 06cnyrobyBaHH.
T3d: Hiz 4 (yogun emis)
OcakisiglACIK/KAPALITUsu.
ailllll lllllllllllllll
1a2 < a3 < a_4 时 > 0
clicg,blissl lglj gljgl jglg 1
Jusue 8y juaiaia 8y Juaiaia 8y Juaiaia Juaia
.
aill j i j j j jll lllie g Jlll aill ll
aalag aaiiia jslg ijl jj jn jnsall nssll
ilba jyj y jy jill ayd aed
()
13
gall 1
a a a a a a a a a a a a a a a a a a a
Jd 1
()
aell 2e 100ll 5g 1000 1000
100 100 100 100
pL 1
a aaa aaaa aai 1i i j 3 J 1
Culal
a aalaaas
a
:
aclil aalaaaba plsiuily jie kail jka
Aa 100
:Jblll
A. all 45 20 80 all jall
1,5 3y 3y y
AAA 1
aalil
AaBaa aaaa
A. all 42 53 64 all 75 all 86 all 97

C. x A. x ab
aijoll oeiiei ciably jI Jauy o yaa o jial biiei
000011 a1is bua 000011 jglb o jsl bua
Cllgall jai gaii jgi jglal ogail cilc oolny
cbwllgbll OON/OFF jT4
glll lal jn 12 aagabla L2 galll
.L1
biill (s) acull liss, biill jilll alby ilac aoll bi
alollol 1
20:(aio b)1ae
a a a a a a a a a a a a a a a a a a a
Ji j
a a a a a a a a a a a a a a a a a a a a a a a a a a a a a a
L1 gaii iitii taii iisai .T7 gie biaia laiae iia
e 1

T6
T7
J
gaiyj jy jy jy gale yae wll piaiuiu
yacn jn qil5 jblalll jybiy kaiii .jball
jji 15 oal jall nq eaiy iay jy jy gali
jjn jn jn jy jy biall lac po a y gao
gao biall ON/OFF lgljLjLjLjLjLjON
1
aall aagall jll jll glll 1000000000000000000000000000000000000000000000000000000000000000000000000000000000000000000000000000
a 10000000000000000000000000000000000000000000000000000
CEI/EN 60335-1; CEI/EN 60335-2- -.31, CEI/EN 62233
CEI/EN 61591; ISO 5167-1; ISO
5167-3; ISO 5168; CEI/EN 60704-1; CEI/EN .60704-2-13; ISO 3741; EN 50564; CEI 62301
J 1 J 1 J 1 J 1 J 1 J 1 J 1 J 1 J 1 J 1 J 1 J 1 J 1 J 1 J 1 J 1 J 1 J 1 J 1 J 1 J 1 J 1 J 1 J 1 J 1 J 1 J 1 J 1 J 1 J 1 J 1 J 1 J 1 J 1 J
jaii iiaii 1 1 jaii jaii jaii jaii jaii jaii jaii jaii jaii jaii jaii jaii jaii jaii jaii jaii jaii jaii jaii jaii jaii jaii jaii jaii jaii jaii jaii jaii jaii jaii jaii jaii jaii jaii
aL 1
j j 1 1 1 1 1 1 1 1 1 1 1 1 1 1 1 1 1 1 1 1 1
!
y 1 y j 1 j 1 1 1 1 1 1 1 1 1 1 1 1 1 1
aill jia aaiy aaiy aaiy aaiy aaiy aaiy aaiy aaiy aaiy aaiy aaiy aaiy aaiy aaiy aaiy aaiy aaiy aaiy aaiy aaiy aaiy aaiy aaiy aaiy aaiy aaiy aaiy aaiy aaiy aaiy aaiy aaiy aaiy aaiy
J 120
J 120
J 120
J 120
J 120
aiaa aiai jai gill aably
jlll jll lill lll
yill aalll 4n nn lalba aaiil j
Jssll
y
aJus aii: 1al la 4le
yicu 150
1
J 1 J 1 J 1 J 1 J 1 J 1 J 1 J 1 J 1 J 1 J 1 J 1 J 1 J 1 J 1 J 1 J 1 J 1 J 1 J 1 J 1 J 1 J 1 J 1 J 1 J 1 J 1 J 1 J 1 J 1 J 1 J 1 J 1 J 1 J
m : x = 1 或 3x + 4y + 1 = 0