
TX-42A400E - TV PANASONIC - Free user manual and instructions
Find the device manual for free TX-42A400E PANASONIC in PDF.
User questions about TX-42A400E PANASONIC
0 question about this device. Answer the ones you know or ask your own.
Ask a new question about this device
Download the instructions for your TV in PDF format for free! Find your manual TX-42A400E - PANASONIC and take your electronic device back in hand. On this page are published all the documents necessary for the use of your device. TX-42A400E by PANASONIC.
USER MANUAL TX-42A400E PANASONIC
Operating Instructions
LCD Television

VIERA
For more detailed instructions, refer to the Operating Instructions on the CD-ROM.
To view the Operating Instructions on the CD-ROM, you need a computer equipped with a CD-ROM drive, and Adobe Reader (Version 8.0 or later is recommended) installed on your computer.
Depending on the operating system or settings on your computer, the Operating Instructions may not start automatically.
In this case, open the PDF file under the "MANUAL" folder manually to view the instructions.
Contents
Be Sure to Read
Safety Precautions 2
Maintenance 3
Quick Start Guide
Accessories / Options 4
Identifying Controls 6
Basic Connection. 8
Auto Setup 10
How to Use Menu Functions 12
Specifications 18
Licence. 19
Thank you for purchasing this Panasonic product.
Please read these instructions carefully before operating this product and retain them for future reference.
The images shown in this manual are for illustrative purposes only.
Please refer to Pan European Guarantee Card if you need to contact your local Panasonic dealer for assistance.
Safety Precautions
Warning
Handling the mains plug and lead
- Insert the mains plug fully into the socket outlet. (If the mains plug is loose, it could generate heat and cause fire.)
- Ensure that the mains plug is easily accessible.
- Do not touch the mains plug with a wet hand. This may cause electrical shock.
- Do not use any mains lead other than that provided with this TV. This may cause fire or electrical shock.
-
Do not damage the mains lead, damaged lead may cause fire or electrical shock.
-
Do not move the TV with the lead plugged into a socket outlet.
- Do not place a heavy object on the lead or place the lead near a high temperature object.
- Do not twist the lead, bend it excessively or stretch it.
- Do not pull on the lead. Hold onto the mains plug body when disconnecting the plug.
- Do not use a damaged mains plug or socket outlet.
- Ensure the TV does not crush the mains lead.
If you find any abnormality, remove the mains plug immediately!

AC 220-240 V
50/60 Hz

Power source / Installation
This TV is designed for:
- AC 220-240 V, 50/60 Hz
Table-top use
Do not expose to rain or excessive moisture
- To prevent damage which might result in electric shock or fire, do not expose this TV to rain or excessive moisture.
- This TV must not be exposed to dripping or splashing water and objects filled with liquid, such as vases, must not be placed on top of or above the TV.
Do not remove covers and NEVER modify the TV yourself
- High voltage components may cause serious electrical shock, do not remove the rear cover as live parts are accessible when it is removed.
- There are no user serviceable parts inside.
- Have the TV checked, adjusted or repaired at your local Panasonic dealer.
Do not place the TV on sloped or unstable surfaces, and ensure that the TV does not hang over the edge of the base
The TV may fall or tip over.
Do not expose the TV to direct sunlight and other sources of heat
- Avoid exposing the TV to direct sunlight and other sources of heat.

To prevent the spread of fire, keep candles or other open flames away from this product at all times
Do not place foreign objects inside the TV
- Do not allow any objects to drop into the TV through the air vents as fire or electric shock may result.
Use only original dedicated base / mounting equipment
- Using an unapproved base or other fixtures may make the TV unstable, risking injury. Be sure to ask your local Panasonic dealer to perform the setup or installation.
Use approved bases (p. 5)
Caution
When cleaning the TV, remove the mains plug
- Cleaning an energised TV may cause electric shock.
Remove the mains plug from the wall socket when the TV is not in use for a prolonged period of time
- This TV will still consume some power even in the Off mode, as long as the mains plug is still connected.
Do not expose your ears to excessive volume from the headphones
- Irreversible damage can be caused.
Do not apply strong force or impact to the display panel
- This may cause damage resulting in injury.
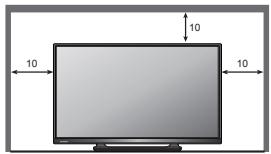
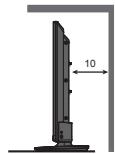
Do not block the rear air vents
- Adequate ventilation is essential to prevent failure of electronic components.
- Ventilation should not be impeded by covering the ventilation openings with items such as newspapers, table cloths and curtains.
- We recommend that a gap of at least 10cm is left all around this TV even when placed inside a cabinet or between shelves.
- When using the base, keep the space between the TV and the surface where the TV is set.
- If base is not used, ensure the vents in the bottom of the TV are not blocked.
Minimum distance
(cm)
Maintenance
First, remove the mains plug from the socket outlet.
Display panel, Cabinet, Base
Regular care:
Gently wipe the surface of the display panel, cabinet, or base by using a soft cloth to clean the dirt or fingerprints.
For stubborn dirt:
First clean the dust on the surface. Dampen a soft cloth with clean water or diluted neutral detergent (1 part detergent to 100 parts water). Wring the cloth and wipe the surface. Finally, wipe away all the moisture.
Caution
- Do not use a hard cloth or rub the surface too hard, otherwise this may cause scratches on the surface.
Take care not to subject the TV's surfaces to water or detergent. Liquid inside the TV could lead to product failure.
Take care not to subject the surfaces to insect repellent, solvent, thinner or other volatile substances. This may degrade surface quality or cause peeling of the paint. - The surface of the display panel is specially treated and may be easily damaged. Take care not to tap or scratch the surface with your fingernail or other hard objects.
- Do not allow the cabinet and base to make contact with a rubber or PVC substance for a long time. This may degrade surface quality.
Mains plug
Wipe the mains plug with a dry cloth at regular intervals. Moisture and dust may lead to fire or electrical shock.
Accessories / Options
Standard accessories
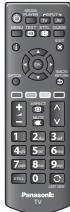
Remote Control
N2QAYB000816

Batteries for the Remote
Control (2)
R6-AA)
(p. 4)
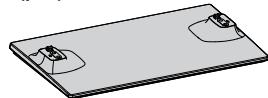
Base
(p. 5)
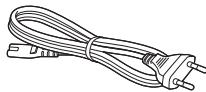
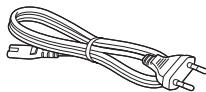
Mains Lead
(p. 8)

Assembly screw for base (4)
(p. 5)
M4×16mm
Operating Instructions
Pan European Guarantee Card
- Accessories may not be placed all together. Take care not to throw them away unintentionally.
- This product contains possibly dangerous parts (such as plastic bags), that can be breathed in or swallowed by young children accidentally. Keep these parts out of reach of young children.
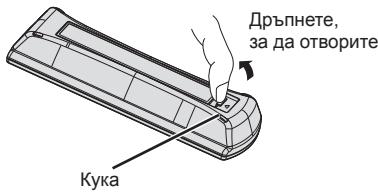
Installing / removing remote's batteries
1 Remove the battery compartment cover.

2 Insert two R6-AA batteries (1.5V) according to "+" and -" polarity markings inside the battery compartment, then close the battery compartment cover.

Caution
Incorrect installation may cause battery leakage and corrosion, resulting in damage to the remote control.
- Do not mix old and new batteries.
- Replace only with same or equivalent type. Do not mix different battery types (such as alkaline and manganese batteries).
- Do not use rechargeable (Ni-Cd) batteries.
- Do not burn or break up batteries.
- Do not expose batteries to excessive heat such as sunshine, fire or the like.
- Make sure you dispose of batteries correctly.
- Ensure batteries are replaced correctly, there is danger of explosion and fire if battery is reversed.
- Do not disassemble or modify the remote control.
Attaching / removing the base
Warning
Do not disassemble or modify the base.
- Otherwise the TV may fall over and become damaged, and personal injury may result.
Caution
Do not use any base other than the one provided with this TV.
- Otherwise the TV may fall over and become damaged, and personal injury may result.
Do not use the base if it becomes warped or physically damaged. - If you use the base while it is physically damaged, personal injury may result. Contact your local Panasonic dealer immediately.
During set-up, make sure that all screws are securely tightened.
- If insufficient care is taken to ensure screws are properly tightened during assembly, the base will not be strong enough to support the TV, and it might fall over and become damaged, and personal injury may result.
Ensure that the TV does not fall over. - If the TV is knocked or children climb onto the base with the TV installed, the TV may fall over and personal injury may result.
Two or more people are required to install and remove the TV.
- If two or more people are not present, the TV may be dropped, and personal injury may result.
When removing the base from the TV, do not remove the base by the methods other than the specified procedure. (see below) - Otherwise the TV and / or base may fall over and become damaged, and personal injury may result.
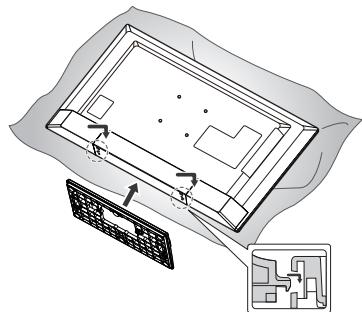
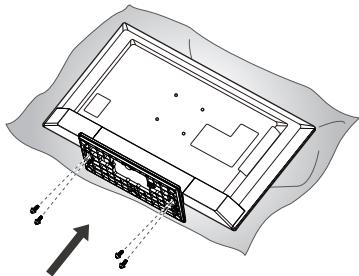
Assembly screws for base (4)

$$ \mathrm {M} 4 \times 1 6 \mathrm {m m} $$

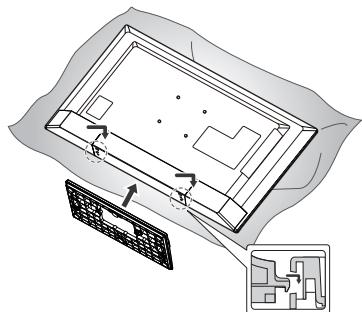
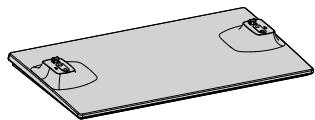
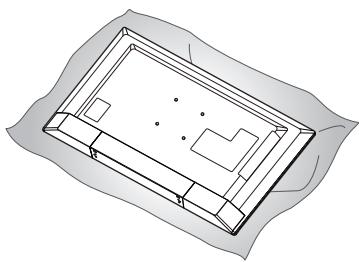
Base
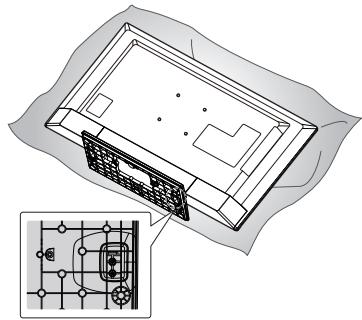
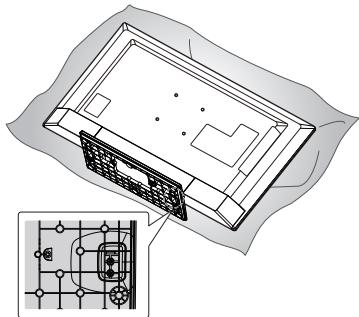
1 Place the TV screen face-down on a cushioned, clean surface to protect the screen from damages and scratches.

2 Insert the base hook into the bottom hole of the TV.
- Please remove the mylar of base before installing.
3 Use the assembly screws for base to fasten the base securely to the TV.
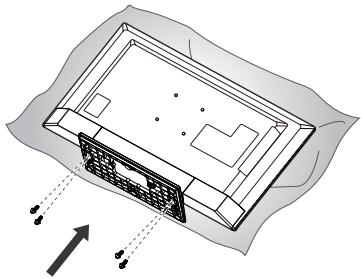
4 Please be sure to fasten assembly screws with screw driver.
Identifying Controls
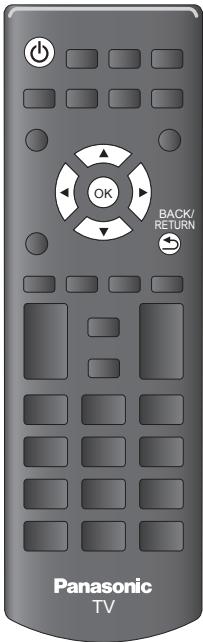
Remote Control
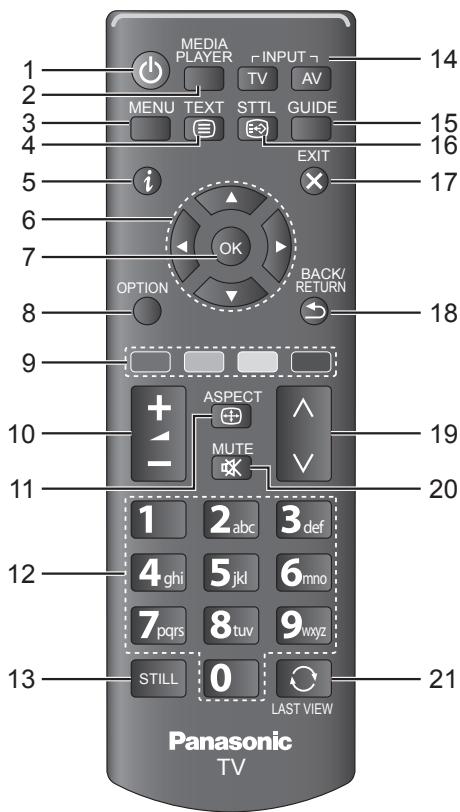
1 Standby On/Off switch
- Switches TV on or off standby.
If you cannot turn the TV power on by pressing button of the remote control, please press / 1 (POWER) button on the bottom of the TV.
2 MEDIA PLAYER
- Switches to USB device viewing / listening mode.
3 MENU (p. 12)
- Press to access [Picture], [Sound], [Timer], and [Setup].
4 TEXT
- Switches to teletext mode.
5 i (Information)
- Displays channel and programme information.
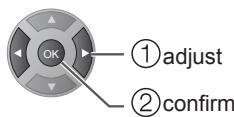
6 Cursor buttons
- Makes selections and adjustments.
7 OK
- Confirms selections and choices.
- Press after selecting channel positions to quickly change channel.
- Displays the Channel List.
8 OPTION
- Easy optional setting for viewing, sound, etc.
9 Coloured buttons (red-green-yellow-blue)
- Used for the selection, navigation and operation of various functions.
10 +/Volume up / Volume down
Changes volume.
11 ASPECT
Changes aspect ratio.
12 Numeric buttons
Changes channel and teletext pages.
- Sets characters.
- When in Standby mode, switches TV on.
13 STILL
- Freezes / unfreezes the picture.
- Holds the current teletext page (teletext mode).
14 Input mode selection
- INPUT-TV - Switches Antenna / Cable mode.
- INPUT-AV - Switches to AV input mode from [Input Selection] list.
15 GUIDE
- Displays TV guide.
16 STTL
- Displays subtitles.
17 EXIT
- Returns to the normal viewing screen.
18 BACK/RETURN
- Returns to the previous menu / page.
19 / (Channel up / Channel down)
- Selects channel in sequence.
20 MUTE
- Switches sound mute on or off.
21 LAST VIEW
- Switches to previously viewed channel.
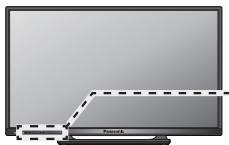
Indicator / Control panel
1 Remote control signal receiver
- Do not place any objects between the TV remote control signal receiver and remote control.
2 Power indicator Red: Standby Green: On
- The LED blinks when the TV receives a command from the remote control.
3 / (POWER)
-
Switches TV on or off.
-
To completely turn off the TV, please remove the mains lead from the wall socket.
4 INPUT/OK
-
Selects an input source.
-
Confirms and enters a selection on the On-Screen Display Menu.
5 MENU
- Opens or closes the On-Screen Display Menu.
6 VOL+/-
Changes volume.
- Adjusts the value of the selected item on the On-Screen Display Menu.
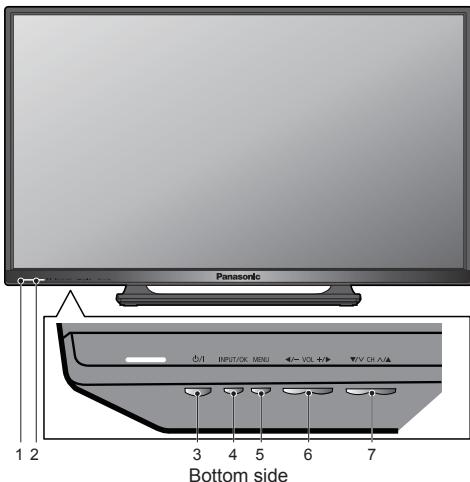
7 CH▲/▼
Changes channels.
- Selects item on the On-Screen Display Menu.
Note
- If the TV is turned off by / 1 (POWER) button on the bottom of the TV, you cannot switch TV power on by button of the remote control. Please press / 1 (POWER) button again on the bottom of the TV to turn the TV on.
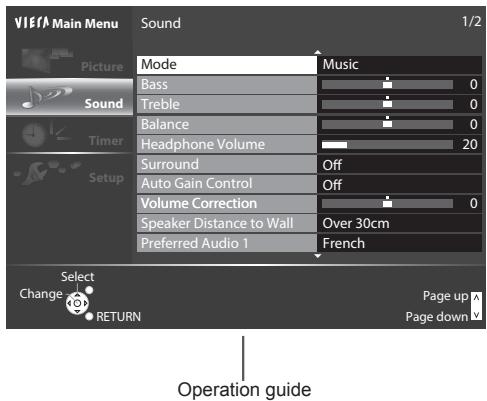
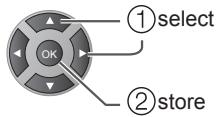
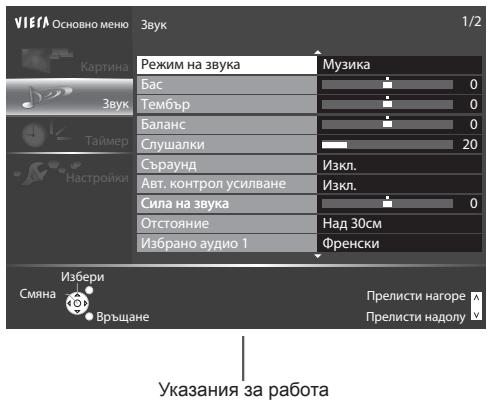
Using the On-Screen Displays - Operation guide
Many features available on this TV can be accessed via the On-Screen Display menu.
Operation guide
Operation guide will help you to operate by using the remote control.
Example: [Sound]
How to use remote control

MENUE


BACK/RETURN

EXIT
- Open the main menu
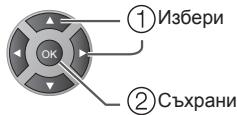
- Move the cursor / select from a range of options / select the menu item (up and down only) / adjust levels (left and right only)
- Access the menu / store settings after adjustments have been made or options have been set
- Return to the previous menu
- Exit the menu system and return to the normal viewing screen
Auto power standby function
The TV will automatically go into Standby mode in the following conditions:
- [Off Timer] is active in the [Timer]. (p. 16)
- No operation is performed for the period selected in [Auto Standby]. (p. 16)
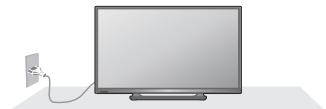
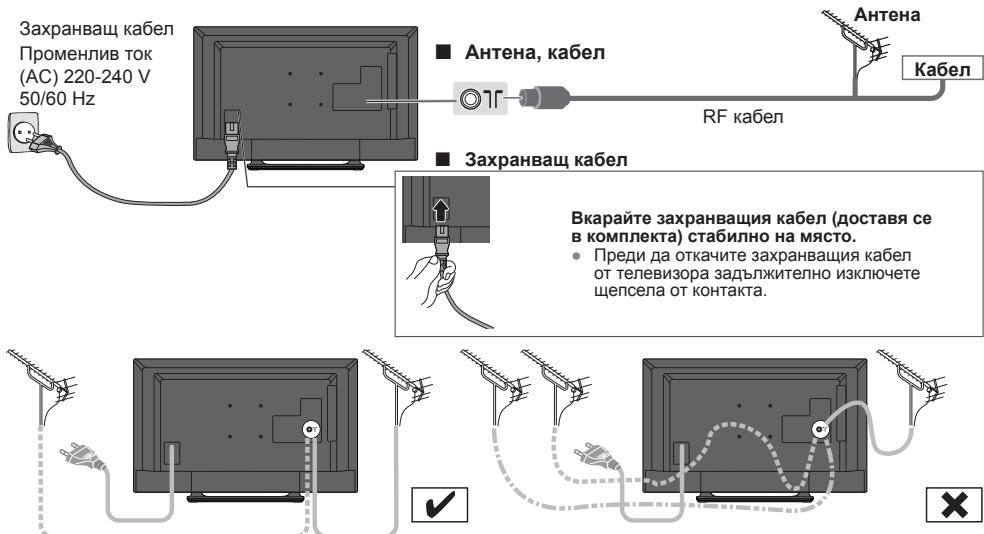
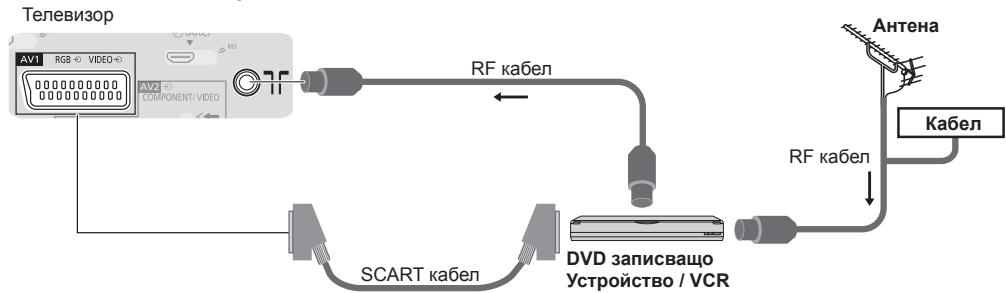
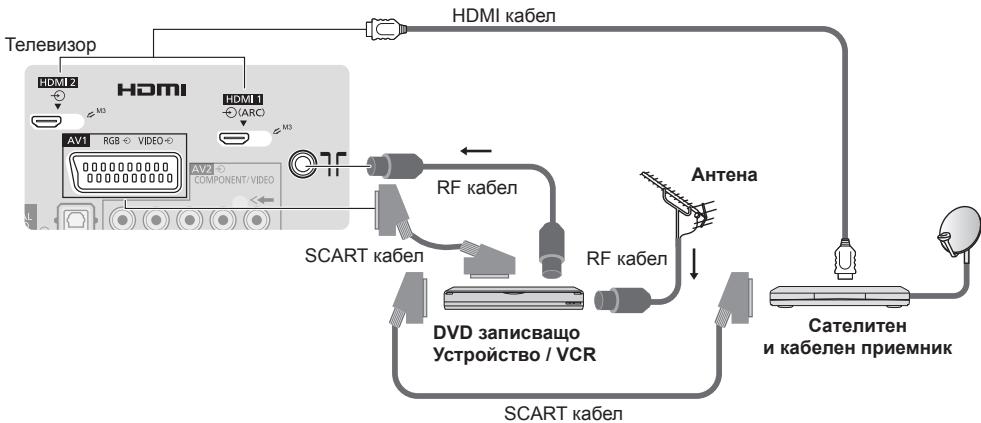
Basic Connection
External equipment and cables shown are not supplied with this TV.
Please ensure that the unit is disconnected from the mains socket before attaching or disconnecting any leads.
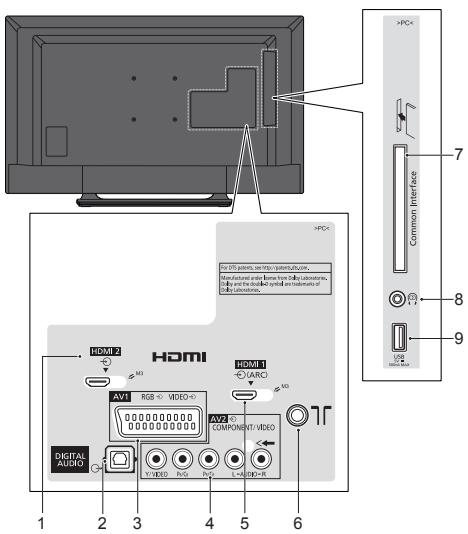
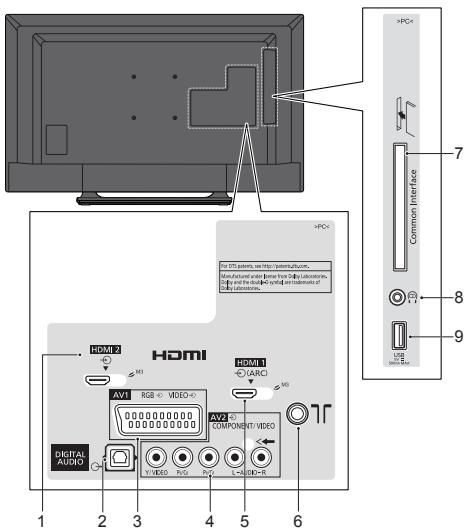
Terminals
1 HDMI 2 (p.9)
2 DIGITAL AUDIO
3 AV 1 (SCART) (p.9)
4 AV 2 (COMPONENT /VIDEO)
5 HDMI 1 (ARC) (p.9)
6 Terrestrial terminal (see below)
7 Cl slot
8 Headphone jack
9 USB port
Connections
Mains lead and aerial
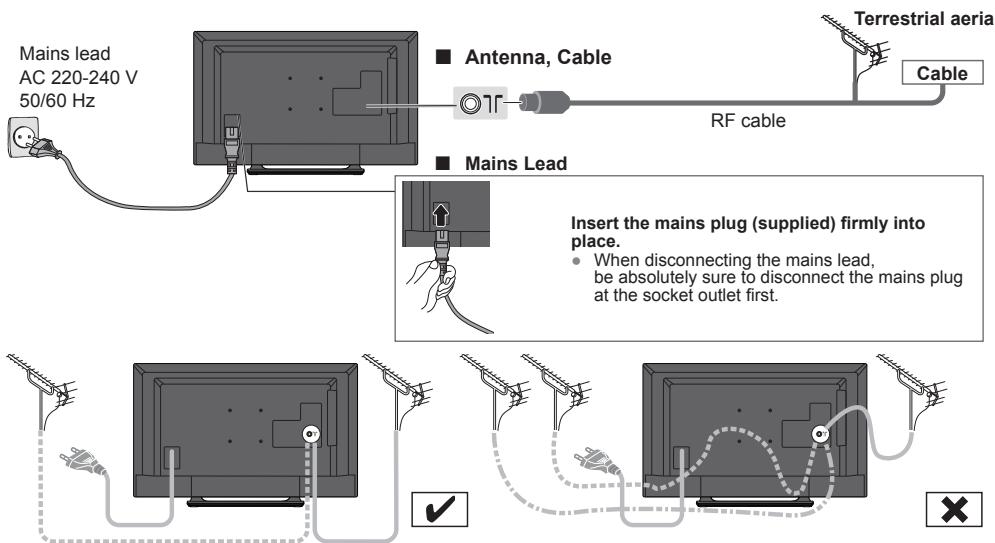
If the antenna is placed in the wrong location, interference might happen.
Note
- Do not put the Coaxial cable close to the mains lead to avoid noise.
- Do not place the Coaxial cable under the TV.
- To obtain optimum quality picture and sound, an Aerial, the correct cable (75 Ω coaxial) and the correct terminating plug are required.
- If a communal Aerial system is used, you may require the correct connection cable and plug between the wall Aerial socket and the TV.
- Your local Television Service Centre or dealer may be able to assist you in obtaining the correct Aerial system for your particular area and the accessories required.
- Any matters regarding Aerial installation, upgrading of existing systems or accessories required, and the costs incurred, are the responsibility of you, the customer.
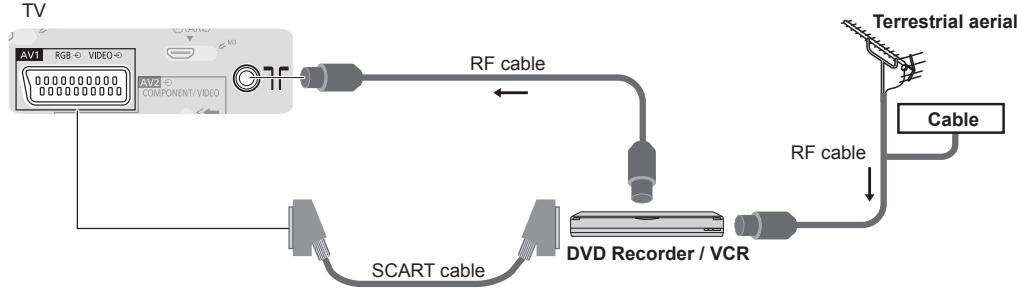
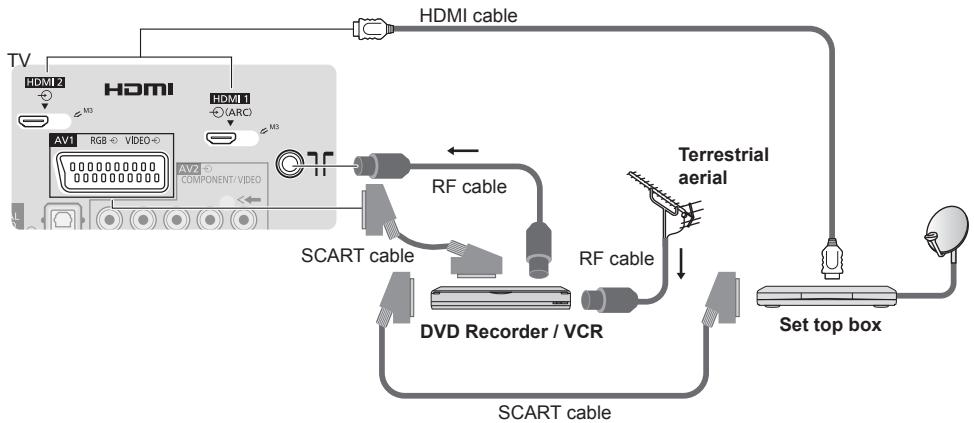
AV devices
Player

DVD Recorder / VCR
DVD Recorder / VCR and Set top box
Note
- Please also read the manual of the equipment being connected.
- Keep the TV away from electronic equipment (video equipment, etc.) or equipment with an infrared sensor.
Otherwise, distortion of image / sound may occur or operation of other equipment may be interfered.
- When using a SCART or HDMI cable, use the fully wired one.
- Check the type of terminals and cable plugs are correct when connecting.
Auto Setup
Search and store TV channels automatically.
- These steps are not necessary if the setup has been completed by your local dealer.
- Please complete connections (p. 8, 9) and settings (if necessary) of the connected equipment before starting Auto Setup. For details of settings for the connected equipment, read the manual of the equipment.
1
Plug the TV into mains socket and switch On

- Takes a few seconds to be displayed.
- If the red LED shows on the TV, press the Standby On / Off switch on the remote control.
2
Select the language

3
Select your country
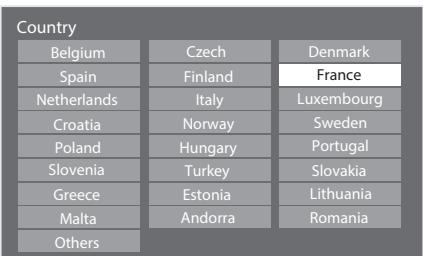
Depending on the country you select, select your Region or store the Child Lock-PIN number ("0000" cannot be stored) by following the on screen instructions. (Only for France, Italy and Belgium)
4
Select [Antenna] and start tuning
![PANASONIC TX-42A400E - Select [Antenna] and start tuning - 1](/content/2025/01/192950/images/99061b447d3ec017ce0ce3d39bd7fe46c148a39c097a2359ea606ece57284633.jpg)
![PANASONIC TX-42A400E - Select [Antenna] and start tuning - 2](/content/2025/01/192950/images/5ca32adad74094a82608e8eb53a863c1c47bf2ad225e7ed6a3d0e89a2bc50b52.jpg)
![PANASONIC TX-42A400E - Select [Antenna] and start tuning - 1](/content/2025/01/192950/images/fdca79187a0b3299bc6570cfddf0cca379eb4b175dc6f3fb230f413b24be6a4c.jpg)
- Auto Setup will start to search for TV channels and store them. The stored channels and sorted channel order vary depending on the country, area, broadcasting system and conditions of signal reception.
- Auto Setup screen varies depending on the country you select.
5
Select [Home]
Select [Home] viewing environment to use in your home environment.
Please select your viewing environment.
Home
Shop
![PANASONIC TX-42A400E - Select [Home] - 1](/content/2025/01/192950/images/c26a744c26dae8c9d3682bff9249371f1b6d7d05eb1f6573c90110d4ef450c4a.jpg)
[Shop] viewing environment (for shop display only)
[Shop] viewing environment is the demonstration mode to explain main features of this TV.
Select [Home] viewing environment to use in your home environment.
- You can return to viewing environment selection screen at the stage of [Shop] confirmation screen.
1 Return to viewing environment selection screen
2 Select [Home]
Shop
You have selected shop mode
BACK/ RETURN
![PANASONIC TX-42A400E - Select [Home] - 1](/content/2025/01/192950/images/9f712fda52250a22bfb7a83b2146f9272c57a59094cd759652f27c1cabf3243b.jpg)
Please select your viewing environment.
Home
Shop
![PANASONIC TX-42A400E - Select [Home] - 2](/content/2025/01/192950/images/642716614c021c8974315203e8fb06bcf53dcf4f7835941f783a89e9fec10b63.jpg)
①change
② confirm
To change viewing environment later on, you will need to initialise all settings by accessing
[Shipping Condition]. [Shipping Condition] (p. 17)
Auto Setup is now complete and your TV is ready for viewing.
If tuning has failed, check the connection of the RF cable, and then, follow the on screen instructions.
4s16u3
How to Use Menu Functions
Various menus allow you to make settings for the picture, sound, and other functions.
EXIT

To return to the previous screen
BACK/RETURN

To change menu pages
Choose from among alternatives

Adjust using the slide bar

Go to the next screen


To reset the settings
- Picture or sound settings only
[Reset to Defaults] in the [Picture] (p. 14) or [Sound] (p. 15) - To initialise all settings
[Shipping Condition] (p. 17)
Menu list
| Menu | Item | Adjustments / Configurations (alternatives) |
| Picture | Viewing Mode | Selects your favourite picture mode for each input. [Dynamic] / [Normal] / [Cinema] / [True Cinema] / [Game] [Dynamic]: Improves contrast and sharpness for viewing in a bright room. [Normal]: Normal use for viewing in a normal lighting condition. [Cinema]: Improves the performance of contrast, black and colour reproduction for watching movies in a darkened room. [True Cinema]: Reproduces the original image quality precisely without any revision. [Game]: Provides suitable images for fast response signal when playing games. • Not valid on TV mode • To display a continuous record of time spent using [Game] mode ⇒ [Playing Time Display] (p. 17) In each viewing mode, [Contrast], [Brightness], [Colour], [Sharpness], [Tint], [Colour Balance], [P-NR], and [3D-COMB] can be adjusted and stored for each input. |
| Backlight, Contrast, Brightness, Colour, Sharpness | Increases or decreases the levels of these options according to your personal preference. | |
| Tint | Adjusts the picture hue to suit your taste. • For NTSC signal reception | |
| Colour Balance | Sets the overall colour tone of the picture. [Cool] / [Normal] / [Warm] | |
| P-NR | Picture Noise Reduction Reduces unwanted picture noise and flicker noise in the contoured parts of a picture. [Off] / [Min] / [Mid] / [Max] | |
| 3D-COMB | Makes still or slow moving pictures more vivid. [Off] / [On] • Occasionally, while viewing still or slow moving pictures, colour patterning may be seen. Set to [On] to display sharper and more accurate colours. • For PAL / NTSC signal reception in TV mode or from composite | |
| Colour Matrix | Selects image resolution of component-connected or HDMI-connected devices. • Only for HDMI / YPbPr input source • Only used with 480p or 576p video signal | |
| AV Colour System | Selects optional colour system based on video signals in AV mode: [Auto] / [PAL] / [SECAM] / [M.NTSC] / [NTSC] • For AV input source only. | |
| 16:9 Overscan | Selects the screen area displaying the image. [Off] / [On] [On]: Enlarges the image to hide the edge of the image. [Off]: Displays the image in the original size. • Sets to [On] if noise is generated on the edge of the screen. • This function is available when aspect is set to [16:9]. • This function can be memorised separately for SD (Standard definition) and HD (High definition) signals. | |
| Picture | Reset to Defaults | Press OK button to reset the current Picture [Viewing Mode] of the selected input to the default settings. |
| Sound | Mode | Selects your favourite sound mode. [Music] / [Speech] / [User] • The selected mode affects all input signals. [Music]: Improves sound quality for watching music videos, etc. [Speech]: Improves sound quality for watching news, drama, etc. • Common sound settings are applied for [Music] and [Speech] mode but [Bass] and [Treble] settings are applied for each mode independently. [User]: Adjusts the sounds manually by using the equaliser to suit your favourite sound quality. • For the [User] mode, [Equaliser] will appear on the [Sound] instead of [Bass] and [Treble]. Select [Equaliser] and adjust the frequency. → [Equaliser] (see below) |
| Equaliser | Adjusts the frequency level to suit your favourite sound quality. • This function is available when [Mode] is set to [User]. • Select the frequency and change the frequency level by using the cursor button. • To enhance the bass sound, raise the level of the lower frequency. To enhance the treble sound, raise the level of the higher frequency. • To reset the levels of each frequency to the default settings, select [Reset to Defaults] by using the cursor button, and then press OK button. | |
| Bass | Adjusts level to enhance or minimise lower, deeper sound output. | |
| Treble | Adjusts level to enhance or minimise sharper, higher sound output. | |
| Balance | Adjusts volume level of right and left speakers. | |
| Headphone Volume | Adjusts the volume of the headphones. | |
| Surround | Surround sound settings. [Off] / [On] | |
| Auto Gain Control | Automatically regulates large sound level differences between channels and inputs. [Off] / [On] | |
| Volume Correction | Adjusts the volume of individual channel or input mode. | |
| Speaker Distance to Wall | Compensates for the low frequency sound due to the distance between the speakers and the wall. [Over 30cm] / [Up to 30cm] • If the back space between the TV and wall is over 30 cm, [Over 30cm] is recommended. • If the back space between the TV and wall is within 30 cm, [Up to 30cm] is recommended. | |
| Preferred Audio 1 Preferred Audio 2 | Selects the first and second preferred language for DVB multi audio (depending on the broadcaster). |
| Menu | Item | Adjustments / Configurations (alternatives) | |
| punoS | MPX | Selects multiplex sound mode (if available) [Stereo]: Use this normally. [Mono]: When stereo signal cannot be received. [M1] / [M2]: Available while mono signal is transmitted. For Analogue mode | |
| SPDIF Selection | SPDIF: A standard audio transfer file format Selects the initial setting for digital audio output signal from DIGITAL AUDIO and HDMI 1 (ARC) (ARC function) terminals. [Auto] / [PCM] [Auto]: Dolby Digital Plus, Dolby Digital and HE-AAC multi-channel are output as Dolby Digital Bitstream. MPEG is output as [PCM]. DTS is output as DTS for video contents of [Media Player]. [PCM]: Digital output signal is fixed to [PCM]. ARC (Audio Return Channel): A function of digital audio output using HDMI cable | ||
| MPEG Optical Level | Adjusts the audio level output from DIGITAL AUDIO terminal as the initial setting. [-12] / [-10] / [-8] / [-6] / [-4] / [-2] / [0] (dB) Normally, [PCM] sound is larger comparing with the other types of audio track. | ||
| HDMI 1 Input(HDMI) HDMI 2 Input(HDMI) | Selects to fit the input signal. [Digital] / [Analogue] [Digital]: When sound is carried via the HDMI cable connection. [Analogue]: When sound is not carried via the HDMI-DVI adaptor cable connection. For HDMI input only | ||
| SPDIF Delay | Adjusts the delay time of the sound output from DIGITAL AUDIO and HDMI 1 (ARC) (ARC function) terminals, if the sound does not synchronise the image. | ||
| Downmix Mode | Selects the output mode for listening to compressed music. [Surround] / [Stereo] / [Dual1] / [Dual2] For DVB mode | ||
| Type | Narration settings for impaired users (only available in some countries). [Normal] / [Hearing Impaired] / [Visually Impaired] [Hearing Impaired] => [Preferred Subtitle Type] (p. 17) Set to [Visually Impaired] to activate the narration sound track when available on the broadcast. [Visually Impaired] appears after you have selected this option. (see below). For DVB mode | ||
| Vignes/Impaired | Speaker | Narration sound track is output to the TV speakers. [Off] / [On] | |
| Headphone | Narration sound track is output to the headphone. [Off] / [On] Connect a headphone before selecting this option. | ||
| Volume | Adjusts the volume of the narration sound track. | ||
| Pan and Fade | Sets the audio pan and fade effect. [Off] / [On] [Off] : Main Audio programme [On] : Controls the level of the Main Audio Programme and controls the pan of the Associated Audio Programme | ||
| Reset to Defaults | Press OK button to reset the current [Bass], [Treble], [Balance], [Headphone Volume], [Surround], [MPEG Optical Level], [Type], and [Visually Impaired] to the default settings. | ||
| Timer | Off Timer | Sets the time until the TV automatically goes to Standby mode. [Off] / [15] / [30] / [45] / [60] / [75] / [90] (minutes) | |
| Time zone | Adjusts the time data. • The time data will be corrected based on GMT. • Set to [Auto] to adjust the time automatically according to your area. | ||
| Auto Standby | Automatically turns the TV to Standby mode for energy saving when no operation is performed for 4 hours. [Off] / [2 hours] / [4 hours] • Automatic input switching with the connected equipment affects this function and time-count will be reset. • The notification message will appear 3 minutes before going into Standby mode. | ||
| Setup | Link Settings | CEC | When set to [On], the TV will automatically switch to the appropriate HDMI input whenever an HDMI connected equipment is initially turned on and the Play mode is selected. [Off] / [On] • The HDMI CEC feature of connected HDMI CEC-compatible device must be turned on. |
| Power off Link | When set to [On], all HDMI connected equipment will be turned off automatically by turning off the TV. [Off] / [On] • A Panasonic DVD Recorder will not turn off if it is still in the Rec mode. • The TV remains on even if all the HDMI connected equipment are turned off. | ||
| Child Lock | Locks a channel / AV input to prevent access to it. | ||
| Tuning Menu (Antenna / Cable) | TV Selection | Selects the type of signal you want to tune. [Antenna] / [Cable] | |
| Automatic Channel Search | Automatically searches for the receivable channels. | ||
| Scan | Adds newly found channels while keeping existing channels. | ||
| Analogue Manual Tuning | Searches for the analogue channels manually. | ||
| DVB-T Signal Condition | Checks the DVB-T signal condition. | ||
| DVB-T Manual Tuning | Searches for the DVB-T channels manually. | ||
| DVB-C Signal Condition | Checks the DVB-C signal condition. | ||
| DVB-C Manual Tuning | Searches for the DVB-C channels manually. | ||
| Favourite Network Select | Selects your favourite network for each broadcasters (only available in some countries). • For DVB mode | ||
| Favourites Edit | Creates a list of favourite channels. | ||
| Skip | Skipping unwanted channels. | ||
| Sort | Sorts channels. | ||
| ChannelListEdit | Edits channels. | ||
| Clear block | Clears the channel lists. | ||
| Setup | Language | Changes language for on-screen displays. | |
| Display Settings | Preferred Teletext | Selects the preferred language for DVB teletext service (depending on the broadcaster). | |
| Teletext Character Set | Selects teletext language. [West] / [East1] / [East2] [West]: English, French, German, Greek, Italian, Spanish, Swedish, Turkish, etc. [East1]: Czech, English, Estonian, Lettish, Rumanian, Russian, Ukrainian, etc. [East2]: Czech, Hungarian, Lettish, Polish, Rumanian, etc. | ||
| Preferred Subtitles 1 Preferred Subtitles 2 | Selects the first and second preferred language for DVB subtitles (depending on the broadcaster). | ||
| Preferred Subtitle Type | Selects the preferred subtitle type. [Normal] / [Hearing Impaired] • [Hearing Impaired] provides aids in understanding and enjoyment with DVB subtitles (depending on the broadcaster). • [Preferred Subtitles 1] / [Preferred Subtitles 2] are given priority. | ||
| Input Labels | Accesses the input labels list to select the label of each input mode or set to skip unconnected one for easier identification and selection in [TV Selection], [Input Selection] or banner. • To skip the input mode, select [Skip]. | ||
| Banner Display Timeout | Sets how long the Information banner stays on screen. [0 (No display)] / [1] / [2] / [3] / [4] / [5] / [6] / [7] / [8] / [9] / [10] (seconds) | ||
| Playing Time Display | Sets to [On] to display a continuous record of time spent using [Game] mode in the top right of the screen every 30 minutes. [Off] / [On] • This function is available when [Viewing Mode] is set to [Game]. | ||
| Radio Mode | Sets the timer for turning off the screen automatically when a radio channel is selected [Off] / [5] / [10] / [15] / [20] (seconds) • The sound is active even if the screen turns off. This function is effective in reducing power consumption when listening to a radio channel. • Press any buttons except Standby, Volume Up / Down and Sound Mute buttons to turn the screen on. • Not valid on Analogue mode | ||
| System Menu | Shipping Condition | Reset all settings to the original condition. | |
| Common Interface | Sets to watch encrypted channels, etc. | ||
| System Update | Downloads new software to this TV. | ||
| Software Licence | Displays the software licence information. | ||
| Demo Settings | • For [Shop] viewing environment. | ||
| System Information | Displays the system information of this TV. | ||
| Power Save | Reduces brightness of picture to economise on power consumption. [Off] / [On] | ||
- A different menu will be displayed in the mode of [Media Player].
- Only available items can be selected.
Specifications
| Product fiche | |
| Supplier | Panasonic Corporation |
| Model ID | TX-32A400E |
| Energy efficiency class | A+ |
| Visible screen size(diagonal) | 80 cm / 31.5 inches (diagonal) |
| On mode average power consumption | 30 W |
| Annual energy consumption*1 | 44 kWh |
| Standby power consumption*2 | 0.3 W |
| Off mode power consumption | 0.3 W |
| Screen resolution | 1,366 (W) × 768 (H) |
1: Energy consumption XYZ kWh per year, based on the power consumption of the television operating 4 hours per day for 365 days. The actual energy consumption will depend on how the television is used.
2: When the TV is turned off with the remote control and no function is active.
For the information of rated power consumption, refer to the label on the TV back cover.
Licence
Even if no special notation has been made of company or product trademarks, these trademarks have been fully respected.
This product incorporates the following software:
(1) the software licensed under the GNU General Public License, Version 2.0 (GPL V2.0) and/or,
(2) open sourced software other than the software licensed under the GPL.
The software categorized as (1) - (2) are distributed in the hope that it will be useful, but WITHOUT ANY WARRANTY, without even the implied warranty of MERCHANTABILITY or FITNESS FOR A PARTICULAR PURPOSE. Please refer to the detailed terms and conditions thereof shown in the "Software Licence" menu on this product.
At least three (3) years from delivery of this product, Panasonic Corporation will give to any third party who contacts us at the contact information provided below, for a charge no more than our cost of physically performing source code distribution, a complete machine-readable copy of the corresponding source code covered under GPL V2.0 or the other licenses with the obligation to do so, as well as the respective copyright notice thereof.
Contact Information:cdrequest@unipf.jp
The source code and the copyright notice are also available for free in our website below. http://www.unipf.jp/dl/DTV13ET/
DVB
DVB and the DVB logos are trademarks of the DVB Project.
Dolby

DOLBY DIGITAL PLUS
- Manufactured under license from Dolby Laboratories. Dolby and the double-D symbol are trademarks of Dolby Laboratories.
HDMI

HIGH-DEFINITION MULTIMEDIA INTERFACE
- HDMI, the HDMI logo, and High-Definition Multimedia Interface are trademarks or registered trademarks of HDMI Licensing LLC in United States and other countries.
HD TV

HIGH-DEFINITION TELEVISION
- The "HD TV" Logo is a trademark of DIGITALEUROPE.
DTS

dt
2.0+Digital Out
- Manufactured under license under U.S. Patent Nos: 5,956,674; 5,974,380; 6,487,535 & other U.S. and worldwide patents issued & pending. DTS, the Symbol, & DTS and the Symbol together are registered trademarks & DTS 2.0+Digital Out is a trademark of DTS, Inc. Product includes software. © DTS, Inc. All Rights Reserved.
Notice for DVB functions
This TV is designed to meet the standards (as of August, 2013) of DVB-T (MPEG2 and MPEG4-AVC(H.264)) digital terrestrial services and DVB-C (MPEG2 and MPEG4-AVC(H.264)) digital cable services.
Consult your local dealer for availability of DVB-T services in your area.
Consult your cable service provider for availability of DVB-C services with this TV.
- This TV may not work correctly with the signal which does not meet the standards of DVB-T or DVB-C.
- Not all the features are available depending on the country, area, broadcaster, service provider.
- Not all CI modules work properly with this TV. Consult your service provider about the available CI module.
- This TV may not work correctly with CI module that is not approved by the service provider.
Additional fees may be charged depending on the service provider. - The compatibility with future services is not guaranteed.
- Check the latest information on the available services at the following website. (English only)
http://panasonic.jp/support/global/cs/tv/
Information for Users on Collection and Disposal of Old Equipment and used Batteries

These symbols on the products, packaging, and/or accompanying documents mean that used electrical and electronic products and batteries should not be mixed with general household waste. For proper treatment, recovery and recycling of old products and used batteries, please take them to applicable collection points, in accordance with your national legislation and the Directives 2002/96/ EC and 2006/66/EC.

By disposing of these products and batteries correctly, you will help to save valuable resources and prevent any potential negative effects on human health and the environment which could otherwise arise from inappropriate waste handling.
For more information about collection and recycling of old products and batteries, please contact your local municipality, your waste disposal service or the point of sale where you purchased the items. Penalties may be applicable for incorrect disposal of this waste, in accordance with national legislation.
For business users in the European Union
If you wish to discard electrical and electronic equipment, please contact your dealer or supplier for further information.
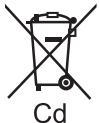
[Information on Disposal in other Countries outside the European Union]
These symbols are only valid in the European Union. If you wish to discard these items, please contact your local authorities or dealer and ask for the correct method of disposal.
Note for the battery symbol (bottom two symbol examples):
This symbol might be used in combination with a chemical symbol. In this case it complies with the requirement set by the Directive for the chemical involved.

Declaration of Conformity (DoC)
Authorized Representative :
Panasonic Testing Centre
Panasonic Marketing Europe GmbH
Winsberging 15, 22525 Hamburg, Germany
Customer's Record
The model number and serial number of this product may be found on its rear panel. You should note this serial number in the space provided below and retain this book, plus your purchase receipt, as a permanent record of your purchase to aid in identification in the event of theft or loss, and for Warranty Service purposes.
Model Number
Serial Number
Panasonic Corporation
Web Site: http://panasonic.net
Panasonic®
Mодeн No. TX-32A400E
Hnctpykun 3a pa6oTa TeJeBn3Op C TeuH KpncTajN

3a noDro6Hn HNCTpyKuHN BxKTe PbKOBOcTBOTo 3a ekCnloaataaHa npInnoXeHna CD-ROM. 3a da moKeTe Da pa3rIeMaTe PbKOBoCTBOTO 3a ekCnloaataaHa CD-ROM, Tp6Ba Da nMaTe KOMnToBp c yeTeu 3a CD-ROM n HnctaIIpan Adobe Reader@ (Bepcn8.0 mIn no-HoBa ce npenOpbUba) Ha KOMnIObTa.
B 3aBnCmOCT OT onepauOnHata cnTeMa nI IN hactpOoiKte HA bAuaN KOMnHbP, PbKOoDCTBOTo 3a ekClIOaTauN MOKe da He ce OTOpN aBTOMaTNo. B TaKb Cnyau TOpBe TpaJa c FopMat PDF B npKaTc "PbKOoDCTBO", 3a da pa3rpeDate nHCTpyKuINTE.
VIERA
CbDbpxkaHne
3aДьлЖиТЕЛНО пpoуTeTe
PpeDpa3Hmepkn. 2
PoiipbJka 3
KpaTko pIbKOBoDcTBO
Akkesecoapn / Onuun 4
IeHTnФmUnpaHepaYnpaBHeHnTo...6
OCHOBHn Bp3K.. 8
ABTomatnuHn HactpoKn 10
Kak ce n3no3BaT yHKunnte Ha MeHIOTo... 12
Cneunpkauu 18
JIinueH3 19
Блардами В, Ye 3akynixte To3n npodykHa Panasonic.
MOny, npOyete HACToAaTO pBkoBDCTBO BHNMaTeHNo npdeIa I3noJI3BaTe npOkyTA n ro 3ana3eTe 3a cnpaBA b6Deue.
N3obpaKeHHa T BpKOBoDCTBO TcnykaT CaMO 3a NIOCTpaCnHa npIMepNTe.
Ako IMate HxJda OT nOMooIOT MeCTHn DInCTpn6bTyOp Ha Panasonic, pperNeaIte
PAnHeBpOneiCKTa rapaHcUOnHNa KapTa.
Блгарский
ПредпаЗн МеркN
PpeDynpexdHne
Bopabene c uencela n kaeba ha 3axpaHbHeTo
BkapaTe 1e 1oKpaB KOnTa. (Ako 1eNcIbT e Xlaab, ToM MoKe da ce Harpee n da npuHn noJap.)
OcnnypeTe CN neceH DoCTbN DO KOHTaKtHa Ha 3axpaHbauuKaBeJ.
He doKocBaIe 3axpaHbuaIa I c MoKpa pka. ToBa MoKe da npuHHn TOKOB yap.
He Ieon38aTe 3axpaHbaaui Ka6ePi, KOTo He ca octabehn C tos TeBm3Op. ToBa Moke da prunHH noxap im TOKOB yUap.
He noBpeKdAaTe 3axpaHbauaJa Ka6eI. IobpeDeHnT Ka6eIMoKe da npuHnIOxap uJIn TOKOB yAp.
He MeCTe TeIeBn3Opa, KOraTo Ka6eNbTe BkJIHoueH B KOHTaKT.
- He noctabraye Teckn ppeMetn Bbyxu Kaebna Hne noctabraye Kaebna 6n3o Do npeMetn C BvcoKa TemnpaTpa.
He ycykbaite Kaeba, He ro nperebbaite ppekomepno H He ro onbbaite.
- He nbpnaTe Ka6ena. XbaaTe Kopnyca Ha 6e9cena, KoraTo n3KIOvBaTe 6e9ceJa OT 3axpaHbAHeTO.
- He noJI3BaIte NOBpeIe IueIcIe IJIIn KOHTaKT.
BHHMaaBte TeIeBn3OpbT da He CmaQka 3axpaHbuaa Ka6en.
Ako OKTPNETE HNAKKABA HepeHnOCT,BeHara n3BAdete zencena?

Поменjaminв ТOK (AC)
220-240 V
50/60 Hz
3axpaHbAhe /MHCTaJaCn
To3n TeIeBn3Op e npoeKtnpaH 3a:
- Поменлнв тok (AC) 220-240 V, 50/60 Hz
Hactonha ynotpe6a
He n3naraTe Ha nbXd nnHa npekomepHa Bnara
3a da npedeOTbpaNTe NOBpeDa, KOrTO MOKe Da
PnUHmN yDap OT eNEKTPnEeCKn TOK nIIN PNOkap,
He N3paraiTe TeneBn3Opa Ha nbXd INI pKeOMepHa
Bnara.
He cnapaIte Ha ypeDa cbDoBe C TeHocTn, KATO HnAp. Ba3n I He n3napaTe TeneBn3Opa Ha KaneuHa nn Teuaa Boda.
He OTCpaHbAaTe KanaunTe HNKOTA He MoDnФuPauTe TeJeBnOpa Camn
KOMNOHEHTNE IOD BUCOKO HANPEXEHNE MORAT da npnHHT CEPN03E H TOKB yad. He MaxaIte 3aDNHNA KAK HA TENEB3Opa, Tb KaTO MOKe Ja ce CTINHe DO KOHTAKT C qACTN IOD HANPEXEHNE.
BtpeHnma qactn, KOITa da MoTat da bdat nonpaBENI OTnptepbTeN.
Даite Telenebi30а за ровера, настору ини поразы рпс метший дилр на Paranasonic.
He noctabrayte TeJebn3opa Ha HAKIOHEn nIHN HeCTa6NIHN NOBbpxHOCTN; YBepete ce, ye TeJebn3OpbT HE BNCN OT KpaHa OCHOBata
TeNeBn3OpT MoKe Da naIne IINI da ce npeKaTpyn
He n3laarTe TeJIeBn3Opa Ha npraKa CJIbHueBa CBETnHa nDpyrN n3TOUHNu Ha CBETnHa
- ɪərəbʌtɪeɪnɪlaɪaHæTəHaɪteBɪnɪzaɪpɪyaɪnɪpɪkaCJIbHueBa CEBITInHaɪnɪdpyɪnɪN3TOUHnɪzɪHaTOnIInHa.

3a da ce npedeotbpaTn
noxap, HNKORA He dpbxte
CBeu nn DpyrN
H3TOUHNu Ha OTKpNT
PJaMbK 6JIN3O Do TO3N
npoDyKT
He nocTABnTe UyXn TeNa B TeneBn30pa
He no3B0nJaBte B TeneBmOpa Da nonaDat KaBbToN da bIoNo npEmedTe nPe 3BzduHnTe OTBpN, TbKaTO TOBA MOKe Da pNiuHnIO NKap NnTOKOB yUdp.
M3non3BaIte camo cneuaHnIte opurnHaJIHn noCTaBKn /ypeu 3a 3akpenBaHe
I3n03BaHeTo Ha HeoOboPeHn CToKn IInn Dpyn HcKcpaunPnpncocO6bEnHn MOKe Da DoBeDe Do HekTaBnHOCT Ha apata NpCK OHT HapaHbaHe. POMone CeBOW MeCTeN DInbp HA Panasonic da M3BbPmN HactPoKATA INN HcTanaMraT.
- 13no13BaIte Oo6peHn OCHOBn (CTp.5).
BHHMaHHe
Orato NOUcTBaTe TeJIeBn3Opa, N3BaIeTe ⅢeCena O T KOHTaTa
ПочuctBaHETOHaTeBEN3OpCBKIOUeHO3axpaHbAHe MÖKeДaПрИЧИНТOKOBудAp.
Ako He n3noJIb3BaTe TeJIeBn3Opa npoDbJnxIteJIHO BpeMe, n3KJIIOUcTe Ucncela OT KOHTaKaT
To3nTeNEBn3Op npOdbNkBaJa KOHCYMnpa I3BcCTHO KOnJIeCTBO eNEKTPnIeCTBO DOpN b INb N3KJIOnyeh PexHM, AOKU cIeCenA e Cb5p3An KbM KONTAKT.
He n3JaraIte Baunna cnuy Ha npekomepeho cnJIeH 3ByK OT cnUwanknTe
- MojkeTe da cn npuynHnTe TpaHNo yBpeXdHe Ha cnyxa.
He npinlaraTe roIma cnila nnu nnnn 3necko Bb3deNCTBnB Bbpxy ekpanHHna naHn
TOBA MOJE DA pRNUHIN NOBPeDN, KOINTO DA DOBEdaT DO HapAHBaHE.
He 6IokpaIte 3aIHnTe Bb3dUshn OTBOpN
AdeKBaTHATA BEHTIaJMaE oT cBtueCTBeH0 3NaHeHne,3a Da CepeTObATn NOBpeKdHaTeHo H eNEKTPOHHTE KOMNOHEHTi.
BENTINAAMTA He Tp86Ba Da ce 3atpyndHBA KATO BEHTINAAMOHNITE OTBOPn CE NOKPbAT C pEpmETN KATO BECTHNIU, NOKPNKB 3A MAcu N 3ABECi.
-Ппениячавамда се оваги разстоне OT nohe 10сн habсякд ecokono tebeNb3ора dopri akо тоу e noctabenВ ukaф ии мexdvy pafoTBe.
-Пи m3nOJI3BaHE Na NOCTABKATA, cna3BaiTe pao3TOHnIe MekJy TneBn3Opa I NObpxHOCTTa, HA KOrTo ToI e NOCTABeH.
Ako He ce 3n013Ba NoctabKa, yBepe Ce ye OTBOpTe Ha DbHOTo Ha TeNeBUN3opa He ca 6nOKupaH.
MnHmMaJIHo pa3CTOHHe
(CM)
PoDpBxka
PbpoOTcpaHete 3axpaHbaunKa6eJ OT KOHTaTa.
EkpaHEn naneJ, Kopnyc, ochoba
Pepobha rpnka:
BHMATEHNO 36bpcBaIe NObpxHOCTTa Ha ekpaHHnaHeN, KopyNA u OCHOBaTc M MeKa KbPNa, 3a Da OTCTpaHNTe 3aMbPCBAAHNATAu OTNeAHTbUcNE.
3a ynpntn 3ambpcbaHna:
Пьрво почстete праха OT NOБьхнocТа. Habлaxнete Мека Кьрna C спста ВОДа ИИ паздан HeYтРанЕн почствац претар (1 чадпретар в 100 чади ВОДа). ИзuedeTe Кьрпати ИЗбьшete NOБьхнocТТ. Нakраз збьшete Вага.TA.
BHMaHne
He n3no3BaIe TBbpda Kbpna I He TbpkaTe NOBbpXHOCTTa TBbpDe CINHO, B npOTnBEH cIyau MoKe da HApackaTe NOBbpXHOCTTa.
PrrnKtee Ce da He nIaIrate NaBbpxHcTne Ha TeneBn3Opa H BODa I NoCHCTBaun npenapatn. PpOHKnBaHeto H TeuHOCT B TeneBn3Opa MoKe Da pIurNHy NOBpeA.
- IorgpIXeTe Ce ae He nIarate NoBpXHcCTHe Na npapnAtpNoTbH HaceKOMn, pa3bOpNtEni, p3aepDInenu andpyrnn TneMnBu BceCTBa. TOBA MOKe Da HApuy NauCteBTO Na NobpXHcCTTa Nm da DoBepeO doEbnBaHe Aho704.
IobbpxHOCTA HcEAPHHNAHNE I cneuaHIO TepnHa O MOKE necho Da 6bde yBpeHene. BHIMABAITE da He nOyKbATE INI DPACKATe NOBbPbXHOCTA C HOKTI INI dpyrT BtbpDnpeDMTe.
He npncaane pnoDbNkTeneH KOPTA H KpOyca OCHOBATA C rMa mIIN MATEPnAIN OT PVC. ToBa MOKe da hapuian KaeeCTBTO HA NOBpXHOCTTA.
3axpaHbaI ka6eI
Peobno 3a6pbcaite 3axpanbaunia ka6en cbc cyxa kbpna. Bnara n npax morat da dobedat do noxapar nn tokoB ynap.
Akkesecoapn / Ongnn
CTaHdapTHn akcecoapn
DnCTaHcnoHNO
ynpaBJIeHne
N2QAYB000816
MOntaxhen 60nt 3a ochobata (4)
(ctp. 5)
M4×16mm

Batepni 3a
DINCTAHUOHHOTO
ynpaBneHne (2)
(R6-AA)
(ctp.4)

Hnctpykun 3a pa60Ta
OCHOBA
(cTp. 5)

3axpaHbaa ka6eI
(cTp. 8)
PanaBpOeNcKa rapaHnca
To3n npOyDkBbIpbKaCTH (AnPIMHPAe HIOHOBOPT6bMKN), KOHTo pIeDcTbIAIBAT NOTEHUANHa OANOHCTa 3a MANKDeLa, TbKATO MOrAT Da bSdart NOrbTHAI NTIN BmUAHN. DpXbTe Te3N cACTH MaHCTO, HeNDcTbIH0 3a MAJKIN DeLA.
IocTaBHe / n3BaxJaHe Ha 6aTePnnte Ha nCtHaunOHnTO ynpabJeHne
1 OToctpaHete Kanaka Ha otDeleHeMeTo 3a 6aTeepn.
2IocTabeteIbe6aTePnTINR6-AA(1,5V)Kato cna3Ite MapknpOBkata 3aIopnIeT“"N“" BOTdeneHHeTo 3a6aTePnTe, CneI KoTo 3aTbOpTe KanaKaHa NaOTdeneHHeTo 3a6aTePnTe.

He n3non3BaIte npyra noCTabka OCBEN Ta3N, KOJTO e npdeOCTaBeH C TO3N TeJIeBn3Op.
B npotnbEN cnuyaI TeNBeN3OpbT MoKe da naHne I da ce NOBpeNi, I da npuHnH HapaHraBaHe Ha YOBeK.
He n3noJ3BaIte noctabkata, akoTce orbHe nn nobpeyn fHn3nueckn.
- I'NtO3BaHToTe Na fIe3Mueckn NOBpeDeHa NoCTaBkA MoKe Da npuHInn HapAraBaHe. He3a6abHO ce CbPjXeTe C MeCTHnIy dIbnp Ha Nanosonic.
Pn noCTaBHe ce yBepTe, ye BCnKu BnHTOBe ca 3dpaBO 3aTeHaTn.
AKe He 6bDe 06bPHATO BHMAMHe Ha npabUNHO 3aTHAHe HA BHTOBete NO BpeMe HA cTNO6BaHTo, NOCTABKaTn HMa da 6bDe DoCTaTbUHO 3dpaBA, 3a Da N3dbPxN TeNEBn3Opa I ToJ MoKe Da nAdHe, Da ce NobpeDn INI da PnCHnHn HapAHBaHe.
Ybepete ce, ye TeIeBn3OpbT Hma da naHe
- AКОТЕNEВИСORTББдсБОРЕилДЕа сКУАТ ha NOCTABKATA pri Beve MOHTIpaH TENEBUN3O, ToM MOKE DA naDEHnДЯ р�ЧИNHAN HAPAHBAJE.
Heo6xOaMn ca Hau-MaNko Dbama duu 3a MOHTnpaHe n CBaJHHe Ha TeJeBn30pa.
Ako He npncbctBaT Dbama nnn noBee duSh, TeJeBn3OpB T MoKe Da 6bJe n3nyChat n da npuHnHa pahraBaHe.
PnO TcpanBaHe Ha NoCTabKaTa OT TeJeBn3Opa CneDaIe EINHCTBeHO yKa3aHnraT, ONnCaHn IpOeDypata.
(BnKTeNo-dOJy)
B npotnbEn cnuyaTeneBn3OpbT n/nn noCTabkata MOKe da naHe i da ce nobpei, a MoKe i da ce hapaHnte.

MOHTAXHH 60JTOBE 3a OCHOBATA (4)
$$ \mathrm {M} 4 \times 1 6 \mathrm {m m} $$
Ochoba
1 NocTabeTe TeneBm3Opa C ekpaHa HaNOpIy BbPxy Meka nYHCTaNOBpXbHOCT, 3a da NpeNdAaNte EkepaHa OT HapanaBaHe N HApadcKaBaHe.
2 BkapaiTe Kykata Ha OCHObATA B DOJIHnO OTBOp Ha TeIeBn3opa.
- Monja, Otrctpahef ofoioto ot ochobata, npedn da nBbduoNE MOHTAXA.
3 ⅢnOJI3BaIte MOHTaXHITe 6oJITOBe 3a OCHOBaTa, 3a Ja r 3aKpeINTe 3dpaBO KbM TelEBu3Opa.
4 3aIbIKNHTeHNO 3aTeHETe MOHTaXHnTe 6oNTObecOTBeptKa.
IdentnФицпане Ha ynpaBJIeHneTo
DuctanMOHNO ynpabneHne

1 Klno3aBkn./Mkn. ha peXHM Ha roTOBHOCT
Повета в指导下 телевизорот ржим на rotoBOTHOCT.
Ako He MOxete Da BKNIOHTe TENEBU3Opa KATO HATNCHEte 6yToHa (MnCTaHUNHOY npabIeHne, HATNCHEte 6yToHa O/1 (MOUHOCT) pa3noJoxeh B DOHATA qACT Ha TENEBU3Opa.
2 MEDIA PLAYER
PéRBKlOvBaB v PexMIm 3a pRrIeN Ha / cnyuHaene OT USB yctroIcTB0
3 MENU (ctp. 12)
- HataChete 3a doctbnp do [KaptnHa], [3Byk], [TaImep], n [HactpoiKn].
4 TEXT
- Празьключва В реким Ha TeNETeKCT.
5 i (NnHΦopMaun)
Ekpanhoto MeHIO OCNrpyBa DOCTbI Do MHORO OT cyHKunTe Ha To3n TeJIeBn3Op.
Uka3aHna 3a pa60Ta
Yka3aHnra 3a 4oBaO7e bI NMONOHaD aBOPABite C TeneBb30paUe3 DInCTAHUNHOHTOpNpABAEHe.
Ппмер: [3Byk]
Kac ce n3non3Ba dntaHnOHHO ynpaBneHne


OTbopete ochoBHOTO MeHIO
- Ппемесные курсopa /изберete
иземождо олшто /изберete enemeh
OT меню (camo haropeи надoly) /
настоpe НИВATA (camo наляв
и надяно)
Bne3e B MeHOTo /3aIa3eTe 3aIaDeHHeT ACHTOyN oUOJI
Bbphete ce KbM npedxOndTo MeHIO
Ie3eTe OT MEHOTO I CE bPbHTe KbM ekpaba 3a rTpeHa TEneBnA
Функця abTO rTOBHOCT Ha 3axpaHbaHeto
TeIeBn3OpbT abTomatuHOn 1e npEbkIIOU KbM pexm Ha rTOBHOCT npi CneHIne ycNOBIA:
- [ABTomaT.ИЗКЛЮУBAHe] e aKTINBEH B [Taɪmep]. (CTp. 16)
He e n3Bbpuheo HnkaKBO DeiCTBne 3a n36paHnaepnoB B [ABTom. cTeHd6a]. (CTp. 16)
Ochobn Bpb3kn
Ioka3aHnTe BbHnH yctPoJCTBa n Ka6eHn He Ce doCTabT C To3n TeNeBn3Op.
Mona, yBepete ce, che TeIeBn3OpbTe n3KJIouHen OT 3axpaHbAunia KOHTKT, ppei da Cbbp3BaTe nII OTKaUbATE Ka6eIIN oObOpyDbaHe.
TepMNHaTI
1 HDMI 2 (ctp.9)
2 DIGITAL AUDIO
3 AV 1 (SCART) (ctp. 9)
4 AV 2 (COMPONENT /VIDEO)
5 HDMI 1 (ARC) (ctp.9)
6 TepMNHa 3a Ha3eMHa Bp3Ka (BnXTe no-dony)
7 Cl rHe3do
8 KaK 3a cIyuaJIKu
9 USB nopT
Bp3Kn
3axpaHbau Ka6eI n eΦnRpHa aHTeHa
Ako aHTehata e noCTaBeHa Ha HeNoDxOJaIo MAcTo, MoKe Da IMa CMyUeHn.
3a6e9kka
He noctabraye KoakcnaJIHHa Ka6en B 6IIN3OCT do 3axpaHbauJra Ka6en, 3a da n36erHete cmUeHn.
He nocTabraTe KoakcnaiHna Ka6e np oN TeJebu3opa.
73a Oda cnpyPte OTMMAHNO KaCTBO Ha 3Bkyu N KapTnHaT, INOIN3BAIte NOxOJaA aHTHe, Ka6eN (75 KOAKcIAaHE) n KOHEKTOF.
AOKU n3nONBaTe 6oua TEHeBzINOHNa aHTeHa,MOxE da IMA hUxJa OT NIOXODaI KAbEN I KOHEKOTpn 3a Bp3ka Mekdy KAOKTAkTa 3a aHTeHaTn aTEHeBz3Opa.
Bauatae 6b3nMm4a3nHMOKe Da Bn NOMoHe C n3bopa Ha aHTeHa n HeOxoDnIMte yctPoICTBa, nOxOJaA 3a
KInHeHTb Hocn PbHataOTOBPOHOCT 3a BCNUHcO6TOrTeNCTBa, C8bP3AHn C INCTAHPaHETo HA aHTeHATA, MOdePHa3AHAraIyHa yCTPOBCTAuta N EHOxOOxIMMNTo DOnbI HENHEHn 3a Bb3HNkHAniTE p3AXoHn.
AVycTpoNCTBa
Pnnebp

DVD 3aHcBaUO UcTpoCTBO/VCR
DVD 3aHnCBAazo yctpoCTBO/BnDEoKacetofoH n zuΦpOB npHmHHK
3a6eJexka
- Пожетete и уньтва themselves to be CTPOCTBOTO, KOETCBBp3BaTe.
Држte TeteBn3opa Danee OTE nEeKToHNO 6OpyDbaHe (BJeO o6OpyDbaHe N dpyrN) nI npyei C mHpaepBeH cEH3op. B npOTbEN CNyauM MoKe da Ce noLyuN i3KpRbBaHe Ha KapTInHa / 3Byka nI nI da ce BNoOn pa60TaHa dpyro 6OpdyBaHe.
Korato n3non3bate SCART nHDMI ka6en, n3non3baTe hantbJHo onpOboDen Ka6en. - Ppi Cbvp3BaHe npOBepTe dani TnBt Ha tepMNHaNTe i KaBeHNITE KOHEKTope nOxDxOJaU.
ABTOMaTHNHaCTpOiKn
ABTOMATNUHO TbpcHe 3aNaMeTBAHe Ha TeLEBn3IOHH KAnAHJN.
Te3n DeiCTBna He ca Heo6xOaMn, ako TeIeBn3OpbT e 6uN HacTpoEH OT Baunia DInIbP.
MOna, Cbpxte (ctp. 8, 9) n HactpoTe (ako e Heo6xOJIMO) Cb5p3aHOTo yCTPOCTBO npedn da cTAPnate "ABToMaTHnHn HactpoKn". MoJa, PnochTeTe pKOBODCTBOt 3a paOta Na Cb5p3aHOTo yCTPOCTBO 3a NObueHnHDPOMAua OTHOCHO HACTPOKTHe.
1
CbpxeTe TeJeBn3Opa Cbc 3axpaHbaHeTo ITO BKJIHOyETe
0/1
Heo6xoJIMn ca HKoJIco CeKHyDn da ce BKnIOu n EkpAHT

AkoHaTeleBn3OpaCBTeuChepBeHLEDIIOd dioda,HaTNCHeTe KIOUHa HpeKIMa rTOOBHOCT HaDcTaHUNOHHTO ynpabNeHne.
2
H36peTe e3nk
Sprache
Deuts
Dansk
Polski
Sroski
English
Svenska
Cestina
Hrva
Français
Norsk
Magyar
Slovenscina
Italiano
Suomi
Slovenscina
Latviesu
Espanol
Türkce
bblrapckn
eesti keel
Portuque
EMnviK
Româna
Lietuviu
ederlands
3
U36epeTe Ibpxkaba
Дьржава
Bc
Ueewkn
dHn
Иссань.
中HnHaHn
Фразанця
XoHaHnIa
ITANIA
JIOKCEMOyP
XbOBaTna
Hopberma
WBeunr
Ponwa
yHrapn
loptyraia
CnoBHeH
Typcn
CtobKaM
Tbpcn
Ectonma
JNTBa
Majra
Anopa
Romania
4
B 3abHcMocT OT bPdXaBata, KOTOr 36epete, 36epete perHOHa cn ININ cbxpaHete PIN KOda DeTcKa 3aunTa("0000" He Moke da 6bde cbxpaHeO), KATO cIeBaTe IHCTpyKUInTe ha ekpaHa.
I36epete [AHTeHa] n IycheTe HaCTpoiBaHeTo
ABTomatuHnHaCTpOki
AHTeha
Ka6eI
![PANASONIC TX-42A400E - I36epete [AHTeHa] n IycheTe HaCTpoiBaHeTo - 1](/content/2025/01/192950/images/4f27be7a84d1cd2d80e8e7b5842e8b2208c8cd58d2faec52c040e72c74981841.jpg)
①Избери
②Дocтbn
3anoyba aBTOMaTHHaTa HAcTPOKa
ABTomatuHnHaCTPOJKN
Ctatyc: CkaHpaHe...
AHaIorOBn KaHaNi:1
UΦpOBu KaHaH:M:0
CkaHpaHe

Kpa
Bpueane
3aonuBa npoucBt "AtonmatuHn Hactpoikm" KOIO ue OTKPUE 3anaa KaHAnITE CbXpaHeneHt KaHAn n IOpde6ata MM ca pa3nnuH b Pa3nnuHte DbPxABN, PAHO, CSCTEM HA N3bYBaHae y UcNOBIA h PnIeMaHae H cIRHaJa.
Ekpahta 3a ABOMATUH NACTPOKn e pa3nnueh B 3abncmOCT OT bPjXabata, KOTo I6Bepe.
I36epeTe [KnIInu]
I36epete cpea Ha rIeane [KmIiue] 3a da nI3nOJI3BaTe B domaunha cpea.
YnblJHOMOeH npedCTaBnteI:
I3nITatehen ceHTbP ha Panasonic
Panasonic Marketing Europe GmbH
Winsberging 15, 22525 Xam6ypr, TepMaHnra
BelenkHa notpe6ntela
HomepT ha MoDeta H cepriHnHart H oep Ha TOn3 npOyKT MokTe Da BIVdte Ha 3aJINMy Kapanak. 3aIiUeTe To3n cepenH Omepe Ha npEbnHeIO NO-dony mAcTo n 3ana3ete Ta3n KInKka N KacBaTa bEnkka KaTO dokaTeCTBO 3a NKyKnata H no-NeCna IeHTNfKnKaunB C cnYauh Na kpaXbA nn 3aryBa N 3a cenuite Ha rapaHcNtA.
Moden No
CepneH Homep
Panasonic Corporation
YebcaT: http://panasonic.net
Panasonic®
Cislo modelu
TX-32A400E
Návod k obsluze
LCD televator
VIERA
PodrobnéjsiPokyny naleznete v návodu k použitina disku CD-ROM.
Indicator/Bedieningspaneel
1 Ontvanger afstandsbedieningssignalen
Panasonic Testing Centre
Panasonic Marketing Europe GmbH
Winsberging 15, 22525 Hamburg, Germany
Panasonic Testing Centre
Panasonic Marketing Europe GmbH
Winsberging 15, 22525 Hamburg, Germany
Kundens fortegnelse
Panasonic Testing Centre
Panasonic Marketing Europe GmbH
Winsberging 15, 22525 Hamburg, Germany
Asiakkaan todistus
Panasonic Testing Centre
Panasonic Marketing Europe GmbH
Winsberging 15, 22525 Hamburg, Germany
Données du client
Panasonic Testing Centre
Panasonic Marketing Europe GmbH
Winsberging 15, 22525 Hamburg, Germany
Panasonic Testing Centre
Panasonic Marketing Europe GmbH
Winsberging 15, 22525 Hamburg, Germany
A vásárlás adatali
Panasonic Testing Centre
Panasonic Marketing Europe GmbH
Winsberging 15, 22525 Hamburg, Germania
Note per il cliente
10 +/-(Volumopp/red)
Endreryldystyrken.
11 ASPECT
- Endrher bildeforholdet.
12 Talltastatur
Panasonic Testing Centre
Panasonic Marketing Europe GmbH
Winsbergring 15, 22525 Hamburg, Tyskland
Produktregistrering
- Logo "HD TV" to znak towardy DIGITALEUROPE.
DTS

dt's 2.0+Digital Out
Panasonic Testing Centre
Panasonic Marketing Europe GmbH
Panasonic Testing Centre
Panasonic Marketing Europe GmbH
Winsberging 15, 22525 Hamburg, Germany
Fisa clientului
Panasonic Testing Centre
Panasonic Marketing Europe GmbH
Winsberging 15, 22525 Hamburgo (Alemania)