SC 3 EASYFIX - Steam cleaner KARCHER - Free user manual and instructions
Find the device manual for free SC 3 EASYFIX KARCHER in PDF.
User questions about SC 3 EASYFIX KARCHER
0 question about this device. Answer the ones you know or ask your own.
Ask a new question about this device
Download the instructions for your Steam cleaner in PDF format for free! Find your manual SC 3 EASYFIX - KARCHER and take your electronic device back in hand. On this page are published all the documents necessary for the use of your device. SC 3 EASYFIX by KARCHER.
USER MANUAL SC 3 EASYFIX KARCHER
Description of the Appliance EN 5
Quick Reference EN 6
Effect descaler and adjustment of water hardness. EN 6
Operation. EN 7
How to Use the Accessories EN 8
Care and maintenance EN 9
Troubleshooting EN 9
Technical specifications. EN 10
General information

Please read these original operating instructions and the enclosed safety in
structions prior to the initial use of your device. Proceed accordingly. Keep both booklets for future reference or subsequent owners.
Proper use
Use the steam cleaner only for private households. The appliance is intended to be used with steam and can be used with the appropriate accessories as described in these operating instructions. You will not need any detergent. Please adhere to the safety instructions.
Environmental protection

The packaging material can be recycled. Please do not place the packaging into the ordinary refuse for disposal, but arrange for the proper recycling.

Old appliances contain valuable materials that can be recycled. Please arrange for the proper recycling of old appliances. Please dispose your old appliances using appropriate collection systems.
Electrical and electronic devices often contain components which could potentially pose a danger to human health and the environment if handled or disposed of incorrectly. However, these components are necessary for the proper operation of the device. Devices marked with this symbol must not be disposed of with regular household rubbish.
Notes about the ingredients (REACH)
You will find current information about the ingredients at: www.kaercher.com/REACH
Scope of delivery
The scope of delivery of your appliance is illustrated on the packaging. Check the contents of the appliance for completeness when unpacking.
In the event of missing accessories or any transport damage, please contact your dealer.
Spare parts
Use only original KARCHER spare parts. You will find a list of spare parts at the end of these operating instructions.
Warranty
The warranty terms published by the relevant sales company are applicable in each country. We will repair potential failures of your appliance within the warranty period free of charge, provided that such failure is caused by faulty material or defects in manufacturing. In the event of a warranty claim please contact your dealer or the nearest authorized Customer Service centre. Please submit the proof of purchase. (See address on the reverse)
Safety Devices
CAUTION
Safety devices protect the user and must not be modified or bypassed.
Pressure controller
Should excessive pressure occur in case of an error, a safety valve ensures the release into the environment.
Fuse
Should the device be in danger of overheating, the fuse disconnects the device from the mains.
If the fuse or the safety valve responds in case of an error, please contact the competent KÄRCHER customer service.
Description of the Appliance
Illustrations on fold-out page 4!

A1 Descaler cartridge
A2 Filling hole for water
A3 Carrying handle
A4 Holder for accessories
A5 Display
a Indicator lamp (green) - line voltage is on
Indicator light (red) - water shortage
c Indicator light (red) - replace descaler cartridge
d RESET button - set water hardness
A6 Switch - ON
A7 Switch-OFF
A8 Storage holder for floor nozzle
A9 Running wheels (2 ea.)
A10 Mains cable with mains plug
A11 Steering roller
B1 Steam gun
B2 Unlocking button
B3 Selector switch for the steam volume (with child protection)
B4 Steam lever
B5 Steam hose
C1 Detail nozzle
C2 Round brush Black
C3 Round brush Red
C4 Power nozzle
C5 Round brush Large
D1 Hand nozzle
D2 Terry cloth cover
D3 Microfibre cloth cover
E1 Extension tubes (two tubes)
E2 Unlocking button
F1 Floor nozzle
F2 Retaining clip
F3 Terry floor cloth
F4 Microfibre floor cloth
Quick Reference
Illustrations on Page 2
Illustration 1
Insert the descaler cartridge into the opening and push it until it is tightly fitted.
Illustration 2
Fill the water tank with a maximum of 1 litre of fresh tap water.
Illustration 3
Plug in the mains plug.
Press the ON switch to turn on the appliance.
Illustration 4
Indicator lamp glows green. The device is ready for use after approx. 30 seconds.
Illustration 5
Set water hardness prior to first use.
ATTENTION
In order to guarantee the optimum functionality of the descaler cartridge, the device must be set to the local water hardness prior to the first operation.
Further information concerning the device setting can be found in Chapter "Effect descaler cartridge and setting of water hardness".
Illustration 6
Connect the accessories to the steam gun.
Operatsteam lever.
Effect descaler and adjustment of water hardness
Effect descaler cartridge
ATTENTION
Only work with a cartridge inserted.
As soon as the device is filled with water and is taken into operation, the descending effect of the cartridge is activated.
Lime that is contained in the water is absorbed by the granules in the cartridge. This prevents the calcification of the device. An additional device descaling is thus not required.
Note
The granules in the cartridge can change their colour after contact with water; this is related to the mineral content in the water. This discolouration is harmless and does not have any negative effects on the device, cleaning work or the functionality of the cartridge.
Water hardness levels and flashing impulses
Note
The hardness of the tap water can be inquired at your water management office or the municipal utilities.
| Degree of hardness | ° dH | mmol/l | Number of flashing impulses | Interval of flashing impulses | |
| I | soft | 0-7 | 0-1,3 | 1x | 4 seconds |
| II | medium | 7-14 | 1,3-2,5 | 2x | |
| III | hard | 14-21 | 2,5-3,8 | 3x | |
| IV | very hard | >21 | >3,8 | 4x | |
Setting of the water hardness
ATTENTION
In order to guarantee the optimum functionality of the descaler cartridge, the device must be set to the local water hardness prior to the first operation.
This is done via the RESET button.
Notes
The device is set to the highest water hardness level (level IV) by default.
After completion of the water hardness setting, it remains saved until a new setting (e.g. after relocation) is necessary.
During the setting no pause of more than 15 seconds may take place. Otherwise the device is automatically set to the water hardness selected last or the highest water hardness with initial start-up.
Please observe the following procedure:
Connect the mains cable to the power supply system.
The device must be switched off prior to the setting.
Push the RESET button and hold it down during the start-up of the device.
After 2 seconds the indicator light is blinking and signals the current setting of the water hardness via the number of impulses.
By repeatedly pressing the RESET button, the setting of the water hardness level changes.
As long as the RESET button is pressed, the flashing impulse for the relevant water hardness level is not shown.
As soon as the button is released, the flashing impulse appears for the output of the selected water hardness.
If the water hardness is set to the desired level, hold down the RESET button for 3 seconds so that the setting is saved.
The saving process is displayed by the lighting up of the indicator light for the water hardness.
ATTENTION
If the device is used in another area with a different water hardness (e.g. after relocation), the water hardness must be reset.
Operation
Illustrations on fold-out page 3!

Assemble the appliance
Illustration A
Insert steering roller and running wheels and lock them.
Illustration B
Illustration C
Connect the required accessories (see Chapter "How to use the accessories") to the steam gun. Insert the open end of the accessory on the steam gun and push onto the steam gun until the unlocking button of the steam gun locks into place.
Illustration D
Use the extension tubes if necessary. To do so, connect one or both extension tubes to the steam gun. Insert the required accessories on the free end of the extension tube.
Removing the Accessories
Move the selector switch for the steam volume back (steam lever locked).
Illustration E
To detach the accessory parts, press the unlocking button and pull the items apart.
Filling the Water Reservoir
The water reservoir may be refilled at any time.
ATTENTION
Do not use condensation water from the drier! Do not fill with detergent or other additives (for example fragrances)!
Fill the water tank with a maximum of 1 litre of fresh tap water.
Turning on the Appliance
ATTENTION
In order to guarantee the optimum functionality of the descaler cartridge, the device must be set to the local water hardness prior to the first operation. Further information concerning the device setting can be found in Chapter "Effect descaler cartridge and setting of water hardness".
Place the unit securely on a firm surface.
Insert the mains plug into a socket.
Press the ON switch to turn on the appliance.
Indicator lamp glows green.
The device is ready for use after approx. 30 seconds.
Note
During the first steaming after removal and reinserting the cartridge the blast of steam can still be a little weak. The device requires a short break-in period, as the cartridge has to be filled with water first. This is why the steam discharge is unsteady at first and single water drops may exit. The amount of escaping steam increases continuously until the maximum amount is reached after approx. 30 seconds.
Refilling Water
In case of a water shortage in the water tank, the water shortage indicator light is continuously on.
Fill the water reservoir
The descaler cartridge remains fixated in the device.
Notes
Fill in the water via the lid of the descaler cartridge. This way a steady steam output is always guaranteed.
As soon as the water tank is filled with water again, the red indicator light goes out.
The device is equipped with a dry run protection for the pump. Should the pump run dry for a longer period of time, e.g. because of an incorrectly installed cartridge, the pump switches off and the indicator light for water shortage flashes red.
In order to operate the device again, the device must be switched off and back on. In the process it must be ensured that the cartridge is inserted correctly and there is enough water in the water tank.
Adjusting the Steam Quantity
Use the selector switch for the steam volume to regulate the discharged steam. The selector switch has three positions:
| Maximum steam volume |
| Reduced steam volume |
| No steam - child protection Note: In this lever position, the steam lever cannot be used. |
Set selector switch to the required steam volume.
While operating the steam switch, always direct the steam gun at a separate piece of cloth until the steam is emitted evenly.
Interrupting operation
If the device is not used for more than 20 minutes, please switch off the device for energy conservation purposes.
Press the OFF switch to turn off the appliance.
Turning Off the Appliance
Illustration 6
Press the OFF switch to turn off the appliance.
Disconnect the mains plug from the socket.
Illustration H
Push the steam switch until steam discharge stops. Now, the boiler of the appliance is unpressurized.
Move the child protection unit toward the back (steam lever locked).
ATTENTION
If the device is not used for a longer period of time (approx. 2 months), please empty the water tank. This avoids decomposition of the water.
Illustration K
Completely empty the water tank to remove existing water.
Storing the Appliance
Illustration 1
Illustration J
Put the extension pipes into the large accessory compartments.
Insert the manual nozzle and detail nozzle onto each extension pipe.
Attach the big round brush to the small detail nozzle.
Put the small round brush and nozzles into the medium accessory compartment.
Hook the floor nozzle into the parking position.
Wrap the steam hose around the extension pipes and insert the steam pistol into the floor nozzle.
How to Use the Accessories
Important application instructions
Cleaning floor surfaces
It is recommended to sweep or vacuum the floor prior to using the steam cleaner. This way, the floor is already cleared of dirt/loose particles prior to the wet cleaning.
Refreshing textiles
Prior to treatment with the steam cleaner, always check the reaction of the textiles in an inconspicuous location: Steam at first, then let dry and then check for colour or shape changes.
Cleaning of Coated or Lacquered Surfaces
When cleaning painted or plastic-coated surfaces, as found on kitchen and living room furniture, doors, parquet; wax, furniture polish, plastic surfaces or paint can come loose or stains can be created. When cleaning these surfaces, briefly steam a cloth and wipe the surfaces with it.
ATTENTION
Never direct the steam jet at glued edges as the edge band may loosen. Do not use the steam cleaner on unsealed wooden or parquet floors.
Cleaning of Glass
In case of low outside temperatures, especially in the winter, warm up the window pane by slightly steaming the entire glass surface. This will prevent tensions on the surface which might lead to glass breakage.
Then clean the window surface with the hand nozzle and attachment. Use a squeezee to remove the water or wipe the surfaces dry.
ATTENTION
Do not direct steam onto the sealed locations of the window frame to prevent damage.
Steam gun
You can use the steam gun without any additional accessories, e.g.:
to remove light wrinkles from hanging clothes by steaming them at a distance of 10 to 20~cm
to remove dust from plants. Here, keep a distance of 20 - 40cm
for moist dusting, by briefly steaming the cloth and wiping the furniture with it.
Detail nozzle
The closer this nozzle is to the contaminated area, the higher the cleaning effect, as the temperature and the steam are highest at the nozzle output. Especially suited for cleaning difficult access locations, joints, fittings, drains, sinks, toilets, blinds and heaters. Heavy lime scale can be drenched in vinegar prior to steam-cleaning. Let the vinegar penetrate for about 5 minutes.
Round brush (small)
The round brush can be installed onto the detail nozzle as an accessory. Attached brushes can therefore be used to remove heavy soiling.
ATTENTION
Not suitable for cleaning sensitive surfaces. Illustration C
Attach the round brush to the detail nozzle.
Power nozzle
The power nozzle can be installed onto the detail nozzle as an accessory.
The power nozzle increases the emission speed of the steam. Therefore, it is well-suited for cleaning very tough dirt, blowing out corners, grooves, etc.
Illustration C
Attach the power nozzle to the detail nozzle according to the round brush.
Round brush (big)
The round brush can be installed onto the detail nozzle as an accessory. This round brush allows to clean large rounded surfaces (e.g. sink, shower tray, bathtub, kitchen sink).
ATTENTION
Not suitable for cleaning sensitive surfaces.
Illustration C
Attach the round brush to the detail nozzle.
Hand nozzle
Illustration B
Install hand nozzle on steam gun.
Pull the cloth cover over the hand nozzle. Especially well-suited for small washable areas, shower stalls and mirrors.
Floor nozzle
Suited for all washable walls and floor coverings, e.g. stone floors, tiles and PVC floors. Work slowly on very dirty surfaces to allow the steam to act on the dirt for a longer period of time.
Note
Detergent residue or care emulsions that are still present on the surface to be cleaned can lead to streaks during steam cleaning. However, these will disappear with repeated cleaning procedures.
Illustration F
Attach the floor cloth to the floor nozzle.
1 Place the floor nozzle on top of the floor cloth. Depending on model - fold before the floor cloth the long way.
2 Open holding clamps.
3 Place the cloth ends into the openings.
4 Close the holding clamps.
CAUTION
Do not insert fingers between the clamps.
Parking the floor nozzle
Illustration
During work breaks, hook the floor nozzle into the parking holder.
Care and maintenance
Emptying the water tank
ATTENTION
If the device is not used for a longer period of time (approx. 2 months), please empty the water tank. This avoids decomposition of the water.
Press the OFF switch to turn off the appliance.
Disconnect the mains plug from the socket.
Remove the accessories from the accessory compartments.
Remove the cartridge from the device.
Illustration K
Completely empty the water tank to remove existing water.
Replacement descaler cartridge
ATTENTION
The replacement intervals of the cartridge (display indicator light) must be complied with; otherwise the service life of the device is reduced.
If the cartridge is not replaced in the indicated intervals, irreparable damage can be caused on the device.
Note
The replacement intervals depend on the local water hardness. Areas with harder water (e.g. I/II) have a shorter replacement interval than areas with softer water (e.g. I/II).
Indicator light display at the end of the operating time
The necessary cartridge replacement is indicated via the indicator light "Replacement cartridge" by the following actions:
Two hours before the end of the operating time the necessary replacement is indicated by flashing.
One hour before the end of the operating time the indicator light flashes faster.
If the operating time of the cartridge is completely depleted, the indicator light "Replacement cartridge" is continuously on and the device switches itself off in order to prevent damage to the device.
Insert new descaler cartridge.
Press the OFF switch to turn off the appliance.
Remove the cartridge from the device.
Insert new cartridge into the device.
Press the ON switch to turn on the appliance.
Hold down the RESET button for 4 seconds. Then the indicator light "Replacement descaler cartridge" goes out and the operating time of the cartridge starts again.
Allow the device to warm up.
Then hold down the steam lever for approx. 30 seconds to bleed the cartridge.
Note
During the first steaming after removal and reinserting the cartridge the blast of steam can still be a little weak. The device requires a short break-in period, as the cartridge has to be filled with water first. This is why the steam discharge is unsteady at first and single water drops may exit. The amount of escaping steam increases continuously until the maximum amount is reached after approx. 30 seconds.
ATTENTION
When replacing the cartridge, ensure that there is no confusion and the old cartridge is not reinserted.
Care of the Accessories
Note
The floor cleaning cloth and the cloth cover have been pre-washed and can be used immediately for working with the steam cleaner.
You can wash dirty floorcloths and cloth covers in the washing machine at 60^ . Do not use a liquid softener as this would affect the ability of the cloths to pick up dirt. You may tumble dry the terry cloths. The microfiber cloths are not suitable for the tumble.
Troubleshooting
Often, failures have simple causes and you can do the troubleshooting yourself using the following overview. If you are in doubt or if the failure is not listed here please contact the authorized customer service.
No steam
Indicator light - water shortage is continuously red
No water in the water reservoir.
Refill water
Indicator light - water shortage flashes red
Dry run protection of the pump is activated.
Switch on/off the appliance again.
Ensure that the cartridge is inserted correctly and there is enough water in the water tank.
No / little steam despite enough water in the water tank
Descalerr cartridge not inserted or inserted incorrectly.
Insert cartridge or ensure tight / correct seating.
Descaler cartridge was removed during the filling of the water or a new descaler cartridge was inserted.
Leave the cartridge in the device during filling.
Hold the steam lever down permanently, after 30 seconds the full steam output is reached.
Steam lever cannot be pressed anymore
Steam switch is secured with the lock / child-proof lock.
Move the selector switch for the steam volume to the front.
Indicator light "Replacement descaler cartridge" is on / flashes red
Operating time of the cartridge completed soon
Insert new cartridge and reset the maintenance display.
See Chapter "Insert new descaler cartridge".
RESET button was not pushed after the replacement of the cartridge
Hold down the RESET button for 4 seconds after inserting the cartridge.
The device switches off automatically
Operating time of the cartridge over
Insert new cartridge into the device.
See Chapter "Insert new descaler cartridge".
RESET button was not pushed after the replacement of the cartridge
Hold down the RESET button for 4 seconds after inserting the cartridge.
Technical specifications
| Power connection | |
| Voltage | 220-240 V |
| 1~50-60 Hz | |
| Protection class | IPX4 |
| Protective class | I |
| Performance data | |
| Heating output | 1900 W |
| Operating pressure max. | 0,35 MPa |
| Heating time | 30 Seconds |
| Steam volume | |
| Continuous steaming | 40 g/min |
| Steam push max. | 100 g/min |
| Filling quantity | |
| Water reservoir | 1,0 l |
| Dimensions | |
| Weight (without accessories) | 3,2 kg |
| Length | 360 mm |
| Width | 236 mm |
| Height | 252 mm |
Subject to technical modifications!
Contenu
Consignes generales. FR 5
www.kaercher.com/REACH
www.kaercher.com/REACH
Fornitura
Geen water in de watertank.
www.kaercher.com/REACH
www.kaercher.com/REACH
Leveringsomfang
www.kaercher.com/REACH
Leveringsomfang
www.kaercher.com/REACH
www.kaercher.com/REACH
Toimitus
www.kaercher.com/REACH
Σuακεuaσαί
To npapatoe uIKO tsuOKEunc ateikoVicetai otn oukeuaia. Kata nTv aTouoKeuaia eLeyTe To TpeiXoMeTO nC wC tpoC vTnApoNTa.
EavLeiouv Eapriuata n Exouv TpokAnei Cnuiic Kata tn eapopa, npakaloue Evnpewotov Tpoun-Thetaan og.
Avtaaaktka
XpnojIoToiei attKAEiTikv nniaavtaaakTkA KARCHER. Etnokotn anvtaaakTkiw 0a Bpeite oTo TEoL wv TApovTuov oyniWxepiaou.
Eyyunon
www.kaercher.com/REACH
Teslimat kapsami
Calismayi yarida kesme
KpaTkoe pyKOBoIDCTBO RU 6
PnHnHn DeiCTBnKapTpndKa DnYdAneHn HKnHn HAcTpoKa JecTkoCTN BObl 6
3Kcnnyataua RU 7
IcnoJIb3OBAHne npHaJnxHoCTe RU 8
YxOДI TexHnueeOe 6cnyKuBaHne. RU 9
Pomoub B cnyae HenoJaok RU 10
Texnueckne daHHbIe RU 11
Obuye yka3aHna

Ipeed nepBbIM npImeHneM yctpoiCTBa npOHTaTe 3Ty opINHaJIbHyIO IN-H
CTpyKUNIO NO 3KCNLYATAUIMN IN PNIJIARAEMbEy Kua3AHIN NO TEXHnke 6eONaCHOCTN. DeIcTByIte B COOTBETCTBm C HMMC. CoXpAHnte 6bOPObIpJ dJaDaJIhNeJ IberoNoIbJ3OBAHn INI dIg cIeJeyoUero BlaJeBtca.
IcnoJIb3OBaHHe no Ha3NaYeHHIO
IcnoJb3ayTe np6op dIy OuCTkn napom NcknOHTeJIbHO BDOMaHEM X03rCTBE.
Pnp60 npnHa3NaueH nI pynoBeDHeN OOnCTKn npom. OOnCTky MoXHO pNOBOuNTb C npImeHeHem NOxOaunx npHaadNexHoCTeN, ONcAHhBx B pyKoBDCTBe No 3Knpyataun. MoUune cpeCTBa He Tpe6yOTc. CneJyT cobIoDaT b HcTpykUnn no Texnke 6e3onacCHO
3aunta okpykaioe cpebl

YnakoOuHbIe MaTePnAJIbI npriOAnHbI IaB BTOpNCHouO6paOToKIM. PO3OTMy He BbIb6paCbIAuIte YnakoBky Bmecte C DoMaUHmMn OTXoAMn, a CdaJIte ee B OINH N3 PnyKTOB PnneMa BTOpHHO CbIpBJ.

CtapbI npnBopbl coepkataeHHbIe nepepa6BaTbIBaEMbI MaepnAbI, noDneJaxaune pepe-dae B nyKbTI pInemKn BtopuHoro cbIpB. Po3OTMy yTuIN3NpyTe CtapbI npnBopbl uepe3 COOTBeTCTByUOJIe CNCTeMbI npnEMKn OTXoOB.
3NeKtpnueckne 3NeKtpoHbIe npn6Opby qaacto co-dejkat KOMNoHETbl, KOToBpe npn HnepaBInbHOB mO-opaSeHHN HeNaDnaLauey tynlnsaunnpedctabJHOT noteHuAnbHyo OnaCHObT dnn IIOJe n EKOton. TeMe He MeHee daHbIe KOMNoHETbl Heo6XoDMbI dnn npaBnBHO pa6ToI np6Opa. Pn6Opby, O603aYeHNbE 3TIM CmBONOM, 3aPpeJeHo yTNIN3npoBaT BMeceC b6ItTOBbIMN OTXDAMn.
www.kaercher.com/REACH
KoMnJIeK TNoCTaBKn
KomnneKtaa npi6opa yka3ana Ha ynakOBke. Ppi pacnakOBKe npi6opa npoBepntb KomnneKtaaio.
PnOOBHApUxHnNEoCTaOuXn PnHaNDnxHOCTeI INNIOBpeJDeHN, NOnyHeHHbX BO BPMe rTpAHCNOPTOpBKN,CneJeYtBeDoMnTb ToproByo oprAHn3aunIO, npDabwyo nPiooB.
3anachbIe yactn
Ucnpb3yte ToIbKOOpnHbNbIe 3anaChbIe cAuant CmpMb KARCHER. OncaHme 3anaChbIX cAutei haoDITB B KOHJIe daHHIO IHCTpyKIMNo 0KcPiYATAuM.
TapaTna
B kaxdoi cTpahe DeIeCTBYOT COOTBECTBEHNO rapaHTnHbIe yCIOBnIA, INaDaHHbIe IyONHOMOeHHO OPAHnA3uMeI c6bIta NaHeI npDoyKunB DaDHoHc CTpaHE.
Bo3MOxHbIe HEnCpabHocTn np60paB T TeueHne ra- pAnHoro cpoKaMb yctPraHaem 6ecPnAtoHc, eCNI npuHIna 3akJouaTeoB a DepeKTx mATEpnaLoB nnn OOnkKax npn iNtROTOBHeN. B Cnpyae Bo3NHKObeHn npTeH3n B TeueHne rapaHTnHorO cpoKa npoc6ba o6paaTabc, IMeE npi Ce6e HeK O Nokynke, B ToproByo OpraHn3aCuIO, IpOdaBsuO Bam np6Op nIN B 6bnKaiuSyuYPOnHOMOeHHyO cnyKbCepBncHO 6cbNyKBAHN.
ДаТа Bыlnуcka OTOБрахаETСЯ Ha 3aBOДСКОТа6ичkeВЗakoINPOBaHнOMВИde.
Pn3OMOTdIbHbIeUcIpblIIMeHOT cIeDyIOoee 3NaHeHne::
Приимер: 30190
3 roD BbInycka
0 cToJeTne BbInycka
1 DecaTnIeTne BbInycka
9 BTOPAIuPpMaecaBbInycka
0 nepBra zpa Mecaa BbInycka
Takim O6pa30M, B DaHHOM npIMpe KoD 30190 03HaaeT DaTy BbInycka 09/(2)013.
3aunthbyeyctpoiCtBa
OCTOPOXHO
3aumhne ly cpmoe 3n m thn oambe. BouduImeHue 3aumhbx ycmpoom u nphe6pexHe Umu he donyckaemc.
PerylTop daBneHn
EcnnBpe3yIbTaTe HeNCnPabHOBCTn BO3HNkaeT n3bI ToCHoe NOBbIeHHe NdABJIeHn, dIaERO pa3rpy3Kn B OkpykaOuSyo CpeDnyCpnyKNT npedeoxpaHntbHbN Knaan.
3aunTa nnabKm npeoXpaHnTeJeM
EcnnBpe3yIbTaTe HeNCnPABNCHOTN UcTpoIcTBO nepeRpeBaetc, 3aunita PnabKIM npEdoxpanHTeM OtJeLJeTcPOCTBO TO cien.
Ecnn B cnuyae HeNCnpaBHOCTn cpa6bTaBbAet 3aunTn pnpdoxpanHTeMe Nn npdoxpanHTeBn Knaanh, CneJyET ObpATINbC BY YPONHNOMOeHHyo cepBcHHyocnyb KARCHER.
Onncanne npnbopa
306paKeHHa. Ha pa3BOpTe 4

A1 Kaptpndk dny ydaJeHnaKnn
A2 3aHbHoe OTBepCTne Iy BoDbl
A3 PykoTka IJIa HOseHnI npnbopa
A4 DépkaTeIb Iny pInHaIeXHoCTeI
A5 INdkaunn Dncnne
a KOHTPONbHaJa nMaHa (3eIeHa) - HAIuHne HaprJxKHeHa B Cetn
b KOnTpOJIbHaJ lamnOuKa (KpachOro zBeta) - "He-DOCTaTOK BOIbl
C KoHTpOJIbHaJ IaMNoUka (KpaChOrO ZeBaTa) - "3aMeHnITb KapTpNxD YdaJeHnHaKnINn
d KhoNka c6pOca - YcTaHOBKa JecTkoCTn BObl
A6 BbIKIIOUaTeJIb "BKn."
A7 BbIKJIIOuATEIb"BbIKI."
A8 NapkoobuHoe KpeIeHne HacaKn dJa nOa
A9 Pa6o7ne kOJIeCa (2 8TuKn)
A10 CTeBov Kaebb co wTeNceJbHOB BnIKoI
A11 HaprabJiaIouni polnK
B1 Napoboi nictolet
B2 KhoIka de6JokupOBKn
B3 PpeeknIOuOaTeJIb KOJIuYeCTBa napa (c3aIHToIOT BKNIOUeHINr DeTbMn)
B4 Pbyar noaun npa
B5 ⅢnHn noaun npa
C1ΦopcyHkaToueHNoCTpyN
C2 Kpyrnaa 电tka 耘HbI
C3 Kpyrnaa ΜeTka KpaHbI
C4 BbICOKOIpOn3BODInTeIbHaJHΦOpCyHka
C5 Kpyrnaa 电Ka Bonyo
D1 Puyhna fopcyHka
D2 Yexon n3 maxpoBoi TkaHn
D3 MmKpOBoJIOkOHnIyexoN
E1 YdnnHnTeNbHbIe Tpy6kn (2 st.)
E2 KhoIka de6JokupOBKn
F1 OpocyuKa IJnY nIcTKn IOna
F2 3axmM
F3 MaxpoBaTkaHbДЯMbITbI NOla
F4 TkaHb dIyMbITbI NOJa I3 MmKpOBOJOKOH
KpaTkoe pykoBOdCTBO
306paKeHHn np6opacm. Ha cTp.2
PncyHok 1
YctaHOBInTe KAPTpINx DnIyUdAnEnHnHaKINN BOTBepCTne IN HAKMInTe DnI npOHy nOcaDNi.
PncyHok 2
→ 3aπntb BpeepBpyap Iπra BOdbI He 6oJee 1 πTpa CBexeB BOONPOBOHOBIObl.
PncyHok 3
BCTaBtE wTeNCeIbHyIO BUNKy B 3JeKtpopo3eTky.
Hakmte BbKIOUaTeIb "BKn."ДЯВknIOUeHn npu6opa.
PncyHok 4
→ KOHTPOBNaHЯ NaMOnOCha rOpIT 3eJIeHbIM cBTetOM. PnI6Pbn3nteHbNo chepe3 30 cek. pI6bOp roTob K pa6oTe
PncyHok 5
→ПелдпеловIMSCINOLTB3OBAHMEMHACTPOINTB XECTKOTB OBObl.
BHIMAHNE
Ymobbl oecneumb onmmabHbI pexum pa6ombl karpmuOxda ydaneuHa hakuu, nepe npesim Ucnonl3oaeuem npubopa cedyem hacmpoumba Ha jxcemcmb mecmho eobbl.
DOnonHmteBHyU uHcFopMaUuNo hAcmpoKe npubopa cm.6 anaase, Ppuuun deucmeur kapmuOka dny yadaneHue hakuni u hacmpouka jeecmkocmu eoobl".
PncyHok 6
ChyTne npHaJdxKHOCTe
PereklnoateTbe KOnnueCTBa npa yctaHOBuTB B HnKHeM noNoxeHn (PbUar noDaun npa 3a6No-KPOBAH).
PncyHOK E
→ДяСЧТЯ ПИнадлЕХСНЕТЕ на Кнон-ук разблорови и OTДЕЛNTE detaUNpyr ot dpyra.
HanoJIHTb 6ak DIA BOdI
Pe3epByap DnI BODbl MOKeT 6bITb HAnONHeB IIO6OIMoMeHT.
BHIMAHNE
He uonbyume ckohendcupoeaehnyo oody u3 cyuunbHOJ MauuHb!
He doabmaime mooupe cpecdmea unp dyuee do- 6aKa (HaNPumep, apomamuzamopbl)!
→ 3aIITb Bpe3epByap IJIY BoDJI He 6OJee 1IITpa CBExeB BOOpnoBOHOH BOJI.
BkIIOueHne np6opa
BHIMAHNE
Ymobbl oecneumb onmmabHbI pexum paombk karmpuOxa dnyoaneuHa hakuu, nepeo nepBIM ucnon30aHuem npubopa cledyem hacmpoumbc Ha xeemKocmb mecmHou obbl.
DOnonHumeIbHyU uHcFopMauIIO no HacmpoKe npubopa cM. e anase "Ppuunui deicmeur KapmuOda ony ydaenue hakuni u Hacmpouka jeecmKocmu eoobj".
→ YctaHOBInTe npH6Op Ha TBepyIO NOBepxHOCTb.
BCTABTBe UTENCeNBHy BO BUNKy 3NEKTPONHTA HBA 3NEKTPOPO3ETKY.
→ Haxmnte BbKJIIOUaTeIb "BKn."ДЯ BkJIIOUeHnI npu6opa.
→ KOHTpOJIbHaJaAMNoUka rOpnt 3eJeHbIM ZBeTOM.
→ Пиблentьно чeps 30 ск. пбор ratob к pa6Ote
Yka3aHne
Ipi nepBoi o6pabOtKe napOM nocne I3BNeueHnI
OBpatHOJ yCTaHOBK KAPrDJa BvXoD CTpyu npAa 6y- det HEMHO 3aTpUdHEn. UcpoTbYbntOpTeBc6yETcH
6BonLsho nepNo npPapBOtKn, NotOMY cTo KapTpNdx
DOJenK b6Itb 3aONHEn BOoI. Pto 3To npUnHe nap
6yDet B hauane BxOHD HepeRyIpaHNO mOryT BxOoD
OTDeBhBe KaJIIN BOaI. KOJIYeCTBO NODaBaE
Moro npa NoctOAnHo YBeJIuNHaBaETcN, IN pIn6IIm3
TeNbHO uee30 CekyHd NODaaya DoCTnraeT MaKcMyma.
DolNB BoBbI
Пин Нeoctatke BОды B pe3epByape 3aropaetca NOCTOHHbIM CBETOM Kpachar KOHTPOlbHЯ NaMna HeoCTATKa BОды.
→ HanoJIHHTb 6aK IJRA BOIbl
www.kaercher.com/REACH
Szallitasi tétel
www.kaercher.com/REACH
Obsah dodávky
www.kaercher.com/REACH
Dobavni obseg
Obseg dobave Vaše napravje prikazan na embalazi. Pri jemanju stroja iz embalaze preverite popolnost vsebine.
Pri manjkajocem priboru ali transportnih skodah obveste VaSega prodajalca.
Nadomestni deli
www.kaercher.com/REACH
Zakres dostawy
www.kaercher.com/REACH
Articole livrate
www.kaercher.com/REACH
Rozsah dodávky
Rozsah dováky vásho zariadenia je zobrażeny na obale. Pri vybałovani skontrolujte uplnost obsahu balenia.
Ak niedtoré diely chybaju, alebo ak zistite skody vznikuté pri preprave, informujte prosim o tom predajcu.
Náhradné diely
www.kaercher.com/REACH
Opseg isporuke
www.kaercher.com/REACH
Obim isporuke
Sadržaj isporuke Vaseg uredaja je prikazan na ambalazi. Pre vadenja uredaja iz ambalaze proverite da li jeadržaj potpun.
Ona3BaHe Ha OKoJIHaTa CpeDa

OnakobuHnTe MaTePnAn MoT Da ce peuKnnpaT. MoNe Hx BbprnTae OnakOBKnTe npDOMaUnHe TcOTNaDbU, nI pEpaTe Ha BTOpNCHy CypOBuHN C cIe NOBtOPHa yNOpTe6a.

Ctapnte ypein cbbpxkat ueHHMATEpnaH, NOJlekauu HA peuHKnIpaHE, KOITMOrAT da 6bDat ynoTpebeHn NobTOPO. Iopadn TOBa MOJI ONCTpaHraBte CTapnte ypeIN, INIOJN3BAIKN IOXoDAUa 3a ceJIa TcNCTeMn 3a cbSuPaHe.
EneKtpnueKnite n eneKtpOnHnIte ypeI neCtO cbIbP- kxt CstabN huaCTn, KOITOp nPi HENpABnHIO bOpabeHe uHn HEPaBnHO I3XbPJIrHE MoRAT da I npctabnBaBnat OTeHNuHa nOaCHOT 3a OyeBikOTo 3dApBe n 3a OKoHnata cpeA. BbIpeK ToBa 3a npabInHata eknnoatayna Ha ypeIneTte3n CbStabNn cactn Ca Heo6xOdHMn. Ob03NaHeNeHTE cTo3n CmBbON ypeI He Tpr6Ba Da bSdat N3XBpINHn C bStOBnTe OTaNbU.
Yka3aHn3a cBcTaBKnTe (REACH)
AkyanHa HcfoPMAZna 3a CbctABKITE ue HameRite Ha:
www.kaercher.com/REACH
06em Ha DocTabkata
06EmbT Ha doctabKa Ha ypea e n3o6pa3eH ha onakobkata. PnP a3onakobaHe npOBepete daHn cbdbpXAHMETo e PbHNo.
PnI IINCBaun npnaHdNekxHocT nI npI TpaHcnpTn Httn MoJyBedeMe Taun TbproBeu.
Pe3epBn qactn
H3n0n3BaTte cama opnunnaHnnepe3epBnH nactnHa KARCHER.CnncbK h nepeBnHTte actnue haempnte B kpar na hactoIooYtTBaHe 3a paobota.
Tapaanua
BbB BcKa CtpaHa BaxaT rapaHIOHNHe yCNoBnA, nyBnKyBAHNOTOpM3nPAnaTA OhtnACnCTpn6ByTopcKaΦnMa.EBeHTyaIHHNOBpeDNHaBaunYpeUe ξeOTCTpAmH B pAMKnTe H aRapauHOHHN CPOK 6e3nIaTHO, aKo CE KAcAE 3a DeΦeKT B MaTePnaJIte NInn pIn npOIMBOCTBO.B rapaHIOHEn cnyaM ce o6bPheTe KbM DnCTpn6ByTopa NInn Hai-6nI3KmN OTOpn3npan CepBn3,KATO pIepCTaBnTE KAcobata6Benexka. (Adpcnte Nte HamePiTe Ha 3aJndata CTpaHua)
PpeDn3Hn npncnoc6JeHna
PNEIa3JNBOCT
IpeDnaHume npucnocobneu cnyxam 3a 3auima Ha nompe6umena He mpr8ea da ce npomeharn uU 3ao6ukam.
PerylaTOP 3a HJIraHaTeO
Ako B cnyaH na NoBpea Ce nOuY TbTpE rOJMaHO HnBaHaRe, eMn NpEa3eH KlananCe TpyKs 3a OTBeKdAHeTO My B OKoHnTa Cpea.
CtoTnem npedna3nten
AkoBcnyaHaNoBpeDaIMMaOnachOCTOTnperepBaHeHa ypeDa,edIN CTOnTneM npednataHTe Ce rpnx3a pa3delleHa ypeDa OT mpeXata.
Ako cTOnIeMaMHT npEpaNaIteI INI npEpa3HnT KnaIaNc ce 3aJeIeCTBaB v CnyauHa n NaOBpeA, MoJa da Ce o6bPheTe kMb OTOpINsRApHnCepBn3 h KaHRer.
Onncanhe na ypeda

BuxTe cxemnte Ha pa3rhaTata cTpaHnua 4

A1 NaTPOH 3a OTCTpaHЯBaHe Ha KOTJIeH KaMbK
A2 OTbOp 3a nblHe He B0da
A3 Dpbkkka 3a HocHe
A4 1p8kka3a npHaadJeKHOCTn
A5 Ioka3aHne Ha ndnpeier
a KoHTpOHa nAmna (3eNeHa)-IMa HAnpeXeHne OTMpexkata
b KOHTponHa JAMNa (UepBHeHa)- HeIOCTnHa BOda
c KoHTpOJIHa IaMnA (YepeBaHa)-CMraHa Ha naTpOHa 3a OTCpaHbAbe Ha KOTIeH KAMbK
d Bytoh RESET - hactpoiKa Ha TBbPIOCTTa Ha BO-data
A6 IpeKbcBau-Bkn
A7 IpeKbCbau - N3kn
A8 Hocau 3a napKpuape 3a npoBaTa n03a
A9 XoobnKoIeNa (26poa)
A10 MpekOBs 3axpaBaas Ka6eI c uencen
A11 Bodeua polka
B1 IapoctpyuH nuctolet
B2 Byton 3a De6nKpaHe
B3 Pnekbcaw 3a n36op Ha KOJIneCTBOTo npa (cbc 3aunTa 3a Deca)
B4 JIoct3a npapa
B5 NapoctpyuH mapkyu
C1 CtpyHaI03a
C2 Kpbrrna YeTka YepHa
C3 Kpbrrna yetka YepBena
C4 CnloBaI03a
C5 Kpbrrna Yetka TOnaM
D1 PbUHaIIO3a
D2 XaBmHeNo nokpnaIaNo
D3 MmKpOcΦn6bPnHO no-Kpntne
E1 YdbjkaBaun Tpbn (26poa)
E2 ByToH 3a De6JIOKnpaHe
F1 PoiOBaIIO3a
F2 3aBpkaa cko6a
F3 XabIneHa Kbpna 3a noD
F4 MnkpoΦnbPna KbPna 3a noD
KpaTko yntbTaHe
Bux n3o6paXeHnra Ta Ha cTpaHnca 2
Φnrgypa 1
Поставе Татрана 3а от相对较има He KaTneH KaMbK B OTBpaи ГпрTNCHete,ДOKATOЗ actaHe do6pe.
Phi rypa 2
Haneite B pe3epBoapa 3a BOda MaKcMym 1 nIbP npraCHA BOda OT BOdONpOBOda.
Φnrypa 3
BknHouTe eencela B eIektpnueckaTa Mpeka.
→ HataHcHe 6yToHa - BKn, 3a Da BKnIOuHTe ypeJa.
Φvrypa 4
KoHTponHaTamaamna CBetn 3eNeHO.
Cnepokono 30 cekyHn ypeBt e roTOB 3a pa6o-Ta.
Φnrgpa 5
CTeENHa TBbPDoCT Ha BODaTn NmNyJcN
Ha Murahe
Yka3aHne
TbBdOCTTa HbOdaTt O BoDOnPBODa MoXeTe Da HayuHte O cnJy6a BoOchoHaBaHe HnO tO 6unHa-ta.
I3non3BaHe Na npHnAdnHexHOCTnTe
BaxHn yka3aHn 3a ynoTppe6a
NoCTBaHe Ha noOBn NOBbpxHOCTN
Ipenopbya C nepei n3non3bae ha na-pongnynna ypeoNt da ce MMeTe NInnncmYe. Taka oue nped Bnaxhoto NouchtaBe NpOte cOCbo6xdaBa OT mpcottncBc0bdoHn qactuNsi.
Ocbexbahe Ha TeKCTnJ
IpeDn TpEtnpaHe C npocOtpyHnna ypeD MoJN BnHaRn Da IpoBepBaTe YcToHnOBCTTa H aTEKCTINHtE TbKaHN Ha cKpNTo MeCTo: IIpbBO ObJeNeTc e napa, CneI TOBA OCTaBeTe N3CbXHe N hakpA npobPeTe 3a N3MeHeHn Ha cBETA nΦOpMaT.
TouncTaBe Ha nobbpxHOCTn C nokpntne nn NaK
Пи почбтвае налakрани плпokрtnс с пл actма совьхостп, кato Napр. КухнECHN Истимп мебели, Вbatи, napket, MORAT Да ce OTДЕЛТВОБК, Мебелен лak, ИЗКУCTBEHи NOKРNTЯ Илб БОИ И де ообрауBAT netha. Пи почбтвае на� TeЗи NOBbpxHOCTN hANOETе edha Крna сnapa и n36bplwete NOBbpxHOCTIte C her.
BHIMAHHE
He hacooyaume npama KbM 3aIeneHu pbo6oe,mbu kamo Ienunomo Moxe da ce omdenu. He uon3aeUme ypeda 3 noucmeane Ha he 3aneyamahu bpehu nodoee unnpakem.
Nouctbahe Ha CTbKNO
ПиMuNcKbHbHnI TempeaTpy 3aTOnPiTe CTbKnata Na HpO3OpUeTne,пдгД BCNCHKO pE3 3mIATA,кATO JeKo HApPbCKaTe Cnapa YmaIa TcBKnHe NaobpXHoCT. ПToM aHaNChu E cMb4BaTb HAnpexKeHЯ NOBbPxHOCT-Ta,КoNTMOrAT d a DoBeJat DO cUyBaHa He cTBKnIO.To HakpA noOpCTe NOBbPxHOCTTa Na npO3opeua CpbHata IIO3a n KOpRbANOTo.3a n3TeJIHne Ha BODaTa IIN0Ibn3BaIte npIcTbKa 3a npO3OpU nII nIb3bPwTe NOBbPxHOCTTa DO cyXO.
BHIMAHHE
He hacoueaume napama KbM 3aneyamahime mecma Ha pamkama Ha npo3opeua, 3a da He zu nopeudume.
NapoctpyuH nucToJeT
Bve moxe da n3noI3BaTe napoctrpyHnra nictolet n 6e3 npHaadnexKHOCTn, HanpImep:
3aOTCTpaHBAHe Ha JIeK HbHKn OT OKaEHeN IpExN, KaTo IIN HApBckate C npapa To pa3ctOHHne TO 10-20 cm.
3a nochctBaHe na npax no ueTr. PnTo ToBa cnaBaBte paocTHeHne OT 20-40 CM.
3a BnaxHO NOCHCTBAHe Ha npax, KaTO HANOITE KbPnata 3a KpATKO cnapa nCneT ToBa N36bpuTe MeBcENITE C HeN.
CtpyHaIIO3a
KoNkoTo No-6Ibn3O e TЯ da 3ambpcEHO MRCTO, ToNkoBа NO-BvCOK e EeKbTb OT ONUCTBAHETO, TbI KATO TempepaTpAra N npapaTa haH-BvCOKn Ha n3XoJa Ha Ido3a. OOCbeNo pAKtnCaHNo 3a NoNUCTBaHe Na TpyDn DOctbHnM MeCTa, FyTN, apMaTyPn, KaHAn, YmBANHnIi, ToaJIeTHn, UOpN nn PadaTOpN. PpeNi ONUCTBaHe C npA cINHIne BApOBuKOBn OTlanarHnMorat Da 6bDat HappbckaN C oet, OCTabete Da noDeECTBa5 MHNyU, cIeT ToBA o6bnite C npA.
KpbTJIa YeTKa (MaJka)
Kpbflata yeTka MoKeJa ce MeoHTnpa KaTo DoNbHHe Hne KbM ToUcOBATA CToyHa NDo3a. Taka 6NaIroDapEnHe Ha YeTKnTE MOrA TeL HeO Da 6bDat OCTpaHHe N yOpNTnTe 3AmbPCBaHAn.
BHIMAHHE
He n oxdoxoara 3a noocmeane Ha nuycmeumenu noebpxhocmu.
Phirypa C
3aKpeneTe KpbIraTa YeTKa KbM ToUkOBaTa CtpyHa DIO3a.
CnnoBaIIO3a
CnIOBataIHO3aMOKeJaCEMOHTnpaKaTODOnbJIHeHneKbMToUKObATACTpyHaIHO3a.
CinobataIIO3a yBelenuBa CkOpocTtHa H3Nl3aHe Ha napata. Iopadn ToBa TRe e NOxOJa7a 3a noUcCTBaHe Ha oOcobo HnyopnTu 3AmbpcBaHnur, npOdyXbaHe Ha bTn, Fynu N.T.H.
Φnrgypa C
3aKpeneTe CnIOBATA dIO3a KbM TOcKObATA cTpyHa dIO3a B cBoTBcTcBne C KpbIraTa YeTKa.
KpbTna Yetka (rOJMa)
Kpbflata yetka moke da ce MOHTnpa kaTOIOnbHHe Hne KbM TOUKObATA CTpyHa NIO3a.C Ta3n Kpbflra YeT Ka Morat da bDat noCTBaHN 3aObLeHN NOBpXHOCTN (Hapr. yMbAhnHUn, dyuOBE, BaHn, KyxHeHcKn MNBKN).
BHIMAHNE
He e nooXoOra 3a noocmeae Ha nuyeceumenu noobpxHocmu.
Φnγρa C
3aKpeneTe KpbIraTa YeTKa KbM ToUkOBaTa CTpyHa DIO3a.
PbUHaIIO3a
Φnrypa B
MOHTIpaIte pTuHa NIO3a Ha npOcTpyHnI HnCToJET.
Ntternete Nopmbanoto Bbpyx PsHnata DIO3a. Oc0eHo nOdoXoJura 3a MaKIn MmEun Ce nobbpxHOCTN, dyuKabHmN orneJa.
IpoobaIIO3a
POnxoJa3a MNeuCe CTeHHN NIOOBn NOKpnTna, Hnap. KAmehHn NIOOBe, NIOChN INoOBe OT PVC.CiHNo 3aMbpcHeNTe NOBbPxHOCTNs ObpaBoTbaTe bAbHo, 3a Da BbSeJeCTBa Napata No-dbIro Bpeme.
Yka3aHne
OCTaBtIeT OTOHCTBaUH pnenAPAT NII NOIbIbP XAaH EUMCN, KOINTO OUE CE HAMIPAT Ha ONUHCTBAHATA NOBbPXHOCT, PNI IOHCTBAHe C napa MORa DA OBOEaTdo HApBeHOMPH NeMaTc, KOINTO OBuAE N3ue3BATn MHOORKpATHo PNIOJIOKeHne.
F
3aKpeTe noObTa KaBpNa Ha IIO3aTa 3a NOI.
1 Nocabete noDoba IIO3a BbpykPnata 3a nO. B 3aBcIMoCT on ObopydBaHeto - Ppei ToBA cTHe H aIJIbXKHO Kpnpata 3a nO.
2 OTbOpTe 3aIbpkaunTe cKo6n.
3 IocTaBete KpaunataHa KbpnaT BOTBOpnte.
4 3aTbOpTe 3aIbpKaunTe cKo6n.
PPEJNA3JIHBOCT
He cnaaume npbcmune cu mekoy ckobume.
Pomou npn HEn3npaBHOCTN
Mhoro YecTo npuHnHte 3a nobpeJa ca enEmeHTapHn I c NMOUHTa Ha CNEHnTe Yka3AHHa MoKe JcMaI Da nOCTpaHnTe. Ako He CTE CnUPHyn INN NobPeJIne He ca ONiCaHN Tuk, O6bPheTe Ce KbM OTOpnsnapHncepBn3.
JincaHa napa
KoHTpOJIHa JAMNa - HeIOCTnHa BOa CBETn NOCTOARHO YepBeHo
JIINca Ha BOda BbB BOHnpe3epBoap.
→ DonbJbAhe c BOda
KoHTpOJIHa JAmna - HeIOCTnH a Boa Mmra YepBeHo
3aunntata ot cyx xoHa nomnatae aKtmbupaHa.
→ I3KIIIOUteTe IN BkIIOUteTe OTHOBO ypeJa.
YBepete ce, Ye NaTpoHbTe NocTaBen NpabuNHO Ye B pe3epBoapa 3a BOda IMA DoCTaTBUHO BOda.
JIINCBa/MHORO MaKo npa,BbIpeKeN Ye BODaTaB pe3epBoapa 3a BOa e DoCTaTbHa
Tatpoht 3a OTCTpaHbAhe Ha KOTneH KAMbK He e NOCTabEH INIe NOCTabEH rpeuHO.
IocTaBete NaTPOHa NIM ObPHeTe BHMaHnI npaBnIHOTo /3dpaBOTo My 3aKpeNBaHe.
Bytoh RESET He e 6nJI HATncat CneI cMaHa Ha naTPOHa
→ 3aπbpxTe 6yToH RESET hata 4 cekyHn cnEi nocTaBHe Ha naTpoHa.
YpeBt Ce nKIOUba aBTOMaTHNO
Bpemeto 3a pa6ota Ha natapoHa npKluOu
NocTaBeTe HOB natoH B ypeHa.
BuxTe IJIaBA "IIOCTaBHe Ha HOB NaTPOH 3a OTOCTpaHbBaHe HA KOTJIeH KaMbK".
Bytoh RESET He e 6nJI HATncchat Cnei CmHa Ha natapona
→ 3aπbpxTe 6yToH RESET hata 4 cekyHn cnEi nocTaBHe Ha naTpoHa.
Texhneckn daHHN
EneKtpo3axpaHbaHe
| Hansejechen | 220-240 V |
| 1~50-60 Hz | |
| Градуς на зашита | IPX4 |
| Клас зашита | I |
| Данни за мошноста | |
| Нагревателна мошност | 1900 W |
| РавOTно налаягам макс. | 0,35 MPa |
| Вреем за подравале | 30 секунди |
| Колочевто пара | |
| Проблаж'teelю ручке на пара | 40 r/Min |
| 100 r/Min | |
| Едократулоизучке на пара макс. |
KoJIuYeCTBO Ha NbJIHeHe
www.kaercher.com/REACH
Tarnekomplekt
Selle seadme tarnekomplekt on kujutadu pakendil.
Kontrollige lahti pakkides paki sisu.
www.kaercher.com/REACH
Piegades komplekts
Jusu aparata piegades komplekti ir attelots uz iekopojuma. Izsainojot pbaraudiet, vai satsir piligs.
Ja trukst pigeonumi vai transportesanas laikara radusies bojumi, ludzu, informejiet tirgotaju.
Rezerves dalas
Izmantojiet tikai originalas KARCHER reserves dalas. Parskatu pār reserves dam Jus varat atrast sīs lieto-sanas pamacibas beigas.
Garantija
Katra valsti ir spekma uznemuma atbildtgas sabiedribas izdotie garantijas nosacijumi. Garantijas terima ietvaros iespejamos Jusu ikartas darbibras trucejumus mses noversisim bez maksas, ja to celonis ir materiala vai rao sanas defekts. Garantijas remonta nepiecesamibas gadijuma ar pirkumu apiecino so dokumentu griezieties tie pirtogata ja vutvakajpa bilvarotaja klienta apkalposanas dienesta.
(Adresi skatit aizmugure)
Drosibasiekartas
UZMANIBU
Drosbas iekartas kalpo lietotaja aizsardzibai un tasa nekada veidnedrikst mainit vail atstat neieverotas.
Spiediena regulators
www.kaercher.com/REACH
Komplektacija
www.kaercher.com/REACH
KomnJIeKT noCTaHaHHa
KOMPNEKTAci npnctpo 3a3aueha Ha ynakobci. Pnnpo3nkyBaHHi nprCTPOIO nepeBipuTNI KOMPNEKTAciIO. Y pasi hecata iDOnaTKOBOrO oIbAnHnnA bO yUkoJKeHb,OTpIMAHN iD qac TpaHcNoptyBaHHc, cniD nobiDOMTe npCe B TOpRoBeIbHy oprAhIaCIIO, Jka npOdaIa anapat.
3anachi yactnHi
Bnokpctobyte Ttinbsopirihansh3anaChi qactHnphiPMKARCHER. Onc 3anachnx qactnh Hapnkiu daHOI hCTpykui 3 ecKnnyataui.
Tapahtia
YKOJI KpaIH DIOb yMOBN rapaHTI, HadaHOI BIDNOBIDO pIPOMO-npOaDbAeM. HenoJAMKn BpoBOTnCPTO MO NycyBaEM 6BeKoTbOHO nPoTAROM TepmHyDII rapaHTI, JAKU BOHN BkINKANH 6PaKOM MATEPIANY NOMILKAMN BfTOBOTNeHH. Y BUNaKDy UHHHOI rapaHTI 3BepTTbCJ DO npOdABuN H NaBnNKChn ABTOP3OBAHn cepBHCN CEHTP 3 DOKUMeHTaJIbHM NiTBePdKeEHNM NOKYNK.
(Adpecn nVB. Na 3BPOtI)
3axnch npncTrooi
OBEPEXHO
3axuChi npucmpoi cnyyomb dna 3axumy koprucmyeaeie. Budo3mHa zaxuchux npucmpoie yu HexmyaHHn HUMHe doynckaaembc.
PerylaTOp Tncky
JaIIO yBnADKy NOMIKN BUNHNAE 3aHaTTO BUCOKNI TNC, 3aNo6iKn KJIaNAn 3aBe3neUye Ioro BiBdI B HaBKnOINHe cepeDOnuIe.
PnaBkn 3an06jxHnK
JaKIO y BnnaJky NOMNIKNI npNCTpi MoKe JnepeRpiTncsA, 3aON6IXHKn 3a6e3NeUc BiEcdHaHHN pNCTpOo BiMepexi.
JaIIO pIIaBKM 3aONbIKHM a6o 3aONbIKHM Knahan cnpaIbObyIOb b PAOTi NOMNk, bdyI naKa, 3eptaIteTcEO dIbnObiaJbHOI cepicHOI clyXbK AKRCHER.
Onnc npuctpoH
3o6paXeHHaB.Ha po3Bopoti4

A1 Kaptripdkn BnuDaneHnHaKnny
A2 3aJIbBnI O'TBip IaIy BOiN
A3 Puyka
A4 Tpimau nI npinaJexHocteI
A5 IIndkaiaHa dncnnei
a KontpoIbHa Iamna (3eIeHa)-HnBnictb Hnpy- n y mepexi
b KoHTpOJIbHa JIaMna (YeBBoHa) - "HeCTaYa BoDn"
c KoHTpOlbHa IaMna (YeRbOHa) - 3aMIHnK KapTpPnIXk DnIe BnJaIeHHa HAKINy
d KhoNka CnIaHnra - BcTaHOBneHHra XOpCTKoCTi BOIN
A6 BmMkau "BMK."
A7 BmNkau"BmNk."
A8 NapkyBaIbHe KpInJeHHaHacAn dIy iIbnorn
A9 Po6oqi kOleca (2 uTkyu)
A10 MepexeBn KaebI i3 utencbHIO BnIKOIO
A11 CnpmaMOyBaIbHn BaJIeCb
B1 Napobovn nictonet
B2 KhoNka po36nOKyBaHHa
B3 IpeemKau KJIbKOCTI napy (3 3axUCTOM BiD BMKAHHaDiTbMn)
B4 Baxjnb noaui napu
B5 Napobni shnaHr
C1 Conno ToUKOBOrO CTpyMeHr
C2 Kpyrna uitka Yopn
C3 Kpyrna uizTka YepBoHn
C4 BucOKoNpOdyKTHBHa opcyHka
C5 Kpyrna zitka BeNkn
D1 Puyne cnono
D2 POKPIT3 eNoHky
D3 MikoPoBoJIoKoHnHiyOxOJI
E1 POnobKByBaJIbHi Tpy6Kn (2WtYkn)
E2 KhoNka po36nokyBaHHa
F1 Conno nany nony
F2 3aTnckau
F3 MaxpoBa TkaHnHa dIe nIiDnIe
F4 MikpoBOJOKOHHa TkaHnHa IJI niJIOI
Kopotka iHctpykua
→ДИВ.MaHONKaHa cTOpIHci 2
PncyHok 1
BctahOBitb KaptripJx DNJI BnIaIeHnHaKIny BoT-Bip Ta HATNCHTB DJI MiuHOi φikcaii.
PncyHok 2
→ 3aIITn Bpe3epByap He 6IbIe HIX 1 nItp cbIXoI BOIOPOBIDHOI BOIN.
PncyHok 3
BCTaBTe wTeNCeIbHy BnIKy.
→ HaTnCHyTN BmNKaay "BMNK,", 06 BBIMKHyTN npi-ctpi.
PncyHok 4
→ KoHTpoJIbHa NaAMnOuKa rOpNTb 3eJIeHIM KOJIbOpOM. PtIbIaNo Hepe3 30 cekynd npicTpiB dyede roB Bm.
PncyHok 5
→ Pered nepsoe ekcnnyataueio BCTaHObitb kopCTKICTB BOIN.
YB4A
Ioo6 3a6e3neumu onmumalhe fyHKuoHyeaHnHaKarpmpxOdaBuaDaeHHaNakuy, npucmpiMa6bymu HanaawoeaHue neped npwum eukopucmanHmdo jocpckocmi micceoi oodu. Dodamkoey hOpmaio uodo hanaawyeaHnHa pcmppoio e po3ini ,PpuunDii karpmpxOdaBuaDaeHHaKuny ma hanaawyeaHn Kocpmkocmi eo du"
PncyHok 6
→Пиндайтесадкуdo napoboro nicToeta.
→ Hatachitb nepemka napn.
Pe3epByap IJI BODI MOXHa HAnOBHOBaTn B 6yIb- kI yac.
YBAGA
He eukopucmooyamu kondehcam 3 cywapku dnyi nu3nu!
He hanoeHIOAmu 3acobamdu nya uuehenna a6o ihuumu dobaekamu (hapanpuKnaad apomamuzamopamu)!
→ 3aIITn BpeepByap He 6IbIe HIX 1 nItp cbIXoI BOdONpOBiDHOI BOIN.
YbIMKHeHnI npnlaNy
YBARA
Ioo3abe3neumu onmumalhe fynkuiohyaahnka kampidxa durebanaehna Hakuny, npucmpiu Mae 6ymu hanaumoeanu neped nepwum bukopumhanmdo joxopcmkocmi mcieoei oodu.
Due. dodaamkoey IHopmauio 0do haanaumyeaanr npucmpo e po3oini ,Ppuuuni kapmpjka dn euaenha knakny ma hanaumyeaanh xopcmkocmi eodu).
→ Pπηπaɪd Heo6xɪdno BCTaHoBnIbAtn Ha MiúHy OCHOby.
BCTaBTe mepeKHN uTKeep y uTencelbHy po3eTy npnlaNy.
→ HATUCHYTN BMMKauh "BMNK," 106 BBIMKHHTn npntpii.
→ KoHTpOJIbHa NaAMnOuKa rOpIb 3eNeHm KOnbOpOM.
→Пиблзно Урета 30 секунд писстрий буde roto-BИN.
Bka3iBka
Iiucnepuoro BnnapoBvBaHHn iicn BuaaeneHn Ta BCTANHOHNH KAPTRNDJy CTPMHN pAn MoKe 6bTN TPOXn CnaBkIM. PnictpMae HeNoBDRo nonpaocobatN, TOMO 90 KapTmDc SNOTATK NOBHeN 6bTN 3anOBHeH N BDOIO. TOM cyouaTy BuaJIeHn Hn napn bSyde HepeyraHm I MOKytB BVCTynATN OKPem KpanPi BOH. KlbKiTb napn, 10 noaetcb, nocTIHO 36IbWycb cI, npIbn3No chee3 30 cekynd noaay daocrae MakCmMy.
DolnBaHNaBn
Ipn Hectaiv BoN BpeepByapi noctiHOn roptb YepBOHn IHdkatop Hectaiv BoN.
→ HanoBHTn 6ak dny BODn
KaptpnDkIy BuaJIeHHe HAKINy 3aIIuHaCTbCp npI cyomBy 3a#kCOBaHmB pncTpoI.
Bka3iBkn
Boda 3aIINBaTebCyepe3 KpiuKy KaTpNJa dIy BuaIeHnHa HauNy. TaHKM uHOM 3a6e3neUcYbC8 NoCTHa NOTyKHiCT Napr.
■ Picnra toro, kpe3epBapar IaD BOiI aanBOHIOCTbC, cepBOHa KOTpOblbHa NAMNA BUMNKAETCbC.
Pnncptpi ObnadHnann 3axCTOM HACOCY BID cyXo ro XOy. Jkso Hacoc Tpmbanu Yac npaioe i cyXMM XODM, HapKnnd, Yepe3 HenpaBnIbHO BCTaHOBJIENH KApTpnDjK, HACOBMNKAeTcSi KOHTpOblHa NaMaHa HeCTaW BoIN NoCHNHe6 BImMaTn cepBOHmCBITNO.
I TnToro, 063HOB EKCNyAtyBAtn nPnCTpiT, TpeBaNOr BIMKHyTN i 3HOB YBMkHyTN. IaBoRo TpeBa NpeCBiDHTNCsR, 1o KaTpndx BCTaHOBHeNo PpABINbHO i B pe3epByapri 3 BOIOE DOCTaTHK KInbKiCTb BOIN.
PeryIIOBaHnKiJIbKoCti napu
3a donomoroo nepemnkaa kibkocti npar perylnoctb ckiNbKtB npn,raKa nodaactc. Nepemknau mae TPNONOXEHNHA
3aΦikCyBaTn Kpyrny Μιrky Ha conNl KpanKOBoro CTpyMeH.
Pуна Форсунka
PncyHok B
BCTaHObIb pyHue conNo ha napOBn nictoNET. HataRHTb 4oxON Ha pyHue conNO.OcOblno Do6pe iDxOINb DnA HeBEJIKNXm BepExOHb, OMO MNOTCB, dyOnOB KabiHK Ta d3epKan.
Opcsnka nna niDnorn
Писточа на Спix МИнх CTIHINx Ta noIobnIX nOKPITITB, HanpIKNAD, KAM'HNX nIINOR, nIIINK T a noIbiHINxopNDy. Ha cIbHo 3a6pydHeHx NOBepxHx npaoJte NoiInbNo dЯTORO, uOb 3bInbWNTn TpBBAJIcTb dI napr.
Bka3iBka
3aannn 3acoby dny uuieHH afo emylbcii ndoTnay, kki aanlauoTbcHa ouhuiybani nopexhi, MoJytb npni uuieHH napopo ytBopOBaTN cMyr, kki BnaIJIIObTc npri bgaratopazOBMY ounieHH.
PncyHok F
→ 3akpinTu TkaHnHy dny MmTTa NiIIOHa φopcyHui dny NiIIOH.
1 BctahOBiB foPCsyHKn dny nuuueHHn iJIOr nHa TKAHNHy dny niJIOrN.
B3aIeKHOCTi BID oIbIaIaNHaHn-CKIaIITb 3a3daneRid TkaHNy DnI niIIOrN B3doBX.
2 BiKpTu3aTuCKn.
3 Iomictnt KInci TkaHHN BOTBOPN.
4 3aKpntn 3aTnCKn.
OBEPEXHO
He 3acoeyeamu naIbui mix 3amuckamu.
NapkybaHnΦopcyHKn dny niDnorn
PncyHok
Baxijb noaqui napn He moXHa HaTnchTu
Baxijb noaqi napi 3aqiKcbAHn 6kOyBaHnM / aXnCTOM BiD BkIouehn DItbMn.
→Перемикай киньковпапу певессу положеня.
KoHTpOJIbHa JIaMna ,3amHa KaTpPnIXka dIy BvIaJIeHHe NaKInPy" TOpNtB / 6JIIMAc CepBOHm CBITJOM
Ckopo 3akinhyeTbcepooboun yac kaptnpjka
BCTaHOBIb HOBm KApTpNiJx Ta npeBeEiTb Ha3aI IHINKATOp Heo6XiDnOCTi TexHIO HO6CnYROyBaHN.INb.Po3dIn, BCTaHOBnENHn HOBOrKpTnJaDnBnAneHnHaKnHy"
KhONky cKnDaHnI niCJIa 3amHn KApTpIJa He 6yIHOHaTNCHyTO
→ Ytpnmyte KhoNkYCKndaHnIiNCnBCTaHOBneHHKaTpndka npOTrOM 4 ckyHd HATNCHEHomyctaHI.
Ppncpi BiiKluohaetbca camoctio
3aikyuεtbcpaobouyackaptpnxdka
BCTaHOBHTM HOBNI KAPTpIxDK B pIcNtPI. DnB.po3dIN, BCTaHOBJIeHNA HOBO KAPTpIxDKa IIINbIAeHNA HAkYNI.
KhONky cKnDaHnI niCnIaMIn KApTpNiJa He 6yIHOHaTNCHyTO
→ Ytpnmyte KhoNkYCKndaHnI PCnBCTaHOBneHHKaTpndka npOTrOM 4 ckyHb HATNCHEHomy CTAHi.
TexhiuHxapaKTepeNCTnKN
Kayinci3ik KypaIapbl KK 5
Bvibim cinnattamacbl KK 6
KbickaHa HycKaynbIK KK 6
KaKtby Ketipyre apHaIFaH KaTpnuJxdi naiDanany KHe cy KepeMekTiinirOpHaty .. KK 6
KoIdany KK 7
KabdkTapdb kondaHy KK 8
KyTu MeH TeXnKaIbIK TeKcepy XyMbIcTapbl. KK 9
Keepinep 6oIraHaKaEMeK aIy .KK 10
TexHnKaJIbIK MaFlyMaTTap. KK 11
XaannbHyckaynap

БуMbHbIbIbIbIaflaW pet kOpaHny aIbHbIa oCbI bIcK naIaNanahy HcKaYbIbIFH JxHe KaMtbIJfAh
Kayinci3ik 60bihua Hcckaynapdb OkbIn bHbIbH3. Onilapra cain epekeet etinH3.KitantapdbH ekeyin De KeHHri naiandaanhy yuHn Hemece ocb dyBmblKeHH niadanaHabTynfanaq yuHc KaTaN KoBHb3.
www.kaercher.com/REACH
KanTama iwiHdere 6enweekterp
C3dH 6yIbMbHb3dbH jKeTki3iNy KEnMei Kopanwa da
6eHneHReH. 6yIbIM KopanwacbH awKaHaJa Kopanwa
iHiJHei 6yIbMm HcBnueKTePiH TOnbIK XeHe
6y3blMaH Tpye BoNfAaBbIh TeKcepin AnbH3.
Erep KeB6ip Xa6DbkTAP KOK Bonca Hemece
TaCbMaJdY Ke3HDei Akaynap Bocna, annapaTbI
catKaH FnpMaHbXabapdAp etIH3.
KocanBb6eIweKeTep
TeKaHa TynHcyckabIK KARCHER Kocankbl 6bnuekterp
KoJaDaHbIb3. Kocankbl 6bnuekterpin CypETMeci
Ocbl HcyckayblTbIH, CoBHJaB 6epiRteh.
Kenilme
Biyimdapmbi3 yiwinepenJe kayanTbI eTim cepiKTEcTePIMi3 tapaibHn WbIrapbIaNbH KeniIndeme wapTTapbl KUwte bOanbl. Erep MATEpnaIapdbH aKayPiFbHe MeHec DaJIbHday bapbcHbDaftb KaTeiKtep TaBbIcN, 613 bIKTNMaA kAYbIbKTapdb KeniIN MEP3imi iWihne akbcIb3 xKeHdeM3. KeniIN MEP3imi iWihne Hapa3blkTbpabH3 bOJcA, acnTbI catKaH cayda MekeMeCine HeMece XakbIHaRa fekinETTI cepBCTIK Kb3MeT Kepctery OpbHaIhCaTbIn any YerIH Kepcetin, xAbapNaCbHbI3.
HdpinreH KyHi KepceTiIreH Typ KeCTeciHde UnppnaHaH.
Keke cahandapdbIH MaftbHaHacbi KeleceiJe 6oJaDbI:
MbicaJIbI:30190
3 ΘHДipijIReH kBJIbI
0 ΘHdpipinreH facbipbl
1 ΘHπipinreHONKbINDbIK
9 ΘHdpinre anbHbHekHIcaHbI
0 ΘHdiipinreHaibHbH6ipiHsi caHbI
CoHbIMeH 6yJ MbIcAJa 30190 KoIbI
09/(2)013 eHdiipinre H KyHn 6iJipeidi.
Kayincizik KypanlappbI
△ ABAIJIAHbI3
Kayincdik KypanadapbHbIH MAKcambI KonDahNyubHbI Kayinmen cakmahanby, ocbnapbOa3eepmye Hemece bblkncbsI kAnbOpyra BonMuaBbI.
KbICbIMDb peTteri
ErepKaTeXaFdaBbIHDa 7MaMaadahTbICKOrapblKbcBIM naJaD6oJcA, CaTaHbIpBrIi KnAnaH OHbIH TeMeHneYiH KopuHaH opTa IbIfApy apKbIbI KaMTAmac33 eteJI.
Bankbifbiw caKaTahDbipfbiW
Ynblc KOnlaanBai Ke3Ie XaHy Kayny XaRaDnHda 6AnKbIbIi CaTaNbIpyBbIu 6ByIMhNbIXeNiDe H axbIpaTbIyIbH KAMTAMacB3 etEeI.
Erepeaikbifbiu cakTaHdbipfbiH HeMece caKaTaNDbipfbiU KJIanaHua aKaaylbK aHbIKtaca,Depey KARCHER Kb3Met KepeSy MaMaHbHa xa6aplaacblh3.
ByiYbIM CnPaTtMaCbI
CypetTep aubinatbH 46eTTe KapaHbI3

A1 KaKtbl KeIpyre apHaIraH KapTpndx
A2 Cydbkylofa apHaHaFah MoBH
A3 TaBImaIaNay TyTkacbl
A4 Benuwekeptepihyctafbiu
A5 Dicnnei Kepcetkiu
a BaKbIay 7ambl (Xacbl TycTI) - JeJIiIK KepHey 6ap
b BaKbJnay wambl (kb3bl) - Cy kTeKJIikci3di
c BaKbIay WAmbl (Kb3bl) - KaKTbI KeTIpyre apHaIFaH KapTpndxdi aybICTbIpy
d RESET Tymeci-Cy kepmektinirih opahTy
A6 AxbipaTkblu-Kocy
A7 AxxbipaTkbiu - Ujipy
A8 Edeh copy wymek yctay wih Ttkacbi
A9 Dmckijep (2 daHa)
A10 ΘnEkpTOKKaKocKa6eIepaWacbImeH
A11 BaftaftbIu poNk
B1 By nictoleti
B2 AxbipaTkbil TYIme
B3 KeNnO3nIaJIbI bI IbIbIHIN KOKcbl (6aIanapdbH KocByHaH CaTay)
B4 By 6epydiin deHrein peTteri
B5 By bepy uHaHri
C1 HykTei afbH yMeryi
C2 DeHreNEK Kblnwa Ka
C3 DeHreNEK KbIwak KbI3bl
C4 Kyat wymeri
C5 DeHreIeK kblIiHaYJKeH
D1 Kon wymeri
D2 Tykti MaTaDaH KacalraH Kan
D3 MnkpoΦn6paDaH XacJrH Xa6bH
E1 ¥3apTkblTytikTepe (2 daHa)
E2 AxbipatKbIu TYMe
F1 Eden kyyfapa hpanfah wymeri
F2 Bekitkiu
F3 EdeHre apHaIraH Teppn epimdi y6epeK
F4 MmKpOΦn6paIaH JkaCaIraH eJeHre apHaIraH 7y6epek
Kbickawa Hycckaynbik
CypeTrep 26eTTe KapaHbI3
Cypet 1
→ KaKtby Ketipyre apHaIraHan KapTpIaXdi caHbIayFa caIbIn, opHbHa 6eKiTiIReHne 6acBbI3.
Cypet 2
Cype3epByapbHa eH Ke6i 1 nItp Ta3a Ky6bp cybIH KyBbHbI3.
Cyper 3
XeNi aWacbH eHri3iH3.
→ BybIMdbI Kocy yuH AxkbipaTkbl - Kocy 6acbHb3.
Cypet 4
→ Baikayay lambi XacbI TYcENH XaHaDbI.
UamamEn 30 ckyhdtan KeiH 6yibIM KymbICka
daHbIN.
Cypet 5
→ Anrau naiandaanhy andbiHa cy kepMeKTiIirIH OPhaTbHb3.
HA3AP AYdAPbIHbI3
KaKmbi Kemipyee apnAnrH KapmuDxdi y3diKci3
XyMbic XacayBn KaMmaMaB3 emy yuIH, anrau
naDaanhy anbHdo dyBm KepaInikmi cy
KepeKminalieBe uimdoyn kaxem.
Biyimhhi pemney napamempnei myanbl monblk aknaparmbl "KaKmbl kermipyae apHAnrah karpmuokdi naDanahy xe He cy KepMekmiaIH oPhamy" mapayihn mabyfa bonabi.
CypeT 6
Ka6bIbIKTapdbI 6y nCTOnetIHe JKaIFaHbI3.
By niHTiperiH 6acbIbI3.
KaKTbI KeTipyre apHaJIFaH KapTpNIXdi NaIdaIaIHy XeHe cy KepMeKTIJirIH opHaTy
KaKbI Ketipyre apHaJIFaH KapTpNIXKi naJaNaHy
HA3AP AYdApbIhbl3
Eyubmbj mek Kapmpudx6eH naaDaanHb13.
BvHbIMdbCyfA TOIbIbIN,naIaIanaHa 6actaFaHHah KeIH,KapTpNkDIn KaKKa KapcbI yFHkuNcBc ICKE KcOblnAbI.
CyaabI KaK KapTpndJKe Tynipuikke aHaHaJaDbI. CoaH 6aJIaNaHbICTbI 6yIMMbH 6tEnyi 6oJIbIpbImaIbI. BybIMDaI KaJIbUmDeH Ta3apTyra KaTbICTbIKocbIMwa 7paapanapKaKet eMEc.
Hyckay
Cy TnREHNHe KekIH KAPTpIaXJderI TyIipSiKTeP TyciH e3eRpyI MymkH, ON Cyda MNHepaIaNbI Ty3dapBHy bOnybIMen 6aIIaNbHcTbI. ByIy Tc e3repicHiH ewKaHdai 3mHaJIx JOK Xe He 6yblMra, KAPTpIaXJdi Ta3aay JxMbIcTApBMy Me naiDaIaNHaYfKe pci acepH Tnir36eiDi.
Cy KepMeKTinirHIN DeHreJnepi XeHe JapbIK CnHAnJaPbI
Hyckay
Ky6biIbI cydbH KATtBbIbFbH CymEH KAMTAMcbl3 ety
baackapMaBHn HHeMe cKomMyHaJIbI shaPyaMbIbIK
BeDMCTBoLnabHn BijYe BoJaBu.
Ka6dbikTapdbiaxkbipaty
→ 由山bIbIcBnKeN03MnAraNb aXbIpabTbIn - KockblshApTbI No3nIraF KoJIbHb3 (6y6epyDIn DeHreIne peTteru Xa6bIlnar).
Cypet E
XabdkTapdbH 6bnLweKTePiAakbipatyuWih, 6nokTanh bIfapy 6bTaIpmacblh 6acbln, 6bnLweKepdi 6biHIn iHHeH 6bjpC cybpl anbHb3.
Cy caybIbH TOnTbipy
Cy caybItbH Ke3 KeIeR H Ke3e KaTt ToTbIpyFa 60bady.
HA3AP AYdAPbIHbI3
Kip Keinmipeiumeh KOHDeHcauJyIck cydbI naaanah6aHbI3!
Ta3anaftbu 3ammapbI He baca Kaocnanapbo (MbicaJIb, Jynap) KUmaHbI3!
Cype3epByapbHa eH KEBi 1IITp Ta3a Ky6blp cyblH KyblHbl3.
BvibMbIeWiPy
HA3AP AYdApbIhbl3
KaKmbi Kemipyee apAnranr KaMpudxdin y3diKci 3xMbic xacaybH KAmmaMab3 emy yuih, anrau naDanahy anbHda dyubim Jepeinikmi cy KepmeKmminiahe Seuimdoyni KaXem.
BiyIMhBIn pemney napamempnepi myanbl moIbIK aknapammbi "KaMki kemipyee apHanraH kapmuOdjdi naDanaHy xeHe cy KepMeKmianiaH ophamy" mapayihan mablya bonadbl.
→ BybIMdbI TypaKbIbIbIbIH KaMTaMaCbI3 eTeTIN 6eTKE KObIHbI3.
→ ΘneKtp aWacbIH 3JIeKtp p03eTKacbHa caJIbIbI3.
→ ByiBIMdiKocy yuiH AxxbpataTkblI - Kocy 6acbHbI3.
BaKbIay WAmbl Xacbl TycneH XaHaIbI.
ⅢaamamEn30cekyHDTAHKeiIH6yblIMKMybIcKa daibH.
Hyckay
Kaptrpndjdi anbln, onbl KaTadaH opHaTkaHHaH KeHH anfla 6yay Ke31He 6ydbH CORYb eni anc3 bonyb yMmkih. ByyBIMrfa BkCka 6eIMdEny YaKaTbI KaKeT, cSe6be Kaptprndjdi anlDbMeH cyFA TOnTbpy KepeK. CoNdbkTaH 6actankb Ke3e 6y byAflbH TypaKcb3 60bnIn, TamuBlnap naJa 60nyb MyMkiH. XiBepiin OtbyaTbH 6ydbH MeIWepi Jxorapblan OTbPaDbl, WAmamHe 30 cekyHtan H KeHH 6xibepy MaKcMaMnbl DeHreIRE XeTeDi.
Cydbieecen Kyio
Pe3epByapda cy keTkiikci3 6oIraH ke3e 6aKbIaNay 7aMbI TypaKtbl Tpyde KbI3bl TycneH XaHaIbl.
Cy6aBH TOnTbIpy CoBIme 6ipre KaKtBu KeTIpyre apHaNfah KApTPrJx6yBm6BeKITInrEh Kynde KaJaDbI.
Ha3apbIhbl3da 6OJcblH
CytKaKtBk KetyPye aPhaHaFan KaTpIaXk KaNaFbApkbl KyblabOcblaMa TpyaKtB type6 byXibepy kamTamac3b3 etinedi.
Cy pe3epByapbIH cyfa ToTbIpFaHHaH KeiIH Kbl3bl6aKblay wambl eWedi.
CopanTbH KpyrakTbHbH KaMTamac3Ie tU yuH 6yHbIM KopraHbICHe HkabIKTaIHaF. Erep copan yaK yaKbIT BObl Kpyrak pexmMde, MbCaIbI KapTpNdk YuH cy KpyrakTbJIbIFb I dyPbIC opHaTbImarFaH XaFaJaDa JxMbIC XacaRaH Ke3De, copan eWeDi XeHe Kb3Bn 6KaBInay WAmbl XaHaAbI.
Biyimdbi epi kapa naandaanyuhi, OHbEiwipin, KaiTaKocyKaKET.KapTPnDxHINdxpbIC peTtenreHHe XHeOpHaTbIaNFaHbHa, COhBMeH KaTape3epByapda CxyKekTIeEkeHIKe3 xeTKi3y KaKET.
By meJIsepiH peTtey
KeNnO3nUaJIbIby IbIbIcBiHbIaXbIpaTbI - KOKbIbUbIHbIKEMeIMHeuBIFInKATKaHb6ydbI MneUepi petteNi.KeNnO3nUaJIbAaXbIpaTbI-bKnCKbUbTIbYuN O3nUaJIb60NaDaI:
| Бурын сени мениерi | |
| Бурын Кыckартыган мениерi | |
| Бусыз - балanapдын косунан корfay Нүхай: Осы позцяда 66 Бердин дөнүдүйн рemmeeisi колдын ралmaiodы. |
→ KeIIO3nIaJIbI axbIpaTbI-KoCKblTbI 6yDbH KaXeT MeJIWePiE opHTy.
6y bepydIn DeHreIH peTteriH KocY, ocb Ke3e, anbIMeH 6y tanAuaCbH, 6y bipKaanBtBbIbKaHaJea DeHH KaHda Ja bip WSybepeKke 6aBbITay KaKet.
BmybIMhIn Kymbcic icteyih yaKbitwa TOKTaTy
BmybIM 20 MNHyTTaH y3ak KONdaNbImaHaJxafdAina, KyaTbI yHEmDey yuHIN 6yibMbIe uWipiH3.
ByibMbIeippy yuih AxbipatKbIi -Owipy 6acbHb3.
BiyibIMdbi icTeH wblfapy
Cyper 6
Byibimblb eipy yuih Axbipatkbilw -Owipy 6acblb3.
→ 3ηκTp aωaCbH 3ηεκTp po3εTkaCbHaH χbIfapBn anbHbI3.
Cyper H
→ 5yIbIyIbI ToKtAmaraHua, 6y 6bpYiIN DeHreIH peTteriuiH 6acblH3. EHNJI 6yblMHbH 6y Ka3aHbHaD KbcIbIM XOK.
→ BaIanapdAn KopraHbIcTbI apTKa opHaTbIHb3 (6y miHTiperi KynblntanfAH).
HA3AP AYdAPbIHbI3
Eaep 6yubim y3ak yakbim 6oobu (uamamem 2 aui naDanaNbIMmaca, cy pe3epeyapbH bocamy kaxem. Ocbinaui cybO h 6x3nblb 6o0nbipmbmaUbi.
Cyper K
CyesepeByapabIaHdafCydbIb6apBbIFIOToBfIbeMeHTeRInTACTaHb3.
Byibimdbicakray
Cypet 1 Cypet J
→ 3apKbIu TytIKepDi Jka6dbkTAP yHIN YNKe HcytAluHTpaE hErH3iH3.
→ KON wymei MeH yKTENI aBbI WymeiH 3aPTkbl TytIKTepre eHRI3HJ.
YIKeH KJIJIuaKtBI HYKTEni aFBH IJMyMeIHe OPHATbHbI3.
→ KiIkeHTaK bJIiHaKaTbI KepeK-xapAkapTaPra apHaHaFAnOpTaBbIK yCTaFbIkaOpHaTbIHb3.
Edeh kyyra aphanfah wymeri napk yctaybihia inihi3.
By xibiépyre apHaIraH uHaIriHi y3apTkbiu tyTikTeprdi aHaiIbIpa opaHb3 xHe 6y TaNaIshaBi eH eHHyfa apHaIraH uMyMerIhe eHr3IH3.
Xa6bIbIKTapdbI KOJaHaY
MaHbI3DbI KOJaHaY Typanbl HycKaynapbl
Kep 6etin Ta3anay
By TaanaarbIbIbn KOnlaHb6ac 6bpyIn eEneHdi cblnbpHy He waHcOpfbInay ycbIbInaIbI. OcbInaIwa eEn h bInraIbI Taanay anabHbIa KIP/60c KOkblCTah TaanahAbIa
ToKbImaHbI KaHaP Ty
ToKbIma 6yIbIMapabH Ta3aIaydb I bactMaac 6byh, anDbIMeH KePiH6eITIH aIMakTa ToKbIMahbH 6y acepHe TpaKaTbJIbFbH TeKcepy KaKeT. AnDbIMeH 6ymen Ta3aIahbI3 da, KeTipin, MaTahbI h Tyci, niiHi e3repYiH TeKcepiHi3.
KanTaNFaH, XaIaNfHaH HEmeCe NaKTaNFaH 6etTepDi Ta3anay
Ac 6bnmecinih jxhe yj xnhaba, eciKtep, napket CnAaTbI nakTaTnFAH Hemece JxacAHbI MATEpnaIapMeH KAnTAfNaf 6TeTpeI Ta3anaFah Ke3e, 6aNayI3, XnHa3 nonltypacbi, JxacAHbI MATEpnaIapDaH JxacAFan 6BETep JxHe cbI 6BeHIn, Tycin kanyI, DaTAP naJa D6onyi MyMkH. OCb 6BETpeI Ta3aJIy Ke3Ihde MaTHbI KIIKeHe KypratbIHb3 XHe 6BETepH cyPTIH3.
HA3AP AYdAPbIHbI3
XancbpbIraH xuekepee 6ybi 6aBImmaHa3, ce6e6i Xa6bIcMbIpyB IuMycin KanyI MyMKIH. BybIMbo nak XaRbIMarAraaw Hemece npKem eedepo mazanay yiwn naudanaHbaHb3.
OHeKTepeT Ta3aIay
CyIb aya paBly Ke3iHne, ocipece KbIcTa, Tepe3e eNHeKTePHi, eNHeK bEtiHbMyme AkbIbHdAn eHdien, XblItbHbI. OcbIaHa, eNHeKte JapbIKwakTapdbHn naJa 60NyIha aKeynyi MymKiH aNHeK bEtHIn DeFopMaunnaHy KepHeY TuTcydi.
Codaan KeiH Tepe3e 6etIH K01 B6pykkiuImen JxHe KaNTaMaMeH Ta3aAHyB. CydAn 6ocaty yiwin paKeIbdi KOnlaAHyB3 HEmecE 6tterepi Kyprak etIN cyptIH3.
HA3AP AYdAPbIHbI3
Tepeze xakmaybHbIH naKHeN kanmanraH xepnepiHe HkycaH Keinmpin anMac yuiH, 6yOlaOraH kapaB 8aBarmmamAbI3.
By nuctoleti
Ciz6y nictoletin cantamanaapcbla3 da naiandaana anaacbl3,Mbicalbl:
- ityni Tpyrah KIMdEeri XeHIN 6ypMeIepDi KeTIpy yuii Onapdb10-20cm KaBbIKTbIKTaH 6ymeh eHDeH3.
-eCiIMdIKTepeHAnbIeKtipyyuiH.CoIyuiH 20-40cmKaubkTeBfHcakTaHb3. - wahdbblbifandbketipyuhi,ocbiMaKaTaTAtybepekei a3dan bmyen eHden,ohbEmen xna3dblycypTH3.
HykTei afbH wyMeri
Ta3aay canacbI hykTei aBIn yMerieHIN KIPneHRe
Jepre JkaBnDfBbHa TayenDi JxorapBnainDb,ce6bei
temepaTypa MeN KbCbIM yMerieHIN Ibifa BepicinHe
EH JxorapBb6oBnTabBnAd. KOn JeTyre KbIn
Jxernpdi, fyranapDb, apmAtypanapDb, cyarapnapDb, uHrBbUwAnapDb, dpeTxanapDb,
KanIO3uNepdi XeHJeKblby6BatapeynapBn Ta3aayFa
cXipece TImDi 60bnTbBnAd. kTIH KatbIn KaFraH
Jxernpin 6bEmn Ta3aaydbn anDbHa cipKe cybIme
Hemece IImOH KbIbKbIme Cynan, cipKe cyb5 MInHy
iHiHde ecep eTy yuiH ToCbIn, codaH KeHbymE
Ta3aanl, ketipyre 6oBan.
Dhenrenek Kbliwaak (kiwkehtai)
LcHnDpNk KblnakTbKocBmua petiHne HkyTeJI aBfH WymEnHe opHatyfa 6oNaIb. KblnauKeH Taanaydbn apKacbHa, TybpIn Kanran KipNepDi OHaBpaK Ketipyre 6oNaIb.
HA3AP AYdApbHbI3
Te3 akaynaHambiN 6empeDi ma3anayra kenmeoDi.
CypeT C
→ LiHnHApniK kblwAaKtbI wMyerHe opHaTbIb3.
Kyar Wymeri
KyaT WymerH KocbIMsa peTIne HkyTeJI afbH WymeriHe opHatyfa 60ana.
KyaT yUmeri 6y afbIbIHbIH XbIIaMdbIFbH apTTbIPAabI.
CoDbItaH on aca KaTbI NaCTAHybl Ta3anay, 6bybIupardbI, cahInaynapdbI jHe T.6. ypnent Ta3ap TY uuii XapamMbI.
Cyper C
Kyat wymeriH deHreNEK kblwakka cNkec HkyTei afbH wymeriHe 6ekitih3.
DhenreJek KblnwaK (yJIkeH)
DeHreNEK KblJwaKtB KoCbIMwa petIHne HyKTei aBbH WuyMerHe OPhaTyfa 6oIaMb. Ocbl yNKeH DeHreNEK KbIwAaKeN deHReNEK beTepdi (MbIcaMbI dyu NpODoHb, BAHHa, WHyfBIma) Ta3aJIaybIraJIbI. HA3AP AYdAPbIHbI3
Te3 akaynaHambin 6emmepoi mazanayra KeImeuoi. Cypet C
→ LiHnHApniK kblwAaKtbI wMyerHe opHaTbIb3.
KoJ wyMeri
Cypet B
KoI wUyMerIH 6y nIcTOnetIHe opHaTbHb3.
KoI wMyerHin YcTihderi KantTaMaHbI TapTbIHbI3.
Ocipece ynkeh eemec, jyfyabolatbH 6eTTep yuHJ kcbkneediMbicaIbI dyu KaBnHaIapb JxHe aHainapu yHIn.
EeHxyyra apHaJrAn wYmeri
Kyyra bonaTbH bapIbK Ka6bIprHa Mece eHeNdi TeCEMep yuH xKaCbI keNeDi, MbICaIb Taac eHeDep, KaFenPi nIaIanpaJxHe NPB XBaCaIraH eEn TeCEMepyuiH. OTe KipIeHren BSeTpeDe y3aBbPak, cEcp ety MaKcTaBnDa bary KyMbic icTeH3.
Hyckay
Erep Ta3anaHaTbH Tcem YcTiHe Jyfbl 3aTTbH
Hemece NOpInpneiTH 3MylBcINJaPdbH KAnDbIKTapbl
Kanca, OHda bMyEm Ta3anay Ke3iHe, eDeHde
Cb3bIKTap naJa 6Onyb MyMkiH, onap aDeTte bMyEm
Ta3aJlaydb IbHpePet KOnDaHraHHaNKeIH
KoBlaNaBl.
Cypet F
EeH wSybepeKti eEn kyyra apHaIraH wymeriHe 6ekitih3.
1 Eeden kyyra aphanfah w6bepekti eeden ta3anay ywmerthe KMI3H3. KonlaNbIaTbIH MaKCaTaBHa baiJaHaBcIbEe Hxyyra aphanfah w6bepekti B60BaIIHa 6yKeTH3.
2 KbickbiUHTapdblaawbHbI3.
3 Wy6pek wetepin cahbnaynapra canbln, TbIfb3dAn TapTbHb3.
4 KbicblTapbl Jka6blHb3.
△ ABAIJIAHbI3
CaycaKmapbIbI3ObH KbcIKbIu apacbHa mycin KaMbayIH KaadaranaHbI3.
EeH xyyra apHaIFaH wUmeriH napK no3nucbHa KOblHbI3.
CypeT
KymbictoTOKtaTkaHKe3Je,eHeHxyyfa apHaIraH WymerinnapKcTaybiBihaiinH3.
Kytmy MeH TexHnKaJIbIK TeKcepy XyMbICTapbl
Cype3epByapbH60caTy
HA3AP AYdApbIhbl3
Eeep 6yubim y3ak yakbim 6oobu (wamamem 2 aui naDanaabaMaca, cype3epeyapbH bocamy kaxem. OcbinaaCyobH 6xbyIbIbObnBipMaAoiB.
→ 3ηεκTp aωaçbH ΣηεκTp pɔεTkacbHaH χbɪfapbɪn anbHbI3.
Kepek-kaapaKaTapdbkaTaNah aIbHbI3.
KaptpnDxdi 6yHbIMHaHa aIbIbI3.
Cypet K
Cype3epByapbIHdaftbCydbHbapnbIbH TOJbIFImeHTerinTaTcHaB3.
KaKtbl Ketipyre apHaJIFaH KapTpNIXkdi aybICTbIpy
HA3AP AYdAPbIhbl3
Kapmuδxdi ayibcmbipy apanbifih (6aKbinyawMbbl 6oBbHua) caakm kayem, eumnec 6yubimbi nauidanyH mep3iMi kbICkapabdi.
Kapmuokoi kepceminaen apanbikma ayibcmbipmaca, 6yubimra mysemimec 3akbl Kenyi MyMKH.
Hyckay
Kaptpnndjiaaybictbypeke3eHepi ci3 opHaIaackaH jepderi cy KepMeKTinirHe 6aIIaHbCTbl 60blT a6blIaI. KaptpnndjiaaybictbypapaJIbIbI cybl xMcaK aIMakTapra kapaRaHda (MbICaNbI l/II), cybl KepMeK aIMakTapra (MbICaNbI l/IV) Xorapbl 60naIbI.
Painanany Mep3imHH aKtanybHdafb6akblay 7amblhKnpcetkiwi
KeNeci "KapTpuDkdi aybIcTbpy" bakblay wambl kHaFan kafdaa da KapTpuDkdi aybIcTbpy KaJezT:
CohbI naiadanaHy Mepr3iMHInH AkiKanbyiba Hae kciarat KaNfRa deHH KaptPrdXduA ybiCTbpyKaKeTeTnirI IaMhBHe XblnBlkItkaybApKbIbIkePcTeTineJI.
IaIaIaHMy Mep3iMaIkTaNbHa 6ip Cafat KaIFaHaF aeiHH INdNkATOP XblJam XblBbIKTaIbI.
Kaptpnndkni naianaany Mep3imi TOnbIbIme HAnKaTaNfAH Ke3Je, "Kaptpnndkdi aybIcTbIpY" 6aKbImay WAmbl y3dikci3 JhaHabJxHe 6yblm 3aKbMaJyDbl 60NdbIpMay YuH abTomaTTb TypDe eUwei.
KaHa KaTpnpJxDi opHaTy
BymbMbteewipy yuH AxbpaTkbl -Owipy 6acbHb3.
Kaptpnndj6yHbIMHaHaanabHb3.
→KaHa KaTpnpKdi 6yHbIM iWHe caNbHbI3.
→ ByiBIMdbI KOCy yuiH AxxbIpaTkblI - Kocy 6acbIbI3.
4 cekynd boiBY RESET tymecin bacbln TypbHbI3. Coadan kein "KaKtbl ketipyre apnaIrah KapTpiJxdi aybcItpy" baklnay waMbI JkaHaDbj XHe KapTpiJxdi naIdaIaNHy Mep3iMi KaHaDaH 6actanaIbI.
→ BybIMHbIH KbI3ybiHa MymKiHdik 6epiH3.
→ Kaptpnndkden aya shyfapy yuih 6y mihtiperih 6acbin, 30 cekynd 6oynbYCTan TpybHbI3.
HycKay
Kaptpnndjai anblin, onbl KaTadaan opHaTkahn H KeHH anfla 6yIay Ke3Hne 6yDblc Cofybl eni anc3 bony Mymkih. ByybIMra Bccka 6eIMdny YaKbI Ta Kaeet, cSe6bi Kaptpndkni AaBldMeH cyr TOnlbypeKepek CoNdbkTah 6actanbl Ke3de by aftblu Typakcb13 60bnIn, Tamublnap naJa da 60nyb MyMkn. Xiibepinol tBpaTbH 6dyH MeIlepi Xorapblan Otbpalb, WAMamEn 30 cekynTah KeHH 6xibepy MaKcImaJIb DeHeire XeTei.
HA3AP AYdApbIhbl3
Kapmuþdi ayibcmbipy ke3ihde uamacbin KemmeeeHHi3ze Xhe 6yBbIMra ecki Kapmuþdi Kaima cunmaraHbHbI3ra Ke3 xemk3H3.
Ka6dbikTapdbi KyTu
HycKay
EeH JyyfA apHaJrAn 7y6epeK neH KOJI yMeriHe apHaJrAn KaTama andIn ana JyBInFaH xHe onApDbl 6bIepn JxMyBcKa naiJaAnaHyra 6oNaIb.
EeH Jyyra apHaIraH 7y6epeK nen KaTamaHb Kip JyFbIa MaIHaNda 60 C TeMepaTypaA JyBbI3. 7y6epeKTEpDi Yy KezIHne KIPi IaHaRa apHaIraH 3aTTapDbI naIaIaNah6aHbI3, onap Kpi Di ciHipin anybl MyMkiH. TyKi T7y6epeKTEpDi KENtipriWte KenTIpyre 6oJaIb. MInkoPbopaan JxacalraH 7y6epeKTEpDi KenTIpriWte KenTIpyre 6oJMaIbIb.
Keedeprinep 6oJFaHda KEMeK aNy
KemuiikTeprin ce6eih actbida KepcetIirre Tizimre caikec 3iH3 jox ayibH3 MymkH. KydkTI kafdainapda Hemece ociba atanfah emec ce6ebi kafdainapda Kb3met Kepcety beniimih apnabMiMaHaDapImeXaBapnaCbH3.
By xok
"Cy xetkiniKci3di" 6aKbInay Wambl TypaKtbl Tpyde Kb13bl TycneH KaHaDbI
Cy 6aBbIHda cy Jxok.
→ Cybbl TOnTbIpbIn KMybIHbI3.
"CyXeTkiNikci3di"6aKbInaywaMbIkb3blTycnEH XbInbJIbIKTaIbI
CopaTbI Ke6yDen Kopfay yHKnUraCbI icKe KocBJIbI.
→ ByuMbIbI eWipiH3 xHe KaTaNOCbHbI3.
→ KapTpIaXJIHIN DaPbIC opHaTbIITFaHbIHa, CObIMeH KaTape3epByaparca CyKeTkiNtIKteEkeHIne Ke3 KeTki3Hl3.
Pe3epByapda cy ketkiniKti 60na Tpya 6y KOK/a3 60nca,
KaKtbl KeTipyre apHaIraH KaTpPnJx6yMbIMFaCaJIbH6aHaH Hemece dupbic opHaTbJIMaHaF.
KaptpnIxdi caIbIbI3 Hemece OHbl 6epiK/DypbcOpblHa 6ekitH3.
KaKtIb keTipyre apHaJIrH aKpTnIck Cyra TOnIbIpy Ke3IHe aJIbIHraH HeMece KaHa KaTbI keTipyre apHaJIrH aKpTnIck OPhaTIbIrfan.
ToTbIpyKe3iHneKapTpNkDi6yBIMhIH iUHDe KaIbIpbHbI3.
→ By kbcmbih TOblbImeKamTaMaCb3 ety yuH, 6y nHtiperiH 30 cekynd 6oBb 6acbl typbHb3.
By 6epydiH deHre peTteriWiH bacy MymkiH emec.
CaKaThaDblpFbIwnHe/6baIanapdbInKocblnXibepyIneH KOpFayMeHKa6blInKaJbl.
→ KeNnO3nIyIbI6yIbIfbIbIH KCKblbIH aIbIHfbl I03nIyraFaOpHaTbIbI3.
"KaKTbI Ketipyre apHaIraH KapTpNdxKdi aybICTbipy" 6aKbIay WAmbl Kbl3bl TycneH XaHaDbI/XbInbIbIKtaDbI
Kaptrnndxndin naindaanhy mep3imi Jybyipda aayktaana
KaHa KapTpInxk OPhaTbHb3 KHeKbI3MeT Kepcety INdkatOpbIn KaiTa OPhaTbHb3. "KaKbTe KeTipyre AhFaHnFka HaKa KapTpInxkDi eHri3y TaPaybIn KapAbaI3.
Kaptrpndxdi aybictbipfahanKeiH RESET tyMeci 6acblmadaI
OphatKaHHaN KeiIN RESET Tymecin4 ckyHd 6oHbI bacIn typbHbI3.
BvibIM 3diriHEn oedi
Kaptpnndjin naiJaIaHy mep3iiaaykTanyda
KaHa KaTpNjdkz6 BybIM IiHHe cAnbHbI3. "KaKtby KeTipyre apHaJIrAn KaHa KaTpNjdkJ eHrI3? TaPaybIh KaPaHbI3
Kaptrnndjai aybictbipfahHKeiH RESET tyMeci 6acblmadaI
OphatKaHHaN KeiIN RESET Tymecin4 ckyHd 60bI bacbl typbHb3.
TexHnkaIbIK MaFlyMaTTap
| ЗлектPre кocу | |
| Злект Кернeyi | 220-240 V |
| 1~50-60 Hz | |
| Корray даржeci | IPX4 |
| Корray Класы | I |
| Жимьс сидаэрbayl | |
| Жылу онлайнділiri | 1900 Вт |
| Кысынын Enж Когары Deнгей | 0,35 бар |
| Жылу укыты | 30 Секунд |
| Бу калемi | |
| Узak укытпы by xizibepy | 40 р/мен |
| Бу aflыны макс. | 100 р/мен |
| Толъру мелшepi | |
| Су вагы | 1,0 п |
| Калемi | |
| Буйынын Керек-харakтарьз calmaftы | 3,2 кг |
| Узындыfы | 360 мм |
| Енi | 236 мм |
| Биiktirì | 252 мм |
TexuKabik 3eepicmp nao60bIn KaNybl MymkiH!
aJll
aJ 1 J 1 J 1 J 1 J 1 J 1 J 1 J 1 J 1 J 1 J 1 J 1 J 1 J 1 J 1
g jll l c aoc gog aagoljll n 1n o gao 10aill n o y bfo 1o 2g y aig aalll .alall
g>9 no pGJJI Jc Jc Jc/1j2y 0aJIJI Jc
1111 1111 1111 1111 1111
/aaooosu oJ gaiawgbrjll JdsLp
eJaoLac JnJusKJ aJjI aogbbrg w p. .OyJzJsKJ aJjI aogbbrJ JxJxI oal
Jallaac Jxjg jzj gawbkrjzj 1
a30 2j j
jlll jiaol lbaial jie
jll jgll no aawgbjll
jgljlllallll l
jJJI JJJI JJIJIJIJIJIJIJIJIJIJIJIJIJIJIJIJIJIJIJIJIJIJIJIJIJIJIJIJIJIJIJIJIJIJIJIJIJIJIJIJIJIJIJIJIJIJIJIJIJIJIJIJIJIJIJIJIJIJIJIJIJIJIJIJIJIJIJIJIJIJIJIJIJIJIJIJIJIJIJIJIJIJIJIJIJIJIJIJIJIJIJIJIJIJIJIJIJIJIJIJIJ
4 0d l bdl ocl j 1e Ila c 0g Jldw" pckl c2o aog g g y d s aawbcrJ Lac 18g " wkl allj aawgb
ED = OD
jE
00gll 1Jgog
Jz 30
abg>lo
e 1 1 1 1 1 1 1 1 1 1 1 1 1 1 1 1 1 1 1 1 1 1 1 1 1 1 1 1 1 1 1 1 1 1 1 1 1 1
j 2009 10000000000000000000000000000000000000000000
.30Jx 8gaaJll J
002 10c oIc/00y jaiwbl//Jluiu/1ic
aagb jy
aJxJlly aJis
abg>lo
aagwlaal wsg aiojll aaiao Jscg aaii jge g gall lgc Jaalgolswlg
J
1yLall pssio y. ylll O
Oo aIaI IaII Jn oAoi all k
9 plu Aaiia aRgll Aoi all .
aaiia aaii all iai ll aiia all
a
Jlbei jgs xie oclal
aabssbysy 1000000000000000000000000000000000000000000000000000000000
a025 j 111111111111111111111111111
2x - y = 8
gull clal aai jla -pksll 4
Jaiu Jia 2014
clll 1j
. cJl jjJ 1 Jo JSoWJ
a|a|g a|i|
olall 1j
4
//g>)aIgabjie/1jEiJpOdA
i//0i0j0o//j
olal j 1
jy jzjjl jla jlae
jIJ J
Jogill soo aKwI W
.
.2jIJJIeJIO aagbJUwWp
K
olalolall jzjoclll 0
JlllJIaIgBjJld
4
JUdWJ 10 dI/1 JyJyJyJy
aagbrrll Jzoo jglal all>
Jlll" pKJIJIeao elia JolKJI
jglgogJolgo Jkw"aaogbdo
Jzj 1 J
jg>
0d jllj aagb jI
jLy jzull jlaJcI JbcI
jglJ J
aJUJI aJg
J 2000
alsoa
Jzg 2aRw osj lcl aBll adg Jaa
oJl lIwIy Iaui Iolai J
y gagg aJz Jz
C
jllgaaagcaglll aagg
.0dssssssssssg
(oo5) oJxIollol
2gjagjglc jorjssallloljkrj
o aolal aljlln k sak aalok aalwks
jgg>JssssJg>Joo) ajjlll bawll
.(ab).b0g>Jssllcogploaxy
4
awluw/12aww/6bwiawllo
C
2g> a@ga ojssuall olw al 9
1
1 1
B 0j0
J 1
go laa aaww wll aag g jle wss
pLaLssJnJgJnJnJnJnJnJnJnJnJnJnJnJnJnJnJnJnJnJnJnJnJnJnJnJnJnJnJnJnJnJnJnJnJnJnJnJnJnJnJnJnJnJnJnJnJnJnJnJnJnJnJ
.
a0y1y a@g
aI aI aI aI aI aI aI aI aI aI aI
aJlJlJlJlJl
go Jolss. jnJgJgJgJgJgJgJg
a a a a a a a a a a a a a a a a a a a a a a a a a a a a a a a a a a a a a a a a a a a a a a a a a a a a a a a a a a aaa
(oo) 0jduaJl oJrJl
JL JsOe jzS OJwJy all oJwJy alljI JIJIg. JIJIg JIJIg .oJwJy JIJIg JIJIg oJwJy JIJIg 4 4W/121 / cB/ aW/10c 0000 29 0000
jglzjj
1
J
yI JgJgJgJgJgJgJgJgJgJgJgJgJgJgJgJgJgJgJgJgJgJgJgJgJgJgJgJgJgJgJgJgJgJgJgJgJgJgJgJgJgJgJgJgJgJgJgJgJgJgJg
aJlaJdJdJd
a@p|daww|dawj
a a
pIaIeIgIgIgIgIgIgIgIgIgIgIgIgIgIgIgIgIgIgIgIgIgIgIgIgIgIgIgIgIgIgIgIgIgIgIgIgIgIgIgIgIgIgIgIgIgIgIgIgIgIgI gJagJagJagJagJagJagJagJagJagJagJagJagJagJagJagJagJagJagJagJagJagJagJagJagJagJagJagJagJagJagJagJagJagJagJagJagJagJagJagJagJagJagJagJagJagJagJagJagJagJagJ
Jg:JgJgJgJgJgJgJgJgJgJgJgJgJgJgJgJgJgJgJgJgJgJgJgJgJgJgJgJgJgJgJgJgJgJgJgJgJgJgJgJgJgJgJgJgJgJgJgJgJgJgJ
albaalglolbaalghaww
a aalball alalbll bss sic
gagagall alg> g oogolll llk wlll
lgjll ldls yds yglalg alg alll
gaiy kwlalll cgal lgog gawll
jiaaab sic. galln gln aln lq
o00000000000000000000000000000000000000000000000000000000000000000000000000000000000000
jLill aos 9 pS211
jNJLJnJGJLJIaAs 0s>ll P aAs JIJJgaiogaiuJGJLJIaAs
K oJoo. Jolaoal all jz 0sall g
jglzjj J
a//j/ aagb> cJ/ jaoyglwJlaj
olal/JmuC aJr JgJ// aaJgo yu kll
JgYJ oJau// Jzui// Jq dJzai
J> ologka// Jo Jia// JgA2// sKay
a//j/ aogb> lac aab" Jao 9 jq// buo
."olal/JmuC aJr Jbuq gJluSll
AaB aJg jgeJgJyD y 1
Jogill JaaeKJgU 9
JgJgJgJgJgJgJgJgJgJgJgJgJgJgJgJgJgJgJgJgJgJgJgJgJgJgJgJgJgJgJgJgJgJgJgJgJgJgJgJgJgJgJgJgJgJgJgJgJgJgJ g30 Jy
e 100000000000000000000000000000000000000000000000000000000000000000000000000000000
aIjI aawgbrs cllc clall aaiy baiy baiy baiy baiy baiy baiy baiy baiy baiy baiy baiy baiy baiy baiy baiy baiy baiy baiy baiy baiy baiy baiy baiy baiy baiy baiy baiy baiy baiy baiy baiy baiy baiy bAI ybBnBnBnBnBnBnBnBnBnBnBnBnBnBnBnBnBnBnBnBnBnBnBnBnBnBnBnBnBnBnBnBnBnBnBnBnBnBnBnBnBnBnBnBnBnBnBnBnBnBnB n Bn Bn Bn Bn Bn Bn Bn Bn Bn Bn Bn Bn Bn Bn Bn Bn Bn Bn Bn Bn Bn Bn Bn Bn Bn Bn Bn Bn Bn Bn Bn Bn Bn Bn Bn Bn Bn Bn Bn Bn Bn Bn Bn Bn Bn Bn Bn Bn Bn Bn Bno Bno Bno Bno Bno Bno Bno Bno Bno Bno Bno Bno Bno Bno Bno Bno Bno Bno Bno Bno Bno Bno Bno Bno Bno Bno Bno Bno Bno Bno Bno Bno Bno Bno Bno Bno Bno Bno Bno Bno Bno Bno Bno Bno Bno Bno Bno Bno Bno Bno B no CNO OoOg oogogogogogogogogogogogogogogogogogogogogogogogogogogogogogogogogogogogogogogogogogogogogogogogogogogogogogogogogogogogogogogogogogogogogogogogogogogogogogogogogogogogogogogogogogogogogogogogogogogogogag
al>all jc olall jsc biaa all f < olaclj jlc biaiall caiyll pia. olaizall .baill b> JJ 3 oal baill claooog Nds no biaol oocp .olll jwol pksll aui iouic yd no olall jwc biao ola/c jy waej adilio aR JLg jlgjll bdo . (Jlwl, Jli) olall
J

3 a|gbaI a>adall jbl gJl a|jL
jglj
A 0g
.1g w g a>gs a>gill 5k
B
C
1gJ.>JL Jc yddydo ydo ydo 1e 1d ddo ydo ydo ydo ydo 1d 1d 1d 1d 1d 1d 1d 1d 1d 1d 1d 1d 1d 1d 1d 1d 1d 1d 1d 1d 1d 1d 1d 1d 1d 1d 1d 1d 1d 1d 1d 1d 1d 1d
d
()aJlJIaJlJIaJlJIaJlJIaJl
E
y j 10j 10j 10j 10j
olll jj
.0ggl clall 1j 2Joo
!y/da/dazo cso clo pdoaui y 10101g1 aai 100 aie psc 100 (joc Jia//Jaw Lc)
1 1 1 1 1 1 1 1 1 1 1 1 1 1 1 1 1 1 1 1
jssssssssssssssssss
abg>lo
sJgssallc0aacjzdsolleasllkdo 1alall lalal
1cI 1c gaiall a> no bga jgeJI. (IV al>al) olal wsc a>
Jb.olalll scc a 10000000000000000000000000000000000000000000000000000000000000000000000000000000000000000000000000
CLgSSaAsbAsSbJLJLgBgP 1 JgJasllc gio jgeIgSjUg 1
12c 1g 10a11 ola l jlc baoiL p< jgeJ Jxw Jx aIc
sll 120g a 2 g 2e
Iaill .aill dJg> oJw | Jbqg
.qlll aRg
jgljjgljglzao jc bdo
4 0
ylllUc,pslllclao
8iog jIgJl IogS. aIit 30 Jlg> .IaIyI
5 0
oJal Jzll JcIaI Jsc Og 0g 1a2p
4
a//j/ aawbcr c/1 jy/ yglw/ yla/
olal/ muc a> jc jge// aa/ go yuLl
./gyl oall jzai// jzai/
JG Cogleal / 20 Jia/ lgcay
a/siKa
a//j/ aawbcr lac aab" jzjg// b
."olal/ muc a> jr bawg y
6 0
Jlll Wswo Jc Jaxll Jwogp 0 Jxll Zieo Jxw
JL Jl j] aWbJc aB 10aJI Wue aJg
auii aiij iawgbjacaaib
4
a5 = 12a1b5 = 2 > 0 A5 = V/J_1 = V
aJSLJ slzal all aogb jll Jgeo Jzj P ay .alzwig cll jlgll Jdo
o slal jg gol jll sll jol aol p 1
J 1 J
abg>lo
ggl jn aagwgbzlljck
algal gac aql glgcll aoldo
al ggl gocg cgrll gl .aall
gl abll Jlac gl jgcll lc lsw sgl
.awgbzll Jac wglw
jIg

a all jbl gall a j
4 ag2aill
aJl aJl aogb A1
cJl cJo a2i9 A2
A3
A4
Jrrll A5
jgoo aS uill xge-(uov) Jgus 2cuo a
olall - (jai) pssll 14a a b
aagb. Jll- (JzJ) Pssjj 2
aJl
ollljsc a >j -b2all ola|jj d
Jzul2A6
J 12A7
A8
(julc) A9
aA10
J
a2g0,1A11
B1
B2
aJaaWggo)JauaAsJ J B3
(Java)
B4
B5
1201201 C1
gwi 000 C2
j> oJooolC3
aC4
S 00000 C5
D1
wlaal 1 D2
a aJ JJ JJ JJ JJ D3
(ae2 2) y. o.o.o.o.o.o E1
E2
aJ1 aF1
F2
a. g a. j a. f F3
a aalal alalal alalal
J.1L aIaIaIaIaIaIaIaIaIaIaIaIaIaIaIaIaIaIaIaIaIaIaIaIaIaIaIaIaIaIaIaIaIaIaIaIaIaIaIaIaIaIaIaIaIaIaIaIaIaI
jLjge JcJbJdJIJIbcJc
oJ 1 JlJIaIJIJI
gglalglggegejll
g 1
a02jggljg00jrlcljwaa
LaioeYac
(a)
#
4g
190p2iua/la>lo/1j
cclieWy/91gLc0 LsJyJy2
- ( a + b) = 0
baio
123 0g> 111 1c bdo cdo all>
I 100
all
a_1 = 2 b_0
bJzllgJyIj 10
Jg jgeaal gga jgejll oJr> a>
.
2bJg>loglsoa980a 1
g>Jl jyj yj loylo pao g|rdoa|Jg>J<
.kaERCHER aos
Inhalt
5 AR aoe
5 AR
6 AR
6 AR
1aog wslj allj aawgbr Jac aab
6 AR oal
7 AR
9 AR
10 AR
11 AR ....
12 AR
aale
Jusss

1d 10
Jolzillpssjglplxilg
- JJJJ1i: oJrJgJl aJzJll 89 jJgJjgo
JolldssyI JdIyI bIyI y
jglalwla jI> g|laq s
Jnnnnaa
aallll
j 1000
.ajjai jbiu
pduu j 1jLgJl JgJlI Jaa
LjS pJ Jll kss aawlaal lalall
JgJ>Jj.1JzJzJz
a aal all 1
.
a_i = 12
o0eoeae 1
aLw 0g oogall no aolllp
LgU Lgauu uucuuguaa aolal
aolalil yjg jooJI aaiJall
alagaoaolgoaaialljg
y
ojeYI oJalll.1J.lio oJaiyI
aawllgazjllpbi go g9glo aaydall
aigjyIg aIjgJl oje Jaiw lo wlc
aIgUJLwYlA>o Jc oJgB> JSu 19
oogao gao jolil glgao Jolal all
Jzj aRg oUgol o i j. aibls
j0 j0000000000000000000000000000000000000
aJjiaoll 10aagall jao jolll ojaal ojej
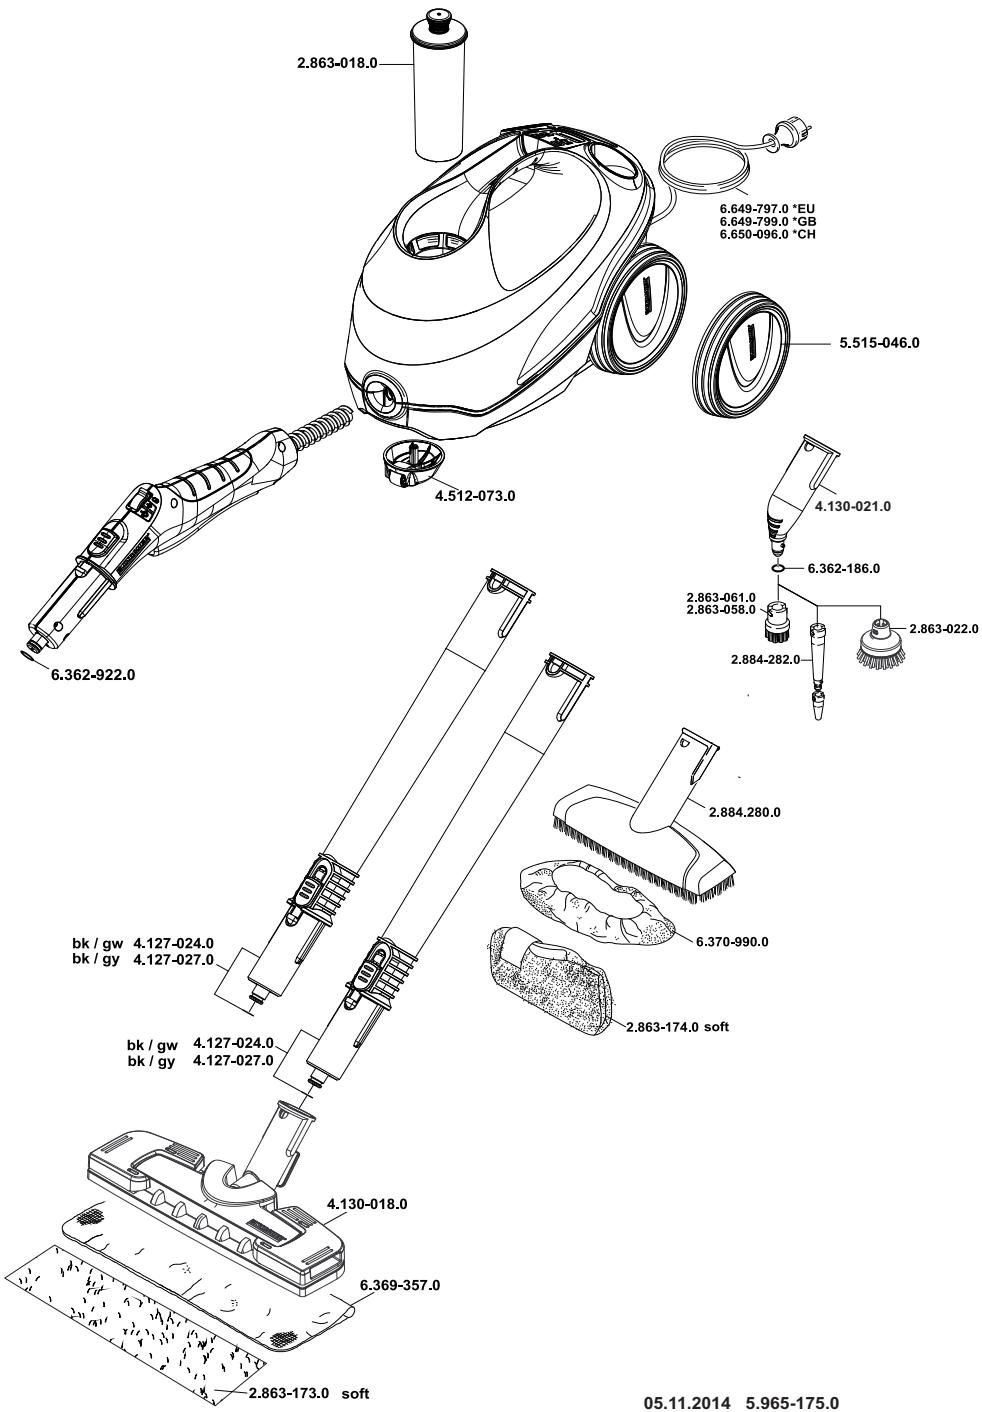

http://www.kaercher.com/dealersearch

71364 Winnenden (Germany)
Tel.: +49 7195 14-0
Fax: +49 7195 14-2212