CTL 26 E - Industrial vacuum cleaner FESTOOL - Free user manual and instructions
Find the device manual for free CTL 26 E FESTOOL in PDF.
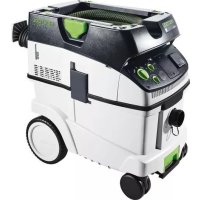
| Product Type | Mobile industrial vacuum cleaner |
| Brand | FESTOOL |
| Model | CTL 26 E |
| Tank Volume | 26 liters |
| Dimensions (L x W x H) | 630 x 365 x 540 mm |
| Weight | 13.9 kg |
| Power Consumption | 350 - 1200 W |
| Max Air Flow | 234 m³/h (3900 l/min) |
| Max Vacuum | 24,000 Pa |
| Filter Surface Area | 6,318 cm² |
| Hose Length | 3.5 m (D 27 mm) |
| Power Cord Length | 7.5 m |
| Sound Pressure Level | 71 dB(A) |
| Protection Class | IP X4 |
| Dust Category | L (up to 1 mg/m³) |
| Liquid Suction | Yes |
| Automatic Filter Cleaning | Yes (AC model) / No (standard) |
| Antistatic System | Yes |
| Power Tool Connection | Yes (integrated socket) |
| AUTO/MAN Function | Yes |
| Parking Brake | Yes |
| CE Compliance | Yes |
Frequently Asked Questions - CTL 26 E FESTOOL
User questions about CTL 26 E FESTOOL
0 question about this device. Answer the ones you know or ask your own.
Ask a new question about this device
Download the instructions for your Industrial vacuum cleaner in PDF format for free! Find your manual CTL 26 E - FESTOOL and take your electronic device back in hand. On this page are published all the documents necessary for the use of your device. CTL 26 E by FESTOOL.
USER MANUAL CTL 26 E FESTOOL
CTL 26 E, CTL 26 E SD,
CTL 26 E AC, CTL 26 E S D E/A
CTL 36 E, CTL 36 E AC,
CTL 36 E AC-LHS,
CTL 36 E LE, CTL 36 E LE AC
1


ENS-CT26
ENS-CT36

Original operating manual
1 Symbols 13
2 Machine features 13
3 Technical data 13
4 Intended use. 14
5 Safety instructions 14
6 Operation 15
7 Settings. 15
8 Working 16
9 Service and maintenance. 17
10 Accessories 18
11 Disposal 18
12 Warranty 18
13 EU Declaration of Conformity..... 19
The specified illustrations appear at the beginning of the Operating Instructions.
1 Symbols

Warning of general danger

Risk of electric shock

Read the Operating Instructions/ Notes!
3 Technical data

Wear a dust mask.

Warning! The machine may contain hazardous dust!
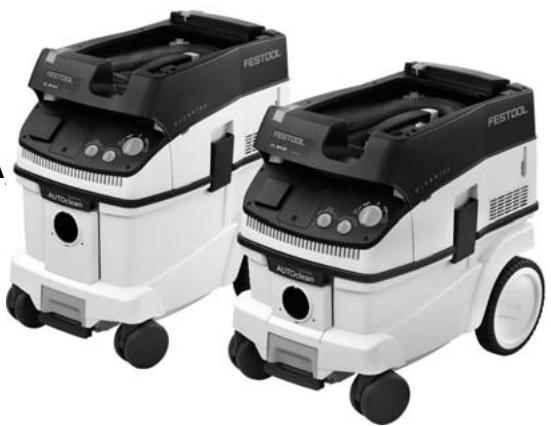
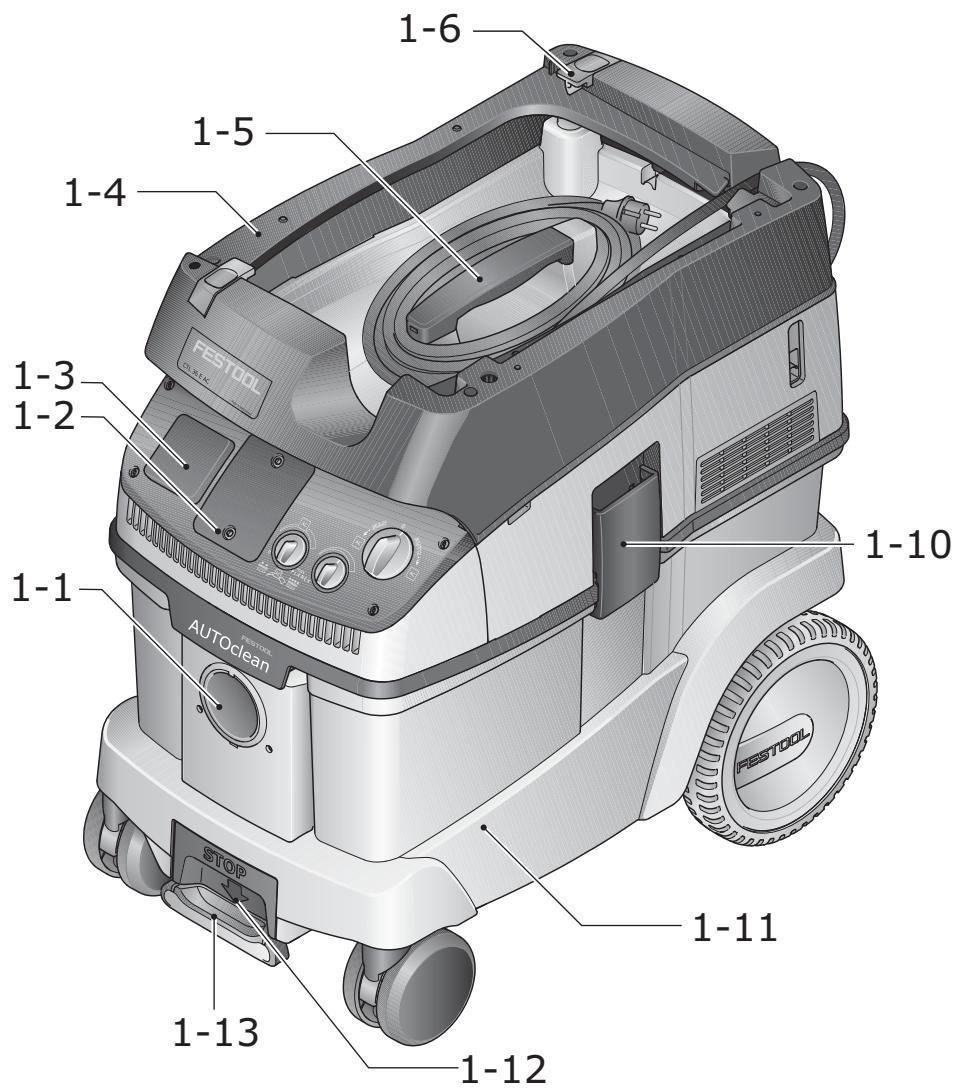
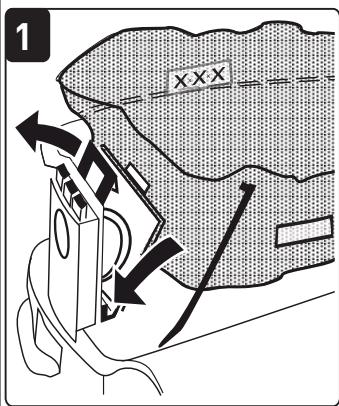
2 Machine features
[1-1] Intake opening
[1-2] Module slot (compressed air module for CTL 36 E LE, socket module for CTL 26 E SD)
[1-3] Appliance socket
[1-4] Hose store
[1-5] Handle
[1-6] SysDoc
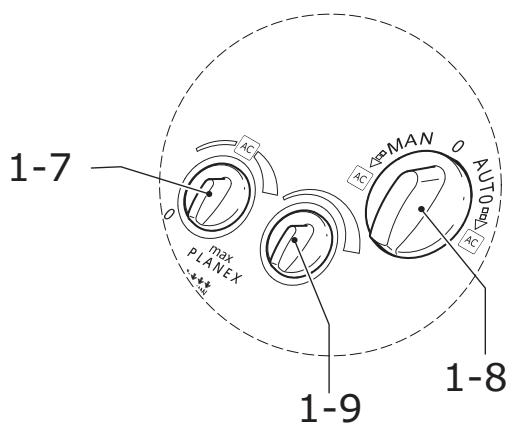
[1-7] Automatic cleaning (only versions with AutoClean)
[1-8] Switch
[1-9] Suction power adjuster
[1-10]Locking clip
[1-11]Dust container
[1-13] Brake
| Mobile dust extractors | ||
| Power consumption | 350 - 1200 W | |
| Maximum appliance socket connected load | EU CH, DK GB 240 V/ 110 V | 2400 W 1100 W 1800 W/ 500 W |
| Max. suction capacity (air), turbine | 234 m³/h (3900 l/min) | |
| Max. vacuum, turbine | 24000 Pa | |
| Filter surface area | 6318 cm² | |
| Suction hose | D 27 mm x 3,5 m-AS | |
| Length of the net cable | 7,5 m | |
| Sound pressure level as per EN 60704-2-1 | 71 dB(A) | |
| Protection category | IP X4 | |
| Container capacity | CTL 26 E, CTL 26 E AC, CTL 26 E SD | 26 I |
| CTL 36 E, CTL 36 E LE, CTL 36 E AC, CTL 36 E LE AC, CTL 36 E AC-LHS | 36 I | |
| Dimensions L x W x H | CTL 26 E, CTL 26 E AC, CTL 26 E SD | 630 x 365 x 540 mm |
| CTL 36 E, CTL 36 E LE, CTL 36 E AC, CTL 36 E LE AC, CTL 36 E AC-LHS | 630 x 365 x 596 mm | |
Mobile dust extractors
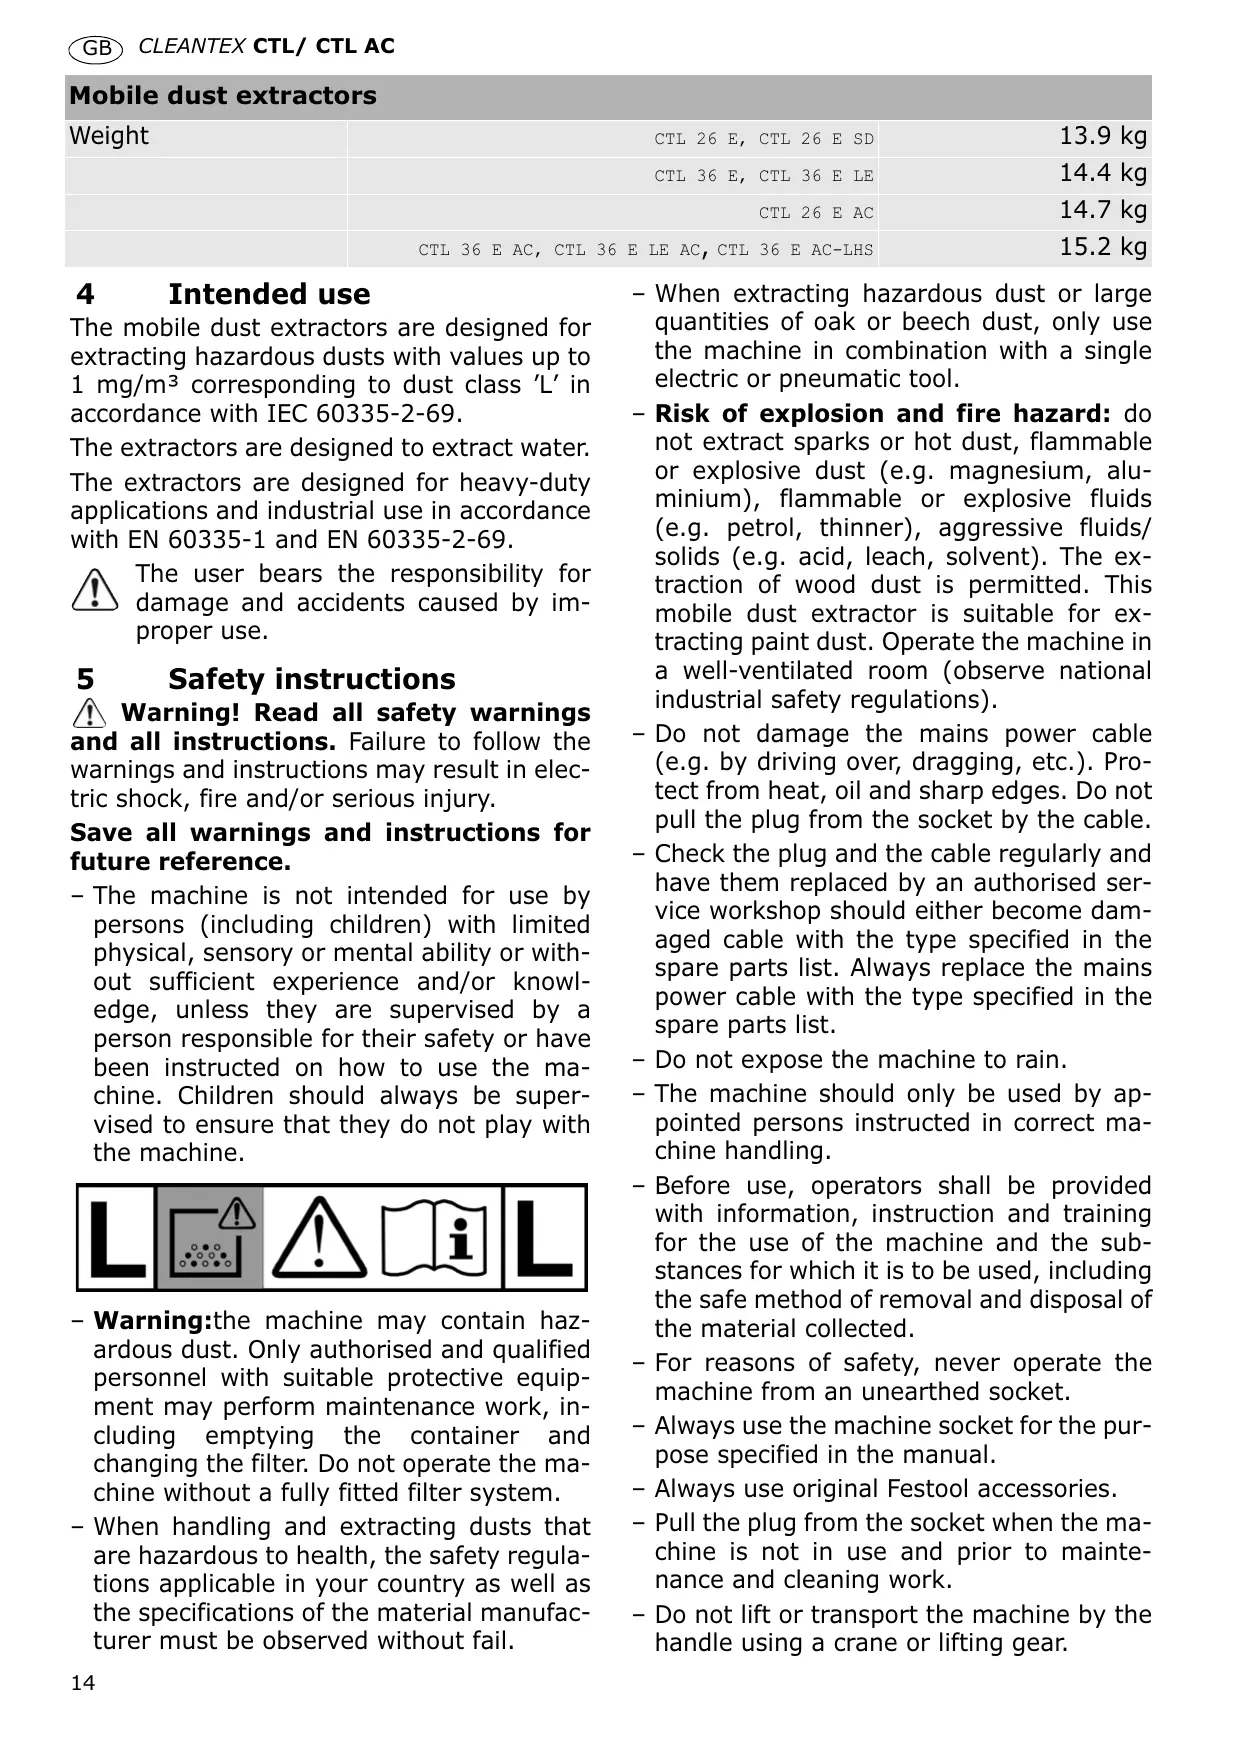
| Weight | CTL 26 E, CTL 26 E SD | 13.9 kg |
| CTL 36 E, CTL 36 E LE | 14.4 kg | |
| CTL 26 E AC | 14.7 kg | |
| CTL 36 E AC, CTL 36 E LE AC, CTL 36 E AC-LHS | 15.2 kg |
4 Intended use
The mobile dust extractors are designed for extracting hazardous dusts with values up to 1mg / m^3 corresponding to dust class 'L' in accordance with IEC 60335-2-69.
The extractors are designed to extract water. The extractors are designed for heavy-duty applications and industrial use in accordance with EN 60335-1 and EN 60335-2-69.

The user bears the responsibility for damage and accidents caused by improper use.
5 Safety instructions
Warning! Read all safety warnings and all instructions. Failure to follow the warnings and instructions may result in electric shock, fire and/or serious injury.
Save all warnings and instructions for future reference.
- The machine is not intended for use by persons (including children) with limited physical, sensory or mental ability or without sufficient experience and/or knowledge, unless they are supervised by a person responsible for their safety or have been instructed on how to use the machine. Children should always be supervised to ensure that they do not play with the machine.

- Warning: the machine may contain hazardous dust. Only authorised and qualified personnel with suitable protective equipment may perform maintenance work, including emptying the container and changing the filter. Do not operate the machine without a fully fitted filter system.
-
When handling and extracting dusts that are hazardous to health, the safety regulations applicable in your country as well as the specifications of the material manufacturer must be observed without fail.
-
When extracting hazardous dust or large quantities of oak or beech dust, only use the machine in combination with a single electric or pneumatic tool.
- Risk of explosion and fire hazard: do not extract sparks or hot dust, flammable or explosive dust (e.g. magnesium, aluminium), flammable or explosive fluids (e.g. petrol, thinner), aggressive fluids/ solids (e.g. acid, leach, solvent). The extraction of wood dust is permitted. This mobile dust extractor is suitable for extracting paint dust. Operate the machine in a well-ventilated room (observe national industrial safety regulations).
- Do not damage the mains power cable (e.g. by driving over, dragging, etc.). Protect from heat, oil and sharp edges. Do not pull the plug from the socket by the cable.
- Check the plug and the cable regularly and have them replaced by an authorised service workshop should either become damaged cable with the type specified in the spare parts list. Always replace the mains power cable with the type specified in the spare parts list.
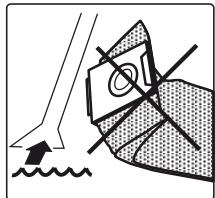
- Do not expose the machine to rain.
- The machine should only be used by appointed persons instructed in correct machine handling.
- Before use, operators shall be provided with information, instruction and training for the use of the machine and the substances for which it is to be used, including the safe method of removal and disposal of the material collected.
- For reasons of safety, never operate the machine from an unearthed socket.
- Always use the machine socket for the purpose specified in the manual.
- Always use original Festool accessories.
- Pull the plug from the socket when the machine is not in use and prior to maintenance and cleaning work.
- Do not lift or transport the machine by the handle using a crane or lifting gear.
6 Operation

WARNING
Unauthorised voltage or frequency! Risk of accident
The mains voltage and the frequency of the power source must correspond with the specifications on the machine's name plate.
In North America, only Festool machines with the voltage specifications 120 V/60 Hz may be used.
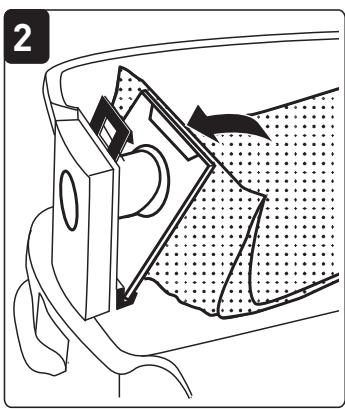
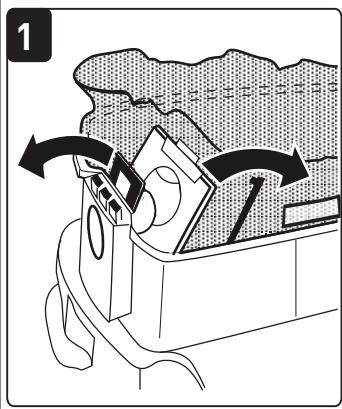
6.1 Initial operation
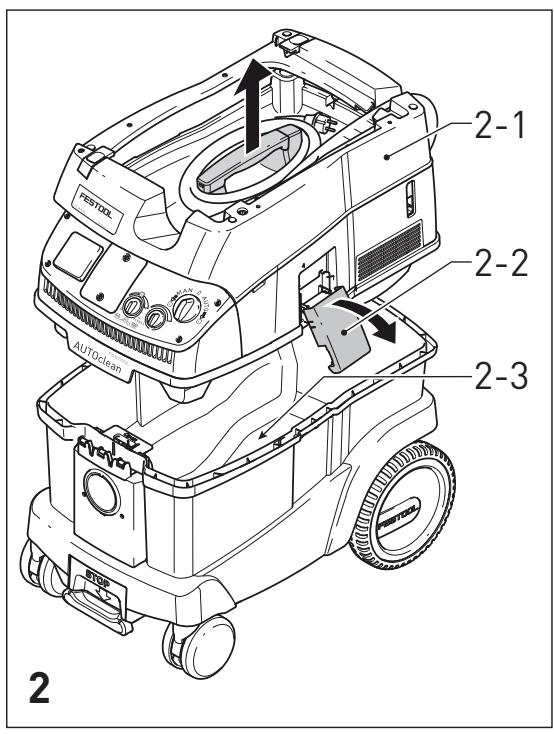
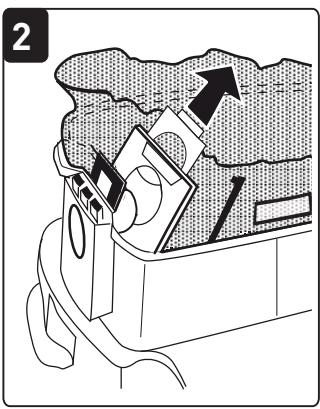
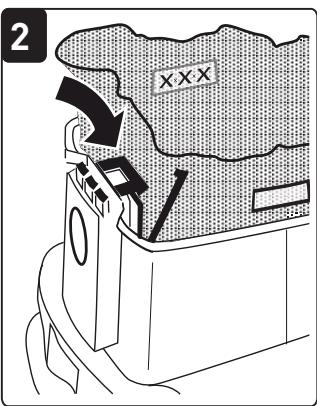
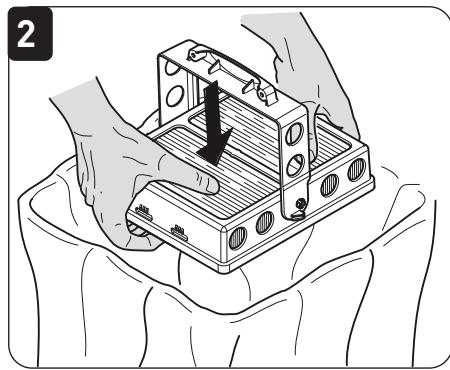
- Open the locking clips [2-2] and remove the top section of the machine[2-1].
Remove the accessories from the dust container [2-3] and the packaging!
Insert a filter or disposal bag in the dirt trap (see chapter 7.6 and 7.7).
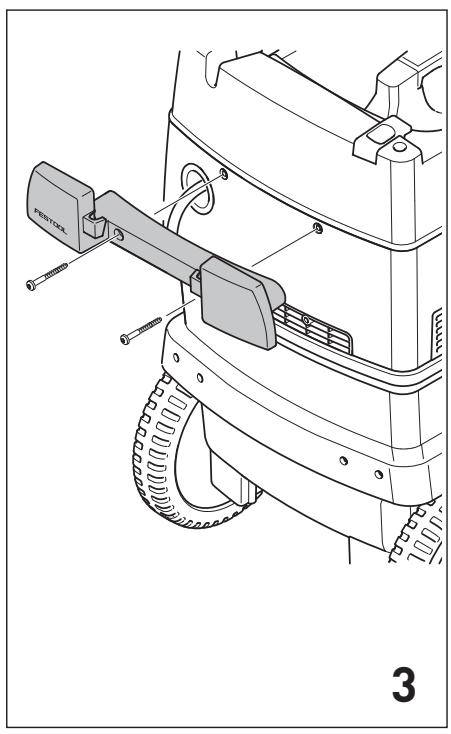
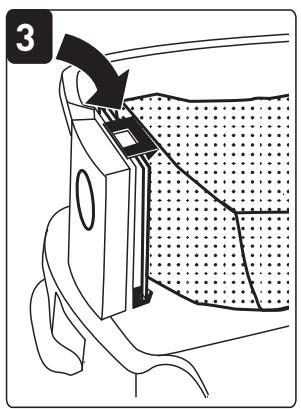
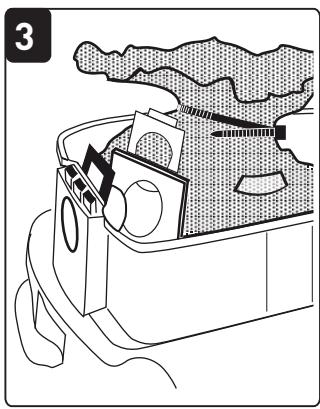
Replace the top section [2-1] and close the locking clips [2-2]. - Attach the cable holder to the rear of the mobile dust extractor (see Fig. [3]).
Connect the suction hose to the machine.
6.2 Switch on/off
Insert the plug into an earthed socket.

WARNING
Risk of injury from tools starting up unexpectedly
Before setting the switch to the "AUTO" or "MAN" position, make sure that the connected tool is switched off.
The switch [1-8] serves as an on/off switch.
Switch position "0"
Appliance socket [1-3] is disconnected from the power, mobile dust extractor is switched off.
"MAN" switch position
Appliance socket [1-3] is connected to the power, the mobile dust extractor starts.
"Auto" switch position
Appliance socket [1-3] is connected to the power, the mobile dust extractor starts when the connected tool is switched on.
7 Settings
7.1 Connecting electric power tools
WARNING
Risk of injury
Observe the maximum connected loads for the appliance socket (see chapter "Technical data").
Make sure that the power tool is switched off before connecting or disconnecting.
Connect the electric power tool to the appliance socket [1-3].
Following installation of the socket module (included in the scope of delivery of the CTL 26 E SD), you can use the mobile dust extractor as follows:
-
CTL 26 E S D E/A: Socket module with automatic switch-on function for the use of two electric power tools: e.g. 2 sanders, 1 jigsaw + 1 sander
-
CTL 26 E SD: Socket module with permanent power supply for use as extension cable: e.g. charger, lamp, etc.
(1) The total power drawn, independently of the socket type, must not exceed the printed value.
7.2 Connecting pneumatic tools

WARNING
Risk of injury
Make sure that the pneumatic tool is switched off before connecting or disconnecting.
If the compressed air module [1-2] (496141; included in scope of delivery of CTL 36 E LE, CTL 36 E LE AC) is installed, the automatic switch-on function of the mobile dust extractor also works in combination with air tools.
We also recommend installing the VE service unit (495886). The service unit filters and lubricates the compressed air and enables an adjustment of the air pressure. An IAS adapter (454757) is available to connect Festool air tools to the IAS system.
The operating pressure of the tool must be 6 bar for the automatic switch-on unit to function correctly.
7.3 Adjusting the suction power
You can use the suction power adjuster [1-9] to adapt the machine suction power to different applications.
7.4 Applying the brake
Folding out the black brake lever [1-13] prevents the mobile dust extractor from rolling. To achieve this, lift the front end of the mobile dust extractor slightly and push the black brake lever downwards until it latches into place. Push the green lever [1-12] again to release.
7.5 Temperature cut-out
To prevent overheating, a temperature cutout switches the mobile dust extractor off when it reaches a critical temperature.
- Switch off the mobile dust extractor and allow to cool for about 5 minutes.
If the mobile dust extractor will not switch on again, please contact a Festool service workshop.
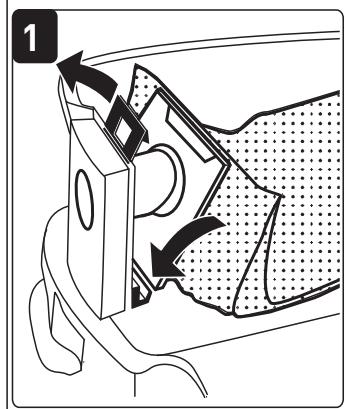
7.6 Changing the filter bag
Removing the filter bag [4]
- Open the locking clips [2-2] and remove the top section of the machine[2-1].
Remove the filter bag.
Dispose of the used filter bag in accordance with statutory regulations.
Clean the dust container [2-3].
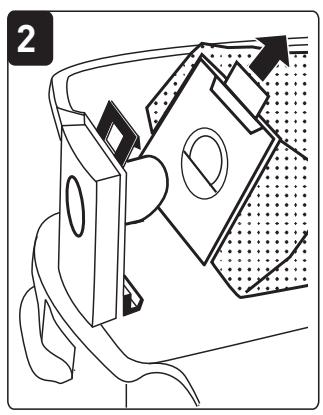
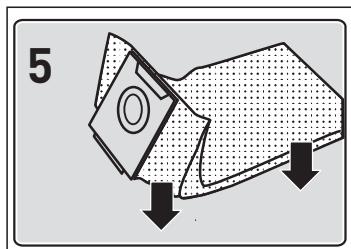
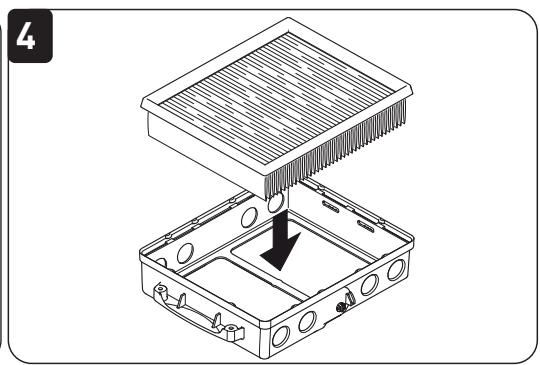
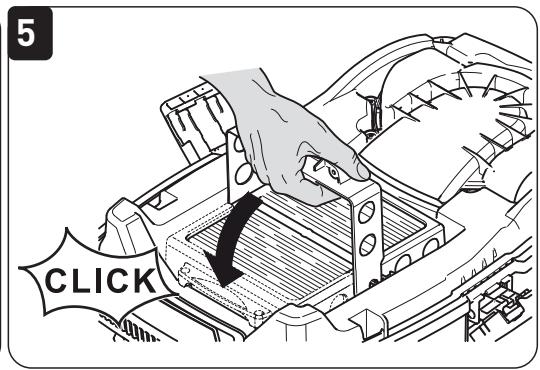
Inserting the filter bag [5]
Insert a new filter bag (FIS-CT 26/36) in the inlet port of the dust container and interlock it. Important: be aware that the locking engages.
Replace the top section [2-1] and close the locking clips [2-2].
(1) Make sure that the filter bag is not pinched between the top and bottom sections.
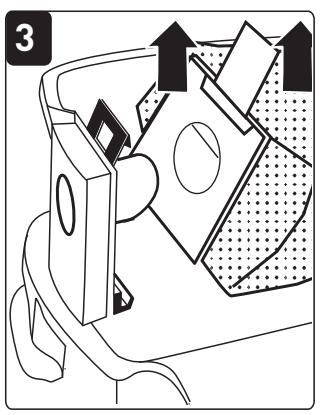
7.7 Changing the disposal bag
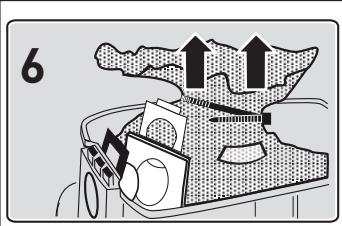
Removing the disposal bag [6]
- Open the locking clips [2-2] and remove the top section of the machine[2-1].
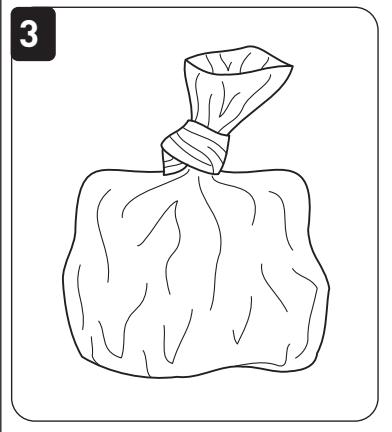
Close the disposal bag.
Remove the disposal bag. - Dispose of the used disposal bag in accordance with statutory regulations.
Clean the dust container [2-3].
Inserting the disposal bag [7]
Insert a new disposal bag (ENS-CT26/36) on the inlet nozzle of the container and lock in position.
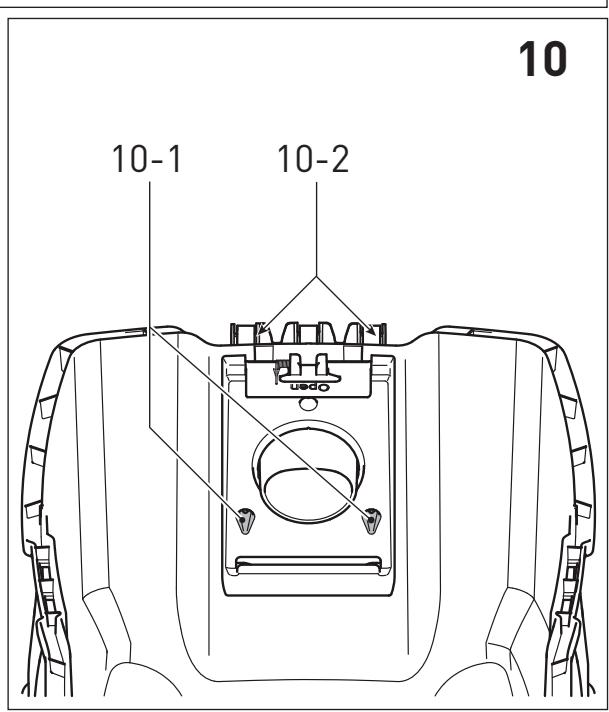
Important: The lateral openings on the disposal bag must be positioned inside the container. Make sure that the bolt engages.
- Place the disposal bag over the edge of the container.
![FESTOOL CTL 26 E - Inserting the disposal bag [7] - 1](/content/2025/01/176783/images/1202467b287bd18b0e926fb12c37992ba9382b15d4c5fb97fe58682e8034e7b7.jpg)
Make sure that the contacts [10-2] are free.
Replace the top section [2-1] and close the locking clips [2-2].
8 Working
8.1 Handling
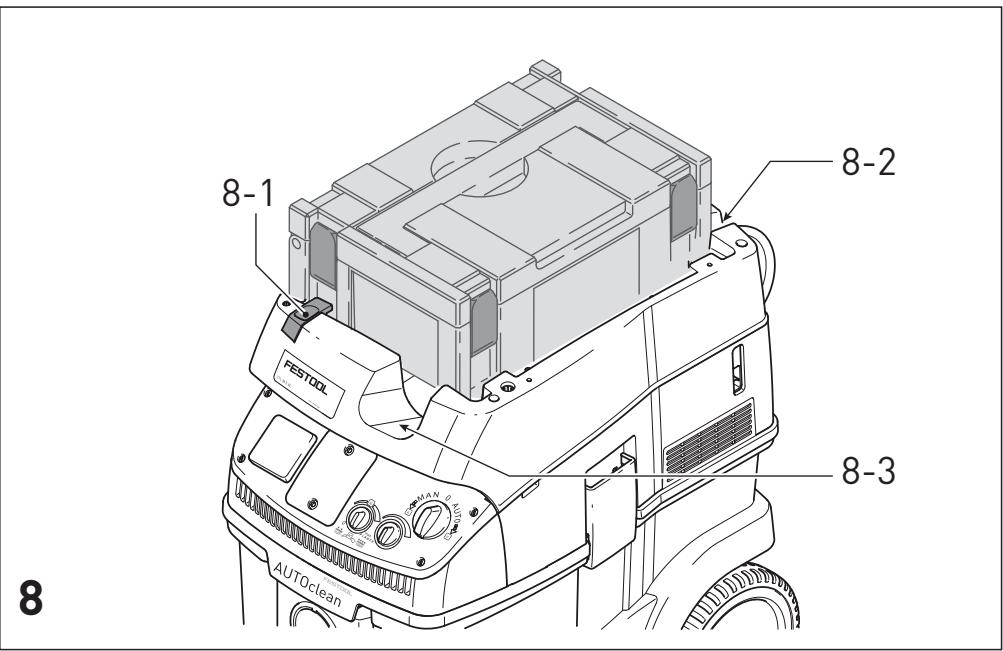
Hose store: after finishing work, you can feed the suction hose through the recess [8-3] and place it in the hose store. You can do the same with the mains cable through the other recess [8-2].
SysDoc Systainer attachment system: a Systainer can be attached to the storage area via the two slides [8-1].
8.2 AUTOClean - Cleaning the main filter (only versions with Auto-Clean)
To maintain a constant suction power when extracting fine dust, you can adjust the frequency of the automatic [1-7] cleaning system in infinite variables using the rotary knob. Always use the automatic cleaning system in combination with a disposal bag (in line with dust class 'L' requirements).

Before performing wet extraction tasks or working with a filter bag, set the [1-7] rotary knob to position 0.
Set the automatic cleaning function to the highest setting when [1-7] extracting large quantities of dust.
Manual cleaning

If the suction power decreases, cleaning can be started manually by turning the switch [1-8] to the AC symbol pointed on either side of the switch.
We recommend cleaning the main filter completely if severely clogged:
Set the suction power adjuster [1-9] to the maximum setting.
Cover the end of the nozzle or suction hose with your hand for 10 seconds.
Turn the switch to the [1-8] AC symbol.
① When the CT-VS closing slide is used (order no.: 497926), the filter can be cleaned fully without removing the connected electric power tools.
In intensive applications that generate adherent dust, it may be necessary to clean the filter element mechanically under certain circumstances (extract). Wear a dust mask!
8.3 Special features of the CTL 36 E AC-LHS
To use the mobile dust extractor in combination with the PLANEX:
- Use the accompanying kink-resistant suction hose D 36 mm x 3.5 m-AS.
- Use the accompanying special suction sleeve to connect the PLANEX.
Insert the accompanying CT-VS closing slide between the intake opening [1-1] and the suction hose. - Fit the tool holder as described in the accompanying installation instructions.
- When performing extraction work with the PLANEX, always use disposal bags to prevent dust from escaping into the surrounding area.
8.4 Extracting dry materials

CAUTION
Hazardous dust
Damage to the respiratory passage
- Use a filter or disposal bag when extracting hazardous materials!
Observe the following when extracting dust generated by operating electric power tools:
If the exhaust air is discharged back into the room, the air renewal rate L within the room must be sufficient. The volume of air discharged back into the room must not exceed 50% of the fresh air volume flow (room volume V_R × air renewal rate L_W ). Observe all the relevant regional regulations.
Remember: A moist main filter clogs more quickly when extracting dry materials. Therefore, dry the main filter before extracting dust or replace the damp filter with a dry one.
8.5 Extracting fluids
Before extracting fluids, remove the filter or disposal bag (see chapter 7.6). We recommend using a special wet filter.
The dust extractor stops automatically when the maximum level is reached.

CAUTION
Escaping foam and fluids
Switch off the machine immediately and empty the dirt trap.
8.6 The antistatic system
Friction inside the extraction hose causes static electricity to develop during extraction. Operating personnel may receive unpleasant electric shocks while working. The mobile dust extractor is fitted with an antistatic system as standard to discharge any static electricity that may develop. However, always use the enclosed antistatic extraction hose.
8.7 After finishing work
Only versions with AutoClean: Clean the main filter automatically or manually (see chapter 8.2).
- Switch off the mobile dust extractor and disconnect the plug.
Wind up the mains power cable.
Empty the dust container.
- Place the mobile dust extractor in a dry room inaccessible to unauthorised users.
9 Service and maintenance

WARNING
Risk of injury, electric shock
Always disconnect the mains plug from the socket before performing maintenance work on the machine!
All maintenance and repair work which requires the motor housing to be opened must only be carried out by an authorised service workshop.
Damaged safety devices and components must be repaired or replaced in a recognised specialist workshop, unless otherwise indicated in the operating manual.
Observe the following instructions:
- A dust test must be performed at least once a year by the manufacturer or an instructed person. This test may include checks to determine whether the filter is damaged, the machine is sealed properly and the monitoring features are functioning correctly.
- During maintenance and repair work, all components that cannot be cleaned satisfactorily must be replaced. The old components must be sealed in impermeable plastic bags prior to disposal in compliance with applicable regulations for this type of waste.
9.1 Changing the filter element
NOTE
Motor damage
- Never operate the extractor without a filter element fitted as the motor may become damaged.
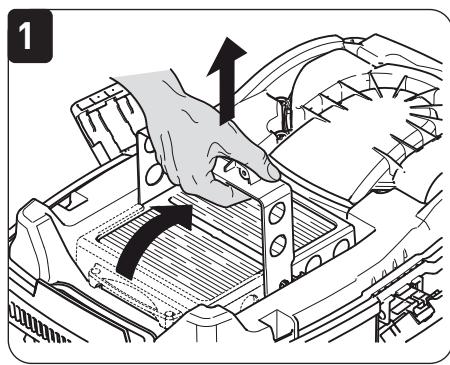
- Open the locking clips [2-2] and remove the top section of the machine[2-1].
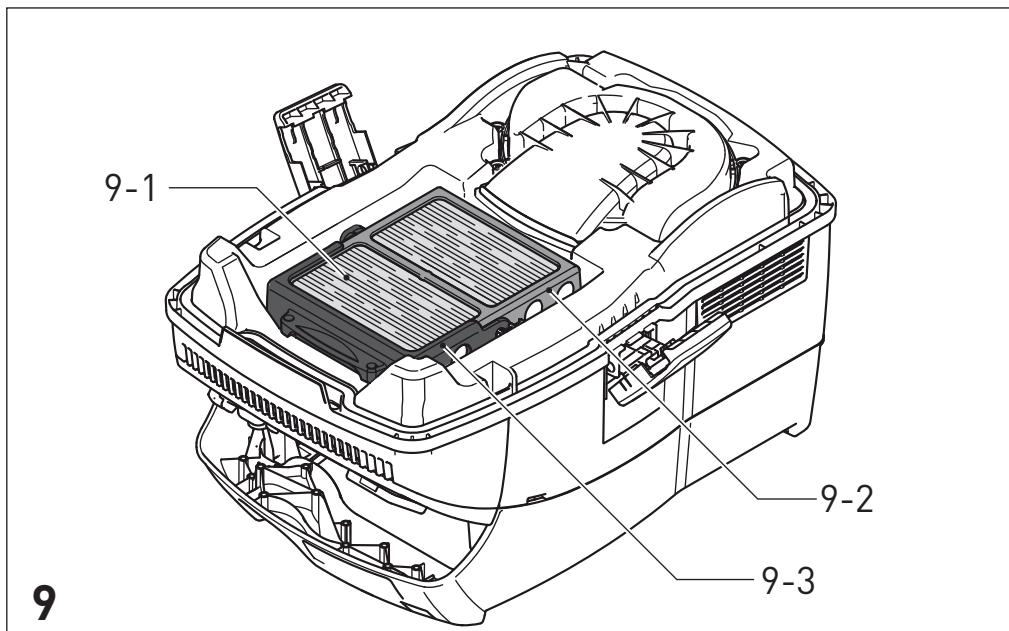
- Turn the top section of the machine so that the main filter is facing upwards (Fig.[9]).
- Fold over the lever [9-1] and remove the retainer. [9-2]
Remove the used main filter and replace [9-3] with a new one.
Dispose of the used filter in accordance with statutory regulations.
Insert the retainer [9-2] and fold over the lever [9-1] until it engages.
Replace the top section [2-1] and close the locking clips [2-2].
9.2 Emptying the dust container
The dust container [2-3] can be emptied once the top section has been removed.
After extracting fluids, clean the fill level sensors [10-1] regularly with a soft cloth and inspect for damage.
10 Accessories
Use only original Festool accessories and Festool consumable material intended for this machine because these components are designed specifically for the machine. Using accessories and consumable material from other suppliers will most likely affect the
quality of your working results and limit any warranty claims. Machine wear or your own personal workload may increase depending on the application. Protect yourself and your machine, and preserve your warranty claims by always using original Festool accessories and Festool consumable material!
The order numbers for the accessories and filters can be found in the Festool catalogue or on the Internet at "www.festool.com".
10.1 Modules
The following modules for upgrading the mobile dust extractor are available in the accessories programme. Modules must be fitted to the module slot [1-2] by an authorised service workshop:
- Compressed air module,
- Socket module with permanent power supply,
- Socket module with automatic switch-on unit (not suitable for GB 110 V version),
- Energy box module (EAA) for using the automatic switch-on unit on the EAA.
You can find more detailed information on the modules at "www.festool.com".
11 Disposal
Do not throw the power tool in your household waste!! Dispose of machines, accessories and packaging at an environmentally responsible recycling centre. Observe the valid national regulations.
12 Warranty
We offer a warranty for material and production defects for all our tools in accordance with the locally applicable legal provisions, but for a minimum of 12 months. Within the EU member states, the warranty period is 24 months (verification through invoice or delivery note). Damage caused by the operator, natural wear, overloading, incorrect handling or through the use of the equipment not specified in the operating manual, or damage which was known at the time of purchase, is not covered by the warranty. Furthermore, damage caused by the use of non-original accessories and consumable materials (e.g. sanding pads) is also excluded.
Complaints can only be accepted if the tool is returned while still assembled to the supplier or an authorised Festool Customer Service workshop. Keep the operating manual, safe-
ty instructions, spare parts list and purchase receipt in a safe place. Otherwise the current warranty conditions of the manufacturer shall apply.
Note
Due to continuous research and development work, we reserve the right to make changes to the technical content of this documentation.
13 EU Declaration of Conformity
| Mobile dust extractor | Serial no. | |
| CTL 26 E | 495851, 495853, 495854, 495855 | |
| CTL 26 E SD (E/A) | 497067, 497068 | |
| CTL 26 E AC | 496529, 496531, 496532, 496533 | |
| CTL 36 E | 495484, 495859, 495860, 495861 | |
| CTL 36 E AC, CTL 36 E AC-LHS | 496537, 496539, 496540 496541, 497989, 498073 | |
| CTL 36 E LE | 495863, 496946 | |
| CTL 36 E LE AC | 496543 | |
| Year of CE mark: | ||
| CTL 26 E, CTL 36 E, CTL 36 E LE | 2008 | |
| CTL 26 E AC, CTL 36 E AC, CTL 36 E LE AC, CTL 36 E AC-LHS | 2010 | |
We declare under sole responsibility that this product complies with the following directives and standards:
2006/42/EG, 2004/108/EG, EN 60335-1, EN 60335-2-69, EN 55014-1, EN 55014-2, EN 61000-3-2, EN 61000-3-3.
Festool GmbH
Wertstr. 20, D-73240 Wendlingen, Germany
$$ p p a. D. J d a n u s S i n w l c $$
Head of Research, Development and Technical Documentation
11.05.2010
REACH for Festool products, its accessories and consumable materials:
REACH is a European Chemical Directive that came into effect in 2007. As "downstream users" and product manufacturers, we are aware of our duty to provide our customers with information. We have set up the following website to keep you updated with all the latest news and provide you with information on all the materials used in our existing products:
www.festool.com/reach
8.3 Particularités CTL 36 E AC-LHS
I CLEANTEX CTL/CTL AC
I CLEANTEX CTL/CTL AC
Varning for allman risk!

Varning for elstötar

8.3 Speciella procedurer CTL 36 E AC-LHS
Sette inn filterpose [5]
He don't have any changes in the amount of water.
CeTeBoe HaprJxHne n yactota nCTOuHnKa TOka DOJIxHbI COOTBETCTBOBaTb DaHHbIM, YKa3aHHbIM Ha 3aBODcKo Ta6JInuKe.
B CeBepHoi AmePKe MoXHo IcNoIb3OBA TbToIbKO MaunHKn Festool c xapaKTepeNCTNKo IIO HapJxEHHIO 120 B/60 T.
7.3 PerylnpOBka HHTeHcNBHOCTN BCaCbIBaHnA
3aunTa OT neperpBeA OTKIIOUaET nbileydaJIauOuI annapaT Do DOCTNXKeHnKpNTnuecko Tempeatypbl.
BbIKJUChTe nbIeYdaJIaIousi n annapaT nn daIte emy OCTbITb B TeueHne npm. 5 MNHyT.
① Ecni nocne 3TOrO OH He BkJIIOuAeTCa, o6paTnTeCb B MaCTepcKyu CepBnCHoN cIyX6bl Festool.
7.6 3aMeHa MeuKa-Пылесборнka
I3BleueHne MeuKa- nblnc6OpHnka [4]
OTKpoITe 3aXIMHbIe cKO6bl [2-2] IN CHIMnTe BepxHIOU qAcTb aAnnapaTa [2-1].
13BLeKeNTe MeuOK-nyIeSc6OpHnK.
YtHnI3npyIe NcNoJIb30BaHHbI MeJOK- nblnc6OpHbK B COOTBETCTBn C 3aKOHOdaTeJIbHbIMN PpeDnCaHnA M.
Ouicntte pe3epByap Ila rpa3n [2-3].
YctaHOBka MeuKa- nblnc6OpHnka [5]
BCTaBbTe HOBbI MeoK-Pllec6OpHnK (FIS-CT 26/36) (pnc. [5]). BaxHo: ropIOBHy MeuKa-Pllec6OpHnKa PLOTHO HacaIte Ha BnyckHO wTycep.
YcTaHOBInTe BepXHIOU qAcTb [2-1] Ha MeCTOn 3aΦnKcnpuIte 3aJxIMHbIe cKO6bl [2-2].
① Cnéinte 3a Tem, yTo6bI MeWoK- nblnc6bOpHnK He OKa3aJcR 3aJkaTbIM Mejdy BepxHei HnXHei YacTAmN.
7.7 3aMeHa MeiKa dIy yTnIn3aunn N3BleueHne MeiKa dIy yTnIn3aunn [6]
OTKpoITe 3aXIMHbIe cKO6bl [2-2] IN CHIMITE BepxHIOU qAcTb aPnapaTa [2-1].
3akpoTe MewoK dny yTnIn3aun.
I3BVeKeNTe MeWoK dJa yTnIn3aCIN.
YTNIN3npyuTe NcNoIb3OBAHHbIM MeWOK DJIY TNIIN3aCIN B COOTBETCTBUN C 3aKOHOdaTeJbHbIMN PpeDNICAHNYMn.
Ouicnttepe3epByapIraIgpr3n[2-3].
UctaHOBKa MeSHKa dIyTnIn3aunn [7]
BCTaBbTe HOBbI MeoK dJa yTnIn3aun (ENS-CT26/36) Bo BnycKHOJ uTyuepe3epByapa n 3aΦNKcnpyTe erO.
Baxho: 6OKOBbIe OTBepCTnMa MeuKa IJy TnIn3aun DoJXHbI HaxoINTbcr BHyTpNi pe3epByapa dIra rpa3n. Y6eINTeCb BΦnkcaun pRgela.
Pa3mecntTe MeoK dJa yTnIIN3aUN Ha KpOMkax rpa3ec6OpHnka.
Y6eIntecb B HaNuHn CBO6oHOrO 10CTyNa [10-2] K KOHTaKTaM.
- YctaHOBNTe BepXHIOU qactb [2-1] Ha MeCTO n 3aΦnKcnpyIte 3axmHbIe cKO6bl [2-2].
8 BbIopHeHne pa6oT
8.1 YnpabJIeHne
OTcek dIy xpaHennn 7JHa: no OKOHuaHnn pa60Tb I BCacbIBaIOuIe 7JHaHr MOxHO npOraHyTb uepe3 OTBepCTne [8-3] n CLOXHTb B OTcKe dJa XpaHennn 7JHaHra. Upe3 OTBepCTne [8-2] MoxHo npOraHyTb cTeBOi Ka6eJIb I TAKKe pa3MeCTntb erO B OTcKe dJa XpaHennn 7JHaHra.
Iprn HHTeHcNBHOM NCPOJIb3OBaHnC
HaJIINpaHHeM Yactu PbIIN HeO6xOdIMo
BbIIOJIHNITb MExaHnueCKyO OUNCTKY
OCHOBHOrO fNJIbTpa (c NOMOUsbIO PbIJeCoCa).
Iprn OUNCtKe IcNoJIb3yIte pecnnpaTop!