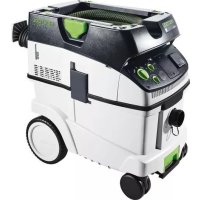
CTL 55 E - Industrial vacuum cleaner FESTOOL - Free user manual and instructions
Find the device manual for free CTL 55 E FESTOOL in PDF.
| Product type | Industrial vacuum cleaner |
| Brand | FESTOOL |
| Model | CTL 55 E |
| Dimensions (L x W x H) | 710 x 380 x 935 mm |
| Weight | 22 kg |
| Tank capacity | 55 liters |
| Power consumption | 350 - 1200 W |
| Max airflow | 228 m³/h |
| Max vacuum | 23000 Pa |
| Filter area | 14000 cm² |
| Suction hose | Ø 27 mm x 3.5 m |
| Sound pressure level | 72 dB(A) |
| Power cable length | 7.5 m |
| Protection class | IP X4 |
| Dust class | L (conforms to IEC 60335-2-69) |
| Max connected power at socket (CE) | 2400 W |
| Main functions | Suction of dry and liquid dust, antistatic system, suction power adjustment, connection for power and pneumatic tools |
| Maintenance and cleaning | Filter element cleaning by handle (10 strokes), filter bag change (ref. 452973), tank emptying |
| Safety | Thermal protection, automatic shut-off in case of overheating, level indicator shut-off for liquids, mandatory earthing |
| Spare parts | Filter bag (452973), filter element (452923), pneumatic module (452829), handle (452921), hose support (487072) |
| Warranty | 12 months minimum, 24 months in EU depending on conditions |
Frequently Asked Questions - CTL 55 E FESTOOL
User questions about CTL 55 E FESTOOL
0 question about this device. Answer the ones you know or ask your own.
Ask a new question about this device
Download the instructions for your Industrial vacuum cleaner in PDF format for free! Find your manual CTL 55 E - FESTOOL and take your electronic device back in hand. On this page are published all the documents necessary for the use of your device. CTL 55 E by FESTOOL.
USER MANUAL CTL 55 E FESTOOL
Head of Research, Development and Technical Documentation
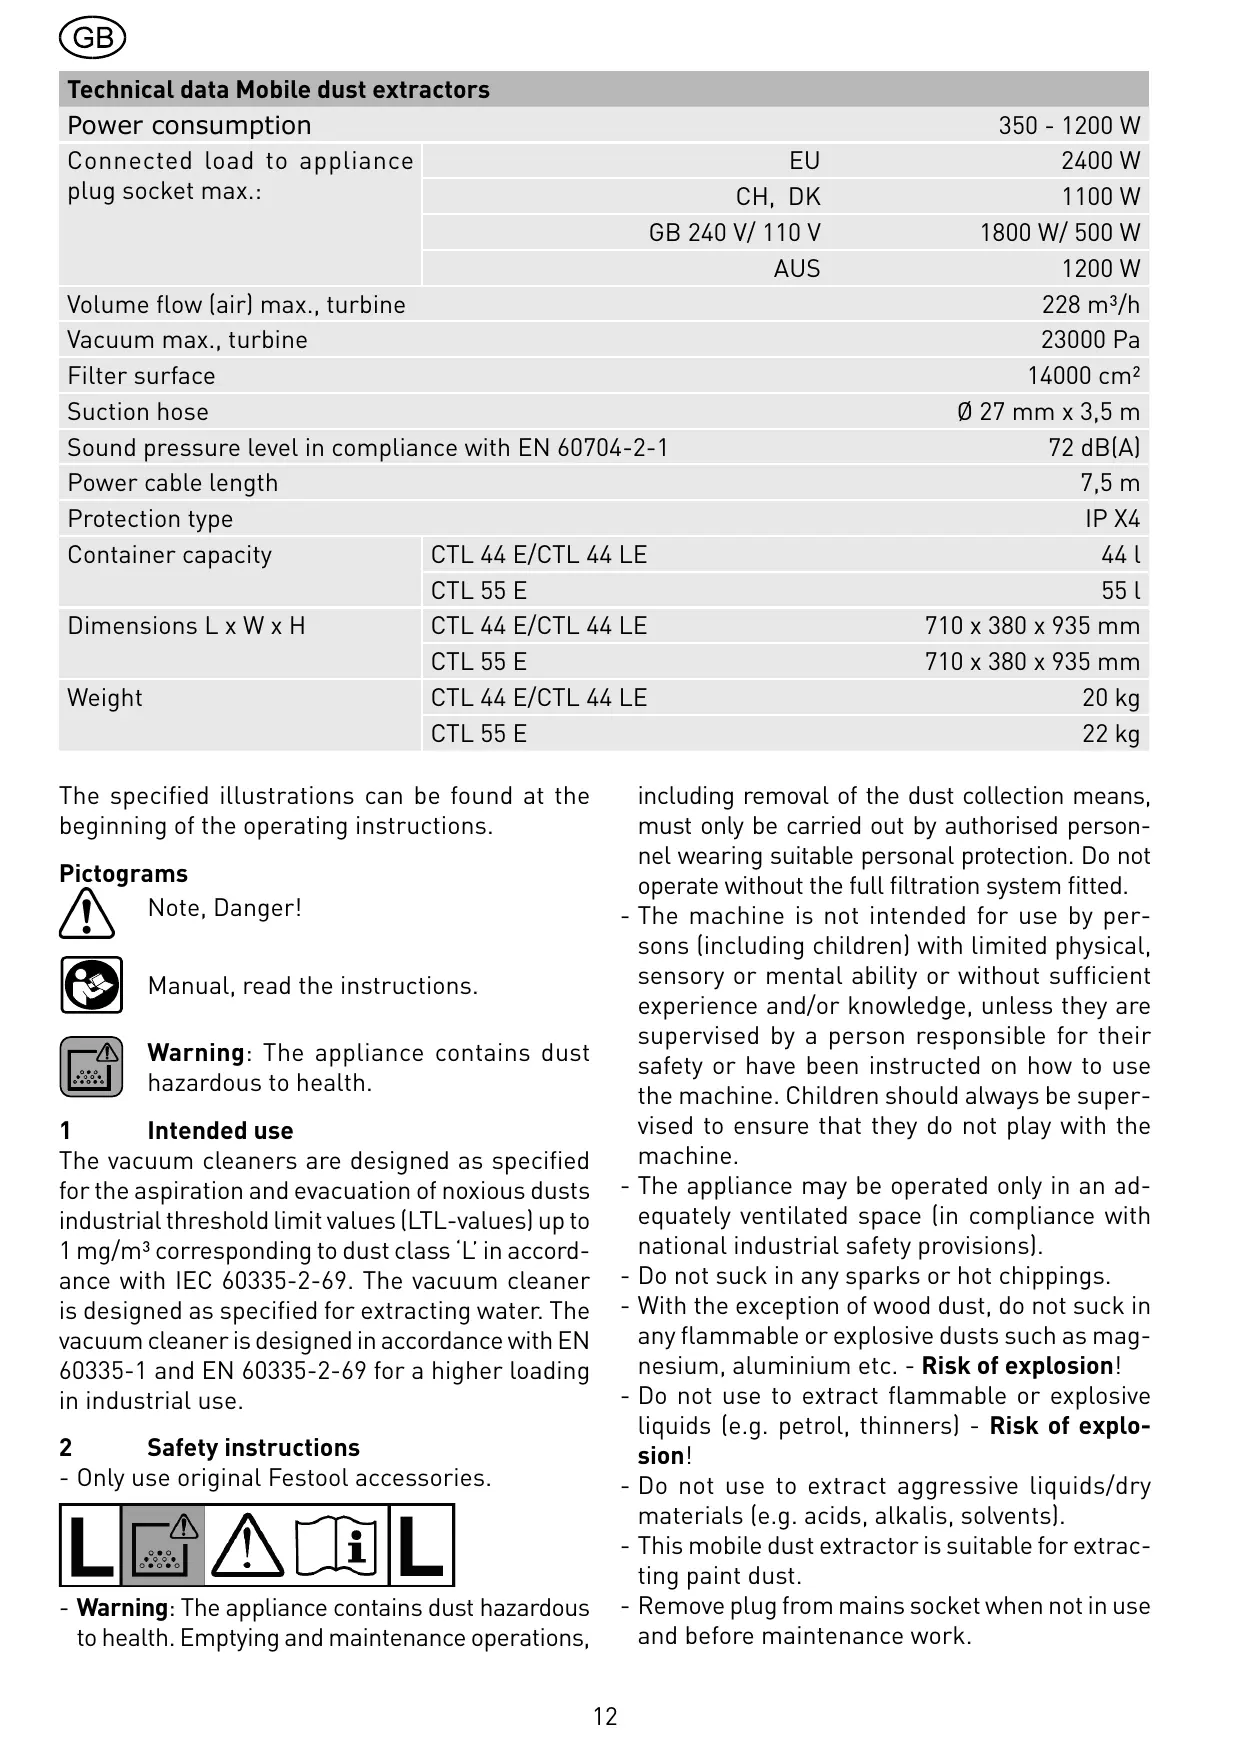
| Technical data Mobile dust extractors | ||
| Power consumption | 350 - 1200 W | |
| Connected load to appliance plug socket max.: | EU | 2400 W |
| CH, DK | 1100 W | |
| GB 240 V/ 110 V | 1800 W/ 500 W | |
| AUS | 1200 W | |
| Volume flow (air) max., turbine | 228 m³/h | |
| Vacuum max., turbine | 23000 Pa | |
| Filter surface | 14000 cm² | |
| Suction hose | Ø 27 mm x 3,5 m | |
| Sound pressure level in compliance with EN 60704-2-1 | 72 dB(A) | |
| Power cable length | 7,5 m | |
| Protection type | IP X4 | |
| Container capacity | CTL 44 E/CTL 44 LE | 44 l |
| CTL 55 E | 55 l | |
| Dimensions L x W x H | CTL 44 E/CTL 44 LE | 710 x 380 x 935 mm |
| CTL 55 E | 710 x 380 x 935 mm | |
| Weight | CTL 44 E/CTL 44 LE | 20 kg |
| CTL 55 E | 22 kg | |
The specified illustrations can be found at the beginning of the operating instructions.
Pictograms

Note, Danger!

Manual, read the instructions.

Warning: The appliance contains dust hazardous to health.
1 Intended use
The vacuum cleaners are designed as specified for the aspiration and evacuation of noxious dusts industrial threshold limit values (LTL-values) up to 1mg / m^3 corresponding to dust class 'L' in accordance with IEC 60335-2-69. The vacuum cleaner is designed as specified for extracting water. The vacuum cleaner is designed in accordance with EN 60335-1 and EN 60335-2-69 for a higher loading in industrial use.
2 Safety instructions
- Only use original Festool accessories.

- Warning: The appliance contains dust hazardous to health. Emptying and maintenance operations,
including removal of the dust collection means, must only be carried out by authorised personnel wearing suitable personal protection. Do not operate without the full filtration system fitted.
- The machine is not intended for use by persons (including children) with limited physical, sensory or mental ability or without sufficient experience and/or knowledge, unless they are supervised by a person responsible for their safety or have been instructed on how to use the machine. Children should always be supervised to ensure that they do not play with the machine.
- The appliance may be operated only in an adequately ventilated space (in compliance with national industrial safety provisions).
- Do not suck in any sparks or hot chippings.
- With the exception of wood dust, do not suck in any flammable or explosive dusts such as magnesium, aluminium etc. - Risk of explosion!
- Do not use to extract flammable or explosive liquids (e.g. petrol, thinners) - Risk of explosion!
- Do not use to extract aggressive liquids/dry materials (e.g. acids, alkalis, solvents).
- This mobile dust extractor is suitable for extracting paint dust.
-
Remove plug from mains socket when not in use and before maintenance work.
-
Do not pull plug out of mains socket by its cable.
- Protect the cable against heat, oil and sharp edges.
- Check the plugs and cables regularly and have them replaced by an expert if damaged.
- Do not leave devices out in the rain.
- Do not lift or carry the devices by their handles using a crane hook or lifting gear.
- The device may only be used by persons who have been trained in its use and who are authorised to do so.
- If noxious dusts have been extracted, the vacuum cleaner and all accessories must be completely cleaned (inside and outside) by suction and wiping, before removal from the contaminated area. Parts that cannot be completely cleaned are to be packed for transport in a plastic bag with an airtight seal.
- For safety reasons, only operate the machine using a totally earthed socket.
3 Appliance preparation and initial operation
The accessories are delivered horizontal in the container (2.10), and must be removed prior to initial operation.
3.1 Power supply

The line voltage and frequency must correspond with the data on the ratings plate!
Make sure that the vacuum cleaner is switched off when you plug the power cable in.
The antistatic system (AS)
Friction in the suction hose causes electrostatic charges which can result in unpleasant electric shocks for the operator. In order to conduct these static charges to earth, the extraction units are provided with an antistatic system as a standard feature. However, antistatic hoses and accessories have to be used in this case. The antistatic function will only work if the plug is plugged into a totally earthed socket.
3.2 On/off switch (1.3)
In position 0 the vacuum cleaner is switched off and the appliance plug socket (1.2) is dead.
Two modes of operation are possible:
a) Switch position „MAN“
The appliance plug socket is dead.
The cleaner motor starts immediately.
b) Switch position „Auto“
The appliance plug socket is live.

Before turning the switch to the „Auto“ position, ensure that the tool connected to the appliance plug socket is switched off.
The cleaner motor starts only when the tool connected to the appliance plug socket is switched on.
3.3 Suction force regulator (1.4)
The suction force regulator can be used to vary the suction capacity. This permits a precise adaptation to different substances to be picked up.
3.4 Temperature control
A temperature fuse switches the dust extractor off before this reaches a critical temperature to protect against overheating - switch dust extractor off and leave for around 5 minutes to cool down.
If the dust extractor still cannot be switched back on, please consult a Festool-service centre.
3.5 Connecting an electric tool

Observe the maximum connected load on the appliance plug socket (see "Technical Data")!

Make sure that the electric tool is switched off when plugging it in and unplugging it.
Connect the electric tool to the appliance plug socket (1.2).
3.6 Connecting pneumatic tools

Make sure that the pneumatic tool is switched off when plugging it in and unplugging it.
When the compressed-air module (1.8) (452829; supplied ready with CTL 44 LE) is fitted, the automatic cut-in of the appliance also operates in conjunction with compressed-air tools. We also recommend fitting of the VE supply unit (452797). The supply unit filters and oils the compressed air and allows the air pressure to be regulated. An IAS connecting piece (454757) is available for connecting Festool compressed-air tools with the IAS system. To ensure trouble-free functioning of the automatic cut-in, the operating pressure of the tool must be 6 bar.
4 Operation
4.1 Opening/closing the vacuum cleaner
- Open retaining clamps (2.2),
- Raise upper part (2.4) until support catch (2.5) engages.
Follow the reverse order to close the appliance. You must raise the upper part slightly before depressing or disengaging the support.
4.2

Changing the filter
During the following procedure, take care not to raise dust more than is unavoidable.

Wear a P2 breathing protection mask with health-hazardous dusts!
al
Changing the filter bag (3.4)
Order no.:
CTL 44 E/CTL 44 LE 452972
CTL55E 452973
- Open the vacuum cleaner,
- Remove the used filter bag (see printed text on filter bag),
- Dispose of the used filter bag in accordance with statutory requirements,
- Thoroughly clean the dirt container (2.10) and the space (3.1) for suction turbine (wipe down with a damp cloth),
- Insert new filter bag (see printed text on filter bag). Important: Press the filter bag sleeve (3.3) firmly onto the dust extraction fitting (3.2)!
- Close the vacuum cleaner.
b) Changing the filter element (2.3)
Order no.: 452923

Do not operate machine without a filter element. This may damage the motor.
- Open the vacuum cleaner,
- Remove the used filter element (see printed text on the filter element packaging),
- Dispose of the used filter element in a sealed, dust-tight bag in accordance with statutory requirements,
- Thoroughly clean dirt container (2.10) and space (3.1) for the suction turbine (wipe down with a damp cloth),
- Fit a new filter element (see printed text on the filter element packaging),
- Close vacuum cleaner.
4.3 Cleaning the filter element
To clean, move the handle (2.1) to and fro about 10 times. N.B.: You need to clean the filter element only if you use the vacuum cleaner without a filter bag.
4.4 Emptying the dirt trap (2.10)
Always remove the upper part of the vacuum cleaner before emptying the dirt container!
- Open the vacuum cleaner,
- Raise the upper part slightly, depress the support (2.5),
-
Raise the upper part to the stop (vertical position),
-
Remove the upper part by moving it forwards horizontally,
- Empty the dirt container,
- Replace the upper part. Warning: Make sure that both upper-part pins are fully inserted in the recesses (1.5)!
- Close the vacuum cleaner.
4.5 Stand/Brake
The wheels can be blocked by the brakes [2.8], thus preventing the vacuum cleaner from rolling away unexpectedly.
4.6 Hose depot (partly in scope of delivery)
Securing the hose depot on the dust extractor: see Fig. 4. When work is complete, you can guide the extractor hose through the opening (4.1) and deposit the hose in the depot. Similarly, the mains cable can also be guided through the opening (4.2) and deposited in the hose depot.
5 Application
- A systainer can be fixed to the storage area (1.9) with the two clamps (1.11). Tools or accessories can also be stowed on the storage area and in the storage compartments (1.6).
- A hose coupling (1.10) (487072) can be plugged into the opening (1.7). The suction hose is connected to the tool from above with the hose coupling. Alternatively, a hose clip (452998) can be fitted for coiling the suction hose.
- The push handle (2.11) (452921) makes the vacuum cleaner easier to move. Accessories (e.g. vacuum accessories) can be fixed to the push handle batten (2.9).
- An air blast is obtained by inserting a suction hose in the blast opening (2.7).
5.1 Vacuuming dry materials
A filter bag must be used without exception when evacuating noxious substances!
Before using the vacuum cleaner to evacuate dry substances, a filter bag must always be inserted in the container. Then the evacuated material can be disposed of easily. The filter element becomes damp after evacuating liquids. A damp filter element suffers more wear and tear if it is used for dry materials. Accordingly, the filter element should be dried or replaced with a dry one before dry operation.
5.2 Vacuuming liquids
Do not evacuate combustible liquids!
If foam or liquid escapes, stop work immediately and empty the dirt container.
The filter bag has to be removed before evacuating liquids. We recommend use of a special wet filter. When the maximum filling level is reached, a bag-full indicator (2.12) automatically interrupts extraction.
6 After finishing work
- Switch off the cleaner and pull the Plug of the mains lead out of the Plug socket.
- Wind up the mains lead [2.6].
- Empty dirt tank.
- Clean the vacuum cleaner inside and outside by suction and wiping.
- Deposit the appliance in a dry room, safe from unauthorised use.
7 Maintenance and care

Always remove the power supply plug from the socket before carrying out any work on the machine.

All maintenance and repair work which requires the motor casing to be opened may only be carried out by an authorised service centre.
A safety test is to be carried out at least once a year by the manufacturer or an instructed person, e.g. for possible damage to the filter and leaks in the appliance, and to ensure that the control devices are functioning.
If the user services the appliance, it must be dismantled, cleaned and serviced, as far as possible without any danger to the maintenance staff and other persons. Appropriate measures include decontamination before dismantling, locally filtered forced ventilation on the dismantling site, cleaning the service area, and suitable personal safety equipment.
8 Accessories, filter
The accessory and filter order number can be found in your Festool catalogue or on the Internet under "www.festool.com".
9 Disposal
Do not throw the power tool in your household waste! Dispose of machines, accessories and packaging at an environmentally responsible recycling centre. Observe the valid national regulations.
10 Warranty
For our tools, we give warranty for material and production defects in accordance with the locally applicable legal provisions, but in any case for at least 12 months. Within the EU member states, the warranty period is 24 months (verification through invoice or delivery note). Damage caused by, in particular, natural wear, overloading, incorrect handling, or damage caused by the operator, or damage caused through use of the equipment contrary that specified in the Operating Instructions, or damage which was known at the time of purchase, is not covered by the warranty. Furthermore, damage caused by the use of non-original accessories and consumable materials (e.g. sanding pads) is also excluded. Complaints can only be recognised if the tool is returned while still assembled to the supplier or an authorised Festool Customer Service workshop. Keep the Operating Instructions, Safety Instructions, Spare Parts List and purchase receipt in a safe place. Otherwise the respective, current warranty conditions of the manufacturer shall apply.
Note
Due to continuous research and development work, we reserve the right to make changes to the technical content of this documentation.
REACH for Festool products, their accessories and consumables
REACH is a European Chemical Directive that came into effect in 2007. As "downstream users" and product manufacturers, we are aware of our duty to provide our customers with information. We have set up the following website to keep you updated with all the latest news and provide you with information on all the materials used in our existing products: www.festool.com/reach
8 Accessoires, filter
Pn PooCoeHHeHH N OToCoeHHeHH PHeBMOnHCTpyMeHT DoJIKeH 6bITb BblKJIouyeH.
Ecnu yctahOBlen nHeBMOmOyIb (1.8) (452829, CTL 44 LE - BXoNT B o6bEM noCTaBKn),TO 6yJeT pa6oTaTb aBTOMaTnKa BKJIoueHn IblJeYdaJIaIO- Ue Ro aIIapata B COueTaHn C nHeBMOHcTpymEn TAmr. PekomeHnyem yCTaHOBtB DOJOpHnTeIbHo y3eI NOrTOBKn cXaTOro BO3Dyxa VE (452797). DaHhBu y3eI NOrTOBKn cXaTOro BO3Dyxa OUn- Uaetero, IpomacInBaET I N03BOJraET peRynpoBAHne DaBLeHn BO3Dyxa. JIpaNcoEINHeHn INHeBMOHcTpymEntob Festool c cncTeMoI IAS y HAc NMeEtC coEHNHTelb IAS (454757). DJa OBecneueHn 6e3ynpueHOn pa6ToI aBTOMaTKn BKIoUeHn pa6Ouee daBLeHne IHcTpymenta DoJxHo 6bITb paBHo 66ap.
4 Pnucn DeiCTBna
4.1 OTKpbITb/3aKpbITb nbIeYda-JraUoUsn annapaT
- pa30mKHyTb 3aOpHbIe 3aIeJkn (2.2),
- OTKINHyTb BBepx BePxHIOu qAcTb aannapata (2.4) Do 3actOnopnbAHnO npobI (2.5).
3aKpbBaTb B o6paTHOM nopAKe.ДЯ npIXKaTnIu paCzepJIeHnO onOpbl Tpe6yEtc ChauJa cIeRka npINoDnAryB ePxHIOU qAcTb nbIeYdaJraUoero annapata.
4.2 3aMeHaΦnJIbTppa

Pn BbIIOJIHeHn CJIeDyUOuX pa6oT CJIeIITb 3a TeM, UTo6bI He pacIbJIaJaCb Nblb.
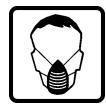
Ecni nbIb coepKNT BpeHbIe npImecn, noJIb30BaTbcra pecnnpaTopoM D2!
a) CmeHa MeuKa- nblnc6OpHnka (3.4)
N° 3aKa3a:
CTL 44 E/CTL 44 LE 452972
CTL55E 452973
-OTKpbITb nbIeYdaJIoUoN annapaT
- BbIHyTb IcNoJIb3OBAHHbI ΦnJIbTp-MeWOK (cM. yKa3aHHe Na ΦnJIbTp-MeWKe),
- yTnIu3npoBaTb nCNoJIb3OBAHHbI ΦnJIbTpMeUOK cOrJaCHO npEynCMOTpeHbIM HopMaM,
- NOIHOCTbIO OUHCTNTb rpr3eYIOBHTeJIb (2.10) I NOIocTb (3.1) IJRA Typ6nHbI OTCOca (npoTepeTB BIAJHOI TpIKNoI),
- BINOJNTb HOBbI ΦINbTp-MeWOk (cM. yKa3aHne Ha ΦINbTp-MeWke). BaxKHo: KpeNKo HaNAbVTb
Mуфту Фильтг-Мeшka (3.3) на BCасыВаюшпштуцр (3.2)!
- 3aKpbItb nbIeUdaJauoJn annapaT.
b) CmeHaΦnIbTpkyoUeTo ΘIeMeHtA (2.3)
N°3aKa3a: 452923
3a npeuaetcBbTjKka 6e3 nJbTpOBaJIbHOro 3JeMeHa! 3To MoKeT npNBecTu K nobpejdeHIO 3JeKtpoDbuRaTeIa.
- OTKpbITb nbIeuydajouo nn annapaT,
-ИЗВЛЕЧь ИСПОЛБ30ВАнHBи ΦИЛБТРОВАЛБНИ マЛЕМЕNT (сM.УКAZAHп Ha yPаКOBКe ΦИЛБТРОВАЛБНOrO эЛЕМЕNTa), - yTnIu3nPoBaTb NcNoJIb30BaHHbI ΦNJIbTpOBAJIbHbI ΘJIeMeHT, BINOJN B eRO B NblJeHepOnHucaeMbI 3aKpbITbI NaKeT, cOrJaCHo ppeDycmOTpeHbIM HopMaM,
- NOIHOCTbIO OUHCTnTB rpa3eYIOBNTeJIb (2.10) I NOLOCTb (3.1) dIy Typ6uHbI OTCocA (npoTepeTb BlaJXHO TpIKnO),
-yCTaHOBNTb HOBbI ΦnJIbTpOBAJIbHbI ΘJIeMeHT (cM. yKa3aHHe Ha yPaKOBKe ΦnJIbTpOBAJIbHOrO ΘJIeMeHTa), - 3aKpbItb nbIeUdaJIoUoi n aIInpaT.
4.3 OuNCTKaФиЛьТpoВаьHOrO 3JIeMeHTa
Дя оистк pyky (2.1) kaatb Bnepei-Ha3ad Ok. 10 pa3. ПрimeuaHne: oynctka ФильтpoBaJbHoro элем enta Tpe6yetc TolbkoВ TOM clyuae, ecIn nbileyuJaIauOu n annapaT pa6oTaET 6e3 Фильтmeшka.
4.4 OnopoxKHeHne nblIec6bOpHnka (2.10)
peed onopoxHeHem rpa3eyIobnteTne Tpe6yeTc
chauaLCHaTB BepxHIOU qactb nbIeYdaJIaHOeTo
annapata!
- OTKpbITb nbIleyeJaIaIouIe nnapapT,
- CJIerKa npHIOdHЯTb BepXHIOU qaCTb, npJxKaTb onopy (2.5),
- OTKINHyTb BepxHIOU yAcTb Do yNopa BBepx (Bep-TnKaJIbHoe nOLOXKeHne),
- CnTb BnepeiBepxHIOU qAcTb, yIepKINBaJ eE B Tropn30HTaJIbHOJ PLOCKOCTN,
- onopokhntb rpa3eyIobNTeJIb,
-BHObHacaIHTbBepXHIOU qactb.BHmAHHe: IoJIHoCTbIO BBeCTn 6a 6oITa BepxHeu qactn B npEHa3NaueHHbIe JIy HIX BbIeMKn (1.5)! - 3aKpbItb NblJeUdaJIoUan aInpapaT.
4.5 Повставka/Topmo3
Topmo3a (2.8) cnjxat dIЯ 6IoknpoBkn KoIec, yTo npeIoTbpaaet HekeJaTeJIbHyIO OTKaTky nbIleydaJIAHIOSeO aannapata.
4.6 0TceK dIy xpaHEny IJHaHra (B pa30-6paHHOM BnDE B KOMJIeKTe NOCTaBKn)
KpeIJIeHne oTceKa dJa xpaHeHnJ 7JHaHa nIbIeUdAJIaIooJem aIappate: cM. pnc. 4. IocLe OKOHuaHnJ pa6OtBi Bbl MoXeTe npOBecTN BCacBbAIOuIshIaHr cheE3 OTBepCTne (4.1) n pa3MeCTNb erO B OTcKe dJa xpaHeHnJ. CheE3 OTBepCTne (4.2) Bbl MoXeTe npOBecTN ceTeBOJ Ka6eJIb N TaKxpe pa3MeCTNb erO B OTcKe dJa xpaHeHnJ 7JHaHra.
5 PpIMeHHe
- Ha noJIke (1.9) moXHo 3aKpeNITb DByMra 3aNoPamn (1.11) Systainer. KpOme TOro, Ha noIky IN B KaPmaHbI (1.6) moXHo KlaCTb INHCTpyMeHTbl IN KOMnJIeKTyUOUsne DeTaIIIN.
- B OTBepCTne (1.7) MoXHo CTaBnTb DepeKaTeIb pyKaBa (1.10) (487072). DepeKaTeIi cIyKaT dIЯ NOIbOda OTCaCbIBaIOUeTo pyKaBa K INHcTpymEHTy CBepxY. IЯ HAMOTKn OTCaCbIBaIOUeTo IJIaHra IMeETcR B03MoXHOCtB IcNoJIb3OBaTb PeTJIIO dJIЯ IJIaHra (452998).
-PykoTka (2.11) (452921) obJeIeYaJIouSeIro aIappaTa. KpeIke (2.9) pykoTkn MOnKHO npIKpeIJIaTB KOMJIeKToUoIne DeTaII,HaIpIMep,OTcAsbIAOUsne Tpy6bl.
-Посл e BCTaBKn OTCaCbIbAIOUeTo WJaHra B BblDyBHOe OTBepCTne (2.7) nocTynae T Bo3dux npo-DyBKn.
5.1 OTCacbIbAHne cyxnx MaTepnaIOB
8 PrnHaJneJxKHOCTN,OnJIbTp
Homepa 3aka3a Дя пинадлжноctey n onlbtp Bbl haideTe B Baшем kaTalore Festool nInnВ INHTepHet no aDpecy „www.festool.com".
9 ytnln3aun
He BbI6paCbIbAaIe aannapat BmecTe C 6bITOBbIMn OTxOamn! Obecneyte 6e3OpacHyo dJa OkpyJxauoJe cpeBly yTNIIN3aUIO aannapata, OChactKn n ynpakOBKn. CoJIIOaIte DeiCTByUOuNe HaunOHaJIbHbIe npednncAHn.
10 TapaANTna
Для наших пиборов мblпрededoctabлгem rapанTию, распрocтpanяюшуюс Ha DeфeKТы MaTeprn-ala И пои3ВODCTBa, corlacho 3akOHoJaTeIbHbIMпрдпсанЯm, DeiCSTByUOuM B KOHKpeTHoIcTpaHe. Мнимальнь срok DeiCSTBnA rapaHTn 12 mecayeB. Для стpan-yuaCTHnC EC cPOKdeiCTBnA rapaHTn 24 mecya (pnpпрдьвileHn cheKa nll NaKlaJHO).Таразня He pacnpoctpanjaretca Ha nobpexkeHnna, noJyueHhIe B pe3yIbTaTe eCTeCTBeHHOro n3HoCA/ncNoIb-3OBaHnra, NepeRpy3Kn, HeHaJIeXaUeRo nCNoIb-3OBaHnra, nobpexkeHnna lo BIne NOpIb3OBaTeJЯ nII npN nCNoIb3OBaHnN BoPekn PykoBoDCTBy nO 3KcIpyatauNi, li6o n3BeCTHbIe Ha MoneHT nOKynK (yuEHNa ToBapa). NckJIuOaETcra TAKKe yUep6, BBi3BAHHbI nCNoJIb3OBaHnEM HeoprInHaJIbHOJ OCHactKN i paCxOndhIx MaTeprnAIOB (HaNPmEp, shInΦOBaJIbHbIX TapeLoK).
IpeTeH3nn npHnMaOTc T0lbKO B TOM clyuae, ecIn np6op DoCTaBLeH K NoCTaBUnky IInn ABTOPAHHbI cepBnCHbI ueHTp Festool B Hepa3o6paHnom BnDe. CoxpanyTe PykoOJCTBO nO 3KcPnyataun, HnCTpykUnn nO texHnKe 6e3Opacnoctn n TOBaphIyek. BoCTaJIbHOM deN
CTBOBaTb COJlaCHO COOTBETCTBYUOuM yCIOBnAm IpeIoCTaBJIeHnI rapaHTnN n3rTOBtTeJIa.
PpmeaHne
B CBra3n C NoCToHbIMN NCCJIeIOBaHnIaMn I HOBbIMn TexHnueCKmN pa3pa60TkaMn 0npMa oCTaBJIaTe 3a cO6oI npaBO Ha BHeceHne N3MeHeHnB TexHnueCKne XapaKTePncTnKn.
REACH pour n3deLNI Festool, nx ochTkn npacXoHbIX MaTePnaIIOB
C 2007 roda dinpektnBa REACHЯВяETcpeIamENTOM NO XIMNUeCKM BeUeCTBAM, DeIcTBYIOUM HaTeppntOpn Bce EBpOnbI. BbICtynaB PoJIN «PnBVeKaeMOrO yuactHnKa» 3TOro peIaMeHTa, Mbl, KaK npOn3BOINTEJN N3DeJIn, pRiHNMaem Ha Ce68ObraTeJIbCTBO PpeIOCTABJrTb COOTBeTCTBYIOUyUHOHΦOpMaIu HOshm KJIneHTAm. YTo6bl DEpXaTbBAC BV Kypce IocLeDnX Co6blTN IN PpeIOCTABJrTb HΦOpMaIu O BeUeCTBax, KOToPbIE BKJIouYeHbIBCNOCK BblSeUYOMaHrTO PeIaMeHTa IN KOTOpbIEMOrT NcNoJIb3OBaTbCSBBAH aShx N3dEJInx, Mbl C03-DAJIIN CpeZnaJIbHbI Be6-caIT:www.festool.com/reach