
POCKET DV AHD 200 - Portable digital camera AIPTEK - Free user manual and instructions
Find the device manual for free POCKET DV AHD 200 AIPTEK in PDF.
| Product type | Portable digital camera |
| Brand | AIPTEK |
| Model | POCKET DV AHD 200 |
| Image sensor | 5 megapixels (2592x1944) |
| Video resolution | HD (1280x720), D1 (720x480), CIF (352x240) |
| Photo resolution | 3M, 5M, 8M (interpolated) |
| Lens | F3.0, f=7.45mm |
| Digital zoom | 4x |
| LCD screen | 2.4 inches |
| External storage | SD/MMC card up to 32 GB SDHC |
| Battery | Rechargeable lithium (compatible NP60), battery life ~200 photos or 90 min HD video |
| Interface | USB 2.0 |
| TV output | Component HDTV, NTSC/PAL |
| Video file format | MOV (requires QuickTime or HD-DV DECODER) |
| Photo format | JPEG |
| Audio format | WAV |
| Main functions | HD video recording, photo, audio, TV recording, playback, digital zoom, flash, self-timer, white balance, effects (B&W, sepia), night photos |
| Power supply | Rechargeable lithium battery and USB power adapter |
| Care and cleaning | Clean with a soft dry cloth, avoid moisture and high temperatures |
| Safety | Do not disassemble, avoid shocks, use only original accessories |
| Spare parts and repairability | Removable battery, external memory card, available adapter and cables |
| General information | Manual available in several languages, included software (ArcSoft Digital Theatre, TotalMedia Studio MV, HD-DV DECODER) |
Frequently Asked Questions - POCKET DV AHD 200 AIPTEK
User questions about POCKET DV AHD 200 AIPTEK
0 question about this device. Answer the ones you know or ask your own.
Ask a new question about this device
Download the instructions for your Portable digital camera in PDF format for free! Find your manual POCKET DV AHD 200 - AIPTEK and take your electronic device back in hand. On this page are published all the documents necessary for the use of your device. POCKET DV AHD 200 by AIPTEK.
USER MANUAL POCKET DV AHD 200 AIPTEK
Dear user, thanks for purchasing this product.
Much investment in time and effort has gone into its development, and it is our hope that it will give you many years of trouble-free service.
Safety Notice:
- Do not drop, puncture or disassemble the camera; otherwise the warranty will be voided.
- Avoid all contact with water, and dry hands before using.
- Do not expose the camera to high temperature or leave it in direct sunlight. Doing so may damage the camera.
- Use the camera with care. Avoid pressing hard on the camera body.
- For your own safety, avoid using the camera when there is a storm or lightning.
- Do not use batteries of different specifications. Doing so may lead to the potential for serious damage.
- Remove the battery during long periods between usage, as a deteriorated battery may affect the functionality of the camera.
- Remove the battery if it shows signs of leaking or distortion.
- Use only the accessories supplied by the manufacturer.
- Keep the camera out of the reach of infants.
FCC Compliance Statement:
This device complies with Part 15 of the FCC Rules. Operation is subjected to the following two conditions: (1) this device may not cause harmful interference, and (2) this device must accept any interference received, including interference that may cause undesired operation.

This equipment has been tested and found to comply with limits for a Class B digital device, pursuant to Part 15 of the FCC rules. These lin
are designed to provide reasonable protection against harmful interference in residential installations. This equipment generates, uses, and can radiate radio frequency energy, and if not installed and used in accordance with the instructions, may cause harmful interference to radio communications.
However, there is no guarantee that interference will not occur in a particular installation. If this equipment does cause interference to radio or television equipment reception, which can be determined by turning the equipment off and on, the user is encouraged to try to correct the interference by one or more of the following measures:
-Reorient or relocate the receiving antenna.
-Move the equipment away from the receiver.
-Plug the equipment into an outlet on a circuit different from that to which the receiver is connected.
-Consult the dealer or an experienced radio/television technician for additional suggestions.
You are cautioned that any change or modifications to the equipment not expressly approved by the party responsible for compliance could void Your authority to operate such equipment.


Do not throw the appliance away with the normal household waste at the end of its life, but hand it in at an official collection point for recycling. By doing this you will help to preserve the environment.
Table of Contents
Getting Started. 1
Knowing your camcorder parts 1
Installing the battery. 2
Charging the battery 2
Inserting a memory card (optional) 3
Turning on/off your camcorder 3
Setting language 4
Setting time 4
Reading LCD indicators 5
Basic Operations 6
Recording a video clip 6
Taking a still picture 7
Recording a voice clip. 8
Recording TV program 9
Playing back your recordings. 10
Playing back your recordings on PC 11
Connecting the camcorder to TV 12
Advanced Operations 14
Menu operation 14
Menu items in Camera mode. 14
Menu items in Playback mode 15
Menu items in Setting mode 16
Battery Life Indicator 17
Battery Life. 18
Storage Capacity 18
Specifications 19
System Requirements 20
Appendix 21
Instruction for ArcSoft Digital TheatreTM 21
Instruction for ArcSoft TotalMediaTM Studio MV 22
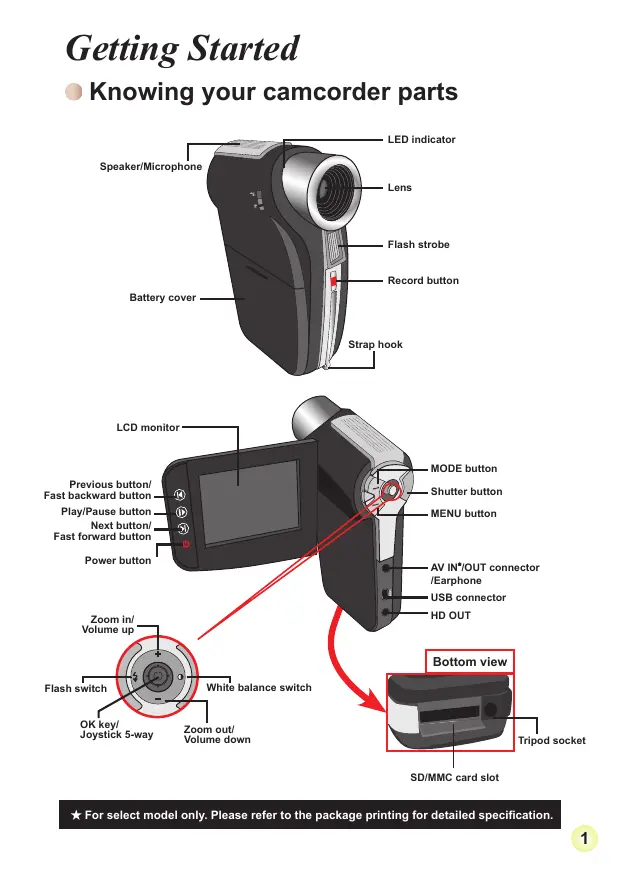
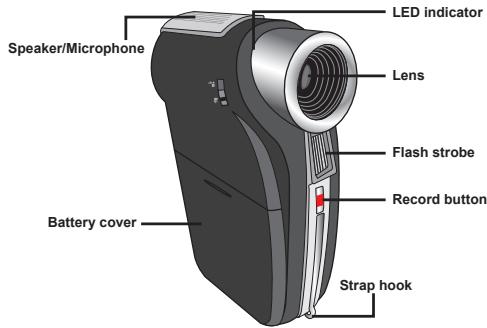
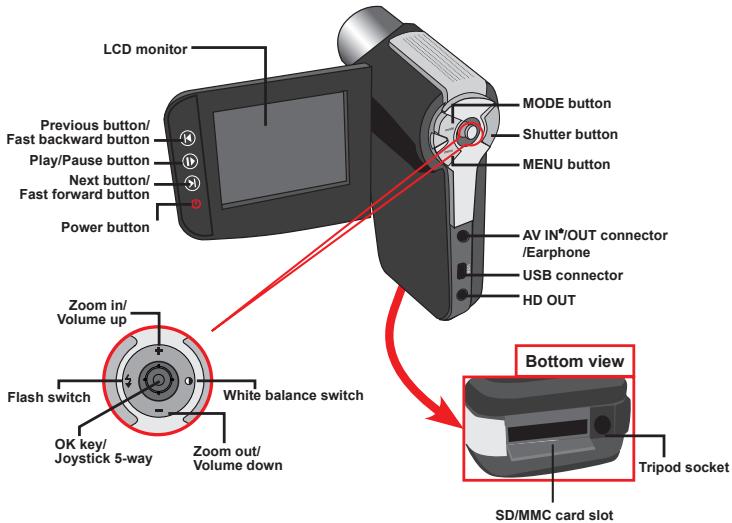
Getting Started
Knowing your camcorder parts
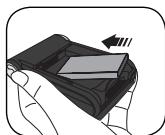
Installing the battery
- Slide the battery cover open as indicated.
- Place the accessory Li-Ion battery into the compartment. Note that the metallic contacts must be aligned with the contacts in the compartment.
- After the battery is properly installed, replace the battery cover.
- Charging the battery
Please charge the battery at least 8 hours for first time use.
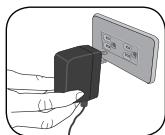
- Connect the cable.
Connect one end of the supplied AC adapter to the USB port of the camcorder and the other end to a wall outlet.
OR
Connect one end of the supplied USB cable to the USB port of the camcorder and the other end to a powered PC. Make sure the camcorder is powered off.
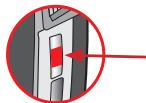
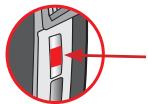
- The charging LED turns red and the charge starts.
- When the charging is interrupted or the battery pack is fully charged, the charging LED will turn green.
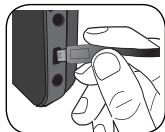

OR
When using a PC to charge the battery, do not power on the camcorder, or the charge will stop.
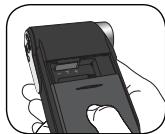
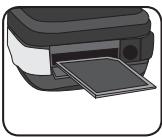
- Inserting a memory card (optional)
To insert a memory card, do the followings:
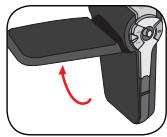
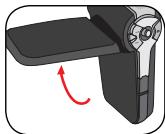
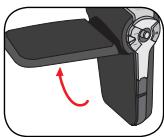
(1) Open the LCD monitor.
(2) Slide open the SD card cover.
(3) Gently push the card as indicated until the card reaches the bottom of the slot.
To remove the memory card, gently push the card and it will pop up. Then pull the card out of the slot.

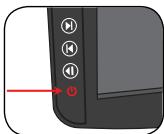
Turning on/off your camcorder
Open the LCD monitor or press and hold down the Power button for 1 second to turn on the camcorder.
To turn off the camcorder, press and hold down the Power button for 1 3 seconds or close the LCD monitor.

If the camcorder is not turned on after pressing the Power button, please check:
1. The battery pack is well installed in the camcorder.
2. The battery pack has enough power left.
If the camcorder stays inactive for a long period of time, it may automatically shut down due to the Auto-Off setting.
Setting language
- Power on the camcorder.
- Press the MODE key to enter the MODE menu.
- Use the Joystick switch to select the Setting mode and press OK to enter the menu screen.
- Use the Joystick to select the Language item, and then Press OK to confirm.
- Move the Joystick up/down to select a language.
- When done, press OK to confirm the setting.
Setting time
- Power on the camcorder.
- Press the MODE key to enter the MODE menu.
- Use the Joystick switch to the Setting mode and press OK to enter the menu screen.
- Use the Joystick to select the Date & Time item, and then Press OK to confirm.
- Move the Joystick up/down to adjust value. Move the Joystick left/right to shift between fields.
- When done, press OK to confirm the setting.
Reading LCD indicators
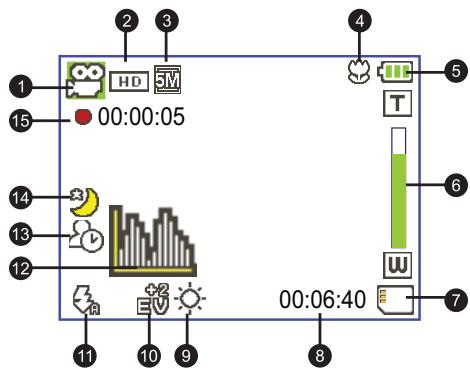
1 Mode icon
2 Video resolution
3 Picture resolution
4 Macro mode
5 Battery life
6 Zoom ratio indicator
SD card inserted
Remaining recordable time
9 While Balance mode
10 Exposure mode
11 Flash mode
12 Histogram mode
13 Selftimer mode
14 NightShot mode
15 Recording time
The LCD will display 16:9 ratio while setting as HD (720P) video resolution.
The LCD will display 4:3 ratio while setting as D1 (480P) or CIF video resolution. (Please refer to the page 7 for more detailed instructions.)
Basic Operations
Recording a video clip
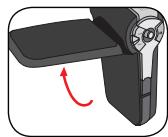
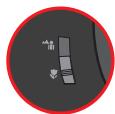
- Set the focus to an appropriate setting. Normally, you may set the focus to () for most filming conditions. Select (喜) only for close-ups.
Note: Please make sure your memory card is inserted before recording.
| 50cm ~ ∞ (20° ~ ∞) |
| 30cm ~ 50cm (12° ~ 20") |
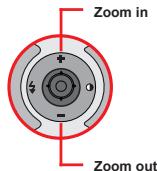
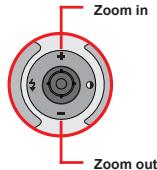
- Move the Zoom button up or down to zoom in or zoom out the screen. The digital magnification is 4X .
- Press the Record button to start recording.
- Press the Record button again to stop recording.
The zoom function is also available during recording
It's normal that the camcorder will feel slightly warm with continuous use / recording due to its high performance.
Taking a still picture
- Set the focus to an appropriate setting. Normally, you may set the focus to (喜) for most filming conditions. Select ( ) only for close-ups.
Note: Please make sure your memory card is inserted before recording.
| 50cm ~ ∞ (20" ~ ∞) |
| 30cm ~ 50cm (12" ~ 20") |
- Move the Zoom button up or down to zoom in or zoom out the screen. The digital magnification is 4X.
Adjust other advanced settings if necessary.

- Press the Shutter button to take a still picture.
Due to the sensor capture feature, the LCD preview and ratio of still picture capture will vary depending upon different video resolution settings. The image capture of the camera is set where as video resolutions are different.
| Video resolution | Preview | Taking pictures and focusing |
| HD(1280x720) | 16:9 ratio | 4:3 ratio |
| D1(720x480) | 4:3 ratio | 4:3 ratio |
| CIF(352x288) |
Recording a voice clip
- Power on the camcorder.
- Press the MODE key to enter the MODE menu.
- Use the Joystick switch to select the Voice Recorder mode and press OK to enter the menu screen.
- Press the Record button to start recording
- Press the Record button again to stop recording.

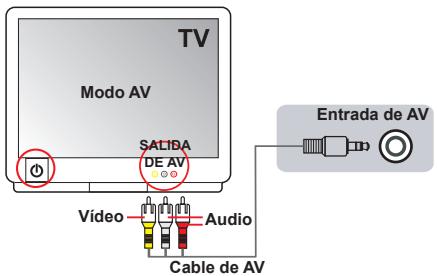
Recording TV program
The digital video recording technology allows you to record TV program via AV-IN cable.

- Turn on your TV or DVD player.
- Connect the AV cable to the AV-Out terminal on the TV or DVD player. (Normally, it's not necessary to switch the mode, please refer to the User's Manual of the TV or DVD player.)
- Power on the camcorder.
- Connect the audio and video ends of the AV cable (yellow/white/red color) to the TV "AV-OUT" jacks.
- Connect the other end of the AV cable to the "AV In" port on your camcorder. When the pop-up message appears on the screen, please select "AV-IN".
- Make sure that the images displayed on the TV or DVD player is also displayed on the camera's LCD.
- Press the Record button to start recording.
- Press the Record button again to stop recording.
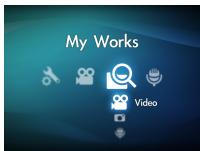
Playing back your recordings
- Press the MODE button and use the Joystick to switch to "My Works" mode.
Or press the Play/Pause button (▶) on the left side of the LCD monitor.
- There are three folders below My works: Video, Picture, and Voice. Select Video, Picture or Voice, and then press the OK key to enter the index mode.

- Operations in playback mode:
| File type | How to... | Action |
| Index mode 00020012 Full-screen mode 00020012 | Shift between Index mode and Full-screen mode | In Index mode, press the OK key to switch to Full-screen mode. In Full-screen mode, press the MENU button to switch to Index mode. |
| Shift between files | 1. In Index mode: Use the Joystick to move the highlight box. 2. In Full-screen mode: Use the Joystick to move left or right. | |
| Video & Audio | Start playing | When selected (in full-screen mode), the file automatically starts playing. |
| Pause/Resume playing | During playing/While paused, press the OK key. | |
| Adjust the volume level | During playing, use the Joystick to move up or down. | |
| Stop playing | During playing, press the MENU button. | |
| Return to the preview screen | Press the Shutter button. | |
| Fast forward | During playing, press the Next (H) button. To stop, press the Play/Pause (Ib) button. | |
| Fast backward | During playing, press the Previous (H) button. To stop, press the Play/Pause (Ib) button. | |
| Select the next file | While paused/stopped, press the Next (H) button. | |
| Select the previous file | While paused/stopped, press the Previous (H) button. | |
| Picture | Zoom in/out | Use the Joystick to move up or down. |
| Lock/Release zoom ratio | When the zoom ratio is greater than 1.0x, press the OK key. | |
| Browse the enlarged picture | When the zoom ratio is locked, use the Joystick to browse the picture. |
- Playing back your recordings on PC
Installng software
Please notice that the recorded videos are .mov format. So you need some special programs to view the recordings on PC. For first time use, please make sure you have QuickTime 7.0 player on your PC. If not, Please follow the below instructions to install the software first.
Please download the QuickTime 7.0 player from the below website: http://www.apple.com/quicktime/download/win.html
OR
Please install the HD-DV DECODER program on the bundled CD. (* HD-DV DECODER is designed for playing back the .mov files recorded by our camcorder with Windows Media Player 10 & 11.)
Connecting PC and Save files
After the software is properly installed on your PC, please follow below procedures.
- Turn on the camcorder.
- Connect the camcorder (with SD card inserted) to your computer with the USB cable.
- A dialogue window will appear automatically. Please select the item "Open folder to view files" and click "OK".
- If the dialogue window does not appear automatically, you may double click on "My computer" and open the "Removable Drive".
- Double-click on the DCIM file folder.
- Double-click on the 100MEDIA file folder.
- Copy the files you wish to keep and save them to the desired location on your computer.
Connecting the camcorder to TV
Please follow the below instructions to connect your camcorder and TV via accessory AV cables for real-time display. You can display your video clips and still pictures on your TV, sharing them with your friends and family.
Connecting the camcorder to HDTV
HD TV hereby means the HDTV built-in component input ports, thus can perform HD (720P) high resolution quality while connected.
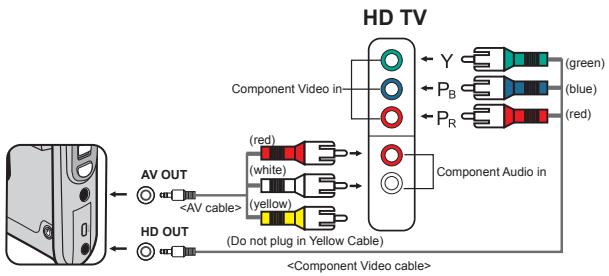
- Turn on your HD TV.
- Turn on the Camcorder.
- Plug one end of the component video cable into the (Component Video IN) port on the HDTV and the other end into the (HD OUT) port on Camcorder.
- Plug one end of the other AV cable into the (Component Audio IN) port on the HDTV and the other end into the (AV OUT) port on Camcorder. (Please do not plug in the yellow connector to HDTV's AV-IN.)
- Press the input switch mode on HD TV and select "Component Input".
If you record an HD resolution clip while connected to your HD TV, the TV display video resolution will down size to D1 (480P) resolution due to data bit rate, but the recorded file will remain HD (720P) with no change.
When connecting to TV, the Zoom function is not available.

Connecting the camcorder to Standard TV
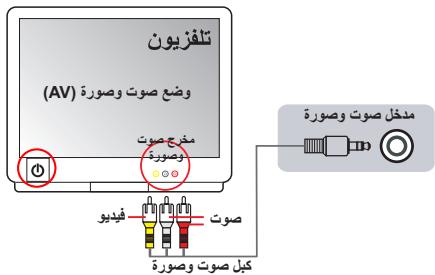
TV = Traditional CRT TV
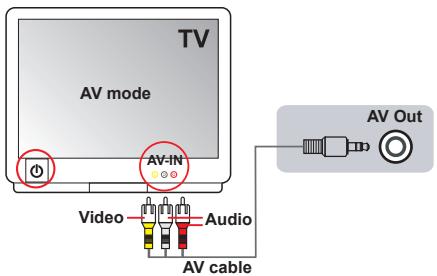
- Power on your TV and switch the TV to AV mode.
- Connect the audio and video ends of the AV cable (yellow/white/red color) to the TV "AV-IN" jacks.
- Power on the camcorder.
- Connect the other end of the AV cable to the "AV out" port on your camcorder. When the pop-up message appears on the screen, please select "AV-Out".
Advanced Operations
Menu operation
The menu items provide several options for you to fine-tune your camera functions. The following table gives details on menu operations.
| How to... | Action |
| Bring up the menu | Press the MENU button. |
| Move the highlight bar | Use the Joystick to move up or down. |
| Enter sub-menu/Confirm an item | Press the OK key. |
| Exit menu/Go back to upper menu | Press the MENU button (when in sub-menu). |
- Menu items in Camera mode
Power-on Press the Menu button.
| Item | Option | Description |
| Video resolution | HD | Set the video resolution to HD (1280x720 pixels). |
| D1 | Set the video resolution to D1 (720x480 pixels). | |
| CIF | Set the video resolution to CIF (352x240 pixels). | |
| Picture Resolution | 3M | Set picture resolution to 3 mega pixels. |
| 5M | Set picture resolution to 5 mega pixels. | |
| 8M | Set picture resolution to 8 mega pixels. | |
| NightShot | On/Off | Enabling this setting allows you to take a photograph with a dark background. Since the shutter speed will slow down when taking photographs at a dark place, we recommend using a tripod to eliminate blurring from hand shake. Warning: Noise increases when NightShot is enabled. |
| WB | Auto | The camera automatically adjusts white balance. |
| Sunny | This setting is suitable for outdoor recording in sunny weather. | |
| Cloudy | This setting is suitable for recording in cloudy weather or shady environments. | |
| Fluorescent | This setting is suitable for indoor recording with fluorescent lamp lighting, or environments with high color temperature. | |
| Tungsten | This setting is suitable for indoor recording with incandescent lamp lighting, or environments with low color temperature. |
- Menu items in Camera mode (continued)
| Item | Option | Description |
| Flash Strobe | On | The flash is forced to fire in every shot. |
| Auto | The flash automatically fires when the lighting is insufficient. | |
| Off | The flash is disabled. | |
| Effect | Normal | Make recordings in natural color. |
| B&W | Make recordings in black and white. | |
| Classic | Make recordings in sepia-toned color. | |
| Exposure | -2~+2 | Manually adjust the exposure to gain better effect when the preview image appears too bright or too dark. A positive value indicates the image will be brighter than usual; while a negative value makes the image dimmer. |
| Selftimer | On/Off | Enable/Disable the selftimer. After the selftimer is turned on, the camera will have ten seconds delay before recording when the Shutter button is pressed. |
| Histogram | On/Off | Enable/Disable image histogram display on the screen. |
| Icon | On/Off | Enable/Disable OSD (on screen display) icons to display on the screen. |
- Menu items in Playback mode
Power-on Press the MODE button Use the Joystick to switch to My Works mode Select Video, Picture or Voice folder Press the OK button Press the MENU button.
| Item | Option | Description |
| Delete One | Yes/No | Delete current file. |
| Delete All | Yes/No | Delete all pictures and video.audio files stored in the memory. |
| Slide Show/Video play | - | The camera displays images/video clips in sequence. You can press the OK key to stop the slide show/video play. |
| Lock | Yes/No | Single, multiple, or all files can be locked. A locked file cannot be erased by a delete function. While the formatting function will erase all locked/unlocked files. |
- If there are no files in the camera, no items will be seen.
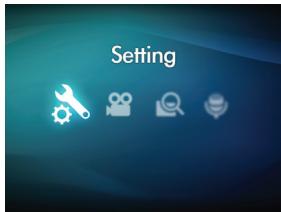
- Menu items in Setting mode
Power-on Press the MODE button Select the Setting ( ) mode Press the OK button.
| Item | Option | Description |
| Date & Time | - | Set date and time. |
| Beep | On/Off | Enable/Disable beep sound. |
| Flicker | 50Hz | Set flicker frequency to 50Hz*. |
| 60Hz | Set flicker frequency to 60Hz*. | |
| TV-Out | NTSC | Set TV system compatibility to NTSC. This option is suitable for America, Taiwan, Japan, and Korea areas. |
| PAL | Set TV system compatibility to PAL. This option is suitable for Germany, England, Italy, Netherlands, China, Japan, and Hong Kong. | |
| Icon | On/Off | Enable/Disable OSD icons to display on the screen. |
| LCD Bright | -2~+2 | Set LCD brightness. A positive value makes the LCD brighter; while a negative value makes the LCD dimmer. |
| Format | Yes | Format the storage medium. Note that all files stored in the medium will be gone. |
| No | Cancel action. | |
| Auto Off | Off | Disable Auto-off function. |
| 1 min | The camera automatically shuts down when staying inactive for over 1 minute. | |
| 3 min | The camera automatically shuts down when staying inactive for over 3 minutes. | |
| 5 min | The camera automatically shuts down when staying inactive for over 5 minutes. | |
| Language | - | Lets you select the language used for OSD. |
| Default | On | Restore factory defaults. Note that your current settings will be overridden. |
| Off | Cancel action. |

Menu items in Setting mode (continued)
- Flicker settings table:
| Region | England | Germany | France | Italy | Spain | Netherlands | Russia |
| Setting | 50Hz | 50Hz | 50Hz | 50Hz | 50Hz | 50Hz | 50Hz |
| Region | Portugal | America | Taiwan | China | Japan | Korea | Thailand |
| Setting | 50Hz | 60Hz | 60Hz | 50Hz | 50/60Hz | 60Hz | 50Hz |

Battery Life Indicator
| Icon | Description |
| Full battery life | |
| Moderate battery life | |
| Low battery life * The flash strobe and the LED lights will be disabled." | |
| Empty battery life |
Note: To avoid sudden outage of power supply, you are recommended to replace the battery when the icon indicates low battery life.
Battery Life
| Still picture | Video clip |
| Number of shots | Recording time (minute) |
| 200 | 90 |
| * shoot every 30 seconds ** flash is off *** resolution is set to 5M (2592x1944) | * resolution is set to HD (1280x720 pixels) |
Note: This table is for your reference only. The actual battery life depends on your battery type and recharge level.
Storage Capacity
| Memory | Video (min.) | Still picture | ||||
| HD | D1 | CIF | 8M | 5M | 3M | |
| SD card (256MB) | 7 | 18 | 40 | 95 | 145 | 230 |
| SD card (512MB) | 15 | 36 | 80 | 190 | 290 | 460 |
| SD card (1GB) | 30 | 72 | 160 | 380 | 580 | 920 |
| SD card (2GB) | 60 | 144 | 320 | 770 | 1160 | 1840 |
| SD card (4GB) | 120 | 288 | 640 | 1540 | 2320 | 3680 |
Note: The actual value of capacity may vary (up to ± 30% ) depending on the color saturation and complexity of your subject and surroundings.
| Item | Description |
| Model | 5 Mega-pixel camera |
| Image sensor | 5 Mega (2592x1944 pixels) |
| Resolution | Still image: 3M/5M/8M 1280x720 (HD) 720x480 (D1) 352x240 (CIF) |
| Lens | Fixed lens (F3.0; f=7.45mm) |
| File format | MOV, JPEG, WAV |
| Video frame rate | 1280x720, up to 30fps 720x480, up to 30fps 352x240, up to 30fps |
| External memory | SD/MMC card (up to 32GB SDHC) |
| LCD display | 2.4" LCD |
| Digital zoom | 4X |
| TV out | HDTV Component out, NTSC/PAL system supported |
| Interface | USB 2.0 |
| Microphone | Yes |
| Speaker | Yes |
| Nightshot | Yes (both in still image and video modes) |
| Battery | NP60 compatible Li-ion rechargeable battery |
Note: Specifications are subject to change without notification.
System requirements are different in different video resolution settings:
| Video Resolution | PC system requirements |
| HD (1280x720) @30fps | OS = Windows XP SP2, Vista or above (QuickTime 7.0 or above) CPU = Pentium 4 3.0GHz or above System RAM = 512MB (1GB recommended) Display card = nvidia Geforece 7600 or ATI X1600 or above with 256MB of RAM |
| D1 (720x480) @30fps | OS = Windows 2000/XP, Vista or above (QuickTime 7.0 or above) CPU = Pentium 4 1.5GHz or above System RAM = 256MB (512MB or above recommended) Display card = 64MB (128MB or above recommended) |
| CIF (352x240) @30fps |
Appendix
Instruction for ArcSoft Digital TheatreTM
Introduction
ArcSoft Digital Theatre is a high-quality media playback application that enhances your viewing experience.
Using the Program
Here you can find a summary of all available buttons and controls.
You can also Right-clicking the video screen to access many of the same controls in menu format.
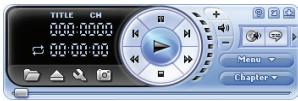
Basic Controls
| Play |
| Stop |
| Pause |
| Previous Chapter |
| Next Chapter |
| Rewind |
| Fast Forward |
Tool Bar
| Select source | |
| Eject/Close | |
| Setup | |
| Capture Image |
Menu, Chapter, and Extend Buttons
| Menu | Menu | Displays all DVD menus. |
| Chapter | Chapter | Displays all DVD chapters. |
| Extend | Opens subpanels for accessing secondary DVD/VCD navigation controls or video/album settings. |
Help, Hide, and Attach Icons

| Help | Open this Help file. |
| Hide | Hides the main control panel. |
| Attach | Attaches the main control panel to the palyback screen. To detach it, click the button again. |
Instruction for ArcSoft TotalMediaTM Studio MV
Introduction
Welcome to ArcSoft TotalMedia™ Studio MV, a fun and easy-to-use program that lets you make amazing, customized DVD movies!
Get Media
The first step in making your movie involves choosing and/or creating the media you want to include.
Insert Media Files
By clicking the relevant button, you can browse your system for video clips and add them to your movie. Each file you select is added as a separate chapter. To input a custom chapter name, simply double-click on the chapter title.
Cutting / Authoring Room
This area allows you to trim the beginning and the end of each video clip added to your project. You can also import video frames and use them as chapter thumbnails. Standard playback controls can be used when trimming your video:
- Use the preview controls (i.e. play/pause/forward/backward) to move to the beginning of the part that you'd like to trim.
Note: For videos longer than 10 minutes, a "seek" bar will appear beneath the time bar to indicate the current position of the video.
- Click the "Mark In" button.
- Use the preview controls (i.e. play/pause/forward/backward) to move to the end of the part you'd like to trim.
- Click the "Mark Out" button to define the area to be trimmed from your video.
Note: You can remove multiple sections of a video by repeating steps 1-4.
- Use the Undo/Redo button when you make a mistake.
- Press the "Clear All" button to remove all trimmed areas and restore the video to its full length.
- The "Go to" buttons can be used to jump to the previous or the next edit on the timer.
- Set as Menu Button
Using the Play/Pause controls, click "Pause" when you come to the scene that you want to use for your chapter button, and then click on the arrow icon next to the preview area.
- Merging
This function allows you to merge several video clips.
- Export
This function provides options for video parameter settings and then save as one file.
Create New Media Files
Here you can add a new submenu or text layer to the selected media file.
- Submenu
Create a new submenu within selected menus.
- Text
Add a text layer to the selected slide. You will have the same text options as you do when entering the menu title.
Design
In this step, you can change how you want your movie menu to look. This includes changing the background design, inputting your own movie and chapter titles, and rearranging the layout of the chapter buttons.
Preview/Produce
When you're finally ready to burn your creation to disc, follow these steps:
Preview
Use the preview controls at the bottom of the screen to preview your movie before burning it to disc.
Produce
When you're ready to create your disc, please click the "Burn" button, and the "Produce" window will appear:
- Input a name for the disc.
- Choose a TV standard you wish to use (NTSC for US or Japan, or PAL for Europe or China).
- Choose a destination to save the movie you compiled, select either a disc burner or your hard drive.
http://www.apple.com/quicktime/download/win.html
ou
http://www.apple.com/quicktime/download/win.html
OPPURE
Grabar programas de television 9
- Grabar programas de television
La和技术 de grabación de video digital permite grabar programs de television mediante un cable de ENTRADA DE AV.
Note: Please make sure your memory card is inserted before recording.
| 50cm ~ ∞ (20" ~ ∞) |
| 30cm ~ 50cm (12" ~ 20") |
http://www.apple.com/quicktime/download/win.html
LUB
http://www.apple.com/quicktime/download/win.html
未は
SisstgEgKsagHnHnHnHnHnHnHnHnHnHnHnHnHnHnHnHnHnHnHnHnHnHnHnHnHnHnHnHnHnHnHnHnHnHnHnHnHnHnHnHnHnHnHnHnHnHnHnHnHnHnH
| 버DI오 채상모 | PC 사(st em 優 于 2000 50% 100% 90% 80% 60% 40% 30% 20% 10% |
| HD (1280x720) @30fps | OS = Windows XP SP2 & Vista 2018 (QuickTime 7.0 2018) CPU = Pentium 4, 3.0 GHz 2018 사(st em RAM = 512 MB (1 GB 2018) 다(st em래이 친드 = 256 MB RAM을 키우고 nVidia GeForce 7600 boot는 ATI X1600 2018 OS = Windows 2000/XP & Vista 2018 (QuickTime 7.0 2018) CPU = Pentium 4, 1.5 GHz 2018 사(st em RAM = 256 MB (512 MB 2018 2018) 다(st em래이 친드 = 64 MB (128 MB 2018 2018) |
| D1 (720x480) @30fps | OS = Windows 2000/XP & Vista 2018 (QuickTime 7.0 2018) CPU = Pentium 4, 1.5 GHz 2018 사(st em RAM = 256 MB (512 MB 2018 2018) 다(st em래이 친드 = 64 MB (128 MB 2018 100% 2018 2018 2018 2018 2018 2018 2018 2018 2018 2018 2018 2018 2018 2018 2018 2018 2018 2018 2018 2018 2018) |
| CIF (352x240) @30fps |
早
ArcSoft Digital TheatreTM
山
Bocnpo3BeJeHne 3aIncesn npocmOTp CHIMKOB Ha PIK
UcTaHOBKa InporpaMMHOrO oBecneHnA
06patneBHHMHe, Bideo3aHncb ocyueCTBnreTcB fopmate .mov.ДпяпсмOTra 3aIacneHЯ пКн HeO6xodmbl cIeuaIaIbIbIe npoRpaMMbl.ПппрвOM ИпОьзOBAHm ybeIeNTc, до NaK YcTahOBHn e npRpyBaTeIb QuickTime 7.0.EcInnpovRpbBatert He yctahOBHn, dnyeCTAHOBKn npOrpamMHorO obecneuHn CcIeYIte npNBeDEHN MHIke INCHTPKUIM.
3aqrhy3ne IpoirpmbateKiteQuickTime 7.0 cnpbdeHNO HNEe Be6-cAeta: http://www.apple.com/quicktime/download/win.html
NIN
UstaHOBtBE nporpamMy HD-DEV DECODER c KOMNAKT-Dncka, BxOJaIeBO B KOMJIeNt NOCTABN.
(°PtoIrpBbATEbn HD-DV DECODER npednHa3aHEn IЯь BocpOu3eDENH phaIOB φoMpTa m. mov, 3aNcAHHbx kAmepo C noJdePckKoi pOINpBbATEB Windows Media 10 n 11.)
PnmeuHnabTaeBtBnBnBnBnBnBnBnBnBnBnBnBnBnBnBnBnBnBnBnBnBnBnBnBnBnBnBnBnBnBnBnBnBnBnBnBnBnBnBnBnBnBnBnBnBnBnBnBnBnBnB
EMKoCTb HocHTeJe
a a a a a a a a a a a a a a a a a a a a a a a a a a a a a a a a a a a a a a a a a a a a a a a a a a a a a a a
a jiall 1jai jia jia jia jia jia jia jia jia jia jia jia jia jia jia jia
j 1 j 1 j 1 j 1 j 1 j 1 j 1 j 1 j 1 j 1 j 1 j 1 j 1 j 1 j 1 j 1 j 1 j 1 j 1 j 1 j 1 j 1 j 1 j 1 j 1 j 1 j 1 j 1 j 1 j 1 j
jll jia jia jia jia jia
yI 1 yI 1 I I I I I I I I I I I I I I I I I I
j
yI 1.
Jaaalll aae 12, jaaal l aai all Jaaal l Jaaal
Jy 1
.
Aagac gaa 1y y
.
()

:dll l 1 j 1 0 s j 1 1
.LCD 1
.SD aLb. 10a
aill Jai jai jai g uuuiy uua aue y
Aaill aaiall lal
gall 1 yols

jlll lllllllllllllllllllllllllllllllllllllllllllllllllllllllllllllllllllllllllll
S OBC = S AOB + S_ BOC
1 1 1 1 1 1 1 1 1 1 1 1 1 1 1 1 1 1 1 1 1 1 1 1 1
.LCD 1
i 1
-
-
-
-
-
-
-
-
-
-
-
-
-
-
-
-
-
-
-
-
- 1.
-
-
-
-
-
-
-
-
-
-
-
-
-
-
-
-
-
-
-
aalbll jol 15
aai jki kui lii iaiy aai ybi dai yie gai jai ai
(.Auto-Off)
1 1
gall 1
OK biol, biol ciog jisil pail jiai piu
Aailll aill lI Jssll
ok
aill jaiy/ jiey jao yjuy 0
baill l aol OK 1e bainally ae ellis je eaiy

1 1
(a) (a) (a) (a) (a) (a) (a) (a) (a) (a) (a) (a) (a)

()j5jill baiu dkiy isle .wlll lgl j5jill baiu p-1
Aolj000000000000000000000000000
Gg 1
Aalll
aill 1
aaiy gaiyall gaiy jiyiy yaiy jaiy iaiy
Aailll aaiu uol OK
Jill Jill
Jusill ayac jg jol o yu jll bldol-0
jai jzj
AVIN"
(DVD) a
j j j j j j j j j j j j j j j j j j j j j j j j j j j j j j j j j j j j j j j j j j j j j j j j j j j j j j
aai jai jai jai
jolall jlll lglg jll glll
aai jll aai jai jai jai jai
-
-
-
-
-
-
-
- 1.
-
-
-
-
-
-
(1/1/1/1/1/1/1/1/1) 0gall gall gall k gall gall gall gall gall gall
a "AV-OUT"
(AVIn"Ogssall gssall jdo dioo oosall jdo jdo jdo jdo
AVIN 15
aiaaa aaii iiall aljia jy jil 1gge aiaagall gao
a aalaa aalaa aalaa aalaa aalaa
jill jil
Jusill aiee y jol oJ " Jssj jll bial
alaaal gblal jaii sla!
"glie" gai juiui jiuui jiuui jiuui jiuui
aalal alal alal alle ( ) aalal / jlll alal
.LCD
j j j j j j j j j j j j j j j j j j j j j j j j j j j j j j j j j j j j j j j j j j j j j j j j j j j j j j
Jgall gll Jgall OK clal glg jgal
:duill 1
jigssll jgs gacgaaal gblal jiei 1
http://www.apple.com/quicktime/download/win.html
g
"AV out" 10000000000000000000000000000000000000000000000000000000000000
| الإستعمال | الإستعمال |
| الإستعمال ب everyday�� | |
| الإستعمال ب everyday�� | |
| الإستعمال ب everyday�� | |
| LED LED LED LED LED LED LED LED LED LED LED LED LED LED LED LED LED LED LED LED LED LED LED LED LED LED LED LED LED LED LED LED LED LED LED LED LED LED LED LED LED LED LED LED LED LED LED LED LED LED LED LED LED LED LED LED LED LED LED LED LED LED LED LED LED LED LED LED LED LED LED LED LED LED LED LED LED LED LED LED LED LED LED LED LED LED LED LED LED LED LED LED LED LED LED LED LED LED LED LED LEDLed LED LED LED LED LED LED LED LED LED LED LED LED LED LED LED LED LED LED LED LED LED LED LED LED LED LED LED LED LED LED LED LED LED LED LED LED LED LED LED LED LED LED LED LED LED LED LED LED LED LED LED LED LED LED LED LED LED LED LED LED LED LED LED LED LED LED LED LED LED LED LED LED LED LED LED LED LED LED LED LED LED LED LED LED LED LED LED LED LED LED LED LED LED LED LED LED LED LED LED LEDs | |
| الإستعمال |
Jaaiaia aaiial yae jaiyaiyaiyaiyaiyaiyaiyaiyaiyaiyaiyaiyaiyaiyaiyaiyaiyaiyaiyaiyaiyaiyaiyaiyaiyaiyaiyaiyaiyaiyaiyaiyaiyaiyaiyaiyaiyaiyaiyaiyaiyaiyaiyaiyaiyaiyaiyaiyaiyaiyai
ArcSoft Digital TheatreTM
四边形 AOBC 为正方形
Ae aee eae ee eae eae eae eae eae eae eae eae eae eae eae eae eae eae eae eae eae eae eae eae eae eae eae eae eae eae eae eae eae eae eae eae eae eae eae eae eae eae eae eae eae eae eae eae eae eae eae eae eae eae e ae
calal
Czal glll j glall lglll jll "gll dai j j iinj
"uiill" jS bio
jilolaii jiyisiall gail lglgillie "cga cia" gajial iiaiaiaiaiaiaiaiaiaiaiaiaiaiaiaiaiaiaiaiaiaiaiaiaiaiaiaiaiaiaiaiaiaiaiaiaiaiaiaiaiaiaiaiaiaiaiaiaiaiaiaiaiaiaiaiaiaiaiaiaiaiaiaiaiaiaiaiaiaiaia
Aiaaaiiae aieae jaoaegaae jaojao jaii ayd yalall Jauill
a a a a a a a a a a a a a a a
y
121 y 1
Syyu Lyu Lydu elui

Jisall llll cai jay aye jiaa stal kay li
a#jaiai
a jisall pial lal jla syy aye je aai eli jlln no jssy
ailll lice iie aia nss gill aaiil clll alaln nnns.

g jll g h i j 1i j j j j j j j j j j j j j j j j j j j j j j j j j j j j j j j j j j j j j j j j j j j j j j j j j
Jgall jll yalil baiill lgl 1, gail n jyic

ailll lalllg 100dla aulily cua la uil 1jai jalnlaie

a jaii ie aai iiaai aiieal aiieal iaiai gai ayaiai aiaii

"cllll lllll 1111 1111 1111 1111 1111 1111
Jall Jd
PAL NTSC)
aall a jai jai jai Jauo la jisi aysi cyi gill ai jial lai jisi
http://www.apple.com/quicktime/download/win.html