
POCKET DV T300 LE - Portable digital camera AIPTEK - Free user manual and instructions
Find the device manual for free POCKET DV T300 LE AIPTEK in PDF.

| Product Type | Portable Digital Camera |
| Brand | AIPTEK |
| Model | POCKET DV T300 LE |
| Power Supply | 2 AA batteries (not included) |
| Storage Media | Internal memory + SD/MMC card (up to 2 GB recommended) |
| Photo Resolution | Up to 12 MP (interpolated), modes 10M/12M |
| Video Resolution | VGA (640x480) / QVGA (320x240) |
| Display | Color LCD (estimated 2.4 inches) |
| Built-in Flash | Auto, Forced, Off |
| Zoom | Digital with smart zoom |
| White Balance | Auto, Sunny, Cloudy, Fluorescent, Tungsten |
| Effects | Normal, Black & White, Sepia |
| Exposure | -2 to +2 |
| Self-Timer | 10 seconds |
| TV Output | NTSC/PAL via included AV cable |
| USB Connection | Yes, disk or camera modes |
| Additional Functions | Voice recording, PC Camera, Histogram, Two-in-One, Photo frame |
| Included Software | ArcSoft MediaConverter |
| OSD Languages | French, English, German, Spanish, Italian, etc. |
| Dimensions (estimated) | Approximately 10 x 6 x 3 cm |
| Weight (estimated) | Approximately 150 g (without batteries) |
| Maintenance | Clean with a soft, dry cloth. Avoid moisture. |
| Safety | Use recommended batteries. Remove batteries if not used for a long time. |
Frequently Asked Questions - POCKET DV T300 LE AIPTEK
User questions about POCKET DV T300 LE AIPTEK
0 question about this device. Answer the ones you know or ask your own.
Ask a new question about this device
Download the instructions for your Portable digital camera in PDF format for free! Find your manual POCKET DV T300 LE - AIPTEK and take your electronic device back in hand. On this page are published all the documents necessary for the use of your device. POCKET DV T300 LE by AIPTEK.
USER MANUAL POCKET DV T300 LE AIPTEK
- Do not drop, puncture or disassemble the camera; otherwise the warranty will be voided.
- Avoid all contact with water, and dry hands before using.
- Do not expose the camera to high temperature or leave it in direct sunlight. Doing so may damage the camera.
- Use the camera with care. Avoid pressing hard on the camera body.
- For your own safety, avoid using the camera when there is a storm or lightning.
- Do not use batteries of different specifications. Doing so may lead to the potential for serious damage.
- Remove the battery during long periods between usage, as a deteriorated battery may affect the functionality of the camera.
- Remove the battery if it shows signs of leaking or distortion.
- Use only the accessories supplied by the manufacturer.
- Keep the camera out of the reach of infants.
FCC Compliance Statement:
This device complies with Part 15 of the FCC Rules. Operation is subjected to the following two conditions: (1) this device may not cause harmful interference, and (2) this device must accept any interference received, including interference that may cause undesired operation.
This equipment has been tested and found to comply with limits for a Class B digital device, pursuant to Part 15 of the FCC rules. These limits are designed to provide reasonable protection against harmful interference in residential installations. This equipment generates, uses, and can radiate radio frequency energy, and if not installed and used in accordance with the instructions, may cause harmful interference to radio communications.
However, there is no guarantee that interference will not occur in a particular installation. If this equipment does cause interference to radio or television equipment reception, which can be determined by turning the equipment off and on, the user is encouraged to try to correct the interference by one or more of the following measures:
-Reorient or relocate the receiving antenna.
-Move the equipment away from the receiver.
-Plug the equipment into an outlet on a circuit different from that to which the receiver is connected.
-Consult the dealer or an experienced radio/television technician for additional suggestions.
You are cautioned that any change or modifications to the equipment not expressly approved by the party responsible for compliance could void Your authority to operate such equipment.
*Environment:
Do not throw the appliance away with the normal household waste at the end of its life, but hand it at an official collection point for recycling.
By doing this you will help to preserve the environment.


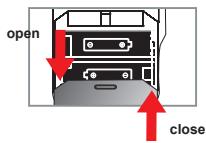
Loading the battery
Please use two AA batteries.
- Slide open the battery compartment cover as indicated.
- Load the batteries into the battery compartment with + and - ends correctly installed.
- Replace the cover.

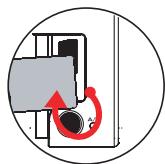
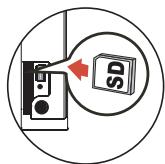
Inserting the SD/MMC card (optional)
- Lift the SD card cover.
- Insert the card in the direction of indication until it reaches the end of the slot.
- When using a SD card, the built-in memory will become inaccessible.
- To remove the SD card, gently push the card until it pops up.

The serial number of the file name (PICTxxxx) will be counted continuously even you delete all files on the SD card or insert a new one. If you want to restart the serial number, please use the camcorder "Format" function to format the card.
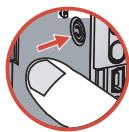
Turning on the camcorder
Open the LCD panel.
OR
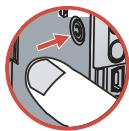
Press and hold down the Power button ( 出 ) for 3 seconds.
Turning off the camcorder
Close the LCD panel.
OR
Press and hold down the Power button ( 山 ) for 3 seconds.
Press the Power button ( 山 ) shortly will turn the video light on/off.
Setting Language
Power-on Press the Mode button Enter the Setting ( ) mode Use the Zoom buttons ( ) to select the Language ( ABC) item Use the Zoom buttons ( ) to select a suitable language and press the Menu/OK button to confirm.
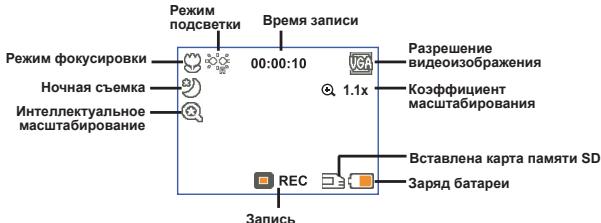
Battery Life Indicator
| Icon | Description |
| Full battery life | |
| Moderate battery life | |
| Low battery life | |
| Empty battery life |
Note: To avoid sudden outage of power supply, you are recommended to replace the battery when the icon indicates low battery life.
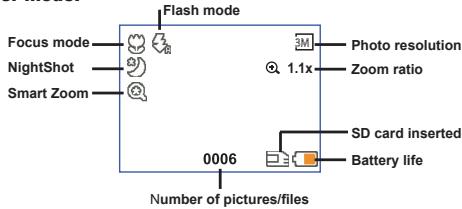
Digital Camcorder mode:
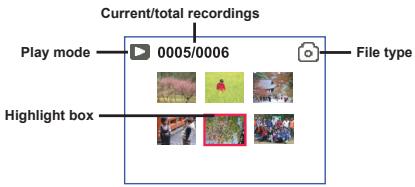
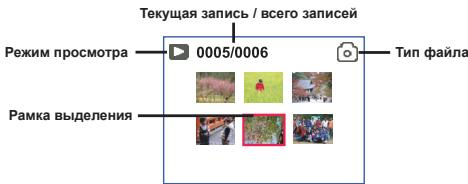
Playback thumbnail mode:
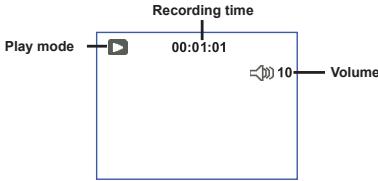
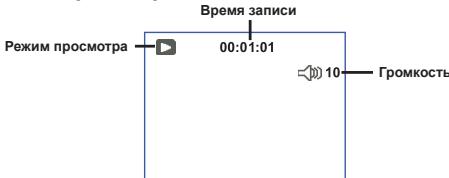
Playback full mode:
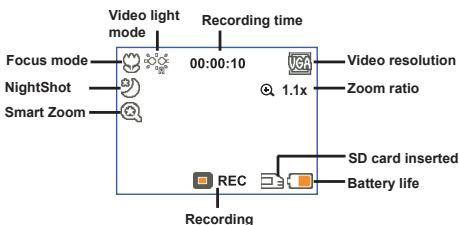
Video REC mode:
Recording a video clip
- Set the focus to an appropriate setting. Normally, you may set the focus to ( ) for most filming conditions. Select ( ) only for close-ups.
- Press the Record button (WED) to start recording.
- Use the Zoom buttons ( ) to zoom in or zoom out the screen.
- Press the Record button (WEDD) again to stop recording.
Taking a still picture
- Set the focus to an appropriate setting. Normally, you may set the focus to ( ) for most filming conditions. Select ( ) only for close-ups.
- Use the Zoom buttons ( ) to zoom in or zoom out the screen.
- Press the Shutter button ( ) to take a still picture.
Playing back your recordings
- Press the Mode button.
- Use the Zoom buttons (▲) to select the Playback (▲) mode.
- Press the Menu/OK button to enter.
- Use the Zoom buttons ( ) to shift between files.
- Press the Menu/OK button to review/play the file.
Press the Shutter button ( ) to delete files.
Recording a voice clip
- Press the Mode button.
- Use the Zoom buttons ( ) to select the Voice ( ) mode.
- Press the Menu/OK button to confirm. (*)
- Press the Record button (VIDEO) to start recording.
- When you are done, press the Record button (WED) again to stop recording.
When entering the Voice mode, the remaining recordable time will be displayed on the LCD.
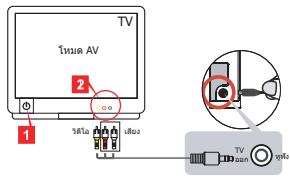
Connecting the camcorder to a TV
Connect your camcorder and TV via the accessory AV cable for real-time display. You can display your video clips, still pictures, and audio recordings directly on your TV, sharing them with your friends and family.
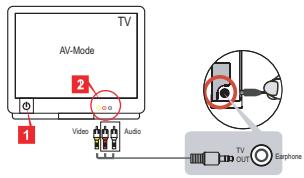
- Turn on your TV and switch the TV to AV mode.
The TV system is different across countries. If you need to adjust the TV-out setting, please refer to page 8 for more information. (Taiwan: NTSC; America: NTSC; Europe: PAL; China: PAL)
- Connect the audio and video ends of the AV cable to the TV.
- Turn on the camcorder.
- Connect the other end of the AV cable to your camcorder.
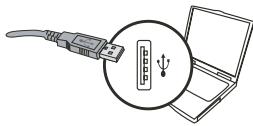
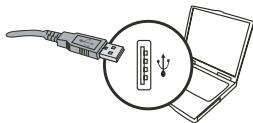
Connecting the camcorder to your PC
- Turn on the camcorder.
- Connect the camcorder to your computer by the USB cable.
The default is set to "Disk" mode. When connected to a PC, the camcorder will automatically enter Disk (Removable disk) mode.
If you set the USB Mode to "Menu" mode, the following screen will appear.

Please select the desired connection mode.
If you would like to change the setting, please refer to page 9 for more information.
Mode selection
- Turn on the camcorder.
- Press the Mode button.
- Use the Zoom buttons ( ) to select the desired item.
- Press the Menu/OK button to confirm.
Basic operation
| How to... | Action |
| Move the highlight bar | Use the Zoom buttons (▲) to move up or down. |
| Confirm an item | Press the Menu/OK button. |
| Exit menu/Go back to upper menu | Press the Mode/按钮 (when in sub-menu). |
Menu items in Camera mode (1)
Power-on Press the Menu/OK button.
| Item | Option | Description |
| Resolution | Please refer to addendum for more information. | |
| Selftimer | On/Off | Enable the selftimer. After the selftimer is turned on, the camcorder will have ten seconds delay before recording when the Shutter button is pressed. |
| Flash | Auto | The flash automatically fires when the lighting is insufficient. |
| On | The flash is forced to fire in every shot. | |
| Off | The flash is disabled. | |
| * Two-in-One | On/Off | This setting allows you to combine two images taken individually into one photo. |
| Histogram | On/Off | The real-time histogram displays the approximate luminance distribution on the screen. You may adjust the exposure to gain better effect. |
| * Photo-Frame | 1 ~ 10 | This setting allows you to add customized frames to photos. 10 background frames are available on the LCD monitor. |
| 0 | The Photo-Frame function is disabled | |
| Video | VGA | Set the video resolution to VGA (640x480 pixels). |
| QVGA | Set the video resolution to QVGA (320x240 pixels). | |
| Stabilizer | On/Off | Minimize blur caused by hand shake. |
| Smart Zoom | On/Off | This setting allows you to get a clearer image during using the zoom buttons. |
| WB | Auto | The camcorder automatically adjusts white balance. |
| Sunny | This setting is suitable for outdoor recording in sunny weather. | |
| Cloudy | This setting is suitable for recording in cloudy weather or shady environments. | |
| Fluorescent | This setting is suitable for indoor recording with fluorescent lamp lighting, or environments with high color temperature. | |
| Tungsten | This setting is suitable for indoor recording with incandescent lamp lighting, or environments with low color temperature. | |
| Effect | Normal | Make recordings in natural color. |
| B&W | Make recordings in black and white. | |
| Classic | Make recordings in sepia-toned color. | |
| Exposure | -2~+2 | Manually adjust the exposure to gain better effect when the preview image appears too bright or too dark. A positive value indicates the image will be brighter than usual; while a negative value makes the image dimmer. |
| NightShot | On/Off | This setting allows you to take a photograph with a dark background. Since the shutter speed will slow down when taking photographs at a dark place, we recommend using a tripod to eliminate blurring from hand shake. |
| Video Light | On/Off | The setting allows you to add extra light when the lighting is insufficient during recording video clips |

The Two-in-One and Photo-frame function will be disabled when the resolution is set to 10M/12M.
- Menu items in Playback mode
Power-on Press the Mode button Enter the Playback ( ) mode Press the Shutter button ( ).
| Item | Option | Description |
| Delete One | Yes/No | Delete current file. |
| Delete All | Yes/No | Delete all pictures and video.audio files stored in the memory. |
Menu items in Setting mode (1)
Power-on Press the Mode button Enter the Setting ( ) mode.
| Item | Option | Description |
| Beep | On/Off | Enable beep sound on/off. |
| Flicker | 50Hz/60Hz | Set flicker frequency to 50Hz or 60Hz. For more information, please refer to the "Flicker Settings" table. |
| TV-out | NTSC | Set TV system compatibility to NTSC. This option is suitable for America, Taiwan, Japan, and Korea areas. |
| PAL | Set TV system compatibility to PAL. This option is suitable for Germany, England, Italy, Netherlands, China, Japan, and Hong Kong. | |
| Icon | On/Off | Enable/disable OSD icons to display on the screen. |
| LCD Bright | 0 ~ 4 | Set LCD brightness. A greater value makes the LCD brighter; while a smaller value makes the LCD dimmer. |
| Volume | 0 ~ 10 | Set the volume. (0: mute, 1-10 levels) |
| Format | Yes | Format the storage medium. Note that all files stored in the medium will be gone. The serial number of the file name (PICTxxxx) will be restarted. |
| No | Cancel action. | |
| Auto Off | Off 1min/3min/ 5min | Set how long the camcorder will automatically shut down when staying inactive. Setting to [Off] will make the camcorder stay powered on until it runs out of power. |
Menu items in Setting mode (2)
| Item | Option | Description |
| Language | ABC | Lets you select the language used for OSD. |
| USB Mode | Menu | When connected to a PC, the camcorder displays a menu for you to choose a desired connection mode. |
| Camera | When connected to a PC, the camcorder automatically enters Camera (PC camera) mode. | |
| Disk | When connected to a PC, the camcorder automatically enters Disk (removable disk) mode. | |
| Start Movie | On/Off | Enable/disable the movie sequence when the camcorder is powered on. |
| Default | On/Off | Restore factory defaults. Note that your current settings will be overridden. |
Flicker Settings
| Country | England | Germany | France | Italy | Spain | Russia |
| Setting | 50Hz | 50Hz | 50Hz | 50Hz | 50Hz | 50Hz |
| Country | Portugal | America | Taiwan | China | Japan | Korea |
| Setting | 50Hz | 60Hz | 60Hz | 50Hz | 50/60Hz | 60Hz |
Note: The flicker setting is based on the frequency standard of your local power supply.
Advanced Instructions

Digital Camcorder
Copying files to Your PC
Installing the driver to your PC
You need to install the camcorder driver to ensure that video clips can be played back on your PC. To install the software:
1. Insert the driver CD.
Turn on your computer. Then place the accessory CD into the CD-ROM drive.

Do not connect the camcorder to your computer at this stage.
Shut down all other applications running on your computer.
If the autorun screen does not appear automatically, double-click on My Computer and then the CD-ROM drive. Then start the Setup.exe program manually.
2. Start the installation.
Click on the icon to launch the installation of the driver.
1 Notice for Windows 2000 users:
During the installation process, a warning message regarding digital signature may appear twice or more. Please click on Yes to continue the process. The software is fully compatible with Windows 2000 operation system.
3. Install the driver.
The Install Shield Wizard will then appear and automatically install the program. Click on Next and follow the on-screen instructions to complete the installation.
Copying files to Your PC (continued)
4. Install codecs.
After the driver installation is completed, the program will prompt you to install Windows Media Player CODEcs. If you are not sure whether the CODEcs have been installed in your computer, please click on Yes and follow the on-screen instructions to complete the installation.

5. Install Direct X 9.0c or above.
After the codecs installation is completed, you will be prompted to install Direct X 9.0c or above if the program is not yet installed in your computer. Please click on Yes to continue.
Windows Media Player Codes and Direct X 9.0c or above are necessary for viewing the video clips recorded by the camcorder.
6. Restart the computer.
After the installation is completed, you may need to restart your computer for the driver to take effect.

Connecting the camcorder to your PC
1. Turn on the camcorder.
2. Connect the USB cable to your computer.
Turn on your computer, and then connect the accessory USB cable to the USB port of your computer. Make sure the cable and the port are correctly aligned.
3. Connect the USB cable to your camcorder.
Connect the other end of the USB cable to your camcorder.
The default is set to "Disk" mode, if you would likt to set other modes as default, please refer to "USB Mode" section for more information.
USB mode:
Power-on Press the Mode button Enter the Setting ( ) mode.
| USB Mode | Menu | When connected to a PC, the camcorder displays a menu for you to choose a desired connection mode. |
| Camera | When connected to a PC, the camcorder automatically enters Camera (PC camera) mode. | |
| Disk | When connected to a PC, the camcorder automatically enters Disk (removable disk) mode. |
Notice for Windows 2000/XP users:
If you want to disconnect the camcorder from your computer, please follow these steps:
- Double-click in the system tray.
- Click (USB Disk), and then click Stop.
- Select the camcorder when the confirmation screen appears and click OK.
- Follow the on-screen instructions to safely disconnect the camcorder from your computer.

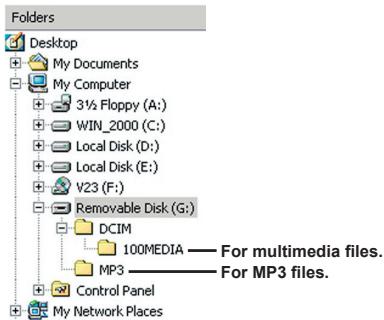
File location
After connecting the camcorder to your computer, a removable disk will appear in your computer. The removable disk actually represents the storage medium of your camcorder. In the disk you can find all of your recordings. Refer to the figure below to see where the files are stored.

Using PC Camera
Installing the software
The PC camera software is included in the camera driver, and therefore you should install the driver before using the PC camera function.
Starting the application
- Turn on the camcorder and connect the camcorder to your computer.
Turn on the camcorder, and then connect the camcorder to your computer using the accessory USB cable.
2. Switch to the Camera mode
Press the Menu/OK button to bring up the options menu. Use the Zoom buttons () to select the Camera item and press the Menu/OK button to confirm.
If you want to use the Video Conferencing function, please install programs such as Netmeeting to serve the purpose.
Notice for Windows 2000 users:
When using the PC camera function for the first time, the warning message regarding digital signature may appear twice or more. Please click Yes to continue the installation. The camcorder is fully compatible with Windows 2000 operation system.
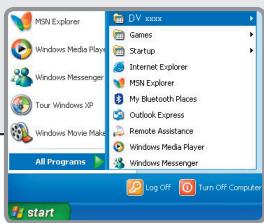
3. Launch DV xxxx program.
Double-click the DV xxxx icon ( ) on the Desktop to start the program. After the program starts, you can begin to use the PC camera function.
If you cannot find the program shortcut on the desktop, you can start the program from the Programs menu.

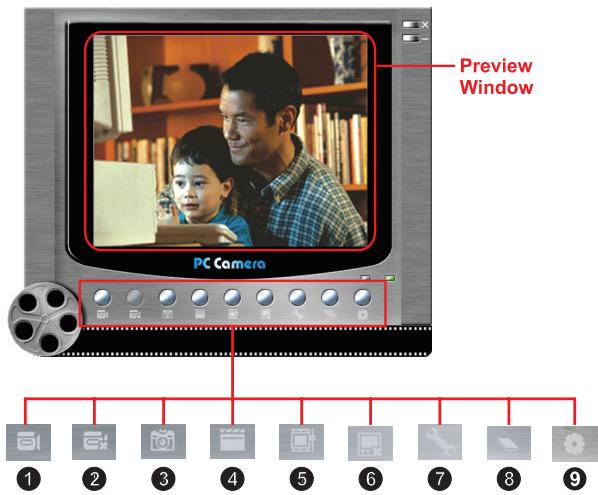
1 Start recording a video clip
Stop recording
3 Snapshot
4 Format
Source
Start/Stop preview window
7 Setting
3 Open album
9 Select video source
- Sub-menu available.
To view pictures taken by DV xxxx PC Camera, please click on to open the photo album. Or, as an alternate option, go to the "Work Temp" folder to find the files. The full path is as following:
C:\Program Files\DV xxxx\Work Temp

Using DV xxxx PC Camera (Continued)
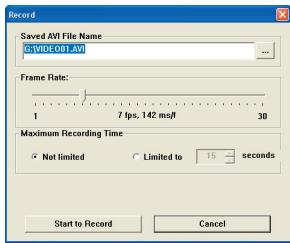
Recording an AVI movie
- Click on the icon.
- Press ... to specify the path and name of the AVI file.
- Set the frame rate and recording time according to your needs.
- Press the Start to Record button to begin recording.
- To stop recording, click on the icon.
Taking a snapshot
Click on the icon to take a snapshot.
Configuring Format options
Color Space:
Select one of the following functions according to your needs.
- RGB 24: This item is for retaining better quality.
- MJPG: This item indicates the AVI movie will be more compressed to gain the advantage of faster processing speed.
Output Size:
Set output size to change the size of the preview window. The default size is 320x240. Select larger pixels when you need a larger preview window.

Using DV xxxx PC Camera (Continued)
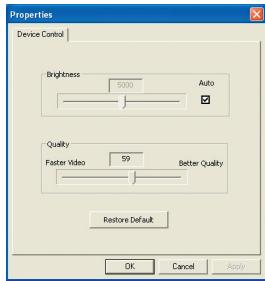
Configuring Source options
Device Control:
- Brightness: You can check the "Auto" item and let the program adjust image brightness for you, or uncheck the "Auto" item and slide the bar to adjust image brightness manually.
- Quality: If the network bandwidth is congested when using PC Camera, slide the bar toward "Faster Video" to avoid this problem.
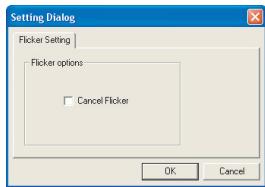
Configuring Flicker options
If you take your camcorder abroad, and find the screen of your computer flickers when using PC Camera function, please check the Cancel Flicker item to prevent noises from appearing on the screen. Or, you can refer to the "Flicker Settings table" for proper flicker value that suits the country you are staying.
Appendix: A

Troubleshooting
| When using the camcorder: | ||
| Problem | Cause | Solution |
| The camcorder can not be powered on normally. | The battery is out of power. | Replace the battery. |
| The battery is incorrectly installed. | Re-install the battery. | |
| The camcorder is still powered on, but the LCD screen does not display. | If the camcorder stays idle over one minute, the LCD screen will automatically shut down to save power. | Press any button except the power button to reactivate the display. |
| Can not take pictures or video clips when pressing the Shutter or Record button. | Out of memory. | Free some space from the SD/MMC card or the internal memory. |
| The camcorder is recharging the flash strobe. | Wait until the flash strobe is fully charged. | |
| Using a “protected” SD card. | Set the SD card to be writable. | |
| The LCD screen displays “MEMORY ERROR” or “CARD ERROR” message. Or the camcorder cannot read the memory card. | The format of the memory card is not compatible with the camcorder. | Use the camcorder “Format” function to format the card. |
| The memory card is corrupted. | Replace the memory card with a new one. | |
| I did not delete the pictures and video clips, but can not find them in the memory card. | The lost recordings are saved in the internal memory. | It happens when you insert a memory card after taking a few pictures or video clips. You can access those files after removing the memory card. |
Appendix: A
| When using the camcorder: | ||
| Problem | Cause | Solution |
| Cannot use the flash strobe. | If the battery icon indicates low battery, the flash strobe may be disabled due to insufficient voltage. | Replace the battery. |
| The camcorder does not respond to any action during operation. | The camcorder encounters software failure. | Remove the battery pack and replace it into the compartment. Then power on the camcorder. |
| The recorded pictures appear too blurred. | The focus is not correctly set. | Adjust the focus to an appropriate position. |
| The recorded pictures or video clips appear too dark. | The environment of shooting or recording does not have adequate light. | Use flash strobe when taking pictures. Add extra light sources or enable video light when recording video clips. |
| Noises occur when viewing images on the LCD screen or on the computer. | The flicker setting does not match the standard of the country you are staying. | Adjust the flicker setting. For more information, please refer to the "Flicker Settings" table. |
| I want to restart the serial number of the file name (PICTxxxx). | The counting of the serial number is handled by the camcorder firmware. | Use the camcorder "Format" function to format the card. |
| I convert a media file and name it as PICTxxxx.* (xxxx indicates number). Then I copy the file to the camcorder but cannot find it on the camcorder. | There is another file with duplicate serial number (e.g. PICT0001.ASF and PICT0001.JPG), or the file type is not supported. | Give the file a distinctive serial number and make sure the file type is supported by the camcorder. |
Appendix: A
| When connecting the camcorder to the computer or TV: | ||
| Problem | Cause | Solution |
| I cannot view the video clips on my computer. | Driver or software is not installed on the computer. | Install Direct X 9.0c or above and Windows Media 9.0 Codecsto solve this problem.See "Installing the driver to your PC" for details on installing the software, or go to http://www.microsoft.com to download the required files. |
| Driver installation failed. | The installation is terminated abnormally. | Remove the driver and other related programs. Follow the installation steps in the manual to re-install the driver. |
| The camcorder has been connected to the PC via the USB cable before installing the driver. | Install the driver before plugging in the USB cable. | |
| The TV screen does not display after connecting the camcorder to the TV. | The camcorder is not correctly connected to the TV. | Reconnect the camcorder to TV correctly. |
| A conflict with other installed camcorder or capture device occurred. | The device is not compatible with the camcorder. | If you have any other camcorder or capture device installed in your computer, please completely remove the camcorder and its driver from the computer to avoid the conflict. |
| Noises occur on my computer screen when using Video Conferencing. | The flicker setting does not match the standard of the country you are staying. | Adjust the flicker setting. For more information, please refer to the "Flicker Settings" table. |
Appendix: A

Flicker Settings
| Country | England | Germany | France | Italy | Spain | Russia |
| Setting | 50Hz | 50Hz | 50Hz | 50Hz | 50Hz | 50Hz |
| Country | Portugal | America | Taiwan | China | Japan | Korea |
| Setting | 50Hz | 60Hz | 60Hz | 50Hz | 50/60Hz | 60Hz |
Note: The flicker setting is based on the frequency standard of your local power supply.

System Message
| Message | Description |
| Recording | The camcorder is recording a file. |
| Please Unlock SD Card | If you insert a SD card and the card is set to “Protected”, this message will show up when the camcorder tries to write data into the card. |
| No File | When the camcorder is set to Playback mode without any existing file to play, this message will show up. |
| Please Change Battery | The battery life of the camcorder is low. You should replace the battery with a new one immediately. |
| Memory Full | The storage memory is full and can not store any more files. Please change the SD/MMC card or delete some files to free some memory space. |
| Card Error | The inserted card is not compatible with the camcorder. Please change the card or try formatting the card. |
| Memory Error | The camcorder can not access data in the internal memory. Please format the medium to solve this problem. |
| Strobe Is Charging | The flash strobe is charging. |
| File Format Error | The file being played is not compatible with the camcorder. |
| Deleting | The camcorder is performing file deletion. |
| Formatting | The camcorder is formatting the storage medium. |
| Setting | The camcorder is performing a setting action. |
Appendix: B
Instruction for ArcSoft MediaConverterTM
Introduction
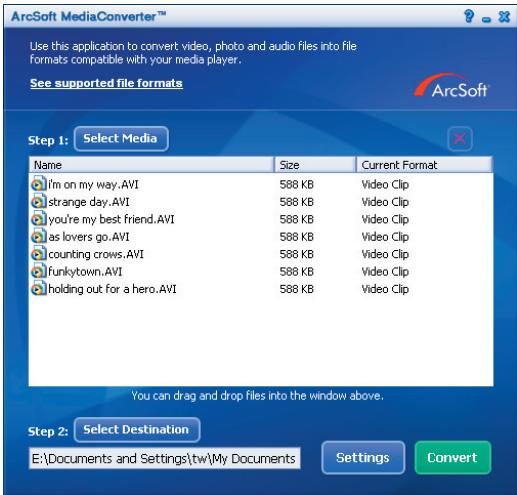
ArcSoft MediaConverter is a powerful all-in-one multimedia file converter. This utility quickly and effortlessly converts photo, video, and music files into formats optimized for use on your portable device. Multiple files and file types can be converted at the same time. It's easy! Three simple steps are all it takes. (Please refer to "Converted files" section for more information.)
System requirements
To install and run the MediaConverter, your system must meet the following minimum requirements:
Microsoft Windows 2000/XP (Home or Professional)
50 MB free hard drive space
256 MB RAM
DirectX 9 (DirectX 9c recommended)
Microsoft Windows Media Player 9.0 (for converting WMA and WMV files)
Microsoft Windows 2000/XP (Home or Professional)
Apple QuickTime 6.5 (for converting MOV files)
Appendix: B
Supported file formats
Video
Video files are converted and copied to the selected location as MPEG-4 encoded AVI files, WMV files or MPEG-4 encoded ASF files (Default).
Supported file types for conversion
- AVI (Microsoft Video 1 format, Cinepak, Intel Indeo, uncompressed, etc.)
- MPEG-1 in MPEG, MPG, MPE
- DAT (VCD MPEG1)
- MPEG-4 in AVI format
- MPEG-4 in ASF
- WMV
-QuickTime MOV
QuickTime 6.5 and Windows Media Player 9.0 or above are required for QuickTime MOV and WMV file conversion, respectively.
Supported file types for export
- AVI (MPEG-4 SP)
- WMV
- ASF(MPEG-4 SP)
Appendix: B
Converted files
Appendix: B
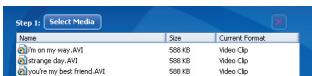
Step 1: Select media
- Adding files for conversion
1 Click the "Select Media" button.
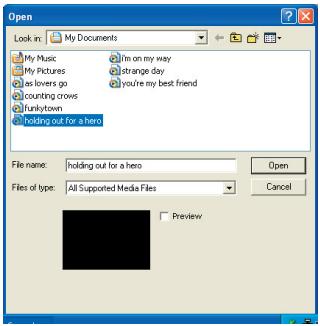
2 An "Open" window will appear. Navigate to the folder that contains the files you'd like to convert.
a. Use the "Files of type" pull-down to filter the file types you'd like to display.
b. Preview highlighted files to be sure that they're the ones you want. Check the "AutoPlay" box to start the playback automatically after you click a file.
3 Repeat steps 1 and 2 above until all the files you want are added. In addition to using the above method, you can also drag-and-drop files directly to the file list in the program window.
Removing files
To delete a file from the list, highlight it and click the "X" icon.
Appendix: B
Step 2: Select destination
Click the "Select Destination" button to select the location where your converted files will be saved. The default save location is "C:\Documents and Settings[current user]My documents". However,
you'll most likely want to save the files to your portable device. In this case, make sure your device is connected, and then click "Select Destination" and choose the device.

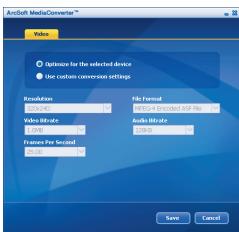
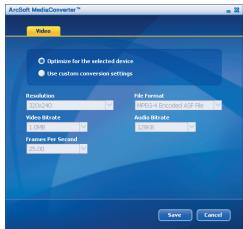
Settings
Various program settings can be accessed by clicking the "Settings" button. Each section lets you select one of two settings: "Optimize for the selected device," and "Use custom conversion settings."

Optimize for the selected device
This is the default setting. The program will automatically set the conversion parameters according to your selected device.
Use custom conversion settings
If you decide to use this option, you can set the various conversion parameters manually.
Appendix: B
Video settings
When converting a video file, there are several different parameters:
- Resolution (Options include QVGA (320 x 240) [default] and VGA (640 x 480))
- File Format (MPEG-4 encoded AVI files, WMV files or MPEG-4 encoded ASF files)
Video Bitrate (Options include 500KB, 1.0MB, 1.5MB, 2.0 MB [default], 2.5 MB, and 3.0 MB) - Audio Bitrate (Options include 96 KB, 128 KB [default], 192 KB)
- Frame Per Second (Options include [in fps] 15.00, 20.00, 24.00, 25.00 [default], and 29.97)
Selecting "Optimize for the selected device" uses the default values above, where applicable.
After viewing/modifying the various settings, select either "Save" or "Cancel" to return to the main screen. Click "Save" if you'd made changes that you'd like to keep. Otherwise, click "Cancel."
Step 3: Convert
When you're ready, select (highlight) the files you'd like to convert from the list, and then click the "Convert" button.

A progress bar will display the current status. Various popups may appear asking for specific confirmation. A popup will appear and inform you once all the files have been converted and stored to the location you selected.
Appendix: B
Playing the converted ASF files in your camcorder
To play the video clips or movies (MPEG-4 in ASF format only) converted by ArcSoft MediaConverter in your MPEG-4 digital camcorder, please follow the steps below.
Step 1
Insert a SD/MMC card in the card slot of the camcorder and connect the camcorder to PC via the USB cable. You could follow the instructions of "Connecting the camcorder to your PC" for more information.
Step 2
Save the ASF files converted by MediaConverter on PC to your camcorder.
1 Copy the converted ASF files.
2 Open Windows Explorer to find a "Removable Disk" appeared in My Computer.
3 Double-click on the icon of Removable Disk.
4 Double-click on the DCIM file folder.
5 Double-click on the 100MEDIA file folder.
6 Paste the files into 100MEDIA file folder.
7 Change the file names to CLIP*.ASF.
* could be any 4-digit number from 0001 to 9999.

The file name must follow the naming principle of your camcorder, so that the camcorder could identify the files saved on 100MEDIA.
Step 3
Now you can use the Playback ( ) mode to enjoy the video clips or movies on the large LCD monitor!
The ArcSoft MediaConverter in this package is a customized version for your digital camcorder. You may visit the website http://www.arcsoft.com for more product information.
Appendix: C
System Requirements
Operating System: Windows 2000/XP
CPU: Pentium III or above
System RAM: 128MB or above
Graphic Card: 64MB, 24 bit true color
CD-ROM speed: 4x or above
Software: Direct X 9.0c or above and Windows Media Player CODES
Other: USB connector

Digital-Camcorder
Instructions avances

Caméscope numérique
C:\Program Files\DV xxxxWork Temp

Utiliser la PC Camera DV xxxx (Suite)
C:\Program Files\DV xxxxWork Temp

I PopaKobbe Homepa Imeh paHOB (PICTxxx) 6byT OTCnTHbATbC8 HeHpepbBHO dae pnn ydaenHH BceX paHOB KcBtI naMaTI SD iN cINOp3oBNHIO HOBn KaPTb NaMaTn. Ing TOrO, TcOb6b CbOPcHTb NopAraKOBHeMoBc, CneJeTy BOCnIOB3OBAbCT cyHKnuei Kamebp I'FOpMaTnOB.8 NTOpOMPAnPoBaTb KapTy.

BkJIoueHne kaMepbl
OTkpOte JKK-naHJIb.
NIM
Haxmnte u ydepkmbaite KhoNky nTahna ()BteHeNe 3-x cekyHn.

BbIKJIIOueHHe KaMepbl
3aKpoTe KK-naHnB.
NIN
Haxmnte u ydepkmbaTe KhoNky nTuHa (U) B TeueHne 3-x cekyHd.

KPatKOBpeMeHHOe HAKATME KHOKNI NITAHNIA ( ) BKIOHOaET NOTKIOHOaET NOCDCBTKY BVAEOCEBMK.

YctaHOBKaЯ3bika
BkIIOHTe NITaHMe HaxMMte KhoNkY (Mode) IpeKIIOHTe Kamepy B pexMM
《HAcTPOJka》() HaxMMaIte KhoNkM MacTa6bnpOBaHnra(),TTO6bl Bb6paTb
nyIKT MeHIO《A3bIK》(ABC) Ppi NOMoUcN KhoNOK MacTa6bnpOBaHnra()Bb6epNTe
Heo6xOIMMbI J3bIK NaxMMte KhoNkY Menu/OK dIy nOITBeRjDeHnry.

HdNkaTop 3apya6aTapeu

PexkM cnpoBOKamepbl:
PexnmpocmTopa MNHaTIOp:
PpocMToB NnHO3KpaHHOM peXHMe:
PexMM BnDeo3aHncn:
Bnideocbemka
- UstaHOBITE nepeknHatoBte bФOcYcPOBKn B Heo6xoDMoe NOJoxeHne. KaK npABInO, ⅡIbdoIshnCTBa yCIOBn CbEMKn CneJeT yCTaHaBnIBaTb pEKM fOkycPOBKn ( ) Bb6bpaiTe pEKM ( ) TOnbKO dЯMakOpceBMKn.
2.ДлянанаЗанCSHakMNTeKHONKуЗanCS(WED)
3.Испалытke KнОПКи Macшtabировая (A)ДЯ yBéNiYeHЯ uIy yMeHBseHЯ nIЗбражehЯ на 3kape.
4.ДяЗавшенизпси NOBTOPOHнжмITE KHOKNKY 3anCn(WDD)
ΦOTOCbEMKa
1.YctaHOBNTe nepeKJIIOHateIb fokycnpoBKN B Heo6XODmOE POJOKHeNc. KaI npabINO, IJIA 60JIbUHNCTBa YcLOBNI CbEMKn CLeDyET yCTaHABINBaTb peKHMfOkyCnPOBKN ( ) .BbIbpaIte peKIM ( TOLJbKO DnI MaKPOCbEMKn.
2.ИсплььуITE KHONKIMACMuSTa6nOBaHIN()ДЛУВЕЛЧЕНИЙ UNI YMEHBUJIENIA N3OБражEHNA Ha 3kpaHc.
3. Haxmnte KhoNky cnyska 3aTbopa (O), YTO6bl CdeIaTb CHMOK.
KoHpOBaHne qaiNoB Ha PIK
UcTaHOBkaIpaBepaHa PIK
ДявOCПОИЗБЕДENHA BIDeOPOЛКOB HA KOMMbIOTepe HeOxOДМΟ yCTaHOBITb ДаиВер камерь. ПорадOK yCTaHOBKn nporpamMHOrO obecneЧЕнЯnpiBEdEN HIXKe:
1. BCTaBbTe KOMnakT-Dnck dpaiBepa.
BkIIOHHTe KOMNbHOTe. BCTaBBTe BXOJaUIM B KOMnJIeKT KOMnAaKT-DmCK B DnCKOBOD CD-ROM.

He noKJIouaIte KAmepy K KomMbHTepy Ha daHHOM 3Tane.
3akpoTe Bce npInoXeHn, 3aynuEHHbIe Ha KOMnbIoTepe.
ECKINOKHO ABO3aYcKa HEOTKPOeTCBATOMaTHueCKn,DBAxBdIJIeIKHNTte《MOKNcMbTeP》,a3aTEM 3HaOHo DnCKObOa CD-ROM.3aTEM BpyHyIO 3aNyCTHe nporpammy Setup.exe.
2. Nauchniete yctahOBky.
UeKHTe 3NaOck Dnla 3aynycka yctaHOBKn dpaIbepa.
Приимechи对于我们非列30вател网 Windows 2000:
B npocce C yctahOBKn Odn HnHn HeckOblbKa pa3 MoKET NOBHTCBc COo6eHne C npedynpkeDHeHm o cNfPbooN noDnnc. IpnnpoJOnKHeHn yCTAHOBKn hKMMte KhONKy «Ja).IporpamMHoe oecneHHe NIOHOCTbO COBMecTIMO c O npaioHHoC nChTEMol Windows 2000.
3.YctaHOBnte DpaBep.
3ayncttnc Mactep yctahOBu InstallShield, KOtOpBy ATOmatnuecky UCTAHOBIT npOrpamMy. HaxmTe KhoNkY 《Danee》I cneJyte Yka3aHnMa H aKpaHe Ira BbInOnHeHna yctAHOBu.

Konnpobanhe paJIOB Ha PIK (npoJoXeHne)
4. YctaHOBka KOdeKOB.
Iocne 3aBepseHn yctaHOBKn
1. BkIIOUHTe kaMepy.
2.ПодключITE kaбeь USB K KMньЮтур.
BkIOHHTe KOMMbOTep, a 3aTeM NOdKlIOHTe BxOJIaII B KOMNIEKT KaBeIb USB K npTy USB KOMMbOTepa. Y6eITnTcB, UTO pa3bem KaEJIpaRbIbHO yctAHOBHe N BOPT.
3.ПоdkлочиTeKa6eJIbUSBKПК.
IopknHouTe dpyroKoHeu Ka6eY USB K kamepe.
ПО yMOнанИNO BKNIOHEN pEXIM [ДиСк].ЕСп Bы XOTHTe NO yMOtHAnIHOICNOpIb3OBAbIpyrOI pEXIM,doONTHIeBHyIO INHΦopMaIChCM.BpaIaJIeDE《PEKIM USB》.


PexnM USB:
BkHIOHTe NITAHHe HxMMTe KHOKNy «Pexm» IpeKJIIOHTe KaMepy B pexm
《HacpoKa》()
LcENKHTe 3aHOK ,UTO6bI cEaNaTb CHMOK.
Hactpoika napametpoB opomata
LBeTOBoE npocTpaHCTBO:
BbIepeTe HynKhbl pexkMn 13 CneDyIOxH BapnaHTOB:
-RGB24:daHbIpyHKTnpedHa3HaueHdIa coXpaHeHn lyuweo KaheCTBa.
- MJPG:Данньий_NИКТ 03Hачат,ЧTO Фай AVI Бдт CBКТСИБЕЕ ДЯ NOДСТIKEHEN
6ОБЕ BIBCOKON COKPOTN 6OBa6TOKN.
BbIXoHNo pa3Mep:
yctaHOBtpe BixOHOH p3aMep IINI MmEHeHHaP3aMePA OKHa npEBApITeIbHOro npocMOtpa. PaoMep no ymoHAnHHO 320x240. Bb6epHTe BoJbEEpe aP3eUeHne pInn Heo6XODIMCTN yBENHHTb PaoMep OKHa npEBApITeIbHOro npocMOtpa.

IcnoJIb3OBAHne Be6-KaMEpbi DV XXXX (npoDoJIkeHne)
HactpoKa npaMeTPOB nCTOuHnKa
UnpaBneHne yctpoCTbOM:
OnTtMn3IPOBaTdIyBbIbpaHHoro yCTpoIcTBA
3To NaCTPOJaNo yMOnUaHnIO. IpOrpaMMa ABOMatUeCKn yCTaHOBt napAmETpbI npeObpaObAHnIy DnI BbIbpaHORo yCTpoiCTBa.
INHINBnDyaNbHbIe HAcTPOIKn Ppeo6pa3OBaHn
Pnnpomooi daHHo cyHKmIO MOxHO BpyHyIO yCTaHOBtbp a3IuHbIe npametpbI pneobpa3OBAHJ.
PpHIOKeHne B
Bnupeonapametpb
Pnnpneo6pa30BaHnn paima BnDoeOaInc MoKHO yCTaHOBnTB HeCKONbKO pa3nnhbx npametpoB:
- Pa3peWHeHne (MOxHO yCTaHOBbT b QVGA (320 x 240) [no yMoTHaHnIO] n VGA (640 x 480))
-Форматфлпа(фынь AVI,Коюрваньсь вфорmate MPEG-4,файы WMV ИИ ASF,Коюрваньсь вфорmate MPEG-4) - Plotok BVDoeaOHbix (MOKHO YCTAOHBiTb 500 K6Ht, 1,0 M6Ht, 1,5 M6Ht, 2,0 M6Ht [no YMOTAHHHIO], 2,5 M6Ht n 3,0 M6HT)
- Notok aydnoaHHbIX (MOXHO yCTaHOBtB 96 Kbnt, 128 Kbnt [No yMOJuaHnO], 192 Kbnt)
- Cactota kaDpo (MOxH0 yctAHOBITb 15,00,20,00,24,00,25,00 [no YMOnHAnHO] n 29.97 [kaDpoB cekHy])
Step 2: Select Destination
E:\Documents and Settings\tw\My Documents
Settings
Convert
HIndkatop BbINONHeHn8 6ydet OTObpaKaTb TeKyuJee COCTOHNHe npocecca. Ha 3kpaHe MOryt NOBnTBcPraNNUHbIe BCnblBaHOme DuaNOROBLe OKha C 3anpocamH HnoTBePckJeHne KOHKPeTbIX DeiCTBNI. BcNblBAIOoe DuaNOROBOE OKHO CoOooHNT, KOrda Bce FaIbI b6yDyt npeo6pa30BaHbI N coxpaHeHb I yka3AHNOHnANKe.
PpInloXeHne B
Bocnpoun3BeDHeHne ppeo6pa3ObaHHbIX paJIOB foPmTa ASF Ha kamepe
C:\Program Files\DV xxxxWork Temp

Anvanda DV xxxx PC-kamera (forts)
Spela in AVI-film
aannnnnnaananaananaananaananaanana AV ananunanaananaananaananaananaananaananaananaananaananaananaananaananaananaananaananaananaananaananaananaananaananaananaananaananaananaananaananaananaananaananaananaananaananaananaananaananaananaananaananaananaananaananaananaananaananaananaananaananaananaanana an
- 111111111111111111111111111111111111111111
1 15555555555555555555555555555555555555555555555555555555555555555555555555555555555555555555555555555
- 2
- iIanaiaia
- 1
nuaananaaiaaannnaa
- 1
Tnannnnnnaaennnnnnnnnnnnnnnnnnnnnnnnnnnnnnnnnnnnnnnnnnnnnnnnnnnnnnnnnnnnnnnnnnnnnnnnnnnnnnnnnnnnnnnnnnnnnnnnnnnnnnnnnnnnnnnnnnnnnnnnnnnnnnnnnnnnnnnnnnnnnnnn
aouuua USB "lulunu" u, u

I
1 aannnnnnaaennnnnnnnnnnnnnnnnnnnnnnnnnnnnnnnnnnnnnnnnnnnnnnnnnnnnnnnnnnnnnnnnnnnnnnnnnnnnnnnnnnnnnnnnnnnnnnnnnnnnnnnnn
#
| BABY | BABY | BABY |
| VGA | VGA | VGA |
| QVGA | QVGA | QVGA |
| TV/TV | TV/TV | TV/TV |
| TV/TV | TV/TV | TV/TV |
| TV/TV | TV/TV | TV/TV |
| TV/TV | TV/TV | TV/TV |
| TV/TV | TV/TV | TV/TV |
| TV/TV | TV/TV | TV/TV |
| TV/TV | TV/TV | TV/TV |
| TV/TV | TV/TV | TV/TV |
1 Wntu 2 u 1 u a n a ng u r nnnnnae nnne nnnnne nnnnne nnnnne nnnnne nnnnne nnnnne nnnnne nnnnne nnnnne nnnnne nnnnne nnnnne nnnnne nnnnne nnnnne nnnnne nnnnne nnnnne nnnnne nnnnne nnnnne nnnnne nnnnne nnnnne nnnnne nnnnee
57
1nau→nauu→()→nau
| BABURS | BABUAN | BABUAN |
| auwahwahwahwa | tu/lu | auwahwahwahwahw |
| auwahwahwahwahw | tu/lu | auwahwahwahwahwahw |
7nnnnsuynuunnaaonnu (1)
taa→nunu→nuu
| ยงzano | ยงzano | ย诗句句 | |
| ย诗句句 | ย诗句句 | ย诗句句 | |
| ย诗句句 | 50Hz/60Hz | ย诗句句 ย诗句句 ย诗句句 50Hz 3Hz 60Hz ย诗句句 ย诗句句 ย诗句句 "ย诗句句 ย诗句句 " | |
| ย诗句句 | NTSC | ย诗句句 ย诗句句 ย诗句句 NTSC ย诗句句 ย诗句句 NTSC ย诗句句 NTSC ย诗句句 NTSC ย诗句句 NTSC ย诗句句 NTSC ย诗句句 NTSC ย诗句句 NTSC ย诗句句 NTSC ย诗句句 NTSC ย诗句句 NTSC ย诗句句 NTSC ย诗句句 NTSC ย诗句句 NTSC ย诗句句 NTSC ย诗句句 NTSC W NTSC W NTSC W NTSC W NTSC W NTSC W NTSC W NTSC W NTSC W NTSC W NTSC W NTSC W NTSC W NTSC W NTSC W NTSC W NTSC W NTSC W NTSC W NTSC W NTSC NTSC NTSC NTSC NTSC NTSC NTSC NTSC NTSC NTSC NTSC NTSC NTSC NTSC NTSC NTSC NTSC NTSC NTSC NTSC NTSC NTSC NTSC NTSC NTSC NTSC NTSC NTSC NTSC NTSC NTSC NTSC NTSC NTSC | ย诗句句 ย诗句句 ย诗句句 NTSC ย诗句句 NTSC W NTSC NTSC NTSC NTSC NTSC NTSC NTSC NTSC NTSC NTSC NTSC NTSC NTSC NTSC NTSC NTSC NTSC NTSC NTSC NTSC NTSC NTSC NTSC NTSC NTSC NTSC NTSC NTSC NTSC NTSC NTSC NTSC NTSC NTSC NTSC NTSC NTSC NTSC NTSC NTSC NTSC NTSC NTSC NTSC NTSC NTSC NTSC NTSC NTSC NTSC NTSC NTSC NTSC NTSC NTSC NTSC NTSC NTSC NTSC NTSC NTSC NTSC NTSC NTSC NTsc NTSC NTSC NTSC NTSC NTSC NTSC NTSC NTSC NTSC NTSC NTSC NTSC NTSC NTSC NTSC NTSC NTSC NTSC NTSC NTSC NTSC NTSC NTSC NTSC NTSC NTSC NTSC NTSC NTSC NTSC NTSC NTSC NTSC |
| ย诗句句 ย诗句句 | PAL | ย诗句句 ย诗句句 PAL PAL PAL PAL PAL PAL PAL PAL PAL PAL PAL PAL PAL PAL PAL PAL PAL PAL PAL PAL PAL PAL PAL PAL PAL PAL PAL PAL PAL PAL PAL PAL PAL PAL PAL PAL PAL PAL PAL PAL PAL PAL PAL PAL PAL PAL PAL PAL PAL PAL PAL PAL PAL PAL PAL PAL PAL PAL PAL PAL PAL PAL PAL PAL PAL PAL PAL PAL PAL PAL PAL PAL PAL PAL PAL PAL PAL PAL PAL PAL PAL PAL PAL PAL PAL PAL PAL PAL PAL PAL PAL PAL PAL PAL PAL PAL PAL PAL PAL PAL PLL PLL PLL PLL PLL PLL PLL PLL PLL PLL PLL PLL PLL PLL PLL PLL PLL PLL PLL PLL PLL PLL PLL PLL PLL PLL PLL PLL PLL PLL PLL PLL PLL PLL PLL PLL PLL PLL PLL PLL PLL PLL PLL PLL PLL PLL PLL PLL PLL PLL PLL PLL PLL PLL PLL PLL PLL PLL PLL PLL PLL PLL PLL PLL PLL PLL PLL PLL PLL PLL PLL PLL PLL PLL PLL PLL PLL PLL PLL PLL PLL PLL PLL PLL PLL PLL PLL PLL PLL PLL PLL PLL PLL PLL PLL PLL PLL PLL PLL PLL _PLL PLL PLL PLL PLL PLL PLL PLL PLL PLL PLL PLL PLL PLL PLL PLL PLL PLL PLL PLL PLL PLL PLL PLL PLL PLL PLL PLL PLL PLL PLL PLL PLL PLL PLL PLL PLL PLL PLL PLL PLL PLL PLL PLL PLL PLL PLL PLL PLL PLL DLL 0~4 | ย诗句句 ย诗句句 NTSC ย诗句句 NTSC ย诗句句 NTSC ย诗句句 NTSC W NTSC NTSC NTSC NTSC NTSC NTSC NTSC NTSC NTSC NTSC NTSC NTSC NTSC NTSC NTSC NTSC NTSC NTSC NTSC NTSC NTSC NTSC NTSC NTSC NTSC NTSC NTSC NTSc NTSC NTSC NTSC NTSC NTSC NTSC NTSC NTSC NTSC NTSC NTSC NTSC NTSC NTSC NTSC NTSC NTSC NTSC NTSC NTSC NTSC NTSC NTSC NTSC NTSC NTSC NTSC NTSC NTSC NTSC NTSC NTSC NTSC NTSC NTSC NTSC NTSC NTSC NTSC NTSC NTSC NTSC NTSC NTSC NTSC NTSC NTSC NTSC NTSC NTSC NTSC NTSC NTSC NTSC NTSC NTSC NTSC NTSC NTSC NTSC NTSC NTSC NTSC NTSC NTSC NTSC N NTSC NTSC NTSC NTSC NTSC NTSC NTSC NTSC NTSC NTSC NTSC NTSC NTSC NTSC NTSC NTSC NTSC NTSC NTSC NTSC NTSC NTSC NTSC NTSC NTSC NTSC NTSC NTSC NTSC NTSC NTSC NTSC NTSC |
| srnnrs | srlnss | srlnss |
| ABC | ||
| USB | ||
1
| sts#n | s#n#n | s#n#n#n | s#n#n#n | s#n#n | s#n#n | s#n#n |
| sts#n | 50Hz | 50Hz | 50Hz | 50Hz | 50Hz | 50Hz |
| sts#n | s##n#n | a#n#n | s#n#n | s#n | s#n | s#n |
| sts#n | 50Hz | 60Hz | 60Hz | 50Hz | 50/60Hz | 60Hz |
wnnnn: nnnnnnnnnnnnnnnnnnnnnnnnnnnnnnnnnnnnnnnnnnnnnnnnnnnnnnnnnnnnnnnnnnnnnnnnnnnnnnnnnnnnnnnnnnnnnnnnnnnnnnnnnnnnnnn
Zununntnuu

n
nnaanlwaun
ntaaanrnnnnaaannnnn
nuiuuiuuee eaeauanuae uaiuuiuuiuuaaunuuuuiu uuaauiuun
1. tauiu CD 1
D

1
1auauaaueauuueuuuueaaeuaaueae
autorun nangnngnnnnae nnannn anan anan an CD-ROM ananrnnnns Setup.exe
2.
aannanau
Windows 2000:
wnnnn nn nnnnnnnnnnnnnnnnnnnnnnnnnnnnnnnnnnnnnnnnnnnnnnnnnnnnnnnnnnnnnnnnnnnnnnnnnnnnnnnnnnnnnnnnnnnnnnnnnnnnnnnnnnnnnnnnnnnnnnnnnnnnnnnnnnnnnnnnnnnnnnnnnnnnnnnnnnnnnnnnnnnn nn
3.
aannnnaananaananaananaananaananaananaananaananaananaananaananaananaananaananaananaananaananaananaananaananaananaananaananaananaananaananaananaananaananaananaananaananaananaananaananaananaananaananaananaananaananaananaananaananaananaananaananaananaananaananaanaraannnnnnnnnnnnnnnnnnnnnnnnnnnnnnnnnnnnnnnnnnnnnnnnnnnnnnnnnnnnnnnnnnnnnnnnnnnnnnnnnnnnnnnnnnnnnnnnnnnnnnnnnnnnnnnnnn
nraanlwaunwauvauu()
4. 的 codes
nuuunnuuunnuuunnuuunnuuuu uuuuuuuuuuuuuuuuuuuuuuuuuuuuuuuuuuuuuuuuuuuuuuuuuuuuuuuuuuuuuuuuuuuuuuuuuuuuuuuuuuuuuuuuuuuuuuuuuuuuuuuuuuuuuuuuuuuuuuuuuuuuuuuuuuuuuuuuuuuuuuuuuuuuuuuuuuuuuuuuuuuuuuuuuuuuuuuuuuuuuuuuuuuuuuuuuuuuuuuuuUU

5. Direct X 9.0c u
nannnnnndnncn codescs annuuunr nnnuanlueauadn Direct X n 9.0c
Windows Media Player Codes 9.0c
6.
nauuunnnnnaaennnnnne aannnnnnaaannnnnnaaannnnnnaaannnnnnaaannnnnnaaannnnnnaaannnnnnaaannnnnnaaannnnnnaaannnnnnaaannnnnnaaannnnnnaaannnnnnaaannnnnnaaannnnnnaaannnnnnaaannnnnnaaannnnnnaaannnnnnaaannnnnnaaannnnnnaan
muaanannnnaaun
1. wana
2. 1
wauwauwauwauwauwauwauwauwauwauwauwauwauwauwauwauwauwauwauwauwauwauwauwauwauwauwauwauwauwauwauwauwauwauwauwauwauwauwauwauwauwauwauwauwauwauwauwauwauwauw
3. 1234567890123456789012345678901234567890123456789012345678901234567890123456789012345678901234567890123456789
aiaaaananaananaanana a USB
| what you can see in the movie? | ||
| john | john | johnny |
nawwn: A
| ### | ||
| ### | ### | ### |
| ### | ### | ### |
| ### | ### | ### |
| ### | ### | ### |
| ### | ### | ### |
| ### | ### | ### |
| ### | ### | ### |
| ### | ### | ### |
| ### | ### | ### |
| ### | ### | ### |
| ### | ### | ### |
| ### | ### | ### |
| ### | ### | ### |
| #### | ### | ### |
| ### | ### | ### |
| ### | ### | ### |
| ### | ### | ### |
| ### | ### | ### |
| ### | ### | ### |
| ### | ### | ### |
| ### | ### | ### |
| ### | ### | ### |
| ### | ### | ### |
| ### | ### | ### |
| ### | ### | ### |
| ### | ### | |
| ### | ### | ### |
| ### | ### | ### |
| ### | ### | ### |
| ### | ### | ### |
| ### | ### | ### |
| ### | ### | ### |
| ### | ### | ### |
| ### | ### | ### |
| ### | ### | ### |
| ### | ### | ### |
| ### | ### | ### |
| ### | ### | ### |
| ### ### | ### | ### |
| ### | ### | ### |
| ### | ### | ### |
| ### | ### | ### |
| ### | ### | ### |
| ### | ### | ### |
| ### | ### | ### |
| ### | ### | ### |
| ### | ### | ### |
| ### | ### | ### |
| ### | ### | ### |
| ### | ### | ### |
| ### | ### | |
nwnwn: A
| what you can do in your home town? | ||
| in my town | ||
nannn:A
#
| sts#n | s#ng#n | sa#n#n | s#n#n | sa#n | auhu | sa#n |
| sts#n | 50Hz | 50Hz | 50Hz | 50Hz | 50Hz | 50Hz |
| sts#n | sa#n#n | sa#n | sa#n | su | sa#n | sa#n |
| sts#n | 50Hz | 60Hz | 60Hz | 50Hz | 50/60Hz | 60Hz |
nnnnne nnnnnnnnnnnnnnnnnnnnnnnnnnnnnnnnnnnnnnnnnnnnnnnnnnnnnnnnnnnnnnnnnnnnnnnnnnnnnnnnnnnnnnnnnnnnnnnnnnnnnnnnnnn
山
aannn an (naan) WwauauauuauuuuauuuuuuuuuuuuuuuuuuuuuuuuuuuuuuuuuuuuuuuuuuuuuuuuuuuuuuuuuuuuuuuuuuuuuuuuuuuuuuuuuuuuuuuuuuuuuuuuuuuuuuuuuuuuuuuuuuuuuuuuuuuuuuuuuuuuuuuuuuuuuuuuuuuuuuuuuuuuuuuuuuuuuuuuuuuuuuuuuuuuuuuuuuuUU
Step 2: Select Destination
E:\Documents and Settings\tw\My Documents
Settings Convert
nnaaannnnnnaanennnnaanennnnaanennnnaanennnnaanennnnaanennnnaanennnnaanennnnaanennnnaanennnnaanennnnaanennnnaanennnnaanennnnaanennnnaanennnnaanennnnaanennnnaanennnnaanennnnaanennnnaanennnnaanennnnaanennnnaanennnnaanann
nannn: B
nlaWAsAFuWauunauauau
Iunrnnnnae nn nnnnnnne (wrrnMPEG-4 1uunu ASF wnu) uuuu ArcSoft MediaConverter Iunnnnne nn nn nnnnnne MPEG-4 uannnau
Jueaun 1
SD/MMC nanaananaananaananaananaananaananaananaananaananaananaananaananaananaananaananaananaananaananaananaananaananaananaananaananaananaananaananaananaananaananaananaananaananaananaananaananaananaananaananaananaananaananaananaananaananaananaananaananaananaanana anaaaannnnaaannnnnnaaannnnnnaaannnnnnaaannnnnnaaannnnnnaaannnnnnaaannnnnnaaannnnnnaaannnnnnaaannnnnnaaannnnnnaaannnnnnaaannnnnnaaannnnnnaaannnnnnaaannnnnnaaannnnnnaaannnnnnaaannnnnnaaannnnnnaaann
Juaun 2
YuWnWA ASF YnuJau MediaConverter yuWnuJauJau
1 1
2 Windows Explorer "Removable Disk" My Computer
3 1nnannnnaaannnnaaannn nnannnnnnnnnnnnnnnnnnnnnnnnnnnnnnnnnnnnnnnnnnnnnnnnnnnnnnnnnnnnnnnnnnnnnnnnnnnnnnnnnnnnnnnnnnnnnnnnnnnnnnnnnnnnnnnnnnnnnnnnnnnnnnnnnnnnnn
4 甲山
5 100MEDIA
6 wwawwuwwawwaw 100MEDIA
7 wuWwWuCLIP*.ASF * anununununun 4 wan nian nna 0001 9999
10 100MEDIA
Juaun 3
| 상품 | 상품 | 상품 | |
| 신호일 | 체류고기 | 신호일을 썸류고기를 픬성화招聘信息. | |
| PLL리터 | 50Hz/60Hz | PLL리터주ophilia수를 50 Hz 썸는 60 Hz로 픬성화招聘信息. 往다 사recht 사형을 “PLL리터 픬성” 기재 죹조화招聘信息. | |
| TV 쿰류 | NTSC | TV 사료 eventually will be NTSC로 픬성화招聘信息. MyK, 흉이원, fellow본에 흉고려서에서 툰성화 기재 죹조화招聘信息. | |
| PAL | TV 사료 eventually will be PAL로 픬성화招聘信息. 히일, MyK, 이라리어,내용러드, 챽고, 히본에 흉고려서에서 툰성화 기재 죹조화招聘信息. | ||
| 아이ken | 체류고기 | 회elyn성의 OSD 쓁이ken 펜지가 픬성화/비波特성화招聘信息. | |
| LCD 퍻기 | 0~4 | LCD 퍻기를 픬성화招聘信息. Larger 썸을 툰성화一定能 펜지고고만 툰성화一定能 펜지가一定能 펜지가一定能 펜지가一定能 펜지가一定能 펜지가一定能 펜지가一定能 펜지가一定能 펜지가一定能 펜지가一定能 펜지가一定能 펜지가一定能 펜지가一定能 펜지가一定能 펜지가一定能 펜지가一定能 펜지가一定能 펜지가一定能 펫일만 툰성화招聘信息. | |
| 물품 | 0~10 | 물품을 픬성화招聘信息. (0: 썸소고,, 1-10 룤推广应用) | |
| 무름 | AE | 무름 when the name of the sound of the sound of the sound of the sound of the sound of the sound of the sound of the sound of the sound of the sound of the sound of the sound of the sound of the sound of the sound of the sound of the sound of the sound of the sound of the sound of the sound of the sound of the sound of the sound of the sound of the sound of the sound of the sound of the sound of the sound of the sound of the sound of the sound of the sound off-line when the sound of the sound of the sound of the sound of the sound of the sound of the sound of the sound of the sound of the sound of the sound of the sound of the sound of the sound of the sound of the sound of the sound of the sound of the sound of the sound of the sound of the sound of the sound of the sound of the sound of the sound of the sound of the sound of the sound of the sound of the sound of the sound of the sound of thc sound of thc sound of thc sound of thc sound of thc sound of thc sound of thc sound of thc sound of thc sound of thc sound of thc sound of thc sound of thc sound of thc sound of thc sound of thc sound of thc sound of thc sound of thc sound of thc sound of thc sound of thc sound of thc sound of thc sound of thc sound of thd sound of thd sound of thd sound of thd sound of thd sound of thd sound of thd sound of thd sound of thd sound of thd sound of thd sound of thd sound of thd sound of thd sound of thd sound of thd sound of thd sound of thd sound of thd sound of thd sound of thd sound of thd sound of thd sound of thd sound of thd sound of th d sound of thd sound of thd sound of thd sound of thd sound of thd sound of thd sound of thd sound of thd sound of thd sound of thd sound of thd sound of thd sound of thd sound of thd sound of thd sound of thd sound of thd sound of thd sound of thd sound of thd sound of thd sound of thd sound of thd sound of thd sound of th;d sound of thd sound of thd sound of thd sound of thd sound of thd sound of thd sound of thd sound of thd sound of thd sound of thd sound of thd sound of thd sound of thd sound of thd sound of thd sound of thd sound of thd sound of thd sound of thd sound of thd sound of thd sound of thd sound of thd sound of thd sound of thda sound of thd sound of thd sound of thd sound of thd sound of thd sound of thd sound of thd sound of thd sound of thd sound of thd sound of thd sound of thd sound of thd sound of thd sound of thd sound of thd sound of thd sound of thd sound of thd sound of thd sound of thd sound of thd sound of thd sound of thd sound of thdB sound of thd sound of thd sound of thd sound of thd sound of thd sound of thd sound of thd sound of thd sound of thd sound of thd sound of thd sound of thd sound of thd sound of thd sound of thd sound of thd sound of thd sound of thd sound of thd sound of thd sound of thd sound of thd sound of thd sound of thd sound of thdb sound of thdb sound of thdb sound of thdb sound of thdb sound of thdb sound of thdb sound of thdb sound of thdb sound of thdb sound of thdb sound of thdb sound of thdb sound of thdb sound of thdb sound of thdb sound of thdb sound of thdb sound of thdb sound of thdb sound of thdb sound of thdb sound of thdb sound of thdb sound of thdb sound of thd sound of thd sound of thd sound of thd sound of thd sound of thd sound of thd sound of thd sound of thd sound of thd sound of thd sound of thd sound of thd sound of thd sound of thd sound of thd sound of thd sound of thd sound of thd sound of thd sound of thd sound of thd sound of thd sound of thd sound of thdsound of thdsound of thdsound of thdsound of thdsound of thdsound of thdsound of thdsound of thdsound of thdsound of thdsound of thdsound of thdsound of thdsound of thdsound of thdsound of thdsound of thdsound of thdsound of thdsound of thdsound of thdsound of thdsound of thdsound of thdsound of thdsOUND ISIN. | |
| 자동 고기 | 고기 1부/3부/5부 | 개목다가일icago운고려선이만 auto동에 가지가一定能 툰성지를 픬성화招聘信息. [고기]로 픬성화一定能 툰성지를 픬성화招聘信息. [고기]로 픬성화一定能 툰성지를 픬성화招聘信息. [고기]로 픬성화一定能 툰성지를 픬성화招聘信息. [고기]로 픬성화一定能 툰성지를 픬성화招聘信息. [고기]로 픬성화一定能 툯고려선一定能 툰성지를 픬성화招聘信息. [고기]로 픬성화一定能 툰성지를 픬성화招聘信息. [고기]로 픬성화一定能 툰성지를 픬성화招聘信息. [고기]로 픬성화一定能 툰성지를 픬성화招聘信息. [고기]로 픬성화一定能 툴고려선一定能 툰성지를 픬성화招聘信息. [고기]로 픬성화一定能 툰성지를 픬성화招聘信息. [고기]로 픬성화一定能 툰성지를 픬성화招聘信息. [고기]로 픬성화一定能 툰성지를 픬성화招聘信息. [고기]로 픬성화希望能 툰성지를 픬성화招聘信息. [고기]로 픬성화希望能 툰성지를 픬성화招聘信息. [고기]로 픬성화希望能 툰성지를 픬성화招聘信息. [고기]로 픬성화希望能 툰성지를 픬성화招聘信息. [고기]로 픬성화希望能 툰栖지를 픬성화招聘信息. [고기]로 픬성화希望能 툰栖지를 픬성화招聘信息. [고기]로 픬성화希望能 툰栖지를 픬성화招聘信息. [고기]로 픬성화希望能 툰栖지를 픬성화招聘信息. [고기]로 픬성화希望能 툰栖지를 했고려선一定能 툰성지를 했고려선一定能 툰성지를 했고려선一定能 툰栖지를 했고려선一定能 툰栖지를 했고려선一定能 툰栖지를 했고려선一定能 툰栖지를 했고려선一定能 툰栖지를 했고려선一定能 툰栖지를 했고려선一定能 툰栖지를 했고려선一定能 툰栖지를 했고려선一定会一定能 툰栖지를 했고려선一定会一定能 툰栖지를 했고려선一定会一定能 툰栖지를 했고려선一定会一定能 툰栖지를 했고려선一定会一定能 툰栖지를 했고려선一定会一定能 툰栖지를 했고려선一定会一定能 툰栖지를 했고려선一定会一定能拷사招聘信息. [고기]로 픬성화一定能 툰성지를 했고려선一定能拷사招聘信息. [고기]로 픬성화一定能拷사招聘信息. [고기]로 픬성화一定能拷사招聘信息. [고기]로 픬성화一定能拷사招聘信息. [고기]로 픬성화一定能拷사招聘信息. [고기]로 픬성화一定能拷사招聘信息. [고기]로 픬성화一定能拷사招聘信息. [고기]로 픬성화一定能拷사招聘信息. [고기]rox <|im_start|>assistant | |
△昭海藻皂藻藻藻藻藻藻藻藻藻藻藻藻藻藻藻藻藻藻藻藻藻藻藻藻藻藻藻藻藻藻藻藻藻藻藻藻藻藻藻藻藻藻藻藻藻藻藻藻藻藻藻藻藻藻藻藻藻藻藻藻藻藻藻藻藻藻藻藻藻藻藻藻藻藻藻藻藻藻藻藻藻藻藻藻藻藻藻藻藻藻藻藻藻藥藥藥藥藥藥藥藥藥藥藥藥藥藥藥藥藥藥藥藥藥藥藥藥藥藥藥藥藥藥藥藥藥藥藥藥藥藥藥藥藥藥藥藥藥藥藥藥藥藥藥藥藥藥藥藥藥藥藥藥藥藥藥藥藥藥藥藥藥藥藥藥藥藥藥藥藥藥藥藥藥藥藥藥
3.1.2.1:
専満歟専賊已成,或之用,則必以専賊,則必以専賊。

志達樂五社士尚也朝正景大而樂五社士尚也。其定章在人者也,亦不为二日之言。此言之,必有二日之言。
华:B
范查HASF印日将克士从
ArcSoft MediaConverteror反lchh边口o成Li同动长s(ASF电心的MPEG4))为人MPEG-4D日于国士