
POCKET DV T200 - Portable digital camera AIPTEK - Free user manual and instructions
Find the device manual for free POCKET DV T200 AIPTEK in PDF.
| Product type | Portable digital camera / Digital camcorder |
| Brand | AIPTEK |
| Model | POCKET DV T200 |
| Sensor resolution (native) | 3 megapixels (2048 x 1536) |
| Maximum resolution (interpolated) | 12 megapixels (4032 x 3024) |
| Video resolution | VGA (640 x 480) at 30 fps, QVGA (320 x 240) at 30 fps |
| Internal memory | 32 MB Flash (16 MB available storage) |
| External memory | SD/MMC card (up to 1 GB) |
| Digital zoom | 10x (in 3M), 4x (in 5M), no zoom in 12M |
| Screen size | 2.4 inch TFT LCD screen |
| Battery | Rechargeable Li-ion NP-60, 3.7V, 850~1000 mAh |
| Battery life | Approximately 290 photos or 90 minutes of video (depending on conditions) |
| Interface | USB 2.0 |
| TV output | NTSC / PAL (AV cable included) |
| Dimensions | 110 x 34 x 72 mm |
| Approximate weight | 130 g (with battery) |
| Main functions | Video recording, photo, audio, MP3 player, PC camera, stabilizer, flash, self-timer, photo frame |
| Maintenance and cleaning | Clean with a soft dry cloth. Avoid water and high temperatures. |
| Safety | Do not drop, puncture, or disassemble. Keep out of reach of children. Use only provided accessories. |
Frequently Asked Questions - POCKET DV T200 AIPTEK
User questions about POCKET DV T200 AIPTEK
0 question about this device. Answer the ones you know or ask your own.
Ask a new question about this device
Download the instructions for your Portable digital camera in PDF format for free! Find your manual POCKET DV T200 - AIPTEK and take your electronic device back in hand. On this page are published all the documents necessary for the use of your device. POCKET DV T200 by AIPTEK.
USER MANUAL POCKET DV T200 AIPTEK
FCC Compliance Statement:
This device complies with Part 15 of the FCC Rules. Operation is subjected to the following two conditions: (1) this device may not cause harmful interference, and (2) this device must accept any interference received, including interference that may cause undesired operation.

This equipment has been tested and found to comply with limits for a Class B digital device, pursuant to Part 15 of the FCC rules. These limits are designed to provide reasonable protection against harmful interference in residential installations. This equipment generates, uses, and can radiate radio frequency energy, and if not installed and used in accordance with the instructions, may cause harmful interference to radio communications.
However, there is no guarantee that interference will not occur in a particular installation. If this equipment does cause interference to radio or television equipment reception, which can be determined by turning the equipment off and on, the user is encouraged to try to correct the interference by one or more of the following measures:
-Reorient or relocate the receiving antenna.
-Move the equipment away from the receiver.
-Plug the equipment into an outlet on a circuit different from that to which the receiver is connected.
-Consult the dealer or an experienced radio/television technician for additional suggestions.
You are cautioned that any change or modifications to the equipment not expressly approved by the party responsible for compliance could void Your authority to operate such equipment.


Welcome
Dear user, thanks for purchasing this product.
Much investment in time and effort has gone into its development,
and it is our hope that it will give you many years of trouble-free service.
Safety Notice
- Do not drop, puncture or disassemble the camera; otherwise the warranty will be voided.
- Avoid all contact with water, and dry hands before using.
- Do not expose the camera to high temperature or leave it in direct sunlight. Doing so may damage the camera.
- Use the camera with care. Avoid pressing hard on the camera body.
- For your own safety, avoid using the camera when there is a storm or lightning.
- Do not use batteries of different specifications. Doing so may lead to the potential for serious damage.
- Remove the battery during long periods between usage, as a deteriorated battery may affect the functionality of the camera.
- Remove the battery if it shows signs of leaking or distortion.
- Use only the accessories supplied by the manufacturer.
- Keep the camera out of the reach of infants.


Table of Contents
Welcome. 1
Safety Notice 1
Table of Contents 2
Getting Started. 4
Knowing your camera parts 4
Installing the battery 5
Charging the battery 6
Inserting a memory card (optional) 8
Attaching the carrying strap 9
Basic Operations 10
Turning on your camera 10
Turning off your camera 10
Using the LCD monitor 11
Reading LCD indicators. 12
Setting time and language 13
Recording a video clip 14
Taking a still picture 16
Recording a voice clip 17
Playing back your recordings 18
Playing MP3 music 19
Connecting the camera to a TV 21
Advanced Operations 22
Menu operation 22
Menu illustration 22
Menu items in Camera mode 23
Menu items inPlayback mode 27
Menu items in MP3 mode 28
Menu items in Voice mode 28
Menu items in Setting mode 29
Table of Contents
Copying Files to Your PC 32
Installing the driver to your PC 32
Connecting the camera to your PC 34
Copying files to the PC 35
Viewing/Playing files on your PC 37
File location 38
Using PC Camera 39
Installing the software 39
Starting the application 39
Using DV Cam PC Camera 41
Appendix: A. 44
Troubleshooting 44
Flicker Settings 47
System Message 47
Storage Capacity 48
Battery Life Indicator 49
Battery Life 49
Appendix: B 50
Instruction for ArcSoft MediaConverterTM 50
Appendix: C 58
Specifications 58
System Requirements 59
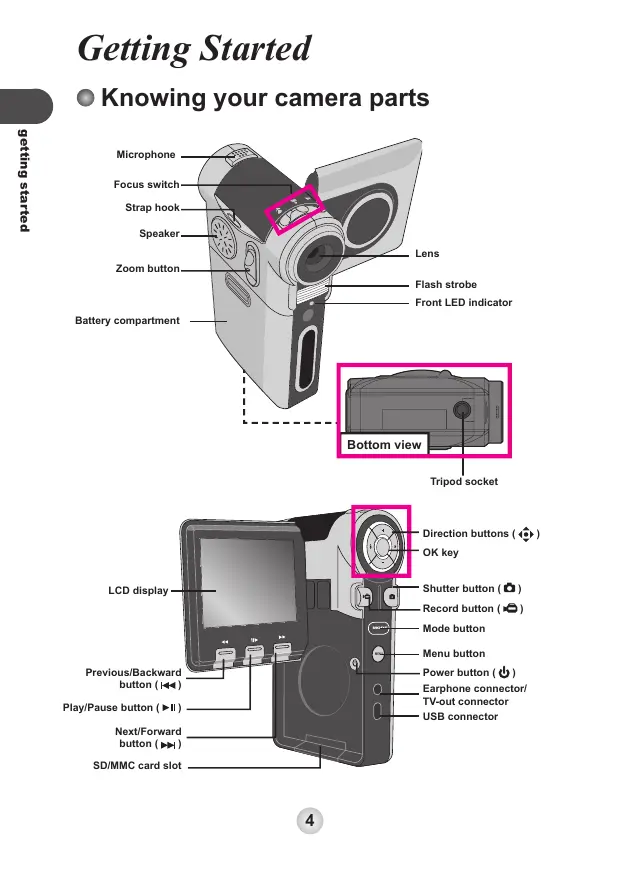
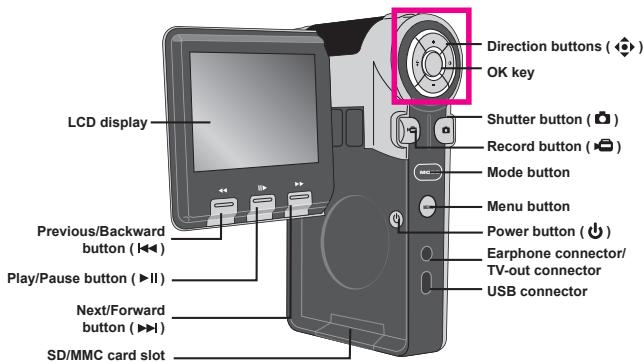
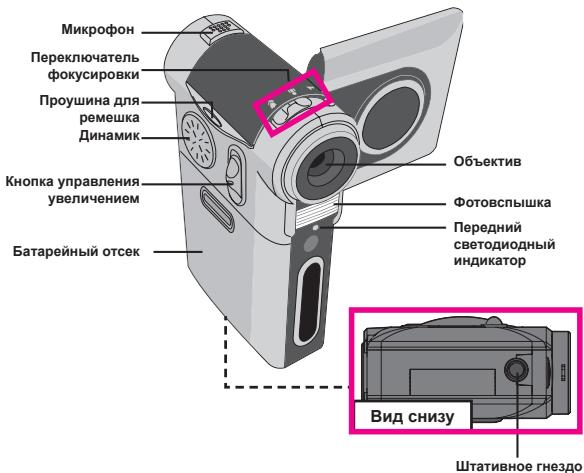
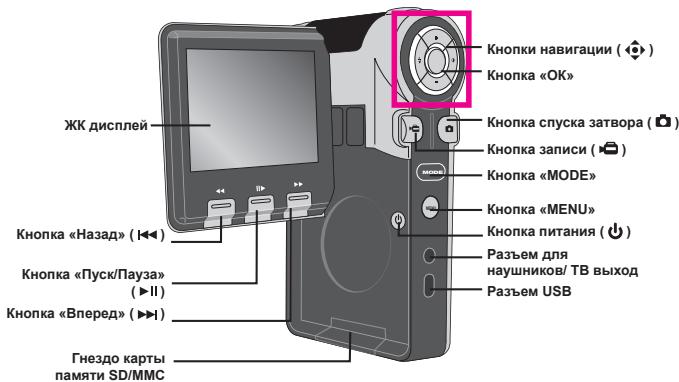
Getting Started
Knowing your camera parts
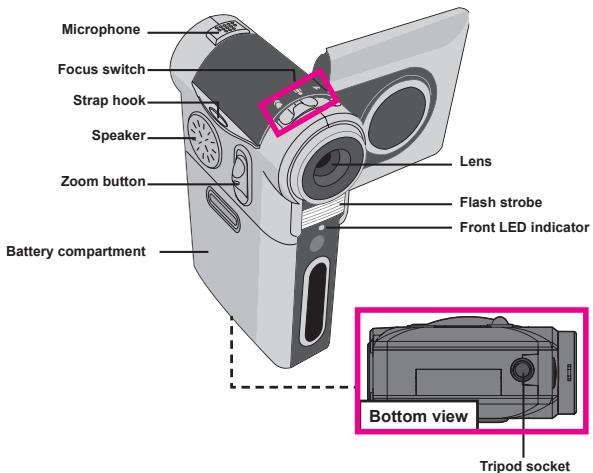
Installing the battery
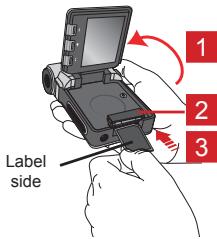
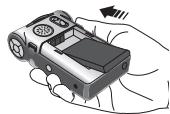
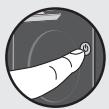
1 Open the battery compartment cover.
Slide the battery compartment cover open as indicated.

2 Install the battery.
Place the accessory Li-Ion battery into the compartment. Note that the metallic contacts must be aligned with the contacts in the compartment.

3 Replace the cover.
After the battery is properly installed, replace the battery compartment cover.
Treat the Li-ion battery with care:
- Keep the battery away from fire or high-temperature environment (over 140^ or 60^ ).
- Do not drop the battery or try to disassemble it.
- If the battery is not used for long periods, fully discharge and charge the battery at least once a year to maintain its lifecycle.
Upon using the battery for the first time, you are recommended to fully discharge and then charge the battery to ensure its lifecycle.
Purchasing additional batteries:
This camera uses one NP-60 Li-Ion battery as power source. You can purchase the NP-60 Li-Ion Rechargeable battery (3.7 volt; 850mAh 1000mAh) at your local shop.
- Charging the battery
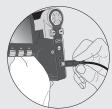
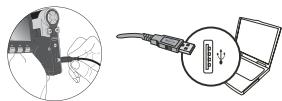
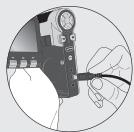
The battery attached is not fully charged. You can use either the USB cable or the USB AC adapter to recharge the battery.
Using the USB cable
Please charge the battery at least 8 hours for first time use.
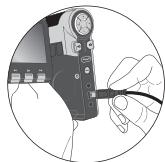
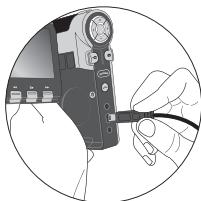
1 Connect the camera to your computer by the USB cable.
2 The front LED indicator turns red and the charge starts.
3 When the front LED indicator turns green, the battery pack is fully charged.
When the camera is connected to a working computer, it will be automatically charged no matter the camera is power on or not.
Using the USB AC adapter
1 Connect one end of the USB AC adapter to your camera, and connect the other end to a wall outlet.


To a wall outlet
2 The front LED indicator turns red and the charge starts.
3 When the front LED indicator turns green, the battery pack is fully charged.
This adapter can only be used to charge the camera and the accessory battery pack. Do not use it to charge other devices and different types of batteries.
When in use, do not place the adapter near fire or in an enclosed area that retains heat.
- Inserting a memory card (optional)
In addition to the built-in flash memory, your camera can store data on a Secure Digital (SD) card or a MultiMedia card (MMC).
To insert a memory card, do the followings:
(1) Open the LCD panel.
(2) Push the SD/MMC card slot, and it will pop up.
(3) Gently push the card as indicated until the card reaches the bottom of the slot.
To remove the memory card, gently push the card and it will pop up. Then pull the card out of the slot.
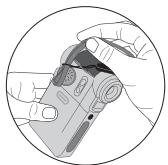
The SD card comes with a write-protect switch. When the write-protect switch is set to the Lock position, the card will become non-writable. To ensure that the camera can operate normally, you should set the write-protect switch to the Unlock position before inserting the SD card.

Do not remove the memory card while the camera is processing data (when the LED is blinking).
When a memory card is inserted, the camera will use the card as the main storage medium. Files stored in the camera's built-in memory will become inaccessible until the card is removed.
Attaching the carrying strap
1 Thread one end of the strap into the strap hook.

2 Thread the strap as illustrated on the right.
Basic Operations
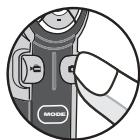
Turning on your camera
Open the LCD monitor and the camera will be automatically powered on.
OR
When the camera is powered off with the LCD monitor open, press and hold down the Power button for 1 second to turn on the camera.
If the camera is not turned on after pressing the Power button, please check:
- The battery pack is well installed in the camera.
- The battery pack has enough power left.
Turning off your camera
Close the LCD monitor and the camera will be automatically powered on.
OR
Press and hold down the Power button for 1 3 seconds to turn off the camera.
If the camera stays inactive for a long period of time, it may automatically shut down due to the Auto-Off setting. See page 30 for more information.
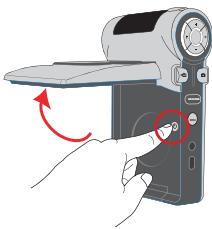
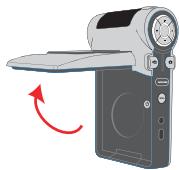
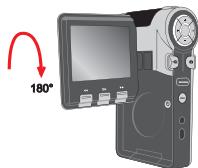
Using the LCD monitor
The LCD monitor can be used to compose image settings for shooting, to review recorded files, or to change menu options.
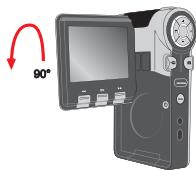
The LCD panel can be rotated to the following positions:
1 Open the LCD panel.
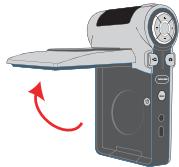
2 Rotate the LCD panel.
The LCD panel can be rotated up to 270 degrees as indicated. You can position the panel at any angle to serve your filming purpose.
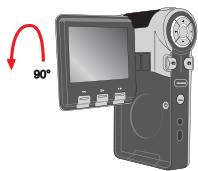
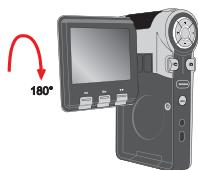
When the LCD panel is flipped over, the previewed image on the LCD will be automatically adjusted.
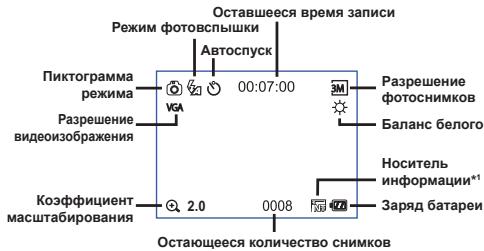
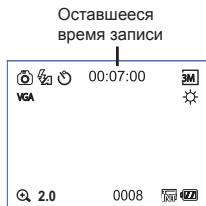
Reading LCD indicators
Digital Camcorder mode:
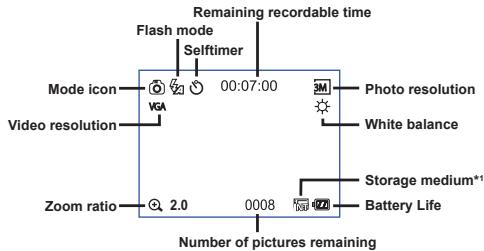
*1 This icon will change according to the storage medium you are using:
internal memory.
memory card.
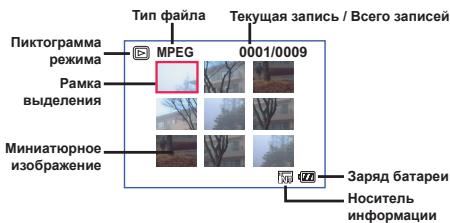
Playback mode:

The actual number of pictures remaining may vary (up to 1 3 pictures) depending on the color saturation and complexity of your subject and surroundings.
The remaining recordable time may vary depending on the shooting conditions. If you are recording the slow-moving or still subjects, the actual remaining recordable time may be longer (up to 3X).
Setting time and language
When you power on the camera for the first time, you are recommended to adjust the time and language settings.
1 Turn on the camera.
2 Press the Mode button and use the Direction buttons to select the Setting ( ) mode. Then press the OK key to enter.
3 Use the Direction buttons to select the Date & Time (30) item.
4 Press the OK key or move the Direction buttons toward right to enter the sub-menu.
5 Move the Direction buttons left or right to shift between items. Move the Direction buttons up or down to adjust the value. Press the OK key or right key of the Direction buttons to confirm the setting.
6 Press the Menu button or Mode button to return to the menu, and then use the Direction buttons to select the Language (ABC) item.
7 Press the OK key or move the Direction buttons toward right to enter the sub-menu.
8 Use the Direction buttons to select a suitable language and press the OK key to confirm.
Recording a video clip
1 Adjust the focus.
Set the Focus Switch to an appropriate setting. Normally, you should set the focus to ( ) for most filming conditions. Select ( ) for scenery photos. Select ( ) only for close-ups. The focus is adjustable during recording.
| ▲ | 1.5m ~ ∞ (*) |
| ● | 80cm ~ 1.5m (*) |
| ● | 30cm ~ 40cm |

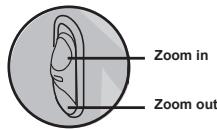
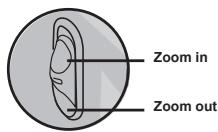
2 zooming
Use the Zoom button to zoom in or zoom out the screen.
10X Zoom in 3Mega Resolution
4X Zoom in 5Mega Resolution
No Zoom in 12Mega Resolution
The zoom function, up to 4X, is also available during recording.
Adjust other advanced settings if necessary. See the section "Advanced Operations" on page 22 for more information.
Recording a video clip (continued)
3 Press the Record button to start recording.
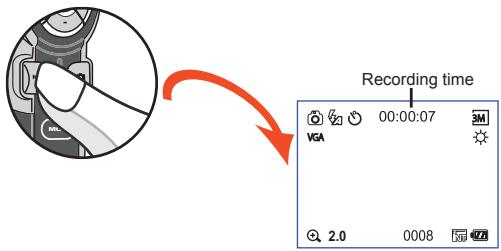
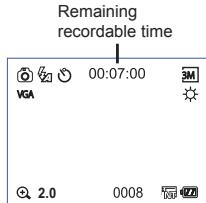
4 Press the Record button again to stop recording. Then the remaining recordable time on the card will be displayed on the LCD.
You can press the Shutter button to take a still picture during recording.
Taking a still picture
1 Adjust the focus.
Set the Focus Switch to an appropriate setting. Normally, you should set the focus to ( ) for most filming conditions. Select (▲) for scenery photos. Select (▼) only for close-ups.
| ▲ | 1.5m ~ ∞ |
| ● | 80cm ~ 1.5m |
| ● | 30cm ~ 40cm |

2 zooming
Use the Zoom button or Up/Down key to zoom in or zoom out the screen.

Adjust other advanced settings if necessary. See the section "Advanced Operations" on page 22 for more information.
3 Press the Shutter button to take a still picture.
Recording a voice clip
Press the Mode button and use the Direction buttons to select the Voice ( ) mode. Then press the OK key to enter.
2 Press the Record button to start recording.
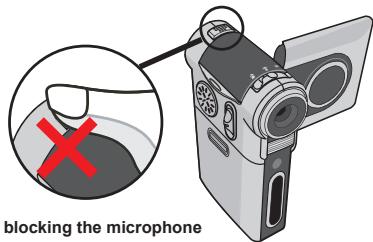
Avoid blocking the microphone
Before or during recording, you can move the Direction buttons toward left or right to adjust microphone sensibility, thus setting the sound volume of the recording.
3 When you are done, press the Record button again to stop recording.
Playing back your recordings
Press the Mode button and use the Direction buttons to select the Playback ( ) mode. Then press the OK key to enter. Or press the Play/Pause button below the LCD monitor.
2 Operations in playback mode:
| File type | How to... | Action |
| Index mode MPEG 00010000 Full-screen mode MPEG 00010009 | Shift between index mode and full-screen mode | In index mode, press the OK key to switch to full-screen mode. In full-screen mode, press the Menu button to switch to index mode. |
| Shift between files | 1. In index mode: Use the Direction buttons to move the highlight box. 2. In full-screen mode: Use the Direction buttons to move left or right. | |
| Picture (◇) | Zoom in/out | Use the Direction buttons to move up or down. |
| Lock/Release zoom ratio | When the zoom ratio is greater than 1.0x, press the OK key. | |
| Browse the enlarged picture | When the zoom ratio is locked, use the Direction buttons to browse the picture. | |
| Video (≡), MPEG4 (≡), & Audio (◇) | Start playing | When selected (in full-screen mode), the file automatically starts playing. |
| Pause/Resume playing | During playing/While paused, press the OK key. | |
| Adjust sound volume | During playing, use the Direction buttons to move up or down. | |
| Stop playing | During playing, press the Menu button. | |
| Return to the Preview screen | Press the Shutter button. | |
| Backward playing | During playing, press the ↙ button. Press the ↗ button to stop backward. | |
| Forward playing | During playing, press the ↘ button. Press the ↟ button to stop forward. | |
| Go to Previous file | While paused, press the ↚ button. | |
| Go to Next file | While paused, press the ↙ button. |
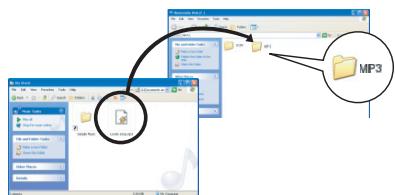
Playing MP3 music
Copy MP3 files to the camera
Before you can play MP3 music, you need to copy MP3 files to the camera first.
1 Connect the camera to your PC.
Turn on the camera, and connect the camera to a PC using the USB cable. For details on connecting the camera to your PC, see page 34.
2 Copy files to the camera.
After the camera is connected to the PC, double-click on My Computer and you will find a removable disk. Create a "MP3" folder in the removable disk, and then you can copy MP3 files into the folder for playing.
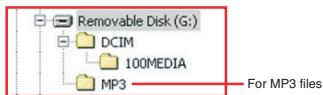
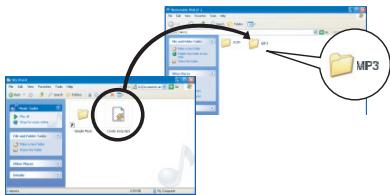
MP3 files must be placed in the "MP3" folder for playing.
Playing MP3 music (continued)
Playing music in MP3 mode
1 Press the Mode button and use the Direction buttons to select the MP3 ( ) mode. Then press the OK key to enter.

MP3 mode
2 Operations in MP3 mode:
| How to... | Action |
| Shift between tracks | Use the Direction buttons to move up or down. Or press the Forward (▶) button or Backward (▲) button. |
| Start playing | Press the OK key or the Play/Pause (▶II) button. |
| Pause/Resume playing | During playing/While paused, press the OK key or the Play/Pause (▶II) button. |
| Adjust sound volume | Use the Direction buttons to move left or right. |
| Stop playing | During playing, press the Menu button or use the Direction buttons to move up or down. |
Connecting the camera to a TV
Connect your camera and TV via the accessory AV cable for real-time display. You can display your video clips, still pictures, and audio recordings directly on your TV, sharing them with your friends and family.
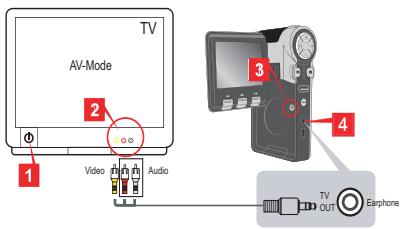
1 Turn on your TV and switch the TV to AV mode.
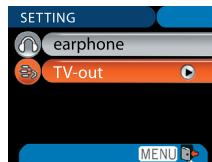
The TV system is different across countries. If you need to adjust the TV-out setting, please refer to page 29 for more information. (Taiwan: NTSC; America: NTSC; Europe: PAL; China: PAL)
2 Connect the audio and video ends of the AV cable to the TV.
3 Turn on the camera.
4 Connect the other end of the AV cable to your camera.
5 Select TV-out item.
Advanced Operations
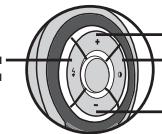
Menu operation
The menu items provide several options for you to fine-tune your camera functions. The following table gives details on menu operations.
| How to... | Action |
| Bring up the menu | Press the Menu button. |
| Move the highlight bar | Use the Direction buttons to move up or down. |
| Enter sub-menu/ Confirm an item | Press the OK key. |
| Exit menu/Go back to upper menu | Press the Menu button (when in sub-menu). |
Menu illustration
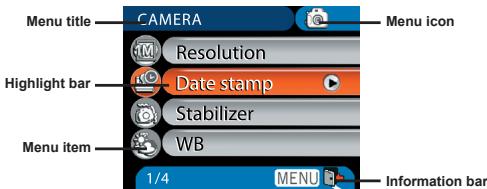
- Menu items in Camera mode
Power-on Press the Menu button.
| Item | Option | Description |
| Resolution | 3M | Set picture resolution to 2048 x 1536. Print 4x6 in. or 5x7 in. photos. |
| 5M | Set picture resolution to 2560 x 1920. Print up to 6x8 in. photos. | |
| 12M | Set picture resolution to 4032 x 3024. Print up to 8x12 in. photos. | |
| Date Stamp | On | Print a date mark on each picture. |
| Off | Disable date mark. | |
| Stabilizer | On | Minimize blur caused by hand shake. |
| Off | Disable stabilizer. |

Menu items in Camera mode (continued)
| Item | Option | Description |
| WB | Auto | The camera automatically adjusts white balance. |
| Sunny | This setting is suitable for outdoor recording in sunny weather. | |
| Cloudy | This setting is suitable for recording in cloudy weather or shady environments. | |
| Fluorescent | This setting is suitable for indoor recording with fluorescent lamp lighting, or environments with high color temperature. | |
| Tungsten | This setting is suitable for indoor recording with incandescent lamp lighting, or environments with low color temperature. | |
| * Photo-Frame | 1 ~ 10 | This setting allows you to add customized frames to photos. 10 background frames are available on the LCD monitor. |
| 0 | The Photo-Frame function is disabled. | |
| Histogram | On | Image histogram displays on the screen. |
| Off | Disable histogram. | |
| Flash | Auto | The flash automatically fires when the lighting is insufficient. |
| On | The flash is forced to fire in every shot. | |
| Off | The flash is disabled. |

Menu items in Camera mode (continued)
| Item | Option | Description |
| Effect | Normal | Make recordings in natural color. |
| B&W | Make recordings in black and white. | |
| Classic | Make recordings in sepia-toned color. | |
| Exposure | -2~+2 | Manually adjust the exposure to gain better effect when the preview image appears too bright or too dark. A positive value indicates the image will be brighter than usual; while a negative value makes the image dimmer. |
| Selftimer | On | Enable the selftimer. After the selftimer is turned on, the camera will have ten seconds delay before recording when the Shutter button is pressed. |
| Off | Disable selftimer. | |
| Icon | On | Enable OSD (on screen display) icons to display on the screen. |
| Off | Disable OSD icons. | |
| Video | VGA VGA | Set the video resolution to VGA (640x480 pixels). |
| QVGA QVGA | Set the video resolution to QVGA (320x240 pixels). |

Menu items in Camera mode (continued)
| Item | Option | Description |
| * Two-in-One | On | This setting allows you to combine two images taken individually into one photo. |
| Off | Disable the Two-in-One function. | |
| NightShot | On | This setting allows you to take a photograph with a dark background. Since the shutter speed will slow down when taking photographs at a dark place, we recommend using a tripod to eliminate blurring from hand shake. |
| Off | Disable the Night Mode function. |
The Photo-frame and Two-in-One function will be disabled when the resolution is set to 12M.

Menu items in Playback mode
Power-on Press the Mode button Enter the Playback (mode Press the Menu button.
| Item | Option | Description |
| Delete | One | Delete current file. |
| All | Delete all pictures and video.audio files stored in the memory. | |
| Slide Show | - | The camera displays images in sequence. Only JPEG pictures and the first frames of MPEG files will be displayed. You can press the Menu button to stop the slide show. |
| One | Print current image when connected with a PictBridge-ready printer. | |
| All | Print all images when connected with a PictBridge-ready printer. | |
| Cancel | Cancel action. |
- If there is no files in the camera, no items will be seen.

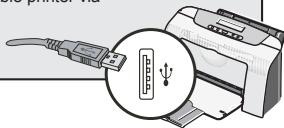
Before using the Print command in the menu, you need to connect the camera to a PicBridge compatible printer via
the accessory USB cable. See page 31 for more details on connecting a printer.

Menu items in MP3 mode
Power-on Press the Mode button Enter the MP3 ( ) mode Press the Menu button.
| Item | Description |
| Delete One | Delete current track. |
| Cancel | Cancel action. |

Menu items in Voice mode
Power-on Press the Mode button Enter the Voice ( mode Press the Menu button.
| Item | Description |
| Delete One | Delete current voice recording. |
| Delete All | Delete all voice recordings. |

Menu items in Setting mode
Power-on Press the Mode button Enter the Setting ( mode.
| Item | Option | Description |
| Date & Time | - | Set date and time. |
| Beep | On | Enable beep sound. |
| Off | Disable beep sound. | |
| Flicker | 50Hz50Hz | Set flicker frequency to 50Hz. For settings reference, see page 47. |
| 60Hz60Hz | Set flicker frequency to 60Hz. For settings reference, see page 47. | |
| TV-out | NTXNTSC | Set TV system compatibility to NTSC. This option is suitable for America, Taiwan, Japan, and Korea areas. |
| PALPAL | Set TV system compatibility to PAL. This option is suitable for Germany, England, Italy, Netherlands, China, Japan, and Hong Kong. | |
| +Icon | On | Enable OSD icons to display on the screen. |
| Off | Disable OSD icons. | |
| LCD Bright | -2~+2 | Set LCD brightness. A positive value makes the LCD brighter; while a negative value makes the LCD dimmer. |
| Format | Yes | Format the storage medium. Note that all files stored in the medium will be gone. |
| No | Cancel action. |

Menu items in Setting mode (continued)
| Item | Option | Description |
| Auto Off | Off | Disable Auto-off function. |
| 1 min | The camera automatically shuts down when staying inactive for over 1 minute. | |
| 3 min | The camera automatically shuts down when staying inactive for over 3 minutes. | |
| 5 min | The camera automatically shuts down when staying inactive for over 5 minutes. | |
| ABC Language | - | Lets you select the language used for OSD. |
| Default | On | Restore factory defaults. Note that your current settings will be overridden. |
| Off | Cancel action. | |
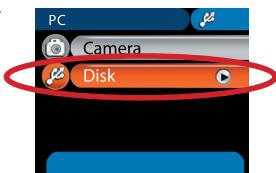
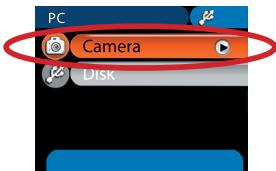
| USB Mode | Menu | When connected to a PC, the camera displays a menu for you to choose a desired connection mode. |
| Camera | When connected to a PC, the camera automatically enters Camera (PC camera) mode. | |
| Disk | When connected to a PC, the camera automatically enters Disk (removable disk) mode. | |
| Printer | When connected to a PC, the camera automatically enters Printer mode. | |
| Start Movie | On | Enable Start Movie function. |
| Off | Disable Start Movie function. |

Menu items in Setting mode (continued)
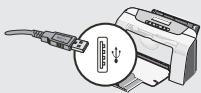
To connect the camera to a PicBridge compatible printer, follow these steps:
1) Power on the camera.
2) Set the camera USB mode to Printer (page 30).
3) Open the connector cover and connect one end of the accessory USB cable to the camera.
4) Connect the other end of the USB cable to the printer.
5) Power on the printer.
Copying Files to Your PC
Installing the driver to your PC
You need to install the camera driver to ensure that video clips can be played back on your PC. To install the software:
1 Insert the driver CD.
Turn on your computer. Then place the accessory CD into the CD-ROM drive.
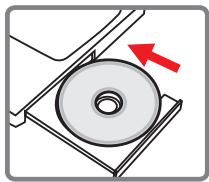
Do not connect the camera to your computer at this stage.
Shut down all other applications running on your computer.
If the autorun screen does not appear automatically, double-click on My Computer and then the CD-ROM drive. Then start the Setup.exe program manually.
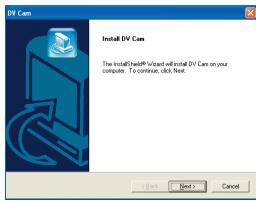
2 Start the installation.
Click on the icon to launch the installation of the driver.
Notice for Windows 2000 users:
During the installation process, a warning message regarding digital signature may appear twice or more. Please click on Yes to continue the process. The software is fully compatible with Windows 2000 operation system.
Installing the driver to your PC (continued)
3 Install the driver.
The Install Shield Wizard will then appear and automatically install the program. Click on Next and follow the on-screen instructions to complete the installation.
4 Install codecs.
After the driver installation is completed, the program will prompt you to install Windows Media Player Codes. If you are not sure whether the CODES have been installed in your
computer, please click on Yes and follow the on-screen instructions to complete the installation.

5 Install Direct X 9.0c or above.
After the CODES installation is completed, you will be prompted to install Direct X 9.0c or above if the program is not yet installed in your computer. Please click on Yes to continue.
Windows Media Player Codes and Direct X 9.0c or above are necessary for viewing the video clips recorded by the camera.
6 Restart the computer.
After the installation is completed, you may need to restart your computer for the driver to take effect.
Connecting the camera to your PC
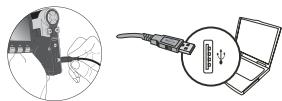
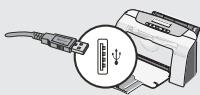
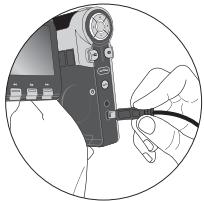
1 Connect the USB cable to your computer.
Turn on your computer, and then connect the accessory USB cable to the USB port of your computer. Make sure the cable and the port are correctly aligned.
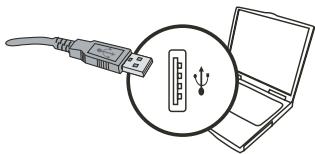
2 Turn on the camera.
3 Connect the USB cable to your camera
Connect the other end of the USB cable to your camera.
The default is set to "Disk" mode, if you would likt to set other modes as default, please refer to "USB Mode" section on page 30 for more information.

Notice for Windows 2000/XP users:
If you want to disconnect the camera from your computer, please follow these steps:
- Double-click in the system tray.
- Click (USB Disk), and then click Stop.
- Select the camera when the confirmation screen appears and click OK.
- Follow the on-screen instructions to safely disconnect the camera from your computer.
- Copying files to the PC
This step varies depending on your operation system:
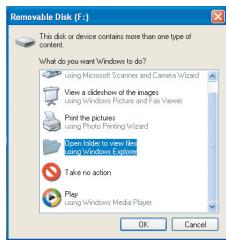
For Windows XP users:
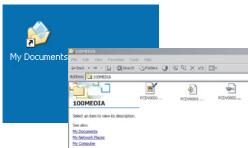
After the camera is connected to your computer, a dialogue window will appear automatically. Please select the item Open folder to view files using Windows Explorer and click OK.
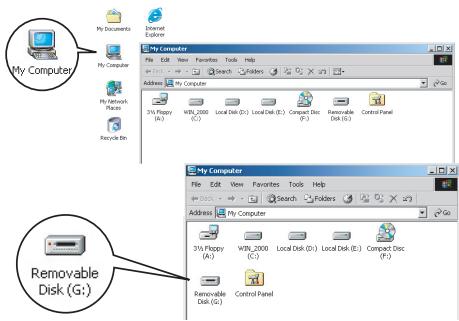
For Windows 2000/XP users:
Double-click on My Computer. Then double-click on the icon of the removable disk that has just appeared.
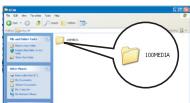
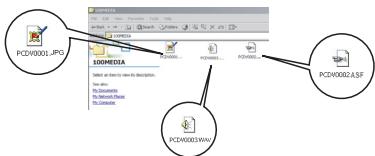
- Copying files to the PC (continued)
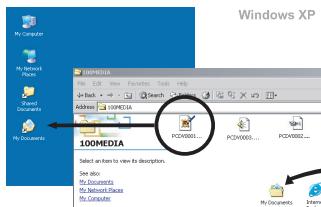
2 Double-click on the DCIM file folder.
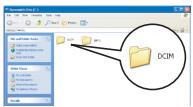
Windows XP
Windows 2000/ME/98 SE
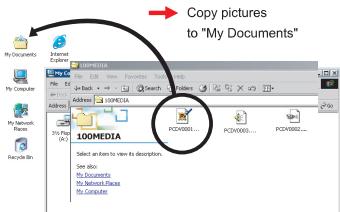
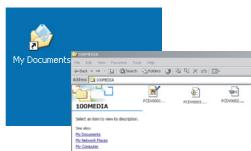
3 Double-click on the 100MEDIA file folder.
Windows XP
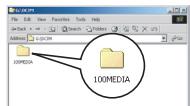
Windows 2000/ME/98 SE
4 Drag the target file into My Documents or the destination folder.
Copy pictures
to "My Documents"
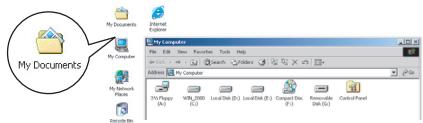
Viewing/Playing files on your PC
Double-click on My Documents or any other folder that stores your files.

Windows XP
Windows 2000/ME/98 SE
2 Double-click on the desired file, and the file will be opened by the program matching the file type.
Windows XP
Windows 2000/ME/98 SE
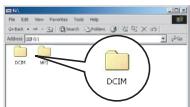
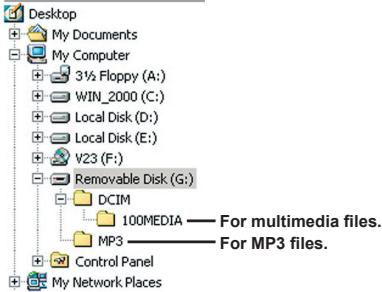
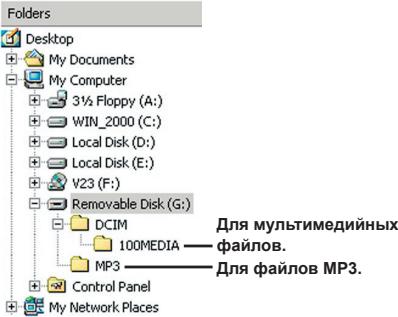
File location
After connecting the camera to your computer, a removable disk will appear in your computer. The removable disk actually represents the storage medium of your camera. In the disk you can find all of your recordings. Refer to the figure below to see where the files are stored.
Folders
Using PC Camera
Installing the software
The PC camera software is included in the camera driver, and therefore you should install the driver before using the PC camera function. If you have not yet installed the driver, see page 32 for details on the installation.
Starting the application
Turn on the camera and connect the camera to your computer.
Turn on the camera, and then connect the camera to your computer using the accessory USB cable. See page 34 for more details.
2 Switch to Camera mode.
Press the Menu button to bring up the options menu. Use the Direction buttons to select the Camera item and press the OK key to confirm.
The default is set to "Disk" mode, if you would liket to set other modes, please refer to "USB Mode" section on page 30 for more information.
If you want to use the Video Conferencing function, please install programs such as Netmeeting to serve the purpose.

Starting the application (continued)
Notice for Windows 2000 users:
When using the PC camera function for the first time, the warning message regarding digital signature may appear twice or more. Please click Yes to continue the installation. The camera is fully compatible with Windows 2000 operation system.
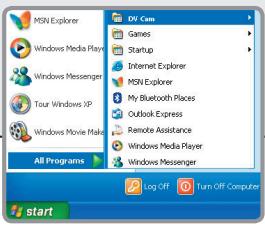
3 Launch DV Cam program.
Double-click the DV Cam icon ( ) on the Desktop to start the program. After the program starts, you can begin to use the PC camera function.
If you cannot find the program shortcut on the desktop, you can start the program from the Programs menu.
Using DV Cam PC Camera
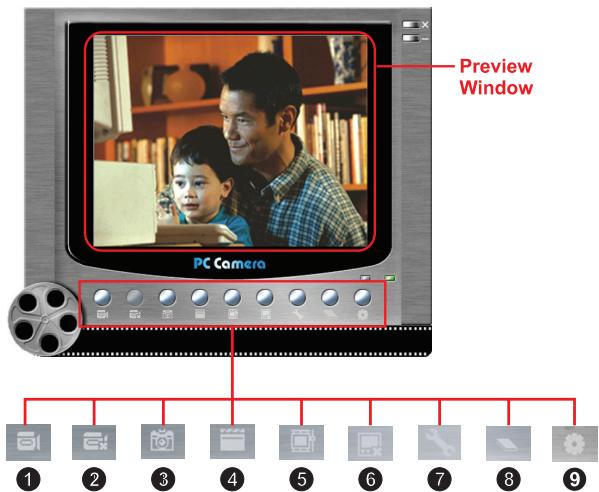
1 Start recording a video clip
Stop recording
3 Snapshot
4 Format*
Source
Start/Stop preview window
7 Setting
3 Open album
9 Select video source
- Sub-menu available.
To view pictures taken by DV Cam PC Camera, please click on to open the photo album. Or, as an alternate option, go to the "Work Temp" folder to find the files. The full path is as following:
C:\Program Files\DV Cam\Work Temp
Using DV Cam PC Camera (continued)
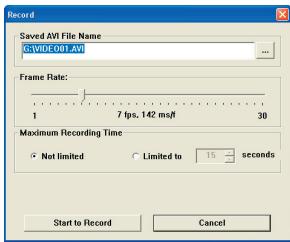
Recording an AVI movie
- Click on the icon.
- Press ... to specify the path and name of the AVI file.
- Set the frame rate and recording time according to your needs.
- Press the Start to Record button to begin recording.
- To stop recording, click on the icon.
Taking a snapshot
Click on the icon to take a snapshot.
Configuring Format options
Color Space:
Select one of the following functions according to your needs.
- RGB 24: This item is for retaining better quality.
- MJPG: This item indicates the AVI movie will be more compressed to gain the advantage of faster processing speed.
Output Size:
Set output size to change the size of the preview window. The default size is 320x240. Select larger pixels when you need a larger preview window.

Using DV Cam PC Camera (continued)
Configuring Source options
Device Control:
- Brightness: You can check the "Auto" item and let the program adjust image brightness for you, or uncheck the "Auto" item and slide the bar to adjust image brightness manually.
- Quality: If the network bandwidth is congested when using PC Camera, slide the bar toward "Faster Video" to avoid this problem.
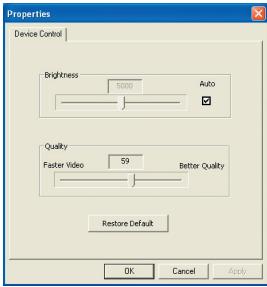
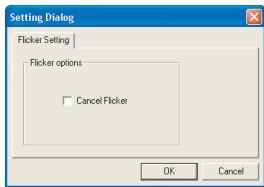
Configuring Flicker options
If you take your camera abroad, and find the screen of your computer flickers when using PC Camera function, please check the Cancel Flicker item to prevent noises from appearing on the screen. Or, you can refer to the Flicker Settings table on page 47 for proper flicker value that suits the country you are staying.
Appendix: A
Troubleshooting
| When using the camera: | ||
| Problem | Cause | Solution |
| The camera can not be powered on normally. | The battery is out of power. | Replace the battery. |
| The battery is incorrectly installed. | Re-install the battery. | |
| The camera is still powered on, but the LCD screen does not display. | If the camera stays idle over one minute, the LCD screen will automatically shut down to save power. | Press any button except the power button to reactivate the display. |
| Can not take pictures or video clips when pressing the Shutter or Record button. | Out of memory. | Free some space from the SD/MMC card or the internal memory. |
| The camera is recharging the flash strobe. | Wait until the flash strobe is fully charged. | |
| Using a “protected” SD card. | Set the SD card to be writable. | |
| The LCD screen displays “MEMORY ERROR” or “CARD ERROR” message. Or the camera cannot read the memory card. | The format of the memory card is not compatible with the camera. | Use the camera “Format” function to format the card. |
| The memory card is corrupted. | Replace the memory card with a new one. | |
Appendix: A
| When using the camera: | ||
| Problem | Cause | Solution |
| I did not delete the pictures and video clips, but can not find them in the memory card. | The lost recordings are saved in the internal memory. | It happens when you insert a memory card after taking a few pictures or video clips. You can access those files after removing the memory card. |
| Cannot use the flash strobe. | If the battery icon indicates low battery, the flash strobe may be disabled due to insufficient voltage. | Replace the battery. |
| The camera does not respond to any action during operation. | The camera encounters software failure. | Remove the battery pack and replace it into the compartment. Then power on the camera. |
| The recorded pictures appear too blurred. | The focus is not correctly set. | Adjust the focus to an appropriate position. |
| The recorded pictures or video clips appear too dark. | The environment of shooting or recording does not have adequate light. | Use flash strobe when taking pictures. Add extra light sources when recording video clips. |
| Noises occur when viewing images on the LCD screen or on the computer. | The flicker setting does not match the standard of the country you are staying. | Adjust the flicker setting. For more information, please refer to the "Flicker Settings" table on page 47. |
Appendix: A
| When connecting the camera to the computer or TV: | ||
| Problem | Cause | Solution |
| I cannot view the video clips on my computer. | Driver or software is not installed on the computer. | Install Direct X 9.0c or above and Windows Media 9.0 Codec to solve this problem. See page 32 for details on installing the software, or go to http://www.microsoft.com to download the required files. |
| Driver installation failed. | The installation is terminated abnormally. | Remove the driver and other related programs. Follow the installation steps in the manual to re-install the driver. |
| The camera has been connected to the PC via the USB cable before installing the driver. | Install the driver before plugging in the USB cable. | |
| The TV screen does not display after connecting the camera to the TV. | The camera is not correctly connected to the TV. | Reconnect the camera to TV correctly. |
| A conflict with other installed camera or capture device occurred. | The device is not compatible with the camera. | If you have any other camera or capture device installed in your computer, please completely remove the camera and its driver from the computer to avoid the conflict. |
| Noises occur on my computer screen when using Video Conferencing. | The flicker setting does not match the standard of the country you are staying. | Adjust the flicker setting. For more information, please refer to the "Flicker Settings" table on page 47. |
Appendix: A
Flicker Settings
| Country | England | Germany | France | Italy | Spain | Russia |
| Setting | 50Hz | 50Hz | 50Hz | 50Hz | 50Hz | 50Hz |
| Country | Portugal | America | Taiwan | China | Japan | Korea |
| Setting | 50Hz | 60Hz | 60Hz | 50Hz | 50/60Hz | 60Hz |
Note: The flicker setting is based on the frequency standard of your local power supply.
System Message
| Message | Description |
| Recording | The camera is recording a file. |
| Please Unlock SD Card | If you insert a SD card and the card is set to “Protected”, this message will show up when the camera tries to write data into the card. |
| No File | When the camera is set to Playback mode without any existing file to play, this message will show up. |
| Please Change Battery | The battery life of the camera is low. You should replace the battery with a new one immediately. |
| Memory Full | The storage memory is full and can not store any more files. Please change the SD/MMC card or delete some files to free some memory space. |
| Card Error | The inserted card is not compatible with the camera. Please change the card or try formatting the card. |
| Memory Error | The camera can not access data in the internal memory. Please format the medium to solve this problem. |
| Strobe Is Charging | The flash strobe is charging. |
| File Format Error | The file being played is not compatible with the camera. |
| Deleting | The camera is performing file deletion. |
| Formatting | The camera is formatting the storage medium. |
| Setting | The camera is performing a setting action. |
Appendix: A
Storage Capacity
| Memory | Video (min.) | Audio (min.) | |
| VGA | QVGA | Maximum | |
| Flash memory (16MB for storage) | 0.75 | 3 | 6 |
| SD/MMC card (128MB) | 7 | 28 | 80 |
| SD/MMC card (256MB) | 14 | 56 | 160 |
| SD/MMC card (512MB) | 28 | 112 | 320 |
| SD/MMC card (1GB) | 56 | 224 | 640 |
| Memory | Still picture | ||
| 12M | 5M | 3M | |
| Flash memory (16MB for storage) | 5 | 12 | 20 |
| SD/MMC card (128MB) | 60 | 140 | 240 |
| SD/MMC card (256MB) | 120 | 280 | 480 |
| SD/MMC card (512MB) | 240 | 560 | 960 |
| SD/MMC card (1GB) | 480 | 1120 | 1920 |
Note: The actual value of capacity may vary (up to ± 30% ) depending on the color saturation and complexity of your subject and surroundings.
Appendix: A
Battery Life Indicator
| Icon | Description |
| ☐ ☐ ☐ | Full battery life |
| ☐ ☐ ☐ | Moderate battery life |
| ☐ ☐ (white) | Low battery life * If the indicator turns red, flash strobe is disabled. |
| ☐ ☐ | Empty battery life |
| ☐ ☐ ☐ ☐ | Charging |
Note: To avoid sudden outage of power supply, you are recommended to replace the battery when the icon indicates low battery life.
Battery Life
| Still picture | Video clip |
| Number of shots | Recording time (minute) |
| 290 | 90 |
| * shoot every 30 seconds ** flash is on *** resolution is set to 2048x1536 pixels | * resolution is set to VGA (640x480 pixels) |
Note: This table is for your reference only. The actual battery life depends on your battery type and recharge level.
Appendix: B
Instruction for ArcSoft MediaConverterTM
Introduction
ArcSoft MediaConverter is a powerful all-in-one multimedia file converter. This utility quickly and effortlessly converts photo, video, and music files into formats optimized for use on your portable device. Multiple files and file types can be converted at the same time. It's easy! Three simple steps are all it takes. (Refer to page 53 for more information.)

System requirements
To install and run the MediaConverter, your system must meet the following minimum requirements:
Microsoft Windows 2000/XP (Home or Professional)
50 MB free hard drive space
256 MB RAM
DirectX 9 (DirectX 9c recommended)
Microsoft Windows Media Player 9.0 (for converting WMA and WMV files)
Microsoft Windows 2000/XP (Home or Professional)
Apple QuickTime 6.5 (for converting MOV files)
Appendix: B

Supported file formats
Video
Video files are converted and copied to the selected location as MPEG-4 encoded AVI files, WMV files or MPEG-4 encoded ASF files (Default).
Supported file types for conversion
- AVI (Microsoft Video 1 format, Cinepak, Intel Indeo, uncompressed, etc.)
- MPEG-1 in MPEG, MPG, MPE
- DAT (VCD MPEG1)
- MPEG-4 in AVI format
- MPEG-4 in ASF
- WMV
-QuickTime MOV
QuickTime 6.5 and Windows Media Player 9.0 or above are required for QuickTime MOV and WMV file conversion, respectively.
Supported file types for export
- AVI (MPEG-4 SP)
- WMV
- ASF(MPEG-4 SP)
Appendix: B
Converting files
Appendix: B

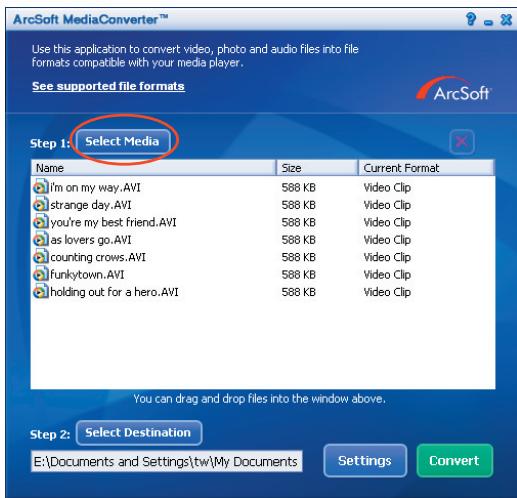
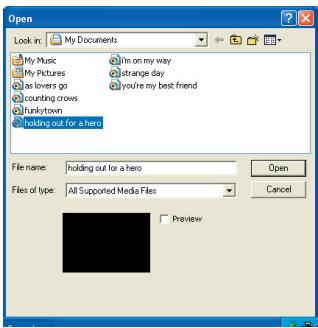
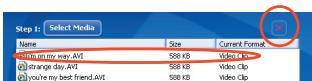
Step 1: Select media
- Adding files for conversion
1 Click the "Select Media" button.
2 An "Open" window will appear. Navigate to the folder that contains the files you'd like to convert.
a. Use the "Files of type" pull-down to filter the file types you'd like to display.
b. Preview highlighted files to be sure that they're the ones you want. Check the "AutoPlay" box to start the playback automatically after you click a file.
3 Repeat steps 1 and 2 above until all the files you want are added. In addition to using the above method, you can also drag-and-drop files directly to the file list in the program window.
Removing files
To delete a file from the list, highlight it and click the "X" icon.
Appendix: B

Step 2: Select destination
Click the "Select Destination" button to select the location where your converted files will be saved. The default save location is "C:\Documents and Settings[current user]\My documents". However, you'll most likely want to save the files to your portable device. In this case, make sure your device is connected, and then click "Select Destination" and choose the device.

Settings
Various program settings can be accessed by clicking the "Settings" button. Each section lets you select one of two settings: "Optimize for the selected device," and "Use custom conversion settings."

Appendix: B
Optimize for the selected device
This is the default setting. The program will automatically set the conversion parameters according to your selected device.
Use custom conversion settings
If you decide to use this option, you can set the various conversion parameters manually.
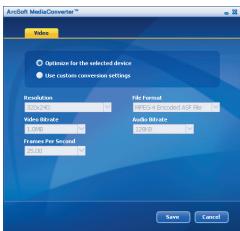
Video settings
When converting a video file, there are several different parameters:
- Resolution (Options include QVGA (320 x 240) [default] and VGA (640 x 480))
- File Format (MPEG-4 encoded AVI files, WMV files or MPEG-4 encoded ASF files)
Video Bitrate (Options include 500KB, 1.0MB, 1.5MB, 2.0 MB [default], 2.5 MB, and 3.0 MB) - Audio Bitrate (Options include 96 KB, 128 KB [default], 192 KB)
- Frame Per Second (Options include [in fps] 15.00, 20.00, 24.00, 25.00 [default], and 29.97)
Selecting "Optimize for the selected device" uses the default values above, where applicable.
After viewing/modifying the various settings, select either "Save" or "Cancel" to return to the main screen. Click "Save" if you'd made changes that you'd like to keep. Otherwise, click "Cancel."
Appendix: B

Step 3: Convert
When you're ready, select (highlight) the files you'd like to convert from the list, and then click the "Convert" button.

A progress bar will display the current status. Various popups may appear asking for specific confirmation. A popup will appear and inform you once all the files have been converted and stored to the location you selected.
Playing the converted ASF files in your camera
To play the video clips or movies (MPEG-4 in ASF format only) converted by ArcSoft MediaConverter in your MPEG-4 digital camera, please follow the steps below.

Step 1
Insert a SD/MMC card in the card slot of the camera and connect the camera to PC via the USB cable. You could follow the instructions of "Connecting the camera to your PC" on page 34 for more information.
Appendix: B

Step 2
Save the ASF files converted by MediaConverter on PC to your camera.
1 Copy the converted ASF files.
2 Open Windows Explorer to find a "Removable Disk" appeared in My Computer.
3 Double-click on the icon of Removable Disk.
4 Double-click on the DCIM file folder.
5 Double-click on the 100MEDIA file folder.
6 Paste the files into 100MEDIA file folder.
7 Change the file names to CLIP**.ASF. *** could be any 4-digit number from 0001 to 9999.
The file name must follow the naming principle of your camera, so that the camera could identify the files saved on 100MEDIA.

Step 3
Now you can use the Playback ( ) mode to enjoy the video clips or movies on the large LCD monitor!
The ArcSoft MediaConverter in this package is a customized version for your digital camera. You may visit the website http://www.arcsoft.com for more product information.
Appendix: C
Specifications
Main Functions
- Digital Video Camcorder (Video Resolution):
VGA (640 x 480 pixels) / up to 30 fps
- QVGA (320 x 240 pixels) / up to 30 fps
-
Digital Still Camera (Hardware Resolution:):
-
12 Mega (4032 x 3024 pixels)
- 5 Mega (2560 x 1920 pixels)
-
3 Mega (2048 x 1536 pixels)
-
MP3 Player: Full Function MP3 Player
- Digital Voice Recorder
-PC Camera:
VGA (640 x 480 pixels)
QVGA (320 x 240 pixels)
- Sensor Resolution: 3 Mega (2048 x 1536 pixels)
- Max. Output resolution: 12 Mega (4032 x 3024 pixels)
- Internal Memory: 32MB Flash memory (16MB for Storage)
- External Memory: Built-in SD/MMC slot (Max: 1GB)
- Digital Zoom: 10X (3M), 4X (5M)
F/N:3.0 - TV-Out: Support NTSC/PAL TV System
- Interface: USB 2.0
- Built-in Microphone
- Built-in Flash Strobe
- Built-in Speaker
- Battery: NP-60 Li-ion Rechargeable Battery (3.7V 850mAh ~ 1000mAh)
- Power Saving: 1min/3min/5min/Off
-
Dimensions: 110 × 34 × 72 mm
-
2.4" TFT LCD panel
- MPEG4 VGA up to 30 fps
- Video Stabilization
- Direct Connect to Printer
Note: Specifications are subject to change without notification.
Appendix: C
System Requirements
Operating System: Windows 2000/XP
CPU: Pentium III or above
System RAM: 128MB or above
Graphic Card: 64MB, 24 bit true color
CD-ROM speed: 4x or above
Software: Direct X 9.0c or above and Windows Media Player CODEcs
Other: USB connector
Benutzerhandbuch


Digitaler Video-Camcorder
12,0 Megapixel interpoliert
Herzlich willkommen
Allumervotrecamescope 10
Eteindrevre camescope 10
2 Allumer le camescope.
Specifications
Funzioni principali
PykoBQdCTBO IOJIb3OBaTeJIa


KoHnpOBaHne 6aJIOB Ha PIK. 32
UcTaHOBka dpaBepa Ha PIK 32
IopKJIoueHne KamepbI K KOMNbIOtepy. 34
KoNipOBaHne paiNoB Ha PIK 35
Iprocmotp/Bocnpon3BedeHne paJIOB Ha PIK 37
PacnoJoxKeHne faiIOB 38
IcnoB3OBaHne Be6-kamepbbl 39
UctahOBka nporpaMMHoro obecneueHna 39
3anyck npinojKeHHa 39
IcnoJIb3ObaHne Be6-KaMepb DV Cam. 41
Прилaxes: A. 44
YcTpaHHe HeNoJaOK. 44
HacrpoKu yactobI o6HOJIeHnA 47
CnCTeMHbIe cooBueHnra 47
EMKoCTb HocHTeJIeI 48
INHnkaTOp 3apra 6aTapei. 49
Bpempaobb6atapen 49
PpInnoKeHne:B 50
IIncTpykunno nocnoB3oBaHnO ArcSoft MediaConverterTM 50
Ppinojokene: C 58
XapakTepeuCTnK 58
TpeboBaHnK cnCTeme 59
Побътовka KЭкплуаци
O63op DeTaJIeKaMepbI
YcTaHOBKa 6aTapeu
1 OtkpoTe KpbIshky
6aTaapeHoro oTceKa.
CdknHtste KpbIbKb 6aTepaHOrO OTEcKa, KIOkBa3Ha0 Na PcyNHe.
2 yctahOBnTe 6aTaapeIO.
BactBaTBe BXOJaIyU B KOMnJIeKT
JInTI-MoHNyU (Li-Ion) 6batapeo.
O6paTITe BHIMAHNE, YTO
MeTANIIeCKHe KOHTaKtBtI DoNkHbI
CObNAATbC KOHTAKTMU BOTcEke.
3 YctaHOBNTe KpbIiKy.
Ponce npabivbHoy yCTAHOBHX batapeynCTAHOBITE Ha MeTO KpbIky BatapeHHORO OTEKA.
O6paaataebc nIITn-nHOHNObBaTapeeoe octopoXHO:
IpeoAnpaHte 8aTeapeO OTOnHbO3eYCTBnBaIbCOKemTnePtpby (BbIue 140^ nH 山 6 0 ^ C ^
He pohraTe 6atapeIO n He nbTaTecb ee pa3o6paTb.
- EcnIbatape He IcNpIb3yTcB TteHHe dIITnTeBHO rBpeMeHNI, pONIOCTbIO pa3raJaTe N 3apXaJaTe ee, NO kpaIeH Mepe, pa3 B TO DnI prPOJdEne cPcOe e CnyKb6.
PnI nepBOM hCNoB3ObaHmN batapei peKoMeHdyTecnoHocTbIO pa3rAHTb, a 3aTeM 3aRapJITb bataeOp Ido obeceHeHnHOHPMaJIbHO rCkNHa eepaBoTb.
1ПиббетенгдОпONHINTEbIbX6Батapeste!B KaheCTBe IVIOHTNtHa KITANBa BDAHNOI KAMpeMe IcNIOJIb3yOTcR NaITM-NOHNtIbSeBAPeNP-60.ПибБPECTn NITNt-NOHHyO aKkMyPnTApTOHy 6BaTePo NP-60(3,7B;850MAu~1000MAu) MOKHO B MAra3IHe.
3apЯka 6aTapei
Pnnparaoouaerbapatere 3aparzheha henoIHOctbIO. Pepe3apxabt6 baataeio cneyet pni nmoi Ka6eIa USB nn ceTeBOrO 6bnoka nHTANIN C INTEpfeMeCOM USB.
IcnoJb3ObaHne ka6eJra USB
Ipepe nepBbIM nCnoJIb3ObaHnEM 3apJxaiTe 6aTaPeH, no KpaHne Mepe, B TeueHne 8-x Yacob.
1 Coeinnite Kaempy c KOMNbIOTepOM NocpeDCTBOM Ka6eJRA USB.
2 IpeednHm HndkaTop CtaHET CBeHTbCkpaCHbIM CBTOM HauHETc3aPdKa.
3 Korga nepedHn HndkaTop cTaHET 3eJeHbIM, 6nok 6aTapei noJIHOCTbIO 3apJxHe.
3aKpOte JKK-MOHHTOP, n KaMepa aBTOMaTHUeCKN BbIKJIIOHNTcR.
NIN
Haxmnte u ydepKnBaIte KhoNky nHTaHna B TeeHne 1-3 CeKHyD, YTObblBbIKIOuHTb KaMepy.
Ecnn Kamaepa He HcnoNb3yTcB TteHHe dInTeIbHOro BpeMeHH, OHa MOKET bIKIOHOTbA BTOMATUeCKH B COOTBCTBm C napameTpom AToO-Off) (ABTOOTKIOHHe).DOnONHITeINbHyu HnΦopmaHcNo CM. Na cHp. 30.
Исторынения XXK монитopa
JKK MOHITOP MOKET INCNIOIb3OBaBcAДЯ KOMIOHOVBKИ NACTPOIKNIO6paeHINPnI cBseMKe, INI pOCSMOrTa3NCAHbXbФaJIIOBUNI DN I3MEHENI napAmeTPOB pI NMOUJI MHeIO.
KK NaHnB MoXHO NOBOpaHbTa b YcTaHaBnBaTb B CNeDyUOuNE nOIOKeHn, NOKa3AHbHe Ha NIIIOCTpaUm:
1 OTKpoTe XX KaHeJIb.
2 NobepeHnTe KK naHeJIb.
KKnAHeNbMOKHO NOBOPaHbTa H 270
rpaDycO, KAK NOKa3AO HA pCysHKe. IAneNb MOKHO yCTaHABNIbBaT IOI NIO6bIM YTIOM B 3ABNCMOCTH 0T3daC CbeMKN.
Ecnn JXK naneHnepeBepHyta, noNoJxHe H3o6paKeHnnaI npdAeBaHrTeNbHOrO npocMToPa h Kx-dmcPiee 6ydtet ATOmatuNeckOn otprEnyPBOHO.
3haeHnIHHaKApOBoXK dncnpeJ
Pexm ufoboB vDoeokapebl:
*1AHHaIHKIOTOPMAMByOEtMeHrytCB3ABINICMOCTNOTHCNOJb3YEMOTO HOCHTEINHOFOPMALIN
BHTpeHHa namTb.
KapTa nAmTn.
Pexmm npocmotpa:
1 DeiCCTBNTeIbHOe NcIOO TcABuINXcR CHIMKOB MOKeT pA3NtIcHbctcRa (Ha 1-3 CmmKa) B 3aBnCHMOCTOn NT HacbIeHHoCTn CebTa n CNOxHOTN O6bEKA tY cNobON bCEmKn.
1 Octabuieec Bpem 3aIncn MoKet n3MeHbTcB 3aBucnMoCTn TocOBnBcMk. Ipi CbMeKe MeDneHNO DBraHOUxNcHr INHeIOBbXhXb XbEKTOB DeCTBnteHbHOctABuieec Bpem 3aIncn MoKet 6bTo bOnbue (do 3-x pa).
UcTaHOBka BpeMeHnЯ3bIka
PnI nepBOM BKNIOUeHIN KAMepbI peKOMeHnyeTcYCTaHOBNtB BpemN Bbl6paTb Y3bIK.
1 BkIIOUHTe KaMepy.
2 HaxmTe KhoNky «MODE» И риnomоцn KhoNOK HabuRaunB bI6epnte peXmM «HactpoiKa» ( ). 3aTeM HaxmTe KhoNky «OK» dЯвха.
3 Пи Ромоши Кнонок Habигаши ВьберптуNYHKT «Дata и Врем»()item.
4 Haxmte KhoNky OKKnn KhoNky Habnraun BnpaBO dnn BXoDa B NOMeHIO.
5 Haxmaite KhONk Nabraaenn BnpaBO nIIN BneBO dIpeeknOeyHMaexdy nyKrtamN. Haxmaite KhONk NABRAaNN BBePx IIN BHN3 dIy yCTaHOBKN 3HaueHNA. HaxMnte KhONk «OK» IIN KhONk NaBraaNN BnpaBO dIy noTBePxJeHHaCTpOKn.
6 HaxmTe KhONky 《MENU》 nKhONky 《MODE》 nB03Bpata B MeHNO, a 3aTEM npn NOMOUs KhONOK Habnraun BBbepnte nyHKT 《R3bIK》 (ABC).
7 Haxmte KhoNky OKn nn KhoNky Habirauin BnpaBO dny BXoJa B noMeHo.
8 NcnoIb3yIte KhONk Habnraun IJRA BbI6pa HyXHOrO RaIka I NaXmTe KhONky «OK» IJRA NOITBepKdEHHJ.
Bvndeocbemka
I yctaHObka fokyca.
YctahOBHTe nepeKJIouaTeB fokycnOBKn B HjxHoe nOJoxHeHne. KAc npabINO, dIe 6oBshuHCTBa yCObNBI cBEmNK fokyCnOBky CnEydety ctahABINBaTb B pexIM ( ) Bb6epnte ( ) dIra foTOcBemKn nei3aeke. Bbluparite ( ) TOnBko dIra MaKpOcBemKn. FOKyC MoXHO hAcTpaNBt Bo BpEM 3aAinCi.
| ▲ | 1,5M ~∞ (*) |
| ● | 80CM ~ 1,5M (*) |
| ● | 30CM ~ 40CM |
2 MacsTa6nPoBaHne
Icnbnb3yTe OHKnki ynpabeneH ybeHHeM dner ybeHHeHn IIN mBHeHne H3O6pAekhenHa 3kpeAe.
DecTeRikpatoHeyBvHEnHeHn pnp paapeJewenH 3 MeranKcnEner
Yétubépèxkpatthoe yénbunenée pnpaapeuènén 5 MeranneKenei
YbeneuChne HebeoMzKno pnpapaeuHn 12 meranKcKeJe

yBENmTb macwta6
ymehbwntb macwta6
ФУнклma MacsttabopobanH IO YeTbIpeKpArTHo yBEnuHnRA TAKKE DOCTYHnBa BO BpEma BInDeOcBeMKn.
1PnI Heo6xOIMOCnH nactpOte DoONHnTeBbIe npaMetpy. DonOnHnTeBHy IOhΦopMaizu CM. B pa3dene «DOnOHnHTeBbIe onepaunm» ha CTp. 22.
Bvndeocbemka (npoJOnxKeHne)
3ДяначалаЗпсинХжмteKhoNKу 3anHcN.

4ДЯЗавшенизпсинхмITEKONКY 3anncs epe pa3.OctabweecBpeMЯЗПСИHa Kapte oTo6pa3ntcHаKK-MOnHTope.
HaxMMTe CysKOByIO KHOJky 3aTbopa, YTO6bl CpeNaTb CHMOK BO BpEMa 3aIMCN.
ΦOTOCbEMKa
1 NaCTPOIka FOKUCNPOBKM.
YctaHOBtE NepeKIOUATeB yOcysOpBKn B H KyHoe NOnOKeHne. KaK npABINO, dI OBoNtINCTBa YcNoBIM CbEMKn FOyCKyOPBky CnEydET yCTaHABINBATB YeKIM (M). BbIbepNTe (A) dI POToCObEMKn nei3Akei. BbIbapaiTe ( ) ToJIbKOd I MaKPOCbEMKn.
| ▲ | 1.5M ~∞ |
| ● | 80CM ~ 1.5M |
| ● | 30CM ~ 40CM |

2 MacsTa6nPoBaHne
NCNc03yTe KhoNkI ynpabrehn IyeBNHcHEM mI KhoNKB HAMBRAIIN BBEPx R BN3I DaeYbENrHEYNI yMHeBUHnI N3o6pBXaHnHa hKpAe.
yBemnHtB macsTa6
ymehbwntb macwta6
PeknM FOOTOBCTbIiHK
yBENmTb macwta6
Pekim 6aanaHca 6boro
ymehbwntb macwta6
1Pn Heo6xOIMOCTHn HactpoTHe DoONHITeBbIe NapaMeTpbl. DOnONHITeBHy nHΦoPMaUcM Cm. B pa3dene «DoONHITeBbIe opeauim» ha CTp. 22.
3 Haxmte KhoNky cnycka 3aTBopa, YTObI cdeNaTb CHIMOK.
Aydno3ainncb
HaKMMTe KONky «MODE» И риnomои KONOK HABINrAunn BbI6epnte peKmM «ДИКТоФОн» ( 3aTEM HaKMMTe KONky «OK» ДЯ BXOda.
IpepeTcK KaCtAeHT Bo3MOXHO BOCnPOn3BODnITb My3bIKYB foPmATE MP3,Heo6xOdMnO cKOpInpObaTb paJbIb MP3 HaKaMepy.

IopKJIIOUHTe KAMepy K I.K.
BkJIOUHTe Kamepy I NOCDoeINHInTe ee K PK c nomoubIO Ka6eIa USB.
Iopno6hble cBeDHeNn o noKnHouEnn KamepbK nK cm. Ha cTp. 34.

CkOnnpynte paajIbHa kamepy.
Pocne nodknluoyenHkamepbI KIK DbaXdbI ueknHte 3auok MoK Kombhotep》N haindtte cBemhbl dick. Co3auiTe h a cbemHom dicske panky《MP3》N konipnye foaihlp MP3 B 3ty panky dno nocnedyuozero Bocnpo3beDeneH.


1) BkIIOUHTe KaMepy.
2) BbGePHTe PnyKT «ПриNTep» В мениko kaMepbl «РекIM USB» (ctp. 30).
3 OToPKeB KbUkSy pa3eMa h n pcoeDnHtE OIEN KOHeu BXOJcero B COMKNEKT Ka6Eny USB K kamepe.
4)Подкнючitepyroу pa3bem ka6eЯ USB K npinTepy.
5) BkIIOUHTe npnHTep.
KoIIpOBaHne paIIOB Ha IIK
UcTaHOBka dpaIbEpa Ha PK
2 BkJIIOUHTe KaMEpy.
3 PoiKJIIOHnTE KaBeIb USB K Kamepe. PoiKJIIOHnTE dApTroy KOeUc KaBEny USB K Kamepe.
IyoymuHaHIO BkIIOueH peXIM dNcA. Ecnn BbI xOTNE IyoMuaHIO INoJIb3OaBbIydpuroy peXIM, CM.pa3dEN PeKIM USB) HA ctp. 30 3a nJIoYeuHEM DoJIoTHInTeBHO INHΦOpMaUNi.

PpocmToP/BOcnpOn3BeJeHne paJIOB Ha PIK
I DvaxdbI pieKnHte npKy «MondoKymentbI» nII IIO6yIO dpyryIO npKy, B KOtopoJ xpaHrTc faaibl.


Windows XP
Windows 2000/ME/98 SE
2Двжды сиКнHTe Tpe6yeMbI ΦaII,ИФaIb 6yDET OTKpbIT COOTBeTCTBHyOuSeI erO paCUnpeHnIO nporpaMMoI.
Windows XP

Windows 2000/ME/98 SE
PacnoJoxeHne paIIOB
Iocne nocknoeHnKaMepbK KOMpbTepy B nanke
(MoKombbTOpe) NOBHTCB CbEmhBn DnCK. CbeMHbN
DnCK B DejCTBnTEbHOCTn PnpctabTnE Tcobn HOCNTe b
HnFOpMaun KaMepb. Ha NDCke HaxOJaTcBce 3aHNCu
kamebp.Cxemy paonoloxeHn FaiIOB cm. Ha pncyHke HnKe.
IcnoJIb3ObaHne Be6-KaMepbl
UcTaHObKa npOrpaMMHOrO oBeCeueHnA
I BkIIOUHTe KaMepu I noKIIIOHTe ee K KOMNbHOtepy.
BKNIOHTe KAMepy u NOKIIOUHTe ee KOMNtboTepy C NOMOUIbXoDJIeero B KOMNIIeKT Ka6eJIa USB. POnpObHIc CBSEHEny CM. Ha ctp. 34.
PmmeaHHe:HaCTPOIN KACTOTbI o6OBHOBENHO OCHOBAHb HA cTaNDArTe CACTOTbI MECTHO 3NEKPCOTcN.
CnCTeMHbIe COo6uHnna
Bocnpou3BeDHeNpeo6pa3ObaHHbIX paIIOB ASF Ha KaMepe
| 카에라와 친류터无疑是 TV 缘縄声 | ||
| 운재 | 원신 | 해울심 |
| 通過協議에서的服务 오 리를 기다수极少 會員如此。 | 通過協議에 쓸라이버나소트워어가 쓸지였어요만에�고습니다. | DirectX 9.0c 이상에 Windows Media 9.0 썼 dkleakle 성화에 사목을 쓸화심사 32-tone지에서 쓸라이버에 쓸지에 기 changing자체한 사ph 을 춤조허가 http://www. microsoft.com을 bgvphon 어 파워한 흦일을다운로드 하심사오. |
| 드라이버를 쓸지 하지 휲회수于此. | 선지가 쓸정상recht로 majority, 만들렸어요. | 드라이버와 기다围观러 퍻로 그름을 쓸화심사오.본 성명서의 쓸지 쓸지에 odds 라드라이버를다시 쓸지 하 심사오. |
| 드라이버를 쓸지 하지 전에 USB 키리 bd로 펔 에라와 PC 키리 키리也会. | USB 키리 bd로 펔화고 기 전에드라이버를 쓸지 하 심사오. | |
| 가에라 리 TV에 conference 후 TV 툇rend에 사무 갼도 우akit에 事故发生 会员如此。 | 가에라 리 TV에 conference conference 会发生. | 가에라 리 TV에 conference conference 会发生. |
| 선지은 기다 퍻라리 내 쓸지 쓸지와 회 事故发生 会员如此。 | 선지가 事故发生 conference 会发生. | 다운 퍻라리나 conference conference conference conference conference conference conference conference conference conference conference conference conference conference conference conference conference conference conference conference conference conference conference conference conference conference conference conference conference conference conference conference conference conference conference conference conference conference conference conference conference conference conference conference conference conference conference conference conference conference conference conference conference conference conference conference conference conference conference conference conference conference conference conference conference conference conference conference conference conference conference conference conference conference conference conference conference conference conference conference conference conference conference conference conference conference conference conference conference conference conference conference conference conference conference conference conference conference conference conference conference conference conference conference conference conference conference conference conference conference conference conference conference conference conference conference conference conference conference conference conference conference conference conference conference conference conference conference conference conference conference conference conference conference conference conference conference conference conference conference conference conference conference conference conference conference conference conference conference conference conference Conference conference conference conference conference conference conference conference conference conference conference conference conference conference conference conference conference conference conference conference conference conference conference conference conference conference conference conference conference conference conference conference conference conference conference conference conference conference conference conference conference conference conference conference conference conference conference conference conference conference conference conference conference conference conference conference conference conference conference conference conference conference conference conference conference conference conference conference conference conference conference conference conference conference conference conference conference conference conference conference conference conference conference conference conference conference conference conference conference conference conference conference conference conference conference conference conference conference conference Conference Conference Conference Conference Conference Conference Conference Conference Conference Conference Conference Conference Conference Conference Conference Conference Conference Conference Conference Conference Conference Conference Conference Conference Conference Conference Conference Conference Conference Conference Conference Conference Conference Conference Conference Conference Conference Conference Conference Conference Conference Conference Conference Conference Conference Conference Conference Conference Conference Conference conference conference conference conference conference conference conference conference conference conference conference conference conference conference conference conference conference conference conference conference conference conference conference conference conference conference conference conference conference conference conference conference conference conference conference conference conference conference conference conference conference conference conference conference conference conference conference conference Conference Conference Conference Conference Conference Conference Conference Conference Conference Conference Conference Conference Conference Conference Conference Conference Conference Conference Conference Conference Conference Conference Conference Conference Conference Conference Conference Conference Conference Conference Conference Conference Conference Conference Conference Conference Conference Conference Conference Conference Conference Conference Conference Conference Conference Conference Conference Conference Conference Conference Conference Conference Conference Conference Conference Conference Conference Conference Conference Conference Conference Conference Conference Conference Conference Conference Conference Conference Conference Conference Conference Conference Conference Conference Conference Conference Conference Conference Conference Conference Conference Conference Conference Conference Conference Conference Conference Conference Conference Conference Conference Conference Conference Conference Conference Conference Conference Conference Conference Conference Conference Conference Conference Conference Conference Conference Conference Conference Conference Conference Conference Conference Conference Conference Conference Conference Conference Conference Conference Conference Conference Conference Conference Conference Conference Conference Conference Conference Conference Conference Conference Conference Conference Conference Conference Conference Conference Conference Conference Conference Conference Conference Conference Conference Conference Conference Conference Conference Conference Conference Conference conference conference conference conference conference conference conference conference conference conference conference conference conference conference conference conference conference conference conference conference conference conference conference conference conference conference conference conference conference conference conference conference conference conference conference conference conference conference conference conference conference conference conference conference conference conference conference conference conference conference Conference Conference Conference Conference Conference Conference Conference Conference Conference Conference Conference Conference Conference Conference Conference Conference Conference Conference Conference Conference Conference Conference Conference Conference Conference Conference Conference Conference Conference Conference Conference Conference Conference Conference Conference Conference Conference Conference Conference Conference Conference Conference Conference Conference Conference Conference Conference Conference Conference Conference Conference Conference Conference Conference Conference Conference Conference Conference Conference Conference Conference Conference Conference Conference Conference Conference Conference Conference Conference Conference Conference Conference Conference Conference Conference Conference Conference Conference Conference Conference Conference Conference Conference Conference Conference Conference Conference Conference Conference Conference Conference Conference Conference Conference Conference Conference Conference Conference Conference Conference Conference Conference Conference Conference Conference Conference Conference Conference Conference Conference Conference Conference Conference Conference Conference Conference Conference Conference Conference Conference Conference Conference Conference Conference Conference Conference Conference Conference Conference Conference Conference Conference Conference Conference Conference Conference Conference Conference Conference Conference Conference Conference Conference Conference Conference Conference Conference Conference Conference Conference Conference Conference Conference Conference Conference Conference Conference Conference Conference Conference Conference Conference Conference Conference Conference Conference Conference Conference Conference Conference Conference Conference Conference Conference Conference Conference Conference Conference Conference Conference Conference Conference Conference Conference Conference Conference Conference Conference Conference Conference Conference Conference Conference Conference Conference Conference Conference |
导录:A
普LK
"Save"(지장)을 썼리ographically. 这러지无疑是在彭友“Cancel"(류소)을 썼리ographically.
导录:B

3.3.1.2:
变 化 1 一 一 (20 一 一 (20 一 一 (20 一 一 (20

- FCC Compliance Statement:
- Welcome
- Safety Notice
- Table of Contents
- Welcome. 1
- Safety Notice 1
- Table of Contents 2
- Getting Started. 4
- Basic Operations 10
- Advanced Operations 22
- Copying Files to Your PC 32
- Using PC Camera 39
- Appendix: A. 44
- Appendix: B 50
- Appendix: C 58
- Getting Started
- Knowing your camera parts
- Installing the battery
- Open the battery compartment cover.
- Install the battery.
- Replace the cover.
- - Charging the battery
- Using the USB cable
- Using the USB AC adapter
- - Inserting a memory card (optional)
- Attaching the carrying strap
- Basic Operations
- Turning on your camera
- OR
- Turning off your camera
- Using the LCD monitor
- Open the LCD panel.
- Rotate the LCD panel.
- Reading LCD indicators
- Digital Camcorder mode:
- Playback mode:
- Setting time and language
- ° Recording a video clip
- Adjust the focus.
- zooming
- Recording a video clip (continued)
- Press the Record button to start recording.
- Press the Record button again to stop recording. Then the remaining recordable time on the card will be displayed on the LCD.
- Taking a still picture
- Press the Shutter button to take a still picture.
- Recording a voice clip
- Press the Record button to start recording.
- When you are done, press the Record button again to stop recording.
- ° Playing back your recordings
- Operations in playback mode:
- Playing MP3 music
- Copy MP3 files to the camera
- Connect the camera to your PC.
- Copy files to the camera.
- ° Playing MP3 music (continued)
- Playing music in MP3 mode
- Operations in MP3 mode:
- Connecting the camera to a TV
- Advanced Operations
- Menu operation
- ° Menu illustration
- - Menu items in Camera mode
- Menu items in Camera mode (continued)
- Menu items in Playback mode
- Menu items in MP3 mode
- Menu items in Voice mode
- Menu items in Setting mode
- Menu items in Setting mode (continued)
- Copying Files to Your PC
- Installing the driver to your PC
- Insert the driver CD.
- Start the installation.
- Notice for Windows 2000 users:
- Installing the driver to your PC (continued)
- Install the driver.
- Install codecs.
- Install Direct X 9.0c or above.
- Restart the computer.
- ° Connecting the camera to your PC
- Connect the USB cable to your computer.
- Turn on the camera.
- Connect the USB cable to your camera
- Notice for Windows 2000/XP users:
- - Copying files to the PC
- For Windows XP users:
- For Windows 2000/XP users:
- - Copying files to the PC (continued)
- Double-click on the DCIM file folder.
- Double-click on the 100MEDIA file folder.
- Drag the target file into My Documents or the destination folder.
- Viewing/Playing files on your PC
- Double-click on My Documents or any other folder that stores your files.
- Double-click on the desired file, and the file will be opened by the program matching the file type.
- O File location
- Folders
- Using PC Camera
- Installing the software
- Starting the application
- Turn on the camera and connect the camera to your computer.
- Switch to Camera mode.
- Starting the application (continued)
- Launch DV Cam program.
- Using DV Cam PC Camera
- Using DV Cam PC Camera (continued)
- Recording an AVI movie
- Taking a snapshot
- Configuring Format options
- Configuring Source options
- Device Control:
- Configuring Flicker options
- Appendix: A
- Troubleshooting
- Flicker Settings
- System Message
- Storage Capacity
- Battery Life Indicator
- Battery Life
- Appendix: B
- Instruction for ArcSoft MediaConverterTM
- Introduction
- System requirements
- Supported file formats
- Video
- Supported file types for conversion
- Supported file types for export
- Converting files
- Step 1: Select media
- - Adding files for conversion
- Removing files
- Step 2: Select destination
- Settings
- Optimize for the selected device
- Use custom conversion settings
- Video settings
- Step 3: Convert
- Playing the converted ASF files in your camera
- Step 1
- Step 2
- Step 3
- Appendix: C
- ° Specifications
- Main Functions
- Benutzerhandbuch
- Herzlich willkommen
- Allumer le camescope.
- Funzioni principali
- PykoBQdCTBO IOJIb3OBaTeJIa
- KoHnpOBaHne 6aJIOB Ha PIK. 32
- IcnoB3OBaHne Be6-kamepbbl 39
- Прилaxes: A. 44
- PpInnoKeHne:B 50
- Ppinojokene: C 58
- Побътовka KЭкплуаци
- O63op DeTaJIeKaMepbI
- YcTaHOBKa 6aTapeu
- OtkpoTe KpbIshky
- 6aTaapeHoro oTceKa.
- yctahOBnTe 6aTaapeIO.
- YctaHOBNTe KpbIiKy.
- 3apЯka 6aTapei
- IcnoJb3ObaHne ka6eJra USB
- NIN
- Исторынения XXK монитopa
- OTKpoTe XX KaHeJIb.
- NobepeHnTe KK naHeJIb.
- 3haeHnIHHaKApOBoXK dncnpeJ
- Pexm ufoboB vDoeokapebl:
- Pexmm npocmotpa:
- UcTaHOBka BpeMeHnЯ3bIka
- Bvndeocbemka
- I yctaHObka fokyca.
- MacsTa6nPoBaHne
- Bvndeocbemka (npoJOnxKeHne)
- 3ДяначалаЗпсинХжмteKhoNKу 3anHcN.
- 4ДЯЗавшенизпсинхмITEKONКY 3anncs epe pa3.OctabweecBpeMЯЗПСИHa Kapte oTo6pa3ntcHаKK-MOnHTope.
- ΦOTOCbEMKa
- NaCTPOIka FOKUCNPOBKM.
- Haxmte KhoNky cnycka 3aTBopa, YTObI cdeNaTb CHIMOK.
- Aydno3ainncb
- IopKJIIOUHTe KAMepy K I.K.
- CkOnnpynte paajIbHa kamepy.
- KoIIpOBaHne paIIOB Ha IIK
- UcTaHOBka dpaIbEpa Ha PK
- BkJIIOUHTe KaMEpy.
- PoiKJIIOHnTE KaBeIb USB K Kamepe. PoiKJIIOHnTE dApTroy KOeUc KaBEny USB K Kamepe.
- PpocmToP/BOcnpOn3BeJeHne paJIOB Ha PIK
- I DvaxdbI pieKnHte npKy «MondoKymentbI» nII IIO6yIO dpyryIO npKy, B KOtopoJ xpaHrTc faaibl.
- 2Двжды сиКнHTe Tpe6yeMbI ΦaII,ИФaIb 6yDET OTKpbIT COOTBeTCTBHyOuSeI erO paCUnpeHnIO nporpaMMoI.
- PacnoJoxeHne paIIOB
- IcnoJIb3ObaHne Be6-KaMepbl
- UcTaHObKa npOrpaMMHOrO oBeCeueHnA
- I BkIIOUHTe KaMepu I noKIIIOHTe ee K KOMNbHOtepy.
- CnCTeMHbIe COo6uHnna
- Bocnpou3BeDHeNpeo6pa3ObaHHbIX paIIOB ASF Ha KaMepe
- 导录:A
- 普LK
- 导录:B
- 3.3.1.2:
Brand : AIPTEK
Model : POCKET DV T200
Category : Portable digital camera