Neptunus 750 Darkcrystal - Washing machine CECOTEC - Free user manual and instructions
Find the device manual for free Neptunus 750 Darkcrystal CECOTEC in PDF.


User questions about Neptunus 750 Darkcrystal CECOTEC
0 question about this device. Answer the ones you know or ask your own.
Ask a new question about this device
Download the instructions for your Washing machine in PDF format for free! Find your manual Neptunus 750 Darkcrystal - CECOTEC and take your electronic device back in hand. On this page are published all the documents necessary for the use of your device. Neptunus 750 Darkcrystal by CECOTEC.
USER MANUAL Neptunus 750 Darkcrystal CECOTEC
2-in-1 submersible pump for clean and dirty water.

Safety instructions 9
-
Parts and components 70
-
Before use 70
-
Installation 70
-
Operation 72
-
Cleaning and maintenance 74
-
Troubleshooting 75
-
Recycling of electrical
and electronic equipment 76
- Copyright 76
SOMMAIRE
EN • The coding in this manual is generic and applies to all code variants of the appliance.
Read these instructions thoroughly before using the appliance. Keep this instruction manual for future reference or new users.
⚠️DANGER! Bodily injury!
Do not pump salt water or corrosive, highly flammable or explosive liquids (such as petrol, oil or nitrocellulose solvents), oils, heating oil or food products.
⚠️DANGER! Electric shock! Risk of injury from electric shock.
⚠️DANGER! Risk of injury! Risk of injury from electric current.
⚠️DANGER! Bodily injury!
Risk of injury if the product is accidentally started up.
Disconnect the product from the power supply before assembling it.
WARNING! The pump must be installed and used in accordance with local regulations for electrical installations. Consult your specialist electrician.
- Children aged 8 years and older, as well as people with physical, sensory or mental disabilities, or those with a lack of experience and knowledge, may only use the product under the supervision of a responsible person, or if they have been instructed in the safe use of the product and understand the potential dangers involved. Children should be supervised to ensure that they cannot play with the product. Children may only clean or maintain the product under the supervision of
a responsible person.
- Do not expose the outlet to moisture.
- Do not pour corrosive liquids (chemicals, cleaning products) or abrasive materials.
- Do not expose the pump to frost.
- Do not operate the pump without water, as it could quickly get damaged.
- Keep children away from the work area.
- Never transport the pump by its cable. Do not pull the cable to disconnect the pump, as this may damage the power cable and water seal. To submerge or lift/secure the pump, attach a rope to the pump handle.
- This appliance must not be used by children. Cleaning and maintenance tasks should not be carried out by children.
- The appliances can be used by people with reduced physical, sensory or mental capabilities or lack of experience and knowledge if they have been given supervision or instruction concerning the safe use of the appliance and understand the hazards involved.
- Do not let children play with the appliance.
- Pumps without frost protection should not be left outside during freezing weather conditions.
- Disconnect the product from the mains before carrying out maintenance work or replacing components.
- The pump must be powered through a residual current device (RCD) with a rated residual operating current not exceeding 30mA.
- Ensure that the voltage supply matches the voltage indicated on the pump's rating plate.
-
If the power cord is damaged, it must be replaced by the manufacturer, its service agent, or qualified people to avoid a hazard.
-
You must keep people, children, and pets away from the area of work.
- The pump is not designed for use in a swimming pool. It must be installed and used in accordance with the installation principles of the NFC15-100 standard. Consult a professional electrician for further assistance.
- Warning! This product generates an electromagnetic field during operation. Under certain circumstances, this field may interfere with active or passive medical implants. To reduce the risk of serious or fatal injury, people with medical implants are advised to consult their doctor and the implant manufacturer before using this product.
- Caution: To avoid accidents or injuries, bear in mind the weight of the appliance when transporting it (see Technical Data).
- Personal protective equipment must be worn when handling this product. Protective equipment, such as gloves and eye protection, used in circumstances where required, will reduce the risk of physical injury.
- Wear appropriate clothes. Do not wear loose clothing or jewellery when handling this product.
- Long hair must be tied back so that it remains above the shoulders to prevent it from getting entangled in moving parts.
- Attention! The water that has passed through this device is not drinkable!
- Operate the pump only with the elbow piece.
- Do not modify the interior of the pump or the float switch, as this may compromise the watertightness of the device.
-
When the pump is in operation, do not touch the pump, the cord attached to the handle, or any objects in contact with water (e.g., objects in the water, handrails, etc.).
-
It must not pump grease, oil or salt water.
- Do not pump sewage from sanitary facilities or sludge water with a lower flow rate than clear water.
- Do not pump water with a temperature higher than 35° C.
- Do not use at ambient temperatures/liquid temperatures below +3°C.
- The end of the hose should be at a height lower than the maximum suction height.
- In the event of overload, the integrated thermal circuit breaker protects the motor by switching off the pump. Once the engine has cooled sufficiently, the pump is ready for operation again.
CAUTION! This device may only be used in accordance with the requirements listed below:
- This device is not designed for continuous use. Please allow the device to rest for 10 minutes after every hour of operation.
- Never start the water pump before submerging the appliance in water.
- This pump is designed for dirty water with suspended dirt particles smaller than 25 mm in diameter. Large dirt particles could damage the pump or block the pipes.
- Never use the pump where there are people in the water.
- This appliance must not be used for drinking water. Contamination of the fluid could occur due to lubricant leaks.
- Do not use the clean water function to pump waste water. This could obstruct and overheat the pump.
- The float switch should only be operated out of the water.
- The hose must not be removed during operation.
INSTRUCTIONS DE SÉCURITÉ
- Carrying handle
- Float switch lock
- Float switch
- Base for clean/dirty water
- Universal connector
- Lower suction base
NOTE:
The graphics in this manual are schematic representations and may not exactly match the product.
2. BEFORE USE
- This appliance is packaged in a way as to protect it during transport. Take the appliance out of its box and remove all packaging materials. You can keep the original box and other packaging materials in a safe place to prevent damage to the appliance if you need to transport it in the future. In case the original packaging is disposed of, make sure all packaging materials are recycled accordingly.
- Check that all parts and components are included and in good condition. If any of them are missing or damaged, please contact Cecotec's Official Technical Support Service immediately.
Box content
- Water pump
- 8-metre nylon rope
- Instruction manual
- Do not remove the product's serial number in order to keep proper traceability if technical assistance is required.
3. INSTALLATION
This pump is designed for domestic use only:
- In places where there is a risk of flooding
- In basins
Liquid contamination may occur due to lubricant leakage.
Make sure to leave enough space around the pump so that the float switch can operate without the risk of jamming (for example, use a basin measuring at least 50x50x50 cm). The pump is designed to operate in liquids not exceeding 35°C.
Before use, you must ensure that the drained water can be safely discharged (consult local regulations). Do not place the water discharge on a road or another passageway.
Hose connection
Fig. 2
The pump is equipped with a universal connector that allows hoses of various sizes to be connected as indicated below:
The pump is equipped with a universal connector that allows hoses of various sizes to be connected as indicated below:
-
Connection for hoses of 13 mm / 15 mm / 19 mm ∅:
-
You must cut the upper end at the universal connector in position a.
- Screw a 25.4 mm tap adapter onto the universal connector.
-
Connect a quick-connect hose connector (for hoses of 13 mm, 15 mm or 19 mm ∅) to the tap adapter, then insert the hose and tighten it.
-
Connection for a 25 mm ∅ hose:
-
Screw and push a 25 mm ∅ hose into the universal connector without cutting anything.
-
Tighten the hose with a clamp.
-
Connection for a 32 mm ∅ hose:
-
You must cut the two upper ends at the universal connector in position b.
- Screw and push a ∅ 32 mm hose into the universal connector.
- Tighten the hose with a clamp.
Note: the hose, tap adapter and quick-connect hose connector are not included.
Switching between different modes
Switch from low suction mode to waste water/clean water mode
To switch from low suction mode to waste water/clean water mode, you need to replace the water pump base.
- Turn the machine over so that the base is facing upwards and unscrew the 4 screws as shown in figure 3.
- Remove the rubber ring from the lower suction base and install it on the clean/dirty water
base. Fig. 4
NOTE: The rubber ring should be fitted onto the top step of the base.
- Install the clean/dirty water base on the machine and secure it with 4 screws. Fig. 5.
NOTE: The opening in the base must be aligned with the machine's water outlet.
Note: The same method is used to switch from waste water/clean water mode to low suction mode.
Switch between waste water mode and clean water mode
Fig. 6.
Switching between waste water mode and clean water mode is simple.
-
As long as the four support legs are folded towards the centre, you can switch from waste water mode to clean water mode.
-
Conversely, by extending the support legs outwards, it is possible to switch from clean water mode to waste water mode.
Functions of the three modes
The three-mode design of this water pump allows it to be used in different environments:
-
In clean water mode, the water pump operates with clean water.
-
In wastewater mode, the water pump operates with wastewater.
-
In low suction mode, the water pump must operate with clean water. In this mode, the residual water level can be as low as 1 mm.
4. OPERATION
The float switch automatically turns on the pump when the water level rises too high. It switches off when the level drops.
- The pump has a float switch that detects the liquid level in a tank. This floats on the liquid and acts as a switch as the level rises or falls. It works with an internal ball that moves by gravity.
- There is an on/off zone. The float switch can be moved up and down to feel the movement of the ball.
There may be overlap between zones due to factors such as switch cable resistance, liquid density, tank size, liquid temperature, sludge, etc.
Float switch on/off zones
Fig. 7
A. Power-on zone. From +45° to 90°.
B. Retention zone. From +45° to -45°.
C. Power-off zone. From -45° to -90° .
- Connect the pump tube (not included) and seal it securely.
- Place the pump on a solid surface or use a rope hanging from the handle. Fig. 8
- Plug the power cable into the mains socket.
- Manually turn the float switch on and off to verify that it is functioning correctly.
- You can also lock the float switch cable to adjust the pumping range.
Notes:
- When submerging the pump in water, do not pull directly on the power cable or switch; use a rope instead. Fig. 9
- To prevent the pump from running dry, always keep it in an upright position and ensure that the float switch is not stuck in mud or obstructed by other objects. Fig. 10
Note: Ensure that the length of the locked position is at least 10 cm, so that the float switch can move freely up and down, automatically turning the function on and off. The longer the length of the locked position, the greater the pumping range. Fig. 11
Fig. 11
A. Locking position length
Continuous operation
This product can be operated continuously.
Turn the handle down and insert the float switch cable into the float switch lock. In this case, the machine will continue to operate. Fig. 12
Note: The machine will continue to operate even without water, so pay attention to the water level when in this state.
Anti-air lock hole
Fig. 13
This pump is equipped with an anti-air lock hole. A jet of water will come out of this hole when the pump is working.
This is a normal feature of the pump.
The anti-airlock hole should be cleaned periodically to prevent a blockage.
Air lock
When a pump is blocked by air, it operates but does not pump water.
An air lock will cause the pump to overheat and fail. This pump has an anti-air lock hole in the middle of the pump casing.
If you suspect an air lock, unplug the pump, clean the anti-air lock hole with a paper clip or a piece of wire, and restart the pump.
Check before starting
- You should check the pump for any damage (especially to the power cable and plug).
- The height of the 'on' and 'off' switching points should be easy to reach.
- You must verify the operation in a barrel filled with water. Immerse the pump in water and then gently lift and lower the float switch. The pump starts and stops.
- The float switch must not touch the bottom before the pump switches off, or there will be a risk of dry running.
Note: The maximum pumping rate is only possible with the largest possible line diameter; if smaller hoses or pipes are connected, the pumping rate will be reduced.
5. CLEANING AND MAINTENANCE
- Unplug the pump's power cable before performing any maintenance or cleaning operations.
- Use a soft, damp cloth to clean the plastic part. Do not use detergents, solvents or sharp objects.
- Clean and store the pump in a frost-free location before the first frosts arrive.
Warning!
- To protect the product, it is recommended to use the pump for a few minutes every 3 months.
- Clean and store the pump in a dry, frost-free place after each use. The ambient temperature should not be below 0°C.
Storage
- Store the unit, the instruction manual and, where necessary, the accessories in their original packaging. This way, you will always have all the information and components.
- To prevent damage during transport, carefully package the device or use the original packaging.
- Keep the machine packed in a dry place.
DANGER! Risk of injury from electric shock, fire and/or serious injury.
6. TROUBLESHOOTING
The following table lists common problems that can occur with the water pump, along with their possible causes and solutions. Use this guide to efficiently diagnose and resolve issues. If you are unable to resolve the issue, please contact the official Cecotec Technical Support Service.
Warning! Before solving any problem, switch off the product and keep other people away.
| Problem | Possible cause | Possible solution |
| The pump won't start. | - There is no power supply.- The float switch is in the low position (power off).- The float mechanism is blocked. | - Ensure that there is electrical power.- Lift the float.- Shake the float.- Check the water height. |
| Pump does not drain. | - The inlet tube is clogged.- The outlet tube is clogged.- The turbine is blocked.- Presence of an air bubble. | - Clean the inlet tube.- Clean the outlet tube.- Disassemble the base and clean the turbine.- Tilt the pump to release the air bubble and then return it to an upright position. |
| The pump does not stop. | - The float is stuck in the raised position.- The float mechanism is blocked. | - Check that there are no foreign objects blocking the float and place it back in the low position.- Shake the float. |
| The flow is not adequate. | - The diameter of the drainage pipe is not adequate.- The inlet tube is clogged.- The outlet tube is clogged.- The turbine is blocked. | - Replace the tube.- Clean the tube or the inlet tube.- Disassemble the base and clean the turbine. |
| The pump stops briefly. | - The instructions for use have not been followed.- The motor automatically switches to safety position.- The tube is not adequate.- The water is too hot. The overheating protection device is stopping the pump. | - Check the immersion depth.- Replace the tube following the instructions for use.- Ensure that the water temperature remains below 35°C. |
7. RECYCLING OF ELECTRICAL AND ELECTRONIC EQUIPMENT

This symbol indicates that, according to the applicable regulations, the product and/or battery must be disposed of separately from household waste. When this product reaches the end of its shelf life, you should dispose of the cells/batteries/accumulators and take them to a collection point designated by the local authorities.
For detailed information on how to properly dispose of electrical and electronic appliances and/or batteries, consumers should contact their local authorities.
Compliance with the above guidelines will help protecting the environment.
Information regarding national packaging recycling systems and their marking can be found on our website.
8. COPYRIGHT
The intellectual property rights over the texts in this manual belong to CECOTEC INNOVACIONES, S.L. All rights reserved. The contents of this publication may not, in whole or in part, be reproduced, stored in a retrieval system, transmitted, or distributed by any means (electronic, mechanical, photocopying, recording or similar) without the prior authorization of CECOTEC INNOVACIONES, S.L.
1. PIÈCES ET COMPOSANTS
Image 1
6. PROBLEEMOPLOSSING
Fig./Img./Abb./Afb./Rys./Obr.1
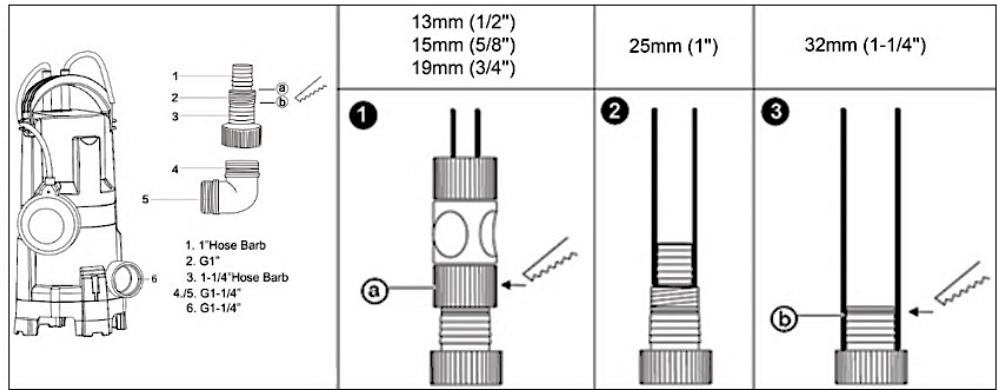
Fig./Img./Abb./Afb./ Rys./Obr. 2

Fig./Img./Abb./Afb./ Rys./Obr. 3

Fig./Img./Abb./Afb./Rys./Obr. 4
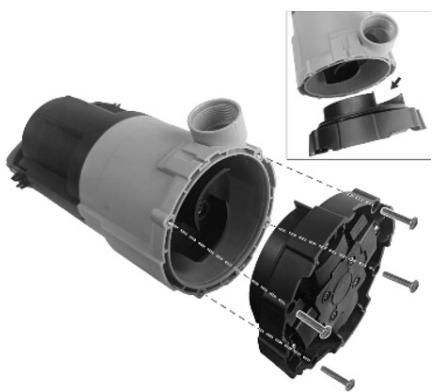
Fig./Img./Abb./Afb./Rys./Obr. 5

Fig./Img./Abb./Afb./Rys./Obr. 6

Fig./Img./Abb./Afb./ Rys./Obr. 7
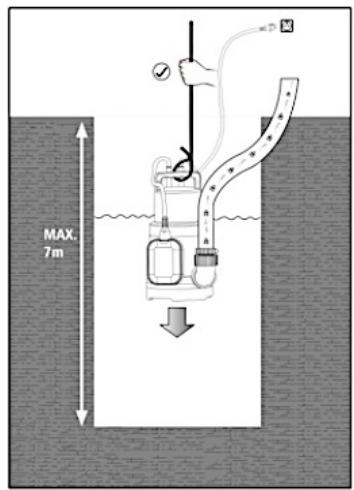
Fig./Img./Abb./Afb./Rys./Obr. 8

Fig./Img./Abb./Afb./Rys./Obr. 9

Fig./Img./Abb./Afb./ Rys./Obr. 10

Fig./Img./Abb./Afb./ Rys./Obr. 11

Fig./Img./Abb./Afb./ Rys./Obr. 12

Fig./Img./Abb./Afb./ Rys./Obr. 13
www.cecotec.es
- SOMMAIRE
- INSTRUCTIONS DE SÉCURITÉ
- NOTE
- BEFORE USE
- BOX CONTENT
- INSTALLATION
- HOSE CONNECTION
- FIG. 2
- SWITCHING BETWEEN DIFFERENT MODES
- SWITCH FROM LOW SUCTION MODE TO WASTE WATER/CLEAN WATER MODE
- SWITCH BETWEEN WASTE WATER MODE AND CLEAN WATER MODE
- FUNCTIONS OF THE THREE MODES
- OPERATION
- CONTINUOUS OPERATION
- ANTI-AIR LOCK HOLE
- AIR LOCK
- CHECK BEFORE STARTING
- CLEANING AND MAINTENANCE
- WARNING
- STORAGE
- TROUBLESHOOTING
- RECYCLING OF ELECTRICAL AND ELECTRONIC EQUIPMENT
- COPYRIGHT
- PIÈCES ET COMPOSANTS
- PROBLEEMOPLOSSING
Brand : CECOTEC
Model : Neptunus 750 Darkcrystal
Category : Washing machine