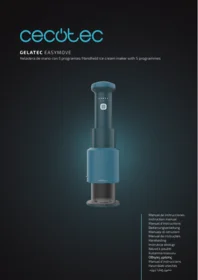
Gelatec Easymove - Refrigerator CECOTEC - Free user manual and instructions
Find the device manual for free Gelatec Easymove CECOTEC in PDF.


| Product type | Ice cream and sorbet maker |
| Brand | Cecotec |
| Model | Gelatec Easymove |
| ICE program | Dairy and non-dairy recipes for scoopable ice cream |
| SORBET program | Fresh fruit is chilled until frozen, then blended into a granita |
| INGREDIENTS TO MIX program | Customize your delicious desserts |
| Start button | Starts the appliance |
| Function button | Allows you to select the desired program |
| Program indicator light | Displays the selected program (A, B, C, etc.) |
| Bowl | Transparent bowl with lid |
| Blades | Very sharp removable blades, removable with the dedicated button |
| Anti-overload safety | Automatic motor shutdown in case of overload or excessive pressure |
| Power supply | 220-240 V ~ 50/60 Hz |
| Maintenance and cleaning | Main unit: damp cloth; bowl and lid: soapy water; do not immerse the main unit |
| Use | Household use only, indoors |
| Repairability | Repairs only by authorized personnel; do not disassemble the blades |
| Precautions | Do not use non-recommended accessories; do not cover the appliance while in operation |
Frequently Asked Questions - Gelatec Easymove CECOTEC
User questions about Gelatec Easymove CECOTEC
0 question about this device. Answer the ones you know or ask your own.
Ask a new question about this device
Download the instructions for your Refrigerator in PDF format for free! Find your manual Gelatec Easymove - CECOTEC and take your electronic device back in hand. On this page are published all the documents necessary for the use of your device. Gelatec Easymove by CECOTEC.
USER MANUAL Gelatec Easymove CECOTEC
Safety instructions 9
EN • The coding in this manual is generic and applies to all code variants of the appliance.
Read the following instructions carefully before using the product. Keep this instruction manual for future reference or new users.
- To protect against the risk of electric shock, do not immerse the cable, plug or motor assembly of the appliance in water or any other liquid.
- This appliance is not intended for use by persons (including children) with reduced physical, sensory or mental capabilities, or lack of experience and knowledge, unless they are under close supervision and have received instructions concerning the use of the appliance from a person responsible for their safety. Close supervision is necessary when any appliance is used by or near children. Children should be supervised to ensure they do not play with the appliance.
- Switch off the appliance and disconnect it from the mains when not in use, before assembling or disassembling parts and before cleaning. To disconnect, grasp the plug and pull it out of the mains socket. Never pull on the power cable.
- Avoid contact with moving parts. Keep hands, hair and clothing, as well as spatulas and other utensils, away during operation to reduce the risk of injury and/or damage to the appliance.
- Always inspect the appliance before use for obvious signs of damage.
Do not use if damaged or if it has been dropped. In case of damage or if the appliance malfunctions, contact the Technical Support Service. -
The use of accessories not recommended may pose a risk of fire, electric shock or injury.
-
Do not use outdoors.
- Do not allow the cable to hang over the edge of the table or worktop, or touch hot surfaces.
- DO NOT USE SHARP OBJECTS INSIDE THE DESSERT CONTAINER.
- Except for user cleaning and maintenance, all other repair services must be carried out only by authorised repair personnel.
- This appliance is intended solely for domestic indoor use and is not designed for use in applications such as: staff kitchens in shops, offices and other working environments; farm houses; by customers in hotels, motels and other residential-type environments; bed and breakfast establishments.
- Never store electrical equipment in a utility room or under a cupboard. If it must be stored in a utility room, always disconnect it. Otherwise, it may pose a fire risk, especially when the equipment is against a garage wall or the door is closed.
- This product is for domestic use only. It is not suitable for industrial or commercial use. Do not use this appliance for any other purpose.
- THIS IS AN APPLIANCE THAT REQUIRES SUPERVISION. Do not leave unattended during use; disconnect after each use. Never leave the appliance unattended when switched on or plugged in.
- Always unplug the appliance from the power supply if left unattended and before assembling, disassembling or cleaning.
-
Always ensure your hands are dry before touching the power cable or disconnecting the plug from the mains socket.
-
Ensure all packaging materials and promotional labels or stickers are removed from the appliance before first use.
- Place on a stable, level surface near a power socket.
- Do not place the appliance on or near a hot gas or electric hob.
- Do not immerse the power cable, plug or main unit in water or other liquids for cleaning.
- Do not use accessories or attachments other than those recommended.
- The paddle is very sharp and must be handled with extreme care.
- Care must be taken when removing the mixing paddle, emptying the container and cleaning.
- Switch off the power switch and disconnect the power supply before replacing accessories or touching moving parts. Disconnect the power connection before leaving the appliance unattended, disassembling or cleaning.
- All parts should be inspected regularly before use. Do not use if any damaged parts are found.
- To prevent injury or possible fire, do not cover the appliance while in use.
- This appliance is not suitable for operation with an external timer or by removing the control system independently.
Warning: This appliance is fitted with a locking function. If the appliance becomes overloaded or subjected to severe stress, the motor will stop automatically. Release the power button and wait 15 seconds for the appliance to recover. If it still fails to start, unplug the power cable and wait for the appliance to cool for 15 minutes before using again.
- After using the product, the power cable must be unplugged, as otherwise there may be a risk of electric shock, leakage or fire.
- Do not disassemble or assemble the paddle yourself to avoid hazards.
- Do not use the appliance if the wiring is damaged. Stop using immediately if any damage occurs. Damaged wiring must be replaced by the manufacturer. Return the appliance to the Technical Support Service. Consumers should not attempt to repair it themselves.
CAUTION
- Do not immerse the main unit or base housing in water.
- To reduce the risk of fire or electric shock, do not disassemble the main unit or base housing.
- Repairs should only be carried out by authorised personnel.
- Check the voltage before using the appliance to ensure that the voltage indicated on the rating label matches yours.
- Never clean with powder detergents or hard utensils.
- THIS IS NOT A BLENDER. Do not process ice cubes or loose hard ingredients.
INSTRUCTIONS DE SÉCURITÉ
1. Parts and components
Fig. 11
- Start button
- Programme indicator light (ABCDE in the following image)
- Function button
- Operation indicator light
- Main unit
- Base housing
- Paddle assembly
- Container lid
- Container
- Paddle release button
- Power cable
A: ICE CREAM: Dairy and non-dairy ice cream recipes that can be served with a spoon.
B: SORBET: Fresh fruit is chilled until frozen and then mixed to achieve a slushie texture.
C: MIX-INS: Customise your delicious desserts with chocolate chips, nuts, fresh fruit and much more.
D: SLUSH: Transform your favourite drinks into slushies.
E: MILKSHAKE: Blend homemade or shop-bought ice cream with milk.
Note:
The graphics in this manual are schematic representations and may not exactly match the product.
2. Before use
- This appliance comes in a packaging designed to protect it during transport. Remove the appliance from its box. You can keep the original box and other packaging materials in a safe place to prevent damage to the appliance if you need to transport it in the future. If you wish to dispose of the original packaging, make sure all items are recycled properly.
- Check that all parts and components are included and in good condition. If any of them are missing or damaged, please contact Cecotec's Official Technical Support Service immediately.
Box content:
- Product
- Instruction manual
-
Quick start guide
-
3 x 260 ml tubs
- 3 lids
Do not remove the product's serial number in order to keep proper traceability if technical assistance is required.
3. Installation
- Remove the ice cream maker from the box and remove all packaging materials.
- Wash the container with warm soapy water to remove any dust or dirt that may have remained after production and transport.
- Do not immerse the main unit or base housing in water; simply clean them with a damp cloth.
- Never use abrasive cleaners or hard objects to clean any of the parts.
- Pour the prepared ingredients into the container. The quantity of ingredients must not exceed the MAX mark (Figure 1).
- Press the container lid onto the container (Figure 2) and place it in the freezer at a temperature below -18°C for 24 hours.
- Remove the container from the freezer and leave it at room temperature for 5-10 minutes before opening the lid.
- Insert the paddle assembly into the base housing and turn to lock it in place (Figure 3).
- Align the base housing with the installed paddle assembly with the container, install it downwards and turn to lock it in place (Figures 4/5).
- Install the main unit on top of the base housing, aligning it with the interior recess (Figure 6). The paddle release button should face towards the housing. Next, press the release button and push the main unit down into the base housing. The main unit will engage with the paddle assembly (Figure 7).
Note: The cup must first be installed in the lower housing, and then the main unit can be installed; otherwise, the main unit cannot be installed.
4. Operation
- After installation, connect the power supply and press the function button to select the desired function. Then press the start button to begin operation. Hold the base housing with one hand. With the other hand, press the start button while simultaneously pressing the main unit downwards (Figure 8).
Operating tips: After starting the appliance, use the palm of your hand to slowly press the main unit downwards.
- When you press the main unit downwards, the paddle will churn the mixture. The operation indicator light will remain blue, indicating that you may continue pressing downwards.
- When the indicator light turns red, this means it has processed the mixture in the container to the bottom. Press and hold the start button and pull the main unit back to the initial position to continue mixing (Figure 9).
- The mixing process is only complete when the main unit is pushed back to its initial position. If mixing is stopped at other positions, it will be difficult to remove the mixing container and main unit, and it will be necessary to remove the mixing container by force.
- Once mixing is finished, release the start button to stop operation. Unplug the power cable and press the paddle release button located at the rear of the main unit (Figure 10) to extract the main unit upwards.
- Turn the container and unlock it to separate it from the base housing.
Note: The main unit must be removed from the base housing before the mixing container can be removed. Do not touch the mixing paddle to avoid personal injury.
- If you wish to mix the mixture further to achieve the desired consistency, you may repeat this mixing process.
Adding additional ingredients to ice cream or sorbet
Once you have finished churning your ice cream, you may add additional ingredients such as chocolate chips, nuts or fruit.
- While the mixture is still in the dessert container, make a 1-2cm well in the centre and pour in the additional ingredients, taking care not to overfill.
NOTE: Additional ingredients should not be larger than 0.5 cm.
- Reconnect the base housing and insert the main unit.
- Select the "Mix-Ins" function and complete the above steps for churning.
WARNING:
- The mixing process is only complete when the main unit returns to its initial position. If mixing stops at any other position, it will be difficult to remove the container. Forcibly removing the container may damage the appliance.
- Processing time will vary according to the recipe, but most recipes require between 2 and 3 minutes.
- If you wish to mix the mixture further to achieve the desired consistency, you may repeat this process.
ENGLISH
- Do not touch the edge of the mixing paddle.
- Before processing frozen mixtures, allow them to rest at room temperature for 5-10 minutes. Allowing them to rest before processing will result in a smoother texture and extend the service life of your equipment.
RECIPES
To help you start using this new ice cream maker quickly, we have prepared several creative recipes in this user manual.
- Ice cream
Low-fat vanilla ice cream
| Cream | Semi-skimmed milk | Semi-skimmed milk | Semi-skimmed milk | Honey |
| 165 ml | 75 ml | 1.5 tsp | 0.5 tsp | 1 tsp |
- Put the milk and sugar in a medium bowl and beat with a hand mixer (at low speed for 1-2 minutes) or with a whisk until the sugar is completely dissolved.
- Add the cream and vanilla extract and beat with a hand mixer at low speed until a homogeneous mixture is obtained.
- Pour the mixture into the container, ensuring it is level and does not exceed the MAX mark.
- After covering the container, refrigerate for at least 24 hours. Ensure the freezer temperature is set below -18°C .
Note: Before mixing, remove the mixture from the freezer and leave at room temperature for 5-10 minutes.
Italian ice cream
| Egg yolk | Honey | Caster sugar | Double cream | Whole milk |
| 3 pcs | 1/2 tsp | 30 g | 160 ml | 50 ml |
- Put the milk and sugar in a medium bowl and beat with a hand mixer (at low speed for 1-2 minutes) or with a whisk until the sugar is completely dissolved.
-
Add the cream, egg yolks and caster sugar, and beat with a hand mixer at low speed until a homogeneous mixture is obtained.
-
Pour the mixture into the container, ensuring it is level and does not exceed the MAX mark.
- After covering the container, refrigerate for at least 24 hours. Ensure the freezer temperature is set below -18° C.
Note: Before mixing, remove the mixture from the freezer and leave at room temperature for 5-10 minutes.
Malt syrup
Pour 160 g of malt syrup into the container and mix using the ice cream programme.
- Sorbet
Fruit juice sorbet
| Caster sugar | Hot water | Lemon juice | Maltose |
| 30 g | 110 ml | 3-5 tsp | 1/2 tsp |
- Add the sugar to the hot water and beat with a hand mixer (at low speed for 1-2 minutes) or with a manual whisk until the sugar is completely dissolved.
- Add the lemon juice and maltose to the mixed sugar water and stir well.
- Pour the mixture into the container, ensuring it is level and does not exceed the MAX mark.
- After covering the container, refrigerate for at least 24 hours. Ensure the freezer temperature is set below -18°C .
Note: Before mixing, remove the mixture from the freezer and leave at room temperature for 5-10 minutes.
Mix-Ins
Frozen yoghurt
| Yoghurt | Cream | Condensed milk |
| 140 g | 40 ml | 80 g |
- Put the yoghurt, cream and condensed milk in a medium bowl and beat with a hand
mixer (at low speed for 1-2 minutes) until the mixture is homogeneous.
- Pour the mixture into the container, ensuring it is level and does not exceed the MAX mark.
- After covering the container, refrigerate for at least 24 hours. Ensure the freezer temperature is set below -18° C.
Note: Before mixing, remove the mixture from the freezer and leave at room temperature for 5-10 minutes.
- Slush
Lemon slush
| Lemon juice | Lime juice | |
| 155 ml | 5 ml | 20 g |
- Place all the above ingredients in a suitable container and mix well.
- Pour the mixture into the container, cover and freeze for at least 24 hours. Ensure the freezer temperature is set below -18°C . Note: Before mixing, remove the mixture from the freezer and leave at room temperature for 5-10 minutes.
- Follow the instructions to carry out processing using the slush settings.
- After initial processing, add 75 ml of drink, such as cocktail or purified water, to the mixing container (do not exceed the MAX mark) and process again. This process can be repeated until the desired consistency is achieved.
Note: You may also add more liquid to the mixture after processing for less ice and a longer shake.
Milkshake
| Whole milk | Oreo biscuits |
| 70 ml | 2.5 pcs |
- Add 160 g vanilla ice cream and 70 ml whole milk to the container.
- Crush the Oreo biscuits and add them to the container.
- Use the milkshake settings according to the instructions.
5. Cleaning and maintenance
- Clean the product only after it has stopped operating and the power cable has been disconnected. Always unplug the power cable before cleaning.
- Do not place the main unit or accessories in a steriliser, dishwasher or dryer for cleaning, sterilising or drying.
- The container and paddle assembly can be cleaned with warm soapy water or in the dishwasher.
- The main unit and lower housing can only be cleaned with a cloth. Do not rinse them with water to avoid electric shock or malfunction.
- After cleaning, place in a clean, ventilated area to air dry before use.
- The paddle is sharp; take care not to cut your hands while cleaning. Use protective gloves during cleaning.
- Use warm soapy water or a dishwasher. Do not wash with boiling water.
- Do not use abrasive cleaners or tools for cleaning.
- When not using for an extended period, clean and dry the product and store it in its original packaging in a dry, ventilated place to prevent moisture from affecting its use.
- Do not store the main unit, base housing or paddle assembly in the refrigerator. The dry mixing container may be stored in the refrigerator.
6. Technical specifications
Product: Gelatec EasyMove
Product reference: EU01_122383
Voltage: 220-240 V
Frequency: 50-60 Hz
Power: 500 W
The power consumption of the appliance in any off-mode condition is 0.3 W.
Technical specifications may change without prior notice to improve product quality.

esigned in Spain
of electrical and electronic equipment
This symbol indicates that, according to the applicable regulations, the product and/or batteries must be disposed of separately from household waste. When this product reaches the end of its service life, you must remove the batteries/accumulators and take it to a collection point designated by local authorities.
For detailed information on how to properly dispose of electrical and electronic equipment and/or the corresponding batteries, consumers should contact their local authorities.
8. Technical support and warranty
Cecotec shall be liable to the end user or consumer for any lack of conformity that exists at the time of product delivery under the terms, conditions and deadlines established by applicable regulations.
Repairs should be carried out by qualified personnel.
If you detect any problem with the product or have any queries, please contact Cecotec's Official Technical Support Service at +34 96 321 07 28.
9. Copyright
The intellectual property rights over the texts in this manual belong to CECOTEC INNOVACIONES, S.L. All rights reserved. The content of this publication may not, either in part or in its entirety, be reproduced, stored in a retrieval system, transmitted or distributed by any means (electronic, mechanical, photocopying, recording or similar) without prior authorisation from CECOTEC INNOVACIONES, S.L.
10. Simplified EU Declaration of Conformity

Cecotec Innovaciones hereby declares that this appliance complies with the essential requirements and other relevant provisions of the regulations applicable in the European Union. This appliance has been designed, manufactured and tested in compliance with required safety and quality
standards. The full text of the EU Declaration of Conformity can be found on the following website: https://cecotec.es/es/information/declaration-of-conformity
| Joghurt | Nata | Kondensmilch |
| 140g | 40ml | 80g |
Fig./Img./Abb./Afb./Rys.1

Fig./Img./Abb./Afb./ Rys. 2
3

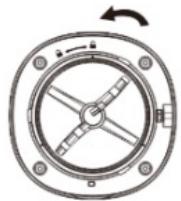
Fig./Img./Abb./Afb./ Rys. 3
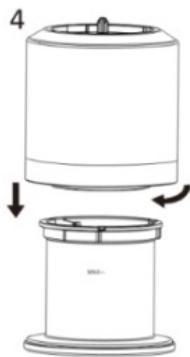
Fig./Img./Abb./Afb./Rys. 4
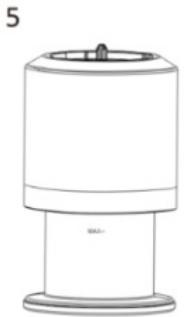
Fig./Img./Abb./Afb./Rys. 5
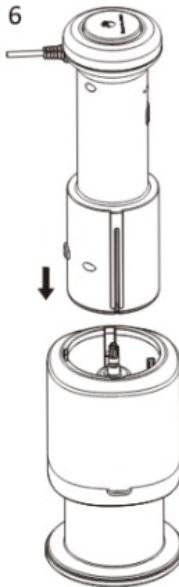
Fig./Img./Abb./Afb./Rys. 6

Fig./Img./Abb./Afb./Rys. 7

Fig./Img./Abb./Afb./ Rys. 8

Fig./Img./Abb./Afb./Rys. 9

Fig./Img./Abb./Afb./Rys. 10

Fig./Img./Abb./Afb./ Rys. 11
www.cecotec.es
- CAUTION
- INSTRUCTIONS DE SÉCURITÉ
- PARTS AND COMPONENTS
- BEFORE USE
- BOX CONTENT
- INSTALLATION
- OPERATION
- ADDING ADDITIONAL INGREDIENTS TO ICE CREAM OR SORBET
- WARNING
- ENGLISH
- RECIPES
- ICE CREAM
- MALT SYRUP
- SORBET
- MIX-INS
- SLUSH
- CLEANING AND MAINTENANCE
- TECHNICAL SPECIFICATIONS
- OF ELECTRICAL AND ELECTRONIC EQUIPMENT
- TECHNICAL SUPPORT AND WARRANTY
- COPYRIGHT
- SIMPLIFIED EU DECLARATION OF CONFORMITY
Brand : CECOTEC
Model : Gelatec Easymove
Category : Refrigerator