Freshessenceindustry 260 Control - Washing machine CECOTEC - Free user manual and instructions
Find the device manual for free Freshessenceindustry 260 Control CECOTEC in PDF.


| Product type | Floor-standing misting fan |
| Recommended use | Indoor, domestic |
| Dimensions (approx.) | Height adjustable from 100 to 130 cm; base Ø 35 cm |
| Weight (approx.) | 5.5 kg |
| Power supply | Mains 220-240 V ~ 50/60 Hz with earth connection |
| Rated power | 260 W (estimate per model) |
| Tank capacity | 6 L (estimate) |
| Misting function | Cold water output to cool the air |
| Oscillation | Automatic via oscillation support |
| Adjustable height | Telescopic tube |
| Mobility | Wheels for easy movement |
| Control panel | Integrated controls for speed and misting |
| Protective grille | Removable front grille for cleaning |
| Safety | Unplug before refilling/cleaning; do not immerse |
| Maintenance | Clean the tank every 3 days; empty the water after use |
| Repairability | Spare parts via Cecotec after-sales service; repair by approved technician |
| Included accessories | Instruction manual |
| Warranty | Official Cecotec warranty |
Frequently Asked Questions - Freshessenceindustry 260 Control CECOTEC
User questions about Freshessenceindustry 260 Control CECOTEC
0 question about this device. Answer the ones you know or ask your own.
Ask a new question about this device
Download the instructions for your Washing machine in PDF format for free! Find your manual Freshessenceindustry 260 Control - CECOTEC and take your electronic device back in hand. On this page are published all the documents necessary for the use of your device. Freshessenceindustry 260 Control by CECOTEC.
USER MANUAL Freshessenceindustry 260 Control CECOTEC
Safety instructions 8
-
Parts and components 53
-
Before use 53
-
Installation 54
-
Operation 56
-
Cleaning and maintenance 57
-
Technical specifications 58
-
Recycling of electrical and electronic equipment 58
-
Technical support and warranty 58
-
Copyright 59
-
Simplified EU Declaration of Conformity 59
SOMMAIRE
EU01_123697 - FreshessenceIndustry 260 Control
EN · The coding in this manual is generic and applies to all code variants of the appliance.
Read the following instructions carefully before using the product. Keep this instruction manual for future reference or new users.
- This symbol means that the water tank should be cleaned every 3 days.
- High humidity levels may promote the growth of biological organisms in the environment.
- Do not allow the area around the device to get damp or wet. If there is excessive moisture, reduce the power. If the misting fan's output volume cannot be reduced, use it intermittently. Do not allow absorbent materials such as carpets, curtains, or tablecloths to become damp.
- Unplug the appliance during filling and cleaning.
- Never leave water in the tank when the appliance is not in use.
- Empty and clean the tank before storage. Clean the tank before next use.
- WARNING: micro-organisms that may be present in the water or in the environment where the appliance is used or stored, can grow in the water tank and be expelled into the air causing very serious health risks when the water is not renewed and the tank is not properly cleaned every 3 days.
- Empty the tank and refill it every 3 days. Before refilling it, clean the tank with clear water. Remove any limescale, deposits, or films that have formed on the sides or interior surfaces of the tank. Dry all surfaces after cleaning. All safety instructions must be closely followed when using the appliance.
- This appliance can be used by children aged 8 years and above and people with reduced physical, sensory, or mental capabilities or lack of experience and knowledge if they have
been given appropriate supervision or instruction concerning use of the appliance in a safe way and understand the hazards involved. Children must not play with the appliance. Cleaning and user maintenance must not be carried out by children without supervision.
- Children shall not play with the appliance. Close supervision is necessary when the appliance is being used by or near children.
- This appliance is intended for domestic use only and is not suitable for use in commercial establishments such as bars, restaurants, farms, hotels, motels, and offices.
- Unplug the appliance from the mains when filling up and cleaning the water tank.
- Make sure that the mains voltage matches the voltage specified on the appliance rating label and that the wall outlet is earthed.
- Do not immerse the cord, plug, or any other non-removable part of the appliance in water or any other liquid. Do not expose electrical connections to water. Make sure your hands are completely dry before handling the plug or switching on the appliance.
- Never immerse the appliance in water. Do not touch the water!
- Check the power cord regularly for visible damage. If the cord is damaged, it must be repaired by Cecotec's Official Technical Support Service to avoid any hazard.
-
Do not carry or pull the appliance from the power cord. Do not use the cord as a handle. Do not push the cable against corners or sharp edges. Do not crush the power cable with the full weight of the appliance. Keep the cable away from hot surfaces.
-
Do not use the appliance if its cord, plug, or housing are damaged, nor after it malfunctions or has been dropped or damaged in any way.
- Do not use the appliance in confined spaces with explosive or flammable vapours.
- Keep the fan away from heat sources.
- Keep hair, clothes, fingers, and other body parts away from openings and moving parts of the product.
- Do not leave the appliance unattended while in use. Unplug it from the mains supply when you finish using it or when you leave the room.
- Do not try to repair the product by yourself. Contact Cecotec's Official Technical Support Service.
- Always turn off and unplug the appliance when not in use, before moving it to a new location, and before assembling or disassembling it. To avoid tripping hazards, wind the cable safely.
- Make sure the fan is not placed near drapes, curtains, or any object that may be drawn into the fan.
- Do not place the cable under any carpet or cover it, place it in an unobstructed space where it cannot be tripped over.
- Operate the fan in a well ventilated area. A distance of no less than 20 cm should be kept from walls and corners to ensure proper air ventilation during operation.
INSTRUCTIONS DE SÉCURITÉ
A. Front grille
B. Blades
C. Misting outlet
D. Oscillation bracket
E. Control panel
F. Telescopic tube
G. Lower black tube
H. Tank handle
I. Water tank
J. Base
K. Wheels
Note:
The graphics in this manual are schematic representations and may not exactly match the product.
2. BEFORE USE
- This appliance comes in a packaging designed to protect it during transport. Remove the appliance from its box. You can keep the original box and other packaging materials in a safe place to prevent damage to the appliance if you need to transport it in the future. If you wish to dispose of the original packaging, make sure all items are recycled properly.
- Check that all parts and components are included and in good condition. If any of them are missing or damaged, please contact Cecotec's Official Technical Support Service immediately.
Box contents:
- Product
- Instruction manual
- Do not remove the product's serial number in order to keep proper traceability if technical assistance is required.
3. INSTALLATION
Tools required
- Spanner
- Screwdriver appropriate for the appliance >s screws (depending on model)
Before starting
• Place all parts on a flat, stable surface.
• Ensure the appliance is disconnected from the mains supply.
• Do not operate the pump without water in the tank, as this may cause damage.
1. Fitting the wheels
Fit the wheels onto the base of the misting fan and secure them according to the fixing system of the model (press-fit or screw-fit). Check that all wheels rotate freely.
2. Installing the lower black tube (with internal spring)
Position the lower black tube over its housing on the base. To insert it, remove the lower fixing screw using an 18 mm spanner, insert the tube into the base, then refit and tighten the screw. Fig. 2
3. Fitting the spring and grey tube
Insert the spring into the interior of the black tube (if not already fitted). Then slide the grey tube inside the black tube until it is correctly seated. Fig. 2
4. Attaching the tube with control panel
Attach the tube incorporating the control panel to the grey tube without fully tightening the fixing, so that the height can be adjusted comfortably. Fig. 2
5. Height adjustment rear wing nut)
Adjust to the desired height and tighten the rear wing nut until the assembly is firmly secured.
6. Final fixing of the control panel
Secure the control panel to the grey tube using the fixing screw (usually pre-fitted). Tighten without forcing the thread.
7. Fitting the water tank
Place the tank onto the base with the opening facing towards the rear.
8. Installing the pump in the water tank
Place the water pump inside the tank and fix it to the bottom using its suction cups. Feed the outlet tube through the opening in the tank to the outside. Fig. 3
9. Accessing the panel tube and connecting to the pump
Unscrew the rear cover of the control panel. Inside, you will find a thin plastic tube: connect one end to the blue outlet on the pump, feeding the tube through the tank opening without kinking it. Fig. 3
10. Electrical connection of the pump to the control panel
Connect the pump cable to the corresponding connector on the control panel (2-pin connector). Ensure the connector is fully inserted.
11. Fitting the rear grille to the motor head
On the motor head, remove the 4 screws with washers. Position the rear section of the protective grille, aligning the smaller inner circle with the screw holes.
Refit the screws with their washers and tighten. Fig. 4
Remove the fixing screw supplied with the fan blades. Insert the blades onto the shaft and retighten the blade screw until firmly secured. Fig. 4
13. Inserting the motor head into the frame
Insert the motor head fully into the misting fans frame/bracket. Fig. 5
14. Locking the assembly to the base
Tighten the fixing screw located on the base to secure the motor head in position. Fig. 5
15. Tilt adjustment (side hexagonal nut)
Slightly loosen the side hexagonal nut until the motor head can be moved to the desired position. Once adjusted, retighten to lock it in place.
16. Fitting the front grille (correct orientation)
Remove the 4 screws with washers from the front panel. Fit the front grille so that the logo faces outwards. Fig. 6
17. Fitting the front section and seals
Fit the front section and check that the seals are correctly seated and free from pinching, to prevent vibrations during operation. Fig. 6
18. Feeding the tube and cable assembly through the control panel
Insert the tube included through the control panel opening:
• a 4-pin cable, and
• a water tube (through which water will flow towards the misting system).
19. Connecting the 4-pin cable
Connect the 4-pin cable to its corresponding connector on the control panel, ensuring correct connector orientation. Fig. 7
20. Connecting the water tube to the control panel valve
Connect the water tube to the valve located inside the control panel. Ensure a complete, secure connection to prevent leaks. Fig. 7
21. Connecting the motor head cable (5-pin)
Connect the cable from the motor head (5-pin) to its corresponding connector on the control panel. Fig. 7
22. Closing the control panel
Refit the rear cover of the control panel and screw it into place. Check that no cables or tubes are pinched.
23. Water recirculation tube (long plastic tube)
Connect one end of the long tube to the blue fitting located at the bottom of the misting fan. Feed the other end through the rear opening of the tank. This connection enables water recirculation.
ENGLISH
24. Final check
- Fill the water tank.
- Check for leaks at all connections and ensure no tubes are kinked or bent.
• Verify the stability of the appliance (wheels and base).
Connect to the mains supply and carry out a brief test covering: ventilation, pump, and misting function (if applicable). If vibrations occur, check the grille fittings and ensure all screws are correctly tightened.
4. OPERATION
Control panel
Fig. 8
- Power button: Press to switch the appliance on and off.
- Speed selection button: Press to adjust the fan speed.
- Oscillation button: Press to activate or deactivate fan oscillation.
- Misting button: Press to activate or deactivate the misting function.
- Timer button: Press to control the timer.
- Power indicator light: Indicates whether the appliance is powered on.
- FLASH indicator light: Indicates receipt of a signal from the remote control.
- Misting function indicator light: Indicates the status of the misting system.
- Oscillation indicator light: Indicates whether oscillation is active.
- Speed indicator lights: Indicate the current fan speed setting.
- Timer indicator lights: Indicate the active timer duration.
Timer function
The timer allows you to programme the automatic switch-off of the appliance between 1 and 6 hours. Each press of the timer button advances to the next duration, displayed via the LED indicator lights T1 (4 h), T2 (2 h) and T3 (1 h). To cancel the timer, ensure all three LEDs are off.
Timer duration and indicator table
| T1 (4 h) | T2 (2 h) | T3 (1 h) | Duration |
| Off | Off | On | 1 h |
| Off | On | Off | 2 h |
| Off | On | On | 3 h |
| On | Off | Off | 4 h |
| On | Off | On | 5 h |
| On | On | Off | 6 h |
| Off | Off | Off | Deactivated |
Remote control
Fig. 9
- Power button: Press to switch the appliance on and off.
- Oscillation button: Press to activate or deactivate fan oscillation.
- Timer button: Press to control the timer.
- High-speed button: Activates the highest fan speed setting.
- Medium-speed button: Activates the medium fan speed setting.
- Low-speed button: Activates the lowest fan speed setting.
5. CLEANING AND MAINTENANCE
Disconnect the appliance from the mains supply before cleaning. Do not submerge it in water or use harsh cleaning products (bleach, ammonia, solvents, or strong alcohols) or abrasive scouring pads.
After each use: Empty and dry the water tank; wipe the exterior with a soft cloth.
Weekly: Carry out a general clean and remove any limescale deposits.
Monthly and at the end of the season: Carry out a thorough clean and inspect the grilles and filters.
Exterior and grilles
Remove dust from grilles and vents using a soft brush (or a vacuum cleaner with a brush attachment), without applying pressure.
Lightly dampen a cloth with water and a drop of washing-up liquid, then wring it out thoroughly.
Wipe the housing and grille with the damp cloth.
Dry with a separate cloth to prevent water marks.
Water tank
Empty the tank, rinse with clean water, and leave it to air-dry with the lid open.
It is advisable to descale the tank regularly:
- Fill the tank with a 1:1 solution of water and white vinegar. Then leave to act for 20–30 minutes (the same procedure applies when using citric acid).
- Gently scrub any areas with limescale deposits using a brush or cotton bud.
- Rinse 2–3 times until no residual vinegar odour remains.
- Dry with a cloth and leave the tank open to air.
Storage
At the end of the season, carry out a thorough clean before storing the appliance.
Dry all parts and leave the appliance for 12 hours in open air with all covers open.
ENGLISH
Store in a dry place, away from direct sunlight, and remove the battery from the remote control.
At the start of the season, carry out a basic clean before use.
When cleaning the product, never use bleach, ammonia, strong alcohols, solvents, or abrasive materials.
6. TECHNICAL SPECIFICATIONS
Product: FreshEssenceIndustry 260 Control
Product reference: EU01_123697
Voltage: 220-240 V\~
Frequency: 50 Hz
Power inlet: 260 W
Power output: 240 W
Technical specifications may change without prior notice to improve product quality.
Made in China | Designed in Spain
7. RECYCLING OF ELECTRICAL AND ELECTRONIC EQUIPMENT

This symbol indicates that, according to the applicable regulations, the product and/or battery must be disposed of separately from household waste. When this product reaches the end of its shelf life, you should dispose of the batteries/accumulators and take them to a collection point designated by the local authorities.
For detailed information on how to properly dispose of electrical and electronic equipment and/or the corresponding batteries, consumers should contact their local authorities.
Information regarding national packaging recycling systems and their marking can be found on our website.
Compliance with the above guidelines will help protect the environment.
8. TECHNICAL SUPPORT AND WARRANTY
Cecotec shall be liable to the end user or consumer for any lack of conformity that exists at the time of product delivery under the terms, conditions and deadlines established by applicable regulations.
Repairs should be carried out by qualified personnel.
If you detect any problem with the product or have any queries, please contact Cecotec's Official Technical Support Service at +34 96 321 07 28.
9. COPYRIGHT
The intellectual property rights over the texts in this manual belong to CECOTEC INNOVACIONES, S.L. All rights reserved. The content of this publication may not, either in part or in its entirety, be reproduced, stored in a retrieval system, transmitted or distributed by any means (electronic, mechanical, photocopying, recording or similar) without prior authorisation from CECOTEC INNOVACIONES, S.L.
10. SIMPLIFIED EU DECLARATION OF CONFORMITY
CE Cecotec Innovaciones hereby declares that this appliance complies with the essential requirements and other relevant provisions of the regulations applicable in the European Union. This appliance has been designed, manufactured and tested in compliance with required safety and quality standards. The full text of the EU Declaration of Conformity can be found on the following website: https://cecotec.es/es/information/declaration-of-conformity
FRANÇAIS
1. PIÈCES ET COMPOSANTS
Image 1
6. TEKNIK ÖZELLIKLER
Ürün: FreshEssenceIndustry 260 Control
Fig./Img./Abb./Afb./Rys.1

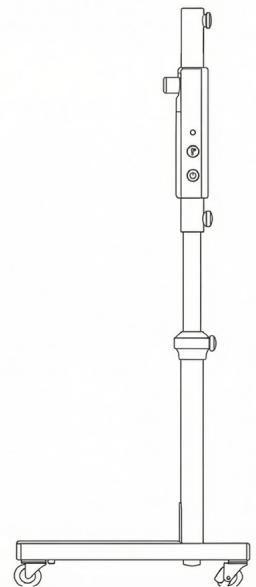
Fig./Img./Abb./Afb./Rys.2
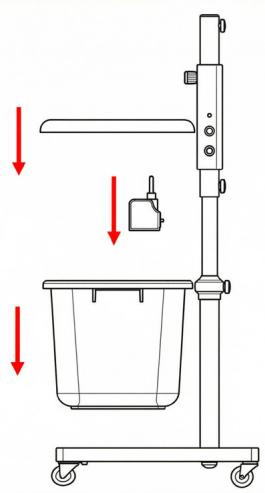
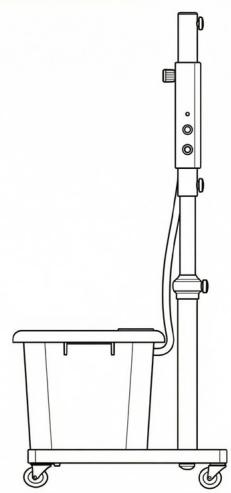
Fig./Img./Abb./Afb./Rys. 3

Fig./Img./Abb./Afb./Rys. 4

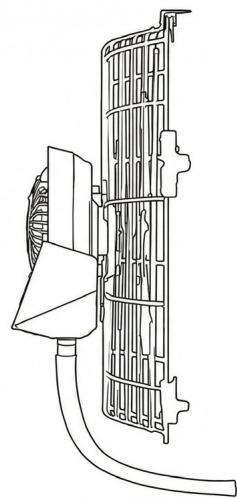
Fig./Img./Abb./Afb./ Rys. 5
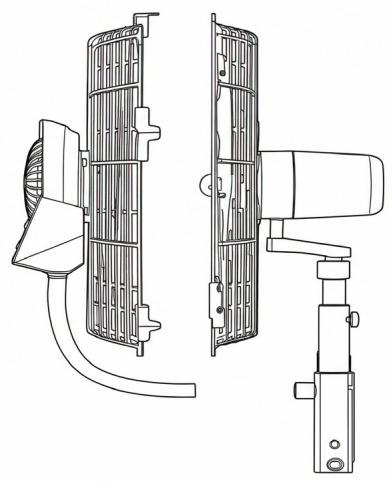
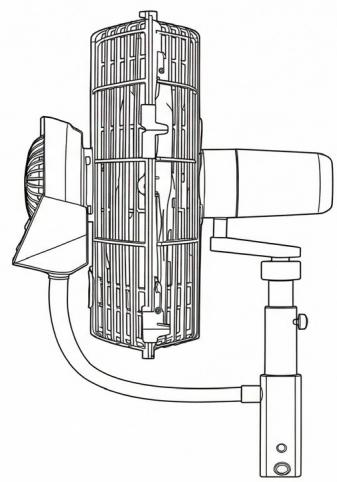
Fig./Img./Abb./Afb./ Rys. 6
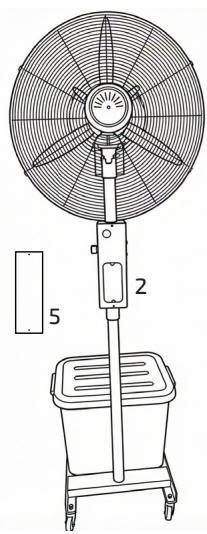
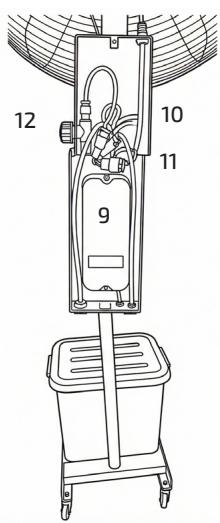

Fig./Img./Abb./Afb./Rys. 7
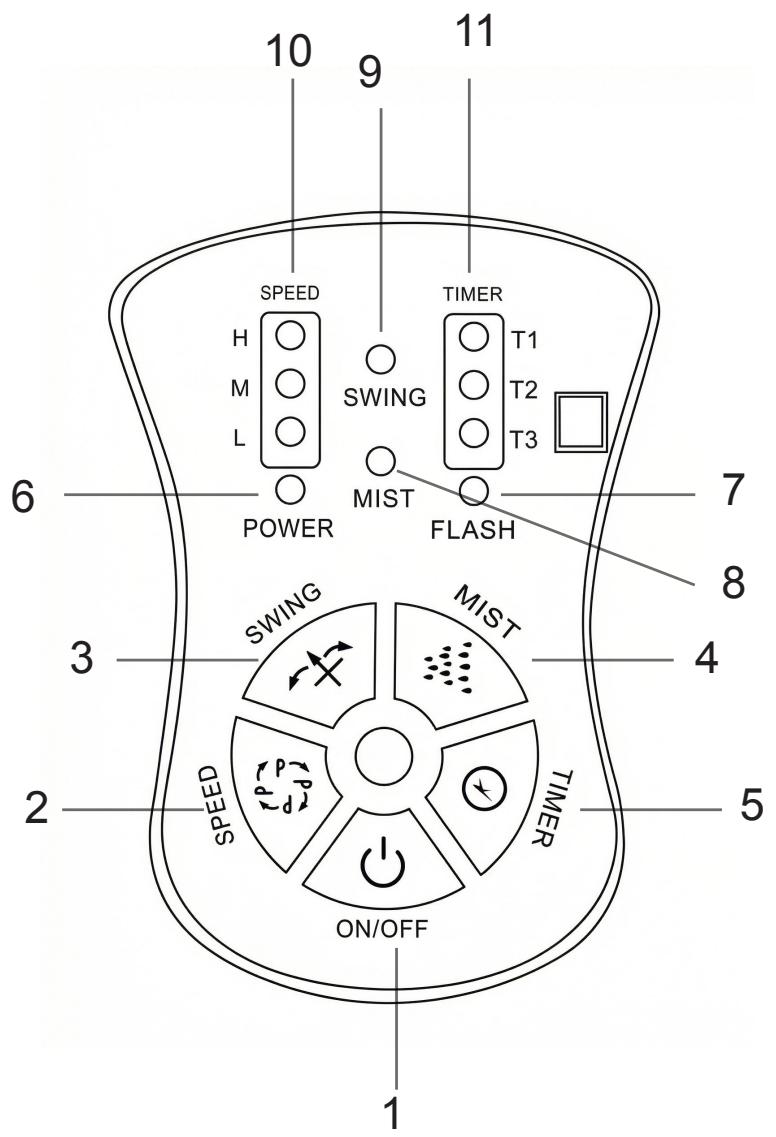
Fig./Img./Abb./Afb./ Rys. 8

Fig./Img./Abb./Afb./ Rys. 9
www.cecotec.es

- SOMMAIRE
- INSTRUCTIONS DE SÉCURITÉ
- NOTE
- BEFORE USE
- BOX CONTENTS
- INSTALLATION
- TOOLS REQUIRED
- BEFORE STARTING
- FITTING THE WHEELS
- INSTALLING THE LOWER BLACK TUBE (WITH INTERNAL SPRING)
- FITTING THE SPRING AND GREY TUBE
- ATTACHING THE TUBE WITH CONTROL PANEL
- HEIGHT ADJUSTMENT REAR WING NUT)
- FINAL FIXING OF THE CONTROL PANEL
- FITTING THE WATER TANK
- INSTALLING THE PUMP IN THE WATER TANK
- ACCESSING THE PANEL TUBE AND CONNECTING TO THE PUMP
- ELECTRICAL CONNECTION OF THE PUMP TO THE CONTROL PANEL
- FITTING THE REAR GRILLE TO THE MOTOR HEAD
- INSERTING THE MOTOR HEAD INTO THE FRAME
- LOCKING THE ASSEMBLY TO THE BASE
- TILT ADJUSTMENT (SIDE HEXAGONAL NUT)
- FITTING THE FRONT GRILLE (CORRECT ORIENTATION)
- FITTING THE FRONT SECTION AND SEALS
- FEEDING THE TUBE AND CABLE ASSEMBLY THROUGH THE CONTROL PANEL
- CONNECTING THE 4-PIN CABLE
- CONNECTING THE WATER TUBE TO THE CONTROL PANEL VALVE
- CONNECTING THE MOTOR HEAD CABLE (5-PIN)
- CLOSING THE CONTROL PANEL
- WATER RECIRCULATION TUBE (LONG PLASTIC TUBE)
- ENGLISH
- FINAL CHECK
- OPERATION
- CONTROL PANEL
- FIG. 8
- TIMER FUNCTION
- FIG. 9
- CLEANING AND MAINTENANCE
- EXTERIOR AND GRILLES
- WATER TANK
- STORAGE
- TECHNICAL SPECIFICATIONS
- RECYCLING OF ELECTRICAL AND ELECTRONIC EQUIPMENT
- TECHNICAL SUPPORT AND WARRANTY
- COPYRIGHT
- SIMPLIFIED EU DECLARATION OF CONFORMITY
- FRANÇAIS
- PIÈCES ET COMPOSANTS
- IMAGE 1
- TEKNIK ÖZELLIKLER
Brand : CECOTEC
Model : Freshessenceindustry 260 Control
Category : Washing machine