Conga Windroid W100 Station - Vacuum Cleaner CECOTEC - Free user manual and instructions
Find the device manual for free Conga Windroid W100 Station CECOTEC in PDF.


| Product type | Window cleaning robot |
| Brand | Cecotec |
| Model | Conga Windroid W100 Station |
| Category | Vacuum cleaner |
| Power supply | Built-in rechargeable lithium-ion battery |
| AC adapter | Model RY72C240300M2 (included) |
| Adapter input | 100-240 V ~ 50/60 Hz |
| Adapter output | 24 V, 3 A |
| Battery life | Approximately 30 minutes |
| Charging time | Approximately 4 hours |
| Dimensions (L × H × P) | 260 × 260 × 95 mm |
| Weight | 1.5 kg |
| Compatible surface | Windows, mirrors, smooth tiles |
| Cleaning method | Automatic edge detection, zigzag or spiral path |
| Water tank | Built-in with fine mist spraying |
| Cloths | Microfiber, washable and reusable |
| Safety | Safety cord with carabiner, anti-fall sensors |
| Docking station | Yes, automatic charging of the robot |
| Remote control | Included with directional commands |
| Noise level | Less than 70 dB |
| Use | Indoor only |
| Maintenance | Regular cleaning of cloths and checking the safety cord |
Frequently Asked Questions - Conga Windroid W100 Station CECOTEC
User questions about Conga Windroid W100 Station CECOTEC
0 question about this device. Answer the ones you know or ask your own.
Ask a new question about this device
Download the instructions for your Vacuum Cleaner in PDF format for free! Find your manual Conga Windroid W100 Station - CECOTEC and take your electronic device back in hand. On this page are published all the documents necessary for the use of your device. Conga Windroid W100 Station by CECOTEC.
USER MANUAL Conga Windroid W100 Station CECOTEC
Safety instructions 11
-
Parts and components 84
-
Before use 85
-
Operation 85
-
Cleaning and maintenance 90
-
Troubleshooting 92
-
Technical specifications 94
-
Recycling of electrical and electronic equipment 95
-
Technical support and warranty 95
-
Copyright 96
-
Simplified EU Declaration of Conformity 96
SOMMAIRE
EU01_123199_Conga Windroid W100 Station
EN • The coding in this manual is generic and applies to all code variants of the appliance.
Please read these instructions carefully before using the appliance. Keep this instruction manual for future reference or new users.
- Make sure that the mains voltage matches the voltage specified on the product's rating label and that the plug is earthed.
- This appliance can be used by children aged 8 years and above and people with reduced physical, sensory, or mental capabilities or lack of experience and knowledge if they have been given appropriate supervision or instruction concerning use of the appliance in a safe way and understand the hazards involved. Children must not play with the appliance. Cleaning and user maintenance must not be carried out by children without supervision.
- This appliance is intended for domestic use only and is not suitable for use in commercial establishments such as bars, restaurants, farms, hotels, motels, and offices.
- The appliance should only be used with the power supply unit supplied with it.
- The device must only be supplied at a safety extra-low voltage in accordance with the power indicated on the device.
- This appliance has irreplaceable batteries.
- This symbol means: for indoor use only.
- WARNING: To recharge the battery, only use the removable power supply unit provided with the appliance, with reference number RY72C240300M2.
- Non-rechargeable batteries must not be recharged.
- The supply terminals must not be short-circuited.
- The filling opening must not be opened during use.
ENGLISH
- The appliance should not be used if it has fallen, shows any visible sign of damage, or if it leaks.
- Keep the appliance out of the reach of children when it is in operation or cooling down.
- Check the power cord regularly for visible damage. If the cord is damaged, it must be repaired by Cecotec's Official Technical Support Service to avoid any hazard.
- This product can only be assembled, disassembled, and repaired by qualified personnel.
- Do not touch the cable, power supply, or charger with wet hands.
- Keep the robot away from clothing, curtains and any other similar materials. Keep hair, fingers and other body parts away from the robot's openings.
- Do not sit or place heavy or sharp objects on top of the appliance or its cord.
- Do not operate the appliance close to heat sources, flammable substances, wet surfaces where it can fall or be pushed into water or allow it to come into contact with water or other liquids.
- The appliance can only be operated with the supplied battery and power adapter. The use of other components or accessories could cause risk of fire, electric shock, or product damage.
- Do not expose the appliance to direct sunlight, intense light or strong magnetic fields.
- Allow adequate ventilation around the adapter when using it to operate the device. Do not cover the power adapter with objects that could reduce cooling.
- To avoid risks, do not disassemble, short-circuit, burn, or heat the battery above 60 °C.
- Make sure the appliance is not plugged in the power supply or on after every use and before carrying out
any cleaning or maintenance task. To disconnect it, do not pull from the power cord. Instead, pull on the adapter.
- Do not twist, bend, stretch, or damage the power cord. Do not place any heavy or sharpened objects on the cable, this could cause a fire or electrical shock.
- Do not use the robot on frameless glass.
- Do not use the product on cracked glass. Reflective coating or glass may be slightly scratched due to dirt on the glass during operation.
- Supervise children to prevent them from playing with the device. Close supervision is necessary when the appliance is being used by or near children.
- It is not recommended for use on glass less than 3 cm thick.
- IMPORTANT: You cannot activate the robot without having secured the safety rope to a solid surface at home. After and before every use, you must check the safety rope is not damaged. You must also check it is properly secured and at the appropriate height to prevent the robot from falling.
- Do not mix different types of batteries or new and used batteries.
- Batteries must be inserted according to the correct polarity.
- If the device is to be stored unused for a long period of time, the batteries should be removed.
- Keep batteries away from children and animals, they could be harmful if swallowed. In case of ingestion, seek medical assistance immediately.
- In case of battery leakage, avoid contact with the skin, eyes or mucous membranes.
ENGLISH
- WARNING: in case of contact with acid, rinse the affected areas with abundant fresh water immediately and contact a doctor as soon as possible.
- Ensure that the battery contacts are clean before inserting them. Clean them if necessary.
- Batteries should not be recharged or reactivated, dismantled, thrown into fire, immersed in fluids, or short-circuited.
- Keep batteries out of the reach of children when there is a risk of ingestion.
- Battery ingestion can cause burns, soft tissue perforation and death. Severe burns may occur within two hours of ingestion.
- In case of battery ingestion, please seek medical help immediately.
- Both batteries and cells can leak under extreme conditions. In the event of a battery leak, keep your skin and eyes away from the liquid. If the liquid comes into contact with skin, wash immediately with soap and water. If the liquid gets into the eyes, rinse them immediately with clean water for at least 10 minutes and seek medical attention. Wear gloves to handle the battery and dispose of it immediately in accordance with local regulations.
INSTRUCTIONS DE SÉCURITÉ
- Power button
- Robot housing
- Handle
- Power cable
- Air outlet
- Water tank lid
- Ultrasonic nozzle
- Suction fan
- Corner cleaning pad
- Anti-fall sensor
- LED indicator light
- Drive wheel
- Mop pad
Fig. 2
- Power cable
- Battery indicator light
- Base power button
- Cable rewind button
- Bottle storage compartment
- Robot storage compartment
- Cover release latch
- Cover
Fig. 3
- Handle
- Rear cover
- Cable storage compartment
- Suction cup
Note:
The graphics in this manual are schematic representations and may not exactly match the product.
2. BEFORE USE
- This appliance comes in a packaging designed to protect it during transport. Remove the appliance from its box. You can keep the original box and other packaging materials in a safe place to prevent damage to the appliance if you need to transport it in the future. If you wish to dispose of the original packaging, make sure all items are recycled properly.
- Check that all parts and components are included and in good condition. If any of them are missing or damaged, please contact Cecotec's Official Technical Support Service immediately.
Box content:
- Product
- Safety rope
- Mop pads
- Water dispensing bottle
- Power adapter
- Remote control
- Instruction manual
- Do not remove the product's serial number in order to keep proper traceability if technical assistance is required.
3. OPERATION
LED indicator light (window cleaning robot)
Solid blue light: standby mode / in operation / fully charged / network configuration completed successfully / OTA update completed successfully.
Blue light (gradual on/off): low battery. Charge fully before use.
Blue light flashing slowly: low water level in the tank.
- Red light flashing: power cable not properly connected / network configuration error / OTA update failure / robot paused due to malfunction.
Blue and red light flashing alternately: OTA update in progress.
Battery indicator light (base)
Solid blue: sufficient battery.
Blue light flashing: insufficient battery.
Red light flashing: low battery.
ENGLISH
Base indicator light
Solid blue light: standby mode / in operation.
Red light flashing red: base error.
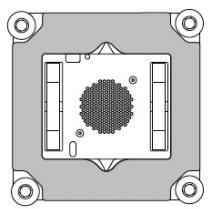
Opening the cover
Fig. 4
- Slide the cover release latch to unlock and open the cover. Then remove the window cleaning robot.
Installing the mop
Fig. 5
Place the mop pad completely flat on the robot's bottom area, ensuring that you do not cover the drive wheel or internal compartments.
- Place the corner cleaning pad flat on the robot's bottom area, next to the anti-fall sensor. Do not cover the anti-fall sensor.
Warning:
- Ensure the mop pad is firmly attached to the mop pad fixing ring to prevent air leaks.
Filling the water tank
Fig. 6
- Place the main unit in a horizontal position.
Open the water tank lid.
• Use the included refill bottle to add purified water to the tank. - Close the water tank lid firmly.
Note:
If the tank runs out of water during cleaning, press and hold the power button on the robot for 3 seconds to stop the suction fan, remove the robot from the glass, and refill with purified water or the supplied cleaning agent. Do not add other cleaning agents to the water tank.
Correct base placement
Fig. 7
- Position the base on the floor, close to the window to be cleaned, to avoid insufficient length of the power cable (6 m).
Place the base on a flat, stable surface. When the handle hangs naturally downwards, the suction cup located on the underside adheres firmly to the surface.
Note:
- Keep the power cable clear. Do not place objects or allow people to pass between the window cleaning robot and the base to avoid tangles and tripping hazards.
Do not place the base on furniture surfaces (such as tables or wardrobes) to prevent falls that may cause injury to people or pets.
Do not place the base on carpets or uneven floors, as the suction cup may not adhere securely.
When moving the base, ensure that the handle is completely vertical before lifting it. If the handle is not vertical, do not drag or move the unit forcefully.
Installing the safety rope
Fig. 8
- Check that the safety rope is in good condition and its fixing system is secured to prevent falls.
- Attach the metal end of the safety rope to the robot's fixed nut and tie the other end to a stable object inside.
- Leave enough safety rope length for the robot to move freely.
Visual guide
- Insert the safety buckle and tighten in the direction indicated by the arrow in Figure 8.
Initial base charging
The base incorporates a lithium battery with minimum factory charge. Charge it immediately upon receipt.
The first charge should last between 5-6 hours.
- Check the status on the battery indicator light during charging.
Switching on the base
- Press and hold the power button on the base for 3 seconds to switch it on or off.
Before use, ensure that the base has enough battery power; if the battery is low. - To retract the power cable, briefly press the cable rewind button to activate automatic rewind.
Placing the robot on the window
- Press and hold the power button on the robot for 3 seconds to enter standby mode.
- Briefly press the power button on the robot to start the suction fan and, holding the robot by the handle, immediately place it on the window.
ENGLISH
- Once positioned, ensure the robot adheres properly before releasing it.
Usage notes
- On slightly inclined windows, the robot may not operate correctly, provide assistance if necessary.
Do not use the product on rainy or very humid days. Condensation on the glass surface reduces cleaning efficiency. - Remove obstacles from the glass (e.g. stickers). Do not use the robot on cracked glass.
Exercise caution on reflective glass or glass with coatings: dust or sand carried by the wind can cause micro-scratches.
• Use of the product on windows with gaps or separations is not recommended.
Cleaning tips
- For dust and stain removal, wet cleaning
a) If the glass has considerable sand or dust, first manually clean an area the size of the robot to avoid scratches.
b) Fill the spray bottle with purified water and spray the mop pad evenly, avoiding excess moisture. It is recommended to apply 8 sprays spread across the widest side of the mop pad. Do not spray on the anti-fall sensor.
c) After spraying, wipe off any excess water on the drive wheel with a cloth to prevent slipping during operation.
- Persistent stains
• Use the deep cleaning mode to clean the glass thoroughly and remove ingrained dirt.
- Water residue
- Use the dry cleaning function. Using the remote control, deactivate the automatic spraying of the ultrasonic nozzle and complete the drying process.
Removing the robot from the window
Fig. 9
- Press and hold the power button on the robot for 3 seconds to stop the suction fan. Then, holding the robot by the handle, remove it from the window and move it to another one.
- Once cleaning is complete, press and hold the power button on the robot for 3 seconds to switch it off completely.
Storing the robot
Fig. 10
- Position the window cleaning robot with the power cable outlet facing upwards and its front facing outwards.
- Place it in the robot storage compartment on the base.
Automatic cable rewind
- Briefly press the cable rewind button. The base will immediately begin rewinding the power cable.
Note:
- If the power cable becomes becomes tangled during rewinding and prevents it from being fully retracted, straighten it manually and briefly press the cable rewind button again to complete the process.
Switching off the base
- Press and hold the power button on the base for 3 seconds to switch it off.
Storing the safety rope
Fig. 11
Unhook the safety rope, roll it up neatly, and place it in the rear storage compartment on the base.
Charging the base
- Place the base near a mains socket and connect it to the power supply.
Charge at an ambient temperature of 0-40 °C.
Charging is complete when all 4 indicator lights remain solid blue.
Storing the base
Once fully charged, disconnect the power cable from the mains socket.
Wind the power cable neatly and place it in the rear storage compartment on the base.
- Store the base in a dry environment to prevent moisture from affecting the battery and motherboard.
Remote control: button functions
Fig. 12
- Move manually to the left: moves the robot to the left while holding down.
- Move manually to the right: moves the robot to the right while holding down.
- Manual move upwards: moves the robot upwards while holding down.
- Manual move downwards: moves the robot downwards while holding down.
- Start/Pause: starts or pauses the cleaning operation.
ENGLISH
- Deep cleaning: combines complete surface cleaning and edge cleaning.
- Spot cleaning: the robot repeats cleaning 5 times over the same area to remove difficult stains.
- Edge cleaning: runs along and cleans the four edges of the window.
- Water spray: on/off: controls the water spray function during operation.
Auxiliary wheel cleaning: cleans the auxiliary wheels when the unit is not in operation.
- Manual spraying: each press performs water spray once through the ultrasonic nozzle (7).
Notes on the remote control
• Install batteries before first use. Remove them if the remote control is not going to be used for an extended period.
To avoid accidental operations, press the Start/Pause button between commands.
Route planning instructions
Automatic cleaning
Fig. 13
«Z» pattern: for horizontal glass. The robot cleans following a «Z» pattern.
«N» pattern: for small vertical glass. The robot cleans following a «N» pattern.
Deep cleaning
Fig. 14
Combines the «Z» or «N» pattern with Edge cleaning. First, it performs the «Z»/«N» pattern and then cleans the perimeter of the glass.
Spot cleaning
Fig. 15
The robot repeats cleaning 5 times over the same area to remove persistent stains.
Edge cleaning
Fig. 16
The robot runs along and cleans the glass perimeter.
4. CLEANING AND MAINTENANCE
- Mop pad
Fig. 17
- Wash the mop pad with water (temperature below 60 °C), wring it out and leave it to air dry to prevent bacterial growth.
- Water tank
Fig. 18
• Empty the water tank after each use to prevent bad odours or bacterial growth from stagnant water.
- Robot surface
Dry any water residue on the robot's surface before storing it.
- Washing instructions for the mop pad
The washing temperature must be below 60°C (140°F).
Do not use fabric softener.
Do not iron.
Do not use bleach.
Do not use bleach.
Do not dry clean.
- Maintenance frequency
After each use.
- Base
Clean the base's exterior surface with a soft, dry cloth to remove dust and water streaks.
Battery removal for recycling
This procedure is used to remove the battery before recycling the equipment at the end of its useful life. Before starting, switch off and disconnect the base from the mains. Handling lithium batteries involves electrical and fire hazards: use PPE and do not puncture, bend or expose the battery to heat or water. When finished, dispose of the battery and equipment (without battery) in the specific containers for batteries and WEEE.
- Remove the robot from the base and open the lower part.
Fig. 19
- Remove the window cleaning robot from the base and set it aside.
- Turn the base upside down and, using a Phillips screwdriver, remove the screws indicated.
Hold the suction cup and remove the bottom cover to access the base's interior.
- Remove the top cover and disconnect the battery.
Fig. 20
- Return the base to its upright position.
• Pull the handle upwards to remove the cover.
- Disconnect the battery cable from the mainboard.
- Remove the battery from the base.
5. TROUBLESHOOTING
| Problem description | Solutions |
| The robot slides down during operation. | · Check if the glass surface has become slippery after several cleanings.· If the mop pad is too wet, it may cause slipping on glass with low friction coefficient. Replace it with a dry mop pad and continue cleaning. |
| Unexpected power cut. | · The UPS system supplies power during the cut. The UPS backup time is 30 minutes and activates an alarm.· Remove the robot or restore power as soon as possible. |
| After cleaning, marks/streaks remain on the glass. | · The mop pad is too dirty. Replace it and repeat the window cleaning process.· If the glass is very dirty, spray a small amount of glass cleaning agent evenly over the surface. |
| The robot stops in an elevated area, emits a sound and the indicator light flashes red. | · Check for loose power connection. Then reconnect and press the Start/Pause button on the remote control to restart the robot.· Pull gently on the safety rope at an angle close to the glass to prevent it from falling.· Check for poor electrical contact or damage to the power cable. |
| When switching on and starting cleaning, the robot completes the process but does not return to the starting point. | · After finishing, the robot returns to an area near the starting point within a radius of R < 30 cm.· You can use the directional buttons on the remote control to help the robot return exactly to the starting point. |
| The robot does not spray water. | 1) First use: internal water pipes may not be completely filled, causing temporary spray failure. This is normal and usually resolves after several spray cycles.29 Empty water tank: remove the robot from the glass and refill the tank with clean water.3) Ultrasonic nozzle obstructed by dust or water film: the ultrasonic nozzle may become temporarily blocked and prevent spraying. This is normal and usually resolves after several spray cycles. You can also gently clean the nozzle with a cotton bud. |
| The battery indicator lights on the base flash red, the robot has stopped working, and the red light flashes. | Low base battery.• Remove the power cable from the rear compartment on the base and plug it into a power socket, then briefly press the Start/Pause button on the robot or on the remote control to resume operation.• After completing the cleaning process and removing the robot from the glass, continue charging the base until it is fully charged. |
LED indicator lights and problem description
This section describes the statuses of the window cleaning robot's LED indicator light and the base's battery indicator light. Each colour and pattern (solid, flashing, alternating, or gradual on/off) indicates an operating, maintenance, or alert condition. Refer to the table to identify the condition and apply the recommended action before proceeding with cleaning.
| LED indicator light | Problem description | Solutions |
| Blue and red light flashing alternately | The firmware is updating. | The firmware is updating, wait for completion. |
| Flashing red | Adapter shutdown error during operation. | Check if the socket and cable connection port are correct or loose. Check if the adapter indicator light is on. |
| Pressure is low. | 1) Check that the mop pad is installed correctly according to the instructions.2) Check for protrusions on the glass. The surface must be smooth without projections.3) Check if the glass is curved, as air leakage may occur when cleaning curved glass.4) Check for gaps/slots in the glass; these can cause air leaks.5) Check if the suction port is obstructed. | |
| Robot detached. | Do not remove the robot forcefully. Press and hold the power button on the robot for 3 seconds to stop the suction fan. Then hold the handle firmly before removing it. If the robot falls, perform the same checks as indicated for the “Low pressure” alarm. | |
| Anti-fall sensor fault. | 1) Check that the mop pad is installed correctly and does not block the four anti-fall sensors.2) Check for dirt adhering to the anti-fall sensors.3) Remove the robot, unplug the adapter and restart it. If it is not restored, contact the Technical Support Service. |
6. TECHNICAL SPECIFICATIONS
Product: Conga Windroid W100 Station
Product reference: EU01_123199
Rated input: 100-240V AC 50/60Hz
Rated output: 24V DC 3A
Rated power: 72 W
Lithium-ion battery: 5200 mAh, 22.2V, 115.4 Wh
Description of the off mode: The power consumption of the appliance in off mode is less than 0.3 W. Once the appliance is fully charged, it will switch to off mode within 20 minutes to save power.
Technical specifications may change without prior notice to improve product quality.
Made in China | Designed in Spain
7. RECYCLING OF ELECTRICAL AND ELECTRONIC EQUIPMENT


This symbol indicates that, according to the applicable regulations, the product and/or batteries must be disposed of separately from household waste. When this product reaches the end of its service life, you must remove the batteries/accumulators and take it to a collection point designated by local authorities.
For detailed information on how to properly dispose of electrical and electronic equipment and/or the corresponding batteries, consumers should contact their local authorities.
Information regarding national packaging recycling systems and their marking can be found on our website.
Compliance with the above guidelines will help protect the environment.
8. TECHNICAL SUPPORT AND WARRANTY
Cecotec shall be liable to the end user or consumer for any lack of conformity that exists at the time of product delivery under the terms, conditions and deadlines established by applicable regulations.
Repairs should be carried out by qualified personnel.
If you detect any problem with the product or have any queries, please contact Cecotec's Official Technical Support Service at +34 96 321 07 28.
ENGLISH
9. COPYRIGHT
The intellectual property rights over the texts in this manual belong to CECOTEC INNOVACIONES, S.L. All rights reserved. The content of this publication may not, either in part or in its entirety, be reproduced, stored in a retrieval system, transmitted or distributed by any means (electronic, mechanical, photocopying, recording or similar) without prior authorisation from CECOTEC INNOVACIONES, S.L.
10. SIMPLIFIED EU DECLARATION OF CONFORMITY
CE Cecotec Innovaciones hereby declares that this appliance complies with the essential requirements and other relevant provisions of the regulations applicable in the European Union. This appliance has been designed, manufactured and tested in compliance with required safety and quality standards. The full text of the EU Declaration of Conformity can be found on the following website: https://cecotec.es/es/information/declaration-of-conformity
1. PIÈCES ET COMPOSANTS
Image 1:
5. PROBLEEMOPLOSSING
Product: Conga Windroid W100 Station
6. TEKNIK ÖZELLIKLER
Ürün: Conga Windroid W100 Station
Station Conga Windroid W1··:ال fenje
Fig./Img./Abb./Afb./Rys. 4


O
O
Fig./Img./Abb./Afb./Rys. 5
O
O
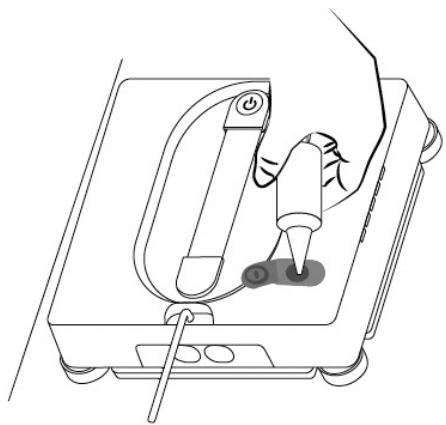
Fig./Img./Abb./Afb./Rys. 6

Fig./Img./Abb./Afb./Rys. 7
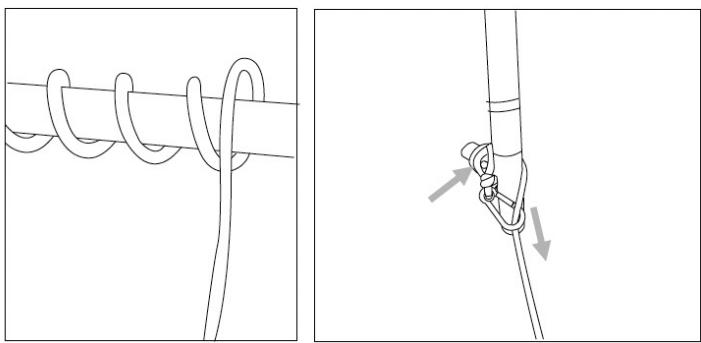
Fig./Img./Abb./Afb./Rys. 8

Fig./Img./Abb./Afb./Rys. 9

Fig./Img./Abb./Afb./Rys. 10

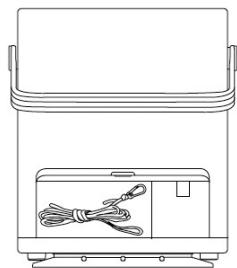

Fig./Img./Abb./Afb./Rys. 11

Fig./Img./Abb./Afb./Rys. 12
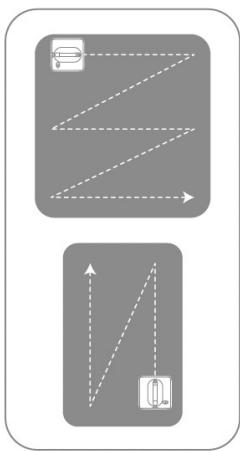
Fig./Img./Abb./Afb./ Rys. 13

Fig./Img./Abb./Afb./Rys. 14
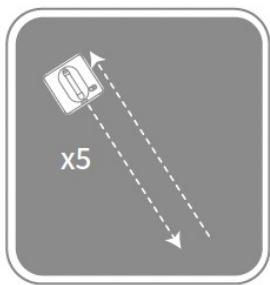
Fig./Img./Abb./Afb./Rys. 15

Fig./Img./Abb./Afb./ Rys. 16


Fig./Img./Abb./Afb./ Rys. 17
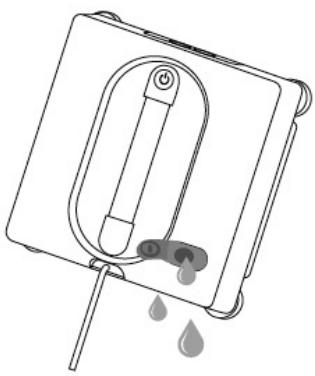
Fig./Img./Abb./Afb./Rys. 18

Fig./Img./Abb./Afb./Rys. 19

Fig./Img./Abb./Afb./Rys. 20
www.cecotec.es
- SOMMAIRE
- ENGLISH
- INSTRUCTIONS DE SÉCURITÉ
- FIG. 2
- FIG. 3
- NOTE
- BEFORE USE
- BOX CONTENT
- OPERATION
- BASE INDICATOR LIGHT
- OPENING THE COVER
- FIG. 4
- INSTALLING THE MOP
- FIG. 5
- WARNING
- FILLING THE WATER TANK
- FIG. 6
- CORRECT BASE PLACEMENT
- FIG. 7
- INSTALLING THE SAFETY ROPE
- FIG. 8
- VISUAL GUIDE
- INITIAL BASE CHARGING
- SWITCHING ON THE BASE
- PLACING THE ROBOT ON THE WINDOW
- USAGE NOTES
- CLEANING TIPS
- REMOVING THE ROBOT FROM THE WINDOW
- FIG. 9
- STORING THE ROBOT
- FIG. 10
- AUTOMATIC CABLE REWIND
- SWITCHING OFF THE BASE
- STORING THE SAFETY ROPE
- FIG. 11
- CHARGING THE BASE
- STORING THE BASE
- REMOTE CONTROL: BUTTON FUNCTIONS
- FIG. 12
- NOTES ON THE REMOTE CONTROL
- ROUTE PLANNING INSTRUCTIONS
- AUTOMATIC CLEANING
- DEEP CLEANING
- SPOT CLEANING
- EDGE CLEANING
- CLEANING AND MAINTENANCE
- FIG. 18
- BATTERY REMOVAL FOR RECYCLING
- FIG. 19
- FIG. 20
- TROUBLESHOOTING
- TECHNICAL SPECIFICATIONS
- RECYCLING OF ELECTRICAL AND ELECTRONIC EQUIPMENT
- TECHNICAL SUPPORT AND WARRANTY
- COPYRIGHT
- SIMPLIFIED EU DECLARATION OF CONFORMITY
- PIÈCES ET COMPOSANTS
- IMAGE 1
- PROBLEEMOPLOSSING
- TEKNIK ÖZELLIKLER
Brand : CECOTEC
Model : Conga Windroid W100 Station
Category : Vacuum Cleaner