Conga Windroid W10 Doublespray - Vacuum Cleaner CECOTEC - Free user manual and instructions
Find the device manual for free Conga Windroid W10 Doublespray CECOTEC in PDF.


User questions about Conga Windroid W10 Doublespray CECOTEC
0 question about this device. Answer the ones you know or ask your own.
Ask a new question about this device
Download the instructions for your Vacuum Cleaner in PDF format for free! Find your manual Conga Windroid W10 Doublespray - CECOTEC and take your electronic device back in hand. On this page are published all the documents necessary for the use of your device. Conga Windroid W10 Doublespray by CECOTEC.
USER MANUAL Conga Windroid W10 Doublespray CECOTEC
cecòtec
Safety instructions 8
-
Parts and components 64
-
Before use 64
-
Operation 65
-
Cleaning and maintenance 67
-
Troubleshooting 68
-
Disposal of old electrical
and electronic appliances 70
-
Copyright 70
-
Simplified EU Declaration of Conformity 70
SOMMAIRE
EN • The coding in this manual is generic and applies to all code variants of the appliance.
Read the following instructions carefully before using the appliance. Keep this instruction manual for future reference or new users.
- Make sure that the mains voltage matches the voltage specified on the product's rating label and that the plug is earthed.
- This appliance can be used by children aged 8 years and
above and people with reduced physical, sensory, or mental capabilities or lack of experience and knowledge if they have been given supervision or instruction concerning the use of the appliance in a safe way and understand the hazards involved. Children must not play with the appliance. Cleaning and user maintenance must not be carried out by children without supervision.
- This appliance is designed for domestic use only and is not intended for bars, restaurants, farmhouses, hotels, motels and offices.
- The device may only be used with the power supply unit provided with the appliance.
- The device must only be supplied at a safety extra-low voltage in accordance with the power indicated on the device.
- This appliance has irreplaceable batteries.
- WARNING: To recharge the battery, use only the detachable power supply unit provided with this appliance, reference JFY72W-240300A2.
- Non-rechargeable batteries must not be recharged.
- The supply terminals must not be short-circuited.
- The filling opening must not be opened during use.
- The appliance should not be used if it has fallen, shows any visible sign of damage, or if it leaks.
- Keep the appliance out of the reach of children when it is in operation or cooling down.
- Check the power cord regularly for visible damage. If the cord is damaged, it must be repaired by Cecotec's Official Technical Support Service to avoid any hazard.
- This product can only be assembled, disassembled, and repaired by qualified personnel.
-
Do not touch the cable, power supply, or charger with wet hands.
-
Keep the robot away from clothing, curtains and any other similar materials. Keep hair, fingers and other body parts away from the robot's openings.
- Do not sit or place heavy or sharp objects on top of the appliance or its cord.
- Do not operate the appliance close to heat sources, flammable substances, wet surfaces where it can fall or be pushed into water or allow it to come into contact with water or other liquids.
- The appliance can only be operated with the supplied battery and power adapter. The use of other components or accessories could cause risk of fire, electric shock, or product damage.
- Do not expose the device to excessive humidity or rain, and keep it away from liquids.
- Do not expose the appliance to direct sunlight, intense light or strong magnetic fields.
- Allow adequate ventilation around the adapter when using it to operate the device. Do not cover the power adapter with objects that could reduce cooling.
- To avoid risks, do not disassemble, short-circuit, burn, or heat the battery above 60 °C.
- Make sure the appliance is not plugged in the power supply or on after every use and before carrying out any cleaning or maintenance task. To disconnect it, do not pull from the power cord. Instead, pull on the adapter.
- Do not twist, bend, stretch, or damage the power cord. Do not place any heavy or sharpened objects on the cable, this could cause a fire or electrical shock.
- Do not use the robot on frameless glass.
-
Do not use the product on cracked glass. Reflective coating or glass may be slightly scratched due to dirt on the glass during operation.
-
Supervise children to prevent them from playing with the device. Close supervision is necessary when the appliance is being used by or near children.
- It is not recommended for use on glass less than 3 cm thick.
- IMPORTANT: You cannot activate the robot without having secured the safety rope to a solid surface at home. After and before every use, you must check the safety rope is not damaged. You must also check it is properly secured and at the appropriate height to prevent the robot from falling.
Remote control battery instructions
- Do not mix different types of batteries or new and used batteries.
- Batteries must be inserted according to the correct polarity.
- If the device is to be stored unused for a long period of time, the batteries should be removed.
- Keep batteries away from children and animals, they could be harmful if swallowed. In case of ingestion, seek medical assistance immediately.
- In case of battery leakage, avoid contact with the skin, eyes or mucous membranes.
- WARNING: in case of contact with acid, rinse the affected areas with abundant fresh water immediately and contact a doctor as soon as possible.
- Ensure both the battery contacts and appliance terminals are clean before inserting them. Clean them if necessary.
- Use only the battery type specified in the technical specifications.
- Batteries should not be recharged or reactivated, dismantled, thrown into fire, immersed in fluids, or short-circuited.
-
Keep batteries out of the reach of children when there is a risk of ingestion.
-
Battery ingestion can cause burns, soft tissue perforation and death. Severe burns may occur within two hours of ingestion.
- In case of battery ingestion, please seek medical help immediately.
INSTRUCTIONS DE SÉCURITÉ
declaration-of-conformity
1. PARTS AND COMPONENTS
Figure 1:
- Power/Start/Stop button
- Power socket
- Safety rope
- Water tank
- Water outlet
- Blue indicator light
- Red indicator light
- Mop pad
Indicator lights:
- Blue light: normal operation.
- Green light: charging completed.
- Red light: window cleaning robot malfunction.
Note:
The graphics in this manual are schematic representations and may not exactly match the product.
2. BEFORE USE
- This appliance comes in a packaging designed to protect it during transport. Remove the appliance from its box. You can keep the original box and other packaging materials in a safe place to prevent damage to the appliance if you need to transport it in the future. If you wish to dispose of the original packaging, make sure all items are recycled properly.
- Check that all parts and components are included and in good condition. If any of them are missing or damaged, please contact Cecotec's Official Technical Support Service immediately.
Box content:
Fig. 2
- Product
- Cleaning ring
- Mop pad
- Power adapter
- Safety rope
-
Filling bottle
-
Instruction manual
- Remote control
- Do not remove the product's serial number in order to keep proper traceability if technical assistance is required.
3. OPERATION
Remote control
A. Do not attempt to recharge the remote control batteries, disassemble them, or dispose of them in fire. There is a risk of explosion.
B. Use AAA batteries of the same type and specification as required. Do not use different types of batteries; there is a risk of circuit damage/burning. To install or remove batteries: slide down the remote cover to open the battery compartment; insert the batteries by aligning the negative pole (-) with the spring end first and press down; reverse polarity installation is invalid; replace the cover.
C. Do not mix new and used batteries or batteries of different models or types.
Figure 3:
- Top-to-bottom automatic cleaning.
- Right-to-left automatic cleaning.
- Left-to-right automatic cleaning.
- Automatic water spraying.
- Manual water spraying.
- Manual upward movement.
- Manual downward movement.
- Manual left movement.
- Manual right movement.
- Start/Pause.
3.1. Water tank
- Do not add any cleaning agents to the water tank.
- Turn the robot over, remove the cleaning ring, open the silicone lid and add clean, impurity-free water. Fig. 4
- Do not fill the water tank completely; 80% capacity is enough to maintain a stable air pressure.
3.2. Installing the mop pad and cleaning ring
Ensure the mop pad is properly placed on the cleaning ring and that the cleaning ring is correctly mounted on the cleaning wheel to prevent air leakage. Fig. 5.
3.3. Securing the safety rope
A. If there is no balcony below the window or door to be cleaned, place a warning sign on the ground floor to keep people away.
B. Secure the safety rope before use by attaching it to fixed objects inside the property to prevent the appliance from falling. Fig. 6.
C. Check that the safety rope is not damaged and that the knot is secure before each use.
3.4. Power connection
Fig. 7
- Insert the DC connector into the robot's power socket and secure it firmly.
- Plug the adapter into the mains socket.
- The appliance is equipped with a built-in backup battery for power failure protection. Ensure the battery is fully charged before use (green light on).
3.5. Placing the robot on the glass
Fig. 8
A. Press and hold the Power/Start/Stop button for 2 seconds to switch it on, and check that the fan is running.
B. Place the robot on the glass, maintaining a safe distance from the window frame.
C. Ensure the robot adheres firmly to the glass before releasing your grip.
3.6. Smart route planning modes
- Top-to-bottom automatic cleaning. Fig. 9
- Right-to-left automatic cleaning. Fig. 10
- Left-to-right automatic cleaning. Fig. 11
3.7. Dry cleaning
Fig. 12
- For the first pass, perform a "dry clean" without spraying water to remove sand or dust from the glass surface.
- If water or cleaning solution is sprayed onto the mop pad or directly onto the glass before removing sand, the water/solution will mix with the sand creating yellowish mud, reducing cleaning effectiveness.
- On sunny days or with low ambient humidity, dry cleaning provides better results.
3.8. Wet cleaning
The window cleaning robot features dual water outlets: spraying from the left side when cleaning leftward, and from the right side when cleaning rightward.
Automatic water spraying
- After starting cleaning, the automatic spraying mode is enabled by default with intermittent spraying.
- Press the Automatic Water Spray button on the remote control; the robot will beep once, indicating that the automatic spraying mode has been disabled.
- Press the Automatic Water Spray button again; the robot will beep twice, indicating that the automatic spraying mode has been enabled.
Manual water spraying
Fig. 13
During cleaning, press the Manual Water Spray button on the remote control for a single spray.
3.9. End of cleaning process
Fig. 14
A. Hold the window cleaning robot with one hand and press and hold the Power/Start/Stop button for 2 seconds with the other hand to switch it off.
B. Remove the robot from the glass.
C. Untie the safety rope and store the appliance and accessories in a dry, well-ventilated place until next use.
3.10. Power failure protection (backup battery)
Fig. 15
- During a power failure, the window cleaning robot activates its built-in backup battery, providing up to 20 minutes of operation when fully charged.
- In the event of power loss, the appliance will maintain its position and stop moving; the red light will flash and an audible warning will sound. Remove the robot from the glass as soon as possible to prevent potential falls.
- Use the safety rope to retrieve the appliance gently; during retrieval, keep it as close to the glass as possible to prevent detachment.
4. CLEANING AND MAINTENANCE
- Ensure the robot is switched off and disconnected from the power supply before performing any cleaning tasks.
- To maintain optimal performance, clean the sensors and wheels with a clean, dry cloth regularly.
- Use a soft, damp cloth to clean the product's exterior surface.
- Do not use corrosive or abrasive products for cleaning, as they may damage the surface and affect operation.
- Avoid using solvents, alcohol, or harsh chemicals on any part of the window cleaning robot.
- The cleaning mop pads are washable and reusable.
- Do not immerse the product in water or place it under running water.
- Do not expose the robot to direct sunlight or high temperatures.
5. TROUBLESHOOTING
- When using a new mop pad (especially on heavily soiled exterior windows), the robot may move slowly or malfunction:
A. Spray a small amount of water or window cleaner evenly across the mop pad or glass surface.
B. After dampening and wringing out the mop pad, attach it to the appliance's cleaning ring before use.
- The robot performs self-check at start-up. If it cannot move smoothly and emits a warning signal, it means that friction may be excessive or insufficient:
A. Check the mop pad for excessive dirt.
B. Window films/stickers (e.g., insulating or frosted films) have a relatively low friction coefficient and are unsuitable for use.
C. Extremely clean glass surfaces may become too slippery.
D. In very low humidity environments (e.g. air-conditioned spaces), the glass may become too slippery after multiple passes.
- When pressing the "Top-to-bottom automatic cleaning" mode, the appliance fails to detect the window's upper edge by sliding along that edge: Press "Start/Pause" and switch to "Right-to-left automatic cleaning" or "Left-to-right automatic cleaning".
- The robot cannot clean the upper left section of the glass: Use the manual mode with the remote control to clean the pending area. Occasionally, if the glass or mop pad becomes slippery, the upper band may shift slightly, leaving an uncleaned area.
- The appliance does not completely clean the windows and finishes prematurely: Press "Right-to-left automatic cleaning" or "Left-to-right automatic cleaning" to complete the remaining area.
- Possible causes of slippage and poor climbing:
A. Insufficient friction. Window films/stickers (insulating, anti-fog, etc.) have a low friction coefficient.
B. Mop pad too wet. If the glass is extremely clean, it may become excessively slippery.
C. In very low humidity environments (e.g. air-conditioned spaces), the glass may become too slippery after multiple passes.
D. When starting (with "Top-to-bottom automatic cleaning" or "Right-to-left/Left-to-right automatic cleaning"), place the appliance at a certain distance from the frame to avoid false detections.
-
After cleaning, circular wheel marks remain on the glass surface: The mop pad is too dirty. Replace it with a clean mop pad and repeat the cleaning process.
-
The robot does not move smoothly. Possible causes
A. The mop pad is too dirty. Replace it.
B. There are areas of different material/finish on the glass (glass, insulating film/sticker or frosted). Use only on a single homogeneous surface.
C. The cleaning wheel screw is loose; tighten it (not excessively, to avoid affecting the lower frame seal and performance on bevelled frames).
- How to proceed if, due to power failure, the robot stops with flashing red light and warning sound:
A. Gently pull the safety rope to retrieve the appliance; keep it as parallel and close to the glass as possible to prevent falls.
B. Switch off the window cleaning robot's power button.
C. Check the cable for poor contact or breakage.
- The robot stops when encountering unknown obstacles, the red light flashes and there is no warning sound. How to proceed:
A. Return the robot to a safe position using the remote control or gently retrieve it with the safety rope, keeping it parallel to the glass to prevent falls.
B. Remove obstacles from the window.
C. Check for air leakage.
- When illuminating at night, arc marks appear on polished glass:
On the first pass, disable the water spraying and use a clean mop pad to remove sand/dust. On the second pass, change to a clean mop pad, activate the water spraying or keep the upper cleaning wheel clean and dry and spray a small amount of detergent or alcohol onto the lower cleaning wheel (1-2 sprays), without soaking it, to remove the arc mark. A completely wet mop pad affects the appliance's operation. - The robot has cleaned all windows, but does not stop automatically: Press the "Start/Pause" button to stop operation.
- The robot does not spray water:
A. Confirm that the water spraying mode is enabled.
B. Clean the water outlet with a soft, clean cloth.
C. Check if there is water in the tank and if the added cleaning solution is clean and pure.
6. DISPOSAL OF OLD ELECTRICAL AND ELECTRONIC APPLIANCES

This symbol indicates that, according to the applicable regulations, the product and/or battery must be disposed of separately from household waste. When this product reaches the end of its shelf life, you should dispose of the batteries/accumulators and take them to a collection point designated by the local authorities.

For detailed information on how to properly dispose of electrical and electronic equipment and/or the corresponding batteries, consumers should contact their local authorities.
Information regarding national packaging recycling systems and their
marking can be found on our website.
Compliance with the above guidelines will help protecting the environment.
7. COPYRIGHT
The intellectual property rights over the texts in this manual belong to CECOTEC INNOVACIONES, S.L. All rights reserved. The content of this publication may not, either in part or in its entirety, be reproduced, stored in a retrieval system, transmitted or distributed by any means (electronic, mechanical, photocopying, recording or similar) without prior authorisation from CECOTEC INNOVACIONES, S.L.
8. SIMPLIFIED EU DECLARATION OF CONFORMITY

Cecotec Innovaciones hereby declares that this window cleaning robot, model EU01_120821 – Conga Windroid 1190 Double Spray, is in conformity with the Radio Equipment Directive 2014/53/EU.
The full text of the EU Declaration of Conformity can be found on the following website:
https://cecotec.es/es/information/declaration-of-conformity
1. PIÈCES ET COMPOSANTS
Image 1:
https://storececotec.de/de/information/declaration-of-conformity
1. PARTI E COMPONENTI
Figura 1:
https://storececotec.it/it/information/declaration-of-conformity
1. PEÇAS E COMPONENTES
Figura 1:
https://cecotec.pt/pt/information/declaration-of-conformity
1. ONDERDELEN EN COMPONENTEN
Figuur 1:
5. PROBLEEMOPLOSSING
https://cecotec.es/es/information/declaration-of-conformity
1. CZĘŚCI I KOMPONENTY
Rysunek 1:
https://cecotec.es/es/information/declaration-of-conformity
1. PARÇALAR VE BILEŞENLER
Şekil 1:
https://cecotec.es/es/information/declaration-of-conformity
1. PECES I COMPONENTS
Figura 1:
https://cecotec.es/ca/information/declaration-of-conformity
https://cecotec.es/es/information/declaration-of-conformity
https://cecotec.es/es/information/declaration-of-conformity


Fig./Img./Abb./Afb./Rys.1

Fig./Img./Abb./Afb./Rys. 2

Fig./Img./Abb./Afb./Rys. 3

Fig./Img./Abb./Afb./Rys. 4

Fig./Img./Abb./Afb./Rys. 5

Fig./Img./Abb./Afb./Rys. 6

Fig./Img./Abb./Afb./Rys. 7

Fig./Img./Abb./Afb./Rys. 8
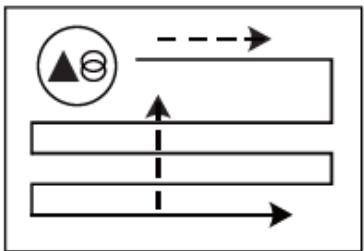
Fig./Img./Abb./Afb./Rys. 9

Fig./Img./Abb./Afb./Rys. 10

Fig./Img./Abb./Afb./Rys. 11

Fig./Img./Abb./Afb./Rys. 12


Fig./Img./Abb./Afb./Rys. 13

Fig./Img./Abb./Afb./Rys. 14

Fig./Img./Abb./Afb./Rys. 15
www.cecotec.es
- SOMMAIRE
- REMOTE CONTROL BATTERY INSTRUCTIONS
- INSTRUCTIONS DE SÉCURITÉ
- PARTS AND COMPONENTS
- FIGURE 1
- INDICATOR LIGHTS
- NOTE
- BEFORE USE
- BOX CONTENT
- FIG. 2
- OPERATION
- REMOTE CONTROL
- FIGURE 3
- WATER TANK
- INSTALLING THE MOP PAD AND CLEANING RING
- SECURING THE SAFETY ROPE
- POWER CONNECTION
- PLACING THE ROBOT ON THE GLASS
- SMART ROUTE PLANNING MODES
- DRY CLEANING
- WET CLEANING
- AUTOMATIC WATER SPRAYING
- MANUAL WATER SPRAYING
- END OF CLEANING PROCESS
- POWER FAILURE PROTECTION (BACKUP BATTERY)
- CLEANING AND MAINTENANCE
- TROUBLESHOOTING
- DISPOSAL OF OLD ELECTRICAL AND ELECTRONIC APPLIANCES
- COPYRIGHT
- SIMPLIFIED EU DECLARATION OF CONFORMITY
- PIÈCES ET COMPOSANTS
- IMAGE 1
- PARTI E COMPONENTI
- FIGURA 1
- PEÇAS E COMPONENTES
- ONDERDELEN EN COMPONENTEN
- FIGUUR 1
- PROBLEEMOPLOSSING
- CZĘŚCI I KOMPONENTY
- RYSUNEK 1
- PARÇALAR VE BILEŞENLER
- ŞEKIL 1
- PECES I COMPONENTS
Brand : CECOTEC
Model : Conga Windroid W10 Doublespray
Category : Vacuum Cleaner