
WL 90 - Light therapy BEURER - Free user manual and instructions
Find the device manual for free WL 90 BEURER in PDF.
| Product type | Light therapy lamp with dawn simulator alarm |
| Brand | BEURER |
| Model | WL 90 |
| Category | Light therapy |
| Power supply | AC adapter 110-240 V, 50/60 Hz, output 5 V DC, 3000 mA |
| Max light intensity | Approximately 2500 lux at 15 cm |
| Light type | LED (lifespan > 50,000 h, not replaceable) |
| Brightness adjustment | Continuous via app |
| Main functions | Sunrise and sunset simulation, RGB ambient light (10 modes), FM radio, Bluetooth speaker, alarm (3 programmable), sleep function, USB charging |
| Radio | FM 87.0 - 108 MHz, 10 presets |
| Speaker | 2 x 3 watts |
| Bluetooth | Bluetooth 4.0, compatible iOS 7.1+ and Android 4.3+ |
| USB port | Charging only (5 V, 500 mA), not compatible with tablets |
| Display | LCD screen with adjustable backlight (auto, off, levels 1-3) |
| Alarm | 3 independent alarms, ringtones (10 melodies, beep, radio), snooze function (1-30 min) |
| Sunset function | Adjustable gradual dimming from 2 to 60 min |
| Sleep function | Delayed shut-off from 2 to 60 min (radio/Bluetooth) |
| App | Beurer LightUp (iOS/Android), controls all functions |
| Cleaning and maintenance | Dry cloth, do not use abrasive products, do not immerse |
| Safety | Use according to instructions, do not use if damaged, keep out of reach of children, avoid moisture |
| Spare parts and repairability | LED not replaceable, AC adapter included |
| Dimensions (estimated) | Approximately 20 x 15 x 10 cm |
| Weight (estimated) | Approximately 600 g |
| Package contents | Wake-up light, AC adapter, instruction manual, quick guide |
| Warranty | Contact Beurer customer service |
Frequently Asked Questions - WL 90 BEURER
User questions about WL 90 BEURER
0 question about this device. Answer the ones you know or ask your own.
Ask a new question about this device
Download the instructions for your Light therapy in PDF format for free! Find your manual WL 90 - BEURER and take your electronic device back in hand. On this page are published all the documents necessary for the use of your device. WL 90 by BEURER.
USER MANUAL WL 90 BEURER
Read these instructions for use carefully and keep them for later use, be sure to make them accessible to other users and observe the information they contain.
Table of contents
- Getting to know your device 10
- Signs and symbols 10
- Intended use 10
- Warning notices/safety notes 11
- Device description 11
- Device start-up 12
7.App start-up 12
7.1 "Beurer LightUp" app 12
7.2 Bluetooth® loudspeaker 12
7.3 Sunset function 13
- Device operation 13
8.1 Setting the time and date 13
8.2 Activating/deactivating the alarm 13
8.3 Setting the alarm time 13
8.4 Switching off the alarm 13
8.5 Setting the display brightness 14
8.6 Radio mode 14
8.7 Goodnight function (radio sleep timer) 14
8.8 Light function 14
8.9 Mood light function 14
9.What if there are problems? 14
- Cleaning and storage 14
- Disposal 14
- Technical data.. 15
Included in delivery
- Wake-up light with cable antenna
- Mains adapter
- Instructions for use
- Brief instructions
Dear customer,
Thank you for choosing one of our products. Our name stands for high-quality, thoroughly tested products for applications related to heating, weight, blood pressure, body temperature, pulse, gentle therapy, massage, air and beauty.
With kind regards,
Your beurer team
1. Getting to know your device
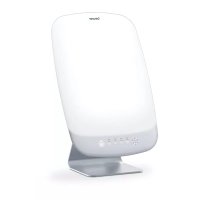
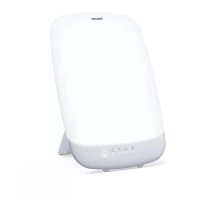
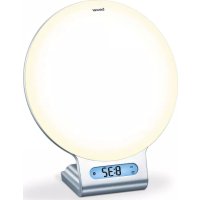
The Beurer WL 90 wake-up light wakes you from sleep in a gentle and natural manner. The LED light gradually becomes brighter like a rising sun, allowing you to slowly become accustomed to the light conditions and your body to gently prepare itself for waking up. You can also set an alarm tone that is sounded following the simulated sunrise and provides an acoustic aid to help you wake up. For the alarm tone, you can choose between the radio or various sounds. Thanks to the "Beurer LightUp" app, it is also easy to control all device functions from your smartphone.
The beurer WL 90 wake-up light provides a rested and pleasant start to your day.
Functions:
- Control of the device functions via smartphone with the "Beurer LightUp" app
- Simulated sunset (wake-up light slowly turns darker over a set period of time)
Light function (white light/reading lamp) - Mood light with individual colour setting (choice of 10 different settings)
- Time shown on the display
- Can be used as a loudspeaker via Bluetooth®
VHF radio - Alarm via radio or sounds
- Goodnight function (wake-up light switches off automatically after a preset time)
Note
The WL 90 wake-up light can only be used with its full functionality together with the "Beurer LightUp" app. Basic functions can also be set directly on the device.
The following functions can only be controlled via the app:
- Bluetooth® loudspeaker
- Choice of 10 defined mood light settings
- Direct choice of mood light colour
- Alarm can be switched on/off for each day
- Adjustment of special alarm settings
- Button tone can be switched on/off
- Activation of sunset function
System requirements:
- Bluetooth® 4.0, iOS from version 7.1, Android™ devices from version 4.3 with Bluetooth® Smart Ready
For a list of all compatible mobile devices, please scan the following QR code:

2. Signs and symbols
| WARNING | Warning notice indicating a risk of injury or damage to health. |
| IMPORTANT | Safety note indicating possible damage to the unit/accessory. |
| Note | Note on important information. |
| Disposal in accordance with the Waste Electrical and Electronic Equipment EC Directive – WEEE | |
| Manufacturer | |
| CE | This product satisfies the requirements of the applicable European and national directives. |
3. Intended use
WARNING
The device may only be used for the purpose for which it is designed and in the manner specified in the instructions for use. Improper use can be dangerous. The manufacturer is not liable for damage resulting from improper or careless use.
4. Warning notices/safety notes

WARNING
- Only operate the device with the mains adapter provided and at the mains voltage specified on the mains adapter.
- Before use, inspect the device and accessories for visible damage. If you have any doubts, do not use the device and contact your retailer or the specified Customer Services address.
- The device is only intended for domestic/private use, not for commercial use.
- This device may be used by children over the age of eight and by people with reduced physical, sensory or mental skills or a lack of experience or knowledge, provided that they are supervised or have been instructed on how to use the device safely and are fully aware of the consequent risks of use.
Children must not play with the device. - Cleaning and user maintenance must not be performed by children unless supervised.
- In the event of defects or operational faults, switch the device off immediately and disconnect it from the mains socket.
- Never plug in or unplug the mains adapter when you have wet hands.
- Keep packaging material away from children (risk of suffocation).
- Arrange the mains cable so that it is not a trip hazard.
- Keep the device, mains adapter and mains cable away from water.

IMPORTANT
- Protect the device from impacts, humidity, dirt, marked temperature fluctuations and direct sunlight.
- Do not drop the device.
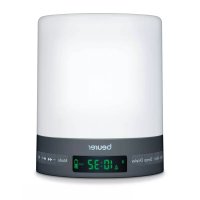
5. Device description
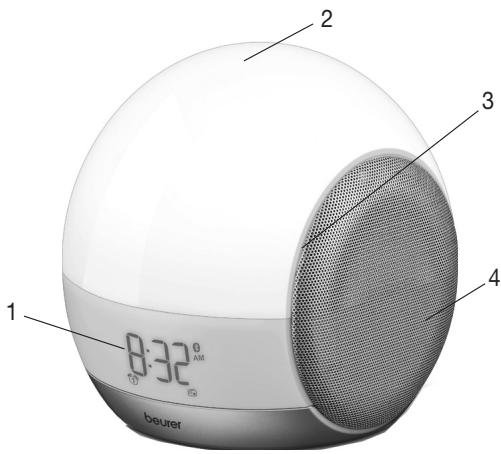
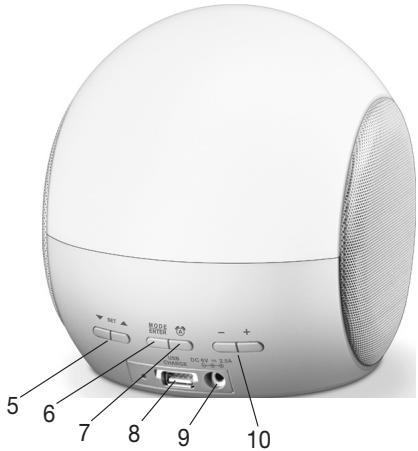
| 1 Display | 6 MODE/ENTER button |
| 2 Light area | 7 ALARM button |
| 3 Snooze function (device vibrates) | 8 USB connection (for charging only, no music playback) |
| 4 Loudspeaker | 9 Mains connector |
| 5 SET buttons ▲/▼ | 10 + / - buttons |
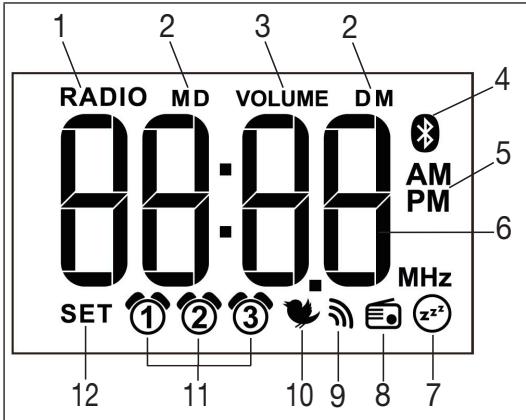
| 1 Radio mode | 7 Goodnight function |
| 2 Month (M)/Day (D) | 8 Radio mode |
| 3 Volume | 9 Beep |
| 4 Bluetooth® | 10 Wake-up melody |
| 5 Clock mode | 11 Alarm memory space 1-3 |
| 6 Time /Date / Radio frequency | 12 Setting active |
6. Device start-up
- Remove the packaging material.
- Check that all parts listed are present.
- Check the device, mains adapter and mains cable for damage.
- Place the device on a firm, even surface.
- Insert the mains adapter connector into the mains adapter socket on the rear of the device.
- Insert the mains adapter into a suitable socket.
The time is shown on the device display. - Route the cable antenna of the device to the rear.
7. App start-up
7.1 "Beurer LightUp" app
Once you have downloaded the "Beurer LightUp" app and the wake-up light is connected to a smartphone via Bluetooth® , you can control all of the functions of the wake-up light with ease via the smartphone app.
For your convenience, instead of using the buttons on the device, we recommend that you control the functions of the wake-up light via the smartphone app.
To control the device's functions with the app on your smartphone, proceed as follows:
- Ensure that your smartphone is connected to the Internet.
2 Activate Bluetooth® on your smartphone. - Download the "Beurer LightUp" app from the Apple App Store (iOS) or Google Play (Android).
- Open up the "Beurer LightUp" app and add the wake-up light.
- You can now control all functions of the wake-up light via the app.
Note
The following functions can only be controlled via the app:
- Bluetooth® loudspeaker
- Choice of 10 defined mood light settings
- Direct choice of mood light colour
- Alarm can be switched on/off for each day
- Adjustment of special alarm settings
- Button tone can be switched on/off
- Activation of sunset function
7.2 Bluetooth® loudspeaker
To activate the Bluetooth® loudspeaker, a connection must be established at least once as follows:
1.Close the "Beurer LightUp" app if it is open.
2. Press the MODE/ENTER button twice until "8T" is displayed. This begins the Bluetooth® search.
3. In the Bluetooth® settings of your operating system (iOS/Android settings), select "WL 90 Speaker" from the device list in order to connect to this.
4. Once the wake-up light is connected to the smartphone, the blue Bluetooth® logo will appear on the display.
5. Select the music function in the menu of the LightUp app.
6. Press the MODE/ENTER button twice to deactivate the loudspeaker. Close the app for this.
Note
The connection is saved for this combination of smartphone and wake-up light device. The Bluetooth® connection is then established automatically when you start the music function in the LightUp app. This automatic function may vary depending on the smartphone model.
Note
Bluetooth®Smart (low energy) is generally used, for example to control the light and alarm functions. For the music playback, Classic Bluetooth®is also used. It is only here that the Bluetooth®symbol appears in the display of the wake-up light (Bluetooth®connection is active or searching for connection).
7.3 Sunset function
The wake-up light can also be used to simulate a sunset, whereby the light slowly turns darker after a set period of time.
The sunset function can only be adjusted via the menu in the "Beurer LightUp" app.
8. Device operation
The following basic functions can also be controlled directly without the app using the buttons on the device, however this is only possible if the app is closed on your smartphone. The wake-up light can only be used with its full functionality together with the "Beurer LightUp" app.
8.1 Setting the time and date

Note
When using the "Beurer LightUp" app, the time and date are already set as these are automatically synchronised with the smartphone every time the app is used.
- Press and hold the MODE/ENTER button for three seconds.
- Hour mode 24 Hr flashes in the display. Set the hour mode using the SET buttons / (24-hour mode or 12-hour mode). Confirm with the MODE/ENTER button.
- The hour display flashes in the display. Set the hours using the SET buttons / . Confirm with the MODE/ENTER button.
- The minute display flashes in the display. Set the minutes using the SET buttons / . Confirm with the MODE/ENTER button.
- The year 2015 flashes in the display. Set the year using the SET buttons / . Confirm with the MODE/ENTER button.
- The month (M) 1 flashes in the display. Set the month using the SET buttons / . Confirm with the MODE/ENTER button.
- The day (D) 1 flashes in the display. Set the day using the SET buttons / . Confirm with the MODE/ENTER button. The set time appears.
8.2 Activating/deactivating the alarm
Activating the alarm
Before setting an alarm, first activate the alarm memory space for which you would like to set the alarm.
The wake-up light features three alarm memory spaces (1, 2, 3) that can be configured individually. You can choose to be woken up by one of the ten wake-up melodies, an alarm tone or the radio.
To select an alarm memory space, proceed as follows:
- Select the desired alarm memory space by pressing the ALARM button. This appears in the display (several alarm memory spaces may be selected at the same time).
- To deactivate an alarm, keep pressing the ALARM button until the corresponding alarm clock symbol disappears from the display.
8.3 Setting the alarm time
Setting the alarm time on the wake-up light
To set an alarm time for the selected alarm memory space, proceed as follows:
- For an already activated alarm, press and hold the ALARM button for two seconds.
- The alarm hour flashes in the display. Set the alarm hour using the SET buttons / . Confirm with the ALARM button.
- The alarm minute flashes in the display. Set the alarm minute using the SET buttons / . Confirm with the ALARM button.
- The alarm tone flashes in the display. Set the desired alarm tone using the SET buttons / (wake-up melody 1-10 , beep or radio). Confirm with the ALARM button.
- The alarm volume (VOLUINE) flashes in the display. Set the alarm volume using the SET buttons / . Confirm with the ALARM button.
- The snooze time (5n) flashes in the display. Set the snooze time (1, 2, 5, 10, 20 or 30 minutes) using the SET buttons / . Confirm with the ALARM button.

Note
Setting the alarm time via smartphone
To be woken at an alarm time set using the app, the smartphone simply needs to be connected to the wakeup light via Bluetooth® when making the settings. Once you have set the alarm time and alarm tone, you can deactivate Bluetooth® on your smartphone or switch off your smartphone altogether. A continuous overnight Bluetooth® connection is not necessary.
8.4 Switching off the alarm
Switching off the alarm during sunrise
You can switch off this sunrise by pressing any button. The alarm tone does not sound. The light is slightly dimmed for 2 minutes. If you press any button again, the light switches off.
Snoopze mode (Snoopze) for the alarm
The device features a snooze mode (Snoopze). If the alarm sounds and you press the Snooze function (by tapping
the light area), the alarm will sound again once the set snooze duration has elapsed.
Switching off the alarm when the alarm tone sounds When the alarm sounds, press any button apart from Snooze. The alarm is now switched off and will only sound again at the set alarm time. The light stays on for a further 2 minutes to allow you to get up, before then switching off automatically. To switch on the light again, see section 8.8.
8.5 Setting the display brightness
The wake-up light features four brightness levels for the display (0, 1, 2, 3, R). Brightness level "R" (automatic) automatically adjusts the display brightness to the surrounding light conditions. To set the display brightness, proceed as follows:
- Press both + / - buttons at the same time. "BL:" appears in the display. Set the desired display brightness using the MODE button (0, 1, 2, 3 or R).
- To confirm the display brightness, press both +/- buttons at the same time.
8.6 Radio mode
To turn on the radio, proceed as follows:
- Keep pressing the MODE/ENTER button until RROB appears in the display.
- Set the radio volume using the + / - buttons.
- Change the memory space using the SET button
- To start an automatic station search, press and hold the SET button for three seconds. Briefly press the SET buttons / to adjust the radio frequency by 0.1 MHz at a time.
- To save a radio station to this programme number, press the MODE/ENTER button. The corresponding programme number (e.g. P1) appears in the display.
8.7 Goodnight function (radio sleep timer)
If radio mode or the Bluetooth® loudspeaker is activated, you can also enable a goodnight function (⊙). You can use the goodnight function to set the number of minutes after which the radio or the Bluetooth® loudspeaker should automatically switch off.
If you would like to use the goodnight function, proceed as follows:
- In radio mode or Bluetooth® loudspeaker mode, briefly press the SET buttons / at the same time.
- The timer display flashes in the display. Select the desired timer duration using the ALARM button (2, 5, 10, 15, 30, 45 or 60 minutes).
- To confirm, briefly press the SET buttons / at the same time.
8.8 Light function
- Using your hand, tap on the side of the wake-up light to make it vibrate lightly. The illuminated display becomes brighter.
- Tap on the side of the wake-up light again within three seconds. The white light of the reading lamp will come on.
8.9 Mood light function
- Using your hand, tap on the side of the wake-up light to make it vibrate lightly. The illuminated display becomes brighter.
- Tap on the side of the wake-up light again within three seconds. The white light of the reading lamp will come on.
- To activate the mood light with change of colour, tap again on the light area of the wake-up light.
- To have a coloured light permanently displayed during the colour change, tap again on the light area of the wake-up light.
- To deactivate the light function, tap again on the light area of the wake-up light.
9. What if there are problems?
You can find further information and a list of frequently asked questions (FAQs) about this product at www.beurer.com.
10. Cleaning and storage
- Clean the device with a dry cloth.
- Do not use any abrasive cleaning products.
- Ensure that no water enters the device. If this should happen, only reuse the device once it has fully dried out.
- Never immerse the device or mains part plug in water or other liquids.
- Protect the device from knocks, damp, dust, chemicals, marked temperature fluctuations, and nearby sources of heat (ovens, heaters).
11. Disposal
For environmental reasons, do not dispose of the device in the household waste at the end of its useful life.
Dispose of the device at a suitable local collection or recycling point. Observe the local regulations for material disposal. Dispose of the device in accordance with EC Directive - WEEE (Waste

Electrical and Electronic Equipment). If you have any questions, please contact the local authorities responsible for waste disposal.
12. Technical data
| Illuminance | Max. approx. 2500 lux (at distance of 15 cm) |
| Light | LED technology (LED service life: >50,000 hours, LED cannot be replaced) |
| Light levels | Continuously adjustable via app |
| Mood light | Automatic RGB colour change, option of setting individual colour |
| Wake-up light function | Off, 2, 5, 10, 15, 20, 30, 45, 60 minutes prior to alarm |
| Sunrise function | Maximum light intensity up to alarm: Light level 5, 10, 15, 20 |
| Snoopze time | 1, 2, 5, 10, 20, 30 minutes |
| Sunset function | 2, 5, 10, 15, 20, 30, 45, 60 minutes |
| Goodnight function (sleep radio) | 2, 5, 10, 15, 20, 30, 45, 60 minutes |
| LCD backlighting | Auto, off, 1, 2, 3 |
| Time | Toggle 12h/24h mode |
| Alarm | 3 alarm times (Off, On, Day) Alarm tone, 10 sounds, radio |
| Button tone | Off, On |
| USB | USB charging function for smartphone with 5 V/500 mA (tablets are not supported). |
| Radio | Frequency range VHF 87.0-108 MHz, 10 memory spaces |
| Music streaming | Bluetooth® |
| Loudspeaker | 2×3 W |
| Mains part voltage supply | Input: 110-240 V, AC, 50/60 Hz, 0.5 A Output: 5 V, DC, 3000mA |
| Mains part protection class | Protection class II |
Subject to technical changes.
We hereby guarantee that this product complies with the European R&TTE Directive 1999/5/EC.
Please contact the specified service address to obtain further information, such as the CE Declaration of Conformity.
FRANÇAIS

Chere clientele, cher client,
10. Nettoyage/stockage
CleyuOuIe yHKUIM MOyT IcNoJIb3OBaTbCnCKJIOHITelbHO ueE3 npIJIOxHeHIE.
Динамк УретаBluetooth®
- BbI6Op n3 10 npEaBapnteIbHO hAcTpoEHbIX CBeTOBbIX cUeHApueB
- Празмов Вьбор цBEТа пОДСВЕТКИ ЛAMпы CO сMeHои CBETOB
BkIIOUeHne N BbIKJIIOUeHne 6yDnJIbHNka Ha KaKdBi nDeHb
- Hac troika cneuaJIbHbIX fynKcIy 6yDnJIbHnka
- Bклочени И Вьклочени Toha КлаваТурь
BkIIOUeHHe IMMTaUIN 3axOda coJHua
CnCTeMHbIe Tpe6oBaHnIa
- Bluetooth® 4.0, iOS Haúnhà n c Bercnn 7.1, yctpoi-CTBa Ha 6a3e Android™ Haúnhà n c Bercnn 4.3 c Bluetooth®Smart Ready.
Дя npocmotpa Bcex coBmecTmbix MObNlbHbIX yctpoCTB COCKaHpyTe cneDuOuI QR-KoI:

2.ПОЯСHEняксIMBOJAM
- Table of contents
- Included in delivery
- Dear customer,
- Getting to know your device
- Functions:
- Note
- The WL 90 wake-up light can only be used with its full functionality together with the "Beurer LightUp" app. Basic functions can also be set directly on the device.
- System requirements:
- Signs and symbols
- Intended use
- WARNING
- Warning notices/safety notes
- IMPORTANT
- Device description
- Device start-up
- App start-up
- "Beurer LightUp" app
- Bluetooth® loudspeaker
- Sunset function
- Device operation
- Setting the time and date
- Activating/deactivating the alarm
- Activating the alarm
- Setting the alarm time
- Setting the alarm time on the wake-up light
- Setting the alarm time via smartphone
- Switching off the alarm
- Switching off the alarm during sunrise
- Snoopze mode (Snoopze) for the alarm
- Setting the display brightness
- Radio mode
- Goodnight function (radio sleep timer)
- Light function
- Mood light function
- What if there are problems?
- Cleaning and storage
- Disposal
- Technical data
- FRANÇAIS
- Chere clientele, cher client,
- Nettoyage/stockage
- CnCTeMHbIe Tpe6oBaHnIa
- 2.ПОЯСHEняксIMBOJAM
Brand : BEURER
Model : WL 90
Category : Light therapy