Cafelizzia 690 - Coffee maker CECOTEC - Free user manual and instructions
Find the device manual for free Cafelizzia 690 CECOTEC in PDF.


| Product type | Coffee maker |
| Brand | Cecotec |
| Model | Cafelizzia 690 |
| Carafe capacity | 1.2 L (about 10 cups) |
| Power | 1000 W |
| Power supply | 220-240 V ~ 50/60 Hz |
| Dimensions (L x D x H) | 20 x 25 x 35 cm |
| Weight | 2.5 kg |
| Color | Black and silver |
| Main functions | Delayed programming, keep warm, auto shut-off, anti-drip |
| Filtration system | Reusable permanent filter |
| Coffee type | Ground coffee |
| Care and cleaning | Carafe and filter dishwasher safe; regular descaling recommended |
| Safety | Automatic shut-off after 2 hours, overheat protection |
| Spare parts and repairability | Spare carafe available; repairability score: 7.5/10 |
| Warranty | 2 years |
| Manual available | Yes, in multiple languages on the manufacturer's website |
Frequently Asked Questions - Cafelizzia 690 CECOTEC
User questions about Cafelizzia 690 CECOTEC
0 question about this device. Answer the ones you know or ask your own.
Ask a new question about this device
Download the instructions for your Coffee maker in PDF format for free! Find your manual Cafelizzia 690 - CECOTEC and take your electronic device back in hand. On this page are published all the documents necessary for the use of your device. Cafelizzia 690 by CECOTEC.
USER MANUAL Cafelizzia 690 CECOTEC
Safety instructions 7
- Parts and components 53
- Before use 53
- Operation 54
- Cleaning and maintenance 59
- Troubleshooting 60
- Technical specifications 61
- Recycling of electrical and electronic equipment 61
- Technical support and warranty 62
- Copyright 62
- Simplified EU Declaration of Conformity 62
SOMMAIRE
EN • The coding in this manual is generic and applies to all code variants of the appliance.
Please read these instructions carefully before using the appliance. Keep this instruction manual for future reference or new users.
- All safety instructions must be closely followed when using the appliance.
-
Incorrect or improper use can be dangerous for the user and damage the appliance.
-
Ensure the mains voltage matches the voltage specified on the appliance's rating label and that the socket is properly earthed.
- Place the appliance on a dry, stable, flat, heat-resistant surface.
- This appliance is intended for domestic use only and is not suitable for use in commercial establishments such as bars, restaurants, farms, hotels, motels, and offices.
- Do not immerse the cord, plug, or any other non-removable part of the appliance in water or any other liquid or expose electrical connections to water. Make sure your hands are dry before handling the plug or switching on the appliance.
- Do not use the appliance if its cable, plug, or housing are damaged, nor after it malfunctions or has been dropped or damaged in any way.
- Check the power cord regularly for visible damage. If the cord is damaged, it must be repaired by Cecotec's Official Technical Support Service to avoid any hazard.
- Do not try to repair the appliance by yourself. Contact Cecotec's Official Technical Support Service for any query or repair.
- Do not cover the appliance during operation and do not place heavy objects on it.
- Do not use the appliance under the following circumstances:
A. On or near a gas or electric hob, in heated ovens, or near open flames.
B. On soft surfaces (such as carpets) or where it may tip over during use.
C. Outdoors or in areas with high humidity levels.
- Do not use any accessory that has not been recommended or provided by Cecotec, as they might cause injuries or damage.
- CAUTION: hot surface. The temperature of accessible surfaces may be high while the appliance is in use and could cause burns. Do not touch hot surfaces during operation or immediately after.
- When filling the water tank, be careful to avoid spillage, especially on the cable and electrical parts of the appliance.
- Warning: the filling opening must not be opened during operation.
- Do not insert coffee while the machine is in operation.
- Do not operate the appliance without water.
- Do not move or turn the appliance off during operation.
- Do not let the cable hang over the edge of the working surface or worktop, and prevent it from touching hot surfaces.
- Switch off the appliance and unplug it from the mains when not in use or when cleaning, before changing accessories, disassembling, or assembling the appliance. Allow it to cool down completely before attaching or removing parts and before cleaning the appliance.
- Never leave the product unattended during use. Unplug the appliance after use and when you leave the room where it is installed.
- Cleaning and maintenance tasks must not be carried out by children.
- The appliance is not intended to be used by children. Keep this appliance and its power cord out of their reach.
-
This product can be used by children and people with reduced physical, sensory, or mental capabilities or lack of experience and knowledge, as long as they have been given supervision or instruction concerning the use of the appliance in a safe way and understand the hazards involved.
-
Supervise children to ensure that they do not play with the product. Close supervision is necessary when the appliance is being used by or near children.
- The appliance must not be submerged.
- Warning: this appliance has undergone a quality control previous to its commercialisation with the aim of ensuring its correct operation. After the quality control testing, the appliance is cleaned thoroughly, therefore, although it is unlikely to occur, there could be rests of water drops.
INSTRUCTIONS DE SÉCURITÉ
- Water tank lid
- Water tank
- Steam knob
- Main body
- Steam wand
- Cup tray
- Power button
- Single-cup button/indicator
- Double-cup button/indicator
- Steam preheating button/indicator
- Brewing unit
- Level float
- Drip tray grille
- Drip tray
- Measuring spoon
- Single-cup filter
- Double-cup filter
- Portafilter
- Coffee spout
NOTE:
The graphics in this manual are schematic representations and may not exactly match the product.
2. BEFORE USE
- This appliance comes in a packaging designed to protect it during transport. Remove the appliance from its box. You can keep the original box and other packaging materials in a safe place to prevent damage to the appliance if you need to transport it in the future. If you wish to dispose of the original packaging, make sure all items are recycled properly.
- Check that all parts and components are included and in good condition. If any of them are missing or damaged, please contact Cecotec's Official Technical Support Service immediately.
- Box content:
- Coffee machine
ENGLISH
- Single-cup filter
- Double-cup filter
- Portafilter
- Instruction manual
- Do not remove the product's serial number in order to keep proper traceability if technical assistance is required.
- Intended use: brewing coffee from ground coffee, hot water dispensing, steam production and heating/foaming of milk using the frother. Any other use may be dangerous.
Before first use
- Unpack and verify that you have all the accessories listed.
- Remove the red silicone cap from the water tank (2) before use. Fig. 2
- Initial cleaning:
- Fill the water tank (2) without exceeding MAX. Place the tank (2) and close the tank lid (1).
- Mount the portafilter (18) with the empty 1-cup (16) or 2-cup (17) filter and turn it firmly until it locks into the group head (11). Fig. 3
- Place a cup on the drip tray (14), ensuring it is aligned with the coffee spout (19).
- Connect to a grounded outlet.
- Press the on/off button (7). The indicators flash during preheating. When the 1-cup coffee button/indicator (8) and the 2-cup coffee button/indicator (9) remain steady, the appliance is ready.
- Open the steam knob (3) fully to purge the steam wand (5) with hot water continuously for at least 30 seconds, then close.
- Press the 2-cup coffee button/indicator (9) to circulate hot water through the portafilter (18) and filter (16/17).
Pump purging
If the pump has drawn in air or the water tank (2) is empty, fill it, press the single-cup (8) or double-cup button/indicator and open the steam knob (3) fully until a continuous stream of water flows from the steam wand (5), then close it.
3. OPERATION
Panel and functions
- Power button (7): switches the appliance on and off. When switched on, the single-cup (8) and double-cup (9) indicators flash, which indicates that the machine is preheating. When the indicators (8) and (9) are lit, the appliance is ready to brew coffee or dispense hot water. If the steam preheating indicator (10) flashes rapidly when turning on, it means
that the steam knob (3) is not fully closed. Turn it in the closing direction as far as it will go.
- Single-cup button/indicator (8): after preheating, press the single-cup button/indicator (8) to start brewing. During the process, the single-cup indicator (8) flashes and the double-cup indicator (9) remains off. The machine stops automatically when the coffee volume set for 1 cup is reached. When finished, the 1-cup (8) and 2-cup (9) indicators remain lit. During extraction you can cancel by pressing the 1 cup button (8) once. The automatic extraction time is preset and includes a pre-infusion phase.
- Double-cup button/indicator (9): after preheating, press the double-cup button/indicator (9) to start brewing. During the process, the double-cup indicator (9) flashes and the single-cup indicator (8) remains off. The machine stops automatically when the coffee volume set for 2 cups is reached. When finished, the 1 cup (8) and 2 cup (9) indicators continue to flash. During extraction, you can cancel by pressing the 2-cup button (9) once. The automatic extraction time is preset and includes a pre-infusion phase.
- Steam preheating button/indicator (10): press the steam preheating button/indicator (10) once to start preheating. During this process, the indicator (10) flashes and, when finished, the machine enters steam mode. If you touch (10) again at any time during the process, the machine exits steam preheating and returns to the coffee extraction state. If the 1-cup (8) and 2-cup (9) indicators flash, the coffee temperature is too high: let it cool down naturally or prepare hot water manually through the coffee spout or steam wand (5). This accelerates the cooling of the circuit when the temperature is high.
- The steam knob (3) has two positions: Closed position, the steam knob (3) is in the closed position when it is turned clockwise as far as it will go. Open position: there are two operating states: ready for coffee/hot water (single-cup (8) and double-cup (9) indicators steady; steam indicator (10) off), the steam wand (5) supplies hot water; and steam state (steam indicator (10) steady on), the steam wand (5) produces steam.
Warning: if, when starting up the appliance, the steam indicator (10) flashes rapidly continuously, this means that the steam knob (3) is not closed, turn it to the closed position.
Indicator lights
| Power indicator | Single-cup indicador | Double-cup indicador | Steam preheating indicator | Cause | Solution |
| On | Flashing | Flashing | Off | Preheating coffee/water | N/A |
| On | On | On | Off | Ready for coffee/ hot water | N/A |
| On | Slow flas-hing | Off | Off | Brewing 1 cup | N/A |
| On | Off | Slow flas-hing | Off | Brewing 2 cups | N/A |
| On | Slow flas-hing | Slow flas-hing | Off | Dispensing hot water | N/A |
| On | Off | Off | Flashing | Preheating steam wand | N/A |
| On | Off | Off | On | Ready to steam | N/A |
| On | Off | Off | Slow flashing | Steaming | N/A |
| On | Off | Off | On | End of steaming | N/A |
| On | Off | Off | Flashing | Steam knob open when the coffee machine is swit-ched on | Close the steam knob |
| On | Flashing | Flashing | Off | After steaming, switch to the coffee function (high tempera-ture). | Wait until the temperatu-re drops or activate the steam knob to release water and cool the appliance. |
| Off | Off | Off | Off | The temperature sensor is shorted or open circuit, or the tempe-rature fuse is open circuit, or the connection line between the power supply board and the display board has a bad con-tact. | Contact Ceco-tec's Official Technical Su-pport Service. |
| Off | Off | Off | Off | Off | N/A |
| Off | Off | Off | Off | Shutdown after being in standby mode for more than 30 minutes | Press any button |
Brewing espresso coffee (example: 2 cups)
- Remove the water tank (2) and fill it with drinking water without exceeding the MAX line. Replace it and close the tank lid (1).
- Connect the coffee machine to the mains socket and press the power button (7). The coffee indicators (8 and 9) flash during preheating. When they remain steady, it is ready.
- Remove the portafilter (18). The recommended amount of coffee for the two-cup filter is 16-16.5 g. Level and compact with the dosing spoon (15) or with a presser. Clean the edge of the filter (16/17) to avoid damaging the group head gasket (11). Fig. 4
- Lock the portafilter (18) in the group head (11) by turning it firmly to the locked position.
- Place the cups under the coffee spout (19).
- Press the 2-cup coffee button/indicator (9). The pump drives the water and extraction begins, the indicator (9) flashes during the process.
- The machine stops automatically when the preset volume is reached.
- Remove the portafilter (18) (use gloves or cloth if hot), discard the grounds, rinse the filter (16/17) and portafilter (18) with hot water. Perform a short rinse by pressing the button/indicator 1 cup (8) or 2 cups (9) without coffee to clean the coffee spout (19). Reassemble the portafilter (18).
Recommended quantity 1 cup: use the 1 cup filter (16) with 9–9.5 g and press the 1 cup coffee button/indicator (8).
Warnings:
- Do not leave the coffee machine unattended during the brewing process, as it sometimes requires manual operation.
- Do not touch the hot surfaces of the machine with your hands to avoid burns, especially the pouring spout and the steam nozzle when using the machine.
Extraction recommendations
- Grinding and freshness: use freshly ground beans. A standard extraction cycle takes between 25 and 30 seconds. If the grind is coarse, there will be under-extraction (light flavour and colour, thin/white crema); if it is very fine, there will be over-extraction (very dark drink, little or no crema). Small changes in fineness greatly alter pressure and volume. As a guide, a double should provide 50-70 mL.
- Height of the compacted coffee: leave about 3 mm to the edge of the filter (16/17). Fig. 5.
- Automatic programmes: the coffee machine includes preinfusion and set times: 1 cup 19 seconds, 2 cups 33 seconds.
- Expected results: 1 cup 25-35 mL of beverage; 2 cups 50-70 mL (adjustable by grinding fineness).
ENGLISH
Brewing cappuccino
- First prepare an espresso coffee in a large enough cup.
- Use cold whole milk (4–8 °C) and pour approximately 1/3 of the capacity into a stainless steel glass (minimum diameter 70 ± 5 mm).
- Press the steam preheating button/indicator (10). When the indicator (10) is on steady, it is ready.
- Purging: place a glass under the steam wand (5), open the steam knob (3) to expel the condensed water. When steam comes out, close the knob (3).
- Insert the end of the frother (5) under the surface of the milk.
- Open the steam knob (3) to maximum to froth. Adjust the position of the steam wand (5) for texturizing.
- When the desired foam is achieved, close the knob (3), remove the glass and pour the frothed milk into the espresso. You can add sugar or cocoa to taste.
Note: Immediately clean the frother (5) and blow out a few seconds of steam to remove milk residues. Be careful, risk of burns due to high temperature.
Hot water
- Place a container under the steam wand (5).
- With the coffee indicators (8, 9) on steady, open the steam knob (3). Hot water will come out of the steam wand (5). During this process the coffee indicators (8, 9) may show pulsating light.
- Close the knob (3) when the desired volume is reached.
Reminder: the steam wand hot water function (5) accelerates the cooling of the circuit when the temperature is high.
Note: During use, be careful with hot parts of the machine. Especially with the water outlet, hot water nozzle and steam wand. During operation, do not touch these parts under any circumstances.
Heating liquids (steam function)
- Use a stainless steel beaker and fill it half full (beaker diameter should be ≥ 70 ± 5 mm).
- Press the steam preheating button/indicator (10) and wait until the indicator (10) is fixed.
- Insert the steam wand (5) into the liquid.
- Open the steam knob (3) to heat.
- Close the knob (3) when the desired temperature is reached.
Note: Clean the steam wand (5) immediately after use.
Caution: the water/steam outlet through the steam wand (5) is very hot, be careful.
4. CLEANING AND MAINTENANCE
Cleaning
- Switch off the coffee machine by pressing the power button (7) and let it cool down.
- Clean the coffee machine's housing with a damp cloth. Do not use abrasive scouring pads, alcohol or solvents.
- Clean the coffee outlet (19) and the group head gasket (11) with a suitable brush.
- Remove the portafilter (18) by turning it, empty and rinse filters (16/17) and portafilter (18).
- Empty and periodically wash the drip tray (14) and its grid (13). Ensure it is completely dry before assembling.
- Clean the water tank (2) regularly.
Descaling
To maintain performance and flavor, perform descaling every 2-3 months.
Preparation: fill the tank to MAX with water and coffee machine descaler (in the proportion recommended by the manufacturer of the descaler).
Descaling cycle:
- Place the portafilter without coffee. Switch on the coffee machine by pressing the power button. When the coffee indicators are steady, press the double-cup button.
- Open the steam knob, let hot water flow out for 2 minutes and close it.
- Leave on for at least 15 min.
- Repeat step 1 and 2 until there is no descaling product left in the water tank.
Rinse:
Clean the tank and fill it with filtered water.
With water only, repeat step 1 and 2 until the tank is empty.
ENGLISH
5. TROUBLESHOOTING
The following table lists the most common problems with their probable cause and recommended solution. If the problem persists, contact Cecotec's Official Technical Support Service.
| Problem | Cause | Solution |
| No water is coming out | Water tank (2) empty | Fill it in |
| Voltage/frequency mismatch | Use a suitable power outlet | |
| Malfunction | Contact Cecotec's Official Technical Support Service. | |
| Malfunction | ||
| No steam is released | Steam wand (5) clogged | Clean it |
| Water tank (2) empty | Fill it in | |
| Malfunction | Contact Cecotec's Official Technical Support Service. | |
| Coffee overflows from the portafilter rim (18) | Excess coffee | Turn off, let cool, clean and dose correctly. |
| Coffee at the brewing unit gasket (11) | Clean the gasket | |
| If it persists | Contact Cecotec's Official Technical Support Service. | |
| Coffee comes out too slowly or not at all | Grinding too fine | Use coarser grind |
| Filter clogging (16/17) | Clean the filter. | |
| Water tank (2) not properly installed | Insert correctly | |
| Limescale build-up | Descale | |
| Malfunction | Contact Cecotec's Official Technical Support Service. | |
| Water leakage at the bottom of the machine | Drip tray (14) full | Empty and clean it |
| Malfunction | Contact Cecotec's Official Technical Support Service. | |
| The tool does not work | Incorrectly connected cable | Plug in correctly |
| Shorted NTC sensor | Contact Cecotec's Official Technical Support Service. | |
| Malfunction | ||
| No milk frothing | Steam indicator (10) off | Wait until ready |
| Container too large or improper shape | Use tall, narrow glass or specific pitcher. | |
| Skimmed milk | Use cold whole milk |
6. TECHNICAL SPECIFICATIONS
Product: Cafelizzia 690 Grey
Product reference: EU01_123331
Rated power: 1230 - 1465 W
Voltage: 220 - 240 V
Frequency: 50/60 Hz
The power consumption of the appliance in any off-mode condition is 0,36 W.
The period after which the appliance automatically switches to off mode is 30 minutes.
Technical specifications may change without prior notice to improve product quality.
Made in China | Designed in Spain
7. RECYCLING OF ELECTRICAL AND ELECTRONIC EQUIPMENT

This symbol indicates that, according to the applicable regulations, the product and/or batteries must be disposed of separately from household waste. When this product reaches the end of its service life, you must remove the batteries/accumulators and take it to a collection point designated by local authorities.
For detailed information on how to properly dispose of electrical and electronic equipment and/or the corresponding batteries, consumers should contact their
ENGLISH
local authorities.
Information regarding national packaging recycling systems and their marking can be found on our website.
Compliance with the above guidelines will help protecting the environment.
8. TECHNICAL SUPPORT AND WARRANTY
Cecotec shall be liable to the end user or consumer for any lack of conformity that exists at the time of product delivery under the terms, conditions and deadlines established by applicable regulations.
Repairs should be carried out by qualified personnel.
If you detect any problem with the product or have any queries, please contact Cecotec's Official Technical Support Service at +34 96 321 07 28.
9. COPYRIGHT
The intellectual property rights over the texts in this manual belong to CECOTEC INNOVACIONES, S.L. All rights reserved. The content of this publication may not, either in part or in its entirety, be reproduced, stored in a retrieval system, transmitted or distributed by any means (electronic, mechanical, photocopying, recording or similar) without prior authorisation from CECOTEC INNOVACIONES, S.L.
10. SIMPLIFIED EU DECLARATION OF CONFORMITY
CE Cecotec Innovaciones hereby declares that this appliance complies with the essential requirements and other relevant provisions of the regulations applicable in the European Union. This appliance has been designed, manufactured and tested in compliance with required safety and quality standards. The full text of the EU Declaration of Conformity can be found on the following website: https://cecotec.es/es/information/declaration-of-conformity
1. PIÈCES ET COMPOSANTS
Image 1:
Recommendations d>extraction
5. PROBLEEMOPLOSSING
6. TEKNIK ÖZELLIKLER
(٨) Ecobin (٩) Ecobin (٩) Ecobin (٩) Ecobin (٩) Ecobin (٩) Ecobin (٩) Ecobin (٩) Ecobin (٩) Ecobin (٩) Ecobin (٩) Ecobin (٩) Ecobin (٩) Ecobin (٩) Ecobin (٩) Ecobin (٩)
information/declaration-of-conformity
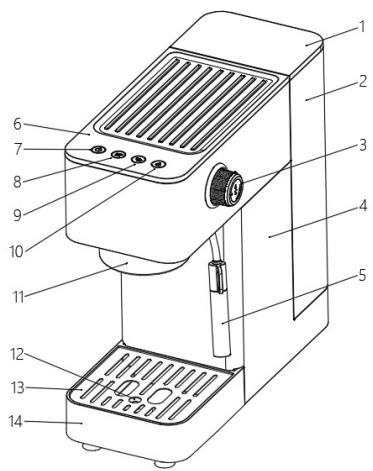

Fig./Img./Abb./Afb./Rys.1

Fig./Img./Abb./Afb./Rys. 2

Fig./Img./Abb./Afb./Rys. 3

Fig./Img./Abb./Afb./Rys. 4

Fig./Img./Abb./Afb./Rys. 5
www.cecotec.es


- SOMMAIRE
- INSTRUCTIONS DE SÉCURITÉ
- NOTE:
- BEFORE USE
- - Box content:
- ENGLISH
- Before first use
- Pump purging
- OPERATION
- Panel and functions
- Brewing espresso coffee (example: 2 cups)
- Warnings:
- Extraction recommendations
- Brewing cappuccino
- Hot water
- Heating liquids (steam function)
- CLEANING AND MAINTENANCE
- Cleaning
- Descaling
- TROUBLESHOOTING
- TECHNICAL SPECIFICATIONS
- RECYCLING OF ELECTRICAL AND ELECTRONIC EQUIPMENT
- TECHNICAL SUPPORT AND WARRANTY
- COPYRIGHT
- SIMPLIFIED EU DECLARATION OF CONFORMITY
- PIÈCES ET COMPOSANTS
- Image 1:
- Recommendations d>extraction
- PROBLEEMOPLOSSING
- TEKNIK ÖZELLIKLER
Brand : CECOTEC
Model : Cafelizzia 690
Category : Coffee maker