
POWER TRIM - Brush cutter FLYMO - Free user manual and instructions
Find the device manual for free POWER TRIM FLYMO in PDF.

| Product type | Electric grass trimmer |
| Brand | FLYMO |
| Model | POWER TRIM |
| Supply voltage | 230-240 V AC, 50 Hz |
| Protection class | Class II (double insulation) |
| No-load speed | 9800-10100 min⁻¹ (depending on version) |
| Guaranteed sound power level | 96 dBA |
| Measured sound power level | 95 dBA |
| Sound pressure | 87 dBA |
| Vibration level | 3.49 m/s² |
| Rated power (estimated) | 500-700 W |
| Cutting type | Nylon line |
| Functions | Edge trimmer and edger |
| Adjustable handle | Yes (variable position) |
| Adjustable shaft length | Yes (telescopic) |
| Safety | Double insulation, debris guard, edge guide, quick stop |
| Max. extension cord length | 40 m (cable 2×1.0 mm²) |
| Maintenance | Clean after use, check cable |
| Spool replacement | Tool-free (side buttons) |
| Certifications | CE, compliance with European directives |
Frequently Asked Questions - POWER TRIM FLYMO
User questions about POWER TRIM FLYMO
0 question about this device. Answer the ones you know or ask your own.
Ask a new question about this device
Download the instructions for your Brush cutter in PDF format for free! Find your manual POWER TRIM - FLYMO and take your electronic device back in hand. On this page are published all the documents necessary for the use of your device. POWER TRIM by FLYMO.
USER MANUAL POWER TRIM FLYMO
EC Declaration of Conformity
The undersigned, authorised by E.C.O.P.I., declares that the following product: Pw500/Pw700, manufactured by E.C.O.P.I. 23868 Valmdarra (LC), Via Como 72, Italy, is in accordance with the European Directives 98/37/CEE (Machinery Directive), 73/23/EEC (Low Voltage Directive),
93/68/CEE (CE Marking Directive) & 89/336/CEE (Directive on electromagnetic compatibility). Directive 2000/14/CEE (Annex VI).
From the Electrolux Group. The world's No. 1 choice.
The Electrolux Group is the world's largest producer of powered appliances for kitchen, cleaning and outdoor use. More than 55 million Electrolux Group products (such as refrigerators, cookers, washing machines, vacuum cleaners, chain saws and lawn mowers) are sold each year to a value of approx. USD 14 billion in more than 150 countries around the world.
Flymo
Power-Trim

Operator's Manual

FULLY


Electrolux Outdoor Products, Flymo/Partner A/S
Lundtoftegårdsvej 93A, DK 2800 Kgs.Lyngby
Tel.: 45 877577, www.flymo-partner.dk
DEUTSCHLAND
Flymo Deutschland
Tel.: 097 21 7640, Fax: 097 21 764202
ESTONIA
Electrolux Estonia Ltd (Electrolux Eesti AS)
Tel.: (372) 6650010
FRANCE
Flymo France SNC
Tel.: 01 46 67 141, Fax: 01 43 34 2491
FINLANDSUOMI
Flymo Finland Suom
Tel.: 00 39611, Fax: 00 39 612632
ITALIA
Mc Culloch Italiana s.r.l. - Via Como 72, 23868 Valmaderra (LECO) - ITALIA
Tel.: 800 017829, Fax: 0341 581671
IRELAND
Flymo Ireland
Tel.: 01 4565222, Fax: 01 4568551
MAGYARORSZAG
Electrolux Lehel Kft
Tel.: 00 36 1 251 41 47
NORGE
Flymo/Partner, div. av. Electrolux Motor a.s
Tel.: 69 10 47 90
NEDERLAND
Flymo Nederland
Tel.: 0172-468322, Fax: 0172-468219
ÖSTERREICH
Electrolux Outdoor Products, Sverige
Tel.: 036-146700, Fax: 036-146070
UNITED KINGDOM
Electrolux Outdoor Products United Kingdom
Tel.: 01325 300303, Fax: 01325 310339
Due to a constant product improvement programme, the factory reserves the right to modify technical details mentioned in this manual without prior notice.
Le fabricant se reserve la possiblité de changer des caractéristiques et des données de ce manuel à n'importe quel moment et sans préavis.
Im Sinne des Fortschrits behält sich der Hersteller das Recht vor, technische Änderungen ohne vorheriger Hinweis durchzuführen.
Door konstante produkt unkwikkeling behoud de fabrikant zich hetrecht voor om rechnispecificaties zoals vermeld in deze handleiding te veranderen zonder biervan vooraf bericht te给他们.
La casa produttrice si riserva la possibilità di variare caratteristiche e dati del presente manuale in qualevemento e senza preavviso.
Lairma productora se reserva la posibidad dechangiar lascharacteristicys datos del presentemanual en qualquiermomento ysin previoviso.
A casa productora se reserva a possiblidade de variarcharacteristicseadosdo presentemanual em qualquer momento e sen aviso precedo.
Tilverkaren reserverar sig ratten att andra fakta och uppgifter ur handbokenutan forvarning.
Producecentor forbisher sig ret til eandringer, hvad angar karakteristika og data i naervarende instruktion, narr som helst og undone varsl.
N Produsenten forbeholder seg all rett og mulighet til a forandre tekniske detailjer i donne manualen uten forhandsvorsel.
Jatkuvan tuotteen parannushojeim tahden valmistaja pidttaa oikeuden vahtaa ilman ennakkoarotuita tasssa ohjekirjasessa mainittuja tekniksi yksityskohtia.
Alyo npoyapaiatoc uevxouc baleiownc npoiovtav, to epyoataio enmuiaoeaotau oikaiawotc v tpoonotie i Teyvke, Aenpoepiec rou avapovtai 0to exxpidiio auto xupic npoyoueyn EIDoinon.
F Polyamatos gyartmá fuljétámi músorunk kovetkehében, a gyrotc ceg fertnrtja a jogat ebben a Hasznalati leirt muzakiado elat ocetzes ertesités nélkūi valtzotāsāra.
W zwiagzku z programem ustawcznego uleszania swoich rywobow producenta zastrzega siebie prawnymian technicznych szcgcogolw ywmionienych w tej instrukcj bi czuprzejno zawadiomiany.
INDEX
Introduction
A) General Safety Instructions
B) Electrical Safety
C) Product Description
1) Safety Markings
2) Assembly
3) Product Adjustment
4) Usage
5) Routine Maintenance
6) Unwanted Products
INTRODUCTION
Thank you for purchasing a E.C.O.P.I. product. With proper operation and maintenance it will provide you with years of service.
WARNING: - before using this machine every operator should familiarise themselves with the entire contents of this manual, paying particular attention to the safety instructions.
A GENERAL SAFETY INSTRUCTIONS
1) Familiarise yourself with all the controls on the trimmer before attempting to operate it.
2) Always switch the machine off and remove plug from mains before changing the cutter head, adjusting, cleaning or if the cable is entangled or damaged, or when leaving the product unattended.
3) Remember the head continues to rotate for a short period after it is switched off.
POWER SUPPLY CABLE
4) Always check the power supply cable for signs of damage or wear before connection. Do not use if damaged or worn.
5) If damage occurs during usage, do not touch the cable, but immediately switch the machine off and disconnect the plug from the mains socket.
6) Always keep the cutting head away from the supply cable during operation.
7) Never carry the trimmer by the power cable.
8) Never jerk the cable to separate the connector.
9) Keep the supply cable away from heat sources, oils and sharp edges.
CLOTHING
10) Wear close fitting and protective clothing including long trousers. We recommend rubber gloves and rubber footwear for outdoor use.
11) Always wear safety glasses with a good fit or a face shield.
12) Never work barefoot or wearing open sandals.
USAGE
13) Use the trimmer only as described in this manual.
14) Check the machine and cable for signs of damage regularly.
15) Never use the machine if the guard is damaged or without the guard fitted in place.
16) Do not switch the machine on when it is upside down.
17) Only switch the machine on when your hands and feet are well away from the head.
18) Ensure you maintain a firm footing at all times.
19) Check the area to be worked in is clear of any debris such as small stones, sticks, etc. These may be projected by the revolving nylon line causing injury to yourself or others or damaging property.
20) Do not use your trimmer in the rain or allow it (or the cable) to get wet.
21) Only use the trimmer in good daylight conditions.
22) Do not use the trimmer when tired or under the influence of alcohol or other drugs.
23) Do not use the trimmer near other people, especially children or pets. If anyone approaches you, stop the trimmer.
24) Never allow children to operate this trimmer. Store the trimmer out of reach of children.
25) Never use wire or metal re-enforced line.
26) Work in a line across slopes and take care when turning.
27) Unplug and check the machine carefully in case of sudden change in vibration or noise pattern.
B ELECTRICAL SAFETY
1) Current The trimmer is suitable for AC supply only.
2) Voltage Ensure the rating marked on your machine is correct for your supply.
3) Plugs We recommend the use of PVC or rubber covered plugs and connectors.
4) Power Point
The machine must be connected to a power point and not a light socket.
5) Residual Current Circuit Breaker (RCB)
For increased safety, we strongly recommend that the electrical power to the machine be supplied through a high sensitivity RCB. RCB's are designed to give additional personal protection against harmful electric shock should a fault occur. RCB devices to fit into household sockets can be obtained from good electrical stores.
6) Extension Cables (for models without wired-in cable)
The electrical supply on your machine is fitted with a "male" connector to facilitate the use of an extension cable system. Ensure you use an extension cable fitted with the appropriate splashproof "female" connector and intended for outdoor usage. If in any doubt contact your dealer.
This machine is double insulated and therefore needs only a 2-core cable. You can fit up to 40 metres of 1.0mm^2 (2-core) circular cables without affecting product performance.
The "male" connector already attached to the supply cable inside your machine is designed to be non-rewirable. Please return to your dealer if any maintenance is needed to this.
EXTENSION CABLE AND PLUG WIRING (UK ONLY)
We strongly recommend the use of a splashproof extension cable intended for outdoor use fitted with both a moulded plug and moulded connector.
If an appliance or extension cord is fitted with a non-rewirable plug which does not fit standard socket outlets in the home, it should be cut off and an appropriate three pin plug fitted in accordance with the instructions below.
WARNING: Never wire an extension cable with anything other than the correct female connector and a 13A BS1363A approved plug with a 13 amp fuse. Never wire a 'male' connector to your extension cable and never wire an extension cable with a plug of any kind at both ends of the cable. This is very dangerous and results in the pins being live which may cause a fatal electric shock.
PLUG REPLACEMENT
If you are competent to do this, proceed as follows. If in doubt, contact a qualified electrician.
Cut off the plug and dispose of it safely.
A plug with bared wires is extremely hazardous, potentially lethal, if engaged in a live socket outlet.
Extension cables contain
two wires which are coloured for easy recognition and these colours or a letter will be marked at the connection points of most good quality plugs.
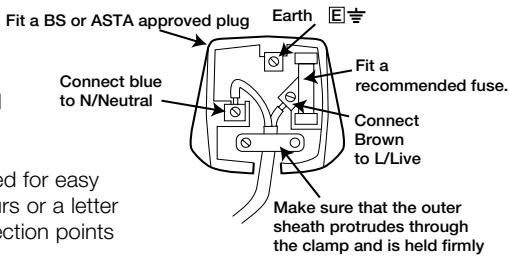

Attach the Brown wire (Live) to the connection in the plug marked 'L/Live'. Attach the Blue wire (Neutral) to the connection in the plug marked 'N/Neutral'.
WARNING: Do not make any connection to the earth terminal of the plug marked 'E' or 1等 . If the cable or plug is damaged you must unplug from the mains before checking.
If a fuse cover is required, ensure it is fitted.
FEMALE CONNECTOR
Each of the two wires leading into the female connector should be connected to either side of the terminal block. It does not matter which way round they are positioned. Before refitting the top cover of the mains plug, or outer casing of the female connector, make sure that the cable clamp is holding the outer sheath of the cable firmly.
Wiring an extension cable directly into the machine should only be carried out by an Authorised Service Dealer. Should the cable on your machine become damaged or need replacing, please return your machine to your dealer.
C PRODUCT DESCRIPTION (Fig. 0)
- Supply cord retainer
- Adjustable shaft
- Rear handle
- Shaft locking button
- Assist handle lock buttons
- Assist handle
- Air vents
- On/Off trigger
- Debris shield
- Mains cable
- Cutting line head
- Edging guide / line protector
- Motor housing
SAFETY MARKINGS
The following symbols on your trimmer are intended to remind you of some of the most important safety precautions:
- WARNING. This product is potentially dangerous. Take great care at all times to avoid injury.
- Read the operator's manual.
- Disconnect the mains plug if the cord is damaged.
- Wear eye protection at all times.
- Approved ear defender.
- Do not work near bystanders.
- Do not use in rain or damp conditions.
- LWA indicates the noise power level. Wear ear plugs or mufflers if necessary.
- CC indicates that the product conforms to the relevant European Directives as required by law.
2 ASSEMBLY
DEBRIS SHIELD INSTALLATION
Fig. 2-1
- Position the motor housing with string head carrier facing up.
- Slide debris shield over motor housing as shown.
Fig. 2-2
- Align edging guide with mating grooves and push firmly in the direction shown until an audible snap is heard.
NOTE: Be certain that edging guide is oriented as shown. Once edging guide, motor housing and debris shield are mated the connection is permanent and cannot be removed without a special tool.
EXCHANGE OF SPOOL
Turn off the machine and disconnect the plug from power supply. Wait until nylonline has come to a complete stop. Pict. 2-3 Press both press Buttons 1 and lift off the cover 2. Pict. 2-4 Replace the empty spool 3 by inserting each line end through the eyelets as shown. Secure the spool with a slight turn to ensure correct position in the base plate. Then replace the cover ensuring both press buttons lock in.
NOTE: The complete spool and line must be replaced and line must be replaced and is available as an accessory.
3 PRODUCT ADJUSTMENTS
Fig. 3-1 - Adjustment Assist Handle
- Using thumb and forefinger push in both spring loaded lock buttons at the base of the assist handle in order to release the ratchet adjustment mechanism.
- Adjust handle as necessary and release automatic lock buttons.
Fig. 3-2 - Adjust Shaft Length
- Grip shaft firmly.
- Push red shaft release button forward and move handle forward or backward to desired length.
NOTE: Shaft may be adjusted in trimming or edging mode.
Fig. 3-3 - Edging Conversion
- Grip shaft firmly.
- Push red button forward and rotate handle assembly until an audible click is heard.
4 USAGE
Fig. 4-1 - Cord Retainer
WARNING: Hook the extension cord around the cord retainer to help prevent disconnection or cable connection stress during usage. Always hold the product off the ground when starting.
Fig. 4-2 - Mower Trimming
For normal trimming, swing the head from side to side without tilting the string head. Keep the string head at same level for an even finish.
Fig. 4-3 - Close Trimming
Tilt the stringhead to the left for close trimming. Using the left side of the stringhead will also tend to eject the grass or debris away from the operator.
Fig. 4-4 - Scalping
The further the stringhead is tilted, the closer the cut. Take extra care for flying debris when doing this.
Fig. 4-5 - Edging
The head can be twisted to the vertical position to edge around lawns, flower beds or pathways for a neater finish. Hold the machine to your left to ensure debris is projected away from you.
WARNING: Only cut with the tip of the line. This is the most effective way to cut.
Take special care not to allow line to curl around mesh fencing or to rub hard against abrasive surfaces such as walls. This will cause excessive line wear or line breakage.
Fig. 4-6 - Do not use the trimmer to 'sweep' debris.
Fig. 4-7 - Do not attempt to feed line bumping the head on the ground.
ROUTINE MAINTENANCE
After usage, disconnect from the mains supply and clean dirt and debris from the cutter line area.
This will prolong motor life by maintaining adequate airflow to cool the motor and ensures the line head continues to snap on and off smoothly.
Inspect the cutter line head for parts that may be chipped, cracked or damaged as these could fly away and cause serious injury.
Replace damaged parts immediately. Use only genuine replacement parts. Any other maintenance work should be carried out by an authorised Service Agent only. Check the product and cable regularly for visible signs of damage or wear. Check that all fasteners and moving parts are secure.
Consult an Authorised Service Dealer if in doubt.
FAULT FINDING
If your trimmer will not start, check that all cables are connected and that the mains power is on. If it still does not work, check the fuse. If you have tried the above and your trimmer still does not work, take it to your nearest Authorised Service Dealer.
UNWANTED PRODUCTS AND THE ENVIRONMENT

Should you find one day that your product needs replacement, or is of no further use to you, think of the protection of the environment. Service Centres will accept your old products and will dispose of them in an environmentally safe way.
INDEX
Introduction
3 REGLAGES DU PRODUIT
UDSKIFTNING AF SPOLEN
TOIPOEETHsH IPOSTATEYTIKoy KATA THMIAZAs
Xnμa 2-1
C OPIS WYROBU (FIG 0)
- DEUTSCHLAND
- ESTONIA
- FRANCE
- FINLANDSUOMI
- ITALIA
- IRELAND
- MAGYARORSZAG
- NORGE
- NEDERLAND
- ÖSTERREICH
- UNITED KINGDOM
- INDEX
- INTRODUCTION
- A GENERAL SAFETY INSTRUCTIONS
- POWER SUPPLY CABLE
- CLOTHING
- USAGE
- B ELECTRICAL SAFETY
- EXTENSION CABLE AND PLUG WIRING (UK ONLY)
- PLUG REPLACEMENT
- FEMALE CONNECTOR
- C PRODUCT DESCRIPTION (Fig. 0)
- SAFETY MARKINGS
- ASSEMBLY
- DEBRIS SHIELD INSTALLATION
- EXCHANGE OF SPOOL
- PRODUCT ADJUSTMENTS
- Fig. 3-1 - Adjustment Assist Handle
- Fig. 3-2 - Adjust Shaft Length
- Fig. 3-3 - Edging Conversion
- USAGE
- Fig. 4-1 - Cord Retainer
- Fig. 4-2 - Mower Trimming
- Fig. 4-3 - Close Trimming
- Fig. 4-4 - Scalping
- Fig. 4-5 - Edging
- ROUTINE MAINTENANCE
- FAULT FINDING
- UNWANTED PRODUCTS AND THE ENVIRONMENT
- REGLAGES DU PRODUIT
- UDSKIFTNING AF SPOLEN
- TOIPOEETHsH IPOSTATEYTIKoy KATA THMIAZAs
- Xnμa 2-1
- C OPIS WYROBU (FIG 0)
Brand : FLYMO
Model : POWER TRIM
Category : Brush cutter