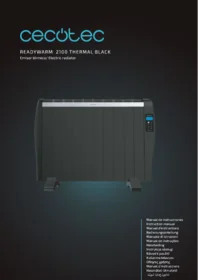
ReadyWarm 2100 Thermal - Electric heater CECOTEC - Free user manual and instructions
Find the device manual for free ReadyWarm 2100 Thermal CECOTEC in PDF.


| Product type | Oil-filled electric radiator |
| Brand | Cecotec |
| Model | ReadyWarm 2100 Thermal Black |
| Power | 2100 W |
| Color | Black |
| Dimensions (L x W x H) | 60 x 25 x 70 cm |
| Net weight | 12 kg |
| Power supply | 230 V / 50 Hz |
| Heating type | Thermal oil |
| Number of elements | 7 |
| Adjustable thermostat | Yes |
| Heating power levels | 3 levels (800 W / 1300 W / 2100 W) |
| Overheat protection | Yes |
| Tip-over protection | Yes |
| Timer | No |
| Maintenance and cleaning | Clean with a damp cloth, without solvents. Do not immerse. |
| Spare parts | Available from Cecotec after-sales service |
| Repairability | Repairability index: 7/10 |
| Warranty | 2 years |
Frequently Asked Questions - ReadyWarm 2100 Thermal CECOTEC
User questions about ReadyWarm 2100 Thermal CECOTEC
0 question about this device. Answer the ones you know or ask your own.
Ask a new question about this device
Download the instructions for your Electric heater in PDF format for free! Find your manual ReadyWarm 2100 Thermal - CECOTEC and take your electronic device back in hand. On this page are published all the documents necessary for the use of your device. ReadyWarm 2100 Thermal by CECOTEC.
USER MANUAL ReadyWarm 2100 Thermal CECOTEC
natural_image
Exterior view of a circular heat exchanger with digital display (no text or symbols visible)Safety instructions 9
-
Parts and components 53
-
Before use 53
-
Product assembly 54
-
Operation 54
-
Cleaning and maintenance 57
-
Technical specifications 57
-
Recycling of electrical and electronic equipment 59
-
Technical support and warranty 59
-
Copyright 59
-
Simplified EU Declaration of Conformity 60
SOMMAIRE
EU01_116943_ReadyWarm 2100 Thermal Black
EN • The coding in this manual is generic and applies to all code variants of the appliance.
EN • This product is not suitable for primary heating purposes. This product is only suitable for well-insulated spaces or occasional use.
Please read these instructions carefully before using the appliance. Keep this instruction manual for future reference or new users.
- Ensure that the mains voltage matches the voltage stated on the product's rating label and that the socket is properly earthed.
- This appliance is intended for domestic use only and is not suitable for use in commercial establishments such as bars, restaurants, farms, hotels, motels, and offices.
- Check the power cord regularly for visible damage. If the cord is damaged, it must be repaired by Cecotec's Official Technical Support Service to avoid any hazard.
- Children under 3 years of age must be kept away unless continuously supervised.
- Children aged from 3 to 8 years shall only switch the appliance on/off provided that it has been placed or installed in its intended normal operating position and they have been given supervision or instruction concerning the use of the appliance in a safe way and understand the hazards involved. Children aged from 3 to 8 years shall not plug in, regulate, clean the appliance or perform user maintenance.
- This appliance can be used by children aged 8 years and above and people with reduced physical, sensory, or mental capabilities or lack of experience and knowledge if they have been given supervision or instruction concerning the use of the appliance in a safe way and understand the hazards involved.
- Children must not play with the appliance.
-
Cleaning and user maintenance must not be carried out by children without supervision.
-
Supervise children to ensure they do not play with the product. Close supervision is necessary when the appliance is being used by or near children.
- This symbol means "Do not cover".
This symbol means "Do not cover".

- WARNING: To avoid the risk of overheating, do not cover the appliance. Do not use it to dry clothing.
- Do not place the product directly under a power socket.
- Do not use this heater in the immediate surroundings of a
bath, shower, or swimming pool.
- Do not use this heater if it has been dropped.
- Use this heater on a horizontal and stable surface, or fix it to the wall, as applicable.
- WARNING: Do not use this heater in small rooms when occupied by persons not capable of leaving the room on their own, unless constant supervision is provided.
- WARNING: To reduce the risk of fire, keep textiles, curtains, or any other flammable material a minimum distance of 1 m away from the air outlet.
- CAUTION: Some parts of this product can become very hot and cause burns. Particular attention must be given where children and vulnerable people are present.
- Do not use the appliance directly on the floor without first installing the feet.
- Do not place the appliance near heat sources, flammable substances, wet surfaces, or allow it to come into contact with water or other liquids. Do not use outdoors.
- Allow the appliance to operate at maximum temperature for 2 to 3 hours in a ventilated area to eliminate any manufacturing residues.
- Always use with components in an upright position.
- Keep the packaging materials out of the reach of children, as they may be dangerous.
INSTRUCTIONS DE SÉCURITÉ
- Control panel
- Power switch
- Feet
- Temperature sensor
- Wall bracket
- Wall mounting accessory
- Remote control
- ON/OFF
- Display
- Programming
- Increase
- Decrease
- Day mode
- Sleep mode
- Anti-frost mode
- Lock
- Mode
- Weekdays (Monday to Sunday)
- Power indicator
- Timer
- Time
Note:
The graphics in this manual are schematic representations and may not exactly match the product.
2. BEFORE USE
- This appliance comes in a packaging designed to protect it during transport. Take the appliance out of its box. You can keep the original box and other packaging materials in a safe place to prevent damage to the robot vacuum cleaner if you need to transport it in the future. If you wish to dispose of the original packaging, make sure all items are recycled properly.
- Check that all parts and components are included and in good condition. If any of them are missing or damaged, please contact Cecotec's Official Technical Support Service immediately.
Box content:
- Thermal radiator
- Feet and bracket
- Remote control
- Battery for remote control (1×CR2025)
- Instruction manual
- Do not remove the product's serial number in order to keep proper traceability if technical assistance is required.
3. PRODUCT ASSEMBLY
Floor mounting
Place the feet at the bottom of the appliance, one at each end, and screw them in place. Make sure they are properly secured.
Wall mounting
- Before installation, make sure the appliance is placed at a minimum safety distance of 20 cm from any obstacles (walls, shelves, floor...).
- Use a drill to make 2 holes in the wall with a distance of 140 mm between them.
- Use the provided screws and wall plugs to secure the wall brackets (5) to the wall.
- Make sure the smaller diameter part of the bracket is flush against the wall.
- Screw the wall mounting accessory (6) to the 2 holes on the lower rear part of the appliance. Make sure the part with only 1 hole is flush against the wall.
- Hang the appliance on the bracket.
- Once hung on the wall, mark the height where the hole of the wall mounting accessory (6) meets the wall.
- Remove the appliance from the wall, use a drill to make a hole at the mark and insert the corresponding wall plug.
- Finally, hang the appliance on the bracket and screw the mounting plate to the wall.
4. OPERATION
Automatic lock
- The control panel buttons will lock when no button is pressed for 1 minute.
- To unlock, press △ and ▽ simultaneously for 3 seconds.
Note
The thermal radiator can be used manually or programmed.
Manual mode
3 operating modes:
- Day mode: temperature can be adjusted from 5 to 35 °C.
- Sleep mode: temperature can be adjusted from 5 to 35 °C.
- Anti-frost mode: temperature can be adjusted from 5 to 15 °C.
Warning
For the appliance to function correctly, the set temperature must be higher than the room temperature. The display will show the room temperature. When setting the desired temperature, always select a few degrees higher, as the temperature shown on the display is closest to the appliance and therefore not the actual room temperature.
Switching on the appliance
- Connect the appliance to a power socket and turn on the power switch.
- The control panel will flash and the °C symbol, temperature and power indicator will light up. If the latter icon does not light up, press ⏻.
- Select the desired operating mode by pressing the corresponding button: day, sleep or anti-frost. The display will show the selected mode.
- Use the △ and ▽ buttons to set the desired temperature for the selected mode. During temperature setting, the °C icon will flash.
- Once the desired temperature has been set, the display will show the room temperature again.
- Repeat the previous steps to set the temperature for other modes.
- Use the ⏻ button to turn the thermal radiator on and off.
Thermostat
- When reaching the selected temperature, the appliance will automatically switch off and the power indicator icon will turn off.
- When the room temperature falls below the selected temperature, the device will automatically switch on and the power indicator icon will light up again.
Note
- The power indicator icon will flash when the appliance is about to turn on or off.
- The configured temperatures will be saved even if the appliance has been disconnected or switched off.
Reset
To reset the appliance while connected to the power supply and the switch is on, ensure it is unlocked or unlock it with the remote control and press the ▽ button for 3 seconds. You can also do this by turning the power switch off and on.
Programmed mode
3 operating modes:
- Day mode: temperature can be adjusted from 5 to 35 °C.
- Sleep mode: temperature can be adjusted from 5 to 35 °C.
- Anti-frost mode: temperature can be adjusted from 5 to 15 °C.
The manually configured temperature will apply to the modes during programmed operation.
Setting current time and day
- Press and hold the ⏻ button until the display shows "00:00".
- The hour digits will flash. Use the △ and ▽ buttons to set the desired hour and press the ⏱ button to save the settings.
- The minutes digits will flash. Use the △ and ∽ buttons to set the desired minutes and press the ⏻ button to save the settings.
- The display will show the weekly calendar (Monday-Sunday, 1-7). Select the current day using the △ and ▽ buttons. Press the ⏻ button to save the settings.
Setting weekly schedule
- The display will show the first 2 bars of the first time period (00:00 - 1:00) flashing. It will also show 1, indicating Monday.
-
Press the desired mode (day, sleep or anti-frost) for the selected period.
-
If sleep mode is selected, the display will show the sleep mode icon and the upper bar will flash.
- If anti-frost mode is selected, the display will show the anti-frost icon and the lower bar will flash.
- If day mode is selected, the display will show the day mode icon and both the upper and lower bars will flash.
- When you have programmed the first period, press the △ button and the bars for the second period will flash.
- Repeat these steps up to 24 hours.
- When all hours of the day have been programmed, press the ⏻ button to finish programming the selected day and repeat the same steps to program all 7 days of the week.
- When you have programmed the entire week, press the ⏻ button to save the settings and the device will begin operating under the selected mode.
Warning
When disconnecting the appliance from the power socket, programming settings will be saved, but current day and time settings will be deleted.
Resetting the current time and weekday
- To unlock the appliance, press and hold the ⏻ button until the display shows "00:00". The hour digits will flash, use the △ and ∽ buttons to select the desired hour, press the ⏻
button to change to minutes and use the △ and ▽ buttons again.
- Press the ⏻ button to save the settings.
- The display will show the weekly calendar (Monday-Sunday, 1-7). Use the △ and ▽ buttons and press the power switch twice. Then press the ⏻ button and either the △ or ▽ button.
Adjusting temperature under programmed mode
- During operation, press the ⏻ button on the remote control twice and use the △ and ∽ buttons to set the desired temperature.
- Once the temperature is set, it will be saved for future use in this mode, even when used manually.
Note
If the appliance is being used in programmed mode and you wish to change it:
- Press the ⏻ button on the remote control twice.
- Press the ⏻ button.
- Select the desired mode and adjust the temperature if necessary using the △ and ∨ buttons.
Remote control
- The remote control operates with a CR2025 battery (included).
- Remove the protective plastic from the battery compartment. If necessary, open the cover.
- The thermal radiator can also be programmed from the remote control following the steps listed above.
5. CLEANING AND MAINTENANCE
- Turn off, unplug the appliance from the power supply and allow it to cool down before cleaning it.
- Use a soft, dry, and clean cloth to clean the product's exterior housing.
- Do not use abrasive cleaners or scouring pads, as they could cause damage to the product's surface.
6. TECHNICAL SPECIFICATIONS
Product reference: EU01_116943
Product: ReadyWarm 2100 Thermal Black
Voltage: 220-240 V\~
Frequency: 50/60 Hz
Power: 1500 W
| Contact details: | Cecotec Innovaciones S.L. Av. Reyes Católicos, No. 60, 46910, Alfafar, Valencia (Spain) | ||||
| Model identifier(s): EU01_116943 - ReadyWarm 2100 Thermal Black | |||||
| Item | Symbol | Value | Unit | Item | Unit |
| Heat output | Type of heat output/room temperature control (select one) | ||||
| Nominal heat output | P_nom | 1.50 | kW | single stage heat output, no room temperature control | [no] |
| Minimum heat output (indicative) | P_min | 1.50 | kW | two or more manual stages, no room temperature control | [no] |
| Maximum continuous heat output | P_max,c | 1.50 | kW | with mechanic thermostat room temperature control | [no] |
| Auxiliary electricity consumption | with electronic room temperature control | [no] | |||
| In off mode | P_o | 0.00 | W | with electronic room temperature control plus day timer | [no] |
| In standby mode | P_sm | 0.20 | W | with electronic room temperature control plus week timer | [yes] |
| In idle mode | P_idle | 0.20 | W | Other control options (multiple selections possible) | |
| In networked standby mode | P_nsm | N/A | W | room temperature control, with presence detection | [no] |
| In standby mode with information or status display | [no] | room temperature control, with open window detection | [yes] | ||
| Seasonal space heating energy efficiency in active mode (portable) | _s,on | 94.5 | % | with distance control option | [no] |
| with adaptive start-up control | [no] | ||||
| Seasonal space heating energy efficiency in active mode (fixed) | _s,on | 92.0 | % | with working time limitation [no] |
| with black bulb sensor [no] | ||||
| with self-learning functionality [no] | ||||
| with control accuracy [no] | ||||
Technical specifications may change without prior notice to improve product quality. Made in China | Designed in Spain
7. RECYCLING OF ELECTRICAL AND ELECTRONIC EQUIPMENT

This symbol indicates that, according to the applicable regulations, the product and/or batteries must be disposed of separately from household waste. When this product reaches the end of its shelf life, you should dispose of the batteries/accumulators and take them to a collection point designated by the local authorities.
For detailed information on how to properly dispose of electrical and electronic equipment and/or the corresponding batteries, consumers should contact their local authorities.
Compliance with the above guidelines will help protecting the environment.
8. TECHNICAL SUPPORT AND WARRANTY
Cecotec shall be liable to the end user or consumer for any lack of conformity that exists at the time of product delivery under the terms, conditions and deadlines established by applicable regulations.
Repairs should be carried out by qualified personnel.
If you detect any problem with the product or have any queries, please contact Cecotec's Official Technical Support Service at +34 96 321 07 28.
9. COPYRIGHT
The intellectual property rights over the texts in this manual belong to CECOTEC INNOVACIONES, S.L. All rights reserved. The content of this publication may not, either in part or in its entirety, be reproduced, stored in a retrieval system, transmitted or distributed by any means (electronic,
mechanical, photocopying, recording or similar) without prior authorisation from CECOTEC INNOVACIONES, S.L.
10. SIMPLIFIED EU DECLARATION OF CONFORMITY
CE Cecotec Innovaciones hereby declares that this appliance complies with the essential requirements and other relevant provisions of applicable European Union regulations. This appliance has been designed, manufactured and tested in compliance with required safety and quality standards. The full text of the EU Declaration of Conformity can be found on the following website: https://cecotec.es/es/information/declaration-of-conformity
1. PIÈCES ET COMPOSANTS
Img. 1
Product: ReadyWarm 2100 Thermal Black
Spanning: 220-240 V\~
Frequentie: 50/60 Hz
Vermogen: 1500 W
6. TEKNIK ÖZELLIKLER
- SOMMAIRE
- INSTRUCTIONS DE SÉCURITÉ
- Note:
- BEFORE USE
- Box content:
- PRODUCT ASSEMBLY
- Floor mounting
- Wall mounting
- OPERATION
- Automatic lock
- Note
- Manual mode
- Warning
- Switching on the appliance
- Thermostat
- Reset
- Programmed mode
- Setting current time and day
- Setting weekly schedule
- Resetting the current time and weekday
- Adjusting temperature under programmed mode
- Remote control
- CLEANING AND MAINTENANCE
- TECHNICAL SPECIFICATIONS
- RECYCLING OF ELECTRICAL AND ELECTRONIC EQUIPMENT
- TECHNICAL SUPPORT AND WARRANTY
- COPYRIGHT
- SIMPLIFIED EU DECLARATION OF CONFORMITY
- PIÈCES ET COMPOSANTS
- Img. 1
- TEKNIK ÖZELLIKLER
Brand : CECOTEC
Model : ReadyWarm 2100 Thermal
Category : Electric heater