USER MANUAL SB2E 750 R AEG
SBE 600 R
SB2E 680 R
SB2-700
SB2E 700 R
SB2E 700 RS
SB2E 705 PLUS
SB2E 750 R
SB2E 760 R

GB Instructions for use Please read and save these instructions.
D Gebrauchsanleitung Bittle lesen und aufbewahren.
F Instruction d'utilisation Priere de dire et de conserver.
Istruzioni d'uso Si prega di leggere le istruzioni e di conservarle.
E Instrucciones de uso Lea y conserve estas instructucciones por favor.
P Instruções de service Por favor leia e conserve em seu poder.
NL Gebruiksaanwijzing Lees en let goed op deze adviezen.
DK Brugsanvisning Vær venlight at læse og opbevare.
s Bruksanvising Var god läs och tag tillvara dessa instruktioner.
SF Käyttoohje Lue ja sailytö
TR Kullanim kilavuzu Lutfen okuyun ve saklayin
RUS INHcTpkykCnna NO NCNoJIb3OBAHNIO PoKajynCTa, npOHTnTe n COxpaHnTe HacTOraIyU INHcTpkykCnIO
使用說明書請詳細閱讀並妥善保存
| Introduction | You have high standards and expect to purchase quality goods - quality offered by Atlas Copco.
We have built a durable and reliable electric power tool for you.
Please read the instructions for use before first operation so you can handle your power tool effectively and safely.
We are sure that buying an AEG Electric Power Tool from Atlas Copco was the right choice! |
| Technical Data | SBE 600 R SB2E 680 R SB2-700 Nominal power 600 W 705 W 700 W No-load speed 0-3100 min-1 1st gear 0-1350 min-1 1500 min-1 2nd gear 0-3200 min-1 3600 min-1 Percussion rate 49600 min-1 51200 min-1 51200 min-1 Drilling capacity in Concrete 20 mm 20 mm 20 mm 20 mm Steel 13 mm 13 mm 13 mm Wood 35 mm 40 mm 40 mm Drill opening range 1,5-13 mm 1,5-13 mm 1,5-13 mm Drive shank 1/2"x20 1/2"x20 1/2"x20 Chuck neck diameter 43 mm 43 mm 43 mm Weight 1,9 kg 2,2 kg 2,2 kg SB2E 700 R SB2E 700 RS SB2E 705 PLUS Nominal power 705 W 750 W 760 W No-load speed 1st gear 0-1350 min-1 0-1350 min-1 0-1350 min-1 2nd gear 0-3200 min-1 0-3200 min-1 0-3200 min-1 Percussion rate 51200 min-1 51200 min-1 51200 min-1 Drilling capacity in Concrete 20 mm 20 mm 20 mm 20 mm Steel 13 mm 13 mm 13 mm Wood 40 mm 40 mm 40 mm Drill opening range 1,5-13 mm 1,5-13 mm 1,5-13 mm Drive shank 1/2"x20 1/2"x20 1/2"x20 Chuck neck diameter 43 mm 43 mm 43 mm Weight 2,5 kg 2,5 kg 2,5 kg |
| Advice for your safety | Please pay attention to the safety instructions in the attached leaflet! Dust that arises when working on material containing asbestos or stonework containing crystalline silicic acid is harmful to the health. Please follow accident prevention regulations. Appliances used at many different locations including open air must be connected via a current surge preventing switch. Always wear goggles when using the machine. It is recommended to wear gloves, sturdy non slipping shoes and apron. Sawdust and splinters must not be removed while the machine is running. Do not pierce the motor housing as this could damage the double insulation (use adhesives). Always disconnect the plug from the socket before carrying out any work on the machine. Only plug-in when machine is switched off. Keep mains lead clear from working range of the machine. Always lead the cable away behind you. Always use the auxiliary handle, even if the machine has a safety clutch since this safety clutch only engages when the machine blocks with a jerk. Do not use diamond core drills on hammer mode. When drilling in walls ceiling, or floor, take care to avoid electric cables and gas or waterpipes. SBE 600 R, SB2E 680 R, SB2-700, SB2E 700 R, SB2E 700 RS, SB2E 705 PLUS, SB2E 750 R, SB2E 760 R |
| ENGLISH | 1 SBE 600 R, SB2E 680 R, SB2-700, SB2E 700 R, SB2E 700 RS, SB2E 750 R, SB2E 760 R |
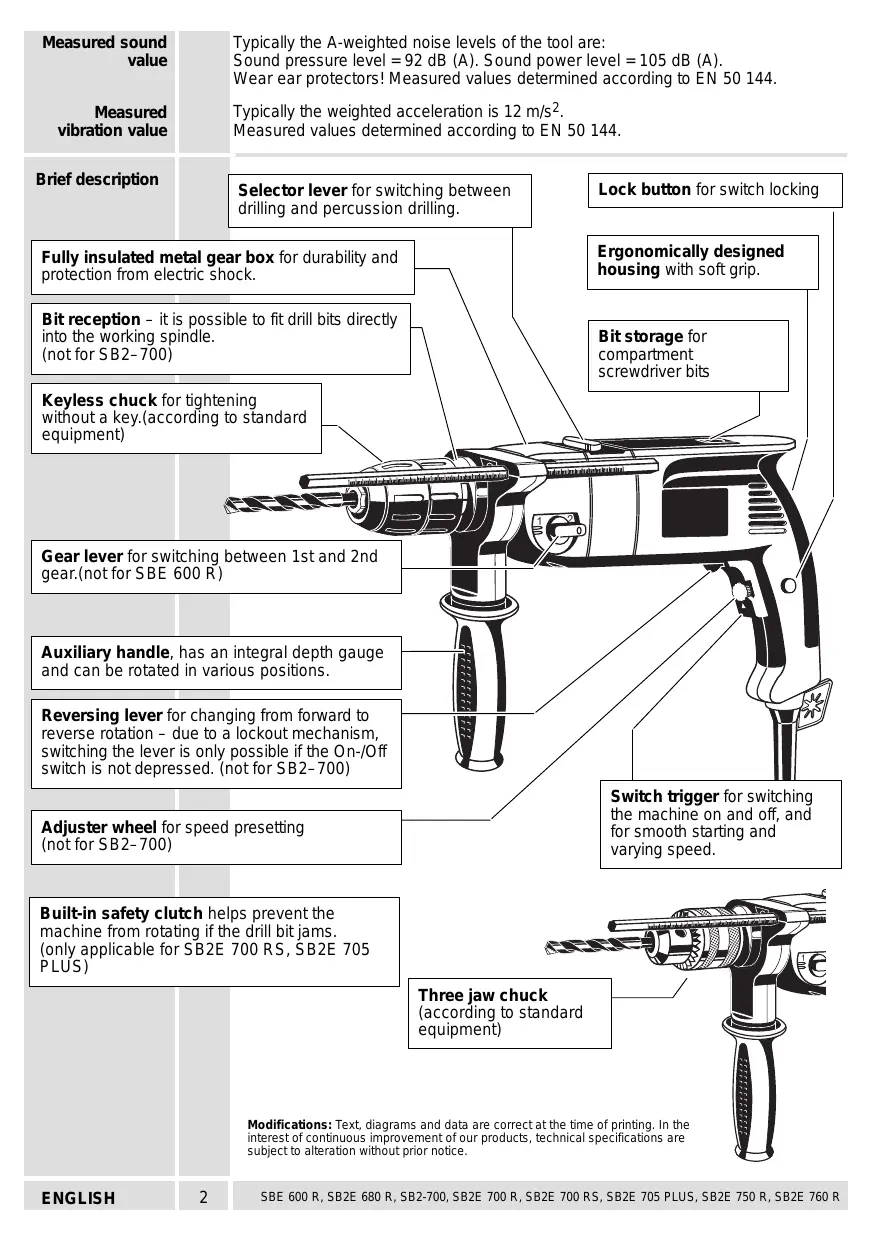
Measured sound value
Measured vibration value
Typically the A-weighted noise levels of the tool are:
Sound pressure level = 92 dB (A). Sound power level = 105 dB (A).
Wear ear protectors! Measured values determined according to EN 50 144.
Typically the weighted acceleration is 12m / s^2
Measured values determined according to EN 50 144.
Brief description
Selector lever for switching between drilling and percussion drilling.
Fully insulated metal gear box for durability and protection from electric shock.
Bit reception - it is possible to fit drill bits directly into the working spindle. (not for SB2-700)
Keyless chuck for tightening without a key.(according to standard equipment)
Gear lever for switching between 1st and 2nd gear.(not for SBE 600 R)
Auxiliary handle, has an integral depth gauge and can be rotated in various positions.
Reversing lever for changing from forward to reverse rotation - due to a lockout mechanism, switching the lever is only possible if the On-/Off switch is not depressed. (not for SB2-700)
Adjuster wheel for speed presetting (not for SB2-700)
Built-in safety clutch helps prevent the machine from rotating if the drill bit jams. (only applicable for SB2E 700 RS, SB2E 705 PLUS)
Lock button for switch locking
Ergonomically designed housing with soft grip.
Bit storage for compartment screwdriver bits
Switch trigger for switching the machine on and off, and for smooth starting and varying speed.
Three jaw chuck
(according to standard equipment)
Modifications: Text, diagrams and data are correct at the time of printing. In the interest of continuous improvement of our products, technical specifications are subject to alteration without prior notice.
| Mains
connection | | Connect only to a single-phase AC current supply and only to the mains voltage
specified on the rating plate. Connection to sockets without earth protection is
possible as the appliance features protective insulation to DIN 57 740/ VDE 0740
and CEE 20. Radio suppression complies with the European standard EN 55014.
When fitting the plug, make sure that the brown (live) wire of this appliance is
connected to the plug terminal marked L or coloured red, and the blue (neutral) wire
of this appliance is connected to the plug terminal marked N or coloured black.
Under no circumstances must the wires of this appliance be connected to the earth
terminal of the plug marked either E, with the earth symbol or coloured green or
green/yellow. |
| Use | | The electronic drill/screwdriver can be universally used for drilling, percussion drilling,
screwdriving and cutting screw threads.
Do not use this product in another way as stated for normal use. |
| Keyless chuck
(according to
standard
equipment)
Changing the
keyless drill
chuck | | Always disconnect the plug from the socket before carrying out any work on the
machine.
Usually, the chuck can be removed by
hand: steady the drill spindle with a fork
wrench and unscrew the chuck by turning
it anti-clockwise. |
| Should the chuck be stuck on the drill
spindle, fit another fork wrench to the
chuck and the drill spindle (see illustration)
or fix an Allen key in the chuck.
If necessary, hit the key shaft lightly with a
plastic hammer.
Mount the chuck in reverse order.
Under high strain in anti-clockwise
operation, the chuck might become loose.
Please use the bit reception to loosen screws in anti-clockwise operation. (not for
SB2-700) |
| Inserting the tool | | Completely insert the tool shaft into the
open chuck.
Hold the grip and firmly tighten the chuck
by turning the sleeve in the "GRIP"
direction.
After the clamping jaws have tightened
around the tool shaft, turn the chuck a
further 1/4 in order to let the chucking
power retention engage. Only then can the
tool itself be chucked by vigorously turning the sleeve in the "GRIP" direction (it
engages audibly with a grating noise.)
The chucking power retention is mainly needed for percussion drilling.
When the chuck is opened with a strong jerk as far as it will go, it is possible that it
can't be closed anymore. Instead, "grating" can be felt (as if the chuck were
over-tightened). In this case turn the sleeve once more in the "RELEASE"
direction; now it can be closed again. The chuck is not damaged by this "grating".
When percussion drilling in stone the drill bit should be checked for tight seat in the
chuck after first use. If necessary, re-tighten the chuck by hand. |
| ENGLISH | 3 | SBE 600 R, SB2E 680 R, SB2-700, SB2E 700 R, SB2E 700 RS, SB2E 705 PLUS, SB2E 750 R, SB2E 760 R |
| Removing the tool | Hold the grip and open the chuck by turning the sleeve in the "RELEASE" direction.
When turning the sleeve the chucking power retention is released, after 1/4 turn the clamping jaws open and release the clamped tool.
Due to the high power potential of the percussion drill the chuck might get stuck at very high load and can not be opened by hand.
In this case, please steady the chuck head with a fork wrench and loosen the front sleeve of the chuck with aid of a footprint anti-clockwise (see illustration). The use of a footprint will not cause any damage to the chuck. |
| Three jaw chuck (according to standard equipment) | Always disconnect the plug from the socket before carrying out any work on the machine. |
| Changing the three jaw chuck | 1. Hold the drive shank with the open-jaw spanner. |
| 2. Insert the drill chuck key in the drill chuck and loosen the drill chuck to the left by tapping it lightly with a rubber hammer. |
| Inserting tools | Mount the chuck in reverse order. |
| The chuck can be used for drill bits or screwdriver bits. For this purpose, open the chuck, insert the selected bit and secure by tightening the chuck with the chuck key.
To remove tools insert chuck key into one of the three holes at the chuck mouth and turn anti-clockwise. |
| Setting the depth gauge | For drilling to specific depth, slide the depth gauge into the hole provided in the handle and fasten it at the required drilling depth. |
| ENGLISH | 4 SBE 600 R, SB2E 680 R, SB2-700, SB2E 700 R, SB2E 700 RS, SB2E 705 PLUS, SB2E 750 R, SB2E 760 R |
| Positioning the auxiliary handle | | The auxiliary handle can be positioned as required. Loosen the clamping by twisting the auxiliary handle, bring the auxiliary handle into the required position and re-fasten the handle. (according to standard equipment) | |
| Switching over drilling percussion drilling | | Turn changeover lever to symbol for percussion drilling.
Turn the switch to position for drilling in metal, plastic, and wood, and for screwdriving. | |
| Changing gear (not for SBE 600 R) | | The gears can be changed when the machine is switched off or is running under no load. Gear change lever in position 1: 1st gear Gear change lever in position 2: 2nd gear | |
| Speed selection (not for SB2-700) | | A = lowest r.p.m.
F = highest r.p.m.
The speed can be controlled in infinitely variable steps up to the speed preselected at the speed dial, according to the finger pressure on the On-/off switch. During continuous operation with switch locked in the position the machine will run at the pre-selected speed. | |
| Switching between forward and reverse rotation (not for SB2-700) | | Select direction of rotation with reversing lever.
Due to a lockout mechanism, the reversing lever can only be switched when the On-/off switch is not depressed.
Only change direction of rotation when the machine has stopped. | |
| Switching the machine on and off | | Intermittent use
Switching on: Press On-/off switch
Switching off: Release On-/off switch
Continuous use
Switching on: Press the On-/off switch and then the locking button, after that release on-off switch.
Switching off: Press the On-/off switch and then release.
The speed can be controlled in infinitely variable steps up to the speed preselected at the speed dial, according to the finger pressure on the On-/off switch. | |
| ENGLISH | 5 | SBE 600 R, SB2E 680 R, SB2-700, SB2E 700 R, SB2E 700 RS, SB2E 705 PLUS, SB2E 750 R, SB2E 760 R |
| Bit storage
(not for SB2-700) | | To open the bit storage compartment insert index finger in recess (as illustrated) and pull locking lever in direction of spindle.
The bit compartment holds a maximum of 6 screwdriver bits. |
| Advice for operation
Tips on drilling in masonry | Take the drill out of the hole from time to time to remove dust.
Switch to percussion-drilling for concrete, hard bricks and tiles, stone, hard cement, and marble (but not when drilling the surface of marble).
For tiles, paving-stones, soft bricks and tiles, soft cement, breeze-block and plaster, switch to normal drilling.
Use percussion carbide tipped masonry drill-bits.
When drilling a hard, smooth surface (e.g. tiles), cover the point to be drilled with adhesive tape in order to prevent the drill tip from skidding. |
| Tips on drilling in metal | Center punch the point you have marked for drilling.
Always hold sheet metal firmly in a vice.
Lay a block of wood under thin metal to prevent it from distorting.
Use HSS spiral drill bits. (For white cast iron, use drill bits with special tips.)
Before drilling large-diameter holes, first drill a small pilot hole.
Use lubricant:
Steel: Oil
Aluminium: Turpentine, paraffin
Brass, copper, cast iron: no lubricant, but take the drill out of the hole frequently to cool it off. |
| Tips on drilling into wood | Center punch the point you have marked for drilling. To prevent the wood from splintering when the drill bit tip breaks through, lay a piece of scrap wood underneath it, or drill from both sides. The maximum drill-diameter can only be reached with a Forstner-drill bit. |
| Tips for screw-driving | Use screwdriver bits of the appropriate size and shape.
Suitable screws can be driven into softwood without pre-drilling.
Pre-drill into hardwood or for screws of large diameter.
Pre-drill further for countersunk screws.
For woodscrews threaded less than their full length, pre-drill approx. half the length of the screw.
Under high strain in anti-clockwise operation, the chuck might become loose.
Please use the bit reception to loosen screws in anti-clockwise operation. (not for SB2-700). |
| Maintenance | The ventilation slots of the machine must be kept clear at all times.
If the machine is mainly used for percussion drilling, regularly remove collected dust from the chuck. To remove the dust hold the machine with the chuck facing down vertically, and completely open and close the chuck. The collected dust will fall from the chuck.
It is recommended to regularly use cleaner (Id.No. 4932 6217 19) for the clamping jaws and the clamping jaw borings.
In order to guarantee constant readiness for operation, the machine should be checked for worn carbon brushes at one of the AEG after-sales service agencies.
Use only AEG accessories and spare parts. Should components need to be replaced which have not been described, please contact one of our AEG service agents (see our list of guarantee/service addresses).
If needed, an exploded view of the tool can be ordered. Please state the ten-digit No. as well as the machine type printed on the label and order the drawing at your local service agents or directly at: Atlas Copco Electric Tools GmbH, Postfach 320, D-71361 Winnenden. |
| Accessories | The range of accessories with part numbers is shown in our catalogue. |
| ENGLISH | 6 | SBE 600 R, SB2E 680 R, SB2-700, SB2E 700 R, SB2E 700 RS, SB2E 705 PLUS, SB2E 750 R, SB2E 760 R |
KypKObIy BvIKIIOUaTeJIb IJIy BKIIIOUeHn I BvIKIIOUeHn IHCtpyMeHTa,IIJaBHOrO BKIIIOUeHn I N3MeHeHn CKOpOCTN.
TpexkynaKobblnatpOnB (BCTaHdapTHOJ KOMPJIeKtaZm)
MoNfKaun: Tekc, nllIOCTpaun n daHbIe BepHbI Ha MoMeHT bByxoHa n3 neaHT. B INTEpecax noctoAnHORO yCObepuEChTBoBaHnna HauNX n3dEni, texHNueckne xapakTepeNtKm MOry n3MeHrTaBcE 6e3 npedBaPntelbHoro yBeDOMJeHnA.
CoBeTbI NO 3aKpyuNbAHnIO WypynOB

Bpemr OT BpemHn BbHmMaTe CbePIO n3 OTBepCTn, IJIr TOrO YTO6bl ydaJIITb PbIb.
HaKepeHnTe Tohky, KOTopyo Bby OTMeTnJIn DJIa CBepJIeHnI.
Bcerda naexho 3akpenjIte MeaJIInueckne JInCTbI B TnCKax.
IOnToHKnIJIcT MeTaJIla IOnKJIaIbIbAIte DepeBraHHbI 6pyCOK, YTObI npedOTbPaATNb NCKpINBJIeHne.
ПльзуITEСВИпалынIMТВЕРДОСПАВНIMСБЕРЛAMN(ДЯбELOROЛNTOTOугна ПОЛьзYITECBСБЕРЛAMNCO CNEцИАльНБИМHANAPKAMN).
ПользунТecь СмЗКО:
Дя CTаи: MacNo
We declare under our sole responsibility that this product is in conformity with the following standards or standardized documents. EN 50144, EN 55014-1, EN 55014-2, EN 61000-3-2, EN 61000-3-3, in accordance with the regulations 98/37/EC, 73/23/EEC, 89/336/EEC
DEUTSCH
Manager Product Marketing and Development


Atlas Copco
Copyright 2000
Atlas Copco Electric Tools GmbH
P.O.Box 320
D-71361 Winnenden Germany
www.atlascopco.de