
BM 3992 - FICHE PRODUIT - Electric mixer SEVERIN - Free user manual and instructions
Find the device manual for free BM 3992 - FICHE PRODUIT SEVERIN in PDF.

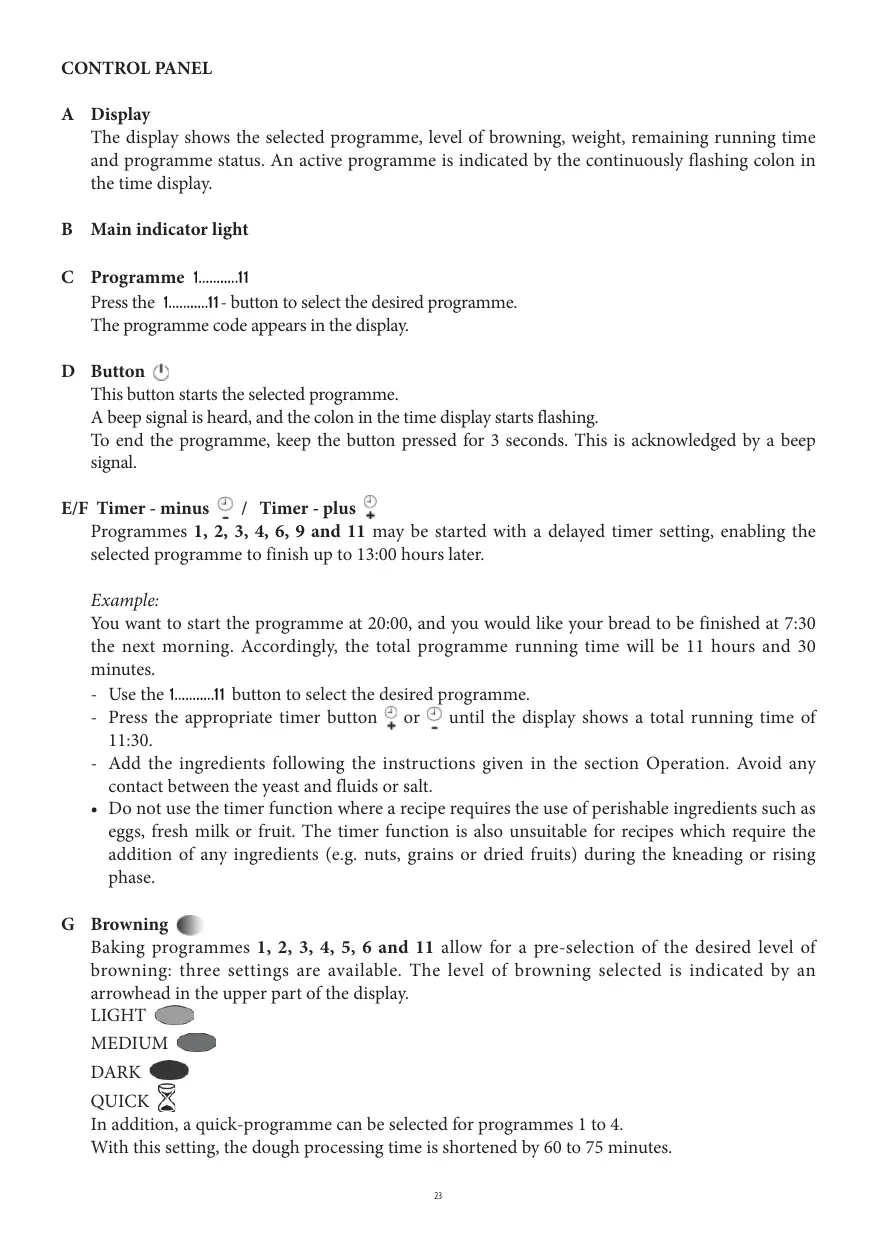


| Product type | Bread machine |
| Brand | SEVERIN |
| Model | BM 3992 |
| Power supply | 230 V ~, 50 Hz |
| Power | 860 W |
| Large loaf pan capacity | 3.8 L (bread from 750 to 1600 g) |
| Small loaf pans capacity (x2) | 1.35 L each (bread about 500 g) |
| Number of programs | 11 programs: Normal, White/Crispy, Wholemeal, Yeast Cakes, Quick, Gluten-free, Dough, Pasta Dough, Sandwich, Jams/Marmalades, Bake |
| Delay timer | Up to 13 hours |
| Settings | Browning (3 levels), bread weight (according to program), audible signal (on/off), key lock |
| Display | Screen with program, browning, weight, remaining time, indicator light |
| Special functions | Keep warm (60 min), add ingredients with audible signal, preheating, kneading, resting, rising, baking |
| Dimensions (L x W x H) | 395 x 275 x 315 mm |
| Weight | 4.9 kg |
| Included accessories | Measuring cup, dosing spoon, tool to remove kneading hook, 2 kneading paddles, 2 small baking pans |
| Pan material | Non-stick coating |
| Cleaning | Pan and kneading paddles washable in hot water with mild detergent; do not wash in dishwasher; do not immerse appliance |
| Safety | Overheat protection, automatic stop at end of program, key lock during operation |
| Warranty | 2 years (parts and labor, excluding normal wear and misuse) |
| Compliance | CE directives |
Frequently Asked Questions - BM 3992 - FICHE PRODUIT SEVERIN
User questions about BM 3992 - FICHE PRODUIT SEVERIN
0 question about this device. Answer the ones you know or ask your own.
Ask a new question about this device
Download the instructions for your Electric mixer in PDF format for free! Find your manual BM 3992 - FICHE PRODUIT - SEVERIN and take your electronic device back in hand. On this page are published all the documents necessary for the use of your device. BM 3992 - FICHE PRODUIT by SEVERIN.
USER MANUAL BM 3992 - FICHE PRODUIT SEVERIN
IMPORTANT SAFETY INSTRUCTIONS
Before using the bread-maker, please read the following instructions carefully.
- The surface of the housing and the steam vents heat up during operation. Do not touch any hot parts of the unit. Be sure to use an oven-cloth or suitable gloves when removing the bread. Make sure to touch only the lid handle when opening the unit.
- The bread-maker should only be connected to an earthed socket installed in accordance with the regulations. Make sure that the supply voltage corresponds with the voltage marked on the rating label. Always remove the plug from the wall socket after use, and also
- in case of any malfunction during use,
- when removing the baking-tin,
- during cleaning of the appliance.
- When removing the plug from the wall socket, never pull on the power cord; always grasp the plug itself. Do not let the power cord hang free; keep it well away from any hot parts of the appliance.
- Before the appliance is used, the main body including the power cord as well as any fitted attachment should be checked thoroughly for any defects. Should the appliance, for instance, have been dropped onto a hard surface, it must not be used any longer: even invisible damage may have adverse effects on the operational safety of the appliance.
- Remove any exterior and interior packaging materials. All these materials are suitable for recycling.
- Caution: keep any packaging materials well away from children, as they are a potential source of danger e.g. from suffocation.
- This appliance is not intended for use by any person (including children) with reduced physical, sensory or mental capabilities, or lacking experience and knowledge, unless they have been given supervision or instruction concerning the use of the appliance by a person responsible for their safety. Children should be supervised to ensure that they do not play with the appliance.
- Ensure a minimum distance of 5 cm to walls or other objects. Do not position or operate the appliance close to or underneath any hanging objects such as curtains or other inflammable materials, and do not position any objects on top of the appliance while it is in use. Always place the unit on a level, heat-resistant work surface. Do not allow the appliance or its power cord to touch hot surfaces or come into contact with any heat sources (e.g. oven-plates or open flames).
- Do not operate the appliance unless the baking-tin with the ingredients has been placed inside the unit.
- Do not expose the appliance to rain or moisture and do not operate the appliance outdoors or on wet surfaces. Always ensure that it is well protected from water splashes. Never immerse the plug, the power cord or the appliance itself in water.
- Caution: do not cover the bread with aluminium foil or similar items during the baking process; the resulting build-up of heat could seriously damage the unit. This bread-maker is intended for domestic use only and not for commercial applications.
- Do not use this appliance for any purpose other than the one described in this manual.
- The use of any accessories other than those provided by the manufacturer may result in damage to the appliance; there is also a possibility of severe personal injury.
- Do not touch any moving parts during operation. Do not put your fingers or hands inside the unit, unless it is disconnected from the mains supply and has cooled down completely.
- In order to comply with safety regulations and to avoid hazards, repairs of electrical appliances must be carried out by qualified personnel, including the replacement of the power cord. If
repairs are needed, please send the appliance to one of our customer service departments. The address can be found in the appendix to this manual.
- Keep this instruction manual for future reference.
Additional important instructions
- Always use an oven-cloth or suitable gloves when touching the unit after use, or when handling freshly baked bread.
- In case of a power failure of less than 7 minutes during operation, the baking process automatically continues at the point of interruption.
- During the kneading process, water vapour may condense on the viewing window. However, this condensation will disappear during the baking phase.
- To ensure evenly baked bread, do not open the lid during the baking process.
- After use, allow sufficient time for the bread-maker and the baking-tin to cool down before cleaning them thoroughly.
- The baking-tin and the kneading hook have a non-stick coating. In order to prevent damage, do not use any metallic, hard, sharp or pointed objects on the coating.
- Caution: Operating the bread-maker empty could result in damage to the unit by overheating of the empty baking-tin.
Caution
- In the event of any smoke coming from the baking compartment, be sure to keep the door firmly closed, but immediately remove the plug from the wall socket. Do not, under any circumstances, try to smother or extinguish smouldering dough with water. Dough may catch fire if it is allowed to rise over the edge of the baking-tin and touch the heating element. It is therefore important to follow the quantity limits given in the recipes.
- Always make sure that the unit is placed well out of children's reach, especially while it is operating.
- Do not place the unit on soft or inflammable surfaces (e.g. carpets). Always ensure that it is placed on a firm, level work surface. Always position the unit in such a way that it cannot fall over.
- Do not touch the steam vents at the rear of the lid, nor the viewing window in the lid: these parts heat up during operation.
- Before cleaning the appliance, ensure it is disconnected from the power supply and has cooled down completely.
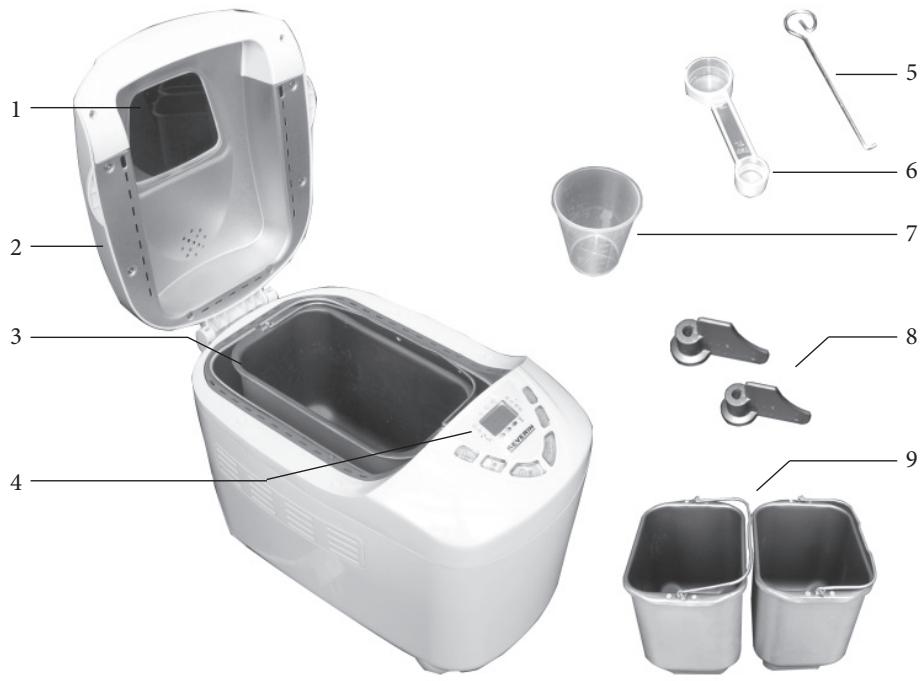
| 1. | Viewing window | 6. | Measuring spoon |
| 2. | Lid | 7. | Measuring cup |
| 3. | Bread baking-tin | 8. | 2 kneading hooks |
| 4. | Control panel with display | 9. | 2 small bread baking tins |
| 5. | Kneading hook extractor |
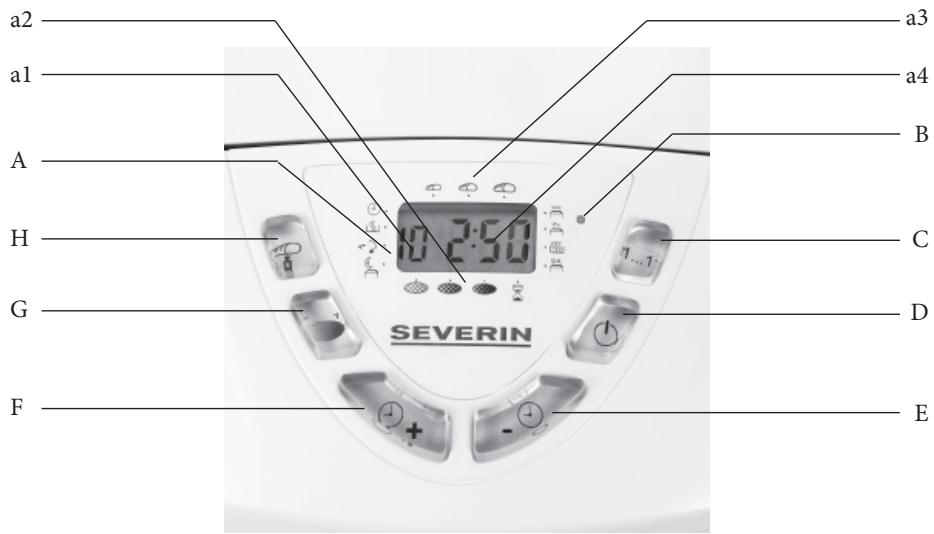
| A | Display | C | Programme 1............11 |
| a1 | Display - programme | D | Start / Stop Ⓞ |
| a2 | Display - browning level | E | Timer - minus Ⓞ |
| a3 | Display - weight | F | Timer - plus Ⓞ |
| a4 | Display - running time | G | Browning control Ⓞ |
| B | Main indicator light | H | Bread weight Ⓞ |
Visual programme-status display:
| Timer | ① |
| Pre-heating | ② |
| Kneading | ③ |
| Standing | ④ |
| Rising | ⑤ |
| Baking | ⑥ |
| Keeping warm | ⑦ |
| End | ⑧ |
CONTROL PANEL
A Display
The display shows the selected programme, level of browning, weight, remaining running time and programme status. An active programme is indicated by the continuously flashing colon in the time display.
B Main indicator light
Programme 1.11
Press the 1.....11 button to select the desired programme.
The programme code appears in the display.
D Button
This button starts the selected programme.
A beep signal is heard, and the colon in the time display starts flashing.
To end the programme, keep the button pressed for 3 seconds. This is acknowledged by a beep signal.
E/F Timer-minus / Timer-plus
Programmes 1, 2, 3, 4, 6, 9 and 11 may be started with a delayed timer setting, enabling the selected programme to finish up to 13:00 hours later.
Example:
You want to start the programme at 20:00, and you would like your bread to be finished at 7:30 the next morning. Accordingly, the total programme running time will be 11 hours and 30 minutes.
- Use the 1............11 button to select the desired programme.
- Press the appropriate timer button ¼ or ¼ until the display shows a total running time of 11:30.
- Add the ingredients following the instructions given in the section Operation. Avoid any contact between the yeast and fluids or salt.
- Do not use the timer function where a recipe requires the use of perishable ingredients such as eggs, fresh milk or fruit. The timer function is also unsuitable for recipes which require the addition of any ingredients (e.g. nuts, grains or dried fruits) during the kneading or rising phase.
G Browning
Baking programmes 1, 2, 3, 4, 5, 6 and 11 allow for a pre-selection of the desired level of browning: three settings are available. The level of browning selected is indicated by an arrowhead in the upper part of the display.
LIGHT
MEDIUM
DARK

QUICK

In addition, a quick-programme can be selected for programmes 1 to 4.
With this setting, the dough processing time is shortened by 60 to 75 minutes.
H Loaf weight
Baking programmes 1, 2, 3, 4, 5 and 6 allow for pre-selection of the loaf size. The selected weight is indicated in the form of an arrowhead symbol beneath the corresponding bread symbol on the display.
Acoustic signal On/Off
- When the bread maker is switched on, the acoustic signal function is active.
- During operation, this function can be de-activated by simultaneously pressing the timer buttons and for a minimum of 3 seconds. (The main indicator light briefly goes out to acknowledge the input)
- To re-activate the acoustic signal function, press the timer buttons and again simultaneously. A beep sound confirms that the function has been enabled.
- Following a power interruption, the signal function is automatically re-enabled.
Protection against wrong input:
Once a programme has been started, all other control buttons will remain blocked until the baking process has finished, or until the up/down button has been pressed for a minimum of 3 seconds.
PROGRAMME FUNCTIONS
The menu allows for the selection of 11 different programmes:
1 = STANDARD
This programme is used most frequently and suitable for breads with a high content of wheat flour.
2 = WHITE BREAD/FRENCH BREAD
Suitable for typical light dough White bread/French bread.
3 = WHOLEMEAL
As opposed to the STANDARD setting, this programme has extended rising and baking phases, since the dough for bread with a high rye or wholemeal flour content tends to rise less strongly than dough containing wheat flour.
4 = CAKES WITH YEAST
Because of its relatively high sugar content, sweet yeast dough tends to brown more quickly; in this programme, the baking phase is therefore shorter.
5 = EXTRA-SHORT PROGRAMME
The loaves will turn out smaller and firmer than usual.
6 = GLUTEN-FREE
For bread made from gluten-free flour
7 = DOUGH
This programme does not include a baking phase. After the programme has finished, the dough (e.g. pizza dough) can be removed and then baked in a conventional oven.
8 = PASTA DOUGH
For dough to make pasta.
9 = SANDWICH
Suitable for baking sandwich bread. The bread has a light structure and a thin crust.
10 = JAM, MARMALADE
Suitable for preparing jam, marmalade. During preparation, make sure the baking-tin is only two thirds full of all the ingredients (approx. 1000g), since the mixture may tend to foam up.
11 = BAKING
Suitable for baking dough (e.g. dough previously kneaded using the DOUGH programme). In this way, the rising phase can be modified according to the type of dough before the BAKING programme is started.
Extra-short programme:
This programme allows for baking bread in a shorter time. With a shortened rising phase, the loaves will turn out slightly smaller and firmer than usual. Please keep in mind that warm water must be used. Best results are generally achieved with a water temperature of around 48 - 50°C. We recommend using a suitable food thermometer. With the temperature too low, the bread may not rise sufficiently strongly; too high a temperature will cause the yeast contained in the dough to rise too early, again leading to an unsatisfactory baking result.
- In the programmes STANDARD, WHOLEMEAL, CAKES WITH YEAST, GLUTEN-FREE and SANDWICH, you may add such ingredients as wheat germ, sunflower seeds, herbs, caraway seeds, ground pepper, ground nuts, muesli, hominy grits, finely cut bacon cubes etc. according to taste.
- A 12-beep acoustic signal indicates when the most suitable time for adding these ingredients has been reached. The table below shows those suitable times.
| Progr. | Browning | Size | Running time (hrs.) | Dough preparation (hrs.) | Baking time (mins.) | Keeping warm (mins.) | Ingredients to be added after mins.: |
| 1 | 3:13 | 2:25 | 48 | 60 | 22 | ||
| 3:18 | 53 | 60 | 22 | ||||
| 3:25 | 60 | 60 | 22 | ||||
| 2 | 3:30 | 2:40 | 50 | 60 | - | ||
| 3:32 | 52 | 60 | - | ||||
| 3:35 | 55 | 60 | - | ||||
| 3 | 3:43 | 2:55 | 48 | 60 | 47 | ||
| 3:45 | 50 | 60 | 47 | ||||
| 3:48 | 53 | 60 | 47 | ||||
| 4 | 3:17 | 2:27 | 50 | 60 | 22 | ||
| 3:22 | 55 | 60 | 22 | ||||
| 3:27 | 60 | 60 | 22 | ||||
| 5 | 1:17 | 0:32 | 45 | 60 | - | ||
| 1:20 | 48 | 60 | - | ||||
| 1:23 | 51 | 60 | - | ||||
| 6 | 2:49 | 1:19 | 90 | 60 | 23 | ||
| 2:54 | 95 | 60 | 23 | ||||
| 2:59 | 100 | 60 | 23 | ||||
| 7 | - | - | 1:30 | 1:30 | - | - | - |
| 8 | - | - | 0:14 | 0:14 | - | - | - |
| 9 | 3:55 | 2:55 | 60 | 60 | 57 | ||
| 10 | - | - | 1:05 | 0:15 | 50 | - | - |
| 11 | 1:00 | - | 60 | 60 | - |
Important information
- If you observe flour residue on the walls of the baking tin, open the lid during the kneading phase and use a rubber scraper to move the flour back into the dough so that it can be properly processed.
Close the lid afterwards.
- When using yeast, the kneading hook may be removed after the final kneading phase.
USING THE BREAD-MAKER
Your new bread-maker allows you to:
- bake breads to various recipes, some of which can be found in the appendix to this manual. However, this bread-maker also allows you to use commercially available ready-to-bake mixtures with up to 500 g of solid ingredients (for a loaf of up to 1000 g).
- The two smaller baking tins can be used for making smaller loaves.
The volume of the two smaller tins is about 2/3 of the large baking tin volume.
- knead dough for bread rolls, pizza etc., and let the dough rise.
- Only recipes with a flour content of 200 - 550 g should be used with this bread-maker. Use 1 1/2 teaspoons of yeast for wheat flour, and 2 teaspoons for rye flour.
Should the flour content fall short of this minimum, thorough kneading of the dough cannot be ensured. Excessive flour content may result in the dough rising over the edge of the baking-tin.
BEFORE FIRST USE
- Remove the baking-tin. Before the bread-maker is used for the first time, it should be thoroughly cleaned, as described in the section Cleaning and Care.
- Fit the kneading hooks into their sockets inside the baking-tin and fill the tin with around 125 ml of water.
- Replace the baking-tin in the unit. Make sure that it locks firmly into place.
- Insert the plug into a suitable wall socket.
- Use the 1............11 button to select programme 11 (BAKING).
- Press the button and let the unit heat up for approximately 10 minutes with the lid open. This will remove the smell typically encountered when first activating the heating elements. Ensure sufficient ventilation.
- Afterwards, press and hold the down-arrow button for approx. 3 seconds to switch the bread-maker off (this is confirmed by an acoustic signal); now remove the plug from the wall socket and allow the appliance to cool down.
- Clean the unit again as described in the section Cleaning and Care.
OPERATION
- Open the lid and remove the baking-tin.
- Fit the kneading hooks into their sockets inside the baking-tin.
- For best results, always put liquids in first, followed by solid ingredients such as flour.
- Finally, add the yeast. Be sure to avoid any contact between the yeast and salt or liquids when using the timer.
- Replace the baking tin in the unit. Make sure that it locks firmly into place. Before starting the programme, close the lid, insert the plug into a suitable wall socket and switch the appliance on.
- Use the 1.....11 button to select the desired baking programme. Each time the button is pressed, the display changes to the next programme in the sequence.
- Select the desired level of browning. (Only for programmes 1, 2, 3, 4, 5, 6 and 11)
- Select the weight. (Only for programmes 1, 2, 3, 4, 5 and 6)
- Press the button to start the kneading and/or baking process. (If you wish to start the programme with a timer delay, the total running time desired can now be set, using the appropriate timer button.)
- During the kneading or rising phase in programmes 1, 3, 4, 6 and 9, an acoustic signal indicates that additional ingredients such as fruits and nuts can be added to the dough, after which do not open the lid, but wait until the programme has finished.
- If you need to interrupt the programme during operation, press the button for approx. 3 seconds. The key input is confirmed by an acoustic signal.
- Once the bread or dough is ready, a multiple acoustic signal is heard and the time display shows 0:00. Press the button for at least 3 seconds and open the lid.
- Carefully remove the baking tin using oven cloths. Do not place the hot baking tin on any heat-sensitive surfaces.
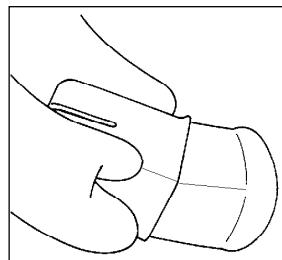
- Remove the bread from the baking tin. To loosen the bread, it may be lightly shaken. Should the kneading hook be stuck in the bread, it should be carefully removed using the extractor tool supplied. To allow the underside of the loaf to cool down as well, it should be placed on a suitable wire rack. Do not attempt to cut the bread until it has cooled down.
- If the bread-maker is not switched off immediately after the programme running time has elapsed, the bread will be kept warm automatically for a period of 60 minutes. The unit will then switch off automatically.
CLEANING AND CARE
- Caution: before cleaning the appliance, ensure that the plug has been removed from the wall socket, and that the appliance has cooled down. Never immerse the bread-maker in water.
- Lift out the baking tin and remove the kneading hooks.
The baking tin and kneading hooks may be cleaned using hot water and a mild detergent. Do not use any rough material for cleaning. If you are unable to separate a kneading hook from the baking tin using normal force, let it soak in lukewarm water for approximately 30 minutes. Do not use excessive force to remove the hook.
- To prevent damage to the drive-shaft seal, the baking tin should not be left soaking for any extended period of time. Do not clean the baking tins in a dishwasher.
- The inside of the lid may be cleaned with a slightly damp, soft cloth. The interior of the appliance must only be cleaned with a soft, dry cloth.
- Do not use cleaning agents specifically designed for ovens, and do not use any abrasives or harsh cleaning solutions, vinegar, or bleaching agents for cleaning.
- Before storing the appliance, always ensure that it has cooled down and that it is completely dry.
TYPICAL PROBLEMS AND QUESTIONS
- The bread has a strong smell.
Check whether the correct amount of yeast was used. Too much yeast causes an unpleasant smell and makes the loaf rise too much. Always use fresh ingredients.
- The baked bread is wet and has a sticky surface.
Remove the bread from the appliance immediately after baking, and place it onto a wire rack, allowing it to cool down.
- Pressing the Start button fails to activate the selected programme.
Make sure that the unit is properly connected to the mains supply.
Should the appliance still be too hot after a previous work cycle, an automatic safety switch prevents the appliance from resuming operation. In that case, the display shows the letters E00 or E01, and a continuous acoustic signal is heard. Press the down arrow button for 3 seconds, and remove the baking tin with the ingredients from the unit. Allow the bread maker to cool down for about 20 minutes with the lid open before you attempt to start the programme again.
- After pressing the Start button, the message E:EE or H:HH appears on the display.
This message indicates a temperature sensor malfunction. In such a case, the appliance must be checked by a qualified technician.
- The loaf has risen too high.
Reduce the amount of yeast, water or flour used.
- The loaf has not risen high enough.
Increase the amount of yeast, water or sweeteners. Ensure that the correct order is used when putting the ingredients into the baking-tin: first the liquid ingredients, followed by the solid ingredients, finally the yeast.
Note: bread made of rye or wholemeal flour tends to rise less strongly than bread made of wheat flour.
- After the baking phase has started, the dough collapses inwards.
The dough is too light. Slightly reduce the quantity of liquids or the amount of yeast, or use a programme with a shorter rising phase. You may also try increasing the amount of salt.
- The dough is too soft or too sticky.
The dough texture may become smoother if a spoonful of flour is added during kneading.
- The dough is very difficult to knead.
Add a spoonful of water during the kneading process.
RECIPES
White bread/French bread Ingredients: Onion bread
| Programme | 2 | |||
| Setting | ||||
| water | 80 | 120 | 180 | ml |
| milk | 90 | 140 | 220 | ml |
| butter | 6 | 10 | 15 | g |
| salt | 1 | 1 1/2 | 2 | tsp. |
| sugar | 1 1/2 | 2 | 3 | EL |
| wheat flour, type 405 | 260 | 400 | 600 | g |
| dry yeast | 3/4 | 1 | 1 1/2 | tsp. |
| approx. yield | 400g | 650g | 1000g | |
Ingredients:
| Programme | 1 | |||
| Setting | ||||
| water | 260 | 350 | 500 | ml |
| salt | ¾ | 1 | 1½ | tsp. |
| sugar | ¾ | 1 | 1 | tsp. |
| wheat flour, type 1050 | 400 | 540 | 760 | g |
| fried onions | 56 | 75 | 100 | g |
| dry yeast | ½ | ¾ | 1 | tsp. |
| approx. yield | 600g | 900g | 1300g | |
Raisin bread Ingredients: Wholemeal bread
| Programme | 1 | |||
| Setting | ||||
| water | 150 | 200 | 310 | ml |
| butter | 1 1/4 | 1 1/2 | 2 1/2 | EL |
| salt | 1/2 | 3/4 | 1 | tsp. |
| honey | 1 1/2 | 2 | 3 | tbs. |
| wheat flour, type 405 | 270 | 420 | 650 | g |
| dry yeast | 3/4 | 1 1/2 | 2 | tsp. |
| raisins | 40 | 75 | 100 | g |
| approx. yield | 550g | 700g | 1100g | |
Ingredients:
| Programme | 3 | |||
| Setting | ||||
| water | 310 | 415 | 620 | ml |
| oil | 1 | 1 1/2 | 2 | tbs. |
| lemon juice | 1 | 1 1/2 | 2 | tbs. |
| rye wholemeal flour | 150 | 200 | 300 | g |
| wheat flour, type 1050 | 300 | 400 | 600 | g |
| sugar | 3 | 4 | 6 | tsp. |
| salt | 1 | 3 | 4 | tsp. |
| dry yeast | 2 | 3 | 4 | tsp. |
| oat meal | 4 | 6 | 8 | tsp. |
| approx. yield | 750g | 1000g | 1500g | |
Wheat and rye bread
Ingredients:
| Programme | 1 | |||
| Setting | ||||
| water | 150 | 220 | 350 | ml |
| natural plain yoghurt 3.5% fat content | 75 | 110 | 175 | ml |
| salt | 1 | 1 1/2 | 2 1/2 | tsp. |
| sugar | 1/4 | 1/4 | 3/4 | tbs. |
| wheat flour, type 550 | 160 | 230 | 350 | g |
| wheat flour, type 1150 | 160 | 230 | 350 | g |
| dry yeast | 3/4 | 1 1/4 | 2 | tsp. |
| approx. yield | 500g | 700g | 1150g | |
Pizza dough
Ingredients:
| Programme | 8 | |||
| Setting | ||||
| water | 230 | ml | ||
| olive oil | 3 | tbs. | ||
| salt | 2 | tsp. | ||
| sugar | 1 | tsp. | ||
| wheat flour, type 550 | 400 | g | ||
| dry yeast | 2 | tsp. | ||
| approx. yield | 600g | |||
Tip:
Once the programme has finished, remove the dough from the baking-tin. Let the dough rise at room temperature for approximately 30 minutes.
Jam, marmalade
The basic recipe consists of finely cut or pureed fruit and gelatine sugar (e.g '2:1'). Information about the correct proportions of fruit and gelatine sugar may be found on the sugar
packaging.
- Wash the fruit and, if necessary, peel it.
- Weigh out about 900 g of fruit, but always observe the overall quantity limits to prevent the mixture from foaming and spilling out. The fruit should be cut into small pieces (max. 1 cm) or pureed.
- Place the fruit and 500 g gelatine sugar into the baking-tin. When making marmalade from berries, add 1 tbs. of lemon juice and blend in well.
- Start the JAM, MARMALADE programme.
- Carefully monitor the process. Use a rubber scraper to remove any sugar residue from the walls of the tin. After the programme has finished, remove the plug from the wall socket, and carefully take out the baking-tin using an oven cloth.
- Carefully transfer the jam or marmalade into prepared jars. Close the jars tightly afterwards, and allow them to cool down.
- The baking-tin should be thoroughly rinsed immediately after use.
Recipes for the two smaller baking-tins
Onion bread
Ingredients:
| Programme | 1 | |||
| Setting | ||||
| water | 130 /130 | 175 / 175 | - | ml |
| salt | \( \frac{1}{3} \) / \( \frac{1}{3} \) | \( \frac{1}{2} \) / \( \frac{1}{2} \) | - | tsp. |
| sugar | \( \frac{1}{3} \) / \( \frac{1}{3} \) | \( \frac{1}{2} \) / \( \frac{1}{2} \) | - | tsp. |
| wheat flour,type 1050 | 200 / 200 | 270/270 | - | g |
| fried onions | 30 / 30 | 38 / 38 | - | g |
| dry yeast | \( \frac{1}{4} \) / \( \frac{1}{4} \) | \( \frac{1}{2} \) / \( \frac{1}{3} \) | - | tsp. |
| approx. yield | 300g/ 300g | 430g/430g | - | |
Raisin bread
Ingredients:
| Programme | 1 | |||
| Setting | ||||
| water | 75 / 75 | 150 / 150 | - | ml |
| butter | 3/3 / 3/3 | 1 1/4 / 1 1/4 | - | tbs. |
| salt | 1/4 / 1/4 | 1/2 / 1/2 | - | tsp. |
| honey | 3/4 / 3/4 | 1 1/2 / 1 1/2 | - | tbs. |
| wheat flour, type 405 | 135 / 135 | 270 / 270 | - | g |
| dry yeast | 1/3 / 1/3 | 3/4 / 3/4 | - | tsp. |
| raisins | 20 / 20 | 38 / 38 | - | g |
| approx. yield | 200g / 200g | 550g/550g | - | |
Abbreviations:
tsp. = teaspoon (measuring spoon: 1 tsp.) = 5 ml tbs. = tablespoon (measuring spoon: 1 tbs.) = 15 ml
g = gram, ml = millilitre
Commercially available ready-to-bake mixes
Various ready-to-bake mixes are to be found.
- Put up to 500 g of the ready-to-bake mixture and the required amount of dry yeast into the baking-tin. Depending on the size of the mix, it may be that only half of the mix can be used at a time.
- Add the corresponding quantity of liquid.
Programme: STANDARD, WHITE BREAD or WHOLEMEAL, depending on the type of flour used.
Additional recipe information
The bread-maker is designed to process recipes with a flour content of up to 550g. In order to prevent the dough rising over the edge of the baking-tin and to ensure that the dough is properly and thoroughly kneaded, do not exceed these limits.
All ingredients should be at normal room temperature.
Sugar assists the yeast as a rising agent, and tends to make the crust darker and thicker.
Salt gives a firmer texture to the dough and slows the rising process down.
When adding additional ingredients of a liquid nature to a recipe, make sure that the quantity of liquid given in the recipe is reduced accordingly. This applies, for instance, when eggs, fresh cheese or yoghurt are used.
The baking results depend on several factors such as air pressure, humidity, water hardness, room temperature or the temperature of the ingredients. If a recipe does not turn out to your taste right away, we recommend modifying the suggested recipes accordingly, as described in the section 'Typical problems'.
Special information for those with allergies
With this bread-maker you may also use flour mixtures specifically formulated for people allergic to grain. The loaves will turn out relatively firm even when higher quantities of yeast or baking powder are used.
However, in this case only the programmes STANDARD or GLUTEN-FREE should be used, choosing the darker browning setting. With this programme, the loaf turns out to have a stronger crust.
With gluten-free flour types, pre-programming is not recommended. Always start the programme immediately after the ingredients have been put in.
For gluten-free bread, commercially available ready-to-bake mixes are most suitable.
TECHNICAL SPECIFICATIONS
| Art.-Nr.: | BM 3992 |
| Operating voltage: | 230 V~, 50 Hz |
| Power consumption: | 860 W |
| Baking capacity: | Large baking-tin 3.8 l capacity: approx. 750 - 1600g loaf weight Small baking-tins 1.35 l capacity each: approx. 500g loaf weight each |
| Approximate dimensions: | 395 mm (L) x 275 mm (D) x 315 mm (H) |
| Weight: | 4.9 kg |
| Timer: | Pre-programmable up to 13 hours |
| Programme functions: | 11 |
| Accessories: | Measuring cup, measuring spoon, kneading hook extractor |
| This product complies with all binding CE labelling directives. | |

Disposal
Do not dispose of old or defective appliances in domestic garbage; this should only be done through public collection points.
GUARANTEE
This product is guaranteed against defects in materials and workmanship for a period of two years from the date of purchase. Under this guarantee the manufacturer undertakes to repair or replace any parts found to be defective, providing the product is returned to one of our authorised service centres. This guarantee is only valid if the appliance has been used in accordance with the instructions, and provided that it has not been modified, repaired or interfered with by any unauthorised person, or damaged through misuse.
This guarantee naturally does not cover wear and tear, nor breakables such as glass and ceramic items, bulbs etc. This guarantee does not affect your statutory rights, nor any legal rights you may have as a consumer under applicable national legislation governing the purchase of goods. If the product fails to operate and needs to be returned, pack it carefully, enclosing your name and address and the reason for return. If within the guarantee period, please also provide the guarantee card and proof of purchase.
TABLE OF CONTENTS
| IMPORTANT CONSIGNES DE SECURITÉ | 34 |
| VOTRE MACHINE À PAIN | 36 |
| LE TABLEAU DE COMMANDE | 38 |
| LES PROGRAMMES | 39 |
| UTILISATION DE LA MACHINE À PAIN | 41 |
| AVANT LA PREMIÈRE MISE EN SERVICE | 41 |
| FONCTIONNEMENT | 42 |
| NETTOYAGE ET ENTRETIEN | 42 |
| PROBLEMES COURANTS ET QUESTIONS | 43 |
| RECETTES | 44 |
| FICHE TECHNIQUE | 48 |
| GARANTIE | 48 |
IMPORTANT SAFETY INSTRUCTIONS
4 = CAKES WITH YEAST
5 = EXTRA SHORT PROGRAM
1 1 = BAKING
Extra short program:
Raisin bread
Ingredients:
Raisin bread
Ingredients:
| Programme | 1 | |||
| Quantité | ||||
| d'eau | 75 / 75 | 150 / 150 | - | ml |
| de beurre | ¾ / ½ | 1¼ / 1¼ | - | c.à.s. |
| de sel | ¼ / ¼ | ½ / ½ | - | c.à.c. |
| de miel | ¾ / ¼ | 1½ / 1½ | - | c.à.s. |
| de farine de froment type 405 | 135 / 135 | 270 / 270 | - | g |
| de levure de boulanger | ½ / ½ | ¾ / ¾ | - | c.à.c. |
| Raisins secs | 20 / 20 | 38 / 38 | - | g |
| Rendement approximatif | 200g / 200g | 550g/550g | - | |
Abbreviations:
tsp = teaspoon (measuring spoon: 1 tsp) = 5 ml
tbsp = tablespoon (measuring spoon: 1 tbsp) = 15 ml
g = gram
ml = milliliter
2 = WHITE BREAD/FRENCH BREAD
5 = EXTRA SHORT PROGRAM
9 = SANDWICH / PANINI
Logbrod Ingredients:
5 = EXTRA SHORT PROGRAM
2 = WHITE BREAD/MILK BREAD
It is suitable for making white bread/milk bread
3 = WHOLE WHEAT
4 = CAKE WITH FRUIT
Regarding sugar content, the sweetness can be adjusted on the device. In this program, the bread is more compact.
8 = YEAST FOR YEAST BREADS
This is a sample.
9 TO2T
Suitable for making dough for bread. The dough is soft and has a certain texture.
10 = MARMALADE
For making marmalade. For making, ensure you have about 1000 g of fruit with all the ingredients (approximately 1000 g) because the mixture may foam.
11 = YOGURT
Suitable for making yogurt (e.g., from milk that has already been heated or with the YOGURT program). Thus, you can adjust the fermentation time according to the type of milk before starting the YOGURT program.
YOGURT program
This program allows the dough to ferment in a shorter time. Due to the shorter fermentation time, the dough becomes softer and more elastic than usual. Note that it should be used with water. Specifically, achieving good results when the water temperature is about 48-50°C. Use a thermometer for this. When the temperature is too low, the dough may not ferment enough. Too low a temperature also results in the dough not rising enough or the crust being too hard. And in this case, the dough result is not satisfactory.
Press the button 1.....11 to select the desired program.
The program starts after a short delay.
D button
Pressing the button starts the selected program.
A sound signal is emitted, and after a set time the kneading begins.
To stop the program, press and hold this button for 3 seconds. The program ends with a sound signal.
Decrease set time / Increase set time
Programs 1, 2, 3, 4, 6, 9 and 11 can be started with the timer setting, allowing you to finish the selected program with a delay of up to 13:00 hours.
Example:
You want to start the program at 20:00 and you want your bread to be ready at 7:30 the next morning. Accordingly, the total program time will be 11 hours and 30 minutes.
- Select the desired program using buttons 1.....11.
- Press the corresponding timer button ⑦ or 一 until the display shows the total program time 11:30.
- Add ingredients according to the instructions given in the operation section. Make sure that the yeast and salt do not come into contact with each other.
- Do not use the timer function when the recipe requires the use of perishable ingredients such as eggs, fresh milk or fruits. The timer function is also unsuitable for recipes that require the addition of ingredients (e.g., nuts, seeds or dried fruits) during the kneading or rising phase.
Crust control
Programs 1, 2, 3, 4, 5, 6 and 11 allow you to set the desired degree of browning from three available options. The selected browning degree is indicated by a bar in the lower part of the LCD display.
LIGHT
MEDIUM
DARK
QUICK BAKE

For programs 1 to 4, the quick bake program can be additionally selected.
The insert allows reducing the dough preparation time from 60 to 75 minutes.
And the weight of the loaf
Baking programs 1, 2, 3, 4, 5, or 6 allow you to set the weight of the baked loaf. The selected weight is indicated by the pointer under the corresponding bread symbol on the panel.
Sound signal / beep.
- The sound signal function is activated by pressing the button. - During operation, this function can be activated by simultaneously pressing the timer buttons and for at least 3 seconds. (When the command is confirmed, the indicator lamp flashes briefly.) - To deactivate the sound signal function, press the timer buttons and again simultaneously. The sound signal confirms that the function is activated. - After power is restored, the sound signal function is activated automatically.
Protection against incorrect input
After starting the program, all control buttons will be locked until the baking process is completed or until the buttons are pressed for at least 3 seconds.
PROGRAM FUNCTIONS
The menu allows you to choose from 11 different programs:
1 = BASIC
This program is used most often for baking white bread with a high content of wheat flour.
2 = WHITE BREAD / FRENCH BREAD
It is used for typical dough (for example, for baking white / French bread).
3 = WHOLE WHEAT BREAD
Compared to the standard program, this program provides longer rising and baking stages, because dough with a high content of rye or whole wheat flour rises not as strongly as dough with wheat flour.
5 = OVERVIEW OF THE BAKING PROGRAM
The baked goods come out smaller in size and harder than with normal baking.
6 = GLUTEN-FREE
Bread loaves made from gluten-free flour.
7 DOUGH
This program does not have a baking stage. After the program ends, the dough (for example, pizza dough) can be removed and used for baking in a conventional oven.
8 DOUGH FOR PASTA
10 = JAM, MARMALADE
Used for making jam and marmalade. When preparing, make sure that the baking pan is filled with all ingredients (about 1000 g) only to two-thirds, as this mixture tends to rise.
11 = BAKING
G = GRAM
ML = MILLILITER
Ready-to-bake mixes available in stores
There are various ready-to-bake mixes available in stores.
Place 500 g of ready-to-bake mix and the required amount of dry yeast into the baking pan. Depending on the mix, for small bakes only half may be needed. Add the corresponding amount of liquid.
Ingredients: wheat flour, whole wheat flour / French bread or bread made from wholemeal flour, depending on the type of flour used.
Additional information on recommended recipes
Bread maker: Purpose and use of recipes with flour content up to 550 g. It is important that the dough does not stick to the mold or overflow, and to ensure a quality result, do not exceed the recommended amounts of ingredients.
All ingredients should be at room temperature.
Sugar helps the yeast to raise the dough and contributes to the formation of a darker and thicker crust.
Salt gives the dough a firmer consistency and slows down the rising process.
When adding additional ingredients such as curd, monitor the consistency and ensure that the amount of liquid specified in the recipe is reduced accordingly. This is required, for example, when adding eggs, milk, fresh cheese, or cottage cheese.
Baking results depend on several factors, such as atmospheric pressure, humidity, water hardness, room temperature, and ingredient temperature. If the suggested recipe does not suit your taste, we recommend modifying it according to the recommendations in the section 'Possible Problems'.
Special information for allergy sufferers
With this bread maker, you can also use flour mixtures specially developed for people with grain allergies. The loaves remain relatively firm even when using large amounts of baking powder.
Kuressaare: Toomas Teder FIE, Pikk 1B,
tel: 45 55 978
Kaina: Ilmar Pauk Elektroonika FIE, Mae 2S,
tel: 4636379, 5187444
Espana
Severin Electrodom. Espana S.L.
Plaza de la Almazara Portal 4, 1st floor E.
45200 ILLESCAS (Toledo)
Tel: 925 51 34 05
Fax: 925 34 19 40
eMail: severin@severin.es
http://www.severin.es
France
SEVERIN France Sarl
4, rue de Thal
B.P. 38
67211 OBERNAI CEDEX
Tel.: 03 88 47 62 08
Fax: 03 88 47 62 09
Greece
BERSON
C. Sarafidis Bros. S.A.
Agamemnonos 47
176 75 Kallithea, Athens
Tel.: 0030-210 9478700
Philippines Business Center
Agias Anastasias & Laertou, Pilea
Service Post of Thermi
570 01 Thessaloniki, Greece
Tel.: 0030-2310954020
Iran
IRAN-SEVERIN KISH CO. LTD.
No.668,7th.Floor
Bahar Tower
Ave. South Bahar
TEHRAN-IRAN
Tel.:009821-77616767
Fax:009821-77616534
Info@iranseverin.com
www.iranseverin.com
Israel
Eatay Agencies
109 Herzel St.
Haifa
Phone:050-5358648
Email: service@severin.co.il
Italia
via Dino Col 52r-54r-56r,
I-16149 Genova
Green Number: 800240279
Tel.: 010/6451102-010418609
Fax: 010/6425009
e-mail: videoelettronica@panet.it
Jordan
F.A. Kettaneh
P.O.Box 485
Amman, 11118, Jordan
Tel:00962-6-4398642
e-mail: app@kettaneh.com.jo
Korea
Jung Shin Electronics co., Ltd.
501, Megaventuretower 77-9
Moonrae-Dong 3ga, Yongdeungpo-Gu
Seoul, Korea
Tel: +82-22-637 3245~7
Fax: +82-22-6373244
Service Hotline: 080-001-0190
Latvia
SERVO Ltd.
Mr. Janis Pivovarenoks
Tel: +371 7279892
servo@apollo.lv
Lebanon
Khoury Home
7th Floor, Cité Dora 3 Building, Dora
P.O. Box 70611
Antelias, Lebanon
Telephone 01 244200, Fax 01 253535
eMail: info@khouryhome.com
Internet: www.khouryhome.com
Luxembourg
Ser-Tec
Rue du Château d'Eau
3364 Leudelange
Tel.: 00352-379494402
Fax: 00352-379494400
Macedonia
Agrotehna
St. Prvomajtska bb
1000-Skopje
MACEDONIA
e-mail: servis@agrotehna.com.mk
Tel: +389 2 / 24 45 009 or -019
Fax: +389 22463270
Hungary
TFK Elektronik Kft.
Gyar u.2
H-2040 Budaörs
Tel.: (+36) 23444266
Fax: (+36) 23444267
Netherlands
HAS b.v.
Stedenbaan 8
NL-5121 DP Rijen
Tel: 0161-220000
Fax: 0161-290050
Norway
Lokken Trading AS
Trollasveien 34
1414 Trollasen
Tel: 40 00 67 34
Fax: 66804560
Austria
Degupa
Sc.2 Et.1, Ap. 27, Sector 1
Bucharest
Tel: +40 21 233 41 12
+40 21 233 41 13
+40 21 688 66 13
Fax: +40 21 233 41 03
+40 21 688 66 13
E-mail: office@forbrands.ro
Web site: www.forbrands.ro
Switzerland
Serbia and Montenegro
tel: +381-21-524-638
tel: +381-21-553-594
fax: +381-21-522-096
Slovak Republic
PREMT s.r.o.
Skladova 1
917 01 Trnava
Tel: 033/544 7177
Finland
Oy Harry Marcell Ab
Rälssitie 6, PL 63
01511 Vantaa
Tel.: 00358 / 207599860
Fax: 00358 / 207599803
Swedish
Rakspecialisten HS
Mollevangsgatan 34
214 20 Malmö
Tel.: 040/12 07 70
Fax: 040/6 11 03 35
Slovenia
SEVTIS d.o.o.
Smartinska 130
1000 Ljubljana
Tel:0038615421927
Fax:0038615421926
Stand:03.2010
- IMPORTANT SAFETY INSTRUCTIONS
- ADDITIONAL IMPORTANT INSTRUCTIONS
- CAUTION
- VISUAL PROGRAMME-STATUS DISPLAY
- CONTROL PANEL
- A DISPLAY
- B MAIN INDICATOR LIGHT
- PROGRAMME
- D BUTTON
- E/F TIMER-MINUS / TIMER-PLUS
- EXAMPLE
- G BROWNING
- H LOAF WEIGHT
- ACOUSTIC SIGNAL ON/OFF
- PROTECTION AGAINST WRONG INPUT
- PROGRAMME FUNCTIONS
- BAKING
- EXTRA-SHORT PROGRAMME
- IMPORTANT INFORMATION
- USING THE BREAD-MAKER
- YOUR NEW BREAD-MAKER ALLOWS YOU TO
- BEFORE FIRST USE
- OPERATION
- CLEANING AND CARE
- TYPICAL PROBLEMS AND QUESTIONS
- RECIPES
- WHEAT AND RYE BREAD
- INGREDIENTS
- PIZZA DOUGH
- TIP
- JAM, MARMALADE
- RECIPES FOR THE TWO SMALLER BAKING-TINS
- ONION BREAD
- RAISIN BREAD
- ABBREVIATIONS
- COMMERCIALLY AVAILABLE READY-TO-BAKE MIXES
- ADDITIONAL RECIPE INFORMATION
- SPECIAL INFORMATION FOR THOSE WITH ALLERGIES
- DISPOSAL
- GUARANTEE
- EXTRA SHORT PROGRAM
- WHITE BREAD/MILK BREAD
- WHOLE WHEAT
- CAKE WITH FRUIT
- YEAST FOR YEAST BREADS
- TO2T
- MARMALADE
- YOGURT
- YOGURT PROGRAM
- DECREASE SET TIME / INCREASE SET TIME
- CRUST CONTROL
- AND THE WEIGHT OF THE LOAF
- SOUND SIGNAL / BEEP
- PROTECTION AGAINST INCORRECT INPUT
- PROGRAM FUNCTIONS
- READY-TO-BAKE MIXES AVAILABLE IN STORES
- ADDITIONAL INFORMATION ON RECOMMENDED RECIPES
- SPECIAL INFORMATION FOR ALLERGY SUFFERERS
Brand : SEVERIN
Model : BM 3992 - FICHE PRODUIT
Category : Electric mixer