
IP-200X - Hob FAGOR - Free user manual and instructions
Find the device manual for free IP-200X FAGOR in PDF.

User questions about IP-200X FAGOR
0 question about this device. Answer the ones you know or ask your own.
Ask a new question about this device
Download the instructions for your Hob in PDF format for free! Find your manual IP-200X - FAGOR and take your electronic device back in hand. On this page are published all the documents necessary for the use of your device. IP-200X by FAGOR.
USER MANUAL IP-200X FAGOR
IPEHOCIM INHdyKluHOHEKOTJIOH / INHdyKluOHHOPTATUBHOIJIITbI /
DRAAGBARE INDUCTIE KOOKPLAAT
MOD.:
IP-200X
N.I.F. F-20.020.517 - B. San Andres, n. 18 • Apartado 49 - 20500 MONDRAGON (Guipezcoa) ESPANA
N.I.F. F-20.020.517 - B°. San Andrés, n° 18 • Apartado 49 - 20500 MONDRAGON (Guipuzcoa) ESPÁÑA

ES
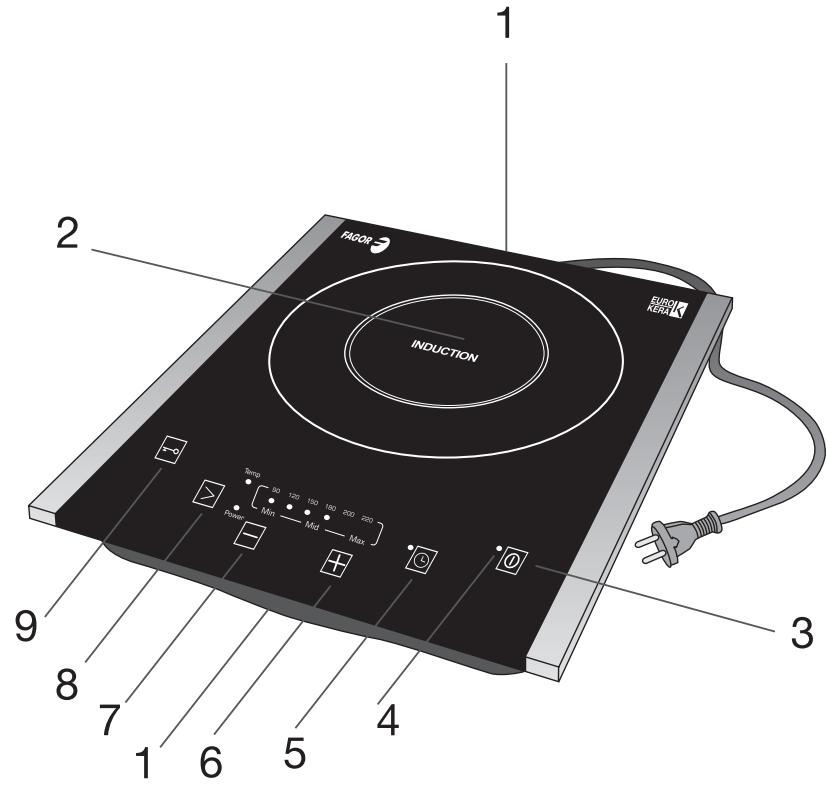
1. DESCRIPCION
- Air inlets
- Vitro-ceramic hob
- ON/OFF button
- ON/OFF pilot light
- Timer button
- Power setting/temperature increase
- Power setting/temperature reduction
- Function selector
- Lock selector
- Temperature mode pilot light
- Power setting mode pilot light
2. TECHNICAL CHARACTERISTICS
Voltage: 220V / 240V
Frequency: 50 / 60Hz
Power: 2000 W
This product complies with the European Directives on Electromagnetic Compatibility and Low Voltage.
3. SAFETY PRECAUTIONS
- Before using this appliance for the first time, read the following instructions carefully and keep them for future reference.
- Make sure that the mains voltage in your home corresponds to that indicated on the appliance.
- In the event of incompatibility between the mains socket and the appliance plug, replace the socket with a suitable one, using a qualified professional.
- The electrical safety of the appliance is only guaranteed if it is connected to an efficient earth installation, as foreseen in applicable electrical safety regulations. If in doubt, contact a qualified professional.
- The use of adaptors, multiple sockets and or extension cables is not recommended. Where it is not possible to avoid their use, only adaptors or extensions that comply with applicable safety regulations should be used, and
ensuring that the indicated voltage limit is not exceeded.
After removing the packaging, check that the appliance is in perfect condition, if in doubt, contact the nearest Technical Support Service.
- Packaging elements (plastic bags, polystyrene foam, etc.), should not be left within the reach of children because they can be dangerous.
- The appliance is for domestic use only. Any other use is considered unsuitable or dangerous.
- The manufacturer shall not be responsible for any damages that may arise from improper or inadequate use, or for repairs conducted by nonqualified personnel.
- Do not touch the appliance with wet or damp hands or feet.
- Keep the appliance separate from water or other liquids, to avoid electric shock; do not connect the appliance to the mains if it is on a damp surface.
- Place the appliance on a dry, firm and stable surface.
- Do not allow children or the disabled to handle the appliance unsupervised.
- This appliance should not be used by physically, sensorially or mentally handicapped people or people without experience or knowledge of it (including children), unless they are supervised or instructed in the use of the appliance by a person responsible for their safety.
Children should be watched to ensure they do not play with the appliance.
- For greater protection, we recommend installing a residual current device (RCD) with an operational residual current not exceeding 30mA . Ask your installer for advice.
- Do not leave the appliance unattended when it is turned on because it can be dangerous.
- When removing the plug never pull on the cable.
- Unplug the appliance before cleaning or maintenance.
- In the event of fault or malfunction where the appliance is not to be used, turn off the appliance and do not
attempt to repair. If a repair is required, contact a Technical Assistance Service authorised by the manufacturer and request the use of original spare parts.
- If the cable for this appliance is damaged, contact an authorised Technical Assistance Service for it to be replaced.
- Do not leave the appliance exposed to the elements (rain, sun, ice, etc.).
- Do not use or let any part of the appliance come into contact or near hot surfaces (kitchen gas or electric hobs or ovens).
- Do not use detergents or abrasive sponges to clean the appliance.
- Do not touch the hot surfaces. Use the handles.
- Do not let the cable come into contact with the hot parts of the appliance.
- Do not dismantle the appliance or attempt to repair it yourself.
- Do not place heavy objects on the hob.
- Do not use the hob near a source of flammable gas or in a damp atmosphere.
- Do not place the hob where water or oil could splash onto it.
- Never leave the hob unattended while it is functioning.
- Open vacuum-packed foods before heating them up on the hob.
- Do not use unsuitable pans.
- Do not cover the air vents or air inlets or insert any foreign bodies into them.
- Correctly centre the pans on the heating area.
After using the hob, let it cool down before touching it.
If you should notice any external defects, disconnect the appliance to prevent short-circuiting. - Do not leave any metal objects on the hob, as they could become very hot.
- Pacemaker wearers should consult their doctor before using this appliance.
4. PANS
- The pan base must be made of a magnetic material.
- Pans made of materials such as glass, ceramic, aluminium, copper and other non-magnetic substances cannot be used.
- The pan base must be flat, and its diameter must be between 12 and 26 cm.
- After switching on the hob, a beep will sound until the pan is placed on the cooking area.
- If you remove the pan from the induction hob while it is functioning, the hob will stop heating and an intermittent beep will sound. After one minute has elapsed, it will switch off automatically.
5. FUNCTIONING
- Ensure the air vents and air inlets are not blocked, and that there are no metal objects on the hob apart from the pans.
- Stand the pan containing the food to be heated on the central part of the vitro-ceramic hob.
- When the hob is plugged in, a beep will sound.
- Press the ON/OFF button to switch on the appliance. You will hear a beep and the pilot light (4) will start to flash.
- After selecting the functioning mode, an intermittent beep will sound until you place a pan on the cooking zone. This beep will sound again each time the pan is removed from the hob, and if one minute elapses and no pan is placed on it, the appliance will switch off.
- Press the function selector (8) to choose the functioning mode. If you switch on the hob but have not pressed the selector button after two minutes have elapsed, it will automatically switch off.
-
The corresponding pilot light will come on depending on the function selected:
-
POWER SETTING MODE ("Power")
(11): This is for selecting a power
setting between the minimum and maximum values ("Min" and "Max". When you start up this functioning mode, the hob will go to the pre-set power setting, which is 4.
- TEMPERATURE MODE ("Temp")
(10): In this functioning mode, the hob automatically adjusts the power supply so that the temperature remains constant. The temperatures indicated for each setting (^) are for guidance purposes only, and the real temperature depends on the pan type, food, etc. You will quickly become familiar with its functioning and can use it according to personal tastes, using low temperatures to keep stews hot, high temperatures for deep-frying, etc.
Whenever you start up this functioning mode, the hob will go to the pre-set temperature setting, 180^ .
- Select the desired power setting or temperature by pressing the power setting/temperature increase or decrease buttons (6 and 7).
- Switch off the hob after use by pressing the ON/OFF button. The fan will stop running after 1 minute. Unplug the hob and leave it to cool down.
6. LOCKING
When the appliance is connected, you can activate the keypad lock by pressing the lock selector (9). The corresponding pilot light will come on. The hob can now only be made to function by pressing the ON/OFF button, and all the other buttons will be disabled. To deactivate the lock function, press the lock selector and hold it down for 2 seconds (9).
7. TIMER
This induction hob includes a cooking time programming option. The hob will switch off automatically after the selected time has
elapsed. The procedure for programming a cooking time is as follows:
- Press the timer button (5). You will hear a beep and "0" will flash on the display.
- Press the "+" and "-" buttons to select the desired functioning time. Each time you press one of these buttons the time will increase or decrease by 1 minute. If you hold one of the buttons down, the time will increase or decrease by blocks of 10 minutes.
After selecting the desired cooking time, wait for 5 seconds. The display will stop flashing and the time will be stored in the memory. If the timer is set to 0 this will have no effect.
If you have programmed the cooking time and wish to cancel the setting, simply press the timer button (5) again.
NOTE: Even if you have not used the timer function, the hob will always automatically switch off after a maximum functioning time. This varies depending on the power setting or temperature selected, as shown in the table below.
| Power setting | 1 | 2 | 3 | 4 | 5 | 6 |
| Automatic switch-off (hours) | 4 | 4 | 3 | 3 | 2 | 2 |
8. CLEANING AND MAINTENANCE
- Unplug the appliance and allow the hob to cool down.
- Use a soft dry cloth to gently remove any dust that has accumulated in the air vent and air inlet.
- If the hob is not excessively dirty, clean it with a damp cloth.
- If there are grease stains on the hob, clean it with a damp cloth and a little toothpaste or neutral detergent.
- Never use abrasive or degreasing cleaning agents or alcohol.
9. TROUBLESHOOTING
| Problem | Possible cause | |
| The ON/OFF pilot light does not come on when the appliance is plugged in. | It is not properly plugged in. The switch, fuse or cable are faulty. | |
| The ON/OFF pilot light comes on but the appliance does not heat up. | An unsuitable pan is being used. For other causes, consult the special maintenance department. | |
| The appliance suddenly stops heating up during functioning. | The ambient temperature is too high. The air vent or air inlet is blocked. The timer setting has elapsed. Check the protection system is working. Carry out an activation test. | |
| Fault code | E3, E6 | Wait for a moment and then press the ON/OFF button. The hob should function correctly when it has reached its normal temperature again. |
| E7, E8 | Press the ON/OFF button. The hob should function correctly when it has reached its normal temperature again. | |
| E1, E2, E4, E5, Eb, EC | Contact the authorised Technical Assistance Service. | |
10. INFORMATION FOR THE CORRECT DISPOSAL OF ELECTRICAL AND ELECTRONIC APPLIANCES

At the end of its working life, the product must not be disposed of as urban waste. It must be taken to a special local authority differentiated waste collection centre or to
a dealer providing this service. Disposing of a household appliance separately avoids possible negative consequences for the environment and health deriving from inappropriate disposal and enables the constituent materials to be recovered to obtain significant savings in energy and resources.
To remind you that you must collaborate with a selective collection scheme, the
symbol shown appears on the product warning you not to dispose of it in traditional refuse containers. For further information, contact your local authority or the shop where you bought the product.
FR
1.DESCRIPTION
2. TEXHnueCKX XAPAKTEPNCTKN
Hansehene:220V/240V
Yectota: 50 / 60Hz
Mouhoct: 2000 W
ToBa n3dJeIne OTROBAPa Ha n3NCKBaHnTa Ha EByPoneiCKnTe IpuKeTbN 3a eJeKTpomarHnTHa CbBMecTUMOCT HNCKO HanpeJxHe.
3. INHCTPYKUIM 3A BE3OPIACHOCT
- Праздд плбвate 3а пьви пт anapata,празеТЕВ BHIMATEJIHTo TOnИ habчнIC ИНСТРУКДИМИ Го заэт eЗ a nocleДВaши спраВки.
- YbepeTe ce, Ye HanpexeHMeTo Ha eJIeKTPnueckaTAt MPexa B DoMa BN mOuHOCCTTa Ha KOHTaKTa OTRObAprTa H aNoCOeHInTe Ha aIapaTa.
B cnuyaHa HeCBBMecTmOCt MeJy KOHTAKTa N UeNCeJa Ha anapaTa, CMeHeTe KOHTaKTa C NOxOJaIi, KaTO IOn3BaTe YcNITte Ha KBaInnPunpaH IpocceNoHaJIncT. - Be3oNaChOcTtHa anapaTa e rapaHTnpaHa cAmO, KOraTo ToI e BkJIIOueH KbM eФNKacHO 3a3eMeH KOHTaKT, KaKTo I3NCKBaT DeiCTBaUHTe HOpMN Ha eJKeTpHecKa 6e3oNaCHOCT. B CJUYaH a CbMHeHne, 06bPHeTe Ce KbM KBaIMΦuPaH npOdecnoHaJIcT.
He ce npenopbYBa n3IOn3BaHepTo Ha aadantTopn,pa3KnOHTeIN uNIn yNbJKNTeIN. B cnyaay e hanoXkTEnHO n3IOn3BaHepTo
IM, Tp6Ba Da ce PJI3BaT CaMo aIaIITOpn
UYbJIXeTI, KOINTO OTROBAPRT Ha
IeINCTBaUInTE HOPMn Ha 6e3oNaCHOC, KaTO
ObIbPHe TE BHMaHme Da He Ce IpeBNIuBa
MaKcIMMaJIHaTa MOUHOC, 6o3HaYeHa Ha
aIaNTopa.
CneI KaTo OTCpaHInTe OAnKOBKaTa, npoBepeTe DaIIN anapaTbTe B OTJNUHO CbCTOHNHe. Ako eMaTe CbMHeHnO, O6bPHeTe Ce KbM Hai- 6JIi3KnI TEXHnueCKn cepBn3.
- OnakobbHnTE MaTePnAIn (HaJIIOHOBN pIHKOBe, CTIpOIpN i np.) He TpR6Ba Da ce OCTaBt Ha IOCTbIHN 3a DeCa MeCTa, TbK KaTO Ca I3TOUHnik HA ONaCHOCTN.
To3n anapat Tp86Ba da ce n3no13Ba cAmo 3a domakinhckn CEiN. Bcya npya ynpTe6a ue ce CHTa 3a HeaekBatha nn Onacha.
- PION3BOJNTIELT He HOCN OTROBOPHOCT 3a 5eTNI, KONTO MORAT Na CE NbIgKaT Ha HeaIeKBaTHa INIIN HeNPaBUNHa yNtpe6a INI HA peMOHT, IN3BbPSeH ON THeKBaIINФИцран NEPCOHAI.
To3n ypei He e npeHa3NaeHc 3a nI3noI3BaHe OT IInuA (B TOBa YNCIO n Deua) C cIINuYeckn, CEINBHN INIy MCTBeHIn yBpeKdAnHry INI 6e3 ONIT INIO3HaHry, OCBEN aKO He ca KOHTPOJInpaHIn INIy OByeHN Da INI3NoI3BaT yPeJa OT IINIeTO, KOeTO OTRObApra 3a TExHaTa CNYpHocT.
- Deuata Tp6BaJa 6bJaT Na6blnDaBAnH, 3a Ja He Ce DoNyCka Da IVpaT C ypeJa.
3a no-do6pa 3aunTa ce npenOpbYBa INHCTaIIPAHeTo Ha npedna3Ho yctpoiCtBO 3a OCTaTBueH ToK (IOVT) c pa6oTeH ocTaBueH TOK He IOBeue O T 30 mA. ObpHete ce 3a CbbET KbM BaIIra eJektpoTeXnIK.
He6opabete c anapata C MOKpn ININ BInaJHKn pbue ININ CTbNana.
3aДаИЗБERHHeTOKOBYapdPbXTeanapaTaДалачOT BOJaIIMDpyrN TeHocTn.He roBKNIOHVAITe,AKOCEHAMIPA BbpxByBIAxHaNOBbpxHOCT.
- ПoctabeTe anapata Bbpy cyxa, Tbpya nCTabnHa NOBbpxHocT.
He no3B0JIaBaIte Dea IIN HENpBaOcIOo6Hn IInca Da 6opABTc aIapata Be3 HaI3Op.
He ocTaBMyTe anapaTBe KJIIOueH, TbK KaTo MoKeJa 6bDe N3TOUHIN HA ONaCHOCT.
3a da n3KJIIOUHTe ⅢeIcEJa, HNKORA He IdbpnaTe 3a KaBena.
- N3KIIIOHTe anapata OT eIeKTPnueckaT a Mpeka, Ppei Da IpeDpnpMeTe KaKBNTO
I Da Ca DeiCTBnI NO NOnCTBaHeTO IINI PNOIDpbXkKaTa MY.
B CnyaHn Ha NOBpeHa IINIIOIO OYHKUHOHPaHe Ha anapaTa, INKJIIOUeTe ro Hn He Ce ONITBaIte Da rO nOpPABrTe. AKe o Heo6XODIMO Da 6bJe peMOHTpAn, O6bPHeTe Ce KbM OTOpN3uPAH OT PPOIN3BOIDTEJia TexHNueCKn cepBN3 IN3NUCKBaIte INIIOJ3BaHETo Ha opINHAlHn pe3epBHN qactNI.
Ako e ybpehen Ka6eIbT Ha anapaTa, 06bphETe Ce KbM OTOpN3npaH TexHueckn cepBn3, 3a Da rO CmEHrT.
He ocTabyIte anapaTa n3JIOxKeH naTMOccpeHNTe BnIAHn (IbXd, CJIbHcE, JIeN np.).
He n3noJI3BaIte He IIOCTaBraIte HnKaKBa. qact OT aIapata Bbpxy INI IN B6JIN3OCT DO ropeuIN IOBbpxHOCtN (eNEkTPIeCKN INI IN ra3OBN KOITIOHN INI fypHNI).
He n3noI3BaIe a6pa3nBnKbPnN IIN npenapatn, 3a da ro noHCTBaTe.
He nnaite ropeuinte noBbpxhoctn. N3no3BaIte dpbXkata u npkoXBatkata.
He donyckaite KaebIbI da onipa do ropeuHte Yactn Ha anapata.
- He pazrIIO6BaIte n He ce OINTBaIte da IoppaBAYe ypeJa.
He noctabraye Bbypxy ypeJa HnKaBn TeKKn PpeDMeTn.
He n3noI3BaIte KOITIOHa B6JI3OCTdo IN3TOUHnK Ha 3aIIaIMrA3 IINBbB BJaXHa cpeia.
He nocTaBMyTe KOJIHOHa Ha MxCTO, KbDeTo MoKe Da 6bDe HApPbCKaH OT BOJa INI Ma3HnHa.
Ha6IIOJaBaIe KOITIOHa, KOraTo E BKLIOUeH.
- OnakOBKIne Ha BakyUmpaHIne XpaHInTeJIHn IpoDyKtn TpIbBA Da ce OTBopr IpeEn Da 6bDaT NocTaBEn Hn KOTJHOHa 3aIrpBaHe.
He n3no3BaBte HeNoDxoJaCn CbDoBe.
- He 3anyuBaiTe BeHTnlaUHOHnTe OTBOpn IN BxOIOBeTe 3a Bb3JyX IN He IbXaIte B TAYKdN PpeDMeTI.
- Поставаяпсьдоветь срета на заразу.
- На НаграBaHe.
CneI n3noJI3BaHe Ha KOITIOHa, OCTaBeTe rDa IVCTInHe pIeDn Da rO NIIaTe.
- Ako 3a6eJENKe KaKbTaO n da e BbHUnHa NOBpeJa, IN3KJIIOUcTe yPeJa, 3a Da IN36eIHeTe KbCo CbeINHeHMe.
He 6BaDa ce octaBt MeTaJIHn IpeIMTeI
Bbpxy-MoTaT Da Ce HaPpeT Do BnCOKI TEMpepaTyPI.
JIuca,Ha KOnTO e NocTaBeH NeiCMeKbP, Tp6Ba Da ce KOHCyIITnpaT C Jekapra Cn IpeNi Da IV3IOJ3BaT To3N ypeI.
4.CbIOBE
- CbdoBete TpR6Ba Da IMaT DbHO, HappaBeHo OTo MaHHTeH MaTePnAJI.
- He MoRaT Ja ce N3NoJI3BaT MaTePmaJIn KaTo CTbKJIIO, TnIHa, anyMnHm, MeN I npYrHe MaHnTHnMaTePmaJIn.
3.Дьното ТрбБа Да e ПIOСКО И ДИМЕТь рпоглOMOT 12 CMиПМЛьКOT 26 CM. - KaTo BKNIOHHTe KOTIOHA ce yBa 3ByKOB CnHaN, DOKaTTOCTaBITE cBd BbpxOHaTa Ha HapraBaHe.
5.AKOOTCTPANHTeCBDAOTINHUYKUHOHHNOKTIOH, NIOUHTA UNE PECTAHe DA HApRABa N Ue Ce Yye pIpeKbchat 3ByKOB CnHaN.Cnei MNHyTa Ue ce N3KNIOH aBTOMaTHHO.
5.ФУHKLIMOHIPAHE
- YBepTe ce, Ye BeHTnlaUOHHNTE OTBOpn I BXoJa Ha Bb3Dyxa He Ce 3aIpyUeHN HЯMaДpyTmMeTaJIHn PpeMEnI,OCBeH CbaC XpaHInTeJIHn PpoJyKTH, BbpxY IIIOuHaTa.
- ПoctabeTe cIbIc xpaHaTb B cpeJaTa Ha KepaMnHAta nloya.
Kato BkIIOHTe IIOUaTa, Iue ce Uye N3CBNpBaHe.
3a da BkIIOHNe YepeHa,HaTNCHe 6yToHa ON/OFF,ue ce ue N3CBNpBaHe n CBETnHHnRT INHnKaTop (4) 3e 3anoHe da Mira.
Cne KaTo n36peTe cyHKnIyTa, ce yBa IpeKbchAT 3ByKO BcHHaJI, IDaTO nOCTaBHTe CbDa Bbpxy 3oHaTa Ha HapraBaHe. To3n 3ByKO CmHAI ZE Ce BKJIOUBy BA BHaRI, KOraT0 OTCTpaHЯBaTe CbDa OT KOTJIOHa I cIeNtTuHaNe Ha eHa MInHY Ta 6e3 CbD, YpeBt Ce N3KJIIOUByA.
HaTnCHHe6byToHa3aN36OpHayHKUma(8) 3aJaN36peTeHaunHpa6Ota.AKOdoDBe MNHTn CnEi BkJIIOuBaHETo Ha yPeDa He CTe HATnCHaJIIN TO3n6byTO,IIIOyAaBTOMaTHHO Uce CE N3KJIHOU.
B 3aBnCmOcT OI N36paHaTa FyHKcIg, Iue Ce BKJIIOUCh CbOTBeTHnT CBeTJInHeH INDkAToP:
HNBO HA HAPRABAHE ("MoohocT") (11): 103boJbA da n3bnpaTe HNBO Ha MoUHOCt
OT MIMMMAHn("Min") Do MaKcMmaJIHa ("Max").BCEKNbT KaTO n36paTe Ta3n cyHKUJypeBbT aBTOMaTuHO ue CE BKJIIOuBa Ha IpeDbapNTeJIHO HAcTpoeHOTnBO4.
TEMNEPATYPE ("Temp") (10): Пи.To3n нанin Ha pa6ota, почata ABTomaTHNO peryInpa nOdaBaHaTа MOUHCT, Taka Ye Tempepatya Da ce noДьржа noCToHNHa. ПOCouHNTe CToHocTN (°C) Ha BCЯKO HnBO Ca opneHTPOBbUHN, peaHNo NOCTrHaTa TA Tempepatya 3aBnCn B rOJMa CTeHEn OT BnDa Ha CSbJa, XpaHnTeJIHnTE pOdoYkTn T.H. 3aNo3haTne ce Do6pe c HauHnHa Ha pa6ToHa ypeJa n FO nIIOJ3BaIte CSfJLacHo pPeIIOHHTaHnIa cn. HanpImep, NaCTpoBaIte Ha NsCKa Tempepatya 3a NoTOnJIeHa XpaHnTe n Ha BnCOKa, 3a IIpbXeHe B OboIIHa Ma3HnHa. BceKn PbT kato I36peTe To3n HauHn Ha pa6ToA, ypeIbT Ce BKlIOuBa Ha PpeDbapITeJIHO HAcTpoEHaTa Tempepatya OT 180°C.
- ɪs36epeTe JæŋaHOTo HNBO Ha HaprBaHe IJIN TEMnepaTpya, KaTo HAtncKaTe 6yTOhnte 3a yBeJIuHaBaHe IJIN HaMaJIbABe Ha HNBTo/ TEMnepaTpyaTa (6 n7).
CJIeHn30Jb3BaHe Ha ypeJa, INKIIIOueTe ro KaTo HAtINcHEte 6yTOHa ON/OFF. BeHTInaTOpBt Ie IIpeCTaHe Da pa6Otn CJIe EDHa MNHyTa. INKIIIOUeTe KOITIOHa OT MPexKaTa Iro OCTaBeTe Da IN3CTnHE.
6.БЛОКИРАЕ
Korato KOJIOHbTe BKJIHOeH,MOKeTe Ja
aKTINBnpuTe 6IOKaJa Ha 6yTOHnTe C HATNCKaHe
Ha 6yToHa 3a 6IOKnPaHe (9). LCe Ce BKJIIOu
CbOTBeTHnT CBETNIHeH INIINKaTOp. B TOBa
NoIooKeHne MoKeJa ca 3aJeCTBa CaMo 6yToHbT
ON/OFF, ocTaHaJIte Ca 6IOKnPaHn. 3a Ja
pa36IoknPaTe, 3aApbXTe 6yToHa 3a 6IOKnPaHe (9)
HaTnCHaT B PpOdbJIxKeHne Ha 2 cekyHn.
7. TEMTOPN3ATOP
CbueCTBvBa B3MOKHOCT 3a IIPOgPamipane Ha BpeMeTo Ha pa6oTa Ha INyKUHONHH KOTIOH. CneI N3TuHa He OnPeJeHHeTO BpeMe, KOtIOHbT Ucce I3KJIOnu ABTomAtuHo. CneJaBte NocOeHHTe
No-DoIy yka3aHnIa npoPampaHe Ha BpeMeTo Ha pa60ta:
- Hatnche 6bytoHa Ha Temnpn3atopa (5).Ie ce yye 3bkyOB cnHaJI Ha ekpaHa Ie ce nOABMnraa "0".
HaTnCHHe 6yToHnTe " + " n - " ,3aJa n36peTe JeJahHO BPeme.C BcRAKO HATnCKaHE Ha eINHnO T Te3n 6yToHn BPemTo Ce yBeJIuYaba INI HamaJIraBa C eJHa MInHyTa.AKo 3aJbPxNtE HaTnCHaT 6yToHa, yBeJIuYeHnTe INI HamaJIeHNTo e c 10 MNHyTI.
CJIeI KaTo I36peTe JekHaHOTo BpeMe, N34aKaaiTe 5 cekyHn. EKpaHbT ue pjcTaHe da MInra N BpeMeTo e 3anaMeTeHo.AKO Temnop3aTopbTe Ha 0, Hma Da nMa HnKaKbB efeKT.
Korato e hactpoeHO BpeMe Ha pa6oTa I JeJaete Da rO OTMeHnte, HATNCHeTe OTHOB 6yToHa Ha TEMnop3aTopa (5).
3A6EJIEXKKA:Дори КогаTo He e n3noI3BaHa ФунКцЯТа Ha Temnopn3aTopa,ПLOUaTa CE ИЗКЛЮЧВа abTomatMuHо BInHaR cIeI ONpeIeIe МakcIMaIeN PeriOuI Ha pa6Ota. To3I PeriOuI BapRuPa B 3aBcIMoCt O T N3bpaHATA MoUHoc T INI TemnePaTya, CbflacHo CJIeHATA TabMua:
CObMeCTHMOCTN COBMeCTHMOCTN npu6obop8
Hn3KoFO HnPRAXeHENI
3. MEPbI IPEIOCTOPOXHOCTN
IpeepnepBbIM nCIOJIb3OBAHEm DaHHoro npIN6opa BHNMaTeJIbHO IPOuTHTe HaCToJUee pyKOBOdCTBO IO 3KcJIpyaTcN IN COxpaHNTe eOДЯ nCIOJIb3OBAHnB KaueCTBe cPpABOCHOro MaTePnaJa B 6yDyUeM.
- Y6eIITecb, yTO HaJIpyKeHne B cETN B IOMeIeHn N MOUHOCTb pO3eTKN COOTBeTCTByIOT 3HaueHnIO, yKa3aHHOMy Ha npi6ope.
B Cnyahe HecOBMeCTUMOcTN po3ETKN IcTOHnka TOKA COITeNCEJbHOB BUNKOI npi6oopa IpnOn3BeDInTe Heo6xoJIMyIO 3aMeHy po3ETKN, pnp6eRhyK POMOuK KBaJIINΦUINPOBAHbIX CneuaJIINCTOB.
3JNeKTPnuecka6Be0nacHocbI np6oBa rapaHTnpyeTcra TOpBko B Cnyae,ecNI OHIOKJIIOUeH K aDEKBaTHOMY IcTOuHNky 3a3eMJIeHNA,COJIaCHO DeICTBYOUIIM HopMaM 3JNEKTPnuecko6e0nacHocTN. PnHaJIuHm ComHeHm O6paTntEc b K KBaINΦnIUPOBaHHbIM CneuaJIInCTam.
He peKoMeHdyETcra NcNoJIb3OBAtB aJaTepbl, TPOHNI KI N/IIIN yDJIINHTeJI. B cIyae Heo6xOIMOCn CneJyET NcNoJIb3OBA TbJbKO aJaTepbl I yDJIINHTeJI, COOTBeTCTBYIOUne DeiCTByIOUm HOpMaM 6e30NaCHocTN. PIn n 3OM HjXHO CJIeNITb, YTObI He 6bl INpeBbIWeH PpeJeI MoUHOCn, Yka3aHHbHa aJaTpe.
IocJIe I3BJIueHnI 3 yNaKOBKn y6eIInTeCb, YTO pIb6Op haxoJntC B 6e3yIpneHOM COCTOHN. Ipr HAIINu CMHeHNI O6paTInTeCb B 6JInxKaI山N IeHTp TEXHnueCKOrO 06cIyJXnBaHnI.
KOMNOHeHTbI ynaKOBKn (PiAcTnKOBBle I NaKeTbI, NOINCTnPOJbHaJe NHa n T.D.) CNeDyET XpaHnTB BdaI IN OT DeTei, TaK KaK OHI MOrYT CTaTb IOTeHcuaJIbHbIMN ICTOChNKAMN ONaCHOCTN.
-ДаньприборслдуETпIMMeHЯТTOЛБКДПЯБыTOBOIICNOЛБ3OBAHЯJIIO6oeДуROEИСПОЛБ3OBAHIEpaccMaTpINBaETcKaKHeaDEKBaTHOEиINONaCHOe.
- ПюиЗВоДиТь He HeCET OTBeTcTBeHOCn 3a ПОВржДeня, HaHeCEHbIe BCJIeDCTBVe He npaBInlbHOrO, OUnIObUHO rIIN HeueIeBOrIO NcIIOJIb3OBoHЯ pIb6Opa, a TaKJKe 3a peMOHT, ПюИЗБeDEHьI HeKBaIIINФИцIpOBaHHbIM nepcoHaIOM.
He npikacaiTecb K npibopy MokpbIMn IIN BIAJXHbIMn pyKaMn NHOramN.
- Bo n36eKaHne 3JIeKTPnueCko pa3pJa daepxNITE pnp6op BdaJIN OT BOJbI ININ dpyRnx XKnKoCTe. He BKJIOuAte np6Op B cTeB, ecIn OH yCTaHOBJeH Na BlaXHoi NOBepxHocTn.
- UcTaHaBnBaIe Tepi6Op Ha cyxu, TBepdyU IN yCTOyHByU IOBepxHOCTb.
He no3B0JIte TeTAM ININHBAInIaM nIOJIb3OBA Tb np6Op 6e3 npncMOtpa.
TOIaIIapAT He IpeHa3HaueH INIcNoJIb3OBaHnI JINzAMN C OraPAnHeHHbIMn DInrAteJIbHbIMn INIyMCTBeHHbIMn CIOOC6HOCTaMn (B TOM YNCJIe DeTbMI), a TaKxJe JINzAMN, He IMeHOUIMN COOTBeTCTByIOUxN 3HaHn I ONbIta. Pa3peUaeTcN oJIb3OBAtbcra anIpaATOM ToJIbKO NOD Ha6JIIOHeHnEM INI pyKOBoDCTBOM JINca, OTBeTCTBeHnHO 3a erO Be3OJaacHoe IpImMeHHeNe.
-ДетямзалршаетсиграТьсannapatom.
Для NOBbISeHnA CTeHEn 6e3ONaChOCTN
ИСПОЛБЗOBAHnI Пибopa peKOMeHДуeTcR
УСТАновka yCtpoiCtBa 3aSHTHOrO
OTКЛHOUeHnI (Y3O) ДЯ NсЛbl TOKA, He
прЕВыlaUошь 30 mA. BOCNoJIb3yITeCb
ПРД 3TOM COBETOM MOHTaXHnKa.
He ocTabnIte BkIIOUeHHbI yTOr 6e3 npICMOtpa, TAK KAK OH MOKeT CtaTb nCTOuHnikOM OaCHOCTN.
BbHIMaJUTeNCeJIbHyIO BUNKy I3 po3eTKI, HNKoTJa He TAnHe 3a UHyp NITaHnI.
- OTKJIIOUaIte npIbOp oT cTeI nepeI hauJIOM IIO6bIX ONEpaIeI IO YIcTKe I 06cJIyXKuBaHIO.
B Cnyae nolomkn nn HnepaBnblHno pa60tbpnp6opapneKpatnte ero NcnoIb3OBAHHe, BblKJIIOHTe ero n He nbItaTecb noHNHTb. B cnyae HeobxOIMOCTN peMOHTa, oBaPaauTecb NCKIIIOHTeJbHO B CEHTp TexHnueckOrO 6cbNJXKBHnA, cepTnΦnUPOBaHHbI npOn3BOIDTeJeM, C 3aIPOcoM Ha 3aMeHy OPIINHAJIbHbIX DeTanei.
-Пиповржденишнура пntаня
Данною пибopa ообразайтесьВ
Сертофицировань сеHTР Тхинчecкого
Осclужknваяни дя erо заменbl.
He npDBePraIte npBOp Bo3eJeCTBnIO npRpoIbHbIX YBJIeHNI (TaKNX KaK DoJXDb, coJIHcE, JeI N T.D.).
He nCnoJIb3yIte He paCnOJaIaTe HnKaKHe YacTn DaHnHO rPi6Opa Ha TOrpaHX NOBepxHocTlX (Ra30BbIX ININ 3NeKTPnuecknx BapOHyBX NOBepxHocTlX ININ PIIITax).
He nCIOJIb3yIte MOIOUe CpeCDtBA IINI abpa3nBHbIe TkaHN IJN CHCTKN Pnp6opa.
He npikacaiTecb K roparym noBepxHocTAm. IcnoJIb3yIe pyuKn nIpyKoRTkn.
He donyckaTe, YTObI uHyp nHTaHnKa cakacra ropaux cacte npnbopa.
3aπpeuaetcamaocToaTeNbHo pa3bnpaTb npemOHtupoBaTb np6op.
3aIpeuaeTcraCTaBHTb Ha npu6Op TjXeJIbe IpeDMeTbl.
- Henb3Я пььзоваься пиитоь Вблпи Источников Горочи ra3OB.
He yctaHaBJIiBaTb IJIITy B MecTaX BO3MOxHOrO IOnJaHnHa Hee 6pbI3r BOdbI INI MaCJa.
He ocTabIbTkIIOeHHyIO pIITy 6e3 npICMOtpa.
- Ipeed HaRpeBaHnEM npOyKTOB B tegMeTnHOnI NocUe Heo6xOJIMO CHaTb C Hee KpbIuKy.
He nolb3oBaTbc8 He npncnocO6neHnoI dna 3TOrO nocydoi.
He 3akpbIbTaB BeHTnJIaIOHHbIe OTBepCTnI H E BCTaBJIbTb B HIX IOCTOpOHHne IpeDmTebl.
- YctaHaBJIbBaTb nocyDy CtporoNo ceHTpy 30HbI HaPpeBa.
HeDoparNBaTbcK PJIInTe DIO NOnHOrO eocTBiBaHn.
Bo n36eXaHHe KopoTkoTo 3aMbIkaHnHa Heo6xoJIMo BbIKJIQUHTb PIIHTy I3 CeTI npi o6hApUxKeHH NBeLHINx NOBpeXdHn.
He cIeJeT octaBJIaTb Ha IIOBePxHocTn IIITbI MeTAJIuYeCKNe IpeJMeTbI BO 36EkaHne IN nepeRpeBa npi BblcOKnx TempepaTypax.
JIua c 3JKeTPOcTmUyIaTOpOM cepIa DaJIxHbI pOkoHCyIbTnPoBaTbCra C BpaOc M KacaTeJIbHO BO3MOxHOCtN IcNoJIb30BaHnI PJIITbl.
4.ПОСУДА
1.Посуда должна IMetb Дно ИЗ МагнITHOROMaTePиANA.
2. He donyckaetcnoIb3oBaTbcraocyoIu3 TaKHX MaTePnaJIIOB, KaK: CTeKNo, KepaMnKa, aHOMnHm, MeB n IpOvHe HemaHHTbIe MaTePnaJIbl.
3. Пocуда должнадиметь пioockoe ochobahine cДиametpor He MeHee 12 cm n He 6oJee 26 cm.
4. Посл Вкюнгплтб 6удтсьшен 3BykoBoCngHnД IOТexnop, noka nocya He 6удтnomeцha B 3OHy harpeba.
5. Nocne ydaJIeHnB C BkIIOUeHHo nnTbI nocyDbI eHaRpeB npeKpaAaTeCra, n pa3JaTeCn npepbIBnCTbI cInHaJ. PnITa aBTOMaTnueckn BbIKIOHTcra Ype3 1 MmHyTu.
5. IOPAQOK PA6OTbI
-
Y6eIITbCBA TOM, UTO BEHTINLAUHOHHbIE OTBepCTNIAOTKpbItbI, NHa IJIInTe OTCYTCTBYOT NOCTOPOHHE MetaJIINueCKNE 06bEKtbl.
-
YctaHOBtB NocyDc PnpOyKTAmn PoIeHTpy KepamHecKoI Dockn.
-Пи ПОДКПIOUChENI ПЛNTы I K cETn pa3Дaetcra 3BYKOBON CINHAn.
BkIIOHHTb IINTy HauKaTneM KHOIIKN ON/OFF. IpoIOJIkaeT 3ByaTb CINHaJ, N IaMNoUka INHdNKaTopa (4) HauHHaet MInTaTb. - Pocne BKJIOUeHnI pINITbI pa3daTc8 3ByKOBo CnIHaN I 3ByuNT DoTex Nop, noka B 3OHy HArpeBa He 6yJeT NOMEueHa nocya. EcIn nocya y6npaTeC c PInITbI, Oha YpeEz MNHyTu BbIKJIOUaeTc CaMa.
HaKaTb Ha nepeKJIIOUaTeJIb cyHKLm (8) n BbIbpaTb pexkIM pa60Tb.I. Ecln B TeueHne DByx MInHT IocNE BKJIIOUeHnI PJIITbI He HaKaTb Ha HrO, PJIITa aBTOMaTIuCeCKn BbIKIoUHTcR.
B 3aBnCmOCTn OT BbI6paHHoФyHKcIMn 3aKInrAeTc8 COOTBeTCTByHouZaJaAMNoUKa INDnKAtopa,a IMHeHO:
PEXUM YPOBHA HAPPEBA ("Power") (11): Повлaret Вьбрат b peхим моцно IT MИнмаль HorO ("Min") до Мakсималь HorO ("Max"). Перд налом подбора peхима павоты седиует установпь уровев 4.
TEMNEPATYPHBIPEXKIM ("Temp") (10): Пи NTOM peKIMe ПЛNTa aBTOMaTneCKn peYJIpyET NOTpe6JIeMyIO MOnHocTB,И TAKIM O6pa3OM NOДерЖIBaETCЯ NocToHHaTe TMNEpATya. 3NaueHnA TempeATpyb (oC) Ha uKaIe yKa3aHbI opHeHTnpOBOuHO.ФakTNecKaj Xe TempeATpya 3aBnCTB 6BJSei CTENHOTINa Nocdy,ПиUIM nT.I.CNeJyET OCBOITbcra c pa6OToI pNtbl I PONb3OBAbCS eH oHa CBoE yCMOTpeHne. HanPImep,ДЯ NOdOrpeBa PInu CNeJyET BbIbPaTb Hn3KyUo TEMpePAtypy,aДЯ pNiTOBOTJIeHnA C 6OJIbSiIM KOLNIyeCTBOM Macna - BBICOKyo.BcIKN pa3,KorDa 3aJaetc DaHNbI peKIM pa6ObTI, BblbPaETc4 ZapaHee 3aDaHbI yPoBeHb 180gC.
Дяьборастенин нагpeви щинжелаemon TeMперatypebl NCIOЛьзуOTсЯпеключateNiYbELUчЕпИУmENHbIeHIN yPOBнr/TeMперatypebl (6 n7).
-По Okончани ПОльзоваян ПЛNTа
Выкл�аеТСЯнkaтmaem KНОПКИ ON/OFF.
Вentлятор[eupleprodOLJaet pa6OtaTbВ
TeueHne OДнOH MmHytbl.OTKЛHouHTb ПЛNTу
OT cETиДaТБ eINOCbITb.
6.CNTCTEMA BJIOKINPOBKN
Пи работаошей плnte можно BKЛHQUHtB СИСТЕМУ 6BJOKИРВК NKHONK.ДЯЗТOrO HJXHO нэхат ha NapeкЛHQUaTeJIb 6BJOKIPOBKN (9), пriN 3TOM 3aJINrAeTc RAOTBeTCTByIOUaI Iamnoчka ИнДиKaTOpa.В ДаднHom pexmme можно ИСПОЛБЗВaTb TOnIbKO KHNkY ON/OFF, NOCKOLky ВCE ocTaNbHbIe KHNkN 6bIyT 3aBLOKIPOBaHbI.ДЯ ВьIKLIOUChENI CnCTeMbl 6BJOKIPOBKN KHNOP HJXHO нэхат ha NapeкЛHQUaTeJIb 6BJOKIPOBKN (9)и удрЖиBaT b erO B TechHeN e DByx cekHyd.
7. TAIMEP
TaimepnpedHa3haeHnIpyprrpmmpoBaHHBpeMeHHpa0bI INdykuHOHHoPiNTb.INoICTeEHmYcTaHOBJEHHORO BpeMeHH pa0bTI pJIHTa ABtOMaTHeCKN BbIKIOuAeTCr.IIpPpMaMMPOBaHHBpeMeHH pa0bTIPiNTbHeOxOIMBOblINlHTb CJeDyUOme DeiCTBNA:
8. YXODI IN TEXHINHECKOE OBCJIYKMBAHME
BbIKIOHTb pNTy n DaTb eH oCTbITb.
Cyxoi MmKoT TpIKO octOpOxHO ydaJIITb nbJIb C BENTINJRAIOHbIX peUeTOK.
CnaBbIe 3aqr3HeHnE KepaMueeckO JockN ydaJIITb BlaJXHO TpIKNo.
KnHbIe PnTHa CKepaMnueckoDocky ydaJHOTc MOKPO TpAKnC HBeOJIbUIM KOnJIYeCTBOM 3y6HOI NaCTbI INI HeITpAlbHOrO MoIOUeR OpeCDtBa.
HeDonyckaetcnpmEnHb abpa3nBhIe MoUzne HJNPOydaJIaHOuIe CpeCDTBA NIN CnIPrT.
9. BO3MOXKhBIE HEMCIIPABHOCTN
HemcnpabHoctb
Bo3MOxHna npuHa
| Послve вкlioоченя пліты лamпочka Иndи妇科topа ON/OFF не загорael. | Плoxой koNsТВ розЕтke. Повржdenе ВькlioЧаел,PrepeOxpaHnteIуи Кабеля. | |
| Лампочka ON/OFF загорael,но пліта не нагревaitся. | He podхODIT посуда. В почix сCityaIXСеДуET образИьсяВ спeцalbHy的大entр оБсLУЖИВANИ. | |
| Пліта peЗko пerectаetн нагеваться ВО ВрмЯ разы. | ВысOKая TemperatURA okpyжаншero ВОдуxa. ЗakpbITы BEHTINIAUCHNble OTBepCTNY. ЗakончINCSY UCTAHOBJIENHь Ha Taimepe PernoD Времени. Нeo6хODIMO п罗ВЕРITь ИСРавНOCТь СИСТЕМы Зашпы олЕКТчЕСКО сTeN KBAPTIPы I NOВТOPH ВКЛЮЧИТь ПлNTу. | |
| КoД HeICspabHocStI | E3, E6 | Послve Ne6BJShOй пay3bl BHOь HaxKaTь Ha KhoIGNK ON/OFF. Когда TemperatURA пліты OпЯТь сТанET HORMaJIbHо, оha 6byet pa60TaTB ySTOnMHBO. |
| E7, E8 | HaxKaTь hab кhoIGNK ON/OFF. Kogda Temperatura пліты OпЯТь сТанET HopMaJIbHо, оha 6byet pa60TaTB ySTOnMHBO. | |
| E1, E2, E4, E5, Eb, EC | Следует образИьсяВ гарANTинь的大entр obSlyXHIBaHЯ. | |
10. INΦOPMAÇU O ΠРABUNьΗΟΥΤΙΝΙΝΑÇΜΟ ΘJEKTPΥΕCKNX Ι3JEKTPΟHHbIX ΠΡΙΒΟΡΟB
Iocne oKoHuaHna cpoKa
cnyXbI,daHHbI np6Op He
dONJKeH yTNJIIN3IPoBaTbC8
BMeCTe C 6bITOBbIMN OTXOJaMn.
Oh MoKeT 6bITb IpepaH
B CpeUaJIbHbIe CEHTpbI
DnΦΦepeHcUPOBaHHO
c6opaOTXoOB,HaxOJaIeNecBBeDOMCTBE MyHnIINaJIbNbIX BlaCTeN,INIaREHTAM, pa6oTaIOUIMB DAnHOI Cpepe yCnyr. Pa3JeIbHaYtINIm3aUIN 6bITobBix 3NeKToPpOIp6OpOB IO3BOJRAET I36EkaTb BO3MOXhBX HeRaTINBHXIPOCLEDTBNI DnI OKpyKaIOUe CpeDbI N3DOPOBBy JIODei,KOTOpBIE MOyT IMeTb MeCTO BCLeIDCTBNE HENpaBInbHOYtINIm3aUIN,a TaKKe IO3BOJRAET NOBOTOPHO NCIOJIb30BaTb MaTePnAJIb,BXODIAUINE B COCTAB 3TNX pIN6OBOP,NIOBtCBs,TAkIM O6pa3OM, CyueCTBeHNOH 3KOHOUMN 3HeprN IN pecypCOB. YTO6bI NOdUePKHyTB Heo6xOIMMoCTb pa3JeHbHOYtINIm3aUIN,Ha DaHHom pIN6ope HaHeceN 3NaK,PpeDynpExJaIOUIN O 3aIPteE INCIJIb3OBAHNA TpaDNlUONHHbIX MYCOPHBIX KOHTeHepOB. IJnI ONUYeHNA BoOE IOndpo6HO INHΦopMaUN CBXJNTECb C MeCTHbIM OprAHOM BlnACTN INIc Mmra3INHom,ΓIe Bbl pIno6peJIu DaHHBI npOdyKT.