
VFA-70 S - Hob FAGOR - Free user manual and instructions
Find the device manual for free VFA-70 S FAGOR in PDF.
| Product type | Ceramic hob |
| Brand | FAGOR |
| Model | VFA-70 S |
| Built-in dimensions (W × D) | 560 × 490 mm |
| Height | 50 mm (estimated) |
| Weight | 12 kg (estimated) |
| Power supply | 240 V ~ 50/60 Hz, 29 A |
| Total power | 5.9 kW |
| Number of cooking zones | 4 |
| Control type | Touch controls |
| Main functions | Timer (1-99 min), zone lock, residual heat indicator (H), auto shut-off, rapid heat (automatic programming 9), dual zone, large cooking zone |
| Safety | Child lock, auto shut-off if forgotten, temperature limitation, overheat detection, cut-off in case of glass crack |
| Care and cleaning | Clean with a damp cloth and soapy water; use a scraper for burnt-on dirt; special ceramic hob cleaner once a week |
| Included spare parts | Power cable, sealing gasket, 4 fixing brackets, scraper |
| Repairability | Repair only by an approved technical service (conditional warranty) |
| General information | Compliant with European directives 73/23/EEC and 89/336/EEC; installation by a professional |
Frequently Asked Questions - VFA-70 S FAGOR
User questions about VFA-70 S FAGOR
0 question about this device. Answer the ones you know or ask your own.
Ask a new question about this device
Download the instructions for your Hob in PDF format for free! Find your manual VFA-70 S - FAGOR and take your electronic device back in hand. On this page are published all the documents necessary for the use of your device. VFA-70 S by FAGOR.
USER MANUAL VFA-70 S FAGOR
CARE & INSTRUCTIONS MANUAL
GUIDE D'UTILISATION ET D'ENTRETIEN
MANUAL DE INSTRUCIONES Y MANTENIMIENTO
RADIANT COOKTOPS
TABLE VITROCERAMIQUE
PLACAS VITROCERÁMICAS
• VFA-70 S

natural_image
Black industrial stove burner with red interior and circular ventricles (no text or symbols)• VFA-78 S

natural_image
Electrical stovetop kitchen with red circular gauges and control knobs (no text or symbols visible)NOTE: To avoid accident and damage, please read these instructions carefully before operating the appliance.
For one year from the date of purchase, provided this product is operated and maintained in accordance with the instructions attached to or furnished with the product, Fagor America Inc. will replace parts and provide labor to correct defects in materials or workmanship. Service has to be provided by a Fagor America Inc. designated service company. Please contact Fagor America at 1 800 201 0806 or by email at infoappliances@fagoramerica.com
THIS LIMITED WARRANTY DOESN'T COVER
- Repairs when the product is used in other than normal, single family household use.
- Damage resulting from accident, alteration, misuse, abuse, fire, acts of God, improper installation, installation not in accordance with local electrical and plumbing codes, or use not approved by Fagor America.
- Replacement parts or repair labor costs if the product is operated outside of the United States/Canada
- Pick up/delivery. This product is designated to be repaired in the home.
FAGOR AMERICA WILL NOT BE LIABLE FOR INCIDENTAL OR CONSEQUENTIAL DAMAGES
Some states do not allow the exclusion or limitation of incidental or consequential damages so this exclusion or limitation may not apply to you. This warranty gives you specific legal rights and you may also have other rights which vary from state to state.
IF YOU NEED SERVICE
Please contact Customer Care at Fagor America at 1.800.207.0806 or email Fagor America at infoappliances@fagoramerica.com
CUSTOMER SERVICE
Write the model and serial number on the lines below, you'll need them in the event of a service call. The model and serial number are located beneath the radiant cooktop
Model: ____
Serial: ____
Date Purchased: ____
Store: ____
Should you need service or have any questions about this product, don't hesitate to contact FAGOR AMERICA Customer Service at 1-800-207-0806
ENGLISH
Operating instructions ......Page 4
FRANCAIS
Manuel d'instructions ....Page 20
ESPAÑOL
Important safety instructions ....5
Sensor description....6
Description of timer 8
Operating....10
Safety 14
Special considerations ....14
Use of containers 15
Cleaning 16
Connection diagram 17
Installation 18
WARNING
- Repair of any faults in your cooktop must be carried out only by an Authorized Repair Service technician, otherwise the guarantee is not valid.
- The technical details and identification of the appliance are shown on the specification plate. Consult this plate before proceeding with electrical connection.
- Electrical connection must be carried out by a certified specialist familiar with official regulations.
- If your appliance has halogen hotplates avoid, looking directly at them when they are not covered by a cooking pan.
Fill in the data table below with all the data of the cooktop that appear on its label.
Trade mark:
Pot.max:
natural_image
Empty rectangular frame with no text, symbols, or content insideW
Type:
Voltage:
natural_image
Empty rectangular frame with no text, symbols, or content inside
natural_image
Empty rectangular frame with no text, symbols, or content insideRead all instructions carefully before using this cooktop. When properly cared for, your new Fagor cooktop has been designed to be a safe and reliable appliance. These precautions will reduce the risk of burns, electric shock, fire and injury. When using kitchen appliances, basic safety precautions must be followed, including the following:
- This appliance must be properly installed and grounded by a qualified technician. Only connect to a properly grounded outlet. See electric preparation and connection instructions in the Installation Instructions.
- Do not repair or replace any part of the cooktop unless specifically recommended. Refer service only to an authorized service center.
- Do not allow children to use this appliance unless closely supervised by an adult. Children and pets should not be left alone or unattended in the area where the appliance is in use. Never allow children to sit or stand on any part of the cooktop.
- Do not store flammable materials in or near the cooktop.
- Do not use water on a grease fire. Smother fire or use a dry chemical or foam-type extinguisher.
- Never use the cooktop to warm or heat a room.
- For personal safety, wear proper clothing. Loose fitting garments or shirts with hanging sleeves should never be worn while using this appliance.
- Use only dry potholders. Moist or damp potholders on hot surfaces may result in burns from steam. Do not let potholders touch hot heating elements. Do not use a towel or other bulky cloth.
- Use proper pan size. This appliance is equipped with one or more surface units of different sizes. Select pans with having flat bottoms large enough to cover the surface unit heating element. The use of undersized pans will expose a portion of the heating element to direct contact and may result in ignition of clothing. Proper coverage of pots and pans to burner will also improve efficiency.
- Never leave surface units unattended at high heat settings. Boi lover causes smoking and greasy spillovers that may ignite.
- Make sure reflector pans or drip bowls are in place. Absence of such may subject wiring or components underneath to damage.
- Protective Liners. Do not use aluminum foil to line surface unit drip bowls or oven bottoms, except as suggested in the manual. Improper installation of these liners may result in electric shock, or fire.
- Glazed cooking utensils. Only certain types of glass, glass/ceramic, ceramic, earthenware, or other glazed pots and pans are suitable for range-top service due to the sudden change in temperature, which may result in breakage - see page 15 for reference.
- To reduce the risk of burns, ignition of flammable materials, and spillage due to unintentional contact with the utensil, the cookware handles should be positioned so that they are turned inward, and does not extend over adjacent surface units.
- Do not soak removable heating elements. Heating elements should never be immersed in water.
- Do not cook on a broken cooktop. If your cooktop should break or crack, cleaning solutions and spillovers may penetrate the broken cooktop and create a risk of electric shock. Contact a qualified technician immediately.
- Clean cooktop with caution. Be careful to avoid steam burns if a wet sponge or cloth is used to wipe spills on a hot cooking area. Some cleaners can produce noxious fumes if applied to a hot surface.
VFA-70 S

text_image
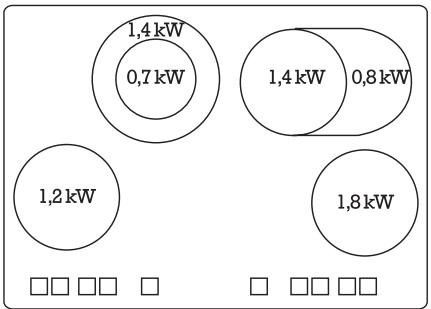
1,8 kW MULTI-RING HOTPLATE (2,7 kW) 0,75 Kw 0,9 Kw 1,05 Kw 1,2 kW Control sensors Multi-ring HotplateMedium Hotplate

text_image
- + - + - 2Small Hotplate
text_image
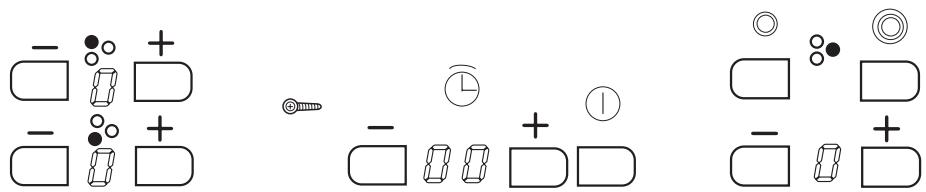
Diagram showing a sequence of icons including a clock, plus sign, and blank boxes with numbers 0, 1, 2, 3, 4, 5, 6, 7, 8, 9, 10, 11, 12, 13, 14, 15, 16, 17, 18, 19, 20, 21, 22, 23, 24, 25, 26, 27, 28, 29, 30, 31, 32, 33, 34, 35, 36, 37, 38, 39, 40, 41, 42, 43, 44, 45, 46, 47, 48, 49, 50, 51, 52, 53, 54, 55, 56, 57, 58, 59, 60, 61, 62, 63, 64, 65, 66, 67, 68, 69, 70, 71, 72, 73, 74, 75, 76, 77, 78, 79, 80, 81, 82, 83, 84, 85, 86, 87, 88, 89, 90, 91, 92, 93, 94, 95, 96, 97, 98, 99, 100Sensors
text_image
Diagram showing various geometric shapes and symbols including circles, rectangles, dots, and a plus sign
natural_image
Pure mechanical diagram showing two circles with directional arrows, no text or symbols presentControl points
- Double hotplate
- Multi-ring hotplate
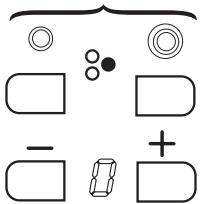
Double hotplate/ Multi-ring hotplate sensors
Hotplate pilot light


text_image
- + + □ □ + □ - □Selected power display
Residual heat display
Power sensors
from: 0 to 9
from: 9 to 0

Blocking control point
Blocking sensor

ON/OFF Sensor
other
| Region | Value (kW) | |---|---| | Top Left | 1,4 | | Top Right | 1,4 | | Bottom Left | 0,7 | | Bottom Right | 0,8 | | Bottom Right | 1,2 | | Bottom Left | 1,8 |VFA-78 S


Control point Heat source for dishes


Heat source position indicators

Indicator display of selected power

Indicator display of residual heat


Heat source power selection sensors
from: 0....9
from: 9....0

Blocking control point
Blocking sensor

Sensor ON/OFF

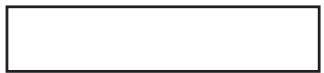
$$ (- 8 8 +) $$
Models with this type of timer control can be assigned to any heat source, and can be timed between 1 and 99 minutes. The assigned heat source will turn off once the time chosen by the user has elapsed.
VFA-78S

Multi-ring Control Sensors VFA-70S
text_image
- + + - + - + - + + - + -Steps for setting and Timing the Heat Source
With the radiant cooktop switched on:
1 Choose the required power of the heat source that you wish to time.
2 Switch on the timer by touching the sensor +. Once on the timer display appears and t appears in the display of each heat source.
3 Touch the + of the chosen heat source. will flash in the display of the chosen heat source. The timer has now been set to the chosen heat source.
4 Choose the desired time pressing + which corresponds to the timer.
Once these steps have been carried out the setting sequence of the heat source timer ends.
If between each step there is a pause of over 10 seconds or if you do not choose a length of time, the timer will automatically switch itself off
Once the timer has been set to a heat source and the time has been chosen, the timer will gradually count down the time and will indicate the time remaining to switch off the heat source.
During the timing, in the heat source display you can see the selected power and the 80 (indicating that this heat source is timed) alternatively. Once the time has passed the heat source will switch itself off, the control will release a warning acoustic signal and will flash in the timing display. Touch any sensor control to stop the warning signal.
Cancelling the timer
Touch the sensor of the timer until 00 is shown on the minute display.
Sensors
The radiant cooking surface is fitted with sensors that are touch-sensitive and also react to the presence of a reflective object.
The hotplate is operated by touching the corresponding sensors with your finger.
Take care to touch only one sensor at a time, otherwise they will not react to the touch.
Keep the sensors clean and do not place objects on them. The sensors may misinterpret dirt or objects placed on them.
While the cooking surface is off, the indicators for all sensors are also switched off.
Starting up
Touch the ON/OFF sensor ⏻ for 3 seconds. The power 0 displays will light up. If no power is selected within five seconds, the hotplate will automatically switch off and must be switched on again.
Power selection - / +
Each heater has - / + power sensors. Touching these allows the power to be set in the cooking ranges of 1 to 9.
To alter the power while the hotplate is on, touch - / + sensors to obtain the required power level.
Switching off the heat source
Choose 0 power for the heat source when you wish to turn off. If the hotplate is hot, H will light up indicating the hotplate is still hot.
Residual heat display H
When activated but with level 0, the corresponding displays shows 0 and H alternatively. While a hotplate is still hot but switched off, the display will show H.
Depending on the power that was used, this display may remain on for up to approximately 30 minutes.
Do not touch the hotplate or its surrounding area, white "H" is displayed. There is a risk of burning.
Warning!
If a power outage occurs while the residual heat display is on, remember that when power is restored the display will not re-appear even though the hotplate may still be hot.
Hotplate blocking function

Blocking of the hotplates prevents accidental changes while they are operating. The initial selections are maintained and the indicators remain active. The hotplates should be blocked to prevent children from operating them or to prevent the effects of accidental contact with cookware or utensils.
Press the blocking sensor until its pilot light ⚙️ comes on.
Unblocking
Touch the blocking sensor until its indicator pilot light switches off.
Double hotplate

The cooktops sources that have double heat source when touching the corresponding sensors to said heat source only work with their small circuit ☐. To operate the outer part, touch the double hotplate sensor until its indicator pilot light comes on, switch off by touching the sensor ☐ until the pilot light switches off.
Focus hotplate

The cooktops, which have the source of the heat source when acting over the corresponding sensors of each heat source, only work with their circular circuit. To switch on the outer part as well, touch the source hotplate ☐ sensor 0 until its control point switches on.
To switch off the focus hotplate, touch the focus hotplate sensor 0 until the control point switches off.
Multi-ring Hotplate

The hobs, which have a multi-ring heat source, on touching the corresponding sensors to said heat source, only work with little resistance. If you wish the center ring to come on as well, touch the double ring sensor ☐ so that the sensor's control point lights up. To use the ring to heat a multi-ring pan, touch the sensor ☐.
To switch off the two functions just touch the corresponding sensors again

and

(9 Quick Heating)
Each control area includes an automatic programming function for quick heating. This programming allows the corresponding maximum temperature to be reached quickly and maintained automatically.
Touch sensor + once and it is in position 9, the corresponding decimal point to 9 will switch itself on.
Touching sensor of the same zone will decrease to the required level (levels 3...6 are recommended).
After having reached the automatic heating time a short signal could be heard and the decimal point will switch itself off. The heat source carries on work in a conventional manner.
To cancel the automatic programming touch the - sensor and the decimal point will switch off.

natural_image
Two identical diagrams showing circular arrangements with a cross symbol, no text or labels present.
SAFETY
Safety systems
In order to protect the electronics from overheating if the control unit detects excessive heat it will switch off the hotplate closest to the sensors and the letter H will appear on the display. This hotplate can be activated when the temperature of the electronic unit returns to normal.
Each hotplate is equipped with an interior temperature limiter that switches off the hotplate if the radiant surface is heated excessively.
If any cracks appear in the radiant surface, immediately disconnect it from the mains. Do not use any part of the cooktop until a new radiant surface has been fitted.
Automatic
If a hotplate is left on accidentally, it will automatically be switched off after a period of time has elapsed, depending on the power level that has been selected (level 1 - 10 hours, level 9 - 1 hour).

SPECIAL CONSIDERATIONS
If more than one sensor is pressed simultaneously, the keys are blocked.
If all the power levels are at 0, the control is automatically switched off after 5 seconds.
If one or more sensors are pressed for more than 30 seconds (for instance a cooking pot or pan is resting on the sensor), the control will automatically be switched off and a warning will sound every 30 seconds while the sensor remains pressed.
Most stainless steel, enamel, iron, ceramic and copper pans can be used on radiant cooktops.

text_image
YESSTAINLESS STEEL
ENAMEL
CERAMIC
COPPER
Aluminium pans are not recommended as they may stain the surface, unless they have stainless steel encapsulated bottoms.
ALUMINIUM
natural_image
Simple line drawing of a cooking pot with two crossed X marks (no text or symbols)ALUMINIUM
natural_image
Simple line drawing of a cooking pot with a side arm and a heating element (no text or symbols)SATINLESS STEEL
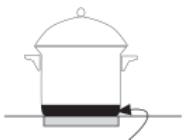
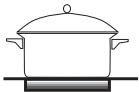
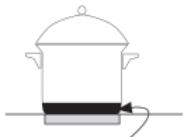
Hotplates should not be switched on without a pan on top. The base of the pan should be flat and dry. Pans that have been used on gas cookers are not normally completely flat and absorb heat badly.

natural_image
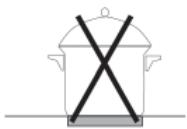
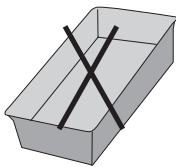
Simple line drawing of a cooking pot with crossed x marks (no text or symbols)Make sure that the diameter of the pan is at least that of the hotplate.


Avoid dragging pans over the radiant glass surface, as it may get scratched.
Always lift the pan.

natural_image
Simple line drawing of a cooking pot with crossed-out black X mark and bidirectional arrows (no text or symbols)Never use tin foil or plastic containers. They may melt and fuse permanently with the radiant glass surface.
natural_image
Simple 3D illustration of a rectangular box with a black X mark on top (no text or symbols)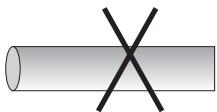
natural_image
Simple diagram of a cylinder with an 'X' mark on its surface (no text or symbols)IMPORTANT: If the radiant glass surface breaks or you notice cracks in it, disconnect the equipment. Call your Repair Service Technician.
Clean the radiant glass surface frequently, when it is cool. Never use abrasive products or pads. Clean with a damp cloth and soapy water.


text_image
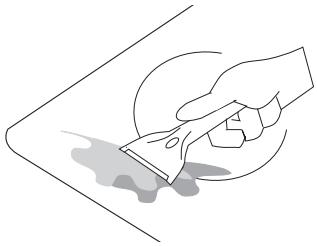
METAL SANDOnce a week, clean thoroughly with specific products that preserve and protect radiant cooktops hobs. Scrape off stuck on stuck dirt with a scraper

natural_image
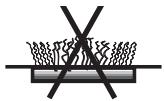
Illustration of a hand using a power tool to clean or scrape material (no text or symbols)If sugar (or sugary matter) or plastic is accidentally burnt on the cooktop, remove at once with the scraper while still hot. Otherwise it may leave a permanent mark.
natural_image
Illustration of a hand using a power tool to clean or brush the surface (no text or symbols)INMEDIATELY
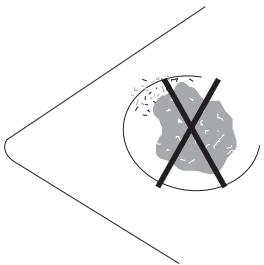
Do not use the cooktop as a work surface. Be particularly careful with dirt or dust from vegetables, cleaning powders, etc. which may scratch the surface when pans are slid over it.
natural_image
Simple line drawing of a cross symbol crossed over a shaded circular area, no text or symbols presentThe radiant cooktop hotplate is supplied with a power cable.
If the power feed wire is damaged, it must be replaced by the manufacturer, by a designated aftersales service or by authorized personnel for safety reasons.
It must be connected to the power supply with a plug that meets the EEC 7 publication or with a multi-pole switch with a distance between the open contacts of a least 1/8 inch (3mm).
Total power
Hotplate: VFA70=5,9 KW. VFA 78=7,3 KW
| PLATE | |||
| Voltage | Int.nominal by phases | Protection | |
| VFA70 | 240V~ | 29A | 32 A |
| VFA78 | 240V~ | 31A | 32 A |
This device conforms to European directives 73/23/CEE and 89/336/CEE
1 Cut out a piece of the worktop following the instructions on the template that comes with the cooktop.
“X” type apparatus for degree of fire protection.
Minimum distance between hole and wall must be 4 inch (100 m/m).

text_image
≥4"Ventillation diagram
Minimun distance

text_image
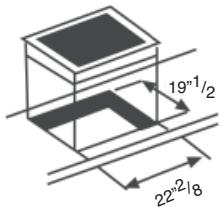
2" MIN 9" / 16" MINVFA-70 S Cut Out
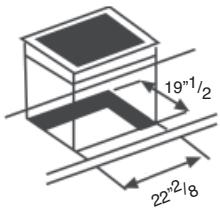
text_image
19"1/2 22"2/8MODEL: 30"
VFA-78 S Cut Out

text_image
19"×1/2 30"2 Place the cooktop face down on a table. Remove the backing paper and affix the sealing gasket all round the perimeter (fig.1).

natural_image
Technical line drawing of a corner joint with a coiled cable, labeled 'fig.1' (no text or symbols on the diagram itself)NOTE: DO NOT USE NON-REMOVABLE ELEMENTS WITH SILICONE.
3 Place the hob alongside the cavity in the worktop and connect the power cable to the electrical socket.

natural_image
Simple line drawing of a kitchen setup with a tray holding four circular plates and a window, no text or symbols present.IMPORTANT: Carry out connection with the power disconnected. There must be a good grounding connection and a switch must be provided in an accessible place to isolate all phases, with at least 1/8 inch clearance between contacts.
The manufacturer will not accept responsibility for installations carried out other than as directed here.
It is equipped with a power input cable for high temperatures.
If a new power input cable is required, installation should be performed by a technician certified by the manufacturer.
If the power feed wire is damaged, it must be replaced by the manufacturer, by the after-sales service or by authorized personnel for safety reasons.
4 Next insert the hob in the worktop cavity, pressing down firmly to ensure a good seal.
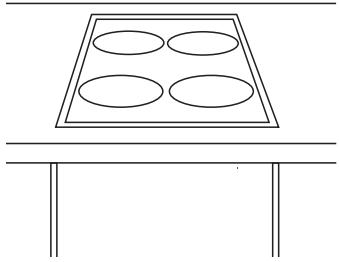
natural_image
Simple line drawing of a four-ohdived tray with four ovals placed on top, above a table (no text or symbols)5 Fix the 4 clamps underneath the hob to the 4 corners of the cavity.
(Clamps, brackets and nuts are supplied in accessory bag).

natural_image
Simple line drawing of a wooden plank and a cylindrical object with a base, no text or symbols present.NOTE: This equipment complies with standard 82/499/CE on radio interferences.
text_image
Diagram showing a sequence of icons including a screw, clock, plus sign, and blank boxes with symbols like 'i', 'l', and 'd'.Temporisateur

text_image
Diagram showing various geometric shapes and symbols including circles, rectangles, and a plus sign with a figure.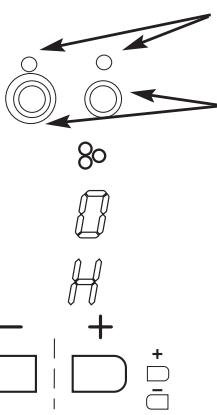
text_image
Diagram showing mechanical components with arrows and symbols, including circles, gears, and a plus/minus signs.Points de contrôle
natural_image
Two identical diagrams showing a speaker grille with circular chambers and a central X mark, no text or symbols present.
SÉCURITÉ
natural_image
Simple line drawing of a cooking pot with two crossed X marks (no text or symbols)ALUMINIUM
natural_image
Simple line drawing of a cooking pot with a side arm and a heating element (no text or symbols)INOXYDABLE
natural_image
Simple line drawing of a cooking pot with crossed X marks (no text or symbols)text_image
Diagram showing three cooking pots with crossed-out food, likely illustrating a cooking or heating process.natural_image
Simple line drawing of a cooking pot with crossed-out X mark and bidirectional arrows (no text or symbols)natural_image
Two 3D geometric shapes: a rectangular box with black X marks and a cylinder with black X marks (no text or symbols)natural_image
Illustration of a hand using a power tool to clean or scrape material (no text or symbols)natural_image
Illustration of a hand using a power tool to clean or brush the surface (no text or symbols)INMÉDIATAMENT
natural_image
Simple line drawing of a crossed-out circle with a cross symbol, no text or labels presentnatural_image
Technical line drawing of a corner joint with a coiled cable, labeled 'fig.1' (no text or symbols on the diagram itself)REMARQUE: NE PAS UTILISER D'ÉLÉMENTS "NON AMOVIBLES" AVEC LA SILICONE
natural_image
Simple line drawing of a kitchen setup with a tray holding four circular objects and a window (no text or symbols)natural_image
Simple line drawing of a four-ohdived tray with four ovals placed on top, above a table (no text or symbols)natural_image
Simple line drawing of a wooden block with a screw and bracket (no text or symbols)natural_image
Empty white rectangle with black border (no text or symbols)Pot.max:
W
Tensión:
natural_image
Empty rectangular frame with no text, symbols, or content inside
text_image
Diagram showing various geometric shapes and symbols including circles, rectangles, and a plus sign with a figure.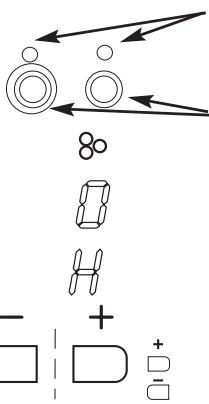
text_image
Diagram showing various mechanical or electrical component symbols with arrows and labels, including circles, brackets, and symbols like '8', '1', '2', and '+'/'-'.Puntos de control
natural_image
Two identical diagrams showing a speaker grille with circular elements and a black X symbol, no text or symbols present.
SEGURIDAD
natural_image
Simple line drawing of a cooking pot with two crossed X marks (no text or symbols)ALUMINIIIO

natural_image
Simple line drawing of a cooking pot with a side arm and a water outlet (no text or symbols)INOXIDABLE
natural_image
Simple line drawing of a cooking pot with crossed X marks on a base (no text or symbols)text_image
Diagram showing three cooking pots with crossed-out food, likely illustrating a cooking or heating process.natural_image
Simple line drawing of a cooking pot with crossed-out black X mark, flanked by two arrows pointing left (no text or symbols)natural_image
Two 3D geometric shapes: a rectangular prism with a black X mark, and a cylinder with the same X mark (no text or symbols)natural_image
Illustration of a hand using a power tool to clean or scrape material (no text or symbols)natural_image
Illustration of a hand using a power tool to clean or brush the surface (no text or symbols)INMEDIATAMENTE
natural_image
Simple line drawing of a crossed-out arrow with a cross symbol inside, no text or labels present.text_image
2" MIN 9"/16" MINVFA-70 S
Dimensiones de encastre
text_image
19"1/2 22"2/8MODELO: 30"
VFA-78 S
Dimensiones de encastre

text_image
19"×1/2 30"natural_image
Technical line drawing of a corner joint with a coiled cable, labeled 'fig.1' (no other text or symbols)NOTA: NO UTILIZAR MATERIALES NO REMOVIBLES COMO LA SILICONA.
natural_image
Simple line drawing of a laboratory setup with beakers and a bench (no text or symbols)natural_image
Simple line drawing of a four-ohdived tray with four ovals placed on top, no text or symbols present.natural_image
Simple line drawing of a wooden plank with a screw and base, no text or symbols presentToll Free: 1.800.207.0806
Email: infoappliances@fagoramerica.com
www.fagoramerica.com